17 The Export Assets to XML Publishing Process
This chapter explains how Export Assets to XML works and how it must be configured.
This chapter contains the following sections:
17.1 The Export Assets to XML Publishing Method
The Export Assets to XML publishing method is a hybrid between the Export to Disk and dynamic publishing methods. Assets are rendered into files, but this publishing method uses the dynamic dependency calculation method rather than the method of Export to Disk publishing.
The Export Assets to XML publishing method differs from the other two in that it is really a data transformation method. While Export to Disk publishing creates one HTML file per page, which could mean that several assets are rendered into one file, Export Assets to XML creates one XML file for each asset that is approved to a destination configured to use this publishing method.
Export to Disk publishing creates Export to Disk files that are to be delivered from a Export to Disk Sites delivery system. In contrast, Export Assets to XML creates XML files for delivery to a database or non-Sites system.
When an Export Assets to XML publishing session runs, this is what happens:
-
On the source system, the approval system provides a list of the assets approved for this destination to Export Assets to XML.
-
Export Assets to XML renders each asset in the list to an XML file. The output file describes the asset, stating all the values for all of the asset's fields.
When you use the Export Assets to XML publishing method, typically you set up a quality assurance process to test the generated files before you move them to the external (non-Sites) system.
This section contains the following topics:
17.1.1 The XML Output
The output from Export Assets to XML is well-formed XML that describes an asset object in terms of its field values. Fields are described as attributes.
For each of the asset's fields, there is a name/value pair. The statement of the value includes the data type of the field. For example, the Name field holds characters. So the name/value pair for an asset's Name field would appear as follows in the output:
<attribute name="Name">
   <string value="nameOfAsset"/>
</attribute>
Flex attributes serve as the fields for flex assets. In the output XML for a flex asset, the flex attribute values are prepended with Attribute_. Here's an example of an attribute value for the price of a sample site product asset:
<attribute name="Attribute_price">
   <decimal value="5.9"/>
</attribute>
Note that the XML output uses the column names rather than the field name of each field/attribute and that column names and field names can be different.
The following is a description of the XML file created by this publishing method, presented as a pseudo-dtd file
<!-- ASSET:
-- ASSET defines an asset object
-- an asset is made up of attributes
-->
<!ELEMENT ASSET (ATTRIBUTE)*>
<!ATTLIST ASSET TYPE CDATA #REQUIRED>
<!ATTLIST ASSET ID CDATA #IMPLIED>
<!ATTLIST ASSET SUBTYPE CDATA #IMPLIED>

<!ELEMENT ATTRIBUTE (STRING | DATE | INTEGER | DECIMAL | BINARY | FILE | ASSETREFERENCE | ARRAY | STRUCT | LIST)>
<!ATTLIST ATTRIBUTE NAME CDATA #REQUIRED>

<!ELEMENT STRING>
<!ATTLIST STRING VALUE CDATA #REQUIRED>

<!ELEMENT DATE>
<!ATTLIST DATE VALUE CDATA #REQUIRED>

<!ELEMENT INTEGER>
<!ATTLIST INTEGER VALUE CDATA #REQUIRED>

<!ELEMENT DECIMAL>
<!ATTLIST DECIMAL VALUE CDATA #REQUIRED>

<!ELEMENT BINARY>
<!ATTLIST BINARY VALUE CDATA #REQUIRED>

<!ELEMENT FILE (CDATA) >
<!ATTLIST FILE NAME CDATA #REQUIRED>

<!ELEMENT FILE>
<!ATTLIST FILE NAME CDATA #REQUIRED>

<!ELEMENT ASSETREFERENCE>
<!ATTLIST ASSETREFERENCE TYPE CDATA #REQUIRED>
<!ATTLIST ASSETREFERENCE VALUE CDATA #REQUIRED>

<!ELEMENT ARRAY (STRING | DATE | INTEGER | DECIMAL | BINARY | FILE | ASSETREFERENCE | ARRAY | STRUCT | LIST)+>

<!ELEMENT STRUCT (FIELD)+>

<!ELEMENT FIELD (STRING | DATE | INTEGER | DECIMAL | BINARY | FILE | ASSETREFERENCE | ARRAY | STRUCT | LIST)+>
<!ATTLIST FIELD NAME CDATA #REQUIRED>

<!ELEMENT LIST (ROW)+>

<!ELEMENT ROW (COLUMN)+>

<!ELEMENT COLUMN ( STRING | INTEGER | DECIMAL | DATE | ASSETREFERNCE)>
<!ATTLIST COLUMN NAME CDATA #REQUIRED>
17.1.2 File Naming Conventions for Export Assets to XML
Exported XML files are named according to the following convention:
assetID.xml
For example, if the asset ID is 3344556677, the file name for the asset's XML file is: 3344556677.xml
The Export Assets to XML publishing method does not use any information that is entered in an asset's Path or Filename field.
17.2 Configuring Your System for Export Assets to XML
The main steps when configuring for the Export Assets to XML delivery type are as follows:
-
Section 17.2.1, "Create the Batch User Account (If One Does Not Exist)"
-
Section 17.2.3, "Configure an Export Assets to XML Destination"
17.2.1 Create the Batch User Account (If One Does Not Exist)
Creating a batch user account is required before any type of publishing can take place. This procedure needs to be performed only once, regardless of the number and types of publishing destinations you are creating.
-
If you have not already done so, create the batch user account. For instructions, see Section 15.4.1, "Create the Batch User Account (If One Does Not Exist)."
-
If a batch user account already exists for your installation, skip to Section 17.2.2, "Specify the Root Export Directory."
17.2.2 Specify the Root Export Directory
As mentioned earlier in this chapter, the directory to which WebCenter Sites exports files is determined by the cs.pgexportfolder property in the futuretense.ini file.
To set the root directory for exported files
-
Start the Property Editor. If you need help with this step, see the Oracle Fusion Middleware WebCenter Sites Property Files Reference.
-
Open the
futuretense.inifile on the source WebCenter Sites system. -
On the Export/Mirror tab select the
cs.pgexportfolderproperty and set its value to the full path of the directory to which files should be exported. This is a global setting for the system.Save the file and close the Property Editor.
-
Restart the application server.
Note:
Before you run an Export to XML publishing session, make sure that this destination directory exists and that is has enough space for the XML files that will be created there.
17.2.3 Configure an Export Assets to XML Destination
Next, create the Export to XML destination by completing the following steps:
-
In the Admin tab on the source WebCenter Sites system, expand Publishing, then Destinations.
-
Double-click Add New.
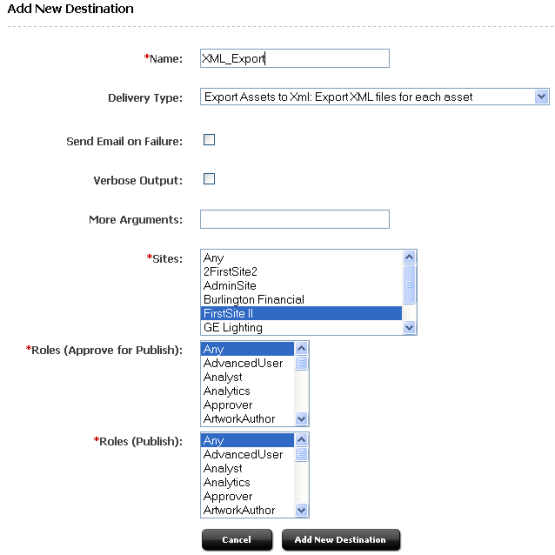
The Add New Destination form appears:
Fill in the fields as described below:
-
Name: Enter a unique name for the destination.
-
Delivery Type: Select Export Assets to XML: Export XML file for each asset.
-
Sites: Select the sites whose assets can be approved for and published to this destination.
-
Roles (Approve for Publish): Select the roles to which you are assigning asset approval privileges. All users who are assigned these roles can approve assets.
-
Roles (Publish): Select the roles to which you are assigning publish privileges. All users assigned these roles can publish.
-
-
Repeat step 1 for each additional export destination that you need to configure for your source system.
17.2.4 Approve Your Assets
If you want to perform a simple test of your configuration, select an asset and approve it and any of its dependent assets.
If you want to complete a test publish of your entire site, approve all the assets for the site. See Section 18.2, "Approving Multiple Assets" for help with approving many assets at once.
17.2.5 Publish and Test the Results
After you have approved assets that can be published to your destination, you can run a test publishing session:
-
On the source WebCenter Sites system, click Publishing in the button bar.
-
In the Publish Console, select your destination from the drop-down list and then click Select Destination.
WebCenter Sites displays information about the assets that are ready to be published to this destination.
-
Click Publish.
A confirmation message appears. Click Yes to proceed with the publish.
WebCenter Sites exports all assets approved for this destination to files. The files are stored in the directory you specified earlier.
-
In the Publish Console Active tab you can observe that the session is running.
-
When the session completes, click the History tab to view the session summary for this session.
Mouse over the session information to view summary information; click Log to view the session log files.
-
The log file displays a list of all the resulting XML files, verify that the files are correct.
17.2.6 Set Up the Schedule
After you have ensured that your destination is configured correctly, that the directory names are created according to your needs, you can finish configuring your publishing system by completing the following steps on the source system:
-
Create scheduled publish events for the destination. For help with this step, see Section 18.7, "Scheduling Publish Events".
-
Plan how you will move the generated files to your external, non-Sites systems. For example, you can set up a regular FTP transfer that automatically moves files to a testing area after a publishing session completes.