21 Working with RealTime Publishing Modes
One of the advantages of RealTime publishing is the feedback that the system generates and displays to the publishing administrator throughout the publishing process. The publishing administrator can monitor sessions in progress, review publishing schedules, inspect history records, and explore logs.
This chapter contains the following sections:
21.1 Complete and Delayed Publishing
A publishing session can run in one of two modes: complete or delayed. The mode must be explicitly specified, as shown in Section 20.2, "Configuring Your System for RealTime Publishing."
-
In a complete publishing session, the five stages of RealTime publishing run in one uninterrupted sequence. You have the option to stop and resume a session, or cancel it.
-
In delayed publishing, the session pauses after the second stage (data serialization). For the session to run to completion, you must resume the session. The final stages follow automatically.
Delayed publishing enables you to control when the system begins writing to the destination database. For example, if you are publishing a large number of assets to a heavily trafficked web site, delayed publishing offers you the option to wait for a low-traffic period, when saving data to the destination database is a more efficient process.
This chapter contains instructions for monitoring complete and delayed publishing sessions, adjusting publishing schedules, and retrieving the histories of past sessions.
21.2 Publish Console
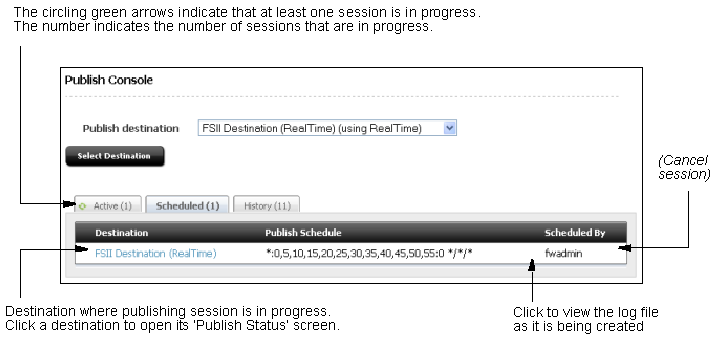
Throughout RealTime publishing, you will use the Publish Console. In the Publish Console, the system communicates information about current, scheduled, and past publishing sessions for all configured publishing destinations.
To open the Publish Console, log in to the administrator's interface and click Publishing on the button bar.
-
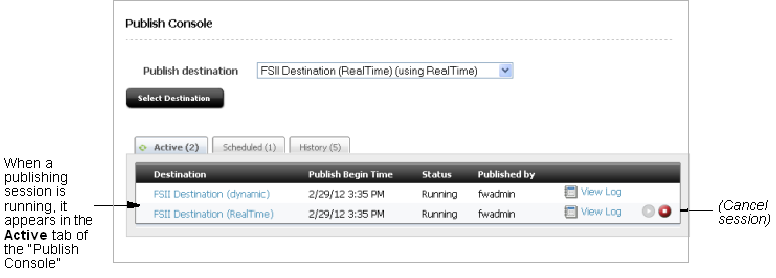
The Active tab shows a summary of ongoing publishing sessions. While a publishing session is underway, you can open the Publishing Status form to learn detailed information about the publishing process in real-time. You can also explore interactive on form logs. Upon completion of the publishing session, you can download text formatted logs. More information about using the functions on the Active tab can be found in Section 21.3, "Working with Active Publishing Sessions". Information on working with logs can be found in Section 21.6.1, "Viewing and Searching Logs."
-
The Schedule tab displays the number of approved assets for each destination and the schedule of publishing sessions. More information about using the functions on the Schedule tab can be found in Section 21.4, "Working with Scheduled Publishing Sessions."
-
The History tab shows summary information on prior publishing sessions. More information on working with the History tab can be found in Section 21.5, "Working with Prior Publishing Sessions". From this tab, you can also access logs of prior publishing sessions. For information about logs, see Section 21.6, "Working with Publishing Logs."
21.3 Working with Active Publishing Sessions
The Active tab of the Publish Console shows information about all publishing sessions currently running. From the Active tab, you can click a destination name to access the Publishing Status form for the selected session. On the Publishing Status form you can monitor the progress of the session as it runs.
Instructions in this section apply to both modes of publishing: complete and delayed (described in Section 21.1, "Complete and Delayed Publishing").
This section contains the following topics:
-
Section 21.3.3, "Canceling a Publishing Session"
Note:
When a delayed publishing session pauses, it remains listed in the Active tab. Canceled sessions are moved to the History tab.
21.3.1 Monitoring a Publishing Session
To monitor a publishing session
-
Open the Publish Console (in the administrator's interface, click Publishing on the button bar).
The Publish Console opens with the Active tab at the front.
-
To monitor a session, stay in the Active tab and select the destination where the session is running.
The Publishing Status form opens.
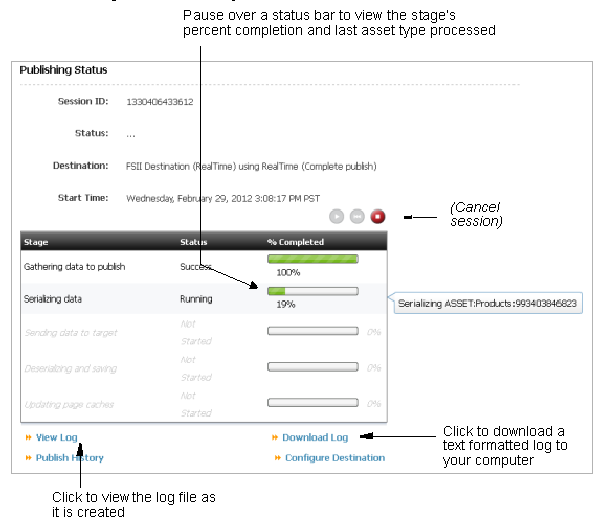
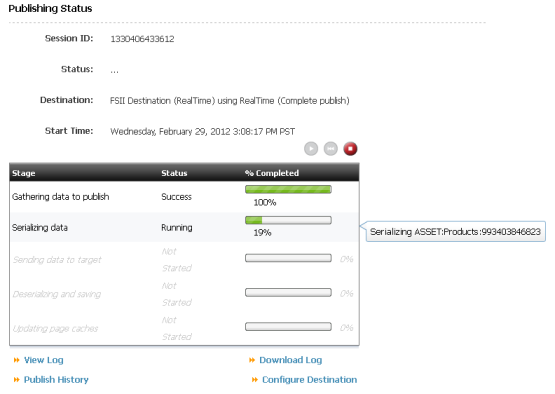
Notice the five status bars, one for each stage of publishing. The status bars are interactive.
-
To view the percent completion of a stage, hold your cursor over the stage's status bar.
-
As you hover, another tooltip opens showing the current asset type being processed. If you continue to hover, you will see the tooltip updating in real-time, always displaying the publishing system's last action.
(While a session is running, you can also view its log.)
-
21.3.2 Resuming a Delayed Publishing Session
Delayed publishing allows you to control when the system begins writing to the destination WebCenter Sites database. This mode of publishing can be used if you are publishing a large number of assets and wish to wait for a low traffic period on your web site before you begin saving data to the destination database.
When a session runs in delayed publishing mode, it pauses after the second stage (data serialization). Although the session pauses, no other publishing session can run to the destination until the current session completes. For the session to complete, you must resume the session. The final stages follow automatically.
-
Open the Publish Console (in the administrator's interface, click Publishing on the button bar).
-
Stay in the Active tab and navigate to the destination where the publishing session is running. (If the destination name is not displayed, no session is running on that destination.)
Figure 21-4 Publish Console Form, Active Tab
Description of ''Figure 21-4 Publish Console Form, Active Tab''
-
Read the destination's Status column and do one of the following:
-
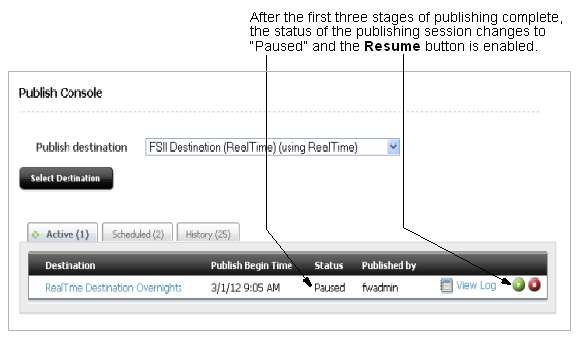
If the status is paused, it means that the first three stages of publishing are complete. To continue the session, click the Resume button (which is enabled only during a pause).
Figure 21-5 Publish Console Form paused.
Description of ''Figure 21-5 Publish Console Form paused.''
-
If the status is running, you can determine which stage is in progress. Open the Publishing Status form:
-
Select the destination where the session is running.
-
In the Publishing Status form, note the progress bars and wait for the second stage to complete. If the second stage is not allowed to complete, the session cannot be resumed.
Note that the status bars are interactive:
To view the percent completion of a stage, hold your cursor over the stage's status bar.
As you hover, another tooltip opens showing the current asset type being processed. If you continue to hover, you will see the tooltip updating in real-time, always displaying the publishing system's last action.
(While a session is running, you can also view its log.)
-
When the second stage is complete, click the Resume button.
Figure 21-6 Resume Session Icon Location on Publishing Status
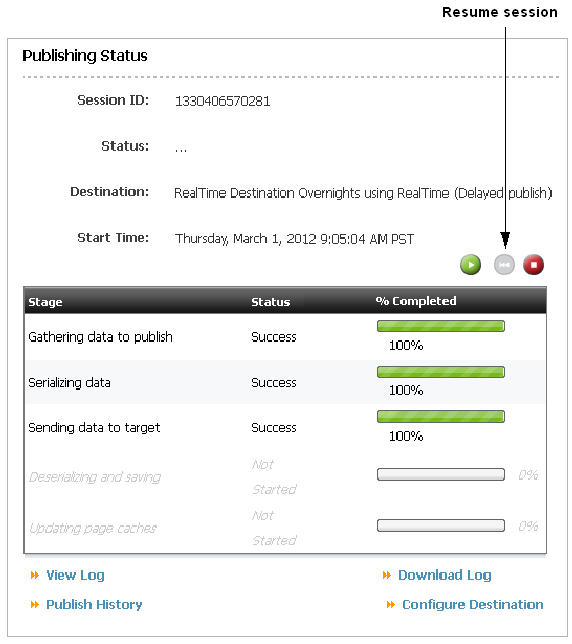
Description of ''Figure 21-6 Resume Session Icon Location on Publishing Status''
-
When the publishing session is complete, all five stages display "Success" in the Status column.
-
-
-
Once a session is complete, you can access its summary information and complete log on the History tab of the Publish Console. To access the History tab:
-
Return to the Publish Console (click Publishing, on the button bar).
-
Click the History tab. More information about options on the History tab can be found in Section 21.4, "Working with Scheduled Publishing Sessions."
-
21.3.3 Canceling a Publishing Session
Ongoing publishing sessions can be canceled (and restarted) by any user with publishing rights. When a session is canceled, session information is moved from the Active tab to the History tab. Here, the session can be rerun, but only if at least the second publishing stage was completed successfully before the cancellation and the session is the most recently canceled.
Note:
You can cancel a publishing session from the Publish Console or from the Publishing Status form. Be careful about which option you choose. If you prematurely cancel a session that you intend to redo, that session cannot be redone. When in doubt, cancel sessions from the Publishing Status form, where you can verify that at least the second stage has been completed.To cancel a publishing session from the Publish Console
-
Open the Publish Console (in the administrator's interface, click Publishing on the button bar).
Note:
Use the following procedure only if you are sure that the canceled session will not be rerun. Otherwise, if you plan to rerun the session, follow the steps on page 21-9 to cancel the session from the Publishing Status form.The Publish Console appears, displaying the active publishing sessions in the Active tab. (If the Active tab is empty, no publishing sessions are in progress.)
-
Stay in the Active tab, navigate to the destination where the session is running and click its Cancel button.
Figure 21-7 Cancel Session Icon on Publish Console Form
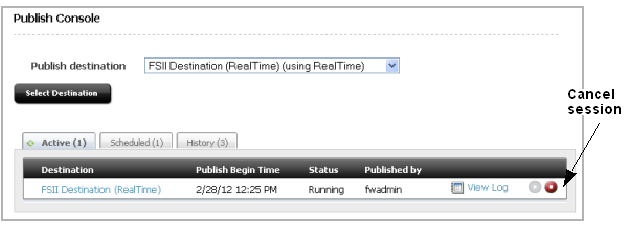
Description of ''Figure 21-7 Cancel Session Icon on Publish Console Form''
A message that the cancellation request has been sent appears above the list of active publishing sessions. WebCenter Sites looks for a stable stopping point; it may take a few moments for the session to cancel. Session information is then moved from the Active tab to the History tab.
To cancel a publishing session from the Publishing Status form
-
Open the Publish Console (in the administrator's interface, click Publishing on the button bar).
The Publish Console appears, displaying the active publishing sessions in the Active tab. If the Active tab is empty, no publishing sessions are currently in process.
Note:
You must use the following procedure if you plan to rerun the session you wish to cancel. The Publish Status form enables you to monitor the publishing process to ensure that at least the second stage (data gathering and serialization) runs to completion. Canceling prior to that stage invalidates rerunning the session.Note also that the option to redo a session is available if all of the following conditions hold:
-
The first two stages of publishing were successfully completed.
-
The session is the most recently canceled publishing session.
-
-
Stay in the Active tab and select the destination where the session is running.
-
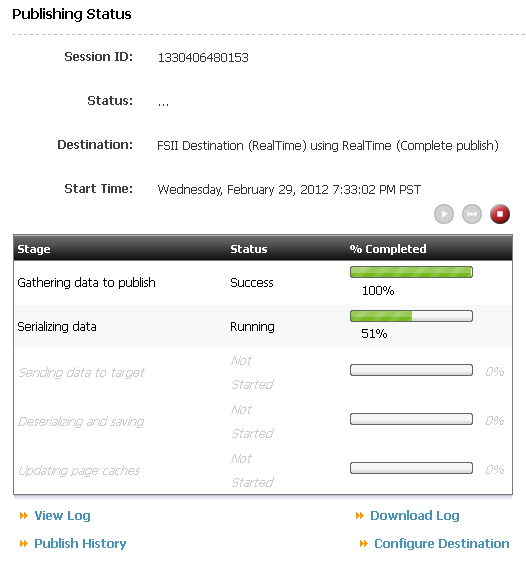
In the Publishing Status form, note the progress of the session and wait for at least the second stage to complete.
-
When the second (or later) stage has completed, click the Cancel button.
A message appears above the status column indicating that the cancellation request has been sent. WebCenter Sites looks for a stable stopping point; it may take a few moments before the session is canceled. Session information is then moved from the Active tab to the History tab.
-
When you are ready to rerun the session, select the History tab, navigate to the session, and click the Redo button. For more information, see Section 21.5.2, "Redoing a Publishing Session."
21.4 Working with Scheduled Publishing Sessions
If a destination is configured for scheduled publishing, its schedule is listed in the Schedule tab of the Publish Console. For instructions on configuring publishing schedules, see Section 18.7, "Scheduling Publish Events."
Use the Schedule tab to:
-
View a destination's publishing schedule
-
Edit publishing schedules
To view or edit publishing schedules for all configured destinations
-
Open the Publish Console (in the administrator's interface, click Publishing on the button bar).
-
Click the Scheduled tab.
The Scheduled tab displays only destinations with a publishing schedule.
Figure 21-9 Scheduled Tab on Publish Console Form

Description of ''Figure 21-9 Scheduled Tab on Publish Console Form''
Note:
A publishing schedule is expressed in the string format that is used by the SystemEvents table:hours:minutes:seconds weekdays/days of month/months of yearFor information about syntax, see Section 18.8, "Reading the Schedule Abbreviations".
-
To view a more user-friendly version of the publishing schedule, hold your cursor over the schedule.
-
To edit a schedule, click the destination name and specify the publishing conditions. (You can also disabled the schedule.)
21.5 Working with Prior Publishing Sessions
The Publishing Console's History tab provides summary information and detailed logs on every publishing session that has run in the past. Past sessions include completed, canceled, and failed sessions, but not delayed publishing sessions that have paused.
Note:
When delayed publishing sessions pause, they remain listed on the Active tab. They are considered to be active sessions.The History tab is interactive. You can hold your cursor over each destination to view the destination's summary information in a pop-up window, or you can select a destination to obtain its session log. To locate information quickly, you can sort the list of destinations by the following criteria: Destination, Publish End Time, Status, and Published by
On the History tab, you can:
-
View summary information about past publishing sessions. See Section 21.5.1, "Viewing Past Publishing Sessions"
-
Access the final Publishing Status form for completed sessions. See Section 21.5.1, "Viewing Past Publishing Sessions"
-
Redo a canceled session. See Section 21.5.2, "Redoing a Publishing Session"
-
Access session logs
-
Clear the entire history list or delete selected sessions
21.5.1 Viewing Past Publishing Sessions
To view past publishing sessions
-
Open the Publish Console (in the administrator's interface, click Publishing on the button bar).
-
Click the History tab.
Figure 21-10 History Tab on the Publish Console Form
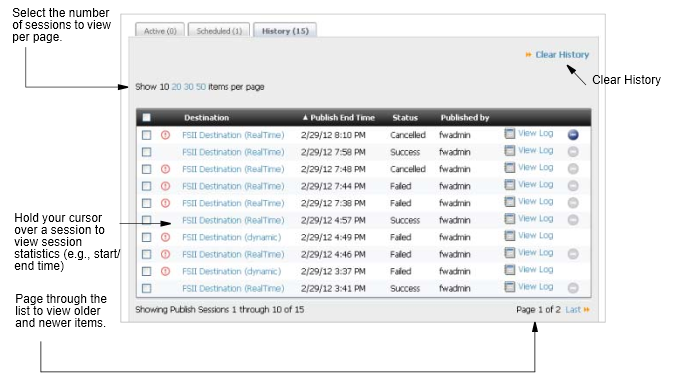
Description of ''Figure 21-10 History Tab on the Publish Console Form''
-
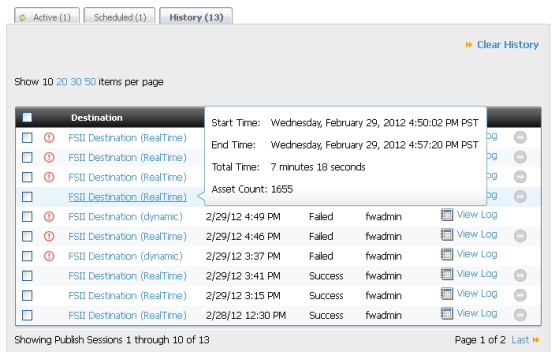
To view a session's summary information, hold your cursor over the destination where the session ran. (You can sort the Destination column by clicking its title.)
A pop-up window displays summary information, as shown next.
The pop-up window shows when the session started and ended, how long it took to publish the assets, and the number of assets published.
Figure 21-11 History Tab on Publish Console Form, Showing Context Window
Description of ''Figure 21-11 History Tab on Publish Console Form, Showing Context Window''
-
To view and download a session log:
-
Select the destination where the session ran.
-
In the Publishing Status form, click View Log.
If a log entry exceeds 200 characters, click the show all link to display the entire entry. You can also search the log for specific entries.
-
To download the log, click the Download Log link.
-
21.5.2 Redoing a Publishing Session
When a session stops (because of system error or user cancellation), you can rerun the session, meaning that you start the session again. When the session starts, it continues the publishing process from the last successfully completed stage. The option to redo a session is available if all of the following conditions hold:
-
The data to be published was successfully gathered and serialized (that is, the first two stages of publishing were successfully completed).
-
The session is the most recently failed or canceled publishing session.
The Redo option is useful when a disruption, such as a power failure, interferes with publishing.
-
Open the Publish Console (in the administrator's interface, click Publishing on the button bar).
-
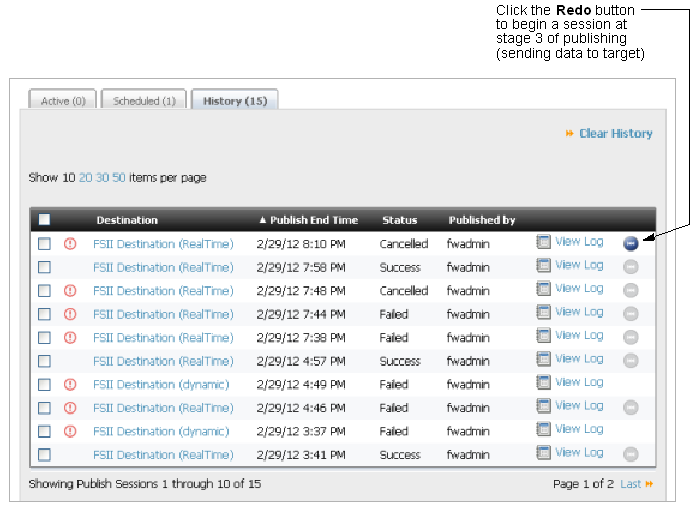
Click the History tab to view past publishing sessions.
The list of past publishing sessions appears. The Redo button is active (in the right-hand column) only for the sessions that can be redone.
If the Redo button is disabled, then either this publishing session did not progress far enough to be redone, or it is not the most recently canceled (or failed) session.
-
Do one of the following:
-
Click the Redo button to restart the publishing session.
-
Redo the session from the Publishing Status form:
-
Click the destination link for the session you wish to redo.
The final Publishing Status form for the session opens.
-
Click the Redo button to restart the publishing session.
The message
Restart request has been sentappears and the session moves from the History tab to the Active tab. The circling green arrows rotate in the corner of the Active tab, indicating a publishing session is active. -
-
-
To monitor the session as it completes, click the Active tab followed by the destination name. (For more information, see Section 21.3, "Working with Active Publishing Sessions.")
21.6 Working with Publishing Logs
21.6.1 Viewing and Searching Logs
RealTime publishing logs store a detailed account of the transactions that take place during a publishing session. The logs are viewable for active and past publishing sessions. They are also available for download, at any time, while sessions run and when they end.
Note:
WebCenter Sites can be configured to generate verbose log files, containing more detailed information than regular log files. Because verbosity lengthens the publishing process, this option should be used only when needed (typically for troubleshooting).WebCenter Sites can also be configured to automatically email text-formatted log files at the completion of a publishing session.
To configure log files and specify the email option, see Section 20.2.4, "Create a RealTime Destination Definition on the Source System."
-
Open the Publish Console (in the administrator's interface, click Publishing on the button bar).
The Publish Console appears with the Active tab open, displaying all currently running RealTime sessions.
Figure 21-13 Active Tab on Publish Console
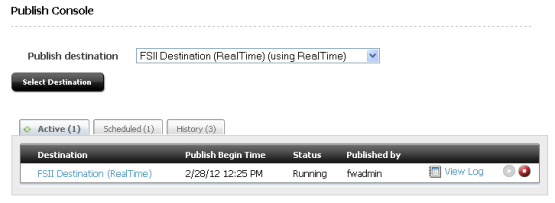
Description of ''Figure 21-13 Active Tab on Publish Console''
-
To view the log of a current session, stay in the Active tab, navigate to the session, and click View Log. To view the log of a past session, click the History tab, navigate to the session, and click View Log.
-
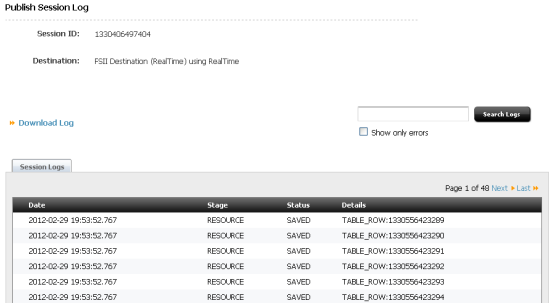
The Publish Session Log form opens. Additional pages are added as the session continues.
-
If a log entry exceeds 200 characters, an ellipsis (three periods) will appear at the end. To see the entire entry, hover the mouse over the entry. The entire entry opens in a window that floats over the log file. Note that the cause of the log event is identified.
Figure 21-15 Pop-Over Window Showing Information for the Log Event

Description of ''Figure 21-15 Pop-Over Window Showing Information for the Log Event''
-
-
You can search the log file in several ways:
-
To search for specific entries, enter a search term in the Search field (at the top right of the form).
Note:
The search utility recognizes terms that are used in the following columns: Stage, Status, and Details. Wildcards and boolean operators are not recognized. -
To view only error messages, select the Show only errors checkbox and leave the Search field empty.
-
To filter error messages by specific terms, select the Show only errors checkbox and enter a search term in the Search field.
-
Click Search.
The Search Results tab opens (next to the Session Logs tab).
Figure 21-16 Search Results Tab on the Publish Session Log Form
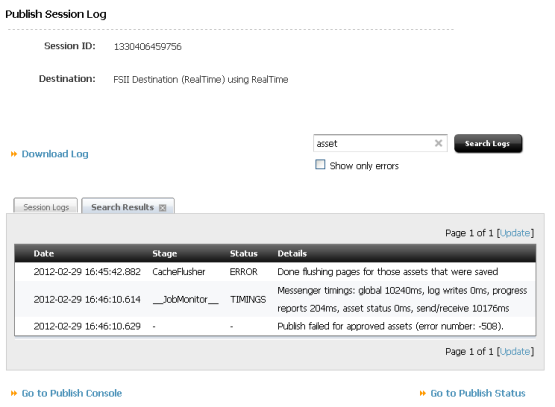
Description of ''Figure 21-16 Search Results Tab on the Publish Session Log Form''
-
To exit the Search Results tab, click the X on the tab.
You are returned to the Session Logs tab.
-
21.6.2 Downloading Logs
A publishing log is available for download at any time during the session and when the session ends. You can download a log file from several places in the RealTime publishing interface, as shown in the steps below.
-
Open the Publish Console (in the administrator's interface, click Publishing on the button bar).
The Publish Console opens with the Active tab at the front. The Active tab lists publishing sessions currently in progress.
-
Download the log file for an active session or a past session:
-
Active tab: Select a destination name, and click Download Log.
-
History tab: Select a destination name, click View log and select Download Log.
The Publishing Status form opens.
-
-
When the session is complete, click Download Log and follow the prompts.
The log file is in text format and can be opened in any text editor.
21.6.3 Deleting Publish History
It is recommended that you delete the publish history regularly ensure proper operation and performance, as all data related to publishing is stored in the database, and the size of these tables can become a performance problem over time. While regular publishes will not greatly increase the size of this table, large publishes (such as the initial publish of a site, especially when it has failed) can leave large amounts of data behind.
Deleting a publish session will do the following:
-
Delete all messages associated with the session from the database tables.
-
Clear out any data associated with it from
FW_PUBDATASTOREon this system (data is often left in this table when a publish fails). -
Attempt to access the destination and clear associated data from
FW_PUBDATASTORE(data is often left in this table when a publish fails).
-
Open the Publish Console (in the administrator's interface, click Publishing on the button bar).
The Publish Console opens with the Active tab at the front.
-
Select the History tab.
All available logs are displayed.
Figure 21-19 History Tab on Publish Console Form

Description of ''Figure 21-19 History Tab on Publish Console Form''
-
Check the box next to each log or logs you want to delete.
-
Click Delete.
The selected logs are deleted.
Note:
As data is inFW_PUBDATASTOREis stored using Large Binary Objects it may be necessary have the DBA manually clean up the Large Binary Data after performing this operation.