20 Configuring the RealTime Publishing Process
When you configure the RealTime publishing process, you define the publishing destination and mirror site configuration data to that destination. In addition, you can set the publishing schedule. This chapter also includes instructions for using the RealTime process to synchronize site data.
This chapter contains the following sections:
-
Section 20.2, "Configuring Your System for RealTime Publishing"
-
Section 20.3, "Adding a New RealTime Destination Definition"
20.1 Overview
Dynamic publishing is the process of copying assets and their underlying schema from one WebCenter Sites system to another. In order for the RealTime publishing process to work, both the source and target systems must be set up for RealTime publishing.
The source system requires the following items to be configured:
-
A batch user account. This user allows publishing to run as a background process and designates the location of publishing logs.
-
If there is a proxy, the identity of the local proxy server. This is identified to WebCenter Sites in the
futuretense.inifile. -
For large publishes (such as the initial publication of a site), the session timeout may need to be increased beyond the default 900 seconds (for example, 9000 seconds). To do so, open
futuretense.iniin property editor and changecs.timeoutto 9000, then restart WebCenter Sites. When the publish is completed this value can be reset. -
The publishing destination, which identifies:
-
The destination URL and port
-
The publishing method
-
Publishing log and email notification options
-
User roles with approval and publishing privileges
-
The RealTime user, who has publishing privileges on the destination
-
Additionally, though not required for publishing to work, you can configure a publishing schedule which will publish approved assets on a regular basis.
Destination System Configuration
The destination system requires:
-
A RealTime user account, which has publishing privileges on the destination.
-
Mirrored site configuration data from the source system for the sites to be published:
-
WebCenter Sites
-
PublicationandSitePlanTreetable data -
Auxiliary tables (such as
SourceandMimeType) -
Asset types
-
Roles
-
Start menu items *
-
Workflow groups and processes *
-
Tree tabs *
-
Saved searches *
* Items marked with an asterisk are typically not necessary on a delivery system.
-
Additionally, if you will not publish from the destination system, we recommend that you turn off asset invalidation.
Follow the steps in this chapter to configure your system for RealTime publishing.
20.2 Configuring Your System for RealTime Publishing
Note:
Configuring a RealTime publishing environment requires you to provide information that is specific to your WebCenter Sites installation and your business practices. Before starting procedures in this section, it is best to read them in order to gather and confirm the information they prompt you to provide.This section contains the following topics:
Section 20.2.1, "Create the Batch User Account (If One Does Not Exist)"
Section 20.2.2, "Set Up the Destination System"
Section 20.2.3, "If a Proxy Server Exists, Identify it to the Source System"
Section 20.2.4, "Create a RealTime Destination Definition on the Source System"
Section 20.2.5, "Initialize the Destination Database"
Section 20.2.6, "Mirror the Site Configuration Data to the Destination Database"
Section 20.2.7, "Test the Publishing Process"
Section 20.2.8, "Test the Published Site"
Section 20.2.9, "Set Up the Schedule"
Section 20.2.10, "Turn Off Asset Invalidation on the Delivery System"
20.2.1 Create the Batch User Account (If One Does Not Exist)
Note:
This procedure needs to be performed only once on each source system, regardless of the number and types of publishing destinations you are configuring.If a batch user account already exists on your source system, skip to Section 20.2.2, "Set Up the Destination System."
A batch user account is required before any type of publishing can take place.
The purpose of a batch user account is two-fold:
-
Enable the publishing process to run as a background process on the source system.
-
Specify the location where publish logs will be stored.
If you have not already done so, create the batch user account. For instructions, see Section 15.4.1, "Create the Batch User Account (If One Does Not Exist)."
Note:
Setxcelerate.batchhost property to the host name of the application server that is hosting the source system. The source system is the batch host. If the port number of the web server is anything other than 80, you must also include the port number. For example, myserver:7001. In a clustered WebCenter Sites environment, only one batch host is supported. The xcelerate.batchhost property must be set on each cluster member to point to the dedicated host.20.2.2 Set Up the Destination System
Data cannot be dynamically published unless the same database schema exists on the source and destination systems. In this step, you will ensure that the structure of auxiliary tables on the source database is reproduced in the destination database. The data, itself, you will mirror in a later step (Section 20.2.5, "Initialize the Destination Database").
The destination also requires a mirror user to complete database transactions on the destination system during publishing. You will ensure that a mirror user exists on the destination. (The mirror user is different from the batch user, which exists on the source system.)
To set up the destination system
-
Determine which auxiliary tables on the source system support the types of assets that users will publish, then manually re-create the table structure on the destination system.
Note:
Auxiliary tables are custom-defined tables that support asset types. The tables are not created via WebCenter Sites' AssetMaker or Flex Family Maker. Examples of auxiliary tables are Source, MimeType, and lookup tables (for different attributes in asset types).Database properties on the source and destination systems, if not an exact match, must be compatible, particularly database schema options (set in
futuretense.ini). Be sure to restart the application server if you make changes tofuturetense.ini. -
Create the RealTime user on the destination system (using the administrator's interface) and note the following:
Note:
The RealTime user has the same privileges as the mirror user configured for Mirror to Server publishing. If a mirror user is configured for Mirror to Server publishing, the same user may serve as the RealTime user.-
Basic privileges: The RealTime user must be assigned the following ACLs:
-
Browser
-
ElementEditor
-
PageEditor
-
TableEditor
-
Visitor
-
VisitorAdmin
-
xceladmin
-
xceleditor
-
-
Additional privileges: Because the RealTime user account is used by the CacheManager to regenerate the page cache after a publishing session, the RealTime user must have sufficient privileges to regenerate all the pages in the cache. Therefore, the RealTime user account must be assigned all the ACLs that are assigned to page entries in the
SiteCatalogtable or database tables that hold data to be rendered.
If you need help with creating the mirror user, see Section 5.4.1, "Creating a New User."
-
20.2.3 If a Proxy Server Exists, Identify it to the Source System
Note:
This procedure needs to be performed only once on each source system, regardless of the number and types of publishing destinations you are configuring.Skip to Section 20.2.4, "Create a RealTime Destination Definition on the Source System" if the local proxy has already been identified to your source system, or a proxy server is not used.
To identify the local proxy server to the source system for all destinations
-
Open
futuretense.iniin the Property Editor on the source system, select the Export/Mirror tab, and specify values for the following properties:-
cs.mirrorproxyserverSet this property to either the name or the IP address of the local proxy server.
-
cs.mirrorproxyserverportSet this property to the port number of the local proxy server.
-
-
Save the property file and close the Property Editor.
-
Restart the application server.
To identify the local proxy server to the source system per destination
-
In the Admin interface, select the Admin tab. Expand Publishing, then expand Destinations, and open the destination.
The destination opens in the main form.
-
Click Edit.
The Edit Destination form for the destination displays.
-
In the More Arguments field, enter
PROXYSERVER=wcs.example.com&PROXYPORT=8080
Where wcs.example.com is the local proxy server, and 8080 is the port the proxy is running on.
-
Click Save.
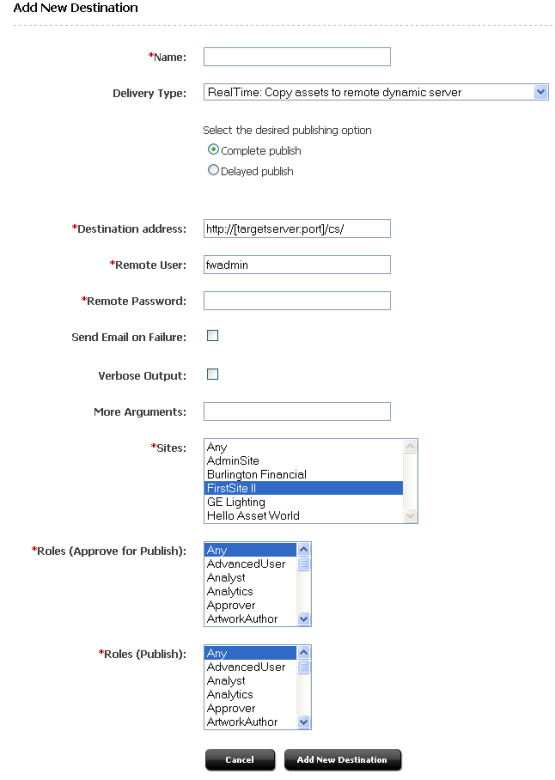
20.2.4 Create a RealTime Destination Definition on the Source System
In this step, you will define the publishing destination to the source system.
Note:
While you can define multiple destinations, bear in mind that only sequential publishing is supported.To create a RealTime destination definition
-
On the source system, log in to the administrator's interface.
-
In the Admin tab, expand Publishing, then Destinations.
-
Under Destinations, double-click Add New.
The Add New Destination form appears.
-
Fill in the Add New Destination form. For guidelines, use the information below.
-
Name: Enter a unique name for the destination.
-
Delivery Type: Select RealTime: Copy assets to remote dynamic server, then choose one of the following options:
-
Complete publish to copy assets to the destination address without interruption to the publishing process.
-
Delayed publish to pause the publishing process before assets are committed to the destination database. To resume the session, a user must initiate the fourth stage of publishing (deserializing [inflating] data and saving it to the destination database). More information on delayed publishing can be found in Section 21.3.2, "Resuming a Delayed Publishing Session."
-
-
Destination Address: Enter the URL in the format shown. For
[targetserver:port], delete the brackets, enter the hostname or IP address of the destination system, and specify the port to be used by the destination. (A slash is required at the end of the URL because this URL is appended dynamically.) -
Remote User: Enter the name of the RealTime user that you created in Section 20.2.2, "Set Up the Destination System." This user will be invoked by the publishing system to unpack the RealTime queue on the destination system.
-
Remote Password: Enter the password of the RealTime user.
-
Send Email on Failure: If publishing fails and email notices to that effect are required, select the checkbox and fill in the field that is displayed:
-
EmailIDs: Enter the recipient's email address. (This field is available only when Send Email on Failure is selected.)
-
-
Verbose Output: Select this option to activate detailed error logging during the publishing process. When this option is selected, messages in addition to error messages are written to the
PubMessagetable. Because additional information lengthens the publishing process, select this parameter only for troubleshooting. -
More Arguments: This parameter is reserved; no additional arguments may be specified at this time.
-
Sites: Select the sites whose assets can be approved for and published to this destination.
-
Roles (Approve for Publish): Select the roles to which you are assigning asset approval privileges. All users assigned these roles will be able to approve assets.
-
Roles (Publish): Select the roles to which you are assigning publish privileges. All users assigned these roles will be able to publish and view the Publish Console.
-
-
Click Add New Destination.
WebCenter Sites writes your information to the
Pubdestinationtable and displays the destination definition in the Inspect form:Note:
Before proceeding to the next step, check the Name field. A red button next to the destination name means that the target server cannot be located. Common causes are the following: The target URL is incorrect or the target server is not running. -
If you need to create more destination definitions, repeat steps 3 through 5 for each new definition.
-
When you are ready to initialize the destination system, proceed to the next section, Section 20.2.5, "Initialize the Destination Database." Begin at step 3 of that procedure.
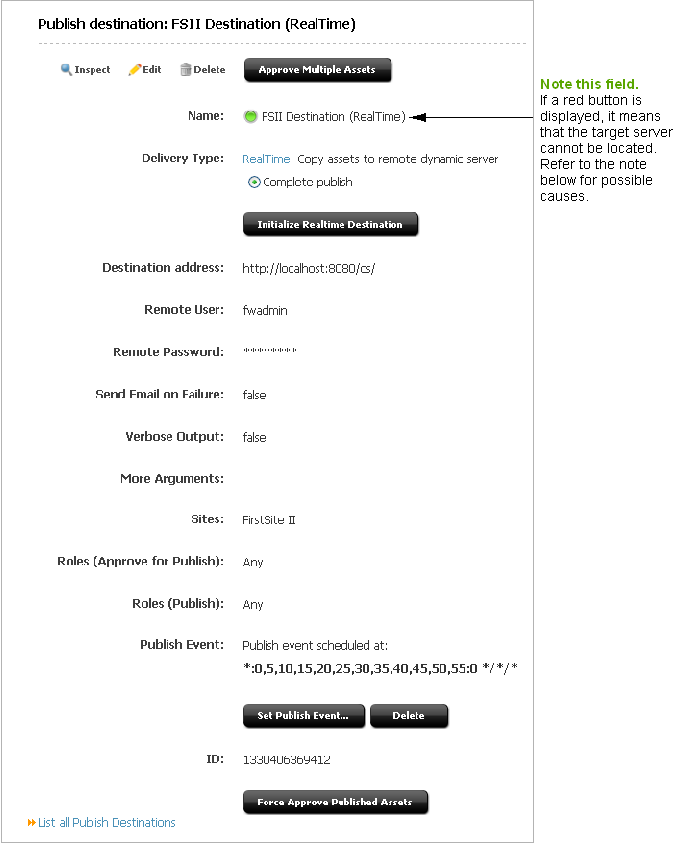
20.2.5 Initialize the Destination Database
You must initialize the destination database before you can publish to it. To initialize, you will mirror two constructs:
-
WebCenter Sites
-
Data in auxiliary tables (which support the types of assets users will be publishing)
The Publication and PublicationTree tables will be updated with the site names and table data you have chosen to mirror.
-
In the Admin tab on the source system, expand Publishing, then Destinations.
-
Under Destinations, double-click the RealTime destination you want to initialize.
-
In the Publish Destination form, click Initialize RealTime Destination.
The Initialize RealTime Destination form appears:
Figure 20-3 Initialize Mirror Destination Form
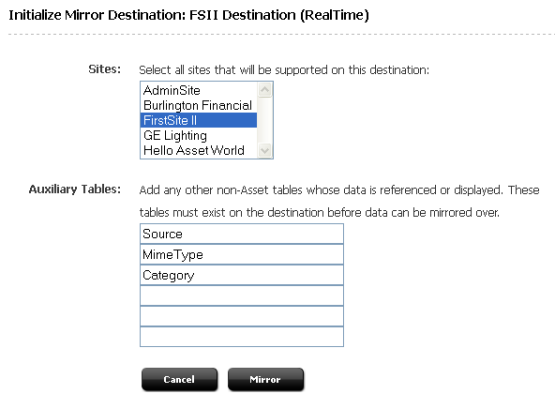
Description of ''Figure 20-3 Initialize Mirror Destination Form''
-
In the Sites field, select the sites whose assets you want to publish to this destination.
-
In the Auxiliary Tables field, enter the names of the following tables:
-
Source, if you are using the source feature for any of your asset types. -
MimeType, if you are using Sites DocLink, flex filter assets, the ImageFile asset type, or if you are using theMimeTypetable for any of your custom asset types. -
Filters, if you are using flex filters on your site. (TheFilterstable lists the classes that are used by the flex filters. You will need to copyjarfiles and classes manually.) -
Any other auxiliary tables (such as lookup tables) for your asset types.
-
-
Click Mirror.
If initialization is successful, WebCenter Sites displays a confirmation message (otherwise, an error message is displayed).
20.2.6 Mirror the Site Configuration Data to the Destination Database
In this step, you will mirror the source's site configuration data (such as asset types and start menu items) to the destination database.
To mirror the site configuration data
-
In the Admin tab on the source system, expand Sites and double-click the site whose data you want to publish to the destination.
-
In Publish Destinations (near the bottom of the form), click Mirror site configuration for destination.
WebCenter Sites displays the Mirror Site Configuration form:
Figure 20-4 Mirror Site Configuration Form
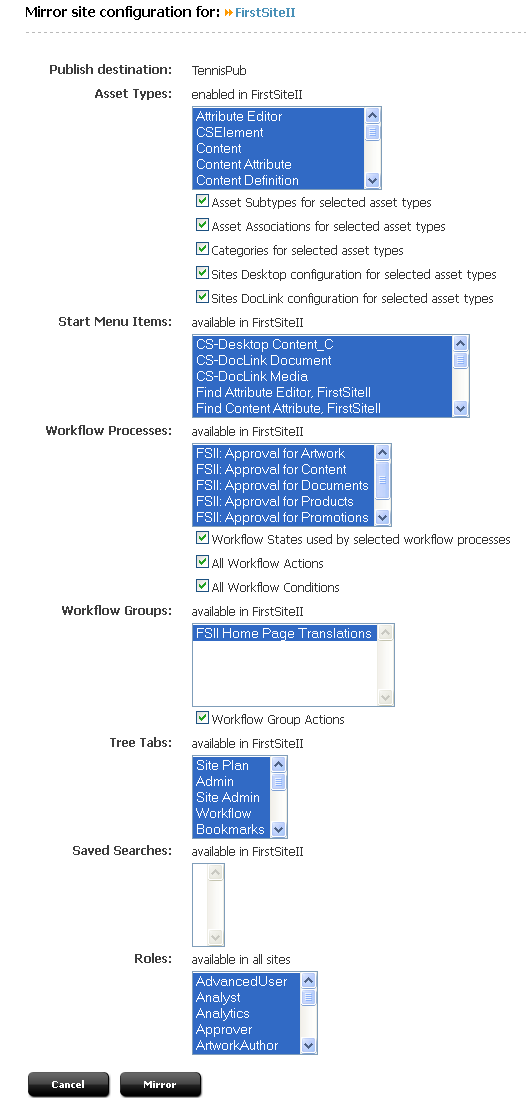
Description of ''Figure 20-4 Mirror Site Configuration Form''
-
Select the data you wish to mirror to the destination:
Note:
Which data you choose to mirror typically varies with the purpose of the destination system:-
If the destination system is strictly for delivery, it makes sense to mirror only asset types.
-
When content management functions are to be supported, mirror the remaining data as well.
-
Asset Types: Select the asset types that you want to make available on the destination.
If your asset types have subtypes and categories, choose the appropriate options from the list in the Asset Types section and select the corresponding check boxes. For example, the
AssocNamedtable contains information about associations for asset types. The table will be mirrored only if you select Asset associations for selected asset types and then the relevant asset types.Select the Sites Desktop / Sites DocLink configuration check boxes to configure the selected asset types for Sites Desktop and Sites DocLink.
-
Start Menu Items: Select any start menu items that you or the developers designed for your content providers to use.
-
Workflow Processes: If there are workflow processes for your asset types, select these processes and the appropriate workflow items.
-
Workflow Groups: Select any workflow groups that you or the developers designed for your content providers to use.
-
Tree Tabs: Select the tree tabs that you want to make available on the destination.
-
Saved Searches: Select any saved searches that you or the developers designed for your content providers to use.
-
Roles: Select the roles that must exist on the destination.
-
-
Click Mirror.
Based on which asset type configuration options you selected in step 3, appropriate rows from the
AssocNamed,AssocNamed_Subtypes, andCategorytables are copied to the destination:-
If you selected Start Menu Items or Saved Searches, appropriate rows from the tables that implement those features are copied to the destination.
-
Based on which workflow configuration options you selected in step 3, appropriate rows from the workflow tables are copied to the destination.
-
-
Repeat steps 1–4 for each site whose assets you want to publish to the destination.
20.2.7 Test the Publishing Process
You can test your publishing process by using all publishable assets or a smaller collection.
This section contains the following topics:
20.2.7.1 Approve Assets
Do one of the following:
-
To fully test your publishing process, you must approve all the assets that you intend to publish. See Section 18.2, "Approving Multiple Assets" for help with approving multiple assets at once.
-
If you wish to perform a simple test of your configuration, temporarily create a home page asset with just a few dependents.
20.2.7.2 Publish the Assets
To run a test publishing session on the approved assets
-
On the source system, click Publishing in the button bar.
-
In the Publish Console, select your RealTime destination from the drop-down list and click Select Destination.
WebCenter Sites displays information about the assets that are ready to be published to this destination.
-
If for some reason the destination has not yet been initialized, it must be initialized now or the publishing session will fail. To initialize the destination, click Create Site on Target in the Publish Console (or follow instructions in Section 20.2.5, "Initialize the Destination Database"). This creates the basic site information on the destination system.
-
Click Publish.
The publishing system mirrors all the approved assets for this destination to the WebCenter Sites database on the destination system.
20.2.8 Test the Published Site
To test your published site, you will point your browser to the home page asset on the destination system and examine the site.
If you have not already done so, you must first determine the home page asset's URL. A WebCenter Sites URL is constructed by concatenating the following values, as shown:
http://<targetserver:port>/<cgipath>/ContentServer?pagename=<your_home_page>/<other_info>
where
-
<targetserver:port>is the hostname or IP address (and sometimes the port number) of the destination system. -
<cgipath>is the value of theft.cgipathproperty in thefuturetense.inifile. For example,<cgipath>is/servlet/for WebLogic and other application servers with servlet architectures. -
ContentServer?pagename=sets the name of the page to be displayed at this URL. -
<your_home_page>is the home page's name from theSiteCatalogentry. -
<other_info>is additional information that is passed in with the WebCenter Sites page criteria variables,c,cid,tid, andp(see the Oracle Fusion Middleware WebCenter Sites Developer's Guide for information about these variables).
For example, the URL for the Burlington Financial home page looks like this when it is rendered by the WebCenter Sites JumpStart Kit:
http://localhost:7001/servlet/
   ContentServer?pagename=BurlingtonFinancial/Page/Home
To determine the URL of your home page and test the site
-
Start the Property Editor on the destination system (if you need help with this step, see the Oracle Fusion Middleware WebCenter Sites Property Files Reference).
-
Open the
futuretense.inifile. -
In the App Server tab, locate the
ft.cgipathproperty and write down its value. -
In the Compatibility tab, locate the
ft.approotproperty and write down its value. -
Save the property file and close the Property Editor.
-
-
Open a text editor and assemble the URL:
-
Enter
http://orhttps://followed by: <targetserver:port>/<cgipath>/For example:
http://bigfatsun.example.com:8080/servlet/
(for WebLogic and WebSphere)
-
At the end of the string, add the following text:
ContentServer?pagename=<your_home_page>
Now the URL should look similar to the following example (for WebLogic and WebSphere):
http://bigfatsun.fatwire.com:8080/servlet/
   ContentServer?pagename=ExampleSite/Page/Home
-
-
Point your browser to the URL you assembled.
-
Scan the page for errors and test all links to ensure they work.
Note:
If you detect an error related to content that is not stored as assets (the content is stored outside WebCenter Sites), use the appropriate transfer protocol to publish that content. For more information, see Section 20.2.9, "Set Up the Schedule."It is recommended that you conduct a complete test of the system at strategic times: under peak load conditions after you have mirrored the entire site for the first time, and at regular points thereafter.
20.2.9 Set Up the Schedule
Once you have ensured that your destination is correctly set up, finish configuring your source's publishing system.
To finish configuring the publishing system
-
On the source system, schedule times running publishing sessions to the destination. For help with this step, see Section 18.7, "Scheduling Publish Events."
-
If your site uses image files that are stored not as assets but as images on the web server, plan how you will move the image files from the CM system web server to the delivery system web server. For example, you can set up a regular FTP transfer.
-
If you are using elements and SiteCatalog page entries that are not CSElement and SiteEntry assets, you must use the CatalogMover tool to mirror them to the destination system. For help with CatalogMover, see the Oracle Fusion Middleware WebCenter Sites Developer's Guide.
20.2.10 Turn Off Asset Invalidation on the Delivery System
By default, the destination invalidates chain publishing. That is, the publishing system (on the destination) marks each published asset as changed, due solely to the fact that the asset was published. Hence, an asset must be approved from the current destination before it can be published to yet another destination.
For assets on a final destination — such as a delivery system — asset invalidation should be turned off. It is an unnecessary (and time consuming) operation, as assets will not be published from that destination.
To turn off asset invalidation
-
Start the Property Editor on the final destination system (delivery, in this example) and open the
futuretense_xcel.inifile. (If you need help with this step, see the Oracle Fusion Middleware WebCenter Sites Property Files Reference.) -
In the Publishing tab, locate the
xcelerate.publishinvalidateproperty and set its value tofalse.
20.3 Adding a New RealTime Destination Definition
Once you have configured your source system to publish to one RealTime destination, you can define other RealTime destinations, if necessary. Follow only the steps below:
Section 20.2.2, "Set Up the Destination System"
Section 20.2.4, "Create a RealTime Destination Definition on the Source System"
Section 20.2.5, "Initialize the Destination Database"
Section 20.2.6, "Mirror the Site Configuration Data to the Destination Database"
Section 20.2.7, "Test the Publishing Process"
Section 20.2.8, "Test the Published Site"
Section 20.2.9, "Set Up the Schedule"
Section 20.2.10, "Turn Off Asset Invalidation on the Delivery System"
20.4 Synchronizing Site Configuration Data
In addition to publishing assets, you can synchronize site configuration between the source and destination. For example, you can synchronize site configuration data from a development system to a management system or to a delivery system.
Use the Mirror Type Configuration page:
-
To move configuration items that support asset types (start menu items, associations, asset types, and so on).
-
If you or your developers add categories or subtypes for existing asset types.
-
To move workflow configuration data from a development system to a management system.
See Section 20.2.6, "Mirror the Site Configuration Data to the Destination Database" for instructions on using the Site Configuration form.
Use the Initialize Mirror Destination page:
-
If you or your developers add sites, or auxiliary tables to your system that you wish to publish.
-
When you need to troubleshoot your configuration. If you can successfully initialize a RealTime destination, the source and the destination systems are communicating.
See Section 20.2.5, "Initialize the Destination Database" for instructions on using the Initialize Mirror Destination form.
20.5 Performance Enhancement
To improve the efficiency of high-volume dynamic publishing, an approval query can be implemented. For more information, see Section 16.4, "Approval Query for Performance Enhancement."