28 Using ADF Timeline Components
This chapter describes how to use the ADF Data Visualization timeline component to display data using simple UI-first development. The chapter defines the data requirements, tag structure, and options for customizing the look and behavior of the component.
If your application uses the Fusion technology stack, then you can also use data controls to create timelines. For more information, see the "Creating Databound Timelines" section in the Oracle Fusion Middleware Fusion Developer's Guide for Oracle Application Development Framework.
This chapter includes the following sections:
28.1 Introduction to ADF Timeline Components
A timeline is an interactive data visualization tool that allows users to view events in chronological order and easily navigate forwards and backwards within a defined time range. Events are represented as timeline items using simple ADF components to display information such as text and images, or supply actions such a links. A dual timeline can be configured to display two series of events to allow a side-by-side comparison of related information.
The timeline component supports expanding and collapsing a group of related timeline items, such as shared hire dates, or a group of related activities such as completion of a number of employee forms. The timeline component also supports an adjustable time range to change the view for zooming in or out.
28.1.1 Timeline Use Cases and Examples
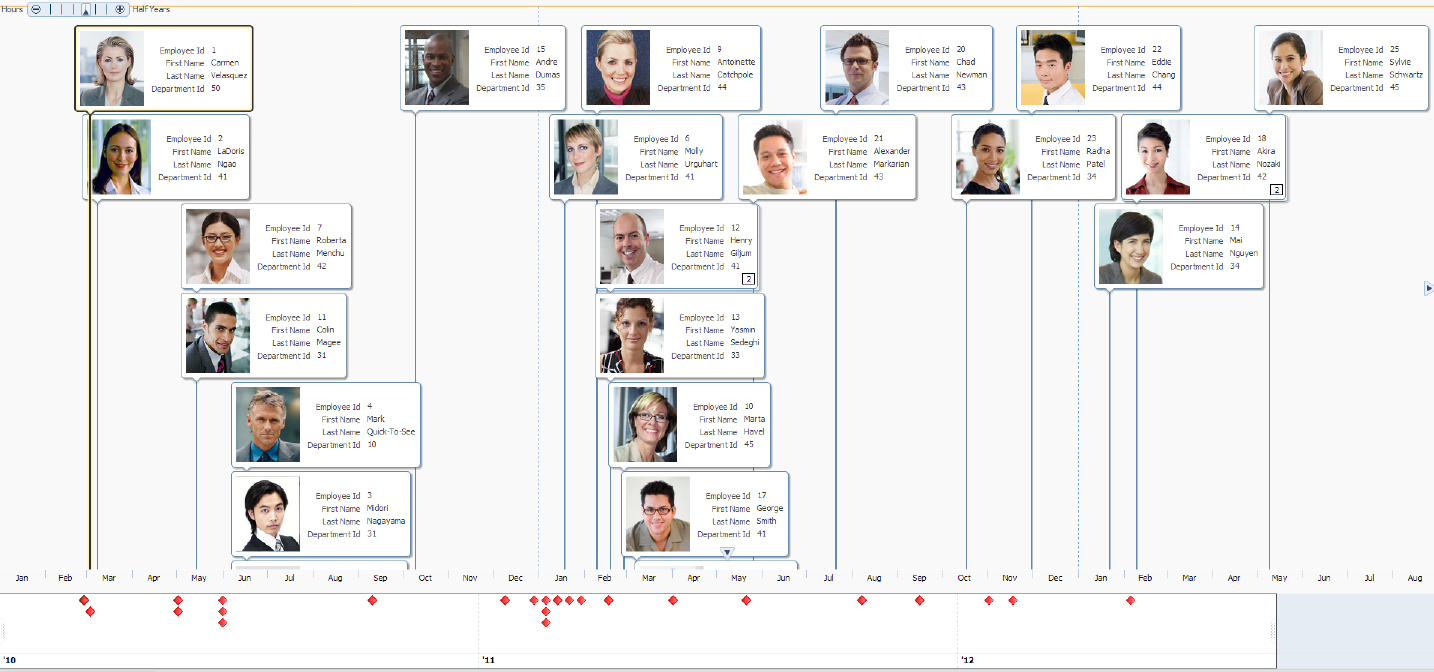
A timeline is composed of the display of events as timeline items along a time axis, a movable overview window that corresponds to the period of viewable time in the timeline, and an overview time axis that displays the total time increment for the timeline. A horizontal zoom control is available to change the viewable time range. Timeline items corresponding to events display related information or actions and are represented by a line feeler to the time axis and a marker in the overview time axis.
For example, the timeline in Figure 28-1 is configured to display the chronological order of the hire dates of employees in the Summit DVT example. In this example, timeline items representing each event display information about the employee using an image and text with labels. The overview window defines the time range for the display of the timeline items, adjustable by changing the zoom control or by changing the edges of the window to a larger or smaller size. When selection is configured, the timeline item, line feeler, and the event marker in the overview panel are highlighted.
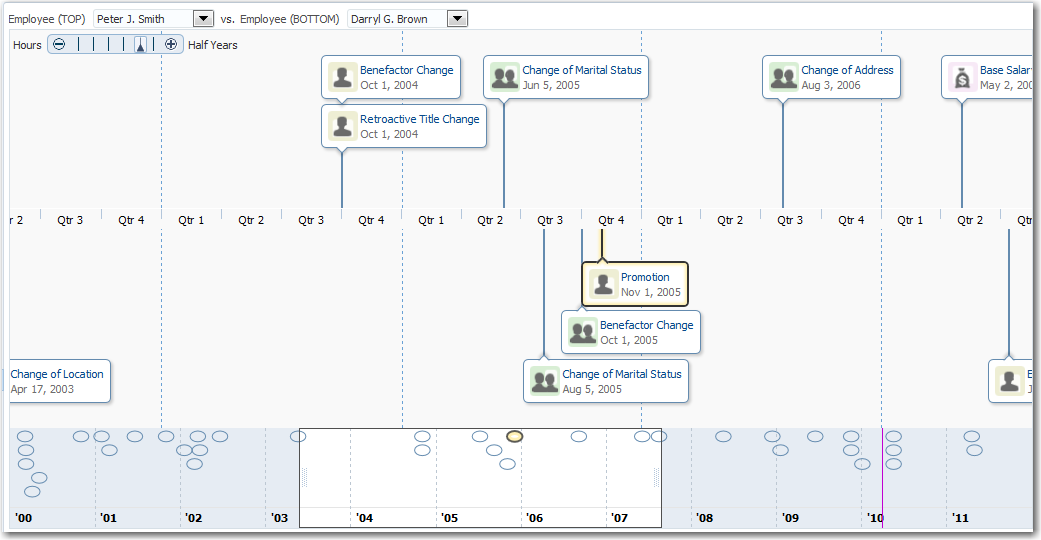
A dual timeline can be used for comparison of up to two series of events. Figure 28-2 illustrates a dual timeline comparing employee change events for two employees over a ten year time period. Timeline events are displayed using a quarterly year time axis within the three plus year overview window. The red colored line in the overview time axis indicates the current date.
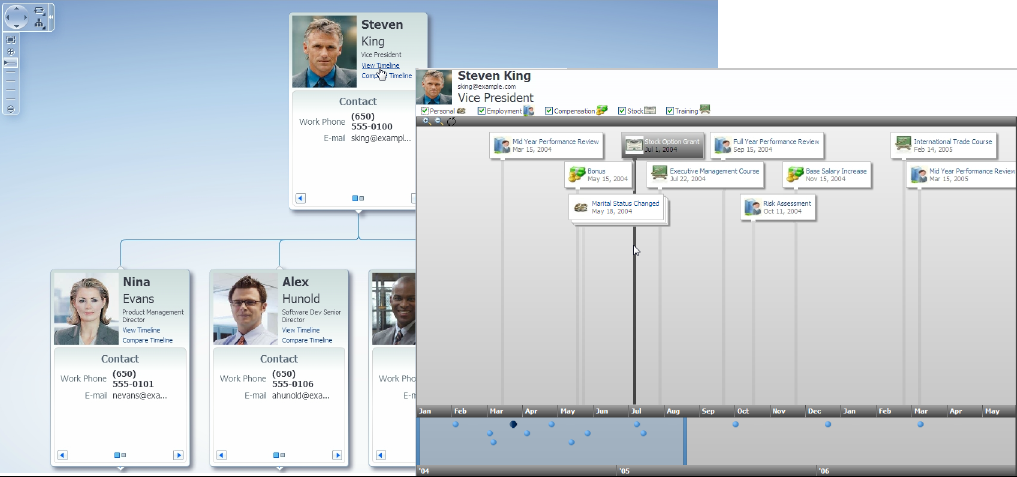
Timelines are useful in providing information in association with other Data Visualization components. For example, Figure 28-3 illustrates the use of a timeline linked from an organizational chart created using a dvt:hierarchyViewer component. For more information, see Chapter 31, "Using ADF Hierarchy Viewer Components."
28.1.2 End User and Presentation Features
To understand how timelines are used and can be customized, it is helpful to understand these elements and features.
28.1.2.1 Layout Options
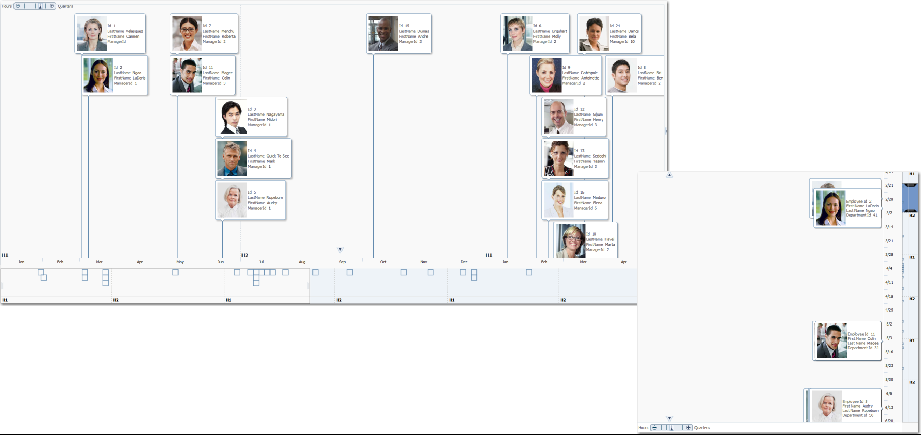
By default, timelines are displayed in a horizontal orientation with events laid out along a horizontal time axis and overview panel. You can change the layout to a vertical orientation with events displayed along a vertical time axis and overview panel. While you can specify that timeline items in a horizontal orientation will not overlap each other in the display, you cannot apply that configuration to items in a vertical orientation. Figure 28-4 illustrates the comparison of a timeline using a horizontal orientation with the same timeline using a vertical orientation.
28.1.2.2 Timeline Item Selection
Each event displayed in the timeline is represented as a timeline item that can include data display components such as images, text, and text labels, or actions such as links, buttons, and menus. A line feeler connects the event to the date in the time axis of the timeline. Events are represented in the overview panel as a configurable marker.
By default timeline items are not configured for selection at runtime. You can configure selection of a single or multiple timeline items. At runtime the event, the line feeler, and the marker in the overview panel are highlighted.
28.1.2.3 Timeline Grouping and Sorting
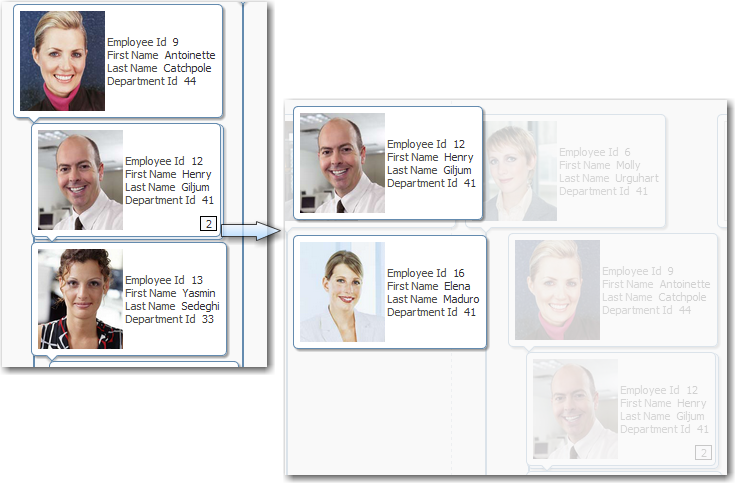
Timeline items that share a common date can be configured to display as a group that can be expanded or collapsed at runtime. By default, a number counter displaying the number of items in a group is provided in the collapsed view. Clicking anywhere in the grouped timeline item opens all items in the collapsed view and clicking in the timeline collapses the expanded view. Figure 28-5 shows a timeline item with a counter opened into an expanded view.
In the default horizontal orientation of the timeline, an overview panel is displayed at the bottom of the timeline. The overview panel includes a movable overview window that corresponds to the period of viewable time in the timeline, and an overview time axis that displays the total time increment for the timeline.
28.1.2.4 Drag and Drop Support
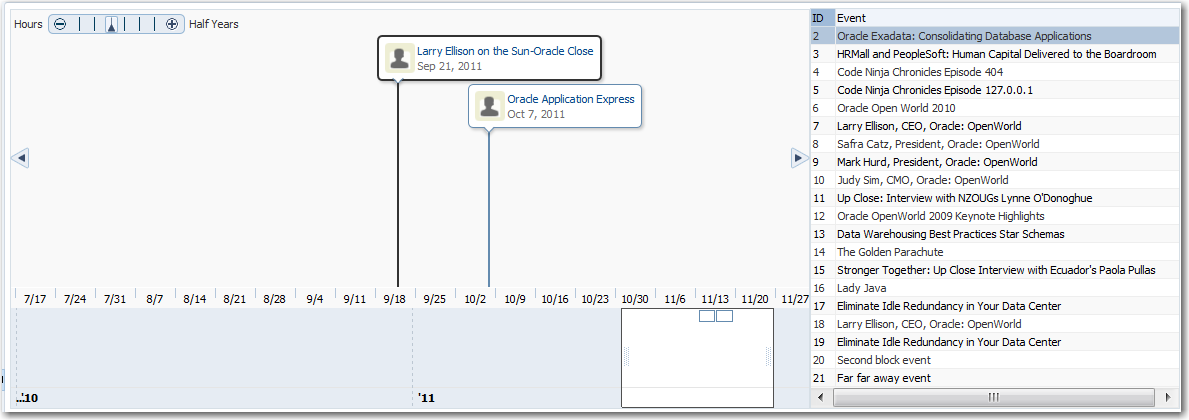
Timeline components support drag and drop operations to and from another collection component, for example, a table. Figure 28-6 shows a timeline configured as a drop target and drag source. When the user drags one of the rows in the table onto the timeline, attributes are displayed as a timeline item. Timeline items can also be selected and dragged to the table to display attributes on a row.
28.1.2.5 Content Delivery
Timelines can be configured for how data is delivered from the data source. The data con be delivered to the timeline either immediately upon rendering, as soon as the data is available, or lazily fetch after the shell of the component has been rendered. By default, timelines support the delivery of content from the data source when it is available. The contentDelivery attribute is set to whenAvailable by default.
Timelines are virtualized, meaning not all data on the server is delivered to and displayed on the client. You can configure timelines to fetch a certain number of rows or columns at a time from your data source based on date related values. Use fetchStartTime and fetchEndTime to configure fetch size.
28.1.2.6 Timeline Image Formats
Timelines support the following image formats: HTML5, Flash, and Portable Network Graphics (PNG).
By default, timelines will display in the best output format supported by the client browser. If the best output format is not available on the client, the application will default to an available format. For example, if the client does not support HTML5, the application will use:
-
Flash, if the Flash Player is available.
You can control the use of Flash content across the entire application by setting a
flash-player-usagecontext parameter inadf-config.xml. For more information, see Section A.4.3, "Configuring Flash as Component Output Format." -
PNG output format. Although static rendering is fully supported when using a PNG output format, certain interactive features are not available including:
-
Animation
-
Context menus
-
Drag and drop gestures
-
Popup support
-
Selection
-
28.1.2.7 Timeline Display in Printable or Emailable Modes
ADF Faces allows you to output your JSF page from an ADF Faces web application in a simplified mode for printing or emailing. For example, you may want users to be able to print a page (or a portion of a page), but instead of printing the page exactly as it is rendered in a web browser, you want to remove items that are not needed on a printed page, such as scrollbars and buttons. If a page is to be emailed, the page must be simplified so that email clients can correctly display it. For information about creating simplified pages for these outputs, see Chapter 35, "Using Different Output Modes."
When a timeline is displayed on a JSF page to be output in printable or emailable pages:
-
Only the events currently in view on the timeline will be included in the content.
-
In email mode, the events will be displayed as a table.
-
In print mode, the timeline overview is not rendered.
28.1.2.8 Active Data Support (ADS)
Timelines support ADS by sending a Partial Page Refresh (PPR) request when an active data event is received. The PPR response updates the components, animating the changes as needed. Supported ADS events include:
-
Timeline item content updates
-
Timeline item insertion and deletion
28.1.3 Additional Functionality for Timeline Components
You may find it helpful to understand other ADF Faces features before you implement your timeline component. Additionally, once you have added a timeline to your page, you may find that you need to add functionality such as validation and accessibility. Following are links to other functionality that timeline components can use:
-
Partial page rendering: You may want a timeline to refresh to show new data based on an action taken on another component on the page. For more information, see Chapter 7, "Rerendering Partial Page Content."
-
Personalization: When enabled, users can change the way the timeline displays at runtime. Those values will not be retained once the user leaves the page unless you configure your application to allow user customization. For information, see Chapter 33, "Allowing User Customization on JSF Pages."
-
Accessibility: You can make your timeline components accessible. For more information, see Chapter 22, "Developing Accessible ADF Faces Pages."
-
Content Delivery: You can configure your timeline to fetch data from the data source immediately upon rendering the components, or on a second request after the components have been rendered using the
contentDeliveryattribute. For more information, see Section 10.1.1, "Content Delivery." -
Automatic data binding: If your application uses the Fusion technology stack, then you can create automatically bound timelines based on how your ADF Business Components are configured. For more information, see the "Creating Databound Timelines" section in the Oracle Fusion Middleware Fusion Developer's Guide for Oracle Application Development Framework.
Note:
If you know the UI components on your page will eventually use ADF data binding, but you need to develop the pages before the data controls are ready, then you should consider using placeholder data controls, rather than manually binding the components. Using placeholder data controls will provide the same declarative development experience as using developed data controls. For more information, see the "Designing a Page Using Placeholder Data Controls" section of the Oracle Fusion Middleware Fusion Developer's Guide for Oracle Application Development Framework.
Additionally, data visualization components share much of the same functionality, such as how content is delivered, automatic partial page rendering (PPR), and how data can be displayed and edited.
28.2 Using Timeline Components
To use the timeline component in UI-first development, define the data, add the timeline to a page and complete the additional configuration in JDeveloper.
28.2.1 Timeline Component Data Requirements
The data layer for the timeline component is specified in its child, the timelineSeries component. You must specify at least one timeline series, at most two in the case of a dual timeline, using a model to access data from the underlying source. The specific model class to use is an instance of org.apache.myfaces.trinidad.model.CollectionModel. This class extends the JSF DataModel class and adds on support for row keys. In the DataModel class, rows are identified entirely by index. However, to avoid issues if the underlying data changes, the CollectionModel class is based on row keys instead of indexes.
You may use other model instances, such as java.util.List, java.util.ArrayList, and javax.faces.model.DataModel. The timeline series component will automatically convert the instance into a CollectionModel, but without any additional functionality. For more information about the CollectionModel class, see the MyFaces Trinidad Javadoc at http://myfaces.apache.org/trinidad/trinidad-1_2/trinidad-api/apidocs/index.html.
Timelines require that the following attributes be set for the timelineSeries component in JDeveloper:
-
value: An EL Expression that references the data model represented in the timeline. -
var: The name of a variable to be used during the rendering phase to reference each element in the timeline collection. This variable is removed or reverted back to its initial value once rendering is complete.
Each immediate child of a timelineSeries component must be at most one timelineItem component. This component makes it possible to customize the event content through stamping. When you use stamping, child components are not created for every event represented in a timeline. Rather, the content of the component is repeatedly rendered, or stamped, once per timeline item, such as the events in the timeline.
Each time a timeline item is stamped, the value for the current item is copied into a var property, and optionally, additional data for the item is copied into a varStatus property. These properties can be accessed in EL expressions inside the timeline item component, for example, to pass the item value to a stamped af:outputText component. Once the timeline has completed rendering, the var and varStatus properties are removed, or reverted back to their previous values.
The values for the value, var, and optionally, varStatus attributes must be stored in the timeline's data model or in classes and managed beans if you are using UI-first development.
Example 28-1 shows a code sample that adds a TimelineCBBean managed bean to your application that references the class or bean that contains the data, and optionally, adds any other methods to customize the timeline. Not all list items in the data set specified by the ArrayList class are included in the example.
Example 28-1 Managed Bean Example to Specify Timeline Data
  //imports needed by methods
import java.text.DateFormat;
import java.text.ParseException;
import java.text.SimpleDateFormat;
import java.util.ArrayList;
import java.util.Date;
import java.util.Iterator;
import java.util.Set;
import javax.faces.bean.ManagedBean;
import javax.faces.bean.SessionScoped;
import javax.faces.bean.RequestScoped;
import javax.faces.component.behavior.ClientBehavior;
import javax.faces.component.behavior.ClientBehaviorHint;
import javax.faces.event.AjaxBehaviorEvent;
import oracle.adf.view.faces.bi.component.timeline.UITimelineSeries;
import org.apache.myfaces.trinidad.model.CollectionModel;
import org.apache.myfaces.trinidad.model.ModelUtils;
import org.apache.myfaces.trinidad.model.RowKeySet;
@ManagedBean(name="cb")
public class TimelineCBBean
{
  private CollectionModel m_model;
  public TimelineCBBean()
  {
    super();
  }
  public CollectionModel getModel()
  {
    if (m_model != null)
    return m_model;
    ArrayList _list = new ArrayList(10);
      _list.add(new EmpEvent("0", parseDate("01.13.2010"), "Oracle Application
          Express", "se198AyXcsk", null));
      _list.add(new EmpEvent("1", parseDate("01.27.2010"), "Larry Ellison on the
          Sun-Oracle Close", "ylNgcD2Ay6M", null));
      ...

    m_model = ModelUtils.toCollectionModel(_list);
    return m_model;
  }
  public void handleKey(AjaxBehaviorEvent event)
  {
    ClientBehavior _behavior = (ClientBehavior)event.getBehavior();
    Set<ClientBehaviorHint> _hints = _behavior.getHints();
    UITimelineSeries _series =
      (UITimelineSeries)event.getComponent().findComponent("ts1");
    if (_series == null)
      return;
      RowKeySet _rowKeySet = _series.getSelectedRowKeys();
      Iterator _iterator = _rowKeySet.iterator();
      ArrayList _list = (ArrayList)m_model.getWrappedData();
      while (_iterator.hasNext())
      {
        Object _rowKey = _iterator.next();
        Object _event = m_model.getRowData(_rowKey);
        _list.remove(_event);
      }
    }
    private static Date parseDate(String date)
    {
      Date ret = null;
      try
      {
        ret = s_format.parse(date);
      }
      catch (ParseException e)
      {
        e.printStackTrace();
      }
        return ret;
    }
static DateFormat s_format = new SimpleDateFormat("MM.dd.yyyy");
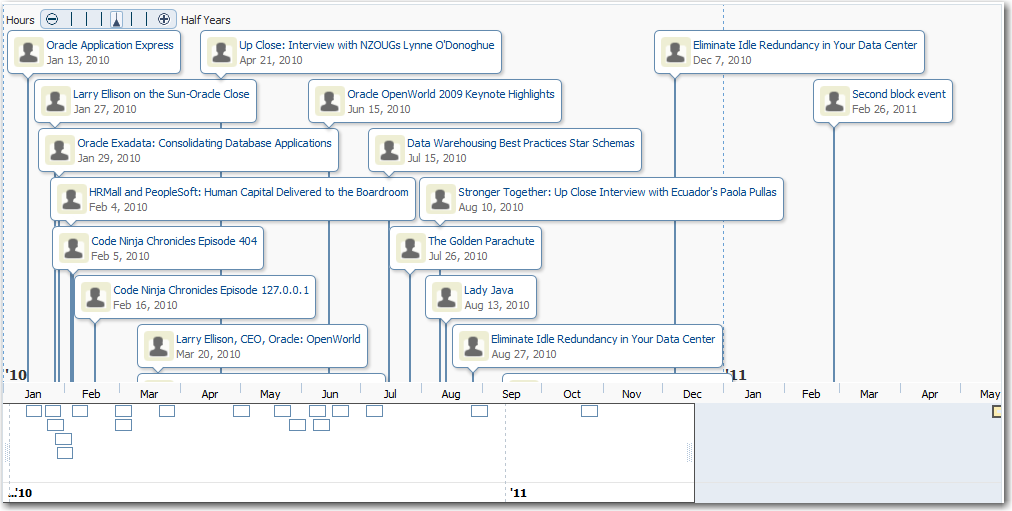
The managed bean example provides the data model for the Employee Presentations timeline displayed in Figure 28-7.
You can find the complete source code for the TimelineCBBean in the ADF Faces demo application. For more information about the demo application, see Section 1.4, "ADF Faces Demonstration Application."
28.2.2 Configuring Timelines
The timeline component has configurable attributes and child components that you can add or modify to customize the display or behavior of the timeline. The prefix dvt: occurs at the beginning of each timeline component name indicating that the component belongs to the ADF Data Visualization Tools (DVT) tag library.
You can configure timeline child components, attributes, and supported facets in the following areas:
-
Timeline component (
timeline): The parent component that wraps the timeline child components and facets. -
Timeline series (
timelineSeries): The immediate child of the timeline component used to specify the data layer for the timeline. You must specify at least one series in a timeline. You can also specify up to one additional series to be used for a comparison between timelines.The timeline series component supports facets that can be used to configure context menus including:
-
bodyContextMenu: Specifies a context menu that is displayed on non-selectable elements in the timeline component. -
contextMenu: Specifies a context menu that is displayed on any selectable element in the timeline component.
-
-
Timeline item (
timelineItem): The child oftimelineSeriesthat represents an event in the timeline. The components supports the use of many ADF Faces components, such asaf:outputText,af:image, andaf:panelGroupLayout. -
Marker (
marker): A configurable shape that represents the event in the overview panel. The attributes are specified in a namedoverviewItemfacet child of thetimelineItemcomponent. -
Time axis (
timeAxis): Child oftimelineused to specify the time axis andtimelineOverviewused to specify the overview time axis. -
Timeline overview (
timelineOverview): An optional component used to provide a macro view of all of the events from all timeline series in the timeline. Users can scroll through the timeline using a zoom control.
28.2.3 How to Add a Timeline to a Page
When you are designing your page using UI-first development, you use the Component Palette to add a timeline to a JSF page. When you drag and drop a timeline component onto the page, a timeline artifact and source code is added to the Visual Editor, and the tag structure is added to the Structure window.
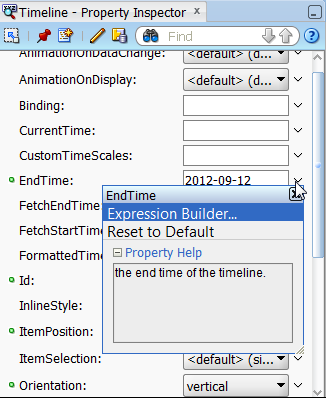
After the timeline is added to your page, you can use the Property Inspector to specify data values and configure display attributes. In the Property Inspector you can use the dropdown menu for each attribute field to display a property description and options such as displaying an EL Expression Builder or other specialized dialogs. Figure 28-8 shows the dropdown menu for a timeline endTime attribute.
Note:
If your application uses the Fusion technology stack, then you can use data controls to create a timeline and the binding will be done for you. For more information, see the "Creating Databound Timelines" section in the Oracle Fusion Middleware Fusion Developer's Guide for Oracle Application Development Framework.
It may be helpful to have an understanding of how timeline attributes and timeline child tags can affect functionality. For more information, see Section 28.2.2, "Configuring Timelines."
You may also find it helpful to understand functionality that can be added using other ADF Faces features. For more information, see Section 28.1.3, "Additional Functionality for Timeline Components."
-
In the ADF Data Visualization page of the Component Palette, from the Gantt section, drag and drop a
Timelinecomponent onto the page. -
In the Property Inspector, view the attributes for the timeline. Use the help button to display the complete tag documentation for the
timelinecomponent. -
Expand the Appearance section, and enter values for the following attributes:
-
EndTime: Enter the ending date to use for the timeline time range using the format
yyyy-mm-dd. Select an end date that will include events in the data collection you wish to display on the timeline. By default the current date is used for this attribute. -
StartTime: Enter the starting date to use for the timeline time range using the format
yyyy-mm-dd. Select a start date that will include events in the data collection you wish to display on the timeline. By default the current date is used for this attribute.
-
-
Optionally, enter values for the following attributes:
-
Orientation: Use the attribute's dropdown menu to change the default layout from
horizontaltovertical.For sample images of timeline orientation, see Section 28.1.2.1, "Layout Options."
-
ItemPosition: If you are using a vertical orientation for the timeline, by default timeline items will not overlap each other vertically in the available space for the timeline. The default value is
noOverlap. In a vertical orientation, this attribute does not apply to the horizontal display of timeline items.You can use an attribute value of
randomto specify that timeline items will randomly lay out the items vertically in the available space for the timeline. -
Summary: Enter a summary of the timeline's purpose and structure for screen reader support.
-
TimeZone: Enter the time zone to use for the timeline. If not set, the value is identified from the
AdfFacesContext.
-
-
Expand the Behavior section, and optionally enter values for the following attributes:
-
ItemSelection: Use the dropdown list to specify whether or not timeline items in the timeline are selectable. Valid values are
single(default),multiple, ornone. This setting applies to both timeline series in a dual timeline. -
SortData: Use to set whether timeline events are sorted automatically by the timeline based on the time of the event, or manually sorted by the data model to which it is bound. Valid values are
auto(default) ornone. -
FetchStartTime and FetchEndTime: Use these attributes to specify the start and end dates to use for delivering content from the data source.
-
-
To set the time axis for the timeline, do the following:
-
In the Structure window, right-click the
timelinenode and select Insert inside dvt:timeline > Time Axis. -
In the Insert Time Axis dialog, enter the scale to use for the time axis of the timeline. Valid values are
twoyears,years,quarters,twomonths,months,twoweeks,weeks,days,sixhours,threehours,hours,halfhours, andquarterhours.
-
-
To add a timeline overview to the timeline, do the following:
-
In the Structure window, right-click the
timelinenode and select Insert inside dvt:timeline > Timeline Overview. -
In the Structure window, right-click the
timelineOverviewnode and select Insert inside dvt:timelineOverview > Time Axis. -
In the Insert Time Axis dialog, enter the scale to use for the overview time axis display of the timeline. Valid values are
twoyears,years,quarters,twomonths,months,twoweeks,weeks,days,sixhours,threehours,hours,halfhours, andquarterhours.
-
28.2.4 What Happens When You Add a Timeline to a Page
JDeveloper generates only a single tag when you drag and drop a timeline from the Component Palette onto a JSF page without setting any additional attributes in the Property Inspector. Example 28-2 shows the generated code.
Example 28-2 Timeline Sample Code in UI-First Development
<dvt:timeline
  startTime="2012-06-27" endTime="2012-06-27" id="t1"/>
If you choose to use the Data Controls panel to bind the data to a data control when creating the timeline, JDeveloper generates code based on the data model. For more information, see the "Creating Databound Timelines" section in the Oracle Fusion Middleware Fusion Developer's Guide for Oracle Application Development Framework.
28.3 Adding Data to Timeline Components
Timeline components require a collection data model to display attributes. For example, to create the Employee Presentation timeline illustrated in Figure 28-7, you must provide a data model that includes a qualifying date value and details about the events.
28.3.1 How to Add Data to a Timeline
To add data to the timeline using UI-first development, create the classes, managed beans, and methods that will create the model and reference the classes, beans, or methods in JDeveloper.
It may be helpful to have an understanding of how timeline attributes and timeline child tags can affect functionality. For more information, see Section 28.2.2, "Configuring Timelines."
You may also find it helpful to understand functionality that can be added using other ADF Faces features. For more information, see Section 28.1.3, "Additional Functionality for Timeline Components."
Add a timeline to your page. For help with adding a timeline to a page, see Section 28.2.3, "How to Add a Timeline to a Page." Confirm that the start time and end time for the timeline is consistent with the data model you are using.
Create the classes and managed beans that will define the timeline's data model and supply the data to the timeline. For additional information and examples, see Section 28.2.1, "Timeline Component Data Requirements." If you need help creating classes, see the Cue Cards > Build Hello World > Create a Java Class topic in the JDeveloper Online Help. For help with managed beans, see Section 2.6, "Creating and Using Managed Beans."
To add data to the timeline in UI-first development:
-
In the Structure window, right-click the
timelinenode and choose Insert inside dvt:timeline > Timeline Series. -
Right-click the
timelineSeriesnode and choose Go to Properties. -
In the Property Inspector, expand the Common section, and set the following attributes:
-
Value: Specify an EL expression for the model to which you want the timeline to be bound. This must be an instance of
org.apache.myfaces.trinidad.model.CollectionModel.Note:
You may use other model instances, such as
java.util.List, array, andjavax.faces.model.DataModel. The timeline component will automatically convert the instance into aCollectionModel.For example, reference the managed bean you created to instantiate the timeline. In the employee presentation example, the timeline managed bean is named
cb, and the data is instantiated when the timeline is referenced. To use the employee presentation data example with a timeline, enter the following in the Value field for the EL expression:#{cb.Model}.For help with creating EL expressions, see Section 2.5.1, "How to Create an EL Expression."
-
Var: Enter the name of a variable to be used during the rendering phase to reference each element in the timeline collection. This variable is removed or reverted back to its initial value once rendering is complete.
For example, enter
evtin the Var field to reference each element in the employees presentation data example. -
VarStatus: Optionally, enter the name of a variable during the rendering phase to access contextual information about the state of the component, such as the collection model or loop counter information. This variable is removed or reverted back to its initial value once rendering is complete.
-
-
In the Structure window, right-click the
timelineSeriesnode and choose Insert Inside Timeline Series > Timeline Item to add a component to display the timeline series data through stamping. -
In the Property Inspector for the
dvt:timelineItem, expand the Common section and enter the following values-
Value: Enter an EL Expression that references the date-related value you wish to display as an item on the timeline. For example, in a collection of date-related employee presentations, you could display presentation date as a timeline item.
For example, to reference the employee presentations data source, enter
#{evt.date}. -
Group: Optionally, you can configure timeline items that share a common date to display as a group that can be expanded or collapsed at runtime. By default, a number counter displaying the number of items in a group is provided in the collapsed view.
-
-
To configure the timeline item to display the data collection attributes in the timeline item, do the following:
-
Use the Structure window context menu to insert components to define the layout of the timeline item.
-
Use the Property Inspector to specify the content and display attributes for the timeline item. For the
valueattribute use an EL Expression that references the row in the data collection.For example, the code highlighted in Example 28-3 shows the component structure and attribute definitions for the timeline item stamped in the employee presentations timeline in Figure 28-7.
-
-
To configure the marker representing the timeline item that displays in the timeline overview, do the following:
-
In the Structure window, right-click the
overviewItem facetand select Insert inside f:facet-overviewItem > Marker. -
In the Property Inspector, set values to specify shape, size, and fill color as desired.
Note:
You can specify the layout and contents of a timeline item in a number of ways. For more information, see Section 28.4.1, "Configuring Timeline Items."
Example 28-3 Code Sample for Timeline Bound to Data
<dvt:timeline id="tl1" startTime="2010-01-01" endTime="2011-12-31" inlineStyle="width:1000px;height:500px" itemSelection="single"> <dvt:timelineSeries id="ts1" var="evt" value="#{cb.model}"> <dvt:timelineItem id="ti1" value="#{evt.date}"> <af:panelGroupLayout id="pg1" layout="horizontal"> <af:image id="img1" inlineStyle="width:30px;height:30px" source="/resources/images/timeline/employment.png"/> <af:spacer width="3"/> <af:panelGroupLayout id="pg2" layout="vertical"> <af:outputText id="ot1" inlineStyle="color:#084B8A" value="#{evt.description}" noWrap="true"/> <af:outputText id="ot2" value="#{evt.date}" inlineStyle="color:#6e6e6e" noWrap="true"> <af:convertDateTime dateStyle="medium"/> </af:outputText> </af:panelGroupLayout> </af:panelGroupLayout> </dvt:timelineItem> </dvt:timelineSeries> <dvt:timeAxis id="ta1" scale="weeks"/> <dvt:timelineOverview id="ov1"> <dvt:timeAxis id="ta2" scale="years"/> </dvt:timelineOverview> <f:ajax event="keyUp" execute="@this" listener="#{cb.handleKey}"/> </dvt:timeline> -
28.3.2 What You May Need to Know About Configuring Data for a Dual Timeline
You can add up to one additional timeline series to configure a dual timeline to compare two series of events. The procedure for adding and configuring another timelineSeries component is the same.
28.3.3 What You May Need to Know About Adding Data to Timelines
The examples in this chapter use classes and managed beans to provide the data to the timeline. If your application uses the Fusion technology stack, then you can use data controls to create a timeline and the binding will be done for you. For more information, see the "Creating Databound Timelines" section in the Oracle Fusion Middleware Fusion Developer's Guide for Oracle Application Development Framework.
Alternatively, if you know the UI components on your page will eventually use ADF data binding, but you need to develop the pages before the data controls are ready, then you should consider using placeholder data controls, rather than manually binding the components. Using placeholder data controls will provide the same declarative development experience as using developed data controls. For more information, see the "Designing a Page Using Placeholder Data Controls" section of the Oracle Fusion Middleware Fusion Developer's Guide for Oracle Application Development Framework.
28.4 Customizing Timeline Display Elements
You can configure timeline items and add a custom time scale to your timeline.
28.4.1 Configuring Timeline Items
Timeline items represent the events displayed in the timeline. The timelineItem component supports the following ADF components to display information and provide actions associated with the event:
-
Layout components including:
af:panelFormLayout,af:panelGroupLayout,af:separator,af:showDetailItem, andaf:spacer. For more information about using these components, see Chapter 8, "Organizing Content on Web Pages." -
Menu component
af:menu. For more information about these components, see Chapter 14, "Using Menus, Toolbars, and Toolboxes." -
Output components including:
af:outputFormattedandaf:outputText. For more information about these components, see Chapter 16, "Using Output Components." -
Message component
af:outputLabelMessage. For more information about this component, see Chapter 17, "Displaying Tips, Messages, and Help." -
Navigation components including:
af:commandButtonandaf:commandLink. For more information about these components, see Chapter 18, "Working with Navigation Components." -
Image component
af:image. For information about how to use theaf:imagecomponent, see Section 16.4, "Displaying Images." -
af:showPopupBehavior:For information about how to use theaf:showPopupBehaviorcomponent, see Section 13.4, "Invoking Popup Elements."
Timeline items are represented in the timeline overview as a configurable shape. You can specify the following attributes for a timeline item marker:
-
fillColor: The color of the marker shape. Valid values are RGB hexadecimal colors. -
opacity: The opacity of the fill color of the marker. Valid values range from0percent for transparent, to100percent for opaque. -
shape: The shape of the overview marker for each selected timeline series value. Valid values are one of seven prebuilt shapescircle(default),diamond,human,plus,square,triangleDown, andtriangleUp. This attribute is not supported for timelines with a vertical orientation. -
scaleXandscaleY: ThescaleX(horizontal) andscaleY(vertical) scale factor. Valid value is a numerical percentage. JDeveloper will automatically resize a marker to fit within the timeline overview area if the marker is too large. These attributes are not supported for timelines with a vertical orientation.
28.4.2 How to Add a Custom Time Scale to a Timeline
You can create a custom time scale for the timeline and overview axes. The custom time scale is configured in the scale attribute of the dvt:timeAxis.
It may be helpful to have an understanding of how timeline attributes and timeline child components can affect functionality. For more information, see Section 28.2.2, "Configuring Timelines."
You may also find it helpful to understand functionality that can be added using other ADF Faces features. For more information, see Section 28.1.3, "Additional Functionality for Timeline Components."
You should already have a timeline on your page. If you do not, follow the instructions in this chapter to create a timeline. For information, see Section 28.2.3, "How to Add a Timeline to a Page."
To create and use a custom time axis:
-
Implement the
CustomTimescale.javainterface to call the methodgetNextDate(Date currentDate)in a loop to build the time axis. Example 28-4 show sample code for the interface. -
In the Structure window, right-click a
timelinenode and choose Go to Properties. -
Expand the Advanced category of the Property Inspector, for the CustomTimeScales attribute, register the implementation of the interface for the custom time axis.
The
customTimeScalesattribute's value is ajava.util.Mapobject. The specified map object contains pairs of key/values. The key is the time scale name (fiveyears), and the value is the implementation of theCustomTimeScale.javainterface. For example:customTimesScales="#{timeline.customTimescales}" -
To use the custom time scale in the time axis or overview time axis, in the Structure window, right-click the
dvt:timeAxisnode and in the Property Inspector, enter the custom time scale name.Example 28-5 shows sample code for setting a
threeyearstime axis and afiveyearsoverview time axis.
28.5 Adding Interactive Features to Timelines
You can add interactive features to timelines, including support for popups, custom context menus, and drag and drop operations.
28.5.1 How to Add Popups to Timeline Items
The timelineItem components can be configured to display popup dialogs, windows, and menus that provide information or request input from end users. Using the af:popup component with other ADF Faces components, you can configure functionality to allow your end users to show and hide information in secondary windows, input additional data, or invoke functionality such as a context menu.
With ADF Faces components, JavaScript is not needed to show or hide popups. The af:showPopupBehavior tag provides a declarative solution, so that you do not have to write JavaScript to open a popup component or register a script with the popup component. For more information about these components, see Chapter 13, "Using Popup Dialogs, Menus, and Windows."
28.5.2 How to Configure Timeline Context Menus
Define timeline context menus using these context menu facets:
-
bodyContextMenu: Specifies a context menu that is displayed on non-selectable elements in the timeline component. -
contextMenu: Specifies a context menu that is displayed on any selectable element in the timeline component.
Each facet on a JSP or JSPX page supports a single child component. For these facets to work, selection must be enabled in the timeline's properties. Context menus are currently only supported in Flash.
You create a context menu by using af:menu components within an af:popup component. You can then invoke the context menu popup from another component, based on a specified trigger. For more information about configuring context menus, see Chapter 13, "Using Popup Dialogs, Menus, and Windows."
28.5.3 How to Add Drag and Drop to a Timeline
You can configure timelines as a drop target or drag source between collection components on a page. For example, you can drag an item from one collection (for example, a row from a table), and drop it into a timeline, or drag an event from a timeline and drop it into a table, as illustrated in Figure 28-6.
To add drop support to a timeline, add the af:dropTarget tag to the timeline component and include the data flavors that the timeline will support. Add a dropListener method to a timeline managed bean that will respond to the drop event.
To add drag support from a timeline to a collection component, add the af:dragSource tag to the timeline component and add the af:collectionDropTarget tag to the component receiving the drag. The component receiving the drag must include the org.apache.myfaces.trinidad.model.RowKeySet data flavor as a child of the af:collectionDropTarget and also define a dropListener method to respond to the drop event.
Example 28-6 shows the JSF page sample code for the ADF Faces demo application illustrated in Figure 28-6. For additional information about the af:table component, see Chapter 10, "Using Tables, Trees, and Other Collection-Based Components."
Example 28-6 Sample Code for Timeline Drop Target and Drag Source
<dvt:timeline id="tl1" startTime="2010-01-01" endTime="2011-12-31"
    inlineStyle="width:800px;height:400px" itemSelection="single">
  <f:attribute name="horizontalFetchSizeOverride" value="3000"/>
  <dvt:timelineSeries id="ts1" var="evt" value="#{dnd.timelineModel}">
    <dvt:timelineItem id="ti1" value="#{evt.date}" group="#{evt.group}">
      <af:panelGroupLayout id="pg1" layout="horizontal">
        <af:image id="img1" inlineStyle="width:30px;height:30px"
            source="/resources/images/timeline/employment.png"/>
        <af:spacer width="3"/>
        <af:panelGroupLayout id="pg2" layout="vertical">
          <af:outputText id="ot1" inlineStyle="color:#084B8A"
              value="#{evt.description}" noWrap="true"/>
          <af:outputText id="ot2" value="#{evt.date}"
              inlineStyle="color:#6e6e6e" noWrap="true">
          <af:convertDateTime dateStyle="medium"/>
          </af:outputText>
        </af:panelGroupLayout>
      </af:panelGroupLayout>
    </dvt:timelineItem>
  <af:dragSource actions="COPY" discriminant="model"/>
  <af:dropTarget actions="COPY" dropListener="#{dnd.handleDropOnTimeline}">
    <af:dataFlavor flavorClass="org.apache.myfaces.trinidad.model.RowKeySet"
        discriminant="model2"/>
  </af:dropTarget>
  </dvt:timelineSeries>
  <dvt:timeAxis id="ta1" scale="weeks"/>
  <dvt:timelineOverview id="ov1">
    <dvt:timeAxis id="ta2" scale="years"/>
  </dvt:timelineOverview
</dvt:timeline>
<af:table var="row" value="#{dnd.tableModel}" rowSelection="single"
    inlineStyle="width:370px;height:400px">
  <af:column headerText="ID" width="20">
    <af:outputText value="#{row.id}"/>
  </af:column>
  <af:column headerText="Event" width="340">
    <af:outputText value="#{row.description}"/>
  </af:column>
  <af:dragSource actions="COPY" discriminant="model2"/>
  <af:collectionDropTarget actions="COPY" modelName="model"
      dropListener="#{dnd.handleDropOnTable}"/>
</af:table>
The data model for this example is defined in the TimelineDnDBean managed bean using an ArrayList class. You can find the source code for the class and the supporting EmpEvent class in the ADF Faces demo application. For more information about the demo application, see Section 1.4, "ADF Faces Demonstration Application."
It may be helpful to have an understanding of how timeline attributes and child tags can affect functionality. For more information, see Section 28.2.2, "Configuring Timelines."
You may also find it helpful to understand functionality that can be added using other ADF Faces features. For more information, see Section 28.1.3, "Additional Functionality for Timeline Components."
You will need to complete these tasks:
-
Add a timeline to your page. For more information, see Section 28.2.3, "How to Add a Timeline to a Page"
-
If you are configuring timeline items as a drag source and you did not bind the timeline to a data control when you added the component to the page, add data to the timeline. For information about adding data to timelines using UI-first development, see Section 28.3.1, "How to Add Data to a Timeline."
-
Create any additional components needed to support the drag and drop.
For example, if you are using a table as the drag source or drop target, you will need to add a table to your page.
To add drag and drop support to a timeline:
-
In the Structure window, right-click the
timelinecomponent, and select Insert Inside Timeline > Drop Target. -
In the Insert Drop Target dialog, enter the name of the drop listener or use the dropdown menu to choose Edit to add a drop listener method to the timeline's managed bean. Alternatively, use the dropdown menu to choose Expression Builder and enter an EL Expression for the drop listener.
For example, to add a method named
handleDropOnTimeline()on a managed bean nameddnd, choose Edit, select dnd from the dropdown menu, and click New on the right of the Method field to create thehandleDropOnTimeline()method.Example 28-7 shows the sample drop listener and supporting methods for the timeline displayed in Figure 28-6.
Example 28-7 Sample Drop Listener for a Timeline
// imports needed by methods import java.text.DateFormat; import java.text.ParseException; import java.text.SimpleDateFormat; import java.util.ArrayList; import java.util.Date; import javax.faces.bean.ManagedBean; import javax.faces.bean.SessionScoped; import javax.faces.bean.RequestScoped; import oracle.adf.view.rich.datatransfer.DataFlavor; import oracle.adf.view.rich.datatransfer.Transferable; import oracle.adf.view.rich.dnd.DnDAction; import oracle.adf.view.rich.event.DropEvent; import org.apache.myfaces.trinidad.context.RequestContext; import org.apache.myfaces.trinidad.model.CollectionModel; import org.apache.myfaces.trinidad.model.ModelUtils; import org.apache.myfaces.trinidad.model.RowKeySet; // drop listener public DnDAction handleDropOnTimeline(DropEvent event) { Date _date = (Date)event.getDropSite(); Transferable _transferable = event.getTransferable(); RowKeySet _rowKeySet = _transferable.getData(DataFlavor.ROW_KEY_SET_FLAVOR); Object _rowKey = _rowKeySet.iterator().next(); EmpEvent _event = (EmpEvent)m_tableModel.getRowData(_rowKey); _event.setDate(_date); orderInsert(_event); RequestContext.getCurrentInstance().addPartialTarget (event.getDragComponent()); return DnDAction.COPY; } private void orderInsert(EmpEvent event) { int _index = -1; ArrayList _list = (ArrayList)m_timelineModel.getWrappedData(); for (int i=0; i<_list.size(); i++) { EmpEvent _current = (EmpEvent)_list.get(i); if (event.getDate().before(_current.getDate())) { _index = i; break; } } if (_index == -1) _list.add(event); else _list.add(_index, event); ArrayList _list2 = (ArrayList)m_tableModel.getWrappedData(); _list2.remove(event); } -
Click OK, and in the Insert Data Flavor dialog, enter
org.apache.myfaces.trinidad.model.RowKeySet. -
In the Structure window, right-click the
af:dropTargetcomponent and choose Go to Properties to set the following attributes in the Property Inspector:-
Actions: Enter a list of the operations that the drop target will accept, separated by spaces. Allowable values are:
COPY,MOVE, orLINK. If you do not specify a value, the drop target will useCOPY. -
Discriminant: Specify the model name shared by the drop target and drag source for compatibility purposes. The value of this attribute must match the value of the of the
discriminantattribute of theaf:dragSourcecomponent you will set for the collection component receiving the drags from the timeline in Step 5.
-
-
To configure another collection component as the drag source for drops into the timeline, do the following:
-
In the Component Palette, from the Operations panel, drag and drop a Drag Source tag as a child to the component that will be the source of the drag.
For example, drag and drop a Drag Source tag as a child to an
af:tablecomponent. -
In the Property Inspector, for the component's Actions field, enter a list of the operations that the drop target will accept, separated by spaces.
-
For the component's Discriminant field, specify the model name shared by the drop target and drag source for compatibility purposes.
-
-
To configure the timeline as a drag source, in the Component Palette, from the Operations panel, drag and drop a Drag Source tag as a child to the timeline.
-
In the Structure window, right-click the
af:dragSourcecomponent and choose Go to Properties to set the following attributes in the Property Inspector:-
Actions: Enter a list of the operations that the collection drop target component will accept, separated by spaces.
-
Discriminant: Specify the name of the model shared by the drag source and collection drop target for compatibility purposes. The value of this attribute must match the value of the of the
modelNameattribute of theaf:collectionDropTargetcomponent you will set for the collection component receiving the drags from the timeline in Step 8.
-
-
To make another collection component the drop target for drops from the timeline, do the following:
-
In the Component Palette, from the Operations panel, drag and drop a Collection Drop Target onto the component that will receive the drop.
For example, drag and drop a Collection Drop Target as a child to an
af:tablecomponent that displays the results of the drop. -
In the Insert Drop Target dialog, enter the name of the drop listener or use the dropdown menu to choose Edit to add a drop listener method to the appropriate managed bean.
Example 28-8 shows the sample drop listener for the timeline displayed in Figure 28-6. This example uses the same imports and helper methods used in Example 28-7, and they are not included here.
Example 28-8 Sample Drop Listener for a Table Using a Timeline as a Drag Source
//Drop Listener public DnDAction handleDropOnTable(DropEvent event) { Integer _dropSite = (Integer)event.getDropSite(); Transferable _transferable = event.getTransferable(); RowKeySet _rowKeySet = _transferable.getData(DataFlavor.ROW_KEY_SET_FLAVOR); Object _rowKey = _rowKeySet.iterator().next(); EmpEvent _event = (EmpEvent)m_timelineModel.getRowData(_rowKey); ArrayList _list = (ArrayList)m_tableModel.getWrappedData(); _list.add(_dropSite.intValue(), _event); ArrayList _list2 = (ArrayList)m_timelineModel.getWrappedData(); _list2.remove(_event); RequestContext.getCurrentInstance().addPartialTarget (event.getDragComponent()); return DnDAction.COPY; } private static Date parseDate(String date) { Date ret = null; try { ret = s_format.parse(date); } catch (ParseException e) { e.printStackTrace(); } return ret; } -
Click OK, and in the Insert Data Flavor dialog, enter
org.apache.myfaces.trinidad.model.RowKeySet. -
In the Structure window, right-click the
af:dropTargetcomponent and choose Go to Properties. -
In the Property Inspector, in the Actions field, enter a list of the operations that the drop target will accept, separated by spaces.
-
In the ModelName field, define the model for the collection.The value of the
modelNameattribute is a String object used to identify the drag source for compatibility purposes. The value of this attribute must match the value of thediscriminantattribute of theaf:dragSourcecomponent you set in Step 7.
-
For more detailed information about configuring drag and drop on ADF Faces or ADF Data Visualization components, see Chapter 34, "Adding Drag and Drop Functionality."
