D Oracle Secure Enterprise Search Configuration for Evaluation
This appendix describes how to configure Oracle Secure Enterprise Search (SES) with WebCenter Portal for evaluation purposes. This configuration is not advised for production environments.
This appendix includes the following topics:
-
Section D.2, "Configuring an Identity Management System in Oracle SES"
-
Section D.3, "Setting Up Oracle WebCenter Content Server for Oracle SES"
-
Section D.4, "Setting Up Oracle WebCenter Portal Discussion Server for Oracle SES"
-
Section D.5, "Setting Up Oracle SES to Search WebCenter Portal"
Tip:
Read and consider Chapter 18, "Managing Oracle Secure Enterprise Search in WebCenter Portal" to understand the detailed steps required before attempting this simplified configuration.
Permissions:
The content of this chapter is intended for WebCenter Portal system administrators. To perform the tasks in this chapter, you must be granted:
-
WebLogic Server Admin role through the Oracle WebLogic Server Administration Console.
-
WebCenter Portal Administrator role through Portal Builder Administration.
-
Portal Framework application Administrator role through the application's Administration Console.
For more information about roles and permissions, see Section 1.8, "Understanding Administrative Operations, Roles, and Tools."
D.1 Understanding the Configuration Script
WebCenter Portal provides a script (ConfigureSES.py) that can help configure Oracle SES for evaluation purposes.
Notes:
-
This evaluation set-up is for use with environments that are not enabled with SSL and SSO.
-
The script is supported on Oracle SES 11.1.2.2 and above. Section D.5.5, "Configuring Oracle SES Facets and Sorting Attributes" is applicable only to Oracle SES 11.2.2.2.
The script performs the following tasks:
-
Creates connection to Oracle SES in WebCenter Portal
-
Creates Federation Trusted Entity on Oracle SES
-
Creates crawl user with crawl role in WebCenter Portal
-
Creates Content Server source in Oracle SES
-
Creates Discussions source and Announcements source in Oracle SES
-
Creates WebCenter source in Oracle SES
The following tasks must be configured before the script is run:
D.2 Configuring an Identity Management System in Oracle SES
This section describes initial configuration in Oracle SES required for searching WebCenter Portal.
-
Log on to Oracle SES with the Oracle SES admin user name and the password specified during installation.
-
Open a browser and enter the URL provided after the Oracle SES installation. (This has the form
http://host:port/search/admin/index.jsp.) -
For Oracle SES 11.2.2.2, the default admin user name is
searchsys; however, a different name may be specified during installation. -
For Oracle SES 11.1.2.2, the admin user name is
eqsys.
-
-
Oracle SES must be configured with an identity management system to validate and authenticate users. This is necessary for secure searches, so searches return only results that the user is allowed to view based on access privileges.
Because WebCenter Portal uses identity propagation when communicating with Oracle SES, WebCenter Portal's user base must match that in Oracle SES. One way this can happen is by configuring WebCenter Portal and Oracle SES to the same identity management system, such as Oracle Internet Directory.
Note:
For information on all supported identity management systems, see Section 30.2.3, "Default Identity and Policy Stores."
Only one identity plug-in can be set up for each Oracle SES instance. All repositories (Oracle WebCenter Content Server, Oracle WebCenter Portal Discussions Server, and Oracle WebCenter Portal) must share the same user base as Oracle SES.
Oracle SES includes numerous identity plug-ins for identity management systems including Oracle Internet Directory, Oracle WebCenter Content Server, and Microsoft Active Directory. For information, see the Oracle SES documentation included with the product. (This is listed in the WebCenter Portal product area on the Oracle Fusion Middleware documentation library.)
The following example sets up the identity plug-in for Oracle Internet Directory:
-
In the Oracle SES administration tool, navigate to the Global Settings - Identity Management Setup page, select Oracle Internet Directory from the available identity plug-ins, and click Activate.
-
Provide the following values:
Host name: The host name of the computer where Oracle Internet Directory is running
Port: The Oracle Internet Directory port number
Use SSL:
trueorfalseRealm: The Oracle Internet Directory realm, for example,
dc=us,dc=oracle,dc=comUser name: The Oracle Internet Directory admin user name; for example,
cn=orcladminPassword: Admin user password
-
Click Submit.
-
-
Each Oracle SES instance must have a trusted entity for allowing WebCenter Portal end users to be securely propagated at search time. (A trusted entity allows the application to authenticate itself to Oracle SES and assert its users when making queries on Oracle SES.) This trusted entity can be any user that either exists on the identity management server behind Oracle SES or is created internally in Oracle SES.
You can create the trusted entity either with the
ConfigureSES.pyscript, in WLST, or in Oracle SES.To have the
ConfigureSES.pyscript create the trusted entity, setConfiguresSES.propertieswith following values:do.config.entity=true proxy.entity.name=<Federation Trusted Entity name> prosy.entity.password=<Federation Trusted Entity password>
To create the trusted entity with WLST, use the
createFederationTrustedEntitycommand. For example:createFederationTrustedEntity(appName='webcenter', sesUrl='http://mySEShost.com:7777/search/api/admin/AdminService', sesPassword='mySESAdminPassword'
entityName='myTrustedEntityUser', entityPassword='myTrustedEntityUserPassword', desc='Trusted entity for WebCenter Portal', sesSchema='eqsys')For command syntax and examples, see the "createFederationTrustedEntity" section in Oracle Fusion Middleware WebLogic Scripting Tool Command Reference.
To create the trusted entity in Oracle SES, follow these steps.
-
In the Oracle SES administration tool, navigate to the Global Settings - Federation Trusted Entities page.
-
Enter a name for a trusted entity. This is the name that WebCenter Portal uses to authenticate itself to Oracle SES at search time (before it propagates the end user identity to Oracle SES).
To allow the entity to be authenticated through the active identity plug-in:
- Make sure that the entity name is the name of a user that exists in the identity management system.
- Leave the password field blank.
- Select the Use Identity Plug-in for authentication check box.
- Enter the authentication attribute value corresponding to the Authentication Attribute in your active identity plug-in.
To allow the entity to be authenticated through Oracle SES:
- Enter any user name (for example,
wcsearch) and password (for example,MyPassword1).- Do not select the Use Identity Plug-in for authentication check box.
For more information, see the online help for the Federation Trusted Entities page in Oracle SES.
Note:
This trusted entity name and password is required later as the
appUserandappPasswordproperties in the WLST commandcreateSESConnection. -
Note:
For reference, the following sample user names are used in this chapter:
-
wcsearch: User of the Oracle SES Federation Trusted Entity -
mycrawladmin: Crawl admin user in WebCenter Portal and in the identity management system to crawl certain objects, such as lists, page metadata, portals, and profiles -
sescrawer(or admin user): Crawl admin user in Oracle WebCenter Content Server withsescrawlerrole(oradmin) role
D.3 Setting Up Oracle WebCenter Content Server for Oracle SES
This section describes how to configure Oracle WebCenter Content Server to be crawlable by Oracle SES (in particular, the Content Server that WebCenter Portal uses for storing documents).
The following steps must be done from within the Content Server.
See Also:
Content Server online help for information on administering roles and users in Content Server
-
Create a crawl user.
If you want users with the
adminrole to crawl, then use an admin user account as the crawl user.If you want non-admin users to crawl, then follow these steps:
-
Create the role
sescrawlerrole. -
Create the user
sescrawler, and assign it thesescrawlerrolerole. This user creates the Content Server source in Oracle SES. -
Add
sceCrawlerRole=sescrawlerroletoconfig.cfg(located inMW_HOME/user_projects/domains/yourdomain/ucm/cs/config).Alternatively, you can append the
sceCrawlerRole=sescrawlerroleline in the WebCenter Content Server user interface (Administration - General Configuration - Additional Configuration Variables).
-
-
Restart the Content Server.
-
In the Content Server console, install the SESCrawlerExport component on the content server, if not done:
-
Log on to the Content Server as a system administrator. For example:
http://host:port/cs. -
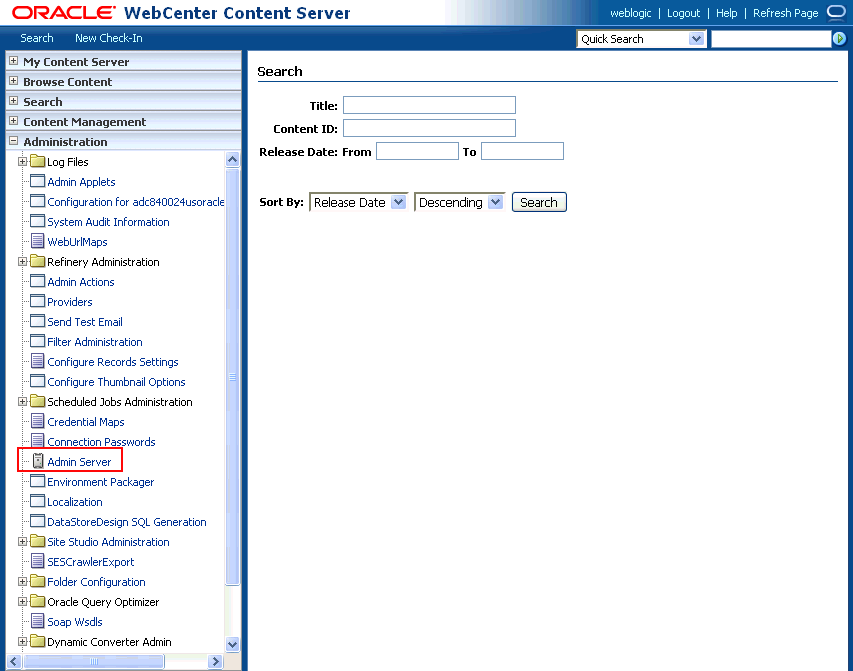
From the Administration dropdown menu, select Admin Server (Figure D-1).
-
Click the button with the instance name.
-
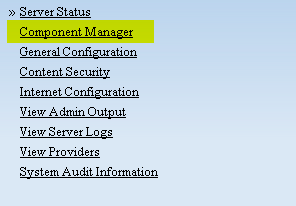
Click Component Manager from the menu list on the left pane (Figure D-2).
Figure D-2 Content Server Component Manager
Description of "Figure D-2 Content Server Component Manager"
-
Select SESCrawlerExport under Integration and click Update.
-
Enter configuration parameters. (You can change configuration parameters after installation.)
Disable security on authentication and authorization APIs provided by the SESCrawlerExport; that is, set Disable Secure APIs to
false. This lets security provided by the SESCrawlerExport be done internally instead of by the content server.Additionally, in clustered environments only, the feedLoc parameter must specify a location on the shared disk accessed by the nodes of the Content Server, and they each must reference it the same way; for example,
sharedDrive/dir1/dir2. Note that this is not the default location (relative path) provided. -
Restart the Content Server.
-
-
Take a snapshot of the Content Server repository.
-
Log on to the Content Server as a system administrator. For example:
http://host:port/cs. -
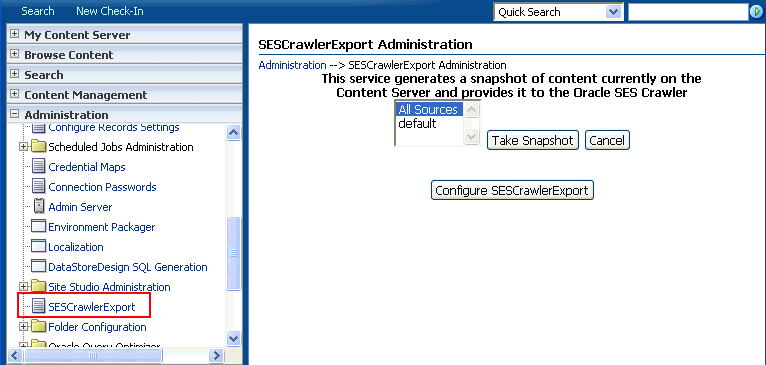
From the Administration dropdown menu, select SESCrawlerExport.
-
Select All sources, and click Take Snapshot (Figure D-3).
It is important to take a snapshot before the first crawl or any subsequent full crawl of the source.
The snapshot generates
configFile.xmlat the location specified during component installation, and feeds are created at the subdirectory with the source name under feedLoc.
-
-
If the Content Server is configured for web rendition, then items in the Content Server are rendered in PDF format. The content item's native MIME type rendition is overwritten. For example, the MIME type of a Microsoft Office Word document is 'application/msword', but when the Content Server uses web rendition the MIME type becomes 'application/pdf'. A search query with the
Mimetypeparameter set to 'application/msword' does not return Word documents.If your Content Server is configured to use web rendition, then you must configure the Content Server metatdata list to include the
dFormatvalue, so that required MIME types are exported to Oracle SES. This is necessary to be able to narrow searches by MIME type.-
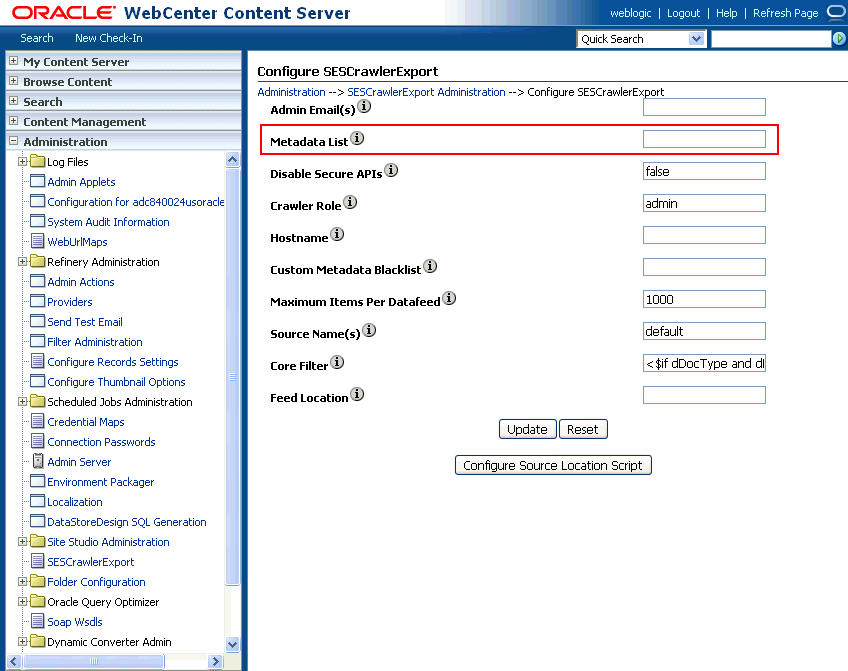
Back on the SESCrawlerExport Administration page, click Configure SESCrawlerExport (Figure D-4).
-
By default, the Metadata List field is blank (Figure D-5). Optionally, add to this field any custom metadata values you require (beginning with
x). For example, the following entry for Metadata List includes custom attributes:xCollectionID, xWCTags, xRegionDefinition
-
If you are using a version of Content Server earlier than 11.1.1.8, then you must add the
dFormatvalue to this Metadata List field. When the blank default value is changed, the default values are removed, and they must be added back. (Content Server 11.1.1.8.0 includes most values required for search, includingdFormat.)Therefore, if you are using a version of Content Server earlier than 11.1.1.8, you must manually enter the default value for Metadata List as follows (plus any custom metadata fields beginning with 'x'):
dFormat,dID,dDocName,dRevLabel,dDocType,dDocAccount,dSecurityGroup,
dOriginalName,dReleaseDate,dOutDate,dDocCreator,dDocLastModifier,dDocCreate
dDate,dDocFunction
-
-
Configure Thumbnail Options for faceted search.
Note:
Oracle SES 11.2.2.2 supports document thumbnails, while earlier releases of Oracle SES do not.
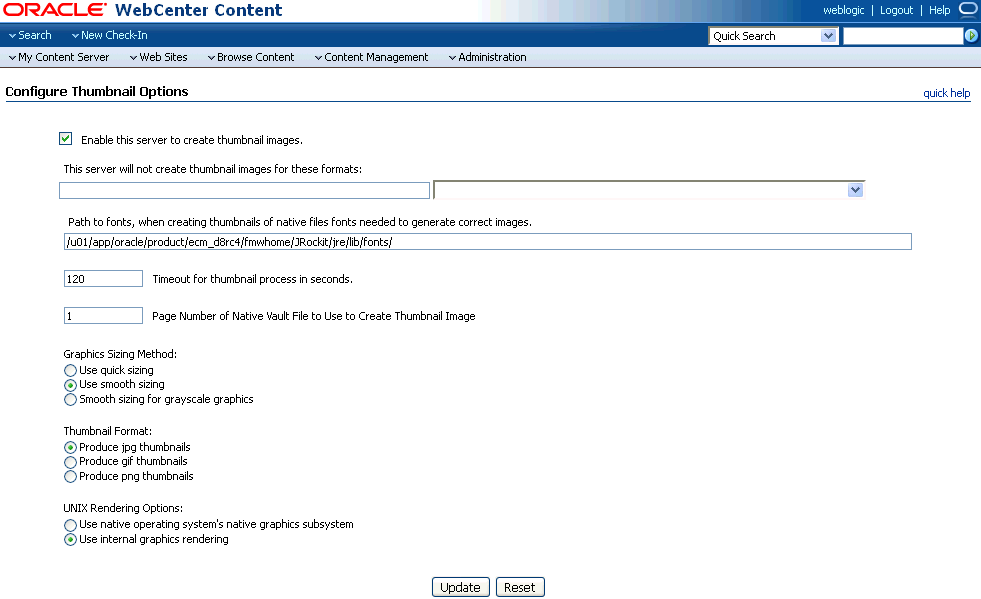
On the Administration tab, select Configure Thumbnail Options to enable document thumbnails in search results. Leave the default settings as is, and click Update (Figure D-6).
See Also:
Deployment Guide.pdf included with the product
D.4 Setting Up Oracle WebCenter Portal Discussion Server for Oracle SES
This section describes how to configure Oracle WebCenter Portal's Discussion Server to be crawlable by Oracle SES (in particular, the discussions server that WebCenter Portal uses for storing discussions and announcements).
Note:
These steps are not required if you have a new installation of WebCenter Portal (with an Oracle database) and Oracle WebCenter Portal's Discussion Server. It is only required if you are using upgraded (patched) instances.
You can find database schema details for the corresponding data sources from your Oracle WebLogic Server console.
-
Run the Repository Creation Utility (RCU) to confirm that the discussions crawler WebCenter Portal component has been installed on the system.
-
Oracle and Microsoft SQL Server databases:
Verify that the Oracle WebCenter Portal's Discussion Server back end has been configured properly by noting that the
MyPrefix_DISCUSSIONSuser is installed in RCU.Then verify that the discussions crawler has been configured properly by noting that the
MyPrefix_DISCUSSIONS_CRAWLERuser is installed in RCU. -
IBM DB2 databases:
Verify that the Oracle WebCenter Portal's Discussion Server back end has been configured properly by noting that the
MyPrefix_DSuser is installed in RCU.Then verify that the discussions crawler has been configured properly by noting that the
MyPrefix_DCuser is installed in RCU.Note:
For IBM DB2 databases,
MyPrefixis limited to five characters. IBM DB2 uses operating system users for authentication (that is, the database user is actually an operating system user). Because some operating systems have an eight character limit for user names, this requires an eight character user name.
If the discussions crawler component is not installed, then you must install it using RCU, selecting the same prefix that was used for the Oracle WebCenter Portal's Discussion Server component. Also, during the tablespace specification step in RCU, select
Prefix_IAS_DISCUSSIONSas the default tablespace. This installs the user for Oracle SES.For more information, see Chapter 42, "Deploying Portal Framework Applications."
-
-
For instances upgraded from WebCenter 11.1.1.1.0 only, run the following tool to upgrade the data in the Oracle WebCenter Portal's Discussion Server database schema, if you have not run the tool yet:
Note:
This step is necessary only if the instance is upgraded from WebCenter 11.1.1.1.0. For instances installed after WebCenter 11.1.1.1.0, this is not required.
java -jar \
MW_HOME/discussionserver/discussionserver-upgradeforses.jar \
<command_line_parameters>
where
command_line_parametersare the following MDS schema details and discussions database schema details:-mds_jdbc_user user_id \ -mds_jdbc_password password \ -mds_jdbc_url url \ -discussions_jdbc_user user_id \ -discussions_jdbc_password password \ -discussions_jdbc_url url
where
mds_jdbc_user,mds_jdbc_password, andmds_jdbc_urlare the values to log in to the MDS schema, anddiscussions_jdbc_user,discussions_jdbc_password, anddiscussions_jdbc_urlare the values to log in to the discussions database schema.For example:
java -jar MW_HOME/as11r1wc/discussionserver/discussionserver-upgradeforses.jar\
-mds_jdbc_user foo \
-mds_jdbc_password MyPassword1 \
-mds_jdbc_url jdbc:oracle:thin:@host:port:SID \
-discussions_jdbc_user foo \
-discussions_jdbc_password MyPassword1 \
-discussions_jdbc_url jdbc:oracle:thin:@host:port:SID
D.5 Setting Up Oracle SES to Search WebCenter Portal
The steps in this section must be performed in the Oracle SES administration tool.
The following steps are required:
-
Section D.5.1, "Logging on to the Oracle SES Administration Tool"
-
Section D.5.3, "Setting Up Oracle SES to Search Discussions and Announcements"
-
Section D.5.4, "Excluding Components from the Spaces Crawler"
-
Section D.5.5, "Configuring Oracle SES Facets and Sorting Attributes"
See Also:
Confirm that you have installed all required patches for Oracle SES. For the latest information on required patches, see the "Back-End Requirements for Search" section in Oracle Fusion Middleware Installation Guide for Oracle WebCenter Portal and the Release Notes.
For detailed information about Oracle SES configuration, see the Oracle SES documentation included with the product. (This is listed in the WebCenter Portal product area on the Oracle Fusion Middleware documentation library.)
D.5.1 Logging on to the Oracle SES Administration Tool
Open the Oracle SES administration tool:
-
Open a browser and enter the URL provided after the installation. (This has the form
http://host:port/search/admin/index.jsp.) -
Log on with the Oracle SES admin user name and the password specified during installation.
-
For Oracle SES 11.2.2.2, the default admin user name is
searchsys; however, a different name may be specified during installation. -
For Oracle SES 11.1.2.2, the admin user name is
eqsys.
-
D.5.2 Setting Up Oracle SES to Search Documents
To search WebCenter Portal documents using Oracle SES, you must first set up a Document Service Manager (with a Document Service Instance and a Document Service Pipeline).
-
Configure the Document Service Manager (one time for each Oracle SES instance).
Note:
Document services are plug-ins involved in the processing of a document when it is being crawled. A document service allows WebCenter Portal to add indexable attributes for documents used in a WebCenter Portal (or Portal Framework) application.
Search attribute names must be unique; two attributes cannot have the same name. For example, if an attribute exists with a String data type, and another attribute is discovered by the crawler with the same name but a different data type, then the crawler ignores the second attribute. Before creating new attributes, make sure to check the list of Oracle SES attribute names and types in the Oracle SES documentation.
-
On the Global Settings - Document Services page, click Create. Select Create New Manager, click Next, and enter the following parameters:
Manager Class Name:
oracle.webcenter.search.crawl.ucm.ses.WcUcmDsManagerManager Jar File Name:
search-crawl-ucm.jarNote:
The
webcenter_search_ses_plugins.zipfile installsORACLE_HOME/search/lib/plugins/doc/search-crawl-ucm.jar.Click Next, and then click Finish (Figure D-7).
Figure D-7 Creating a Document Service Manager in Oracle SES

Description of "Figure D-7 Creating a Document Service Manager in Oracle SES"
-
Create the Document Service Instance.
Again, on the Global Settings - Document Services page, click Create. This time, select Select From Available Managers with Secure Enterprise Search WebCenter UCM Plugin, and click Next (Figure D-8).
Enter the following parameters:
Instance Name: Enter any name here to be used while creating the document pipeline.
WebCenter Application Name: The unique name being used to identify this application in the back-end Content Server.
Connection Name: The name of the primary Content Server connection that WebCenter Portal (or your Portal Framework application) is using to store documents.
WebCenter URL Prefix: The host and port where the application is deployed; for example:
http://myhost:8888.Note:
Use Fusion Middleware Control or the
listDocumentsSpacesPropertiescommand to determine the application name and connection name, as described in Section 18.5.1, "Setting Up WebCenter Portal for Oracle SES." -
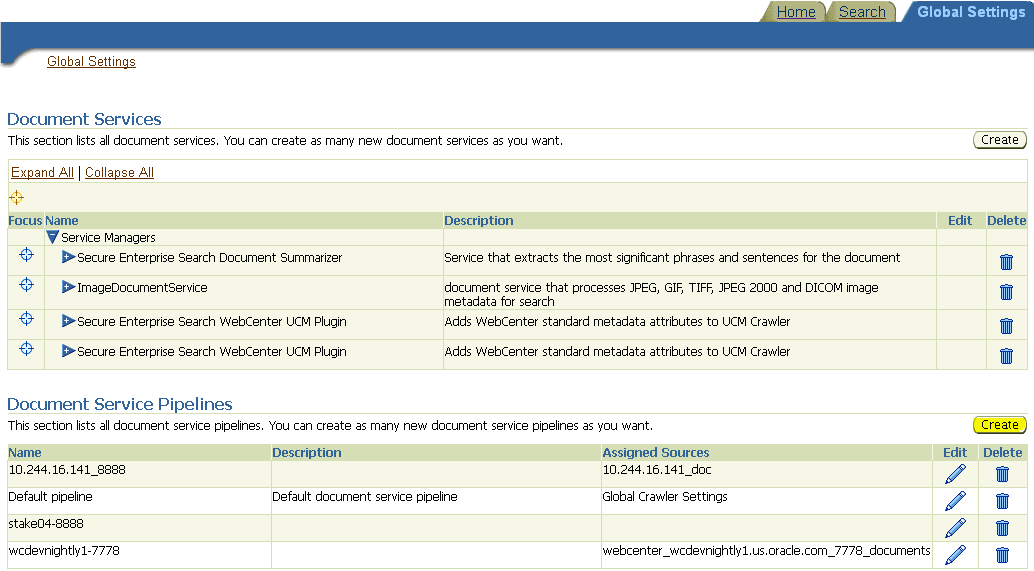
Create the Document Service Pipeline. This invokes the document service instance.
Again, on the Global Settings - Document Services page, under the Document Services Pipelines section, click Create (Figure D-9).
Figure D-9 Creating the Document Service Pipeline
Description of "Figure D-9 Creating the Document Service Pipeline"
-
On the Create Document Service Pipeline page, enter any name for this pipeline. The document service instance you created in the previous step should be listed under Available Services. Select that document service instance, and use the arrow button to move it under Used in pipeline.
Note:
This pipeline created will be consumed by the
ConfigureSES.pyscript to create the document crawler. You will be required to specify this pipeline name for ucm.pipeline field in Section D.6, "Running the Configuration Script."
-
D.5.3 Setting Up Oracle SES to Search Discussions and Announcements
To search WebCenter Portal discussions and announcements using Oracle SES, you must first set up several Oracle SES Database sources: three for discussions and one for announcements. The three discussions sources are for forums, topics in forums, and replies in forums. These separate sources enable users to see search results for forums without also seeing results for all the messages and replies in it.
For example, the discussions sources could have the following:
-
source name
GS_Forumsand View ofFORUMCRAWLER_VW -
source name of
GS_Topicsand View ofTHREADCRAWLER_VW -
source name of
GS_Repliesand View ofMESSAGECRAWLER_VW
The announcements source could have the source name GS_Announcements and a View of ANNOUNCEMENTS_VW.
Note:
There are slightly different steps for Oracle, Microsoft SQL Server, and IBM DB2 databases.
-
Configure the JDBC driver:
-
To crawl a Microsoft SQL Server or IBM DB2 database, download the appropriate JDBC driver jar files into the
ORACLE_HOME/search/lib/plugins/oracleapplicationsdirectory in Oracle SES.Note:
-
For Microsoft SQL Server: Copy the Microsoft JDBC driver files
sqljdbc.jarandsqljdbc4.jar. -
DB2: Copy the IBM driver files
db2jcc.jaranddb2jcc_license_cu.jar(obtainable from the IBM DB2 UDB client).
If the JDBC drivers for JRE 1.5 and JRE 1.6 are different, (for example:
sqljdbc.jarworks for JRE 1.5 andsqljdbc4.jarworks for JRE 1.6), then perform the following:- Download both the driver jars into the
ORACLE_HOME/search/lib/plugins/oracleapplicationsdirectory in Oracle SES.- Add an entry for the JRE 1.6 version (
sqljdbc4.jarfor SQLServer) of the driver jar to theCLASSPATHelement ofORACLE_HOME/search/config/searchctl.conf.- Restart the middle tier.
-
-
Update the
drivers.propertiesfile with the following information:DatabaseName:DriverClassName. -
Add the JRE 1.5 JDBC driver jar file name to the classpath in
META-INF/MANIFEST.MFofappsjdbc.jarandDBCrawler.jar.For example, change:
Class-Path: sqljdbc.jar rsscrawler.jar ../../pluginmessages.jar
to
Class-Path: db2jcc.jar sqljdbc.jar rsscrawler.jar ../../pluginmessages.jar
and change:
Class-Path: appsjdbc.jar
to
Class-Path: db2jcc.jar appsjdbc.jar
For a
keyattribute that is not namedKEY, change the JDBC driver information in thedrivers.propertiesfile to specify the key attribute name:database_name: driver_class_name, key_attribute_nameFor example, for a key attribute named
ID:oracle : oracle.jdbc.driver.OracleDriver, ID
In the crawling query, use
key_attribute_nameas the alias for the key value column name. In this example,IDis the alias forKEYVAL:SELECT keyval id, content, url, lastmodifieddate, lang FROM sales_only
Oracle and SQL Server databases: The following default drivers are used if none is specified in
drivers.properties:-
Oracle:
oracle.jdbc.driver.OracleDriver -
SQL Server:
com.microsoft.sqlserver.jdbc.SQLServerDriver
-
-
Required for IBM DB2 databases only:
-
Make sure that no crawlers are running that use the database crawler source. In the Oracle SES administration tool, check the crawler progress and status on the Home - Schedules page. (Click Refresh Status.)
-
Remake the
appsjdbc.jarfile and theDBCrawler.jarfile. Ensure that theMETA-INF/MANIFEST.MFwas updated correctly; otherwise, the crawler fails with the following error in the crawler log file:EQP-80406: Loading JDBC driver failed
-
Modify the
Oracle_Home/search/lib/plugins/oracleapplications/drivers.propertiesfile to include the following line:db2: com.ibm.db2.jcc.DB2Driver
-
Include the driver jar (
db2jcc.jar) to theCLASSPATHelement ofORACLE_HOME/search/config/searchctl.conf. For example:#CLASS PATH CLASSPATH=ORACLE_HOME/search/webapp/config:ORACLE_HOME/search/webapp/ SESAuthenticator.jar:ORACLE_HOME/search/lib/plugins/commons-plugins- stubs.jar :ORACLE_HOME/search/lib/plugins/oracleapplications/db2jcc.jar
-
Edit
JVM_OPTIONSin theORACLE_HOME/search/config/searchctl.conffile to add the system property"-Doracle.home=ORACLE_HOME/search". For example:JVM_OPTIONS= -Djava.awt.headless=true -Dweblogic.RootDirectory=ORACLE_HOME/search/base_domain -Doracle.home=ORACLE_HOME/search
-
Copy the
ORACLE_HOME/search/lib/plugins/oracleapplications/pluginmessages.jarfile to theORACLE_HOME/search/libdirectory. -
Create the database source. Make sure to enter the correct authorization query and confirm that the attribute name used in Grant Security Attributes matches the one used in the authorization query; otherwise, users do not get any results when searching for documents.
-
D.5.4 Excluding Components from the Spaces Crawler
The spaces crawler collects data for searching the following components:
-
oracle.webcenter.peopleconnections.profile(people) -
oracle.webcenter.community(portals) -
oracle.webcenter.page(page metadata) -
oracle.webcenter.list(lists)
Use the URL parameter ?excludedServiceIds to disable search for any of these components. That is, in the Oracle SES administration tool, on the Home - Sources page for the Oracle WebCenter source, the ?excludedServiceIds in the Configuration URL parameter should equal to the comma-delimited list of service IDs to exclude.
Example D-1 Disable Crawling of People Connections Profiles
http://host:port/rsscrawl?excludedServiceIds=oracle.webcenter.peopleconnections.profile
D.5.5 Configuring Oracle SES Facets and Sorting Attributes
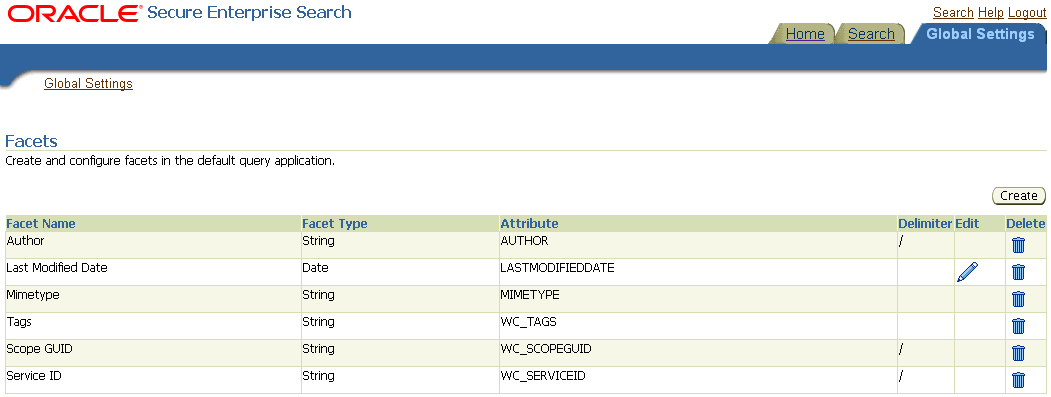
Facets are Oracle SES objects that let users refine searches by navigating indexed data without running a new search. You must first define facets (using the provided files) in Oracle SES. Facets defined in Oracle SES are picked up in WebCenter Portal though the Tools and Services - Search administration page.
Reminder:
Oracle SES 11.2.2.2 supports faceted search with WebCenter Portal, but earlier releases of Oracle SES search do not. This section is applicable only to Oracle SES 11.2.2.2.
WebCenter Portal provides the following input files to the Oracle SES Admin API command line interface:
-
facet.xml: This configures facets in Oracle SES. -
searchAttrSortable.xml: This defines attributes for absolute sort.
Locate these files in oracle.webcenter.framework/ses/webcenter_portal_ses_admin.zip. Unzip this file, and follow the instructions in the readme.txt file.
Running these two files from Oracle SES creates the following facets:
-
Author -
Last Modified Date -
Mimetype -
Tags -
Scope GUID(This appears as the Portal facet. This value is converted to the portal display name in the search results page.) -
Service ID(This facet does not appear in the user interface. All enabled tools and services display in the search results page.)
Notes:
The facet.xml and searchAttrSortable.xml scripts are mandatory. Creating facets in Oracle SES alone is not sufficient for search in WebCenter Portal.
Additionally, the Scope GUID and the Service ID facets are mandatory. Facet names are case-sensitive. You must have these exact facet names.
After you run these files, you view facets in the Oracle SES administration tool on the Global Settings - Facets page (Figure D-10).
To create a new facet, on the Global Settings - Facets page, click Create. Enter a name for the facet and the search attribute from which the facet value should be generated. For String facet types, you must also enter the path delimiter. This is a single character used for demarcation for displaying the facet tree hierarchy for the selected facet tree node on the query page, for example, "tools/power tool/drills", where "/" is the path delimiter. You can set it to blank if the facet tree is one-level deep; that is, its nodes do not have child nodes.
Click Create and Customize to create a facet and configure its nodes in the Edit Facet screen. You can configure facet nodes for a facet of Date type or Number type. For example, for the Last Modified Date facet, you can create nodes like Last Year, Last Month, Today, Between two specific days, and so on.
The Node Configuration tab displays a facet hierarchy in tree format as well as in XML format, where you can add, edit, and delete child nodes for the selected facet node. After editing the facet nodes, click Apply to save the changes.
Note:
Do not modify or delete the Scope GUID or Service ID facets.
Changes you make in Oracle SES are picked up in WebCenter Portal when the application specialist goes to the Tools and Services - Search administration page. WebCenter Portal does not detect changes to facets until this Search administration page is opened. WebCenter Portal remembers the facets selected for use by each portal.
D.5.6 Additional Oracle SES Configuration
Optionally, you can configure the security filter lifespan. This refreshes the authorization policies for users in the system. It is best to have a short lifespan when user policies change frequently. (This appendix uses Oracle Internet Directory identity plug-in as the example.)
For example, in the Oracle SES administration tool, on the Global Settings - Query Configuration page under Secure Search Configuration, enter 0 for Security Filter Lifespan (minutes).
Valid values for the security filter lifespan are between 0 minutes (no cache) and 526500 minutes (cache for one year).
Note:
The ConfigureSES.py runs the setSESVersion WLST command, so that command is not required as part of this chapter's configuration.
D.6 Running the Configuration Script
Oracle provides the ConfigureSES.py Python script to simplify the remaining Oracle SES configuration. This automated configuration includes the following:
-
Creates connection to Oracle SES in WebCenter Portal
-
Creates Federation Trusted Entity on Oracle SES
-
Creates crawl user with crawl role in WebCenter Portal
-
Creates Content Server source in Oracle SES
-
Creates Discussions source and Announcements source in Oracle SES
-
Creates WebCenter source in Oracle SES
The script and its properties file are in the WCP_ORACLE_HOME/webcenter/scripts/ses_11.2.2.2/ directory.
Follow these steps to run the script:
-
Set an environment variable to reference the directory. For example:
setenv SESDIR Oracle_WC1/webcenter/scripts/ses_11.1.2.2/
-
Update the
ConfigureSES.propertiesfile with appropriate values. Example D-4 shows sample values for a WebCenter Portal application.Example D-4 WebCenter Portal Application
# Required update:
#   Actions can be selected or deselected. See properties with 'do' prefix.
#   All 'do*' properties have 'false' value.
#   Change value to 'true' after meeting prerequisite by filling properties with
 no values.
#   For properties with values, check that they are valid in your environment.
#
# Preset values:
#   Documents crawler and Jive database crawler sections contain values of common
 repository used by WebCenter development team.

# ----------------------------------

# Prerequisite - wls instance must be started
admin.user=weblogic
admin.url=app_server.example.com:7005
admin.server=app_server.example.com
admin.password=welcome1
webcenter.host=app_server.example.com
webcenter.port=8892

# Prerequisite - SES instance must be started
ses.host=ses_server.example.com
ses.port=5720
ses.schema=searchsys
ses.admin.password=welcome1

# Prerequisite - Entity name must not exist
do.config.entity=true
proxy.entity.name=webcenterproxy
proxy.entity.password=welcome1

# Prerequisite - webcenter-wls instance must be started
do.config.spaces.crawl.user=true
do.config.connection=true
do.spaces.crawl=true
spaces.crawl.password=welcome1
spaces.crawl.authuseridformat=nickname

# Prerequisite - UCM instance must be started
do.document.crawl=true
ucm.host=ucm_server.example.com
ucm.port=9400
ucm.source=default
ucm.admin.user=weblogic
ucm.admin.password=welcome1
ucm.crawl.authuseridformat=nickname

# Prerequisite - Documents Instance and Documents Pipeline on SES must be created
ucm.pipeline=stake04-8888

# Prerequisite - Jive database must be started
do.discussions.crawl=false
discussions.host=discussions_server.example.com
discussions.port=8890
discussions.db.connstring=jdbc:oracle:thin:@wcdb.example.com:1521/wcdb
discussions.db.admin.user=WC_DISCUSSIONS_CRAWLER
discussions.db.admin.password=welcome1
discussions.crawl.authuseridformat=nickname
-
Set the default directory to the directory of
wlst.shscript. For example:cd Oracle_WC1/oracle/as11gr1wc/common/bin/
-
Run the
ConfigureSES.pyscript withConfigureSES.properties. For example:./wlst.sh $SESDIR/ConfigureSES.py $SESDIR/ConfigureSES.properties
-
Upon successful completion of the script, you must restart the managed server on which the application is deployed (by default, WC_Spaces). For more information, see the "Starting and Stopping Managed Servers Using WLST" section in Oracle Fusion Middleware Administrator's Guide.
