6 Creating WebCenter Portal Framework Applications
This chapter explains how to create a new WebCenter Portal Framework application and discusses the organization and contents of a Portal Framework application workspace in JDeveloper.
This chapter includes the following topics:
-
Understanding the WebCenter Portal Framework Application Template
-
How Is Framework Application Security Configured by Default?
6.1 Creating a New WebCenter Portal Framework Application
This section explains how to use the Create WebCenter Portal Framework Application wizard to create a new portal.
-
Access the application creation wizard. JDeveloper provides several ways for you to access this wizard. For example:
-
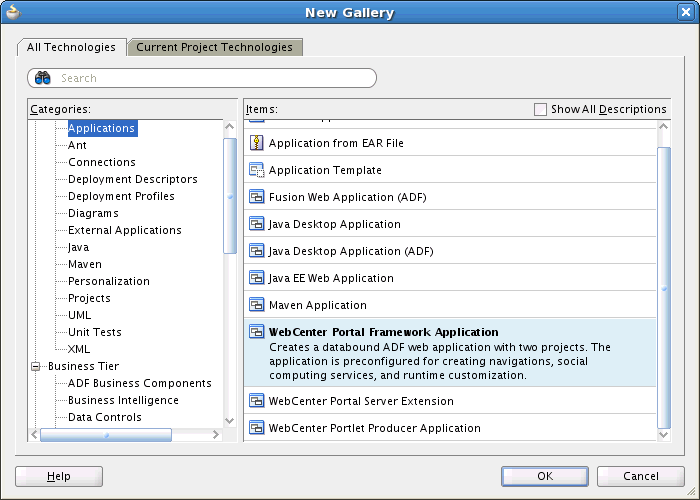
From the File menu, choose New. In the New Gallery dialog, expand Applications, select WebCenter Portal Framework Application, and click OK. For example, see Figure 6-1.
Note:
When you select WebCenter Portal Framework Application, you are selecting an application template that populates the application with a pre-defined set of projects and files. For more information about this template, see Section 6.2, "Understanding the WebCenter Portal Framework Application Template." -
From the Application menu, select New. In the dialog select WebCenter Portal Framework Application.
-
If you have an existing application that is open, in the Application Navigator, right-click <Application-Name> and choose New. In the New Gallery dialog, expand Applications, select WebCenter Portal Framework Application, and click OK.
-
If you have an existing application that is open, in the Application Navigator, from the <Application-Name> drop down menu, select New Application. In the New Gallery dialog, expand Applications, select WebCenter Portal Framework Application, and click OK.
Note:
At this point, you are on the first page of the Create WebCenter Portal Framework Application wizard. The wizard includes five pages, which are explained in the following steps. -
-
Enter a name for the application in the Application Name field, as shown in Figure 6-2.
Figure 6-2 Create WebCenter Portal Framework Application Wizard Step 1 of 5
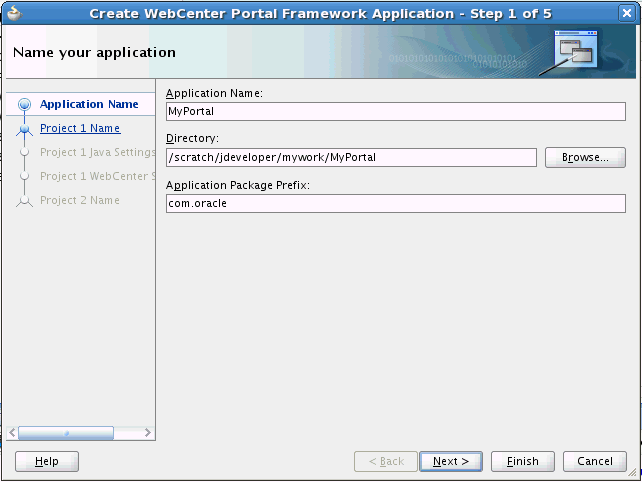
Description of "Figure 6-2 Create WebCenter Portal Framework Application Wizard Step 1 of 5"
-
In the Directory field, enter a path to the directory where you wish to store the application, or accept the default path.
For example:
C:\JDeveloper\mywork\Application1
Optionally, click the Browse button to navigate to the desired directory.
-
If required, in the Application Package Prefix field, enter a prefix to use for packages created within this application.
Note:
Depending on how you launched the wizard, you might see an Application Template list. If you do see this list, make sure WebCenter Portal Framework Application is selected.Tip:
At this point, you could click Finish to create a project with default Framework features, including page hierarchies and navigations. We'll continue and review the rest of the wizard pages. -
Click Next.
-
Enter a project name, as shown in Figure 6-3.
Figure 6-3 Create WebCenter Portal Framework Application Wizard Step 2 of 5
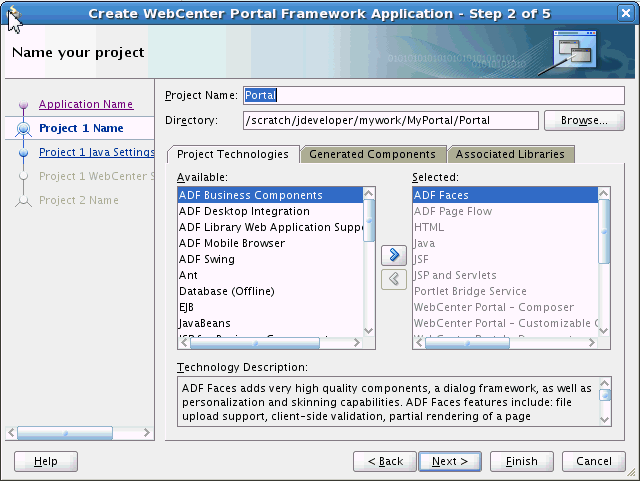
Description of "Figure 6-3 Create WebCenter Portal Framework Application Wizard Step 2 of 5"
-
Enter a directory in which to place the project, or use the Browse button to select a directory.
-
If you wish, select the Generated Components and Associated Libraries tabs to view additional configuration files and libraries that will be added to the project. For more information, see Section 6.6, "What Configuration Files Should I Know About?"
-
Click Next.
-
If you wish, enter a Default Package name and directories for the default Java source files and output class files, as shown in Figure 6-4.
Figure 6-4 Create WebCenter Portal Framework Application Wizard Step 3 of 5
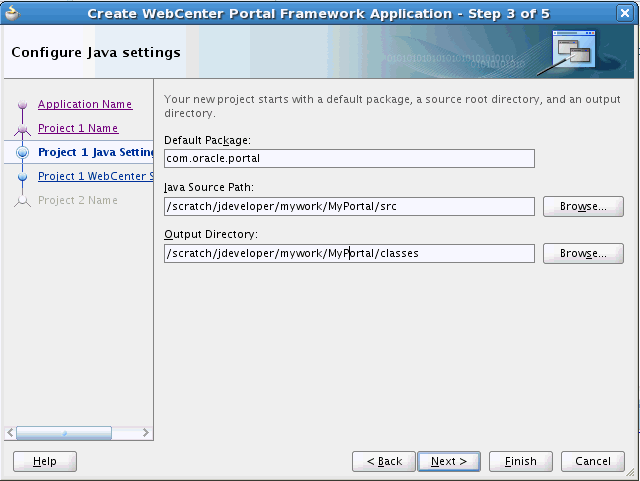
Description of "Figure 6-4 Create WebCenter Portal Framework Application Wizard Step 3 of 5"
-
In the next wizard page, two check boxes appear, as shown in Figure 6-5. Generally, the default settings are recommended; however, see the following note for more information on this wizard page.
Figure 6-5 Create WebCenter Portal Framework Wizard Step 4 of 5
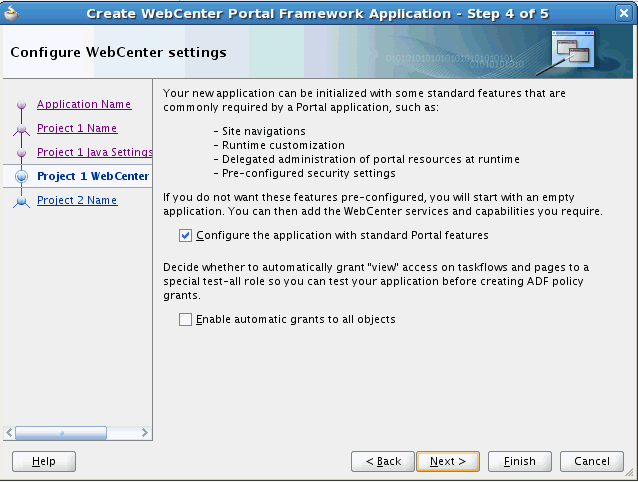
Description of "Figure 6-5 Create WebCenter Portal Framework Wizard Step 4 of 5"
Note:
If you want your application to include the features of Oracle WebCenter Portal Framework, like page hierarchies and navigations, leave the first box checked (Configure the application with standard Portal features). If you uncheck this box, the result is that you will create a traditional Oracle Fusion Web Application that does not contain Framework features.Oracle recommends that you leave the first checkbox selected, unless you know for sure that you do not want to use the Oracle WebCenter Portal Framework features.
The second checkbox, Enable automatic grants to all objects, allows you to create a special role called test-all with View access on all taskflows and pages. This option is primarily added to make testing the application easier. It is unchecked by default.
-
Click Next.
-
In the final wizard page you are given a chance to configure the static application resources project. By default, this project is called PortalWebAssets. The project includes static application resources like HTML and image files. By separating the static resources into a separate project, it is possible to deploy those resources to a dedicated server. See For more information, see Section 6.4, "Understanding the PortalWebAssets Project."
Figure 6-6 Create WebCenter Portal Framework Application Wizard Step 5 of 5
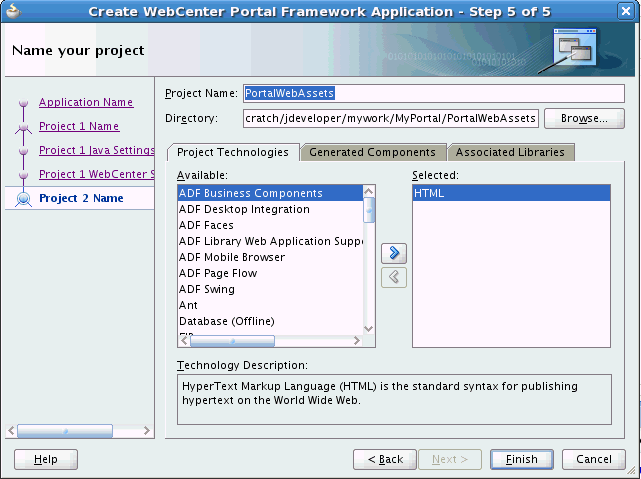
Description of "Figure 6-6 Create WebCenter Portal Framework Application Wizard Step 5 of 5"
-
Click Finish to create the WebCenter Portal Framework application.
6.2 Understanding the WebCenter Portal Framework Application Template
To readily find and use the appropriate components in your WebCenter Portal Framework application, you must ensure that the right technology scopes are set, tag libraries added, and required Java classes are added to the class path. Once you do this, relevant components are included in the Component Palette and relevant context menus become available in JDeveloper.
Fortunately, Oracle provides an out-of-the-box application template to ensure that scopes are set properly and the right tag and Java libraries are added to create WebCenter Portal Framework applications.
The WebCenter Portal Framework Application template populates the application with a portal project and a static application resources project. The portal project includes features like site navigation, page hierarchies, delegated administration, security, page templates, and runtime customization. A Framework application can consume portlets, incorporate content management services, and include WebCenter social computing services. The static application resources project includes static application resources like HTML and image files. By default, this project is called PortalWebAssets. By separating the static resources into a separate project, it is possible to deploy those resources to a dedicated server. See Section 6.1, "Creating a New WebCenter Portal Framework Application" and Section 6.4, "Understanding the PortalWebAssets Project."
Note:
In addition to populating the application with default files and folders, the template populates the Resource Palette with the WebCenter Portal – Framework Catalog and the WebCenter Portal – Services Catalog. The Services Catalog contains data controls and task flows that you can use to integrate WebCenter Portal tools and services in your application. The Framework Catalog contains a collection of components that are most commonly used for building portals. For more information see Chapter 14, "Developing Resource Catalogs."6.3 Building a Portal
After you have created a new Portal Framework workspace, you can begin setting up navigation, adding pages, developing the look and feel, adding content, and working with other features or "assets." For a general overview of portal features, see Chapter 5, "Understanding WebCenter Portal Framework Applications." For more information on adding features to a portal, see Chapter 9, "Introduction to Portal Resource Management."
6.4 Understanding the PortalWebAssets Project
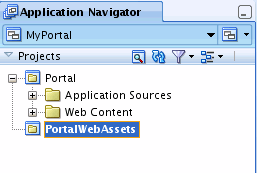
This section discusses the PortalWebAssets project. If you wish, you can place static resources like HTML files and images in this project. The PortalWebAssets project is created, by default, in new Portal Framework applications.
6.4.1 Introduction
Static resources for a web application, like HTML and image files, are typically bundled and deployed with the application. Requests for both dynamic and static resources are generally handled by the host application server. One way to optimize server performance is to separate the static resources from the application and deploy them on a different (possibly less expensive and more scalable) server. Portal Framework applications support this scenario with a static application resources project, which can include static resources like HTML and images. By default, this project is called PortalWebAssets, but you can rename the project if you wish. See Figure 6-7.
To use the static resources project, simply add content (like HTML or image files) to the project. You can do this directly from the file system, by adding files under the ../PortalWebAssets/public_html directory, or by adding in JDeveloper. For instance, to add an HTML file, select New from the File menu, and use the New Gallery wizard to create the resource.
Note:
CSS files used for skins must remain in the Portal Framework application project. Do not attempt to place skin CSS files in the static application resources project.6.4.2 Decoupling the Static Application Resources Project
By default, a portal project includes the static application resources project (PortalWebAssets) as a dependency. This means they are built together and deployed to the same server. If you do not wish to deploy static resources to another server, then you do not need to take any action with respect to the static resources project.
If you wish to decouple the PortalWebAssets project from the Portal project, do the following:
-
Right-click the Portal project and select Project Properties.
-
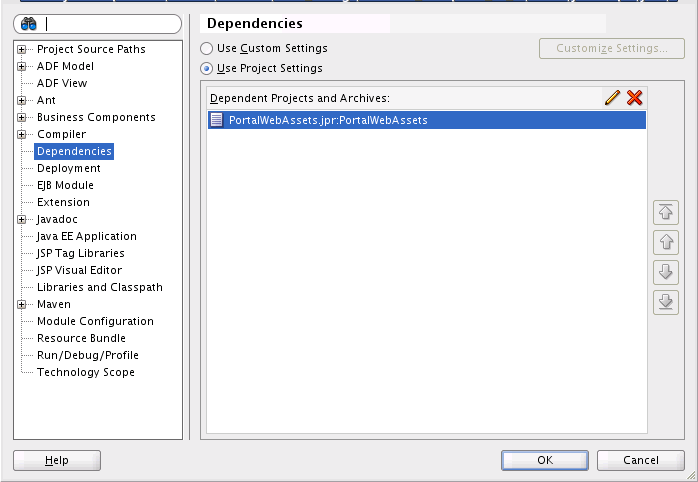
In the Project Properties dialog, select the Dependencies node, as shown in Figure 6-8.
-
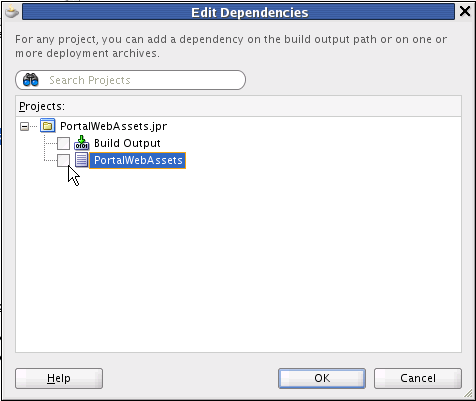
To remove the dependency, click the Delete button, or select the Edit button and deselect the project in the Edit Dependencies dialog, as shown in Figure 6-9.
-
Generate two distinct archives (
Portal.earandPortalWebAssets.jar), and deploy them to separate servers. See Section 6.4.3, "Deployment Options."
6.4.3 Deployment Options
The Portal.ear file is typically deployed to the application's managed server. The PortalWebAssets.jar file can be deployed to any J2EE compliant server container, usually by creating a WAR deployment profile in the PortalWebAssets project and including it in an EAR deployment profile. Another, simpler, option is to unzip the JAR file into an Apache web server. See also Chapter 7, "Deploying and Testing Your Portal Framework Application."
6.4.4 Using EL to Manage Static Resources
Developers can use EL expressions to dynamically generate the target URL for static resources. You have two options for using EL. With the first option, you need to define a base URL preference. The second allows you to map URLs dynamically.
6.4.4.1 Defining a Base URL Preference
This solution provides a single preference that uses a "base" URL to redirect resources to a desired server. With this option, EL expressions take a format that is illustrated by the following sample:
<af:image source="#{preferenceBean.baseResourceURL}/images/globe.png"/>
To configure this option, add a preference to the adf-config.xml file as follows:
<portal:preferences>
...
    <portal:preference id="oracle.webcenter.portalapp.baseresourceurl"
        desc="Default Base Resource URL EL"
        value=
       "#{request.scheme}://#{request.serverName}:#{request.serverPort}#{request.contextPath}"
       resourceType="BaseResourceURL" display="true"
    />
...
</portal:preferences>
The only limitation of this technique is that you can only map values to one server. There is only one preference value that can be returned. If you want to dynamically configure URLs, choose the technique described in the next section, Section 6.4.4.2, "Mapping URLs Dynamically."
6.4.4.2 Mapping URLs Dynamically
This solution lets you construct URLs dynamically through the ability to specify multiple namespaces. With this option, resources become a parameter to the preference, allowing the resources to be mapped to the correct namespace.
This solution supports two ADF component categories:
The first category includes static resources referenced by ADF Faces components. This type of call is illustrated by the following sample:
<af:image source="#{preferenceBean.staticResourceURL['/oracle/webcenter/portalapp/static/images/globe.png']}"/>
The second category includes static resources referenced through the inlineStyle of ADF Faces components. This type of call is illustrated by the following sample:
<af:panelBorderLayout id="pt_pgl1"
inlineStyle='background-image:url(#{preferenceBean.staticResourceURL["/oracle/webcenter/portalapp/static/images/globe.png"]});'>
The EL expression:
#{preferenceBean.staticResourceURL['<resource path>']}
performs a resource namespace lookup to derive the resource URL prefix. The input to the lookup is the path of the resource (for example: /oracle/webcenter/portalapp/static/images/globe.png). To establish the mappings between resource namespaces and URLs, edit the <portal:resource-mappings> section of the adf-config.xml file.
To configure this option, add a preference to the adf-config.xml file as follows:
<portal:adf-portal-config>
    <portal:preferences>
    ...
    </portal:preferences>
    <portal:resource-mappings>
        <portal:resource-mapping path="/"
 url-prefix="#{request.scheme}://#{request.serverName}:#{request.serverPort}#{request.contextPath}"
       />
    </portal:resource-mappings>
</portal:adf-portal-config>
The lookup yields the prefix of the resource URL. The final value of the resource URL is derived by concatenating the URL prefix with the path to the resource. For example,
/oracle/webcenter/portalapp/static/images/globe.png
yields:
http://myserver/static_resources/oracle/webcenter/portalapp/static/images/globe.png
At development time, the url-prefix lookup always resolves to the application's context URL, for example: http://<server>:<port>/<context root>.
Example 6-1 shows a sample mapping configuration in adf-config.xml:
Example 6-1 Sample Namespace Lookup Mapping
<portal:adf-portal-config>
    <portal:preferences>
    ...
    </portal:preferences>
    <portal:resource-mappings>
        <portal:resource-mapping path="/oracle/webcenter/portalapp/static"
            url-prefix="http://myserver/static_resources"/>
        <portal:resource-mapping path="/mycompany/static/images"
            url-prefix="http://myserver/static_resources"/>
        <portal:resource-mapping path="/mycompany/myapp/static/images"
            url-prefix="http://myserver/static_resources/myapp2"/>
    </portal:resource-mappings>
</portal:adf-portal-config>
6.5 How Is Framework Application Security Configured by Default?
By default, a WebCenter Portal Framework application is configured with ADF security.
Default login and logout pages are also provided with the WebCenter Portal Framework Application template.
For more information on ADF security, see Chapter 74, "Securing Your WebCenter Portal Framework Application." See also the Enabling ADF Security in a Fusion Web Application section in the Oracle Fusion Middleware Fusion Developer's Guide for Oracle Application Development Framework.
6.6 What Configuration Files Should I Know About?
A number of automatically generated configuration files are placed under the WEB-INF and Page Flows folders of a portal project when you create a Portal Framework application.
This section briefly describes these file:
-
Section 6.6.1, "The Framework Application Template Default web.xml File"
-
Section 6.6.2, "The Framework Application Template Default faces-config.xml File"
-
Section 6.6.3, "The Framework Application Template Default trinidad-config.xml File"
-
Section 6.6.4, "The Framework Application Template Default adfc-config.xml File"
6.6.1 The Framework Application Template Default web.xml File
Part of Portal Framework application configuration is determined by the content of its Java EE application deployment descriptor file: web.xml. The web.xml file defines many application settings that are required by the application server.
Note:
Rather than being specified inweb.xml, the context root path is assigned when the application is deployed.Typical runtime settings include initialization parameters, custom tag library location, and security settings. Depending on the technology you use, other settings may be added to web.xml as appropriate.
Note:
For standard Java EE files likeweb.xml, there is usually a counterpart Oracle-specific file with additional Oracle-specific options, for example, weblogic.xml.The web.xml file is located in the /public_html/WEB-INF directory relative to the project in your Portal Framework application.
When you first create your Portal Framework application, configuration settings for JSF servlet and mapping and for resource servlet and mapping are automatically added to the starter web.xml file.
The Faces Servlet entry inside <servlet></servlet> tags provides information about the JSF servlet, javax.faces.webapp.FacesServlet. This servlet manages the request processing life cycle for web applications that use JSF to construct the user interface. The configuration setting maps the JSF servlet to a symbolic name, Faces Servlet.
The resources entry inside <servlet></servlet> tags provides information about the ADF resource servlet used to serve up web application resources (images, style sheets, JavaScript libraries) by delegating to a ResourceLoader.
The <servlet-mapping></servlet-mapping> tags map the URL pattern to a servlet's symbolic name. You can use either a path prefix or an extension suffix pattern.
By default, JDeveloper uses the path prefix /faces/*. That is, when a URL, for example, http://localhost:8080/SRDemo/faces/index.jsp, is issued, the URL activates the JSF servlet, which strips off the faces prefix and loads the file /SRDemo/index.jsp.
Note:
If you prefer to use the extensionjsf for web pages instead of jsp or jspx, then you must set the javax.faces.DEFAULT_SUFFIX context parameter to jsf, for example:
<context-param>
  <param-name>javax.faces.DEFAULT_SUFFIX</param-name>
  <param-value>.jsf</param-value>
</context-param>
Then add a servlet mapping in web.xml that invokes the JSP servlet for files with the extension jsf.
To edit web.xml in Oracle JDeveloper, right-click web.xml in the Application Navigator and choose Open from the context menu. This opens web.xml in the Web Application Deployment Descriptor editor, in Overview mode. If you are familiar with configuration element names, then you can also use the XML editor to modify web.xml.
For information about the configuration elements you can use in the web.xml file, see the "Oracle ADF XML Files" section in the Oracle Fusion Middleware Fusion Developer's Guide for Oracle Application Development Framework.
6.6.2 The Framework Application Template Default faces-config.xml File
Use the faces-config.xml file to register a Portal Framework application's resources, such as custom validators and managed beans, and to define all page-to-page navigation rules. The default name of this file is faces-config.xml.
Depending on how resources are packaged, an application can have one or multiple faces-config.xml files. For example, you can create individual JSF configuration files for:
-
Different areas of your application
-
Each library containing custom components or renderers
For more information about creating multiple faces-config.xml files, see Oracle Fusion Middleware Fusion Developer's Guide for Oracle Application Development Framework.
Example 6-2 illustrates the default faces-config.xml file provided through the WebCenter Portal Framework Application template. This file is located in the /public_html/WEB-INF directory relative to the project in your Framework application.
Example 6-2 Default faces-config.xml File Provided Through the Framework Application Template
<?xml version="1.0" encoding="US-ASCII"?>
<faces-config version="1.2" xmlns="http://java.sun.com/xml/ns/javaee">
  <application>
    <default-render-kit-id>oracle.adf.rich</default-render-kit-id>
    <view-handler>oracle.webcenter.portalframework.sitestructure.handler.CustomViewHandler</view-handler>
  </application>
  <lifecycle>
    <phase-listener>oracle.webcenter.skin.view.SkinPhaseListener</phase-listener>
  </lifecycle>
  <managed-bean>
    <managed-bean-name>preferenceBean</managed-bean-name>
    <managed-bean-class>oracle.webcenter.portalframework.sitestructure.preference.PortalPreferences</managed-bean-class>
    <managed-bean-scope>application</managed-bean-scope>
  </managed-bean>
  <navigation-rule>
    <from-view-id>*</from-view-id>
    <navigation-case>
      <from-outcome>login_success</from-outcome>
      <to-view-id>/pages_home</to-view-id>
      <redirect/>
    </navigation-case>
    <navigation-case>
      <from-outcome>logout_success</from-outcome>
      <to-view-id>/pages_home</to-view-id>
      <redirect/>
    </navigation-case>
  </navigation-rule>
</faces-config>
To edit the faces-config.xml file, double-click it in the Application Navigator. By default, the file is opened in the Editor window in Diagram mode, as indicated by the active Diagram tab at the bottom of the Editor window. When creating or modifying JSF navigation rules, Diagram mode enables you to visually create and manage page flows. For more information, see Oracle Fusion Middleware Fusion Developer's Guide for Oracle Application Development Framework.
To create or modify configuration elements other than navigation rules, use the Editor's Overview mode. Enter this mode by clicking the Overview tab at the bottom of the Editor window.
JSF allows multiple <application> elements in a single faces-config.xml file. When you use the JSF Configuration Editor, you can edit only the first instance. For any other <application> elements, you must edit the file directly using the XML editor. To use the XML editor, open the faces-config.xml file and go to the Source tab in the Editor window.
For reference information about the configuration elements you can use in the faces-config.xml file, see the "ADF Faces Configuration" section in the Oracle Fusion Middleware Fusion Developer's Guide for Oracle Application Development Framework.
6.6.3 The Framework Application Template Default trinidad-config.xml File
The default trinidad-config.xml file, available when you create a Portal Framework application, contains information about the application skin family. Additionally, it can contain information about the level of page accessibility support, page animation, time zone, enhanced debugging output, and the URL for Oracle Help for the Web (OHW). Like faces-config.xml, the trinidad-config.xml file has a simple XML structure that enables you to define element properties using JSF Expression Language (EL) or static values.
Example 6-3 illustrates the default trinidad-config.xml file provided through the WebCenter Portal Framework Application template. This file is located in the /public_html/WEB-INF directory relative to the project in your Framework application.
Example 6-3 Default trinidad-config.xml File Provided Through the Framework Application Template
<?xml version="1.0" encoding="US-ASCII"?>
<trinidad-config xmlns="http://myfaces.apache.org/trinidad/config">

  <skin-family>#{preferenceBean.defaultTrinidadSkin}</skin-family>
  <skin-version>v1</skin-version>
</trinidad-config>
In addition to the skin family, you can define the following application values in the trinidad-config.xml file:
-
Page animation
-
Level of page accessibility support
-
Time zone
-
Enhanced debugging output
-
Oracle Help for the Web (OHW) URL
For reference information about the trinidad-config.xml file, see the "ADF Faces Configuration" section in the Oracle Fusion Middleware Web User Interface Developer's Guide for Oracle Application Development Framework.
6.6.4 The Framework Application Template Default adfc-config.xml File
The adfc-config.xml file is the configuration file for an ADF unbounded task flow. This file contains metadata about the activities and control flows contained in the unbounded task flow. The default name for this file is adfc-config.xml.
If ADF Page Flow is specified as a Selected Technology on the Technology Scope page of the Project Properties dialog, a new adfc-config.xml source file is automatically created within the project. The adfc-config.xml file is the main source file for an unbounded task flow.
The adfc-config.xml file is located in the /public_html/WEB-INF directory relative to the project in your Portal Framework application.
Note:
If you do not plan to use task flows in your Framework application, you can delete theadfc-config.xml file.For more information about task flows and the adfc-config.xml file, see the "Oracle ADF XML Files" section in the Oracle Fusion Middleware Fusion Developer's Guide for Oracle Application Development Framework.
6.7 Adding Excluded Files to the Application Navigator
By default, a few files are excluded from view in the Application Navigator. These files are excluded because it is unlikely you'll ever need to edit them. However, because there are potentially some advanced use cases where you might want to edit them, you need to be able to add them back to the JDeveloper UI.
To locate the excluded files:
-
Right-click the project folder and select Project Properties from the menu.
-
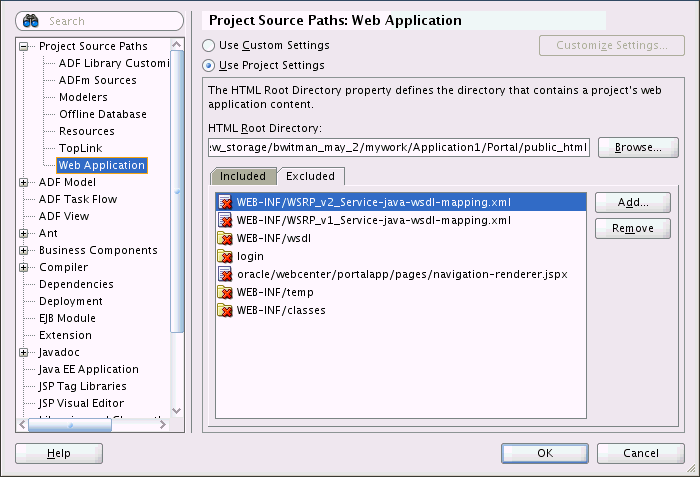
In the Project Properties dialog, select Web Application under the Project Source Paths node.
-
Select the Excluded tab, as shown in Figure 6-10.
-
Select an element from the excluded list and click Remove to remove it from the excluded list. As a result, the element is automatically included in the appropriate folder in the Application Navigator.
As an example, the navigation-renderer.jspx file is used to render resources in the context of a page template. If you wanted to change the way an external URL is displayed within a page, you would first remove the navigation-renderer.jspx file from the excluded list in order for it to appear under the pages folder in the Application Navigator. Then, you could open the page and edit it as desired.
6.8 Securing the Portal
You can define security for an entire portal, a collection of pages and sub-pages, or a single page. You can define security for individual custom components and actions provided by customizable components. In addition, for Oracle WebCenter Portal tools and services that connect to back-end servers using web services, you can provide secure identity propagation with WS-Security.
Because Oracle WebCenter Portal security is based on the JAAS and J2EE standards, enterprise roles defined in the existing identity management store can be leveraged directly when securing a Portal Framework application. You need not synchronize roles within the portal being built. It just references and uses the defined users and roles directly. Note also that you can use file-based security for the development phase of the portal and then easily switch over to enterprise identity management at deployment time.
Oracle WebCenter Portal also provides application roles that you can use to represent the policy of a portal. By associating permissions with an application role defined within the policy store, you can keep them self contained within the portal. On deployment, you can then associate users and enterprise roles with the application roles to grant those permissions to end users.
In some cases, it is desirable to leverage existing portals that have their own authentication mechanism, such as email. The email system is often on a different authentication system (with different user names and passwords) than the portal. The portal must map the email user to the portal user such that end users do not have to enter their user names and passwords each time they need information. Oracle WebCenter Portal Framework provides the means to securely manage these user names and passwords with the External Application functionality.
For more information about options for securing your Portal Framework application, see Chapter 74, "Securing Your WebCenter Portal Framework Application."