 Understanding Profit Manager Tools
This chapter provides an overview of the profit manager tools and discusses how to:
Set up Ledger Mapper.
Create error log reports for the performance ledger.
Create, edit, and approve journal entries manually.
Process and post journals.
Use balancing and reconciliation features.
Use ledger drill down.
Review error messages.
Correct profit manager fact table errors using PF Modification.
Correct OWE dimensions.
Understanding Profit Manager Tools
The profit manager is a set of integrated tools that enable true multidimensional profitability reporting. To obtain true and meaningful profitability reports, you need a central repository as well as reliable and consistent data, and you need to consolidate and enrich the data from your general ledger and other sources.
PeopleSoft EPM infrastructure is the underlying framework that provides reliable and consistent data and consolidates data sources such as your general ledger and the EPM Analytical Applications such as PeopleSoft Activity-Based Management, Scorecard, Funds Transfer Pricing, Risk-Weighted Capital, Global Consolidations, and Workforce Analytics, which are application engines that enrich and transform data.
The features that are described in this section are tightly integrated with the PeopleSoft analytical applications and provide you with ways to:
Move data from your PeopleSoft general ledger using the Ledger Mapper.
Verify the accuracy of your data before you post it to the performance ledger table using the PF Edit engine.
Track data movement to and from the performance ledger table (PF_LEDGER_F00) using ledger drill down.
Control batch processing using the PF Post and PF Unpost engines.
Keep the contents of the journal table (PF_JRNL_F00) clean using the PF Journal Cleanup engine.
Reconcile final table amounts using the balancing and reconciliation features.
After you set up and run a source engine or map ledger balances using the Ledger Mapper, the enriched data is moved to the performance journal table (PF_JRNL_F00). You can run the PF Journal Edit engine to check data integrity at any time. Use PF Journal Modification to revise errors. The PF Ledger Post process moves your data from the performance journal table to the performance ledger table (PF_LEDGER_F00) for reporting.
To check that data migration and enrichment is accurate:
Use the PF ledger drill down feature to track the source of general ledger data for a particular performance ledger after you populate the performance ledger table.
Use the Reconciliation utility to check balances between tables such as GL_LEDGER and PF_LEDGER.
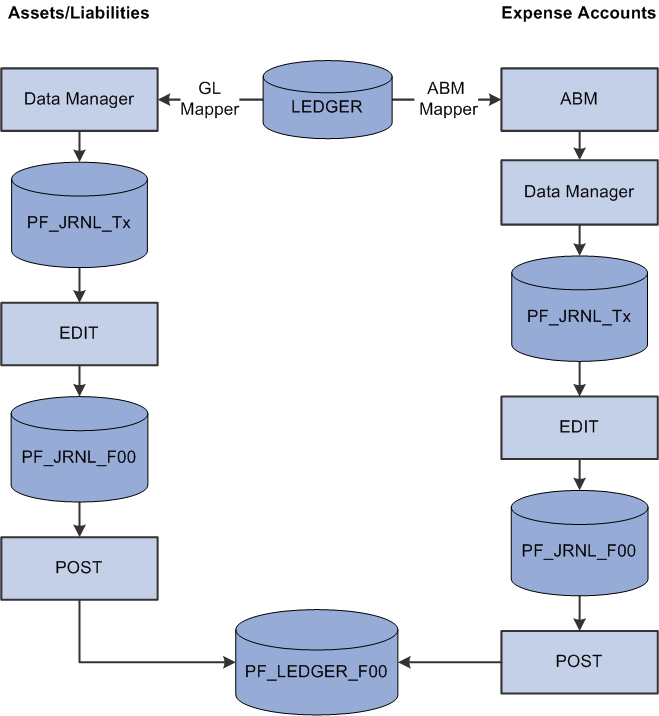
Profit Manager loading the performance ledger table
 Ledger Mapper
Use the Ledger Mapper to map data, such as assets and liabilities, that does not enter the system through one of the optional analytical applications. After you define the ledger mapping rules, you must set up Data Manager rules using the GL mapper method and then run the Data Manager or Allocation Manager engine to populate the performance journal table (PF_JRNL_F00).
For example, PeopleSoft uses the Ledger Mapper to map expense data from the general ledger to Activity-Based Management resources.
To map ledger amounts, you:
Load the GL_LEDGER table.
Use the general ledger mapper method in Data Manager to move the general ledger data into the GLSTG temporary table that you identify as the source table for further data movement.
Note. You might decide to move data directly into the performance journal table (PF_JRNL_F00) using the copy method. You can also create multidimensional data using the prorata or spread even methods.
Note. A number of steps in this process use the Data Manager or the Allocation Manager engine. You must define tablemaps, datamaps, constraints, and filters, and then set up the Data Manager or Allocation Manager rules that use this metadata to produce multidimensional results. In addition, you must set up job metadata and jobstreams.
The following two diagrams illustrate how Ledger Mapper moves the data. The first diagram illustrates Ledger Mapper and the copy method:

Using the Ledger Mapper and copy methods to load the performance journal table (PF_JRNL_F00)
The second diagram illustrates a method in which multidimensional data is created:
The Ledger Mapper uses the business unit relationships that you established in EPM to map amounts. To map multiple general ledger accounts to one performance account, set up ledger mapping rules on the Ledger Mapper page.
Note. You must define your general ledger and warehouse business units and the relationship between them before you set up and run the Ledger Mapper. In addition, before you map ledgers, you must define the tablemaps, datamaps, and constraints to use when you run the Data Manager or Allocation Manager engines. EPM is delivered with predefined tablemaps, datamaps, constraints, and Ledger Mapper Data Manager rules for the SHARE setID.
See Importing Source Business Units into EPM to Create Warehouse Business Units, Setting Up and Working with Metadata for the Operational Warehouse - Enriched.
Setting Up Ledger Mapper
This section lists prerequisites and discusses how to:
Map ledger data.
Create data manager rules for the general ledger (GL) mapper method.
Configure ledger mappings for new or configured ChartFields.
PrerequisitesBefore you can set up your Ledger Mapper, you must:
Complete your warehouse business unit setup.
Specify your ledger mapping defaults.
Set up your tablemaps, datamaps, filters, and constraints.
See Importing Source Business Units into EPM to Create Warehouse Business Units, Specifying Ledger Mapping Defaults, Setting Up and Working with Metadata for the Operational Warehouse - Enriched.
Page Used to Set Up the Ledger Mapper|
Page Name |
Definition Name |
Navigation |
Usage |
|
Ledger to Resource Mapping |
LEDMAP_TBL1 |
EPM Foundation, Data Enrichment Tools, Performance Ledger, Map Ledger Data, Ledger to Resource Mapping |
Map ledger data, such as assets and liabilities, that do not enter the system through one of the analytic applications. |
Mapping Ledger Data
Access the Ledger to Resource Mapping page (EPM Foundation, Data Enrichment Tools, Performance Ledger, Map Ledger Data, Ledger to Resource Mapping).
|
Mapper Type |
Specify Actuals or Budgeted for mapper type. This field is for the Activity-Based Management analytical application only. |
|
Unit |
Select the general ledger business unit to which you are mapping from the prompt list. Depending on your ledger mapping default setup, you might not have to enter information for the rest of the delivered ChartFields. |
|
Description |
Displays the description of the general ledger business unit. |
|
Percentage |
Use this field to split the ledger data from one general ledger business unit into multiple performance accounts or resources in Activity-Based Management. Do this by specifying that only a certain percentage from a ledger gets mapped. |
For each delivered ChartField (ledger, general ledger account, operating unit, department, and product), enter the following information:
|
Description |
Displays the description of each delivered ChartField value or tree node to include in the mapping. |
|
All |
Select this check box to bring all valid values for the specified ChartField (for example, to bring all department data to the performance account). |
|
Tree |
Select this check box to use values from a tree. If the Tree Name not Defined error appears, you must specify the tree name on the Ledger Mapping Defaults page. To create a new tree, use the PeopleTools Tree Manager. |
|
|
Click the Tree button to specify the tree name and the tree node. |
See Also
Specifying Ledger Mapping Defaults
Creating Data Manager Rules for the GL Mapper MethodYou can now set up the Data Manager rules. You must set up a Data Manager rule for each setID for which you want to map ledger data. The data manager rule creates the SQL code for that setID.
See Also
Configuring Ledger Mappings for New or Configured ChartFields
This section describes how to configure ledger mapping with any configured or new ChartFields that you want to use with EPM. This process ensures that the ChartFields appear on the Ledger Mapping Defaults pages and other Ledger Mapper pages.
Warning! Be sure to save your original settings before configuring. Before you attempt any configurations, you should be familiar with the PeopleTools Application Designer and Application Engine, and your ChartField structure.
To configure ledger mappings:
Add the ChartFields to the subrecord LEDMAP_CHART.
To open the record, launch the PeopleTools Application Designer and select File, Open. Open the LEDMAP_CHART subrecord and add the new ChartFields. Fields should be MAP_[name]. Make the new fields key fields.
Add ChartFields depending on whether a prompt table exists. When you are finished, save the record. Add the new ChartField to the LED_KEY2_SBR record and make it a key field. Also add the new ChartField to the LED_KNK_SBR record, but do not designate it as a key.
Add the ChartFields to the SQL object LEDMAP_CHART.
To open the SQL object, select File, Open in the Application Designer. Open the LEDMAP_CHART SQL object (object type: SQL), and add the new ChartFields. Fields should be MAP_[name].
Alter the corresponding tables and views for each of the modified subrecords.
You should alter them in the following order: LED_KNK_SBR, LED_KEY2_SBR, LEDMAP_CHART.
Note. You must use Find Object References to determine which tables and views need to be altered.
Alter the LEDMAP_SEQ grid on the page LEDMAP_TBL1.
In the Application Designer, access the page LEDMAP_TBL1. Go to the LEDMAP_SEQ grid and add or update the following fields:
|
Detail |
Description |
|
Check box CHARTFIELD_X_OPT* |
Record DERIVED_LEDMAP (Short description) (Yes/No) |
|
Edit box CHARTFIELD_X_OPT |
Record LEDMAP_WORK (Long description, Invisible) |
|
Check box CHARTFIELD_X_TOPT |
Record LEDMAP_SEQ (Short description) (Yes/No) |
|
Edit box CHARTFIELD_X_TREE |
Record DERIVED_LEDMAP (Long description, Invisible) |
|
Push Button CHARTFIELD_X_TSEL |
Record DERIVED_LEDMAP (copy image from previous ChartField) |
|
Edit box MAP_[name] |
Record LEDMAP_SEQ (Long description) |
Note. X refers to the ChartField number. If you insert the new ChartField between existing ChartFields on the LEDMAP_CHART subrecord, you must add the new fields and renumber the existing fields. The subrecord sequence number must match the CHARTFIELD_X_OPT.
Note. Before saving the grid and page, adjust the size of all boxes for All/Tree/Tree Name for ChartField.
Add the following fields to the PF_LED_TMPL_TBL1 page:
|
Detail |
Description |
|
Edit box FIELDNAMEX |
Record DERIVED_LEDMAP (None, Invisible, Display Control) Label Text = "FIELDNAMEX" |
|
Edit box CHARTFLD_X_TREEVW |
Record PF_LED_TMPL_TBL (None) |
|
Edit box CHARTFLD_X_NODEVW |
Record PF_LED_TMPL_TBL (None) |
|
Edit box SHORTNAME |
Record PSDBFIELD (None, Display-Only, Related Display) Label Text = " FIELDNAMEX descr" |
Note. X refers to the ChartField number. When you save the data, you can ignore the warning message PSDBFLDLABL. SHORTNAME occurs more than once.
If you receive any errors, check the layout order and reorder the fields as they should appear on the page.
Add the GL mapper rule for the current setID on the Data Manager Rules Define Rule page if it is not there already.
Warning! If the ABMP rule already exists for the current setID, you must rebuild the SQL by resolving the page.
To use trees, specify the appropriate tree view, tree node view, and tree name on the Ledger Mapping Defaults page.
Set up tree view and tree node views for the new ChartFields. Also, be sure to add the views under a record group control for the ChartField (add a new record group if one does not exist). Access the Ledger Mapper Defaults II page and set up a tree name if needed.
Correct existing ledger to resource mappings to reflect the new ChartField.
Use the All Values option as a default or specify a value or tree.
Creating Error Log Reports for the Performance Ledger
You should create an engine error log report to ensure that you have successfully mapped the data. The error log is generated during the Ledger Mapper process.
Page Use to Create Error Log Reports|
Page Name |
Definition Name |
Navigation |
Usage |
|
Engine Error Log |
RUN_REW_0002 |
EPM Foundation, Data Enrichment Tools, Performance Ledger, Create Error Log Report, Engine Error Log |
Create error logs for PeopleSoft application engine processes. |
Creating Error Logs
Access the Engine Error Log page (EPM Foundation, Data Enrichment Tools, Performance Ledger, Create Error Log Report, Engine Error Log).
|
Process Instance and Use all Process Instances? |
Specify a specific process instance or create the error log for all instances. |
|
Run Control ID and Use all Run Control IDs? |
Specify a run control or create the error log for all run controls. |
|
Engine ID and Use all Engine IDs? |
Specify a particular engine or create the error log for all engines. |
Click Run to define parameters for running the Engine Error Log (EWC002) Crystal report.
Creating, Editing, and Approving Manual Journals
This section provides overviews of manual journals, the journal copy feature, and reverse journal entries, and discusses how to:
Enter manual journals.
Copy journals.
Create reverse journal entries.
Attach supporting documentation for manual journal entries.
Approve journals.
Understanding Manual Journals
Before you post your journals, you can use the Journal Entries page to manually record transactions and create journal debit and credit entries. Journals are written to a journal fact table (such as GC_JRNL_MGT_F00), which is the source record for the various ledger posting processes).
Warning! Before you post a journal, ensure that you have properly mapped
the Foreign Currency Code in the Data Manager - Define Target page.
If you do not populate the Foreign Currency Code, unexpected results
may occur when the PF_POST application engine runs.
See Defining the Target.
Understanding the Journal Copy Feature
You can copy a manual journal to:
Record the same journal entry to multiple scenarios.
The journal must use the common consolidation business unit.
Duplicate a journal for another fiscal year or period.
Create reversal journal entries.
You can copy any existing valid or posted journal that was created with or copied from the Manual Journal Entries page.
If the base currency of the target journal's scenario is different from that of the source journal, the system calculates the new base amounts by:
Retrieving the currency exchange rate from the transaction currency and converting it to the new base currency, using the rate type that you specify on the line and the journal date as the currency effective date.
Rate type is required on all manual journals.
Computing the new base amount.
The new base currency amount is equal to the original transaction amount divided by the product of the rate divisor and rate multiplier that is applicable for currency conversion, rounded to the number of decimals that are specified for that base currency.
When copied, if the journal is out of balance because of rounding from any required currency conversion, the system adjusts the base amount of the first journal line.
Regardless of the source journal system source, the target journal system source is set to SCG, which means that the journal was system-generated and originated from the Journal Copy process.
Understanding Reverse Journal Entries
The Journal Reversal page enables you to create a reverse journal entry or reversal batch. The reversal batch is created in a valid (edited) status that does not require journal edits. Alternatively, you can copy your original journal, select the reverse amount check box, and designate the journal date to create a reversal journal.
Reverse journals are associated with your original journal by the journal ID. If you try to post a reversal journal to the system before posting the original, you receive an error message that the original journal has not yet been posted and the reversal does not post. If you should attempt to unpost the original journal that is associated with the reverse journal, you receive an error message specifying that this action cannot be performed. Similarly, if you attempt to unpost a reversal journal entry, you receive a warning saying that you must also unpost the original after unposting the reversal.
Pages Used to Create, Edit, and Approve Manual Journals|
Page Name |
Definition Name |
Navigation |
Usage |
|
PF_JOURNAL_TBL1 |
EPM Foundation, Data Enrichment Tools, Profit Manager, Performance Journals, Journal Entries, Journal Entries |
Enter or copy journals. |
|
|
Journal Copy Options |
PF_JOURNAL_CPY |
Click the Copy button on the Journal Entries page. |
Create journal copies. |
|
PF_JOURNAL_TBL3 |
EPM Foundation, Data Enrichment Tools, Profit Manager, Performance Journals, Journal Entries, Journal Reversal |
Select the option to create a reversal batch and the date of the reversal journal entries. |
|
|
PF_JRNL_ATTACHMENT |
EPM Foundation, Data Enrichment Tools, Profit Manager, Performance Journals, Journal Entries, Journal Attachments |
Attach documentation to support journal entries. |
|
|
PF_JOURNAL_TBL2 |
EPM Foundation, Data Enrichment Tools, Profit Manager, Performance Journals, Journal Entries, Journal Approval |
Set the approval status for a journal. |
Entering Manual Journals
Access the Journal Entries page (EPM Foundation, Data Enrichment Tools, Profit Manager, Performance Journals, Journal Entries, Journal Entries).
|
Ledger ID |
Select a ledger ID which is used to post the journal to the ledger. |
|
Draft |
Select this check box to create a draft journal. This option excludes the journal from the manual journal edit process. |
|
Hold Posting |
Select this check box to prevent the journal entry from posting during ledger post processing. This option enables you to save the journal entry and continue to add information to it at a later time. |
|
Calculate |
Click to initiate the calculate process and update the totals in the Journal Information region and Journal Totals grid. For each journal line on the journal line grid, the system compares all field values with the prior values that are stored in the buffer for any changes. If changes exist on currency, rate type, exchange rate, or base currency, the system determines the new exchange rate. This process also initiates exchange rate checking before the new exchange rate can be accepted. The new exchange rate is then converted to rate multiplier and rate divisor values. If any changes occur in amount, exchange rate, or base amount, the system calculates the unchanged amount based on the system rule or the rule that you specify in the calculate field. The system then adjusts the journal totals and balancing ChartField totals to reflect the new totals. Even if no amount field change occurs but a ChartField value change occurs, the system adjusts the balancing ChartFields totals accordingly. |
|
Copy |
Click to access the Journal Copy Options page and create a copy of this journal. Note. This option is not available until you save the journal. |
|
Edit Journal |
Click to edit (validate) your journal. Your journals cannot be posted until they are valid. If errors occurred on the journal, you can correct the errors with the Ledger Edit component. |
|
Post Journal |
Click this link to access the Post Ledger run control page to post the journal. Note. This option is not available until the journal is valid (edited). |
Journal Information
Expand the Journal Information region to complete or review these fields:
|
Journal Source Code |
Select the source code for the journal. Journal source codes enable you to track the source of your journal data. Source codes are defined with the Journal Source Code page. Note. This is an optional field. |
The system derives values in the Fiscal Year and Period fields from the scenario's calendar, based on the journal date. The system derives the value in the Base Currency field from the business unit definition. The amounts for total debits and total credits for the entire journal appear in the Journal Totals grid.
Journal Lines
Add rows to the Journal Lines grid to enter additional journal lines. For each line, you must complete the Account and Amount fields. If the transaction currency is not the same as the base currency, you must also specify values for the Currency and Rate Type fields. The system uses the associated exchange rate to populate the base amount. The consolidation dimension field label varies depending on the consolidation dimension. For example, if the consolidation dimension is business unit, the field label is Ledger Unit. The ledger template that is associated with the business unit for the journal entry determines the ChartFields that are available for the journal entry. You can use multiple business units within the same ledger ID.
Note. You can customize the ChartFields that appear by clicking the Customize link on the grid.
Journal Totals
Use the Journal Totals grid to view a summary of the journal entry. The information is grouped by dimension value (such as ledger unit) and lists the total number of lines and total debits and credits.
Copying Journals
Access the Journal Copy Options page (Click Copy on the Journal Entries page).
To copy a journal:
Access the Manual Journal Entries page, select the journal that you want to copy, and then click Copy.
The Journal Copy Options page appears. The Copy Journal region lists the values that you are copying from the source journal.
Complete the fields in the Copy Journal group box:
|
Journal ID |
Enter a journal ID for the new journal. The default value in this field is the same value as the journal that you are copying; however, you can override this value. |
|
Journal Date |
Enter a date for the new journal. If the target journal date is different from the source journal date, the system uses the target journal date to derive the fiscal year and accounting period values. |
|
Create Reversal |
Select this check box to create a reversal batch for this journal. If you select this option, specify the period in which you want the reversing journal entry to occur. You can specify the next period based on your original journal date or by specifying a specific period in time. |
Click OK to copy the journal.
The Journal Copied page summarizes the scenarios to which the journal was copied. Any copied journals that require approval (through workflow or security) have an initial approval status of None.
Review the journal and click Submit for Approval to initiate the approval process.
For preapproved journals, the approval status is immediately set to Approved, which copies the journal lines to the journal fact table that you specified on the ledger template.
Creating Reverse Journal Entries
Access the Journal Reversal page (EPM Foundation, Data Enrichment Tools, Profit Manager, Performance Journals, Journal Entries, Journal Reversal).
Select the Create Reversal Batch check box and specify the period in which you want the reversing journal entry to occur.
You can specify the next period based on your original journal date or by specifying a specific period in time.
Attaching Supporting Documentation for Manual Journal Entries
Access the Journal Attachments page (EPM Foundation, Data Enrichment Tools, Profit Manager, Performance Journals, Journal Entries, Journal Attachments).
This page enables you to add supporting documentation for your manual journal.
Click the Add Attachment button to locate the desired supporting documentation, select the file, and attach it to the page.
To view a document, click the File Name link. To remove a document, click the Delete button.
Approving Journals
Access the Journal Approval page (EPM Foundation, Data Enrichment Tools, Profit Manager, Performance Journals, Journal Entries, Journal Approval).
|
Submit for Approval |
Click to submit this journal entry for approval. You set up approval rules on the PF Unit Scenario Definition page. |
|
Approval Action |
Select an approval status for the journal entry. You can select from the following values: None: Indicates a new, unsaved, or saved journal, requiring approval. Approved: Indicates a journal that is approved (or was preapproved) and is eligible for posting. The system does not copy journal lines into the journal fact table until the journal status is set to Approved. As a result, the journal is ineligible for posting until approved. Pending: Indicates that the journal is submitted and awaiting approval. When multiple approval steps are in place, the journal remains in pending approval status until all necessary parties approve the journal. Denied: Indicates that the journal is denied approval. |
|
Comments for Denial Email |
Enter any comments that you want to include in the denial email as a result of the journal being rejected. |
To update the approval status for a journal, select an approval action from the drop-down list box, and then click the Submit for Approval button.
Processing and Posting Journals
This section provides overviews of journal processing and posting and the PF Journal Modification component and discusses how to:
Run PF Journal Edit and PF Journal Re-Edit.
View journal error statistics.
Correct journal errors.
Run PF Journal Cleanup.
Run PF Ledger Post.
Run PF Ledger Unpost.
Unpost and repost transactions.
Understanding Journal Processing and Posting
After you set up and run engines such as Data Manager or Ledger Mapper, the enriched data is posted to a temporary table as specified on the Ledger Template page. You then run the PF Journal Edit engine to identify any balance errors and check for valid dimension values in the ChartFields that are specified on the journal entry. Valid data is written to the PF_JRNL_F00, while any errors that are found are written to the error table, PF_JRNL_E00. Use the PF Journal Modification engine to revise errors, and then run PF Journal Re-Edit to repopulate the PF_JRNL_F00 table. Finally, run the PF Ledger Post engine to populate the PF_LEDGER_F00 table with valid and accurate data from PF_JRNL_F00.
The PF Journal Edit process checks for TSE field errors. This process also checks the balancing rules for the jobs in the jobstream to verify whether the flash totals from these jobs are in balance based on the balancing rules that you defined for the jobs.
Input to the PF Journal Edit engine is always from the performance journal temporary table that is populated by other application engines. For this reason, you must always run the PF Journal Edit engine as a job after the application engine that populates the temporary journal table, but within the same jobstream. PF Journal Edit can never be the first or the only job in a jobstream.
Note. The edit process validates against any prompt tables within the record definition.
The purpose of the PF Journal Edit engine is to validate journals and ensure data integrity before you post to PF_LEDGER_F00. After you run PF Journal Edit for any journal, correct any TSE errors using PF Journal Modification, and then run a PF Re-Edit job. If you have missing dimensions in your first edit, use EPM Foundation dimension pages to add the missing dimensions.
The following table lists the PF Journal Edit batch statuses. These statuses appear on the Ledger Post - Batch Selection page. The system creates one record for each batch status change in the PF_Batch table to allow tracking of the batch status history:
|
Batch Status |
Description |
|
E |
Batch has TSE errors and balance errors. |
|
T |
Batch has TSE errors but no balancing errors. |
|
B |
Batch has no TSE Errors but has balancing errors. A batch status is set to B if any of the balancing rules that are defined for the jobs in the jobstream with a balance rule type of control or force balance and the balancing rule total has an amount difference. The amount difference for the balancing rule with a force balance type is written to the PF_JRNL_F00 for the account that is related to the PF ledger event code and is defined for the balancing rule. |
|
V |
This is a valid batch. No TSE or balance errors exist. Batch is ready to post. |
|
P |
Batch has been posted to the ledger. Status is set by PF_POST engine. |
|
S |
Valid data for the batch has been force-posted to the PF Ledger table. Invalid data (TSE errors) still exists in PF_JRNL_E00 that can be modified and posted later. Status is set by PF_POST engine. |
|
F |
Batch has been force-posted to the PF Ledger table even though balance errors occurred for the batch. You can address the balancing error by posting the difference to the PF Ledger (force balancing). Status is set by PF_POST engine. |
|
O |
Batch has been force-posted to PF Ledger table even though balance and TSE errors occurred. Status is set by PF_POST engine. |
|
U |
Batch has been unposted from PF Ledger table. Status is set by PF_UNPOST engine. |
Note. If the batch is valid, the data is moved to the PF_JRNL_F00 table. If the batch has TSE errors, you must run the PF Journal Modification engine. After correcting errors in PF Journal Modification, use the Journal Re-Edit process to move the corrected data to the PF_JRNL_F00.
The difference between the Journal Edit and Journal Re-Edit processes is that Journal Edit must always be run as a job after the application engine that populates the temporary journal table, but within the same jobstream. (The input file for Journal Edit engine is temporary journal table). You can run Journal Re-Edit as a standalone job because its input file is a permanent table (PF_JRNL_E00).
Journal Re-Edit performs the following functions for all batches: It checks all the batches in PF_JRNL_E00 that have the same keys as the run parameters (business unit, scenario ID, fiscal year, and period) for TSE errors.
Understanding the PF Journal Modification Component
Use the PF Journal Modification component to correct any data that was flagged as an error during the PF Journal Edit process and moved to the PF_JRNL_E00 error table. After correcting errors, run the Journal Re-Edit process to perform TSE validation on data in the PF_JRNL_E00 table and change the data error flag to No if the data is no longer erroneous. (The Journal Post process moves corrected data in PF_JRNL_E00 to PF_JRNL_F00).
The PF Journal Modification pages are designed to enable you to correct actual dimension values in the data, not the dimension tables. You must use EPM Foundation Dimension pages to correct the dimension tables.
Journal Re-Edit performs TSE validation against all the error records in PF_JRNL_E00 that have the same run control parameters (business unit, fiscal year, accounting period, scenario ID). This means that if you run multiple edits for the same parameters at different times, (thus creating multiple batches with the same runtime parameters), you can correct all the batches and dimensions first, and then run Journal Re-Edit once for all batches. Likewise, you can correct one batch at a time, and run Journal Re-Edit after correcting each batch.
Pages Used to Process and Post Journals|
Page Name |
Definition Name |
Navigation |
Usage |
|
PF Journal Modification - Journal Statistic |
PF_JRNL_STATS |
EPM Foundation, Data Enrichment Tools, Profit Manager, Performance Journals, Correct Errors, PF Journal Modification, Journal Statistic |
View journal error statistics by viewing batches of data that are flagged as errors and moved to the PF_JRNL_E00 error table. |
|
PF Journal Modification - Journal Correction |
PF_JRNL_CORRECTION |
EPM Foundation, Data Enrichment Tools, Profit Manager, Performance Journals, Correct Errors, PF Journal Modification, Journal Correction |
View error fields and the number of errors. |
|
PF Journal Modification - Error Details |
PF_JRNL_SUMM |
Click the Display Record Errors button on the Journal Correction page. |
Correct errors as appropriate. |
|
PF Journal Modification - Error Description |
PF_JRNL_TSE |
Click the Display Error Messages button on the Error Details page. |
View error message details for an error. |
|
Journal Cleanup |
RUN_PF_DELB |
EPM Foundation, Data Enrichment Tools, Profit Manager, Performance Journals, Journal Cleanup Report, Journal Cleanup |
Run PF Journal Cleanup to delete journal data by batch ID. |
|
Journal Cleanup - Batch Selection |
PF_DELETE_BATCH |
Click the Get Batch Data link on the Journal Clean Up page. |
Specify whether to delete all displayed batches or use the check box to delete one batch at a time. |
|
Ledger Post |
RUN_PF_POST |
EPM Foundation, Data Enrichment Tools, Profit Manager, Performance Journals, Post Ledger, Ledger Post |
Run the PF Post engine to post data in the journal table that you have determined is valid. |
|
Ledger Post - Batch Selection |
PF_POST_BATCH |
|
Specify the batches that you want to post to the performance ledger. |
|
PF Ledger Unpost |
RUN_PF_UNP |
EPM Foundation, Data Enrichment Tools, Profit Manager, Performance Journals, Unpost Ledger, PF Ledger Unpost |
Run the PF Unpost to unpost any posted data by batch ID that you determine is invalid. |
|
PF Ledger Unpost - Batch Selection |
PF_UNPOST_BATCH |
|
Specify the batches that you want to unpost from the performance ledger. |
Running PF Journal Edit and PF Journal Re-Edit
The PF Journal Edit process checks for TSE field errors. If the edit process does not find any errors, the data is moved to the PF_JRNL_F00 table. If the edit process does find errors, you must correct them before proceeding. After correcting the errors you must run the Journal Re-Edit process which performs TSE validation on data in the PF_JRNL_E00 table, changes the data error flag to No if the data is no longer erroneous, and moves corrected data in PF_JRNL_E00 to PF_JRNL_F00.
Note. In EPM, you can use the performance ledger and the Average Daily Balance (ADB) ledger. Use of the ADB ledger is optional and all of the processing in the ADB ledger is the same as in the performance ledger. The type of balance that is stored is the only difference between the two ledger tables.
PF Journal Edit
You must run PF Journal Edit as a job after running the engine that loads journal data to the performance journal temporary table.
PF Journal Re-Edit
To run PF Journal Re-Edit, follow these steps:
Add the jobstream RE_EDIT to the Jobstream page and select RE_EDIT for the job ID.
Note. You must run PF Journal Re-Edit as a stand-alone job in its own jobstream.
Using the Jobstream Record Suites page, add the appropriate record suites to the RE_EDIT jobstream.
Using the Journal Re-Edit Report page, create the run control for the RE_EDIT jobstream.
The Journal Re-Edit Report page can be accessed using the following navigation: EPM Foundation, Data Enrichment Tools, Profit Manager, Performance Journals.
Warning! You should never run this jobstream from the Run Jobstream page! You cannot specify a ledger ID on the Run Jobstream page and the engine will fail without it.
When defining your run control parameters, remember that the difference between the Rerun check box and the PF Journal Re-Edit engine is that the PF Journal Re-Edit engine is used to re-edit previous batches of journal entries that had TSE errors. Rerun is used after another batch with the same parameters has already been run.
If the status of the batch is other than posted (P,S, F, O) or unposted (U), you can rerun the batch by selecting the Rerun check box. The batch ID is added to the PF_DELBATCH_TBL and is used to clean up the data in the journal for the batch using the PF Delete Batch utility.
See Also
Streamlining Processing with Jobstreams
Viewing Journal Error Statistics
Access the Journal Statistic page (EPM Foundation, Data Enrichment Tools, Profit Manager, Performance Journals, Correct Errors, PF Journal Modification, Journal Statistic).
|
The PF Journal Edit process assigns a PF batch ID to a batch of data going into the journal table. It uses the PF_BATCH_NUMBER that is stored in the warehouse business unit table as the next batch number. The edit process increments this batch number by one every time it processes a new batch of data. The PF batch ID is a combination of the scenario ID, the fiscal year, and the accounting period. |
|
|
Business Unit, Ledger ID, Scenario ID, and As Of Date |
These parameters were specified in the run control that was used to run the jobstream that contained the PF Journal Edit engine. The business unit and PF batch ID uniquely identify a batch of data to be modified. |
|
Record Statistics |
Use the Number of valid records and Number of error records display fields for an overview perspective on the amount of errors. |
|
Last Edited Operator ID, Last Corrected Operator ID, Last Edited Timestamp, and Last Corrected Timestamp |
These fields display information about who ran the last journal edit and when it was run. |
Correcting Journal Errors
Access the Journal Correction page (EPM Foundation, Data Enrichment Tools, Profit Manager, Performance Journals, Correct Errors, PF Journal Modification, Journal Correction).
|
Field Name |
Displays the name of the field in error. |
|
Field Value |
Displays the value for the field in error. |
|
Number of Errors |
Displays the total number of errors. |
|
|
Click the Error Details button to access the Error Details page, where you can view the error details for the field and values in error. You can also correct the dimension value to correct the error. |
Correcting Errors
Access the Error Details page (Click the Error Details button on the Journal Correction page).
|
Field Value |
Specify a field value (dimension) to apply to the lines in error. |
|
All Values |
Select this check box to apply this value to all the rows that are listed. Deselect this check box to apply the value to specific rows only. Specify the rows using the From and To fields. |
|
From and To |
Specify the row numbers to which the new field value should be applied. |
Specify a dimension to apply to the values in error.
|
|
Click the Display Error Messages button on this page to access the Error Description page for that error and review the error message. |
Save your changes.
Running PF Journal Cleanup
Access the Journal Cleanup page (EPM Foundation, Data Enrichment Tools, Profit Manager, Performance Journals, Journal Cleanup Report, Journal Cleanup).
|
Business Unit and Scenario ID |
Select the business unit and scenario ID for which to delete batches. |
|
Job ID |
Select PF Journal cleanup for this standalone job. |
|
Get Batch Data |
Click to retrieve all batch data for the specified business unit and scenario ID and access the Batch Selection page. |
On the Journal Cleanup - Batch Selection page , select the batches to clean up by selecting the Delete Batch Flag check box. Save your changes and return to the Journal Cleanup page to run the PF_DELB process.
Running PF Ledger Post
Access the Ledger Post page (EPM Foundation, Data Enrichment Tools, Profit Manager, Performance Journals, Post Ledger, Ledger Post).
|
Business Unit, Scenario ID, Fiscal Year, and Period |
Select the business unit , scenario ID, fiscal year, and accounting period for which to post batches. |
|
Job ID |
Select PF Ledger Post for this standalone job. |
|
Get Batch Data |
Click to access the Batch Selection page and retrieve all batch data for the specified parameters. |
Note. PF Ledger Post is the last step in the data movement and migration process before you generate reports. The data that reaches the performance ledger table (PF_LEDGER_F00) must be accurate. You can post multiple batches at one time. The only way to post to the ledger is from the performance journal table (PF_JRNL_F00).
Access the Batch Selection page (Click Get Batch Data on the Ledger Post page).
|
|
Click the Get Batch Data button to retrieve the batch data. The data appears in the Batch Information grid. |
|
|
Click the Display Journal Error Report button to access the PF Journal Modification component to view and correct any errors. If you choose not to correct the errors, select the Force Post check box to post this batch to the performance ledger table. |
|
|
Click the Display Balance Results button to see any balance errors that might exist. The display-only Balance Error Statistics page appears. If you choose not to correct the balance errors, select the Force Post check box to post this batch to the performance ledger table. |
|
Select this check box to force post batches that are in error to the performance ledger table. If a balance rule with force balance is used, the out-of-balance amount is posted to the account that is related to the ledger event code for the force balance rule. Only one force balance rule is allowed per batch. |
|
|
Post |
If you do not have any errors for the batches, the Post check box is automatically selected. |
Save your changes and return to the Ledger Post page to run the PF Ledger Post engine and post the specified batches to the performance ledger table.
If you believe that you have posted in error, run the PF Unpost engine.
Running PF Ledger Unpost
Access the PF Ledger Unpost page (EPM Foundation, Data Enrichment Tools, Profit Manager, Performance Journals, Unpost Ledger, PF Ledger Unpost).
|
Business Unit, Scenario ID, Fiscal Year, and Period |
Select the business unit, scenario ID, fiscal year, and accounting period for which to unpost batches. |
|
Job ID |
Select PF Ledger Unpost for this standalone job. |
|
Get Batch Data |
Click to access the Batch Selection page and retrieve all batch data for the specified parameters. Note. The functionality of the Batch Selection page is identical to Batch Selection page for Ledger Post; please refer to that documentation for reference. |
Note. Running the PF Ledger Unpost engine does not necessarily zero-out all the posted data. If the keys are the same for PF batch data during the PF Post process, the data is aggregated in the performance ledger table for those batches. If you unpost aggregated data, you might not obtain a zero balance unless you unpost all the batches for the same parameters. Use the run control ID to find the batches that you want to unpost.
Unposting and Reposting Transactions
To ensure data integrity, PeopleSoft designed the system to prevent you from reposting a batch that has already been posted. Suppose that you post a batch of transactions called Batch A and subsequently find that the data is invalid. You unpost the batch and make the necessary changes. To repost the batch, you must complete the following steps:
To repost a batch previously posted:
Run the entire jobstream again to repopulate PF_JRNL_F00 and create a new batch ID (in our example Batch B).
Your jobstream might include running engines such as Activity-Based Management, File Transfer Protocol, Data Manager, Allocation Manager, or Ledger Mapper, and the PF Edit engine. On the PF Journal Edit run control, make sure that you select the Rerun check box to ensure that the system flags the previously posted batch (Batch A in our example) to be deleted.
Use PF Journal Cleanup to delete obsolete records in PF_JRNL_F00 from the previously posted batch (Batch A).
Post the transactions to PF_LEDGER_F00 using the new PF batch ID (Batch B).
Note. You can also copy the journal to a new journal and post the copy.
Using Balancing and Reconciliation FeaturesThis section provides overviews of PF Reconciliation, job total metadata, and balance rules metadata and discusses how to:
Review and define job totals metadata.
Review and define balance rules metadata.
Run PF Reconciliation.
Review reconciliation results.
Understanding PF Reconciliation
Several features are available for you to use to check data integrity and to verify that input equals output between tables.
Run the PF Reconciliation engine after populating the performance ledger table (PF_LEDGER_F00) to verify that the data that you processed through the system is accurately reflected. The job totals and balance rules metadata pages enable you to specify the fields in the tables that you want to track. You define and use job totals metadata to compare totals between sources such as the GL ledger table or the revenue table versus the target table and the performance ledger table, and find any differences for an accounting period of a business unit and scenario ID.
The PF Reconciliation engine first resolves the sources and destinations into temporary tables using the constraints that are given for the job totals. The engine verifies all the job totals and balancing rules that are defined under the reconciliation job that is being run and calculates the totals and the differences for the balancing rules.
Typically, you run the PF Reconciliation engine after a period to compare to and from amounts between tables, such as the REVENUE_F00 and the PF_LEDGER_F00 or the GL_LEDGER and the PF_LEDGER_F00. The system delivers job totals and balance rules metadata for these types of tables. However, if you want to compare any other source and target tables, you can create your own job totals and balance rule metadata. After running your reconciliation, you can generate a Crystal report for review. You specify the Crystal report ID on the Balance Rules Metadata page. Additionally, use the inquiry pages to track your reconciliation job.
Understanding Job Total Metadata
Job total metadata has two purposes:
To define totals for the PF Record Summary.
For PF Record Summary, define job totals using the Record Name field.
To define totals for balancing rules.
For balancing rules, you define job totals using constraints. Constraints are used to define the scope of the data that is being totaled. The data could come from a single table, but the scope of the data to be considered could depend on data in other tables.
Note. You can toggle the record and constraint fields on the Job Totals page, depending on the job ID that you select. Predefined job total metadata is delivered with EPM .
Understanding Balance Rules Metadata
Balance rules enable you to verify the data throughout the system. For example, you can verify that a monetary amount that you entered into the system reached the performance ledger table (PF_LEDGER_F00). The three balancing rules include:
|
Informational |
Use this balancing rule to review how many rows or how many monetary amounts are in the specified table, or to see information that is not critical but can be used to validate or identify a model. For example, for PeopleSoft Activity-Based Management, you can check that data reaches cost objects directly from resources instead of going through activities. Informational balance rule differences enable you to post to the ledger. |
|
Control |
Use this balancing rule to determine whether an out-of-balance amount exists. The batch is set to balance error status and can be analyzed in a report. Control balance rule differences will not allow you to post to the ledger. |
|
An out-of-balance amount will not stop the post process and can be added to the performance ledger table to force balance. Force balancing can be defined on a rule that compares totals between a source and a destination. You can define only one balance rule for a source and a destination. The setID MODEL has a predefined force balance account (FBAL). If you need to define a force balance account, do so on the Ledger Event Codes page. |
Predefined balance rules metadata is delivered with EPM.
See Also
Pages Used to Set Up Balancing and Reconciliation|
Page Name |
Definition Name |
Navigation |
Usage |
|
Job Total Metadata |
PF_META_TOT_TBL1 |
EPM Foundation, Foundation Metadata, Metadata Creation and Editing, Job Total Metadata |
Review and define job totals for various data that is used as input or output to the different source or target tables in the system. |
|
Balance Rules Metadata |
PF_META_BAL_TBL1 |
EPM Foundation, Foundation Metadata, Metadata Creation and Editing, Balance Rules Metadata |
Review and define balance rules. |
|
PF Reconciliation |
RUN_PF_JOB |
EPM Foundation, Data Enrichment Tools, Profit Manager, Performance Journals, Reconcile Balances, PF Reconciliation |
Run the PF Reconciliation engine to compare to and from amounts between tables. |
|
Job Totals |
PF_RECON_TOT_DATA |
EPM Foundation, Data Enrichment Tools, Profit Manager, Performance Journals, Review Bal/Recon (Balance/Reconcile) Results, Job Totals |
A display-only page that shows the results of a job totals reconciliation. |
|
Balance Rule Data |
PF_RECON_RULE_DATA |
EPM Foundation, Data Enrichment Tools, Profit Manager, Performance Journals, Review Bal/Recon (Balance/Reconcile) Results, Balance Rule Data |
A display-only page that shows the results of a balance reconciliation. |
Reviewing and Defining Job Totals Metadata
Access the Job Total Metadata page (EPM Foundation, Foundation Metadata, Metadata Creation and Editing, Job Total Metadata).
|
Description |
The description that you enter here is used by the Metadata Search engine to find your metadata. |
|
Constraint Code |
Select a constraint code. Constraints are used in this case to define the scope of the data that is being totaled. This data could come from a single table, but the scope of the data to be considered could depend on data in other tables. This field is not available if you are setting up job totals for the SUMM Job ID (PF Record Summary engine). For PF Record Summary, job totals are defined using the Record field. |
|
Field Name |
Select a field name. This field displays the primary record for the field name that you select. For record summary totals, select the record name. The field name identifies the field that you want to total. If the list box does not list the field that you expected, check your datamap definition. |
|
Aggregate Function |
For aggregate functions, you usually select Summation to ensure that all the amounts in the specified field are summed. Select Count to count total records in the data (for example, to count the number of employee IDs). Select Average to average the specified field name totals. |
Reviewing and Defining Balance Rules Metadata
Access the Balance Rules Metadata page (EPM Foundation, Foundation Metadata, Metadata Creation and Editing, Balance Rules Metadata).
|
Description |
The description that you enter is used by the Metadata Search engine to find your metadata. |
|
Report ID |
Select the ID of the report that you want to generate to help analyze any problems that caused the balance differences. You can use this ID for generating a Crystal report after you run the PF Reconciliation engine. |
|
Rule Sequence |
Enables you to group similar rules as subrules. To compare more than one balance field amount, click the add button in the Rule Sequence field to add a rule for a different balance amount field. For example, to compare posted total amounts, create rule sequence 1 and then click the Add button to add rule sequence 2 to compare base amounts. |
|
Description |
Enter a description that accurately defines the balance rule. |
|
Threshold Percentage |
Specify a percentage that reflects the highest percentage that you want to use for analysis. For instance, entering 5.00 in this field would indicate that if the difference between resources and activities in Activity-Based management is over five percent, the system should display the amounts. If the difference is not over five percent, post to the performance ledger table. |
|
Rule Use |
Select from the following rule uses: |
|
Rule Use |
Description |
|
Control |
Select Control if you are comparing tables for engine output amounts. For example, you would select Control and enter a threshold percentage if you were tracking whether the amount for resources equaled the amount that was driven to activities in Activity-Based Management. Any balance error is assigned a batch error status. Generate reports to analyze the balance error before posting. |
|
Force Balance |
Use Force Balance to post balance rule differences that should be posted to the PF Journal table. Then select the ledger event code that identifies the account to which the differences will be posted in the PF Ledger table. |
|
Info Only (information only) |
Select Info Only if you are comparing totals that are not critical (for example, the number of records). Info Only does not create a balance error batch. The batch will be valid. |
|
Ledger Code |
For a rule use of Force Balance, select the account to which the differences that are generated by force balancing should be posted in the performance ledger table. |
|
Job ID |
Select the job ID that is defined on the Job Metadata page. |
|
Section |
This is not a required field. Use this field to help you identify the problem area when an-out-of balance error occurs. The system uses the prompt table PS_PF_META_SEC_VW3. Before a section can be considered valid, it must first be defined in the engine metadata. Valid section codes that you enter on the engine metadata page are the actual application engine sections within the application engine program. |
|
Total ID |
Select the total ID that is defined in the Job Totals Metadata page. |
|
Arithmetic Operation |
Select an arithmetic operation (for example, + or −) to add or subtract multiple job totals. These operations are used with the Side field |
|
Side |
Select Left for the input total IDs, and Right for the output total IDs. |
Running PF Reconciliation
Access the PF Reconciliation page (EPM Foundation, Data Enrichment Tools, Profit Manager, Performance Journals, Reconcile Balances, PF Reconciliation).
The parameters on this page are described in the chapter Streamlining Processing with Jobstreams earlier in this PeopleBook.
After running PF Reconciliation, you can view your balance and reconciliation results using the Review Bal/Recon Results (review balance reconciliation results) component.
Note. You must include the PF Merge engine in a jobstream with the PF Reconciliation engine.
See Also
Reviewing Reconciliation Results
Access the Job Totals (EPM Foundation, Data Enrichment Tools, Profit Manager, Performance Journals, Review Bal/Recon (Balance/Reconcile) Results, Job Totals) and Balance Rule Data pages (EPM Foundation, Data Enrichment Tools, Profit Manager, Performance Journals, Review Bal/Recon (Balance/Reconcile) Results, Balance Rule Data).
Use the Job Totals page to review the job total information from your job. For example, you could use the total value on this page to verify that for Activity-Based Management, the total amount that was allocated to resources was transferred to the CALC_OBJ_F00 table.
This is a display-only page that shows the results of a balance reconciliation. If the Release Record Suite check box is selected, then this job has been released from a record suite.
Using Ledger Drill Down
After loading the performance ledger table (PF_LEDGER_F00), you can track data movement to and from the PF_LEDGER_F00 using the drill down feature. You can track performance ledger details and general ledger mapper details.
To build a search for ledger drill down, you must include the business unit, fiscal year, and accounting period when you specify your search keys.
This section discusses how to:
Specify drill-down criteria.
View drill-down details.
Pages Used to Drill Down on Ledger Data|
Page Name |
Definition Name |
Navigation |
Usage |
|
Drill Criteria |
PF_DRILLSRCH_TBL1 |
EPM Foundation, Data Enrichment Tools, Profit Manager, Performance Journals, Ledger Details, Drill Criteria |
Specify drill criteria for tracking data movement to and from PF_LEDGER_F00. |
|
Drill Details |
PF_DRILL_VW2 |
EPM Foundation, Data Enrichment Tools, Profit Manager, Performance Journals, Ledger Details, Drill Details |
Review and drill down to the results in the PF_LEDGER_F00 table. |
Specifying Drill Criteria
Access the Drill Criteria page (EPM Foundation, Data Enrichment Tools, Profit Manager, Performance Journals, Ledger Details, Drill Criteria).
Drill Criteria
Specify the drill criteria on which you want to perform the search. You can add further search criteria by adding a row and selecting the field on which to search. At a minimum, you must specify the business unit, scenario ID, fiscal year, and accounting period.
|
BUSINESS_UNIT |
Select the business unit. |
|
PF_SCENARIO_ID |
Select the scenario ID. |
|
FISCAL_YEAR |
Specify the fiscal year. |
|
ACCOUNTING_PERIOD |
Specify the accounting period. |
|
Field Value |
Specify your selections for any additional criteria that you add. The drill-down functions in the order in which you add the rows. |
|
Wild Search |
Alternately, you can select this check box to specify any values on which you want to search for the specified field. |
|
|
When you have entered your criteria, click the Get Drill Data button to initiate your search. |
The system retrieves the performance ledger data based on the entered search criteria. You can view the details on the Drill Details page.
Viewing Drill Details
Access the Drill Details page (EPM Foundation, Data Enrichment Tools, Profit Manager, Performance Journals, Ledger Details, Drill Details).
Use this page to view the performance ledger data that is based on your search criteria. You can view scenarios and amounts.
|
|
Click the Get More Drill Back Data button to access a detail page for a row of data. For example, if you are viewing data in Activity-Based Management, clicking the Get More Drill Back Data button accesses the ABM Ledger Data page (AB_DRILL_TBL2). |
Reviewing Profit Manager Error MessagesWhen running any of the engines that are described in this chapter, you can use the Engine Messages component, which is accessible from the Performance Ledger, Performance Journals menu, to review the progress of the engine and errors that were generated.
This component is described in detail in the chapter on Streamlining Processing with Jobstreams.
See Also
Correcting Profit Manager Fact Table Errors Using PF Modification
This section provides an overview of fact table error correction and discusses how to:
View PF summary statistics.
View and correct errors.
Understanding Profit Manager Fact Table Error CorrectionAfter you have run the PF Summary process on a Profit Manager fact table, you can view and correct any errors that were found by opening the appropriate Profit Manager Fact Correction page. This process enables you to view and correct fact errors for your Profit Manger fact tables. For instance, you can use the Ledger Correction component to review and correct invalid data in the ledger fact table. Although there is a separate menu item and page for the Profit Manager Fact Correction process, the process is exactly the same for each.
There is an error table for each Profit Manager fact table. The error table contains all rows with errors that were found during data migration and is a mirror image of the target table, plus two extra columns called Error Flag and PF_EDIT_SEQ_NUM.
Note. Journal modifications are run separately using PF Journal Modification.
For each modification that you run, you must verify the delivered record metadata, record summary metadata, and job totals metadata are accurate.
Viewing PF Summary Statistics
Access the PF Summary Statistics page.
|
Business Unit and PF Batch ID |
Uniquely identifies a batch of data to be summarized or modified. The PF Batch ID is a combination of model ID, the fiscal year, and the accounting period. |
|
Number of Valid Records and Number of Records with Errors |
Review these display fields for an overview of the amount of errors. The field names on the left are defined in job totals metadata and are specified in record summary metadata. |
|
Last Edited Time Stamp |
These fields display information about who ran the last PF Record Summary and when the PF Record Summary was run. |
Click on the Error Fields tab to continue with the modification process.
Viewing and Correcting Errors
Access the Error Fields page.
|
Field Name |
Displays the field name of the error. |
|
Field Value |
Displays the value for the field name in error. |
|
Number of Errors |
Displays the number of records in error for the specified field. |
You can correct fields by selecting the appropriate value to correct the specified column errors and clicking the Apply button. For other fields, you can click on the individual rows and correct those errors using the prompt table.