9 Servicing the Library
This section covers routine procedures you may need to perform when servicing or troubleshooting the library. For details on removing or replacing specific components, see "Replacing Components (CRUs & FRUs)".
WARNING:
Oracle's StorageTek SL150 Modular Tape Library contains a Class-1 laser, as defined by IEC 60825-1 Ed. 2 (2007). Use of controls or adjustments or performance of procedures other than those specified herein may result in hazardous radiation exposure.
See Also:
Place the Library Online and Offline
Always take the library offline before performing any maintenance that might conflict with host data operations. After you complete the disruptive activity, you can bring the library back online and continue host operations.
-
If taking the library offline, stop any host activity before proceeding.
-
From the remote interface, click the Library is Online/Offline drop-down in the upper-right.
-
Select either Set Library Offline or Set Library Online.
Power On the Library
-
Gain physical access to the library. When the library is off, the browser-based user interface is not running, so you cannot power the system on remotely.
-
Verify the robot is unlocked (if not, see "Unlock the Robot").
-
Ensure that the bottom library module has the floor installed.
-
Press the power button on the front upper-left of the base.
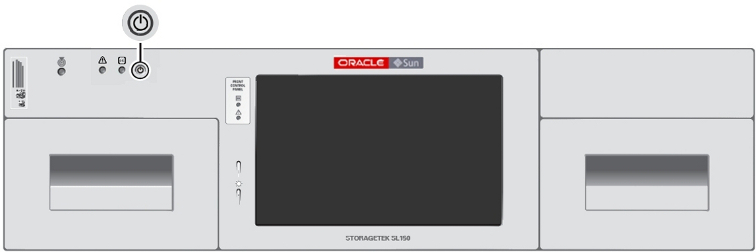
The library boots and performs an audit (see "Audit the Library").
Library Startup Sequence
-
The robot unparks and the hand fully retracts.
-
The robot determines the order of the modules, starting at the top and moving down one module at a time.
-
The wrist sweeps through its full range of motion and the hand moves through the full track range. The reach mechanism extends and retracts.
-
The magazines latch.
-
The library runs a full audit. When the audit completes and all drives are ready, the library is operational (see "Monitoring an Audit in Progress").
Power Off the Library
There are two methods of powering off the library:
-
Controlled Power-Down from the Interface — Always recommended, if possible.
-
Forced Power-Down — Cuts power at the library or rack. Use this method only when the controlled method does not work.
Controlled Power-Down from the Interface
-
Stop any host activity.
-
If using the remote interface, click the power button
 in the upper-left, and then select Power Down Library. If at the library, press the power button on the Front Control Panel.
 -
Optionally, select Prepare the Robot for removal before the library powers down This parks the robot at the top of the library. Select this option if you are powering down for any of the following reasons:
-
Removing or replacing the robot.
-
Moving the rack or moving the library to a new rack.
-
Preparing the library for shipment.
If you selected this option, see "Lock the Robot".
-
Forced Power-Down
-
Stop any host activity.
-
Remove power from the library using one of the following methods:
-
Use the forced (hard) shutdown method. Press the front panel power button and hold it until the library shuts down (approximately 10 seconds).
-
Use the physical method, if the hard shutdown does not work. Remove power from all power supplies (disconnect the power cord from all power supplies or set the PDU or power strip switch to the off position).
-
Lock the Robot
-
Make sure you have selected Prepare the Robot for removal before the library powers down (see "Controlled Power-Down from the Interface"). This parks the robot in a protective housing at the top of the library.
-
Locate the robot lock on the back of the base module. There are two robot lock types (see below). Following the procedure for your lock type.
-
After locking, within the power-down dialog, select I have secured the Robot Lock in the locked position.
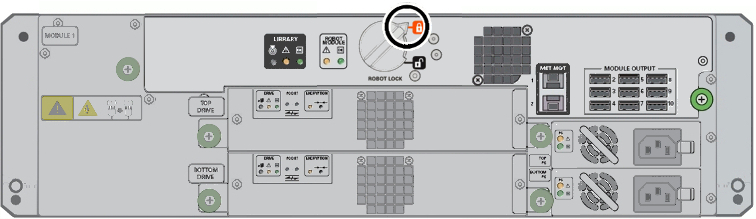
Lock the Knob-type Robot Lock (new version)
To lock, turn the knob counter-clockwise until it clicks into place.
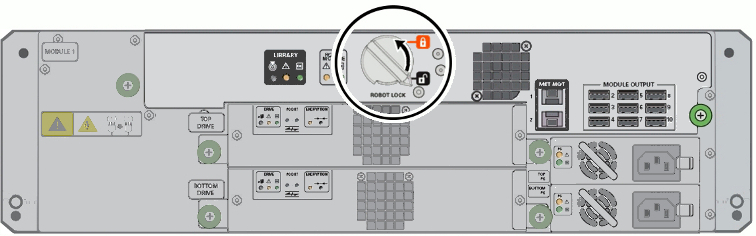
The pointer on the knob should point past the red, locked padlock icon.
Lock the Thumbscrew-type Robot Lock (older version)
-
Loosen the captive thumbscrew on the lock assembly. Pull the lock straight out until the long tab comes out of the slot at right.
-
Rotate the lock assembly counterclockwise 180 degrees, and slide the long tab into the slot at left.
Verify a red locked padlock icon is visible in the small window.
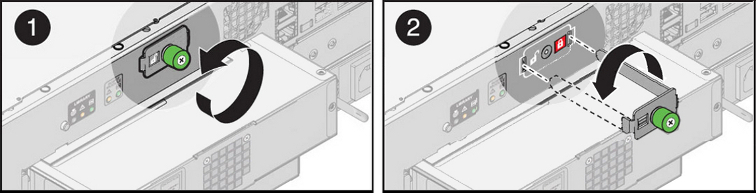
-
Secure the lock assembly by tightening the captive screw. The robot is now locked.
Restart the Library
-
Click the power button
in the upper-left of the user interface, and then select Restart Library. -
If the library has been operating normally and if its contents have not changed, select Bypass audit for a faster restart ...
The option is not available if magazines are open or if the library has been in the Inoperative state. For more information, see "Audit the Library".
Restarting the Library Following a Power Outage
If a power outage occurs, the library returns to its last power state once power is restored. When power is restored, the library powers up and runs just long enough to check its previous power state. If the library was ON before the outage, it will be ON afterward. If it was OFF, the library powers itself OFF after a few seconds.
Restarting a library that was off prior to a power interruption is like powering on any other library that is off. See "Power On the Library".
Audit the Library
During an audit the robot checks each cartridge slot, recording cartridge labels and locations to create a tape catalog. The library must audit whenever tapes are manually moved (meaning moved with human intervention) so that it can update the catalog. The library automatically performs an audit whenever it powers up or whenever you reinsert magazines.
Normally, host applications request audits. However, you can audit the library from the remote interface, but you should avoid this, if possible, as it interrupts host operations.
To manually initiate an audit:
-
From the remote interface, select Library in the left menu.
-
From the Library drop-down menu
 , select Audit Library.
 -
Optionally, select Set the Library back Online ...
-
To take the library offline, start the audit, and close the dialog, press OK.
-
If you did not check the Set the Library back Online ... checkbox, remember to bring the library back online once you are ready.
Monitoring an Audit in Progress
The duration of an audit depends on the size of the library. For example, a 30-slot library can take about 7 minutes to audit.
You can track the progress of the audit on the Library screen of the remote interface. Grayed-out cartridge icons represent unaudited slots. As the audit progresses, audited slots return to their normal appearance. Hovering over a slot shows the current cartridge label information (see "Labeling Cartridges" for label information).
Move the Library Rack
-
Power the library off (see "Power Off the Library").
-
Secure the robot (see "Lock the Robot").
-
If the floor is uneven, remove all magazines from library as tape cartridges can shift and obstruct library robotics when the library is restarted.
-
Unlock all magazines using the remote interface or local operator panel. Press the Select All option on the Unlock Magazines dialog.
-
Remove all magazines.
-
-
Set the rack PDU circuit breakers to OFF and disconnect the PDU power cord(s) from the main circuit.
-
Label and disconnect any host connection or LAN cables.
-
Raise any leveling pads until the casters are supporting the rack. Release any rack anti-tip device(s), and remove any wheel chocks.
-
Move the library to its new location. Reset the leveling pads.
-
Reinstall the magazines.
-
Reconnect power, host-connections, and local area network (LAN) cables.
-
Unlock the robot.
-
Power the library on.
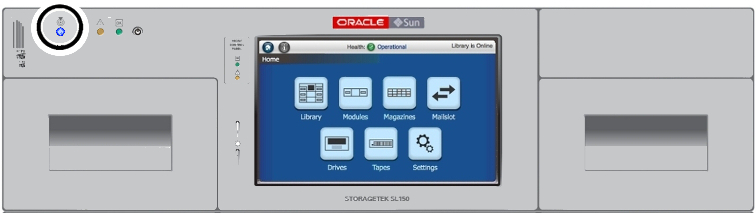
Enable the Locate Light
If you have multiple SL150s in your data center, you an use the locate light to physically identify a particular unit.
-
In the remote interface, click the locate icon
 in the upper left of the screen.
 -
Select Switch Locate Light On.
-
The physical locate LEDs activate on the front control panel and in the black rectangle on the robot CRU.
Troubleshoot the Library
Diagnose a Browser-Based User Interface Problem
-
If you have problems with a browser, try a different browser. Check the SL150 firmware release notes for known incompatibilities.
-
If you start to have problems with a browser that used to work, check for recent changes to the browser configuration:
-
If scripting (Javascript) has been disabled, enable it.
-
If browser plug-ins or extensions have been installed or updated recently, disable or uninstall the add-on software.
-
If browser software has been recently updated, roll back the update and revert to the previous version.
-
-
If an update is available for the browser, install it.
-
If you still have problems after you have tried the latest versions of several browsers, open a service request. See "Get Parts and Technical Support".
Diagnose a Library Problem
-
Diagnose a Problem if You Cannot Login to the Remote Interface
-
Locate and Clear Obstructions, Such as Loose or Protruding Cartridges
Diagnose a Problem if You Cannot Login to the Remote Interface
-
Go to the library and check the local operator panel.
-
If the local operator panel is working and the remote user interface is not, check the Ethernet cable connected to NET MGT port 0 at the rear of the library. Check for network problems.
-
If the local operator panel is also not working, make sure that the library has power. Check the power cord connected to each power supply. Check the data-center power outlet. Check breakers.
-
If the library is connected to power, check the LED Indicators on the library and its components:
-
Power supplies — If an amber power supply LED is lit or if both power supply LEDs are dark, replace the power supply. See "Power Supply Removal and Replacement".
-
Robot Module — If an amber Robot Module LED is lit or if both robot LEDs are dark, replace the robot. See "Robot Module Removal and Replacement".
-
-
If the robot module is OK, restart the library, and repeat this procedure.
-
If problems persist after you have restarted the library and repeated the above diagnostic steps, go to "Get Parts and Technical Support", check for relevant knowledge articles, and then, if necessary, open a service request.
Use the Health Table to Diagnose the Issue
-
Log in to the remote interface, take the library offline, and use the health table.
-
To access the health table, click the Degraded or Failed indicator in the status bar.
-
Note the Fault Code listed in the health table. Suggested fixes are listed below:
-
Fault Code 903:
-
If Drive Auto Clean is enabled — If the drive listed in the suspected component field is mounted, wait. The library will attempt a cleaning once the tape dismounts.
If the fault persists after the tape dismounts, a cleaning cartridge is unavailable or expired. Load a new, LTO universal cleaning cartridge into a reserved slot. Then clean the drive using the library user interface.
-
If using host-managed drive cleaning — Consult the host application documentation and make sure that fresh cleaning media are available. If necessary, clean the drive listed using the library user interface.
-
-
Fault Code 9108:
-
If the Suspect Component is one or more magazines, see "Locate and Remove a Cartridge Stuck in a Magazine Slot".
-
If the Suspect Component is one or more drives, the cartridge may be stuck in the drive. Go to "Get Parts and Technical Support", and check for relevant knowledge articles. If you cannot find a resolution, open a service request
-
-
Fault Code 9109 or 9102 thru 9107:
-
All other Fault Codes:
-
Follow the Recommended Action listed in the health table one at a time and in the order specified in the suspect components list. See "Replacing Components (CRUs & FRUs)".
If you replace the robot, the operator panel, or the chassis of library module 1, power-cycle the library as soon as you finish. These three components maintain records of the product serial number and configuration settings. If you replace more than one of them at a time, without restarting the library, this information will be lost.
-
-
-
After attempting a fix, if the connection status indicator shows Library is Inoperative, restart the library and then see "Check if Fault is Closed in the Health Log" below.
Check if Fault is Closed in the Health Log
After attempting a fix and restarting the library, you should see if the fault record has been closed:
-
Select Service in the left menu. Select the Health Log tab
-
Locate the row for the fault and note the value of the Type field:
-
If the record is still Open, you have not yet isolated the problem. Note the next Suspect Component and repeat "Use the Health Table to Diagnose the Issue" above.
-
If the record is Closed, but the library status is still Degraded, check for remaining faults in the health table and repeat "Use the Health Table to Diagnose the Issue" above.
-
If you Closed all fault records and still cannot get the library into Operational condition, go to "Get Parts and Technical Support", check for relevant knowledge articles, and, if you cannot find a resolution, open a service request. Include fault codes and details of the actions that you have taken.
-
Locate and Remove a Cartridge Stuck in a Magazine Slot
Use this procedure to resolve Fault Code 9108 if the Suspect Components indicates one or more magazines.
-
Identify the problem slot. Correlate the details of the failed move, as listed in the Library Activity Panel, with the Suspect Components field of the corresponding Library Health record.
-
Manually unlock the magazine that contains the problem (see "Mount the Base Module Task 2: Remove the Cartridge Magazine with the Hex Key").
If you feel any significant resistance when you try to remove the magazine, STOP and check for obstructions. Go to "Locate and Clear Obstructions, Such as Loose or Protruding Cartridges".
-
Set the magazine on a flat surface, be careful to not spill cartridges.
-
Locate the slot with the stuck cartridge. Grasp the cartridge by the top and bottom gripping surfaces. Gently try to free the cartridge. Do not force it.
-
If you free the cartridge, check the storage slot for damage or defects.
If you find any damage to the magazine, request a replacement. Go to "Get Parts and Technical Support", and create a service request.
If you find no damage, reseat the cartridge in its slot and make sure that it is moving freely. Reinstall the magazine in its bay and power up the library and see "Check if Fault is Closed in the Health Log".
-
If you cannot free the cartridge, go to "Get Parts and Technical Support", and check for relevant knowledge articles. If you cannot find a resolution, open a service request.
-
Locate and Clear Obstructions, Such as Loose or Protruding Cartridges
If the Suspect Components and/or Recommended Action fields indicate that an obstruction is interfering with the robot or if the Fault Code is either 9109 or in the range 9102-9107, look for a mispositioned cartridge or obstruction in the library.
-
Remove the magazine that will give you the best view of the interior of the library. If you feel any significant resistance when attempting to remove the magazine, do not force it. Instead, remove a magazine on the opposite side of the library.
-
Using the empty magazine bay as a window, look inside the library. Try to locate obstructions, particularly loose or protruding cartridges. Look across, above, and below.
-
If you cannot see any obstructions, gain additional visibility by removing additional magazines.
-
If you see a cartridge protruding from a storage slot in one of the magazines or lying on the bottom of the library, reach in through the open magazine bay and try to remove it.
-
If you cannot reach the cartridge, remove additional magazines for additional clearance.
-
If you cannot remove the problem cartridge, stop here. Go to "Get Parts and Technical Support", and check for relevant knowledge articles. If you cannot find a resolution, open a service request.
-
If you successfully removed the problem cartridge, remove the source magazine and check the source storage slot for defects.
-
If you find any damage to the source magazine, request a replacement. Go to "Get Parts and Technical Support", and open a service request.
-
Otherwise, reseat the errant cartridge in its storage cell.
-
Reinstall all removed magazines in their original bays.
-
Once you have reinserted the magazines, start the library and then see "Check if Fault is Closed in the Health Log".
Save the Health Log to a File
If you need to work on diagnostics off-line or if you need to open a service request, save the contents of the system health log to a file.
-
From the remote interface, select Service in the left menu and then select the Health Log tab.
-
Click Export
 , and then save the file.
The HTML-based
SL150_HealthLog.xlsfile is compatible with current spreadsheet applications, such as Microsoft Excel and Apache OpenOffice Calc. To view these files in web browsers, simply rename the file using the.htmlfile extension in place of.xsl.
Run a Self-Test
Once you have resolved an issue. You can make sure that the library is functioning normally by running a self test. See "Run a Self-Test".
Restore the Factory Default Configuration
Note:
Resetting the library erases the existing configuration. You will have to recreate the configuration from scratch, so do not use this procedure on an operational library except as a last resort.-
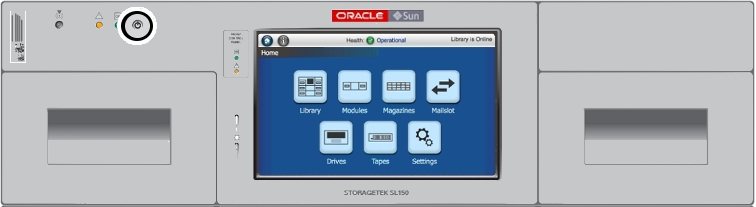
This procedure requires two people. One person at the front of the library and one at the rear. A single person cannot reach both buttons simultaneously.
-
Find the locator buttons — front upper left and rear top center (see below)
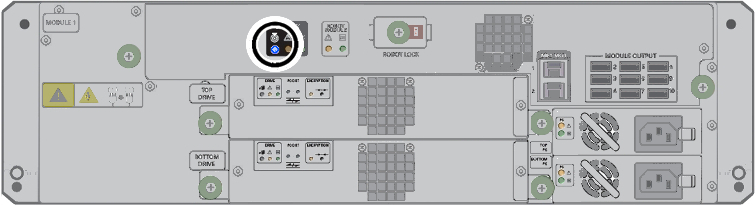
-
Push and release either one of the locator buttons.
-
Once the locator buttons light, simultaneously push and hold both front and rear buttons for about 10 seconds until the lights rapidly flash.
Note:
After 3-4 seconds, the lighted locator buttons flash slowly. After 10 seconds, the locator buttons should start to flash rapidly. -
When the lighted locator buttons start flashing rapidly, release both buttons. The library is now reset to defaults. It should power down and restart.
Note:
If either Locate button is released before the fast flash rate, the reset process terminates. -
If the library does not power-on automatically, press the power button.
-
Run the initial installation wizard and reconfigure the library as you would when setting up a new unit (see "Configure the Library After Powering-on for the First Time").
Get Parts and Technical Support
Check for Relevant Knowledge Articles
-
Log in to My Oracle Support at
https://support.oracle.com. -
Select the Knowledge tab.
-
In the Knowledge Base area, select the Search & Browse tab.
-
In the Select a product or product line field, enter StorageTek SL150 Modular Tape Library.
-
In the Go directly to the best match area, click the Information Center: StorageTek SL150 ... link.
-
In the Information Center document, select the Resources tab, and browse the links on the page.
Get Firmware Updates
Create a Service Request
-
Save a library health log (see "Save the Health Log to a File").
-
Log in to My Oracle Support at
https://support.oracle.com. -
Select the Service Requests tab.
-
Click the Help control in the upper right corner of the Oracle support page.
-
From the Help drop-down menu, select How do I create a new SR?
-
Follow the instructions provided.