6 Importing and Exporting Cartridges
Viewing Tape Cartridge (Media) Health
After a tape mounts to a drive, the drive will report on the health of the tape based on information from the tape's previous use. You can view the health of the specific tape in the Tapes table.
-
From the remote interface, select Tapes in the left menu.
-
View the Media Health column. Possible states are:
-
Unknown
 — the tape has not yet been mounted in a drive, therefore the health of the tape is not known.
 -
Operative
 — the tape is in good health.
 -
Degraded
 — the tape is in moderate health and should be replaced.
 -
Failed
 — the tape is in bad health or incompatible with a tape drive. It should not be used and should be replaced.
-
Guidelines for Handling Tape Cartridges
CAUTION:
Improperly handling tape cartridges can cause loss of data or damage the library.-
Keep tapes clean and inspect for damage before each use.
-
When unwrapping the plastic from a new cartridge, use the string or pull tab. Do not use letter openers, knives, box cutters, scissors, or other sharp instruments.
-
Never open a tape cartridge housing.
-
Do not handle tape that is outside the cartridge; the tape edge might be damaged.
-
Do not expose the tape or cartridge to direct sunlight, moisture, excessive temperatures, or magnetic fields.
-
Transport cartridges in shock resistent cases
Inspect a Tape Cartridge
Always inspect a tape before you insert it into a drive or a library. A defective or dirty tape can damage a drive. Never use a damaged tape. Look for:
-
Dirt or debris
-
Cracked or broken housing
-
Damaged hub-wheel teeth
-
Damaged write-protect switch (front left of cartridge, see below). The switch should slide easily.

-
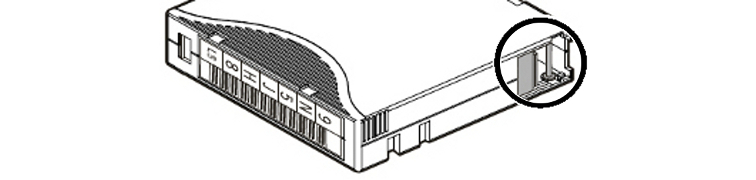
Damaged leader door or pin (located on near rear of cartridge, see below). The door should open cleanly and snaps shut when released. The pin should be straight.
-
Liquid in the tape cartridge
-
Labels not firmly attached, or that extend over the tape cartridge edge
-
Incorrect media type. The cartridge type must be supported by the drives in the library. See "Labeling Cartridges" to verify that the two digit media identifier is supported.

Clean the Tape Cartridge Exterior
Wipe all dust, dirt, and moisture from the cartridge with a lint-free cloth. Use Oracle StorageTek Tape Cleaner Wipes to clean the cartridge exterior. These wipes are saturated with isopropyl alcohol. Do not let any solution touch the tape or get inside the cartridge.
CAUTION:
To avoid damage to cartridges, do not use acetone, trichloroethane, toluene, xylene, benzene, ketone, methylethyl ketone, methylene chloride, ethyldichloride, esters, ethyl acetate, or similar chemicals to remove labels or clean cartridges.Store Tape Cartridges
Store tapes in a clean environment. Do not take a tape cartridge out of its protective wrapping until you are ready to use it. Use the tear string (not a sharp instrument) to remove the wrapping. Before using a tape cartridge, ensure that it has been in its operating environment for at least 24 hours so that it can adjust to changes in temperature and humidity.
Labeling Cartridges
For instructions on how to apply a label, see "Apply a Label to a Tape Cartridge".
The library identifies individual storage volumes using ANSI standard, code 39 barcode labels that are attached to the front of the tape cartridge. The label has both alphanumeric characters and a machine-readable barcode. The following sections describe labeling standards.
Tape Media ID
Standard LTO data cartridge labels have a unique, customer-assigned, six-character volume ID, followed by a two-character media ID field. The media ID characters are:
-
L5 = LTO Generation 5
-
L6 = LTO Generation 6
-
L7 = LTO Generation 7
-
L8 = LTO Generation 8
-
M8 = LTO Generation 7 cartridge initialized to 9TB capacity (only compatible with LTO8 drives, see "About M8 Compatibility" for more information)
-
LV = LTO Generation 5 WORM
-
LW = LTO Generation 6 WORM
-
LX = LTO Generation 7 WORM
-
LY = LTO Generation 8 WORM
-
CU = LTO Universal cleaning
If you need to configure the library for a non-standard labeling scheme, see "Non-Standard Label Formats" below.
Tape Cartridge Types
Cleaning and diagnostic tapes require unique labels to distinguish them from data tapes. The first three alphanumeric characters in the vol-id determine the type of tape.
-
Cleaning tapes — use
CLNUnnfor the vol-id plus the cleaning-specific media ID, whereCLNUis the cleaning tape identifier andnnis a sequence of numbers (for example,CLNU01CU). -
Diagnostic tapes — use
DG[space]nnnplus the media ID, whereDG[space] is the diagnostic tape identifier, andnnnis a sequence of numbers (for example,DG 001L6would be an LTO6 diagnostic tape label).
Label Format Types
Oracle recommends using the default setting.
- No type checking
-
Passes all characters in the label without modification and without checking the media domain and type. Use this option if your labels do not identify the media type:
M123456789ABdoes not, for example, contain a media descriptor, such asL5. - Prepend last two characters
-
Passes all the characters after moving the last two characters in the label to the front:
KL1020L5is translated toL5KL1020. - Full label
-
Passes the first eight characters in the physical label:
KL1020L5is translated toKL1020L5. - Trim last character
-
Passes the first seven characters in the physical label:
KL1020Lis translated toKL1020L. - Trim last two characters (default)
-
Passes the first six characters in the physical label:
KL1020L5is translated toKL1020. - Trim first two characters
-
Passes the third through eighth characters in the physical label:
KL1020L5is translated to1020L5. - Trim first character
-
Passes the second through eighth characters in the physical label:
KL1020L5is translated toL1020L5.
Non-Standard Label Formats
By default, the library uses the eight-character label format that is standard for LTO cartridges. While most backup and storage management applications support the standard LTO labeling format, a few use proprietary labeling schemes to track volumes. If you use such an application, you can, in most cases, configure the SL150 to automatically translate between the physical labels on your cartridges and the logical label format that the application uses internally.
Translating Between Physical and Logical Labels
To accommodate the fullest range of possible labeling schemes, the library supports labels 8 to 14 characters long and provides a label windowing feature that lets you specify how labels should be interpreted when communicating with the host application.
So, for example, if the host application uses only a portion of the physical cartridge label to identify volumes, you can tell the library to construct a logical label using a subset of the characters. Alternatively, if the physical cartridge label is simply a string of characters that does not identify the media domain (LTO) and generation, you can tell the library to skip domain and type checking and send all characters to the host without any further processing (you should not use this option, if your labels include a domain and type).
Managing Unidentifiable, Unsupported, or Missing Labels
If the physical label on a cartridge is missing, misapplied, damaged, or incorrectly formatted, the cartridge can be loaded and stored in the library. Since the library software cannot identify the cartridge, it marks the Tape Label field of the corresponding tape properties sheet [UNREADABLE].
Determine the Required Number of Reserved System Slots
You can reserve up to a maximum of three slots. Based on your cleaning strategy and your diagnostic needs, decide how many system reserved slots to configure:
-
Diagnostic Cartridge — may require 1 reserved slot.
If you are planning to use a diagnostic cartridge, Oracle recommends that you configure one reserved system slot to hold it. This insures that it is always available when needed. But if storage space is at a premium, you can also import the diagnostic cartridge from the mailslot as needed.
-
Cleaning Cartridge — may require 2 reserved slots.
If using library auto cleaning or manual cleaning: configure at least one, preferably two reserved slots. Two cleaning cartridges in reserved slots minimizes downtime by insuring a usable cleaning cartridge is always available, so drives do not sit idle while awaiting cleaning.
If using host-managed cleaning: do not configure system reserved slots for cleaning cartridges. Host applications cannot access system reserved slots. Cleaning cartridges must reside in storage slots controlled by the host application.
Determine the Number of Cleaning Cartridges
Note:
Always use new cleaning cartridges. To the library, every newly imported cleaning cartridge is new, with a usage count of zero. So if you load used cleaning cartridges, you will not have an accurate count of the number of remaining cleanings.At least two cleaning cartridges should be available for drive cleaning. The total number of cleaning cartridges in the library and where they need to reside depends on your drive cleaning strategy and partitioning configuration:
-
If using library auto-cleaning or manual cleaning: Oracle recommends that you provide two, new, LTO universal (
CU) cleaning cartridges into reserved system slots. The partitioning configuration does not affect this number. -
If using host-managed cleaning: the number of cleaning cartridges required depends on your partitioning configuration.
For a non-partitioned library, Oracle recommends that you provide two, new, LTO universal (
CU) cleaning cartridges placed into storage slots.For a partitioned library, Oracle recommends that you provide two, new, LTO universal (
CU) cleaning cartridges per partition. A host application cannot access drives or library slots that are not in the partition that it controls. So each partition must contain cleaning media. For example, three partitions would require three cleaning tapes at a minimum and six for best drive availability
Apply a Label to a Tape Cartridge
-
When handling cartridges, follow all precautions in "Guidelines for Handling Tape Cartridges".
-
Clean the surface where the label will be placed using a small amount of isopropyl alcohol-based cleaning solution. Never use any other type of solvent.
-
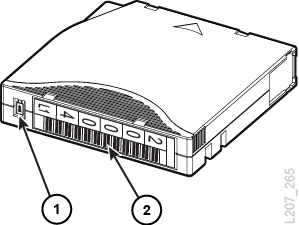
Orient the label with the barcode side down. Orient the cartridge so that the write-protect switch is to your left (see figure below).
-
Peel the backing off the label. Apply the label within the slight indentation. The label must not overlap the edges of this indentation.
1 - Write Protect Switch
2 - Cartridge label correctly applied (barcode side down/character side up)
Prepare Diagnostic, Cleaning, and Data Tape Cartridges
Before loading cartridges into the library you need to prepare the various tape cartridge types: diagnostic, cleaning, and data.
Prepare a Diagnostic Tape Cartridge
Diagnostic cartridges are specially labeled data cartridges used for testing library robotics and drives. You can purchase diagnostic cartridges or you can create them by applying an Oracle-supplied diagnostic label to any available, blank LTO tape. Oracle recommends that you have a diagnostic tape on hand during system configuration and at all times thereafter, if possible.
To create a diagnostic cartridge, apply the DG label from the library's accessory kit to a blank LTO data cartridge (see "Apply a Label to a Tape Cartridge").
Prepare Cleaning Tape Cartridges
Universal cleaning cartridges carry the media descriptor CU. Note that Oracle strongly recommends universal cleaning tapes and requires their use with library-managed drive cleaning. Apply the appropriate label to the cleaning cartridge (see "Apply a Label to a Tape Cartridge"). Labels for universal cleaning cartridges take the form CLNUxxCU, where CLNU is a descriptive prefix, xx is a sequence number, and CU is the media descriptor for universal cleaning media.
Prepare the Data Tape Cartridges
Locate the correct label for the data tape (see "Labeling Cartridges") and apply the label (see "Apply a Label to a Tape Cartridge"). Make sure that the label's media ID matches the cartridge type.
If you need to configure the library for a non-standard labeling scheme, see "Non-Standard Label Formats".
Load the Magazines (Bulk Loading)
Each library module has two magazines that hold 15 cartridges each. Before putting the library into production, you can load the magazines to save time importing cartridges. Additionally, there may be times when it makes sense to bulk load the library using the magazines. The library must always perform an audit after bulk loading.
-
Load the Magazines Task 2: Load the Left Magazine in the Base Module
-
Load the Magazines Task 4: Locking the Magazines and Auditing the Library
Load the Magazines Task 1: Unlock and Remove the Magazines
If the magazines have already been inserted into the enclosures, proceed as follows.
-
From the remote interface, select Library in the left menu. For instructions on logging in, see "Log In to the Remote Interface".
-
From the Library drop-down menu
 , select Unlock Magazines.
 -
Select the magazines to unlock and click OK. The library remains offline and busy until all selected magazines are unlocked.
-
Slide magazines smoothly out of the enclosure, supporting the underside with one hand.
Load the Magazines Task 2: Load the Left Magazine in the Base Module
-
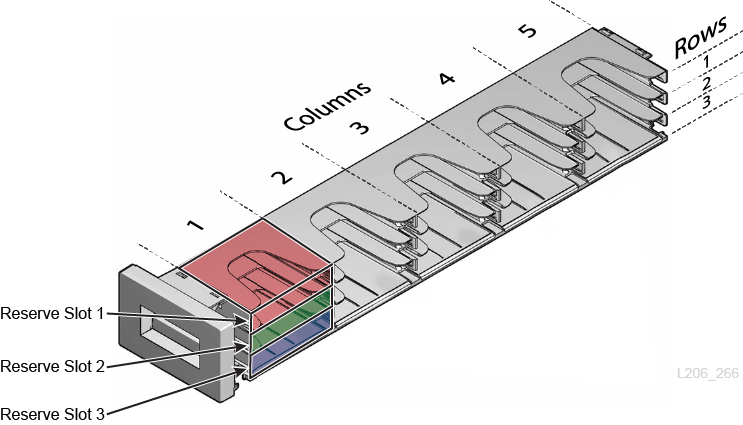
The figure below shows the layout of the base module left magazine.
-
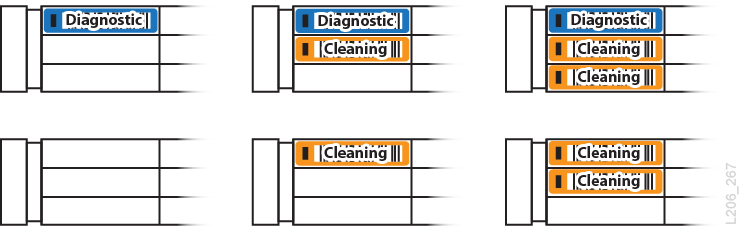
Optionally, populate the reserve slots with diagnostic and/or cleaning cartridges (see "Determine the Required Number of Reserved System Slots"). Place the diagnostic cartridge at the top (if using), followed by the cleaning cartridges. The following are all valid reserve slot configurations:
-
When inserting the cartridges into the magazine, orient the cartridge with the hub down and the label on the open side of the magazine. Gently push the cartridge into the slot until the plastic retention spring snaps into place.
-
If using host-managed drive cleaning, place one or two LTO universal cleaning cartridges in unreserved, data slots. Reserved slots are optional, so the following figure could represent a valid configuration for host-managed cleaning.

-
Load the remaining slots with data tapes.
-
Once loaded, reinstall the left magazine. Be careful to hold the magazine so that tapes do not fall out. Push the magazine into place until it latches with a click.
Load the Magazines Task 3: Load the Remaining Magazines
IMPORTANT:
If using the 19-slot mailslot configuration, leave the right base module magazine empty.-
Slide each magazine out of the enclosure, supporting the underside with one hand.
-
Load data cartridges into the magazine slots.
REMINDER: If host-managed drive cleaning and partitioning the library, place one, preferably two, LTO universal cleaning cartridges in each partition.
-
Once loaded, reinstall the magazines. Be careful to hold each magazine so that tapes do not fall. Push the magazine into place until it latches with a click.
Load the Magazines Task 4: Locking the Magazines and Auditing the Library
-
Log in to the remote user interface.
-
From the Library drop-down menu
, select Lock and Audit Magazines. -
Optionally, select Set the Library back Online... to automatically bring the library online after the audit.
-
Click OK to lock the magazines, take the library offline, and start the audit (see "Audit the Library").
Updating Media Health After a Bulk Load
The library assesses each tape and updates the Media Health state whenever the cartridge mounts a drive. After bulk loading tapes, Media Health for many cartridges will be listed as "Unknown". As the library mounts cartridges during the course of routine operations, the library progressively updates the Media Health property, replacing the "Unknown" values. However, you can force an immediate update of an individual cartridge by taking the library offline and mounting the cartridge.
Import and Export Cartridges Using the Mailslot
When you need to import cartridges into a library or partition or export them from a library or partition, use the mailslot (also known as the cartridge access port or CAP in other StorageTek libraries). The standard mailslot holds up to four cartridges. The optional, expanded magazine holds up to nineteen.
To load or unload cartridges using the mailslot, carry out the following tasks:
-
Assign the Mailslot to a Partition (if the library is partitioned),
-
Unassign the Mailslot when finished.
Assign the Mailslot to a Partition
If your library is partitioned and controlled by two separate host applications, you must assign the mailslot to a partition before exporting or importing. For information on how SCSI hosts handle a shared mailslot, see the SL150 SCSI Reference Guide.
Assign the Mailslot Using the Remote User Interface
-
Select Library in the left menu.
-
From the Mailslot drop-down
 , select Assign.
 -
Select a partition from the Assign Mailslot to Partition drop-down list.
Assign the Mailslot Using the Local Operator Panel
-
On the Home screen, tap Mailslot.
-
Tap Assign to a Partition at the bottom of the screen.
-
Select a partition to assign.
Import Tape Cartridges
-
If importing into a partitioned library, Assign the Mailslot to a Partition.
-
Open the Mailslot, and place the tapes in the mailslot. Close the Mailslot.
-
Use the host application to move the tapes from the mailslot to the storage slots.
If you cannot use the host application, you may Move Tape Cartridges with the Remote Interface. Then, update the host application database to account for the new tapes.
-
Once you are finished importing tapes, Unassign the Mailslot.
Export Tape Cartridges
-
If exporting from a partitioned library, Assign the Mailslot to a Partition.
-
Use the host application to move the tapes from the storage slots to the mailslot.
If you cannot use the host application, Move Tape Cartridges with the Remote Interface. Then, after closing the mailslot update the host application database to account for the removed tapes.
-
Open the Mailslot, and remove the tapes. Close the Mailslot.
Open the Mailslot
-
If using the remote interface:
Select Library in the left menu. From the Mailslot drop-down, select Open and then click OK.If using the local touch panel:
On the Home screen, tap Mailslot. Tap Open Mailslot. If you do not see an Open Mailslot button, the mailslot is incorrectly assigned, see "Assign the Mailslot Using the Local Operator Panel". -
Pull the standard mailslot out from the upper-right corner of the base module.
If using the expanded mailslot, slide out the right magazine in the base module, supporting the weight with one hand. Be careful to hold it so that tape cartridges do not fall out of the slots
-
Add and/or remove cartridges, following the guidelines for "Guidelines for Handling Tape Cartridges".
Close the Mailslot
IMPORTANT:
The library cannot access mailslots until the mailslot is positively latched (you will hear a noticeable click).-
Expanded mailslot (the right base module magazine):
Grasp the front handle while supporting the magazine weight with the other. Carefully align the magazine with the right magazine bay of the base module, and gently push it into the bay until it latches into place with a noticeable click. -
Standard mailslot:
Push the mailslot into the bay using a single, steady motion, so that it latches into place with a noticeable click. If you do not insert the mailslot smoothly, you may fail to engage the latch and may trigger needless, multiple re-audits of the mailslot.
Unassign the Mailslot
You should unassign the mailslot when you are finished importing/exporting so that other partitions can access it.
Unassign the Mailslot Using the Remote User Interface
-
Select Library from the left menu.
-
From the Mailslot drop-down
, select Unassign. -
Click OK.
Unassign the Mailslot Using the Local Operator Panel
-
On the Home screen, tap Mailslot.
-
Tap the Unassign Mailslot button at the bottom of the interface.
-
Tap OK.
Move Tape Cartridges with the Remote Interface
Always use the host application to move tapes when possible. Moving cartridges with the SL150 interface can cause host database inconsistencies that force audits.
-
If the library is partitioned and you will be moving a tape to/from the mailslot, Assign the Mailslot to a Partition.
-
Select Library in the left menu. Right-click on a tape, select Move Tape.
-
At the top of the screen. Optionally, check the Set the Library back Online ... checkbox (the library automatically goes offline when moving tapes with the remote interface). Click OK.
-
The Source field is pre-populated. To select a Destination, click on where you want to move the tape to within the graphical library map.
-
To move the tape, click OK.
-
If you did not check the Set the Library back Online ... checkbox, remember to bring the library back online once you are ready.