- 3.2.1. Using the utsetup Command
- 3.2.2. Not Using the utsetup Command
- 3.2.3. Automating Sun Ray Software Installations
- 3.2.4. Installing Firmware Before Sun Ray Software Installation
- 3.2.5. How to Install Sun Ray Software
- 3.2.6. Post-Installation Configuration
- 3.2.7. How to Install the Windows Connector Components on a Windows System
- 3.2.8. How to Clone a Sun Ray Server
- 3.2.9. How to Install and Configure a Sun Ray Server With Default Settings
- 3.2.10. How to List the Current Sun Ray Software Version
- 3.2.11. How to Remove Sun Ray Software
- 3.2.12. Installation (utinstall) Error Messages
This section provides detailed information about how to install Sun Ray Software.
The utinstall and utconfig commands are the basic commands to install and configure Sun Ray software on a system. There are also a number of additional commands that you need to run to configure a basic Sun Ray server and make it ready to provide sessions to clients.
The utsetup command provides a way to run all
the appropriate commands, including utinstall
and utconfig, in the appropriate sequence to
install and configure a Sun Ray server. By design, the
utsetup command configures a Sun Ray server
to use a shared network (LAN) and it generates a set of
.parms files in the TFTP home directory for
managing Sun Ray Client firmware. This recommended configuration
is detailed in Chapter 2, Planning a Sun Ray Network Environment.
When you use utsetup command to initially install a Sun Ray server, it runs the following commands in sequence:
utinstall
utconfig
utpolicy -a -z both -g -M
utreplica (if HA/failover group selected)
utfwadm -A -a -V (optional)
utadm -L on (optional)
utstart -c
See Section 3.2.5, “How to Install Sun Ray Software” for installation instructions using the utsetup command.
If you need to install and configure a Sun Ray server in a different way than what the utsetup command provides, you must run the individual commands as noted in Section 3.2.1, “Using the utsetup Command”. The following situations may force you to do this:
Using Kickstart (Oracle Linux), Automated Installer (Oracle Solaris 11), or JumpStart (Oracle Solaris 10) to install the software.
Configuring the Sun Ray Software without the Sun Ray data store, which is known as zero administration mode.
This document does not provide detailed instructions about how to use the individual commands instead of using the utsetup command. Refer to the man pages for detailed information about the alternative commands.
The utsetup command enables you to clone the
Sun Ray Software installation and configuration process by
recording the user responses to the installation prompts and
then using those responses at another time and even on another
Sun Ray server. User responses are stored in the
/var/opt/SUNWut/utdialog.d/*.utdialog_responses.props
files and are known as response files.
With utsetup and response files, you have the ability to clone a Sun Ray server installation and configuration setup or to provide default settings for a hands-free, automated installation and configuration solution. Cloning Sun Ray servers can be helpful in many situations, including setting up a number of Sun Ray servers in a failover group.
Using the utsetup command without any options performs an actual install and configuration on the server you run it on.
The following commands can use the information recorded in the response files:
utsetup
utinstall
utconfig
utpolicy
utpw
utgroupsig
utreplica
See the following procedures for automating Sun Ray Software installations:
Starting with Sun Ray Software release 5.3, the Sun Ray Operating Software, formerly known as Sun Ray Client firmware, is no longer included with Sun Ray Software and must be downloaded from My Oracle Support separately. Updating the Sun Ray Clients with the latest Sun Ray Operating Software ensures that the latest Sun Ray Software features are provided. The Sun Ray Client firmware is now officially called Sun Ray Operating Software, but the term "firmware" will continue to be used throughout the documentation. See Sun Ray Operating Software 11.1.1 Release for details.
If you download and install the latest Sun Ray Operating Software before you install Sun Ray Software on a server, the utsetup command enables you to configure the installed firmware and make it available to clients through the utfwadm command similar to previous releases. The current installation procedure provides steps on how to download and install the firmware.
Installing the latest Sun Ray Operating Software before installing Sun Ray Software is recommended, but you can still install and configure the firmware after installing Sun Ray Software. To update the firmware on Sun Ray Clients outside of the Sun Ray Software installation process, refer to Section 14.3, “How to Update Firmware on Sun Ray Clients”.
If the firmware is not installed on the server, the Sun Ray Software installation script will provide the following warning:
Sun Ray Operating Software (firmware) is not installed.
It is recommended that you install the latest firmware
before installing Sun Ray Software.
Continue without firmware? (Y/N) [Y]
Also, if an older firmware version is installed on the server, the Sun Ray Software installation script will provide the following warning:
You are attempting to install SRS on a system with an old version
of Sun Ray Operating Software.
Continue with old firmware? (Y/N) [N]
This procedure uses the utsetup command to install and configure a Sun Ray server for both the Oracle Linux or Oracle Solaris operating system.
The utsetup command optionally configures a
Sun Ray server to use a shared network (LAN) and generates a set
of .parms files in the TFTP home directory
for managing Sun Ray Client firmware (DHCP is not configured to
manage firmware downloads). This configuration is detailed in
Chapter 2, Planning a Sun Ray Network Environment.
Before You Begin
Make sure the server targeted to become the Sun Ray server meets the Sun Ray Software product requirements, including the prerequisites sections.
A Sun Ray server requires both a fixed host name and a static IP address. A Sun Ray server cannot be a DHCP client.
It is recommended that you download and install the latest Sun Ray Operating Software (firmware) before starting the Sun Ray Software installation. Updating the Sun Ray Clients with the latest firmware ensures that the latest Sun Ray Software features are provided.
(Oracle Linux only) The Sun Ray Software installation script removes the Shutdown/Restart options from the console; however, you can open a terminal and execute the commands.
(Oracle Linux only) When Sun Ray Software is activated as part of the installation process, the NetworkManager service on the Sun Ray server is disabled to avoid DHCP and network service conflicts. If there are scenarios where the NetworkManager service is needed (using a mobile Sun Ray server for demo purposes), then you must manually configure the server's NICs. When you uninstall Sun Ray Software, the NetworkManager service is enabled to restore the default configuration.
Steps
Download and unzip the Sun Ray Software 5.4 media pack and make it accessible to the Sun Ray server.
See http://www.oracle.com/technetwork/server-storage/sunrayproducts/downloads/index.html
(Optional) Download and unzip the latest Sun Ray Operating Software (firmware) and make it accessible to the Sun Ray server.
See http://www.oracle.com/technetwork/server-storage/sunrayproducts/downloads/index.html
Updating the Sun Ray Clients with the latest firmware ensures that the latest Sun Ray Software features are provided.
Become superuser on the Sun Ray server.
To avoid installation script errors that can occur if user environment settings are carried forward, use the following command:
% su - root
If you downloaded the latest Sun Ray Operating Software (firmware), change directory to the unzipped firmware directory and install the firmware to make it available to the Sun Ray Software installation script.
# ./utfwinstall
Change directory to the unzipped Sun Ray Software media pack and install Sun Ray Software on the Sun Ray server.
# ./utsetup
When the installation script ends, the log files are available at:
Oracle Linux:
/var/log/utsetup.
year_month_date_hour:minute:second.logOracle Solaris:
/var/adm/log/utsetup.
year_month_date_hour:minute:second.logThe values in the file names reflect a time stamp of when the command was started. Check these files for notices of problems.
See Section 3.2.12, “Installation (utinstall) Error Messages” for a listing of utinstall error messages.
Repeat steps 3 through 5 for each secondary server if in a failover group.
If you choose the HA group (failover group) configuration during the utsetup installation of the primary server, you can copy the generated response files to each secondary server and use the utsetup command to replicate the failover group configuration. For example, you can save the response files to the secondary's server's
/tmpdirectory and then use the utsetup -a -D /tmp command.This strategy reduces the time needed to re-enter the same configuration information and can minimize configuration errors. See Section 3.2.8, “How to Clone a Sun Ray Server” for details.
Add the Sun Ray server's host name or IP address to the
sunray-config-serversandsunray-serversDNS entries, which will make the server available to clients for firmware updates and Sun Ray sessions, respectively.See Chapter 2, Planning a Sun Ray Network Environment for details.
To configure any site-wide settings for the Sun Ray Clients, such as the automatic poweroff feature, you need to update the
.parmsfile for each client. You need to do this on each designated firmware server.See Section 13.2.1, “How to Centralize Sun Ray Client Configurations (.parms)” for details.
Reboot the Sun Ray Clients to download and update to the new Sun Ray Operating Software (firmware) provided by the Sun Ray server.
NoteWhen installing Sun Ray Operating Software on Sun Ray 3 Series Clients, the smart card LED will blink for approximately 40 seconds as the smart card controller firmware is being updated. This is normal.
If you plan to use the Windows connector, install the Windows Connector Components on your designated Windows Server. See Section 3.2.7, “How to Install the Windows Connector Components on a Windows System” for details.
This section includes various configuration procedures that you can perform on the Sun Ray server after installing the Sun Ray Software.
The Java Desktop System (JDS) integration package is a deprecated feature and will be removed in a later release.
The Java Desktop System (JDS) integration package, which delivers a CLI called uttscwrap that improves integration of the Windows connector with the JDS desktop on Oracle Solaris 10. For more information about the uttscwrap command, see Section 17.3.2, “How to Start a Windows Session Within Java Desktop System (Oracle Solaris 10)”.
Change to the media pack location where the JDS integration package is located.
# cd
media_pack_directory/Supplemental/JDS_Integrator/Solaris*/arch/PackagesInstall the JDS integration package (
SUNWuttscwrap).# pkgadd -d .
The uttscwrap command is installed in the
/opt/SUNWuttscwrap/bindirectory.
If you plan to use a headless Sun Ray server running Oracle Linux and Sun Ray Clients using GNOME Display Manager (GDM), then this configuration will generate errors on the Sun Ray Client and consume CPU processes. The errors occur because GDM assumes that the console display is present and GDM will continually attempt to (and fail to) service a non-existent console device.
The workaround is to add the -no-console
option to the preadm command in the Sun Ray
server's /etc/inittab file:
x:5:respawn:/etc/X11/prefdm --nodaemon --no-console
This workaround is not required for Oracle servers, since they have the Integrated Lights Out Manager (ILOM) Service Processor that provides a virtual console.
Many Oracle Linux systems come configured with liberal administrative privileges for non-root users. These privileges should not be made available to users who log in using a Sun Ray Client.
To limit administrative access, do the following:
Review the man pages for
pam_console,console.perms, andconsole.apps.Edit the
/etc/security/console.permsfile to remove display numbers from the definition of console. If a definition exists forxconsole, it should be removed.
For example, a line that reads:
<console>=tty[0-9][0-9]* vc/[0-9][0-9]* :[0-9]?[0-9] :[0-9]
should instead read:
<console>=tty[0-9][0-9]* vc/[0-9][0-9]*
And a line such as the following example should be removed:
<xconsole>=:[0-9]?[0-9] :[0-9]
The Windows connector feature enables you to provide Windows remote desktop services on Sun Ray Clients. Sun Ray Software provides a number of Windows connector components that you should install on a Windows system to improve the performance and functionality of the remote desktop services.
By default, remote desktop services is not enabled on a Windows system, so you must specifically enable it. See the Windows documentation for details.
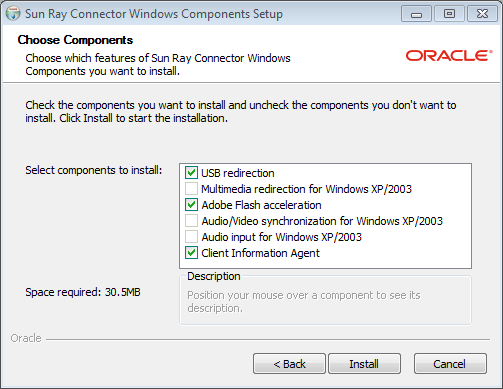
This procedure provides the steps to install the Windows connector components on a Windows system:
USB redirection - Enables access to USB devices connected to a Sun Ray Client from a Windows session.
Multimedia redirection - Enhanced performance for Windows Media Player (Windows XP and Windows Server 2003 R2).
Adobe Flash acceleration - Enhanced playback capabilities for Adobe Flash content.
Audio/video synchronization - Enhanced audio and video synchronization for multimedia content (Windows XP and Windows Server 2003 R2).
Audio input - Enables audio recording on a Sun Ray Client from a Windows session (Windows XP and Windows Server 2003 R2).
Client Information Agent - Enables the client name to be updated across hotdesking and to provide the ability to execute actions on disconnects and reconnects of a Windows session.
If you want to install the Sun Ray Connector Windows components
by using the *.msi files, you can use a
srs-winstaller.exe /S
/D=c:path to extract the
*.msi files from the
srs-wininstaller.exe executable.
To bypass the installation UI, you can run srs-winstaller /S from the command line.
The Adobe Flash acceleration and Audio/video synchronization components require hardware that supports the Windows Performance Counter API. If the Windows Performance Counter API is not working properly, the components might fail to load or behave unexpectedly. In one known example, this problem occurs when a computer has the AMD Cool'n'Quiet technology enabled in the BIOS, which is documented in http://support.microsoft.com/kb/895980.
Steps
Log in to the Windows system as Administrator.
If you plan to install the USB redirection component on a Virtual Machine (VM), you must add USB drivers on some VMs if they do not provide drivers by default. See Section 17.6.5, “How to Add USB Drivers to a Virtual Machine” for details.
Make sure the Windows system has access to the Sun Ray Connector Windows Components installer in the unzipped Sun Ray Software media pack.
media_pack_image/Components/20-SRWC/Content/Sun_Ray_Connector_Windows_Components_2.6Copy the
srs-winstaller.exefile to the Windows system.Double-click the srs-winstaller icon to start the Sun Ray Connector Windows Components Setup Wizard.
Review the License Agreement and click I Agree.
Choose which components you want to install and click Install.
Click Finish once the installation has finished.
Restart the Windows system if instructed.
Go to the following sections (next steps) based on the features you installed.
The multimedia redirection component does not include an audio/video demuxer for MPEG-2 and H.264 video streams. To ensure that video is accelerated, download and install a third-party or freeware solution, such as the MatroskaSplitter freeware.
For Adobe Flash videos, users must enable the Third party browser extensions option in Internet Explorer, which is located in the Advanced tab of Tools > Internet Options.
For audio to work properly, the Sun Ray audio driver must be set as the default. If users have changed their default audio driver, they must perform the following procedure to make the Sun Ray audio driver the default.
From the Windows Desktop, choose Settings > Control Panel.
Click Sounds & Audio Devices.
Click the Audio tab.
If the Sun Ray RDP Audio Driver is not the default, select it and click Apply.
Close your browser and reopen it.
To verify that USB redirection is installed properly, see Figure 17.8, “Verifying USB Redirection in Windows Device Manager”.
To verify that USB redirection is working from a Windows connector session, see Section 17.6.6.1, “How to Verify that USB Redirection is Active”.
The srs-winstaller.exe executable is an
archive, which extracts two .msi files
into a temporary directory and then transfers control to the
Microsoft Windows installer. If the installed Windows
Connector Components software needs to be repaired, the
.msi files may no longer be available.
There are two ways to repair the Windows Connector Components software. The easiest method is to uninstall the software using the add/remove interface and then reinstall using the procedure above.
The other repair method is to select the Windows Connector
Components in the add/remove interface and click Repair. If
the repair process requests the location of the
.msi files, use the following procedure
to extract the files from the
srs-winstaller.exe executable:
Create a new directory with no blanks in the path or name. The example in this procedure uses
c:\srwc).In a command shell window, run the following command:
srs-winstaller.exe /S /D=c:\srwc
The
.msifiles are now available in thec:\srwcdirectory.
The utsetup command enables you to install and configure a Sun Ray server with the Sun Ray Software. You can then use the created response files to install and configure other servers. See Section 3.2.3, “Automating Sun Ray Software Installations” for more information about automating Sun Ray Software installations.
Figure 3.2, “Cloning a Sun Ray Server” shows how you can use the utsetup command to clone Sun Ray servers.
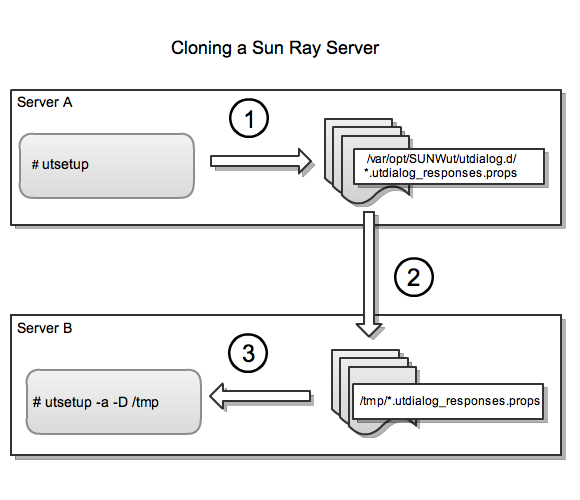
The *.utdialog_responses.props files may
contain passwords that a malicious user could potentially
decode if read, so make sure to use sufficient security
precautions when copying them. For example, the files should
have secure permissions (not readable by group or "other"),
and you should remove the files from their temporary locations
after you complete the configuration.
From the unzipped Sun Ray Software media pack, run the utsetup command to install and configure a Sun Ray server.
The responses you provide are saved in the
/var/opt/SUNWut/utdialog.d/*.utdialog_responses.propsfiles.Copy the response files to another server. In this example, the files are copied to Server B's
/tmpdirectory.From the unzipped Sun Ray Software media pack, run the utsetup -a -D /tmp command to clone the installation and configuration on the server that you created in Step 1.
For members of the same failover group, you can typically apply the configuration without changes. For a new failover group, you may need to edit the response files to create a new configuration (for example to specify a new primary and secondaries for replication). The
utdialog_responses.props(5)man page gives detail about the format of the files.
Another way to use the utsetup command is to quickly install and configure a server with the default settings.
Install, configure, and activate the basic Sun Ray Software product features for standalone use (no failover group configuration) with a minimum of user interaction required (JRE 1.6 must be installed at
/usr/javabefore proceeding).utsetup -d
Complete the configuration:
Optionally configure the system in a failover group (if you did not specify identical administration passwords with the utsetup command for each system, then you must run the utpw command at this time).
# utgroupsig
# utreplica -p
secondary-server1[secondary-server2...]or
# utreplica -s
primary-serverOptionally configure the kiosk functionality.
# utconfig -k -d
Optionally configure the browser web administration interface (Apache Tomcat must be installed at
/opt/apache-tomcatbefore proceeding).utconfig -w -d
Configure the Sun Ray network services.
# utadm -L on
or
# utadm -A
subnetor
# utadm -a
interfaceStart the Sun Ray services
# utstart
This procedure lists the current version of Sun Ray Software running on the Sun Ray server.
Log in as the superuser of the Sun Ray server.
List the current version.
# /opt/SUNWut/sbin/utrelease
To remove Sun Ray Software in its entirety, follow this procedure.
Log in as the superuser of the Sun Ray server.
Open a shell window and change to the
/opt/SUNWut/sbindirectory.# cd /opt/SUNWut/sbin
If you are removing Sun Ray Software from a server in a failover group, disable Sun Ray Client firmware updates.
See Section 14.13, “How to Disable All Sun Ray Client Firmware Updates” for details.
Remove the replication configuration.
# ./utreplica -u
Remove the Sun Ray network interfaces.
# ./utadm -r
Unconfigure Sun Ray Software.
# ./utconfig -u
Answer
yto all of the prompts.Uninstall Sun Ray Software.
# cd /
# /opt/SUNWut/sbin/utinstall -u
Answer
yto all of the prompts.Reboot the system.
Repeat the steps in this procedure for all remaining Sun Ray servers.
If during an installation, upgrade, or uninstall the utinstall script returns an error, refer to the following table for assistance.
Message | Meaning | Resolution |
|---|---|---|
|
You called the |
The |
| Might occur for the installation of any application or patch if relevant packages have not been properly installed. | Verify that he component xxxxxx is present in the installation media directory path and has the correct permissions, then run the utinstall script again. |
| Some of the applications provided with Sun Ray Software are compatible only with certain versions of other applications. | Compatible and necessary applications are included with Sun Ray Software. Remove older versions, then run the utinstall script again. |
| None of the Sun Ray components are installed on this system. | No action is required as the product is not installed. |
| Some files were not properly replaced as part of the upgrade. | Manually copy the listed files from the directory, overwriting the newer files if applicable. |
Space Required and Space Available
table | Not enough disk space was allocated for partition. Repartition the disk and run utinstall again. |
Message | Meaning | Resolution |
|---|---|---|
| The packages listed have not been properly removed. | Use the rpm -e command to remove each listed rpm manually, then run utinstall -u again. |
| Removal of Sun Ray Software was incomplete. | Check the log file for the package that started the problem and manually remove it with the rpm -e command, then run utinstall -u again. |
Message | Meaning | Resolution |
|---|---|---|
|
The |
Verify that the installation administration file
exists ( |
For SPARC platforms: | You are attempting to install Sun Ray Software onto an Oracle Solaris version that does not support the Sun Ray Software release. | Upgrade to the supported version 10 of the Oracle Solaris OS before installing Sun Ray Software. |
For x86 platforms: | You are not running a valid OS release for this platform. | Upgrade to the supported version 10 of the Oracle Solaris OS before installing Sun Ray Software. |
|
Other unrelated files were found in the
| Remove unrelated files from the directory. |
| You decided not to restore from the indicated tar file. | Remove the tar file before running utinstall again. |
| The utinstall script failed to preserve existing configuration files. | Either exit and manually preserve these files or just continue. |
| The packages listed have not been properly removed. | Use the pkgrm command to remove each listed package manually, then run utinstall -u again. |
| Removal of Sun Ray Software was incomplete. | Check the log file for the package that started the problem and manually remove it with the pkgrm command, then run utinstall -u again. |