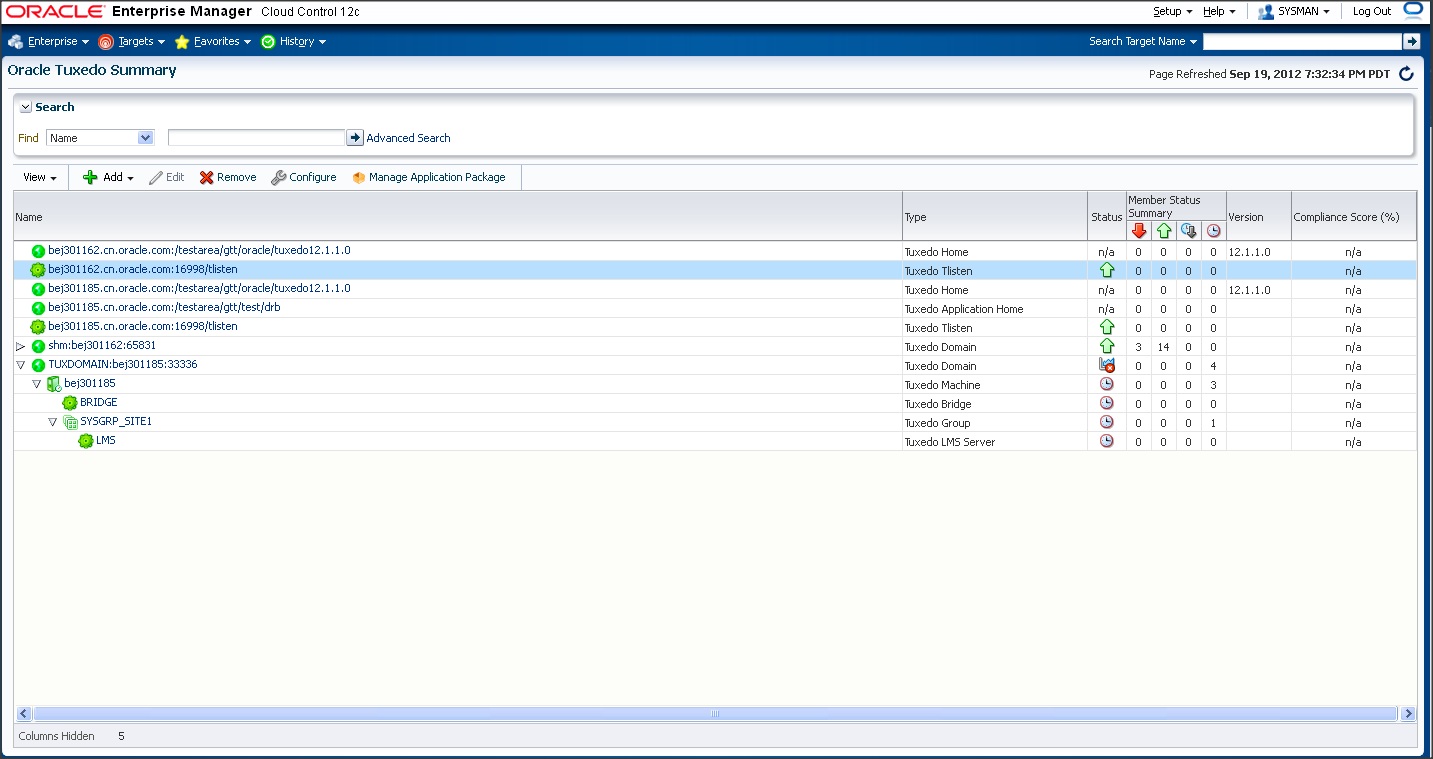
The Enterprise Manager Cloud Control home page is displayed upon logging in. For information about the elements on the home page, click Help in the upper right of the page.
2. From the home page, click Targets > Middleware at the top.
3. Figure 1 Tuxedo Summary PageTable 1 lists the action bar functions.
Table 1 Actions Bar Description A Tuxedo tlisten target can be removed only if no Tuxedo Machine targets have "Managed_by" associated with them, otherwise a warning message pops up to prevent you from proceeding. Table 2 lists descriptions to each summary column fields.
Table 2 Target Summary Description When you select a Tuxedo target from the Enterprise Manager Cloud Control home page or Tuxedo Summary page, the Home page for the target is displayed. For example, when you click on a Tuxedo Domain target, the screen shown in Figure 2 appears.Figure 2 Target Home PageFigure 2 shows the target navigation pane on the left and the content page on the right. From the target navigation pane, you can expand or collapse the tree. When you select a target, the target home page is displayed in the content pane and the target menu is displayed at the top of the page. You can also view the menu for a target by right-clicking the target in the navigation pane.Lists all Tuxedo targets monitored by the OMS instance in a navigation tree. All Tuxedo targets belonging to a Tuxedo Domain are displayed in a tree hierarchy as shown in Listing 1.Listing 1 Tuxedo Domain Tree Hierarchy
• Enterprise Manager for Oracle Tuxedo provides a special UBB page for several targets, allowing you to modify UBB configuration from Enterprise Manager Cloud Control console. To enter the Modify UBB page, click Control->Modify UBB from the target top menu.
Note: To make the UBB modification function work properly, a DOMAINID is required to be configured in the UBBCONFIG *RESOURCES section.For a security domain where the UBBCONFIG file SECURITY parameter is not NONE, when you first time perform high security-level operations (such as shutting up/down the domain, viewing log messages, modifying UBB, and so on in its target page or underlying targets page), the Credentials page appears as shown inFigure 3.Figure 3 CredentialsTo configure credentials in Figure 3, do one of the following:
• Select New to create a new one. Set the following parameters:
•
• If Tuxedo Authentication and Authorization is APP_PW, even though Tuxedo does not use the Tuxedo Username and Tuxedo Password fields value to authenticate or authorize, you must input the two fields as place holders.
• All the Named/Preferred Credentials can be managed by clicking Setup -> Security in the Enterprise Manager console.
• the collection interval for the SERVICE_STATISTICS metric of all targets in a domain are the same;
• the collection interval for the CLIENT_CONNECTION_NUMBER metric of domain and machine targets in a domain are the same;
• the collection interval for the domain metric DOMAIN_OPERATION_STATISTICS is same to the one of machine metric MACHINE_OPERATION_STATISTICS within the domain.
• You can easily change the collection interval for a batch of targets by clicking Enterprise->Monitoring->Monitoring Templates to create a template and applying it to multiple targets.Table 3 summarizes the Tuxedo targets you can monitor from Enterprise Manager Cloud Control and the references to the metrics each target supports and specific administrative operations you can perform on each target home page.
Table 3 Tuxedo Targets For targets on a JMX agent, you can view the configuration topology by clicking Members -> Topology from the Tuxedo Domain context menu. Select Uses in the View drop-down list, as shown in Figure 4.Figure 4 Configuration Topology
1. Set the environment variable JESMONITOR=yes before starting the Tuxedo domain.
2.
3.
4.
5. Start tux_snmpd.
2. If the Batch system is on a Tuxedo domain where Privilege Mode parameter is not NONE (See PRIVILEGE MODE), you are required to log in with credentials. Click Login.
3. In the Credentials page, do one of the following:
•
• Click New to create a new one. Set the following parameters:
• Tuxedo Username/Password/Application Password: The login information used for joining the Tuxedo domain. The user name is used as the job owner when submitting a job, or the requestor when controlling jobs. The acceptable length is from 0 to 30 characters. If any of these three credential fields is input incorrectly or not specified, you cannot enter the Batch System target homepage.
• Connection String: Optional. The acceptable length is from 0 to 2047 characters. You can type NONE in the field as an empty value.After you log in to the Batch system target home page, if the Tuxedo domain Privilege Mode parameter is NONE (See PRIVILEGE MODE), when you first click Submit on the page, a dialog box appears requiring a connection string. Once input, the connection string is saved in the current session until the session expires.Tuxedo Batch System is a system target type used to monitor the metrics generated by JES jobs. For more information, see ART Batch Targets.
1. From the Tuxedo Batch System homepage, click the target menu. Select Target Setup -> Monitoring Configuration.
2. You can view all available jobs and perform a set of Job operations by clicking the JES Jobs tag from the Tuxedo JES Admin target homepage. For more information, see JES Job Operations.
2. Set up a Tuxedo domain (use the sample $ART_HOME /Batch_RT/sample/simpjob file in ART Batch). Set the environment variable JESMONITOR=yes.
3. Set the GDG management as DB-based in $ART_HOME/Batch_RT/ejr/CONF/BatchRT.conf. The values that need to be set in BatchRT.conf are:
4. Copy the job template $JESDIR/ejr_mf_ora/pp/macro/template/GDG_PREDEFINED_JOB to the directory where TuxJES can be found. If JOBREPOSITORY is set in the jesconfig file, put it under JOBREPOSITORY; otherwise, put it under APPDIR.You can manage GDG files by clicking the GDG tag from the Tuxedo JES Admin target homepage. For more information, see GDG Management.Figure 5 Tuxedo Event Monitoring Structure
Note: For Tuxedo 11g Release (11.1.1.3.0) and Release (11.1.1.2.0), to use the User Event feature, you need to set the environment: SNMP_USER_EVENT=y before starting tux_snmpd.
1.
2.
3. Figure 6shows an incident created by EM and caused by Tuxedo event trap.Figure 6 Incident Example
Note: Tuxedo Event Monitoring can monitor user events when the post data is a 32-bit fielded buffer containing the fields listed in Table 1. The Tuxedo user events generated by TSAM Plus alert definitions can be trapped by the Tuxedo SNMP agent and subsequently monitored by Enterprise Manager for Oracle Tuxedo. Also, the TMUSREVT and TMSYSEVT must be configured for user event collection.
Table 1 FML Fields Listing 1 shows an example of user event that is trapped by Enterprise Manager for Oracle Tuxedo.Follow the BI Publisher Installation Guide to install BI on your existing Enterprise Manager. After installing BI, you can go to the BI Publisher Enterprise Reports page by clicking on Enterprise -> Reports -> BI Publisher Enterprise Reports from the Enterprise Manager home page.The new Webapp opens. You can only use the Enterprise Manager administrator user sysman to log into the new Webapp.From the Enterprise Manager home page, click Targets->Services at the top actions bar to open the Services dashboard. On the Services page, click Help on the upper right corner for more information.
1. From the Enterprise Manager home page, click Targets->Services. The Service page appears as shown in Figure 7.Figure 7 Services PageA Tuxedo application (domain), as defined in a TUXCONFIG (UBBCONFIG) configuration file, is a set of machines, servers, and other resources. It can exist in a single machine or cross multiple network-connected machines. To deploy the entire Tuxedo applications automatically, first you need to upload your application packages from the Enterprise Manager Console. An application package (the basic unit of an application), may contain several Tuxedo application servers and other resources of a Tuxedo group. A Tuxedo application consists of one or more application packages.An application package is a zip file and contains all of the Tuxedo group consisting files that are needed by the Tuxedo system (such as application servers, TMS servers, ENVFILEs, application level configuration files, etc.). The application package structure is shown in Figure 10.Figure 10 Application Package StructureFigure 11 shows the machine application structure after the package is deployed on the machine. The application structure under DOM1 remains the same as the original application packages.The "Properties.xml" file is a group-level UBBCONFIG file which describes the relationship and parameters of all the servers within groups in the package. It contains properties in the *GROUPS, *RMS, *SERVERS, and *SERVICES sections of a complete UBBCONFIG file and can contain multiple groups.The Properties.xml file is used to generate the final UBBCONFIG file when deploying the package to a machine.Its content can be modified at that time.Listing 2 Adding Pathname to Server NamesBesides the Tuxedo group related information in the Groups element, there are some package global attributes defined at the beginning of the Properties.xml file as shown in Table 2.
The machine architecture this package can apply to. The possible values are: x86_64, SUNW, powerpc, IA64, and etc. Check the Platform property (Target Setup -> Properties) of a Host target to decide the appropriate value of the MachineArch here. Only when the MachineArch property value is a substring of the host Platform property, the package can be deployed on the target machine. All parameters in theUBBCONFIG file *GROUPS, *RMS, *SERVERS, and *SERVICES sections are divided into three categories, which determines how they are defined in Propertise.xml.Indicates this parameter cannot be defined in the application packages Properties.xml file. It can only be filled in when assembling the UBBCONFIG in Resource Broker domain editor.
• Table 3 lists the category of each parameter in the *GROUPS, *RMS, *SERVERS, and *SERVICES sections.
Table 3 UBBCONFIG Parameter Categories For more information, see Properties.xml Schema in Enterprise Manager for Oracle Tuxedo Reference Guide.To make the TMS executable file (generated by command buildtms),accessible for Tuxedo application runtime when running tmboot, the TMS executable file should be located in sub-directory 'bin' of the application package. The <package_name>/bin folder is appended to the environment variable PATH in the generated setenv file. The setenv file is sourced before booting up the Tuxedo application.For the ENVFILE mentioned previously, RCMD files, and control_file specified by "TMSYSEVT -f", this feature does not support deploying them to directories other than APPDIR. For example, if APPDIR is /nfs/lcfilerc/vol1/APPDIR, you cannot specify ENVFILE=/nfs/lcfilerc/vol2/envfile in UBBCONFIG because ENVFILE isunder /nfs/lcfilerc/vol1/APPDIR/APP1/….After you have prepared the application packages, you need to upload them using the Enterprise Manager Console. This can be done on the Tuxedo Summary page. For more information, see Viewing Tuxedo Summary.
1. From the Tuxedo Summary page, click Manage Application Package.
2. Click Browse. Select your package in the File Upload dialog box.
1. From the Tuxedo Summary page, click Manage Application Package.Domain UBBCONFIG editor is used for creating an Oracle Tuxedo domain. To enter the Domain editor page, click Add->Create Tuxedo Domain on the Tuxedo Summary page; enter a domain name. Click OK. The domain editor initial page appears.Table 4 shows the Controls panel control buttons.
Table 4 Control Buttons Saves the current domain configuration. You can load the saved domain by clicking Edit on the Tuxedo Summary page.When saving the domain, the corresponding UBBCONFIG file is generated according to the parameters defined in each section and verified thoroughly. Once the domain is saved it is ready to be deployed. Enters the Security Management page. If you enable Tuxedo SECURITY while assembling a Tuxedo application, you need to configure certain authentication and authorization related information in the Security Management page. For more information, see Security Management or click Help on the upper right of the page. Lets you configure each section parameters of DMCONFIG. For more information, see Creating Domain Config or click Help on the upper right of the page. Lets you configure the Tuxedo system servers that are specific to ART Batch in the Tuxedo domain. For more information, see JES Configuration or click Help on the upper right of the page.
• tlisten and Tuxedo Home targets have been discovered and monitored by the Enterprise Manager agent on that host.
• It is strongly suggested that you use the full machine name when adding Enterprise Manager agent and starting the Tuxedo tlisten process. Resource broker may not work properly with short machine names.
• The standalone targets added by Add Non-Host Targets by Specifying Target Monitoring Properties in the Discovery page are not supported by Resource Broker.On the left side, are the UBB section panels. Each UBBCONFIG file section corresponds to a panelbox. Only the valid parameters of each section can be edited in this area (that is, only the parameters belonging to the master machine version can be defined).Initially, when you create an Oracle Tuxedo domain, the Domain UBBCONFIG editor provides a limited set of parameters in the *RESOURCES section that do not vary among different Tuxedo versions.The More … in the *RESOURCES section and Add … in other sections are disabled. These parameters are displayed until the master machine is added to the domain. Once the master machine is added to the domain, according to the master machine Tuxedo version, all the invalid parameters for each section are filtered out and turned to invisible.On first entering of the domain editor, the indicator EXT_MON of OPTIONS parameter is set by default for metrics collection purposes.This panel provides a UBB_Resource template that you can choose to generate theUBBCONFIG file *RESOURCES section when creating a domain. The items in the template are listed in Table 5.
Table 5 UBB_Resource Template Items All items can be modified except for MASTER. The MASTER item is generated as a Locked Variable when you specify the master and backup machines. Besides these parameters, you can add other parameters as well.You can also create your own UBB_Resource templates and save them in the Software Library. In all templates, MASTER is filled in by the system automatically following above rule.This panel provides an UBB_Machine template that you can choose to generate theUBBCONFIG file *MACHINES section when creating a domain and specifying machine. The items in the template are listed in Table 6.
Table 6 UBB_Machine Template Items This item is generated automatically by the system. The naming rule is SITE1, SITE2, and so on. It cannot be modified by users. This item is generated by the system according to the machine APPDIR and the domain information when you add machines to one domain. This item is in $APPDIR/tuxconfig and cannot be changed by users. This item is generated automatically by the system using the TUXDIR specified by the machine list. It cannot be modified by users.You can add other UBBCONFIG file *MACHINES section parameters to the as well. You can also specify the TLOG to raw disk. The system deletes it when undeploying this domain.You can create your own UBB_Machine templates and save them in the Software Library. The parameters replacement follows the rule described in Table 6.When you add an application package to a domain, the system replaces some *GROUPS section parameters in Properties.xml as shown in Table 7.
Table 7 *GROUPS Section Parameters This item is generated automatically by the system. The naming rule is GROUP1, GROUP2, and so on. It cannot be modified by users. When you add an application package to one domain, the system replaces some *RMS section parameters Properties.xml as shown in Table 8.
Table 8 *RMS Section Parameters This item is generated automatically by the system. The naming rule is RMS1, RMS2, and so on. It cannot be modified by users. This section is also included in the UBB_Machine template. If the domain is in MP mode, the system automatically adds this section to the UBBCONFIG file as shown in Table 9.
Table 9 *NETWORK Section Parameters The system will generate //hostname:port_number, from which you can modify the port_number. The system will generate //hostname:port_number, from which you can modify the port_number.You can add other parameters to the UBBCONFIGfile as well.When adding an application package to a domain, system replaces some *SERVERS section parameters in Properties.xml as shown in Table 10.
Table 10 *SERVERS Section Parameters When adding an application package to a domain, system replaces some *SERVICES section parameters in Properties.xml as shown in Table 11.
Table 11 *SERVICES Section Parameters If Properties.xml contains this parameter, system replaces it with the corresponding routing name generate by the system.When adding an application package to a domain, system replaces some *ROUTING section parameters in Properties.xml.For otherProperties.xml file *ROUTING section parameters, the system keeps their values and allows you to modify manually. You can add other parameters to the UBBCONFIGfile as well.
Table 12 *ROUTING Section Parameters This item is generated automatically by the system. The naming rule is ROUTING1, ROUTING2, and so on. It cannot be modified by users. Each machine needs one application package.Refer to the descriptions in Application Package Organization and Content to prepare two application packages: APP1.zip and APP2.zip.Figure 12 APP1.zip Content StructureAPP1.zip Properties.xml is shown in Listing 3:Listing 3 APP1.zip Properties.xmlFigure 13 APP2.zip Content StructureAPP2.zip Properties.xml is shown in Listing 4:Listing 4 APP2.zip Properties.xmlAfter the application packages are prepared, refer to Uploading a Package to upload them to EM through Manage Application Package on the Tuxedo Summary page.Before a host can be used for deploying Tuxedo domains, Tuxedo tlisten and Tuxedo home targets must be discovered by EM agent on the host.To discover Tuxedo tlisten and Tuxedo home targets, do the following steps:
1. From the Oracle Tuxedo Summary page, click Add > Oracle Tuxedo Domain Discovery.
2. Fill in the tlisten host name and RMI port. Select a EM agent you want to use for discovery.
3. Uncheck With Oracle Tuxedo Authentication.
4. Click Discover Now.To create an SHM domain, do the following:
1. Refer to Domain UBBCONFIG Editor to enter the domain editor page.
2. Fill out the *RESOURCES section. Note the following:
• IPCKEY: This parameter is initialized to 33333 automatically for each new created domain.
• DOMAINID: This parameter takes the last specified domain name by default.
• MASTER: You can leave it blank since the value is initialized automatically when you add the first machine to the domain.
• MODEL: Keep the default value, MP, to make dynamic machine deployment possible even if you are creating an SHM domain.Click More... to show more options.
3. From the Machine List panel, add a machine to domain by clicking + beside the machine name.If it is the first time the machine is being added, the Application Home option must be specified. The Application Home is the root directory where all domains are deployed.
4. Click OK.
• All the required information for this machine is collected and one UBBCONFIGfile entry is added to the *MACHINES section on the left side.
• Several UBBCONFIGfile entries are generated automatically in other sections as well.
• An LMS server (used for monitoring data collection), is added to the *SERVERS section. It is a mandatory server to enable the machine to be monitored by EM.
• A group named SYSGRP_<LMID> is added to include LMS server.
• The *NETWORK section entry is also added automatically.
1. From the Enterprise Manager home page, click Setup->Add Target->Add Targets Manually.
2. For more information, click Help in the upper right of the page.To make the newly-added machine available for Tuxedo domain deployment, the tlisten process must be started and discovered on the 'Tuxedo Domain Discovery' page by the EM agent. Refer to Discovering Tuxedo tlisten and Tuxedo Home for instructions. Once the tlisten and Tuxedo home targets are discovered, verify the status on the Domain UBBCONFIG Editor page; the newly-added machine appears in the machine list.
1. Click + beside the package entry you want to add to the Package List.
Note: The + button is inactive if the package is not suitable for the machine.
3. Click OK.All entries described in Properties.xml of the package are added to the corresponding UBBCONFIGfile sections as shown in Figure 14The (*) signs before the GROUPS entry and SERVERS entry indicate new-added items to this domain that have not been deployed.Figure 14 New Added EntriesThe GROUPNAME and GRPNO parameters are generated automatically when adding the package. All groups and their assets defined in Properties.xml are added to the domain. Unlike machine entries, one application package can be added more than one time.
1. Click Save&Deploy in the Controls panel to deploy and boot the domain.The new Tuxedo Domain target is created (in the following format)<DomainId>:<PMID of master machine>:<domain IPCKEY>.
2. Figure 15 shows the domain deployment options screen.Figure 15 Domain Deployment Options
3. Enter the usernames and passwords, and click OK on the upper right corner to proceed to the deployment tracking page.When all the steps are successful, the domain has been deployed to the Application Home on the target machine, and booted. The last step of deployment is CheckDeployStatus, where the deployment status is checked and corresponding entries status in the domain editor is changed accordingly. If the deployment is successful, an automatic domain discovery is performed. The new discovered targets belonging to the domain can then be found in the All Targets and Tuxedo Summary page.
1.
2. Click + beside package APP2.zip to add it to the domain.The two servers simpserv2 and simpser3 in the group described in APP2.zip Properties.xml are added to the *SERVERS section.
3.
• The domain must be in Up status when deploying the application package.
• After deploying, only the newly-added packages are delivered to the existing domain APPDIR, and the included new group/servers are activated by Tuxedo MIB calls.Once the deployment is complete, the new directory, APP2, can be found in domain APPDIR and the new targets corresponding to GROUP2 and simpserv2/simpserv3 are created.
1.
3. After the domain target status changes to down status, right click the domain target in the Tuxedo Summary page, and then select Control->Deploy to perform a full deployment of the domain.
1. Click the X button beside the package you want to remove.
• For package-associated groups that have not been deployed and activated on a Tuxedo machine (indicated by *), click OK to remove the selected groups/members.
• For deployed and activated package-associated groups, a Remove from management server only checkbox is displayed.
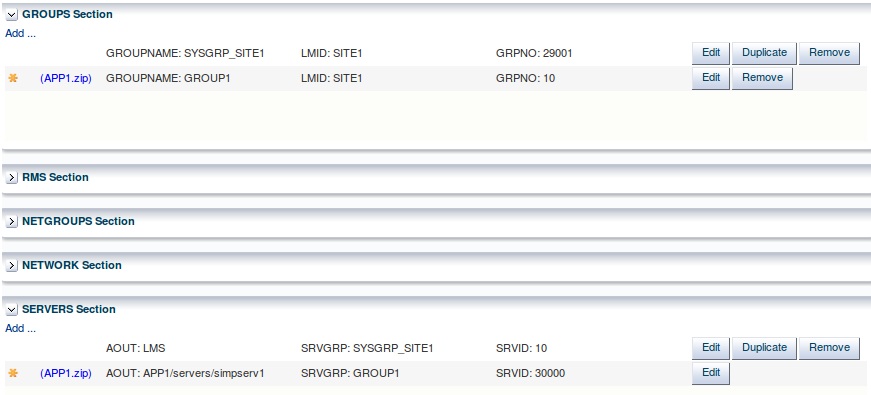
If you leave it unchecked and click OK, an instant undeployment action is triggered completely removing the selected groups from Tuxedo application runtime. If you check it and click OK, the selected groups are removed from the UI only, not impacting underlying Tuxedo application.
Once such action is performed, no further dynamic deployment can be performed until full deployment is carried out for the domain.To deploy a package manually, click Save & Deploy on the Controls panel when there are new added packages to the domain (identified by an asterisk ‘*’).Once the Save & Deploy button is clicked, the current domain editing status is saved and a full validation is started on the domain UBBCONFIG. If the validation fails, the deployment process is stopped and an error message appears.
Note: Dynamic deployment only works on UBBCONFIG entries imported from application packages. To make the manually added UBBCONFIG entries active, a full deployment of the domain must be performed.
1. The newly-added machine is identified with asterisk (*) at the beginning of each imported UBBCONFIG entry.
2. Configure the new machine in the UBBCONFIG section editor, if needed.
3. Before you create a package-level policy, packages should be added from the Package List as candidates (“As Candidate” checkbox is checked). You can modify the imported UBBCONFIG entries detailed configuration by clicking Edit for each entry and then create deployment policies for the candidate packages in the Policy Management console.
Note: Before dynamic deployment of a package, any newly introduced TMS server must be put under the directory referred by the PATH environment variable on Tuxedo boot-up, otherwise, the TMS server will not be able to be found by Tuxedo application runtime, even if it is located in the bin sub-directory of the package.The number of deployed running Tuxedo servers can be increased or decreased automatically when some conditions (incident rules), defined by policy are met. The minimum and maximum server number depends on the MIN and MAX parameter set in the UBBCONFIG.
1. From the Enterprise Manager console home page, click Setup-> Incidents -> Incident Rules.
2. On the Incident Rules page, click Create Rule Set...
3. Enter a rule name, and choose Specific targets on the Targets tab at the bottom of the page.
5.
6. Click Continue in the pop-up window to define an event-type incident rule.
7.
8. Choose Specific events of type Metric Alert.
9. Click Add to designate a specific Metric Alert event.
10. Figure 16 Define a CPU Metric Event- Example
11.
12. Click Next to proceed to the Add Actions step page.
13. In the Advanced Notifications panel, check the predefined notification named Tuxedo Event Connector (PL/SQL Procedure).
14.
15. Enter a name in the Specify Name and Description page. Click Next, and then Continue to finish the configuration.
16. Return to the Edit Rule Set page.Click Save to activate the defined incident rule.The policies are defined and managed centrally in the Policy Management console. To enter the Policy Management console, click Policies in the domain editor Controls panel.Once the incident rule is defined, you can create a policy by clicking Add in the Policy Management console and specifying the options in the Policy Properties page. For more information, see Policy Management. or click Help in the upper right of the page.A domain should be configured so it can be booted up after it is deployed. This action can only be applied to a domain which is not in active status.The default config action is to do tmloadcf of the UBBCONFIG on the master machine. If there areany specific configurations required before the domain boots up (for example, creating TLOG device, or QUEUE space), you can customize the script.This action can be applied to a domain which is not in active status. The default Start Up action is to execute tmboot -y on the master machine. You can also customize the boot script.This action can only be applied to a domain which is in active status. The default action of Shut Down is to execute tmshutdown -y on the master machine. You can also customize the shutdown script.This action can only be applied to a domain which is not in active status. The default Undeploy action is to remove the entire APPDIR on target machines. You can customize the unconfig script to do some cleanup before APPDIR is removed.Several Tuxedo system servers specific to ART Batch are required to be configured in the Tuxedo domain to make ART Batch work properly. For example, the servers ARTJESADM, ARTJESCONV, ARTJESINITIATOR, and ARTJESPURGE are necessary for a functional ART JES system.Since ART Batch uses the Oracle Tuxedo Event component, an Oracle Tuxedo user event server, TMUSREVT, is required in the UBBCONFIGfile. Additionally, a TMQUEUE server is also mandatory to store the JES job information.You can add the servers manually by clicking Add in the Servers section of Domain UBBCONFIG Editor. Make sure you provide correct parameters (CLOPT), to the servers. Once you save configurations in the domain, the Domain Editor performs CLOPT validation on the system servers.System server-related information can be described in Properties.xml, and then packed into an application package. By adding the application packages to a Tuxedo domain, the corresponding servers are added accordingly.The system servers are referred to in Properties.xml using a single server name.
1.
2. Select one or more machines from the Machines list. Click Apply Server Template. Following servers are added to the machine:
•
• Since the TMS_QM used by server TMQUEUE requires a TLOG device, after applying the server template, TLOGDEVICE and TLOGSIZE parameters of the corresponding machine are configured to $APPDIR/TLOG if no path is specified.
• You can configure JES parameters by clicking JESConfig from the Domain UBBCONFIG Editor. JES Configuration consists of two parts:A JES configuration file is used by the TuxJES administration server ARTJESADM. You can configure the following JES configuration file parameters:
• The root repository to store job information. This directory is created under the path set in JES Base Directory. For example, if JESROOT is set to jesroot and JES Base Directory is set to $APPDIR, the full path of the JESROOT directory is {$APPDIR}/jesroot.
Note: If ART Batch related servers are configured on two Tuxedo machines, they must share the same JESROOT repository; only an absolute JESROOT path is acceptable and the directory should exist in the Network File System.
• If NODELAY is not checked, only one job can be in execution status per job name. When it is checked, NODELAY removes the dependency check.
• S: Job submission event.
• C: Job conversion complete event.
• E: Job execution complete event.
• P: Job purge event.
• A: All supported eventsIf EVENTPOST is not specified, no event is posted. The data buffer with event post is FML32 type.The fields are defined in tuxjes/include/jesflds.h.The path of the stored job repository. The job submitting script file path may be a relative path in JOBREPOSITORY if it is set.
• NONE: Default value. Indicates jobs are executed by the OS user who startsthe JES system. This is compatible with all previous JES system implementations .
• USER_IDENTICAL: Indicates jobs are executed by the Oracle Tuxedo user wherethe JES client joins JES system. Make sure that each Oracle Tuxedo user corresponds to an existing OS user before you choose this option.
• USER_MAPPING: The JES system looks up the TuxJES user mapping file and finds the OS user corresponding to the Oracle Tuxedo user where JES client joins JES system, and then appoints this OS user as the job executor.This option is enabled when you choose USER_MAPPING as Privilege Mode. Specify the user mapping file name. User mapping file is under the $APPDIR directory by default.The owner of the User Mapping File created by Resource Broker is root, and its file permission is "-rw-------".
• one of the following: Logs, QUE, TLOG, UBBCONFIG, acc, crlog, data, data_source, jesconfig, jesqinit, tools, tpacl, tpgrp, tpusr, and tuxconfig.
• The user mapping table displays the mapping relationship between Oracle Tuxedo users and OS users. When Privilege Mode is set to USER_MAPPING, the user mapping table is enabled allowing you to add, edit, or delete a user mapping entry. Every line in the mapping table is in the following format:When you set the privilege mode to either USER_IDENTICAL or USER_MAPPING, the following permission settings are made automatically by Resource Broker:
• UBBCONFIG permission settings
• The PERM value in the RESOURCES section is set to 0666. The RQPERM and RPPERM value in all JES servers entries in the *SERVERS section is set to 0666. Therefore, all job users have full permissions to JES system IPC resources.Listing 5 shows a UBBCONFIG file example.Listing 5 UBBCONFIG Example
•
•
•
•
•
•
•
• When you set privilege mode to either USER_IDENTICAL or USER_MAPPING, the following permission requirements must be met.
• Permission requirements for UBBCONFIG
•
• *RESOURCES section AUTHSVC and SERVERS section AUTHSVR parameters must be set properly in accordance with USER_AUTH, ACL, or MANDATORY_ACL settings.
• The $JES_BASE_DIR directory should be created before deployment and be readable/writable/executable for JES domain creator and all JES job executors.
• If a machine is created, configured, or booted up by root user, tlisten on that machine must be booted by root user as well before deploying the Oracle Tuxedo domain using resource broker.From Oracle Enterprise Manager Cloud Control, click Setup > Security > Privilege Delegation. For more information, see Configuring Privilege Delegation Settings in Oracle Enterprise Manager Lifecycle Management Administrator's Guide.
• Optional.The PDKSH executable file which is used for running ART Batch If not specified, the system default ksh command is used at runtime.When using static deployment, all ART Batch related system servers are assembled in the UBBCONFIG file as other servers. The saved JES Configuration file is packed in the distribution package for deployment. The deployed JES configuration file name is the one pointed by the -i option of ARTJESADM CLOPT. The JESROOT directory is not created at this stage; it is created automatically by ART Batch at runtime.The following environment variable settings are added to the setenv.sh file if JES is configured:During configuration, the JES QUEUE system is initialized by the default jesqinit script or user-defined script.The JES-related Tuxedo system servers are described in the Properties.xml which is included in various application packages. You can add these packages into an existing domain as candidates and define their policies. When the policy is evaluated to be fulfilled, the packages are then deployed and the servers described in it are activated.
Note: Dynamic deployment is only on the package (server) level. JESCONFIG does not support dynamic deployment (for example, running Tuxedo domain without ART Batch configured), the JESCONFIG cannot be enforced dynamically.When using resource broker for ART batch, you must configure several Tuxedo provided system servers in the UBBCONFIG file to enable resource broker for ART CICS Runtime.
•
•
•
•
•
•
•
•
•
•
•
•
•
•
• For the ART CICS provided system servers, only the server name should be referred to inProperties.xml.For the system servers that can be built by users, the server name you define in the Properties.xml must be prefixed by the listed server names.
1.
•
•
•
•
•
•
•
•
•
3. Similar to the Tuxedo application package, the CICS application package is a .zip file that packs assets for running CICS Runtime. It includes components described in the following.The Properties.xml (located in the root of the zip file), is used to describe the general properties of the whole package. These general Tuxedo application package parameters are also applicable to CICS packages:All the elements are of the same meaning as the ones in a Tuxedo application package except for SupportedOS. There is no ART CICS for Windows platform.Only Linux, SunOS, and AIX are supported.A new element, CICSVersion, is added to Properties.xml. It indicates which ART CICS version such package is built. This field is used for extension in the future. It can be configured to any value that matches the regex rule 1[1-9](\.[0-9]){3,4}. For the 12cR1 release, the suggested value is 12.1.1.0.To distinguish from Tuxedo application packages, a type attribute is introduced for the ApplicationProperties root element. To mark the package a CICS application package, set the type attribute to CICS. If the type is not set or set to TUX, the package is regarded as a Tuxedo application package.
• Groups Configuration (list_of_groups.desc)
• Tranclasses (transclasses.desc file)
• Transactions (transactions.desc file)
• Programs (programs.desc file)
• TS Queue Model (tsqmodel.desc file)
• Mapsets (mapsets.desc file)
• Typeterms (typeterms.desc file)
• Enqmodel (enqmodel.desc)It is not allowed to define two same "enqmodel" in the file, even if they are in different CICS groups.
• Extra TDQUEUE (tdqextra.desc)It is not allowed to define two same tdqueue, even if they are in different CICS groups.
• Intra TDQUEUE (tdqintra.desc)It is not allowed to define two same tdqueue, even if they are in different CICS groups.Each CICS application package can contain a set of the previously described .desc files, and each .desc can only occur at most once in one package. All the .desc files should be located in the package DESC sub-directory.All COBOL .gnt files are located in the COBLIB sub-directory of the package. These COBOL programs are referenced by the programs.desc file at runtime.All the .mpdef files are located in the MAP sub-directory of the package. They are used by the mapsets.desc file.The script used to create /Q for ARTTDQ and TSQ DB may also be packed in the package. They should be located in the SCRIPT sub-directory and are called when the package is deployed. All the shell scripts are supposed to be independent of each other, and the calling sequence does not impact the script running result.The CICS application packages are managed in the Tuxedo Summary page (same as Tuxedo application packages). For more information, see Application Package Management.When uploading, a validation is performed for Properties .xml file and .desc resource configuration files in each package. The Properties.xml file is validated against the .xsd XML schema, while the resource configuration files are validated for the correct file format and content (for example, unique key field constraint, column number, and required columns etc.).
1.
2. Fill in CICS and COBOL installation directories Click Edit Configurations.In the deployed APPDIR, each CICS application package corresponds to a sub-directory named according to the package name. All the merged .desc resource files are located in the APPDIR/resources directory, which is referenced by the KIXCONFIG environment variable.The following environment variable settings are added to the setenv.sh file:Dynamic Request Broker is a Tuxedo load balancing functionality enhancement that minimizes response time for request calls and provides more reasonable workload distribution across multiple servers (especially in a multiprocessor (MP) domain). More specifically, Dynamic Request Broker is a mechanism that introduces new request routing metrics (for example, service execution time, network time, etc.),as a replacement for the static load values set in UBBCONFIG file and reflects service and network load level dynamically. Furthermore, it syncs metrics across all distributed machines in an MP domain to achieve optimal resource utilization.
• In an MP domain, one of the servers in the candidate list is handling the requests from different machines. As shown in Figure 17, server2 serves both client1 and client2 that are located on different machines.Figure 17 Dynamic Request Broker in MP Domain
• The service execution time is not constant; however, the load value specified in the UBBCONFIG file is static, which may not be applicable for the service as the situation changes.
• The server may be added or removed during run-time; however, the load value specified in the UBBCONFIG file is static, which may not be applicable for the service as the situation changes.You can enable or disable dynamic request broker functionality by clicking Control -> Enable/Disable Request Broker from the Tuxedo Domain menu on Enterprise Manager Console.Figure 18 Link Resources
5. Figure 19 Set Scaling Parameters
• The Hostname entered in a deployment plan must be the full name (for example, slce04vm010. us.oracle.com, the short name slce04vm010 will not work.Create an OVAB script deploy_ovab.sh as follows:You can find the scalinggroupID using the following command:
1. From the Enterprise Manager Cloud Control, click Setup> Notifications > Notification Methods at the upper right of the page.
2. On the Notification Methods page, choose adding OS Command in the Scripts and SNMP Traps field. Click Go.
3. Figure 20 Add OS Command
4. Click OK.
1. From the Enterprise Manager Cloud Control, click Setup> Incidents > Incident Rules on the upper right of the page.
2. On the page that appears, click Create Rule Set.Figure 21 Specify Target Group
4.
5.
6. On the Create New Rule: Select Events page, select Type, Target Availability, and then Specific events of type Target Availability.
7.
8.
9.
10.
11.
12.
13. Check your selections and click Continue to proceed to the final step.
14. You are prompted that the rule has been successfully added. Click the Save button on the page to save the newly added rule.Figure 22 Newly Added Tuxedo Incident Rule