 Understanding PeopleSoft CRM Security
This chapter provides an overview of PeopleSoft CRM security and discusses how to:
Set system-wide security options.
Implement self-service security.
Define PeopleSoft CRM application security.
Understanding PeopleSoft CRM Security
This section discusses:
Security building blocks.
Security terminology.
PeopleTools security.
Application security.
Distributed security.
 Security Building Blocks
This diagram provides an illustration of the different layers of security that are delivered in the PeopleTools and Customer Relationship Management security infrastructure. This chapter will cover each of these security building blocks to assist you in implementing the security needed for your enterprise.
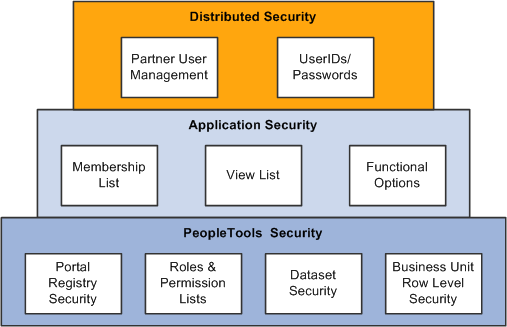
Security building blocks
PeopleTools security controls row-level access to transactions. For example, you would use dataset security to enable a sales representative to see leads as the lead owner, or to enable a sales manager to view leads as manager, and so on.
Application security provides three key elements of CRM security: memberships lists, view lists, and functional options. Membership lists can define the characteristics of one or a group of users (for example, partner users) whose system and data access must be secured. View lists can define the characteristics of one or a group of objects (for example, customers) that a member group has view privileges to. Functional options restrict the user to a set of allowable actions within a secured transaction.
Distributed Security or Delegated administration enables you to set up administrators that are external to your enterprise so they can give other users system access, within the confines of the permissions that you allow the administrator to grant.
Security Terminology
Before you can fully enable security, you must understand the security terms and functions at each level of the system:
|
Security Type |
Where Implemented |
Function |
|
Network |
Network software |
Controls entry into the network and authorizes rights to use shared resources. |
|
Relational database management system |
Operating system |
Controls access to the database. |
|
User |
PeopleTools |
Controls access to application pages, functions, and business components. |
|
Object |
PeopleTools |
Controls access to objects or object groups that are used in application development. |
|
Query |
PeopleTools |
Defines the set of table rows that a user can access while making system queries. |
|
Row-level |
PeopleTools and PeopleSoft applications |
Restricts access to a subset of data rows within tables to which the user has authority. |
|
Permission list level |
PeopleSoft applications |
Enables PeopleSoft application security. |
PeopleTools Security
Use PeopleTools security to define roles and permissions. PeopleSoft delivers a set of roles out of the box that you can use to set up role-based access to PeopleSoft transactions. PeopleSoft provides a recommended set of roles and permissions with each of the products delivered. You can add or modify new or existing roles and permissions to fit your business requirements.
This section discusses
Portal registry.
Roles and permission lists.
Dataset security.
Business unit row level security options.
Preferred markets and security.
The portal registry is a set of dedicated PeopleSoft database tables that store every content reference, typically a URL, available through the portal. A portal registry has a tree-like structure in which content references are organized, classified, and registered. A portal registry contains folders and content references. Folders group and organize content references into a multilevel hierarchy. Except for the root folder, each folder has a parent folder, and each folder can contain content references as well as other folders. Content references are objects that have been registered in the portal registry.
There are several ways to access and maintain the portal registry:
Use the registration wizard to register content references, assign security, and update.
Use the Menu Import feature to upgrade custom menu group definitions.
Use portal administration pages to add, change, or delete folders and content references from a portal registry.
Use the portal registry application programming interface (API) for programmatic access to the registry.
Use the security synchronization process to update the portal registry security based on the menu and script security.
See PeopleTools 8.52: PeopleTools Portal Technologies PeopleBook
Permission lists are the building blocks of user security authorizations. You typically create permission lists before you create user profiles and roles. When defining permission lists, however, consider the roles and user profiles that you will use them with. Recall that roles are intermediary objects between permission lists and users. You use roles to assign permissions to users dynamically. Permission lists may contain any number of permissions, such as sign-in times, page permissions, and component interface permissions. Permission lists are more flexible and scalable when they contain fewer permissions.
Dataset security controls row-level access to transactions. Dataset security is achieved by associating the definition of a dataset to the search definition for transactions that have multiple dataset rules. PeopleSoft dataset security framework may be used to build dataset rules and assign the dataset rules to PeopleTools roles.
PeopleSoft delivers a set of dataset security rules that may be used to secure transaction rows. PeopleSoft CRM uses dataset security for data searches to restrict transaction rows.
It is also used in these applications and functions:
PeopleSoft Sales (leads and opportunities).
PeopleSoft Order Capture (quotes and orders).
Calendar and Task Management.
PeopleSoft Wealth Management.
PeopleSoft Marketing (audience and marketing programs).
PeopleSoft Partner Relationship Manager.
Business Unit Row-Level Security Options
You can implement security to prevent individual users or roles from accessing specific rows of data that are controlled by key fields. Likewise, you can restrict users so that they can access only a specific subset of rows. For example, you might set the user ID security for a call center agent in Paris so that the agent can access only the data that is for a particular European business unit. If you have a team of call center agents in Paris, you could add them all to a role and then use role security to give them all the same access to the system.
A user can belong to multiple roles and use the menu items that are assigned to all of those roles.
Note. You cannot define row-level security attributes by combining roles. In PeopleTools, you designate row-level security for a user by selecting a row-level security role. The row-level security attributes for the role that you select become the security attributes for the user.
This table describes the consequences of row-level security when you use different combinations of system security options and roles:
|
System Security |
Role of User ID |
Row-Level Security |
|
No security |
The user ID is not linked to a role. |
Not applicable. All users can access every object because you have not implemented security. |
|
User-level security |
The user ID is not linked to a role. |
Defined in the application by key field security. |
|
Role-level security |
A user ID is normally assigned to a row-level security role. You can link a user ID to multiple roles, but not when you specify row-level security. |
Defined by a row-level security role. If a user ID is not assigned to a row-level security role, then the user has access to menu items but not to any application pages with key fields that are enabled for row-level security. |
|
Permission list-level security |
All users in a permission list have the same level of security. |
Users are limited to the key fields that are specified by the permission list that is assigned to their user IDs. |
You must define the users or roles that have access to specific business units and setIDs. For example, you might give a particular role access to only one business unit. When a user in the role enters prompts for business units (for example, when entering data that has business unit as the primary key), the available selections include only the business units for which the user has been granted authority. The user's available data has been filtered through one or more levels of security.
The number of users that are assigned the same level of security is a key factor in determining whether you base security on user IDs or roles. If a large number of users have identical access requirements, consider using roles. By assigning the users to a single role, you can make subsequent changes to access requirements once rather than many times.
Preferred Markets and Security
The preferred market that is associated with a user ID controls the data and functions that a user can access. Preferred markets are of two types: industry and geographic.
If a user's preferred market is geographic, the user can only access functionality and data that are valid for business units in the geographic region or country. For example, a country might require certain information about imports that users in another country would not need to enter.
If the user's preferred market is by industry, the user is granted access to only the functionality and data that are implemented for those industries. For example, when financial market users define companies, they can specify financial account and contract data.
See Defining Overall Preferences.
See Also
PeopleTools 8.52: PeopleTools Portal Technologies PeopleBook, “Understanding Portal Technology”
PeopleTools 8.52: Security Administration PeopleBook
Application Security
This section discusses:
Enterprise administration.
CRM application security terminology.
Application security framework.
Security objects.
Dynamic and static membership lists.
Dynamic and static view lists.
Implicit view lists.
Functional options.
Functional option groups.
Functional options conflict resolution.
Enabling functional options.
Business object search system processing.
Financial services industry security.
Catalog security.
How security is processed at runtime.
Application Security consists of three main pieces: membership lists, view lists and functional options. Using PeopleSoft CRM application security, enterprise administrators have the ability to:
Define the community of participants for which security is restricted (membership list)
Define a group or specific list of objects (for example customers) that a partner is allowed to view and transact with (view list).
Define a set of business processes or actions that a participant in the membership group can perform (for example, what a partner can do).
CRM Application Security Terminology
This table lists terms related to security:
|
Term |
Definition |
Example |
|
An object or entity that is being secured. |
Partners should be allowed to view only customers that they are allowed to view. Partner is by definition a security object. Customer is also a security object. |
|
|
Characteristics of one or a group of users (for example, partner users) whose system and data access must be secured. The list ultimately contains a list of members. |
A group of partners or partner users. |
|
|
Characteristics of the viewing object (for example, customers, or accounts) that are secured from the membership list. The list ultimately contains a list of objects. |
A group of customers. |
|
|
A unique code that defines what someone can do within a transaction. |
Determines whether the partner can maintain orders, add customer addresses, or edit revenue. |
|
|
A grouping of functional options. |
Determines whether the partner can maintain orders, add customers, or view customer addresses. |
|
|
A template that defines the view lists and functional options. A security profile is given to one or multiple membership list domains. |
California customers or western manufacturing customers with the ability to maintain orders and add customer addresses. |
|
|
A primary business activity like creating orders, leads, opportunities, cases, service orders, and campaigns. |
Order creation. |
|
|
A table that stores the results of the security domain queries or the static list. |
Partner list. |
PeopleSoft CRM Application Security Framework
PeopleSoft CRM application security framework is a characteristic-based security framework that enables PeopleSoft customers to secure data and functions within a transaction.
For example, suppose you have a group of partner insurance agents that need access to a specific group of customers and you want this group of partners to only generate quotes, submit policy applications, and add customer addresses. Using the pages within the PeopleSoft Application Security component, you can create the security objects, lists, and profiles that you need to secure your PeopleSoft CRM applications to accommodate this situation.
Use PeopleSoft application security to abstract partners and customers as security objects. The characteristics that define the group of partners or customers are called lists.
You can predefine the objects and lists as either membership or view to differentiate viewers (partners who are members with a security profile that have access to specific objects and data) from the target transactions or data objects (which can be customers that are secured within the partner's view privileges).
Note. Application security is used only to secure objects
(person, partner, customer, financial accounts, product catalog, hold codes,
performance metrics, and so on) and not transactions (orders, leads, opportunities,
cases, and so on). Objects in this context mean setup data or data that is
used to create a transaction.
PeopleSoft CRM does not deliver an application security feature for
securing customers from user roles. To make this work, you would have to customize
the security criteria in the Business Object Search adapter definition and
then make some minor coding adjustments.
Application security involves setting up and defining:
Membership lists
Membership lists define the characteristics of one or a group of users (for example, partner users) to whom system and data access and functional permissions and privileges are granted. Users in a security membership list definition are associated with a security profile.
View lists
View lists define the characteristics of the viewing object (for example, customers, accounts, product catalogs) that are secured from the membership list.
Functional options
Functional options define the functions (for example, order submission) that can be carried out by members of a membership list.
Security profiles
Security profiles define the combination of view lists and functional options that make up a specific profile of view and function access. Security profiles are given to members belonging to a membership list.
This illustration represents a high-level view of a security profile using PeopleSoft CRM Application Security.

Security profile definition
PeopleSoft delivers a number of security objects that you can use to implement security. You should not, however, change them in any way. Any changes that you make to the security objects delivered by PeopleSoft impact the security profiles and the security list tables. PeopleSoft recommends that you limit the number of security objects that you create and are careful how you use them.
PeopleSoft delivers these membership type security objects out of the box:
|
Security Membership Object |
Security Object Type |
Industry |
|
Customer |
Membership |
Order Capture |
|
Financial Account Holder |
Membership |
Financial services and insurance |
|
Partner |
Membership |
All |
|
Partner Contact |
Membership |
Order Capture |
|
Person |
Membership |
All |
|
Role |
Membership |
All |
Dynamic and Static Membership Lists
A dynamic membership list is a saved query of characteristics that result in a list of members for a membership list object. The queries are saved using the dynamic criteria definition that is linked to the membership list object.
If the domain type is dynamic, you can edit the membership criteria using the appropriate dynamic criteria definition. You can also view the results of the membership list.
You may associate the membership list to any security profile currently available in the system. Once you associated the membership list with a security profile, that security profile appears in the security profile list for the membership list. When needed, you can remove the association of the membership list to the security profile.
Static membership lists contain a specific list of members that you may associate with any security profile currently available in the system.
A dynamic view list is a saved query of characteristics that results in a viewable list of objects. You set up a view list object similar to the way you set up a membership list object. After you establish a view list, you may grant one or more view list objects (dynamic or static) to a security profile.
Note. Not all objects can be used as view list objects.
View List Security Objects that are delivered as system data:
|
View List Security Object |
Security Object Type |
Application |
|
Catalog |
View List |
Order capture |
|
Customer |
View List |
All |
|
Financial Account |
View List |
Financial services and insurance |
|
Hold Code |
View List |
Order capture |
|
Performance Metric |
View List |
Marketing |
A dynamically defined view list can contain a bind variable or a criteria that is not resolved at the time of creation of the query but is resolved at runtime. This is called an implicit view list.
A business scenario that is supported by implicit views lists would enable partners to view customers with whom they have previously done business with, where orders have been submitted with the partner identified.
For example, ABC Insurance (ABC1), during the creation of a home insurance policy, wants to use quick create to enter a new customer called John Smith (JS1). From this point onwards ABC Insurance would want to have access to John Smith's information.
If ABC Insurance (ABC1) creates an auto insurance policy, they would want access to John Smith (JS1) in the lookup table. The presence of both the partner (ABC Insurance) and the customer (John Smith) on the same transaction enables future partner access to that customer.
To create an implicit view list that would give ABC Insurance access to John Smith's account information, you would create a dynamic view list by selecting the bind search criteria for the Partner on Order field and then selecting Partner.
When you associate an implicit view list to a security profile and run the list refresh process, the system creates a new security profile for each member of the membership list that is associated to that security profile.
To set up an implicit view list, you must use the Configurable Search Setup - Search Fields page to select the bind variable for the security components and fields that you want to use on the Add View List or Add Membership List pages.
You can modify the Customer Search (RSEC_CUSTOMER_SRCH) component to use bind variables and create implicit view lists.
Functional options are defined independently of security objects and domains. Functional options let you determine what a user you can do within an application. For example, you can create functional options that enable users to submit orders or add new customers. To group view lists and functional options, you define a security profile. The security profile is then granted or associated to one or multiple membership lists.
Functional option group is a grouping of functional options, which you can be associated with a security profile. Using functional option groups can make maintaining security profiles easier and more efficient. Enterprise administrators that must make wholesale changes to security profiles can simply change the functional option group associated with the security profiles that must be changed or updated.
Example:
In the world of financial services you have consumer account holders. All consumers by default get a functional option group that enables them to withdraw money up to 200 USD from an ATM, transfer balances and so on. At the same time there is also a special consumer called Don Smith whose account number is 123456. Account 123456 is in a view list that is associated to Don's security profile. On this account you can create a specific functional option called Withdraw Money and let him withdraw money up to 300 USD. The general functional option group gives him default access to a group of functional options. But the specific functional option can be applied on his account by attaching a view list to his security profile. Based on the conflict resolution that is set up to override the first optional group, he can withdraw 300 USD from the ATM.
Functional options enable the enterprise administrator to define the functions that users can access within a transaction. Functional options codes are evaluated at run time by the transaction that is evaluating the functional option.
PeopleSoft delivers these functional options codes out of the box when you install and implement PeopleSoft CRM:
|
Functional Option Code |
Description |
Application/Function |
|
CORE_RSF_FCAST_ROLLUP |
Forecast will begin in rollup; otherwise it begins in summary. |
Sales |
|
CORE_RSF_FCAST_SIMPLE |
Forecast simple reduces options presented to the forecast user. |
Sales |
|
CORE_RSF_ADVANCED |
Controls basic versus advanced mode for lead and opportunity components. |
Sales |
|
CORE_RSF_AUTO_ASSIGN_OFF |
Controls the ability to automatically assign a lead or opportunity at save in add mode. |
Sales |
|
CORE_RSF_DEFAULT_OWNER |
When lead or opportunity is in add mode at save time, the current user is assigned as the primary sales rep by default. If revoked, then leave lead or opportunity unassigned. |
Sales |
|
CORE_RSF_SEARCH_PRODUCT_GROUP |
Enables the end user to search for product group on leads and opportunities. |
Sales |
|
CORE_RSF_SHOW_SITE |
Controls the ability to add a site to a lead or opportunity. |
Sales |
|
CORE_RSF_SUMMARY |
Control the display of the summary page in lead and opportunity. |
Sales |
|
OVERRIDE_IBU |
Override Inventory BU |
Order Capture |
|
RO_RECUR_MAX_DISCOUNT_PERCENT |
Maximum Recurring Discount |
Order Capture |
|
RO_RECUR_MAX_SURCHARGE_PERCENT |
Maximum Recurring Surcharge |
Order Capture |
|
RO_MAX_DISCOUNT_PERCENT |
Maximum discount percent. |
Order Capture |
|
RO_MAX_ORDER_TOTAL |
Maximum order total reached. |
Order Capture |
|
RO_MAX_SURCHARGE_PERCENT |
Maximum surcharge percent. |
Order Capture |
|
RO_MIN_MARGIN_PERCENT |
Maximum profit margin percent. |
Order Capture |
|
SEARCH_ALL_PRODUCTS |
When searching for products in Order Capture, this functional option give the user the ability to search for any products that are defined in the system instead of limiting them to the products that are defined in a catalog. |
Order Capture |
|
MKTHIDE |
Hides marketing fields. |
Marketing |
|
MKTDISP |
Makes marketing fields display-only. |
Marketing |
|
RC_CHOOSE_DIRECT_REPORT |
Choose Direct Report |
Call Center |
|
RC_ON_BEHALF_OF |
On Behalf of |
Call Center |
|
RC_SLA_DETACH |
Enables user to clear a service level agreement. |
Call Center |
|
RSP_ADM_ACCT_TEAM |
Administer account team functional option. |
Strategic Account Planning |
|
RTM_EDIT_TASK |
Edit task functional option. |
Task Management |
|
QC |
Provides access to Quick Create. |
Business Object Search |
|
AFT |
Automatic fund transfer. |
Financial Services and Insurance |
|
All |
All. |
Financial Services and Insurance |
|
APPL |
Complete applications for new contract. |
Financial Services and Insurance |
|
BIPY |
Pay bills. |
Financial Services and Insurance |
|
CLM |
Make a claim. |
Financial Services and Insurance |
|
CLOS |
Close account. |
Financial Services and Insurance |
|
CMPL |
File a complaint. |
Financial Services and Insurance |
|
CPOL |
Change policy. |
Financial Services and Insurance |
|
FEER |
Reverse transaction fee. |
Financial Services and Insurance |
|
INQ |
Inquire about new contracts. |
Financial Services and Insurance |
|
IWIR |
Initiate wires. |
Financial Services and Insurance |
|
MDAC |
Modify financial account. |
Financial Services and Insurance |
|
MDEP |
Make deposits. |
Financial Services and Insurance |
|
MPAY |
Make payments. |
Financial Services and Insurance |
|
MWTH |
Make withdrawals. |
Financial Services and Insurance |
|
NEGO |
Negotiate terms of new contracts. |
Financial Services and Insurance |
|
ORCC |
Order cashier's checks. |
Financial Services and Insurance |
|
ORDC |
Order check copy. |
Financial Services and Insurance |
|
ORDD |
Order document. |
Financial Services and Insurance |
|
ORFC |
Order foreign currency. |
Financial Services and Insurance |
|
ORTC |
Order traveler's checks. |
Financial Services and Insurance |
|
PROF |
Change profile information. |
Financial Services and Insurance |
|
RECH |
Reorder check book. |
Financial Services and Insurance |
|
REQI |
Request information. |
Financial Services and Insurance |
|
RWIR |
Release wires. |
Financial Services and Insurance |
|
SCHK |
Sign checks. |
Financial Services and Insurance |
|
SCON |
Sign or approve new contracts. |
Financial Services and Insurance |
|
SECX |
Complete security transactions. |
Financial Services and Insurance |
|
STOP |
Complete stop payment requests. |
Financial Services and Insurance |
|
TMON |
Transfer money. |
Financial Services and Insurance |
|
TSEC |
Transfer securities in and out of accounts. |
Financial Services and Insurance |
Functional Options Conflict Resolution
Conflicts can happen due to the granting of the same functional options within a single security profile or multiple security profiles. To resolve conflicts the system uses these rules:
If one functional option group grants an option and another revokes it, the revoke takes precedence. If the options are not in the same scenario, the option is granted. Revoke is for the functional option itself. (for example, do you have authorization for transfer money). If one functional option group says yes and another no, conflicts are resolved based on how the revoke options are set up.
For amounts there is a conflict resolution called max amount wins. This means that if one functional option group gives a user access to 2000 USD and another functional option group give a user access to 3000 USD, and the max amount win option is selected, the user gets access to 3000 USD.
Here are two scenarios and the resolution mechanisms that are used to resolve the conflicts originating in the functional options:
Single Security Profile Functional Option Conflict Resolution:
Bob is a financial account holder with the account number of 2001.
Bob is associated with a single security profile (PROFILE_1).
The security profile is associated with a functional option that allows him to transfer money up to 300 USD.
Bob's account (2001) allows him transfer money up to 1000 USD.
The conflict resolution option on the Transfer Money functional option is set for maximum amount always to win.
Resolution: Bob can transfer up to 1000 USD.
Multiple Security Profile Functional Option Conflict Resolution:
ABC Warehouse is a partner to the enterprise.
ABC Warehouse is explicitly associated to a security profile (PROFILE_2) either through a dynamic membership list domain or a static membership list domain.
There is also a generic security membership list for all partners (PROFILE_1), which means it includes the Partner ABC Warehouse.
There are no functional options attached to the view list for both security profiles.
For PROFILE_1, the administrator has specified functional options so that users can submit orders for amounts up to 5,000 USD.
The ability to add addresses has been revoked.
For PROFILE_2, the administrator has specified functional options so that users can submit orders for amounts up to 10,000 USD.
The ability to add addresses has been granted.
The conflict resolution option on the Order Submit functional option is set for the maximum amount always to win.
The Add Address functional option is set so that the revoke option does not win.
Resolution: The ABC Warehouse Partner can submit orders up to 10,000 USD and add addresses.
The display template framework enables you to configure functional option security for your pages. By referencing the functional option on a button or field within the display template, the functional option security is enabled.
See Configuring Display Templates.
Business Object Search System Processing
The transaction adapter determines, based on the transaction, what fields appear on the customer information subpage and the criteria definition that defines the advanced search page. The criteria definition determines what criteria fields appear on the advanced search page, how they appear, and the search definitions to invoke.
The search definition determines the roles to search for the criteria fields, the fields that appear in the search results, how the search results appear, and the quick create definition that the user accesses to create a new business object.
For each role that is searched, the search role determines the security that is applied, the relationships for the role, and whether fields appear in the search criteria or results set for the role. The field definitions determine how the search fields appear on the page, the database records that are searched for each field, and how the user can search for the field.
See Adding and Modifying BO Search and Quick Create Definitions.
Strategic Account Planning Security
Access to plans and templates is secured by dataset rules. Once a plan or template is activated, no further changes can be made in the active status. Edit control security limits edit privileges to designated individuals who can change the status from active to draft status and make modifications.
To ensure consistency between account plans, account managers define account planning templates containing a default set of objectives and goals. They can attach a list of template editors who have security access to make changes and activate a template. Once a template has been moved from draft to active, and its date range is active, account managers can begin creating account plans from a template. Tasks can be attached to an account plan. These tasks appear when you view the tasks for the associated company.
A plan has two types of application security in addition to the PeopleTools security using the permission list. The row level application security is implemented by using dataset rules. Plan edit control security ensures that the user has been granted appropriate access before any status changes can be made to the plan.
With PeopleTools role security, when a user requests access to a page, the system checks the role of the user, and then checks the permission list belonging to the role to decide if the user can access the page. Certain component items can also be disabled by using the navigation security feature. Throughout the application, certain security measures target two roles: Administrator and Agent. If you define your own PeopleTools roles, you must map the roles with either the Administrator or Agent role to get the security features for the new roles.
See Configuring Application Security.
Financial Services Industry Security
Financial Services Industry security uses the Application Security framework to secure Accounts.
See Configuring Application Security.
Catalogs are a single group of products or services that are marketed and displayed together because they share common criteria. PeopleSoft enables you to define the layout and content of online catalogs for internal and external use. You define the look and feel of catalogs by creating display templates, and then define the contents that you want to organize and present according to your template definitions. You can designate products for inclusion in a catalog either by direct association (using product IDs) or by creating business rules to dynamically build product content based on the selection criteria that you define. Similarly, you can control user access to catalogs by associating a Security Membership List with specific catalogs.
For Order Capture there is a functional option code called SEARCH_ALL_PRODUCTS. When searching for products in Order Capture, this functional option will give users the ability to search for any products that are defined in the system, instead of limiting the search to the products that are defined in a catalog. You must group this option into a functional option group. You would then associate it to a membership list in the security profile.
Security Memberships allow you to specify which users or groups of users can have access to certain catalogs. For example, a company can have a Membership List called All Persons that includes all of the people that have a person record in the system. This Membership List is then associated with a catalog.
This means that all of the people on this list can view this catalog. If a catalog called the Premier Catalog was for Premier Customers, a company can create a Membership List that contains all of their Premier Customers and the Premier Catalog would provide special pricing and recommendations for this group of users.
Note. PeopleSoft CRM does not support role-based catalogs, nor do we support role-based access to customers. The system can handle this type of functionality but you will need to customize your CRM application. The only area where you can use a role-based membership list, without customizing your application, is to control the Order Capture hold view list. The other area where you can use the role membership list, without customizing your application, is to control display logic in conjunction with a display template.
See Defining Catalog Content and Permissions.
How Security Information is Processed at Runtime
PeopleSoft CRM application security uses several Application Engines and APIs (application programming interfaces) at runtime to help ensure that the customers and partners to whom you have granted security have access to the correct information and customers.
Here are the elements of runtime security that are activated when a partner, user, or customer attempts to access the PeopleSoft CRM applications that you have secured.
Application Engines
Runtime API
Determines security memberships and view lists.
Generate SQL filters for calling applications
Determines functional options, and functional option resolution.
Provides application programming interface to add and update security framework metadata.
PeopleCode Application Classes and SQL views provide the API to the security framework. This API is provided for impacted applications to access and update the application security framework. The API is used at runtime to evaluate membership and view privilege result sets, but there are some access methods that are provided to update the framework keys, membership, and view privilege tables directly. The API encapsulates all functionality and structure related to the security framework, so that calling applications do not need to understand the inner workings of the framework.
These access methods are an overview of how each of the impacted applications requirements are satisfied through the API.
This access method is provided for instances where the membership tables contain all of the relevant data for the calling application. This method produces a result rowset based on the underlying security object definition. In this usage there are three known values and one unknown value. The three known values consist of a membership security object type, a view list object type, and either a membership object ID, and or a view list membership object ID. Based on the ID that is provided, the API determines the security profiles that are associated to the known entity, and from the profiles determines the data that is to be provided as a result set. The API returns this data in a rowset based on the security object’s list record.
This access method is provided for instances when the results in the membership table need to be merged or joined in a larger SQL statement that is being constructed by the calling application. The known values and the method of data retrieval are the same as the direct data access method, the result of this call is a SQL select statement that returns the keys of the rows of the security object’s table. This SQL statement can be used in a SQL IN clause or correlated sub query to limit the results of the calling application’s constructed query.
There may be instances in which the API cannot be used. An example of this is any time where the logic to determine a result set does not have the ability to run a PeopleCode based API, such as a standard PeopleTools prompt, a view, or a PeopleTools query. For these use cases the design provides example SQL that can be used to join the security data model.
Functional option Conflict Resolution
In instances where a key resolves the same functional option multiple times with different properties, the conflict needs to be resolved. Gathering the functional options and privilege overrides is possible using a SQL UNION, but the resolution of the rules is not possible within a single SQL select statement. This requires impacted applications to be in an environment where it is possible to run PeopleCode to determine the applicable functional options. Because of this functional options are not be determined or executed in a view or query type access method.
An abstract class/interface is provided to model functional option classes. This class is used by the runtime application to run the functional option logic. The runtime class provides access to the logic that is relevant to the application and coded in the attached application class. The class also provides the ability to access the functional option amount value, operator, base currency, and perform currency conversion if required. The runtime API provide a method to pass multiple functional option codes, and execute them. A calling application’s framework could leverage this to provide data driven execution.
Applications that are responsible for the security objects’ secured data require access to update the security cache when a change is made. Since it is possible that a configurable search definition references any data for a given object, all additions and updates to these objects trigger a cache refresh. The known values in this case are the security object type, and security object ID. The API triggers the data caching process providing the known values as parameters. These parameters trigger the caching process to deal only with data that is relevant (for example, the specific object ID).
This access method is provided for instances where it is required to update the security framework data directly in a batch or EIP type mode. The API provides access to create membership, view privilege, functional option, and security key objects. The system provides methods to create the associations between the various security objects, and keys. Security Object types (for example, partners and customers) cannot be created through the API. Since there is not a lot of business logic tied to the security setup components, the API uses SQL objects to update the framework tables directly rather than building component interfaces.
Note. To improve runtime performance, the result sets for static and dynamic membership and view privilege domains are cached into database list tables. Dynamic implicit domains are cached by spawning security keys for each member in the domain. An Application Engine process provides the mechanism for creating the cache tables that store the membership and view privilege lists.
Distributed Security
This section discusses:
Delegated administration.
Role can grant hierarchies.
Creating security groups.
Distributed security, or delegated administration, is the ability to securely delegate administrative responsibility to multiple administrators and managers in an organization (within or external to the enterprise). If you have a large number of partners and high turnover among partner users that you don’t manage directly, it is very time consuming to keep track of partner user IDs and access in a centralized administrative function. Delegated administration enables you to set up partner administrators so that they can keep track of partner user access, within the confines of the permissions that you allow the partner administrator to grant.
PeopleSoft delivers roles within PeopleTools that give administrators the ability to grant roles to other users in a logical way that represents a hierarchy. For example, when the enterprise administrator and the partner administrator are setting up partner users, they can only grant roles for which they are authorized. Partner administrators, in turn, can access the partner organization tree (sales territory tree), define the partner organization, and create partner users only using roles that the partner administrator can grant.
|
Role |
Can Grant Roles |
|
Enterprise channel manager |
Partner admin Partner sales manager Partner Representative |
|
Partner administrator |
Partner sales manager Partner representative |
|
Partner sales manager |
Partner representative |
PeopleSoft Partner Relationship Management (PRM) supports the use of a territory tree for partners. In distributed security, territory trees are referred to as user groups.
An enterprise can implement user groups in PeopleSoft Partner Relationship Management to set boundaries and limits around what partners can do with territory configuration. A partner manager or partner administrator can modify their own territories to show only their own partner nodes and add and delete individual partner representatives to different nodes of a territory tree managed by the partner administrator.
To implement security user groups, an enterprise completes these setup tasks:
The enterprise administrator creates the partner territory tree initially.
For partner organization, the enterprise administrator creates a user group.
For example, you may create a user group called Channel to hold all channel partners and add the enterprise channel manager as primary owner of the user group.
The enterprise channel manager creates a user group.
For example, you may create a user group called ABC Warehouse with the IBM Channel user group as the parent for the partner company IBM. In addition, you create a partner administrator called Sally Smith as the owner. On completion of the task, the system sends an email notification to the Sally Smith, the partner administrator.
See Also
Setting Up Partner Registration
PeopleTools 8.52: Security Administration PeopleBook, “Understanding PeopleSoft Security”
Setting System-Wide Security Options
To set up system-wide security options, use these components
Security Options (SECURITY_OPTIONS).
Security View Names (SECURITY_VIEW_NAMES).
Apply Security (APPLY_SECURITY).
Security SetID Class (SEC_SETID_CLS).
Security SetID Operator (SEC_SETID_OPR)
Security Business Unit Class (SEC_BU_CLS)
Security Business Unit Operator (SEC_BU_OPR)
Operator Defaults (OPR_DEFAULT)
Role Worker (RB_ROLE_WORKER).
Security Views (SECURITY_VIEWS)
This section provides overviews of row-level security views, sensitive worker information, and predefined security roles and sample users and discusses how to:
Select system-wide security options.
Activate security options.
Define view security.
Define business unit security by permission list.
Define business unit security by user ID.
Define tableset security by permission list.
Define tableset security by user ID.
Define overall preferences.
Define call center preferences.
Define sales preferences.
Define change management preferences.
Define account preferences.
Define roles with access to sensitive worker information.
Understanding Row-Level Security Views
Business units and setIDs are maintained in edit tables and can be used as primary keys throughout the system. When a field uses an edit table to select values, you are limited to the values that are defined for the edit table. With PeopleSoft row-level application security, you can specify which values in the edit table are available in a particular view.
Views enable you to access data horizontally for multiple tables. Views are Structured Query Language (SQL) statements that filter out data rows. Users with permission to access particular setIDs or business units see only a subset of the values in the edit tables.
After you set up views, you can specify which users or roles can access the pages that contain secured field values. Within each page, you can also hide specific fields from particular roles.
PeopleSoft delivers applications with security views that apply to key fields in the system. You can alter these views or build views of your own; however, they would be considered a customization. View names include suffixes that reflect the type of security for the view. This table lists the view name suffixes and describes the corresponding security type.
|
View Name Suffix |
Security Type |
|
NONVW |
No security. |
|
OPRVW |
User security. |
|
CLSVW |
Permission list security. |
Note. Although PeopleSoft generally follows this naming convention, the system does not enforce it. As long as you have the view defined in the security view names grid the view name will work.
Row-Level Security for Users
After you select security options and set up security view names, define the security-controlled field values that each user or permission list can access. When you secure key fields in the application, the pages that you use depend on the level of system security that you select. If you select user-level security, use the user security pages. If you select role-level security, use the permission list security pages.
Understanding Sensitive Worker Information
PeopleSoft uses enterprise integration points to transmit worker data from PeopleSoft Human Capital Management (PeopleSoft HCM) to PeopleSoft CRM. Most of the data that PeopleSoft CRM subscribes to from PeopleSoft HCM is sensitive.
Some users, however, should not have access to this data. To give users access to sensitive and semi-sensitive data, you must select the roles that are associated with the users and then indicate what type of information is available to them—either confidential or home contact information.
Users who have sensitive (confidential) data access defined in the Secured Worker Role setup page, can view date of birth, age, national ID, gender, and employee status fields in the Worker and Case components; otherwise, the system hides this information. Users who have semi-sensitive data (home contact) access can view home address, home phone, home email, and home pager fields for a worker.
If a role doesn't have access to sensitive or semi-sensitive data, then all users belonging to the role cannot view the associated fields on the pages in the Worker and Case components.
Warning! When users have access to sensitive or semi-sensitive data, the system enables them to edit some pages. If a user modifies a field in PeopleSoft CRM, the changes could be overwritten the next time that a PeopleSoft HCM message is transmitted to PeopleSoft CRM because the information comes to PeopleSoft CRM through a one-way transmission from PeopleSoft HCM.
See Also
Predefined Security Roles and Sample Users
PeopleSoft provides several roles with predefined user profiles and permission lists in the demonstration database. You can use these sample security configurations as they are delivered, or you can modify them to meet your specific security requirements. The roles and permissions are part of the system data, and the users are part of the sample data delivered in the demonstration database.
This section discusses:
PeopleSoft CRM system IDs.
PeopleSoft HelpDesk and PeopleSoft Support user IDs.
PeopleSoft Integrated FieldService user IDs.
PeopleSoft financial services industry user IDs.
PeopleSoft communication industry user IDs.
PeopleSoft high tech industry user IDs
PeopleSoft government industry user IDs
PeopleSoft Marketing user IDs.
PeopleSoft Sales user IDs.
PeopleSoft Order Capture and Services Management user IDs.
PeopleSoft Order Capture Self Service user IDs.
PeopleSoft Real-Time Advisor user IDs.
PeopleSoft Quality user IDs.
PeopleSoft insurance industry user IDs.
PeopleSoft energy industry user IDs.
PeopleSoft multichannel applications user IDs.
PeopleSoft Partner Relationship Management user IDs.
PeopleSoft Strategic Account Planning user IDs.
PeopleSoft Wealth Management user IDs.
PeopleSoft delivers predefined user IDs, passwords, and associated roles for PeopleSoft CRM.
Note. To look up role information for a user ID, select PeopleTools, Security, User Profiles, User Profiles and then click the Roles tab.
The tables that follow list the delivered PeopleSoft user IDs and passwords:
|
User ID and Password |
Description |
|
SYSADM |
System Administrator |
|
EMPL |
Employee |
|
MGR |
Line Manager |
PeopleSoft HelpDesk, PeopleSoft HelpDesk for Human Resources, and PeopleSoft Support User IDs
This table lists the predefined user IDs and passwords for PeopleSoft HelpDesk, PeopleSoft HelpDesk for Human Resources, PeopleSoft HelpDesk for Higher Education, and PeopleSoft Support:
|
User ID and Password |
Description |
|
CCAG |
Call Center Agent |
|
CCMGR |
Call Center Manager |
|
CRAWLING / WELCOME |
HR Call Center Level One Agent USA (E-Business HCM) |
|
FKELLY / WELCOME |
HR Call Center Level Two Agent UK (E-Business HCM) |
|
HELPAA |
Help Desk Applications Administrator |
|
HELPAG |
Help Desk Agent |
|
HELPMGR |
Help Desk Manager |
|
HHDCAN_ADMIN |
HR HelpDesk Administrator (Canada) |
|
HHDCAN_AGT1 |
HR HelpDesk Agent 1 (Canada) |
|
HHDCAN_AGT2 |
HR HelpDesk Agent 2 (Canada) |
|
HHDCAN_AGT3 |
HR HelpDesk Agent 3 (Canada) |
|
HHDCAN_MGR |
HR HelpDesk Manager (Canada) |
|
HHDUSA_ADMIN |
HR HelpDesk Administrator (USA) |
|
HHDUSA_AGT1 |
HR HelpDesk Agent 1 (USA) |
|
HHDUSA_AGT2 |
HR HelpDesk Agent 2 (USA) |
|
HHDUSA_AGT3 |
HR HelpDesk Agent 3 (USA) |
|
HHDUSA_MGR |
HR HelpDesk Manager (USA) |
|
HSCOTT / WELCOME |
HR Call Center Level One Agent UK (E-Business HCM) |
|
KADDAI / WELCOME |
HR Call Center Level Two Agent USA (E-Business HCM) |
|
MBORHO / WELCOME |
HR HelpDesk Administrator (E-Business HCM) |
|
RJAMES / WELCOME |
HR Self-Service Manager (E-Business HCM) |
|
SMARTHA / WELCOME |
HR Self-Service Employee (E-Business HCM) |
|
SOLTNMGR |
Solution Manager |
|
SSS_AA00100 |
Higher Education Worker and Student |
|
SSS_CONST |
Higher Education Constituent |
|
SSS_FACULTY |
Higher Education Faculty Worker |
|
SSS_FAO |
Higher Education Financial Aid Officer |
|
SSS_FUND |
Higher Education Fundraiser |
|
SSS_HEADMIN |
Higher Education Administrator |
|
SSS_HEAG1 |
Higher Education Level One Agent |
|
SSS_HEAG2 |
Higher Education Level Two Agent |
|
SSS_HEBLENDAG |
Higher Education Blended Agent (IT and non-IT cases) |
|
SSS_ITAG |
Higher Education IT Agent |
|
SSS_MKTMGR |
Higher Education Marketing Manager |
|
SSS_MKTR |
Hgher Education Marketer |
|
SSS_MKTR1 |
Higher Education Marketer |
|
SSS_REC |
Higher Education Recruiter |
|
SSS_REC1 |
Higher Education Recruiter |
|
SSS_REC2 |
Higher Education Recruiter |
|
SSS_REC3 |
Higher Education Recruiter |
|
SSS_RECMGR |
Higher Education Recruiting Manager |
|
SUPPAA |
Support Applications Administrator |
|
TECHSPEC |
Technical Specialist |
PeopleSoft Integrated FieldService User IDs
This table lists the predefined user IDs and passwords for PeopleSoft Integrated FieldService:
|
User ID and Password |
Description |
|
DISPATCH |
Dispatcher |
|
FSAA |
Field Service Applications Administrator |
|
FSAG |
Field Service Agent |
|
FSENG |
Field Service Engineer |
|
FSMGR |
Field Service Manager |
|
FSPART |
Field Service Partner |
|
INVAG |
Inventory Agent |
|
INVMGR |
Inventory Manager |
|
PRODMGR |
Product Manager |
|
PURCHAG |
Purchasing Agent |
|
RECAG |
Receiving Agent |
|
TECHSUP |
Technical Support |
PeopleSoft Financial Industry User IDs
This table lists the predefined user IDs and passwords for PeopleSoft Financial Services:
|
User ID and Password |
Description |
|
FSIADMIN |
FSI Administrator |
|
FSIAGENT |
FSI Agent |
|
FSISS |
FSI Self-Service |
|
FSIMGR |
FSI Account Manager |
PeopleSoft Communication Industry User IDs
This table lists the predefined user IDs and passwords for the PeopleSoft communication industry
|
User ID and Password |
Description |
|
CSPADMIN |
CSP Administrator |
|
CSPAGENT |
CSPA Agent |
|
CSPSS |
Communication Self-service Consumer |
|
GUESTCOMM |
Guest - Communication |
PeopleSoft High Tech Industry User IDs
This table lists the predefined user IDs and passwords for the PeopleSoft high technology industry.
|
User ID and Password |
Description |
|
HITECHADMIN |
High Technology Administrator |
|
HITECHAGENT |
High Technology Agent |
|
HITECHSS |
High Technology Self-Service |
|
HITECHGUEST |
High Technology Guest |
PeopleSoft Government Industry User IDs
This table lists the predefined user IDs and passwords for the PeopleSoft government industry.
|
User ID and Password |
Description |
|
GOVADMIN |
Government Administrator |
|
GOVAGENT |
Government Agent |
|
GOVSS |
Government Self Service |
|
GOVGUEST |
Government Guest |
|
GOVMGR |
Government Manager |
This table lists the predefined user IDs and passwords for PeopleSoft Marketing:
|
User ID and Password |
Description |
|
CAMPMGR |
Campaign Manager |
|
MKTAA |
Marketing Application Administrator |
|
MKTANAL |
Marketing Analyst |
|
MKTCRT |
Marketing Creative |
|
MKTMGR |
Marketing Manager |
|
MKTRES |
Marketing Researcher |
|
SRVCONA |
Service Contract Administrator |
|
TELAG |
Telemarketing Agent |
|
TELFFLAG |
Telemarketing Fulfilment Agent |
|
TELMGR |
Telemarketing Manager |
|
TELSLAG |
Telemarketing Sales Agent |
This table lists the predefined user IDs and passwords for PeopleSoft Sales:
|
User ID and Password |
Description |
|
SLSREP |
Inside Sales Rep |
|
FLDSLSREP |
Field Sales Rep |
|
SLSMGR |
Sales Manager |
|
LDQUAL |
Lead Qualifier |
|
SLSAA |
Sales Application Administrator |
|
CHSLSMGR |
Channel Sales Manager |
PeopleSoft Order Capture and Services Management User IDs
This table lists the predefined user IDs and passwords for PeopleSoft Order Capture and Services Management:
|
User ID and Password |
Description |
|
OCADMIN |
Order Capture Administrator |
|
OCMGR |
Order Capture Manager |
|
OCREP |
Order Capture Representative |
|
FSIADMIN |
FSI Administrator |
|
FSIAGENT |
FSI Agent |
|
CSPADMIN |
CSP Administrator |
|
CSPAGENT |
CSPA Agent |
|
INSADMIN |
Insurance Administrator |
|
INSAGENT |
Insurance Agent |
|
ENERGYADMIN |
Energy Administrator |
|
ENERGYAGENT |
Energy Agent |
PeopleSoft Order Capture Self Service User IDs
This table lists the predefined user IDs and passwords for PeopleSoft Order Capture Self Service:
|
User ID and Password |
Description |
|
CPCUST |
Customer |
|
CPSS |
Customer Self Service |
|
CSPSS |
Communication Self-Service Consumer |
|
GUEST |
Guest |
|
COMGUEST |
Guest - Communication |
|
ENERGYGUEST |
Guest - Energy |
|
GOVGUEST |
Guest - Government |
|
GUESTCOMM |
Guest - Communication |
|
HITECHGUEST |
High Technology Guest |
|
INSGUEST |
Insurance Guest |
|
USGUEST |
Guest - US001 (USA) |
PeopleSoft Real-Time Advisor User IDs
This table lists the predefined user IDs and passwords for PeopleSoft Real-Time Advisor:
|
User ID and Password |
Description |
|
RADADMIN |
Advisor Administrator |
|
RADUSR |
Advisor User |
|
RADMGR |
Advisor Manager |
This table lists the predefined user IDs and passwords for PeopleSoft Quality:
|
User ID and Password |
Description |
|
QAANAL |
Quality Analyst |
|
QAAA |
Quality Application Administrator |
|
QAMGR |
Quality Manager |
PeopleSoft Insurance Industry User IDs
This table lists the predefined user IDs and passwords for PeopleSoft insurance industry:
|
User ID and Password |
Description |
|
INSADMIN |
Insurance Administrator |
|
INSAGENT |
Insurance Agent |
|
INSSS |
Insurance Self-Service |
|
INSGUEST |
Insurance Guest |
PeopleSoft Energy Industry User IDs
This table lists the predefined user IDs and passwords for PeopleSoft energy industry:
|
User ID and Password |
Description |
|
ENERGYADMIN |
Energy Administrator |
|
ENERGYAGENT |
Energy Agent |
|
ENERGYSS |
Energy Self-Service |
|
ENERGYGUEST |
Guest - Energy |
PeopleSoft Multichannel Applications User IDs
This table lists the predefined user IDs and passwords for users implementing PeopleSoft multichannel applications:
|
User ID and Password |
Description |
|
ERMSMGR |
ERMS Manager |
|
ERMSAGENT |
ERMS Agent |
PeopleSoft Partner Relationship Management User IDs
This table lists the predefined user IDs and passwords for users implementing PeopleSoft Partner Relationship Management:
|
User ID and Password |
Description |
|
ECM |
Enterprise Channel Manager |
|
PADMIN |
Partner Administrator |
|
PMGR |
Partner Manager |
|
PREP |
Partner Rep |
|
PMKTA |
Partner Marketing Analyst |
|
PMKTM |
Partner Marketing Manager |
PeopleSoft Strategic Account Planning User IDs
This table lists the predefined user IDs and passwords for users implementing PeopleSoft Strategic Account Planning:
|
User ID and Password |
Description |
|
AASH |
Account Administrator |
|
ACCOUNTMGR |
Account Manager |
PeopleSoft Wealth Management User IDs
This table lists the predefined user IDs and passwords for users implementing PeopleSoft Wealth Management:
|
User ID and Password |
Description |
|
WMADMIN |
Wealth Management Administrator |
|
FA |
Financial Advisor |
Pages Used to Set System-Wide Security Options
|
Page Name |
Definition Name |
Navigation |
Usage |
|
SECURITY_OPTIONS |
Set Up CRM, Security, Security Options, Security Options |
Select the type of security to implement (user or permission list) and the key fields that are controlled by the security settings. |
|
|
RUN_FIN9001 |
Set Up CRM, Security, Apply Security Setups, Apply Security Setups |
Initiate the process that activates the selected security options. |
|
|
SECURITY_VIEWS |
Set Up CRM, Security, Security View Names, Security Views Names |
Define the type of security for each view in the system. The Apply Security Setups process changes the security view names to match the levels of security for each view. These names use the file extensions for the corresponding security type. |
|
|
SEC_BU_CLS |
Set Up CRM, Security, Unit by Permission List, Business Unit Security by Permission List |
Grant access to a business unit by using a permission list. |
|
|
SEC_BU_OPR |
Set Up CRM, Security, Unit by User ID, Business Unit Security by User ID |
Grant access to a business unit by using a user ID. |
|
|
SEC_SETID_CLS |
Set Up CRM, Security, TableSet by Permission List, TableSet Security by Permission List |
Grant access to a tableset using a permission list. |
|
|
SEC_SETID_OPR |
Set Up CRM, Security, TableSet by User ID, TableSet Security by User ID |
Grant access to a tableset by using a user ID. |
|
|
OPR_DEF_TABLE_RB1 |
Set Up CRM, Security, User Preferences, Overall Preferences |
Define overall preferences for a specified PeopleSoft user. |
|
|
OPR_DEF_TABLE_RC |
Set Up CRM, Security, User Preferences, Call Center |
Define preferences for call center agents and other users of the Case component. |
|
|
OPR_DEF_TABLE_RSF |
Set Up CRM, Security, User Preferences, Sales |
Define preferences for sales representatives. |
|
|
OPR_DEF_TABLE_RG |
Set Up CRM, Security, User Preferences, Change Management |
Select user default values that you want the system to display on the Change Request page in PeopleSoft HelpDesk. |
|
|
OPR_DEF_TABLE_RSP |
Set Up CRM, Security, User Preferences, Account |
Select default values that you want the system to use when it does account assignments. |
|
|
RB_ROLE_WORKER |
Set Up CRM, Security, Secured Worker Role, Secured Worker Role |
Define user roles that can access sensitive and semi-sensitive worker information. |
Selecting System-Wide Security Options
Access the Security Options page (Set Up CRM, Security, Security Options, Security Options).
Type of Security
|
Select to disable PeopleSoft application security. All users who are authorized to access a page can select any valid setID or business unit. PeopleSoft CRM applications are delivered with security disabled. |
|
|
Select to enable PeopleSoft application security by user ID or permission list. Each option controls which rows of data a user can see based on user ID or permission list. |
Secured Fields
|
Business Unit |
Select to implement security for the Business Unit field, which is the primary key for many transactional data tables. In some situations, the Business Unit field is a non-key field on a record. |
|
SetID |
Select to implement security for the SetID field, which is the primary key for many setup and rules tables. In some situations, the SetID field is a non-key field on a record. |
Activating Security Options
Access the Apply Security page (Set Up CRM, Security, Apply Security Setups, Apply Security Setups).
Select the language that you are using to apply security and then click Run to load the security views that you created.
It is highly recommended that you clear the application server cache after the Apply Security process has completed. Check the process monitor to determine when the process has finished.
Use the RD_CACHE_DEL application engine program to clear the application cache.
One way to run this program is directly from the operating system command line:
Navigate to the <%PS_CFG_HOME>\bin\client\winx86 directory.
Enter the following command: psae -CT <dbtype> -CS <server> -CD <database name> -CO <oprid> -CP <oprpswd> -R <run controlid> -AI <program id> -I <process instance>
As an example, a user operating with a Microsoft database named CR910TSTon a server named ADDB0123 might type psae -CT MICROSFT -CS ADDB0123 -CD CR910TST -CO PS -CP PS -R CRM -AI RD_CACHE_DEL -I 1
Application Engine programs can also be submitted online from the Application Engine Request page. PeopleTools, Application Engine, Request AE)
See PeopleTools 8.52: Application Engine PeopleBook, “Managing Application Engine Programs”
Defining View Security
Access the Security View Names page (Set Up CRM, Security, Security View Names, Security Views Names).
|
Search Text |
Displays the view name prefixes supplied by each application. When you run the Apply Security Setups process, the system searches for view names that begin with these prefixes. If a view name begins with a prefix from this list, the process changes the view name extension to match the security type that you selected in the security options. The system stores the list in the SEC_VIEW_NAMES table, where you can review or update this information. You can also configure new security views for the system on this page. Note. There is no need to access this page unless you want to implement customized security views. |
|
No Security View User ID Security View and Permission List Security View |
Displays the different security views for the view name prefixes that are supplied by each application. When you run the Apply Security Setups process, the Application Engine process can switch to the Permission List Security View (CLSVW), the User ID Security View (OPRVW) or the No Security View (NONVW) based on the option you selected on the Security Options page. |
|
Type |
Select the type of field (SetID or Unit) that the security view affects. |
Defining Business Unit Security by Permission
List
Access the Business Unit Security by Permission List page ( Set Up CRM, Security, Unit by Permission List, Business Unit Security by Permission List).
Select the business units to which you want the permission list to have access.
Note. PeopleSoft does not deliver any business units that are associated with permission lists. You must make this association using the Business Unit Security by Permission List page.
Defining Business Unit Security by User
IDAccess the Business Unit Security by User ID page (Set Up CRM, Security, Unit by User ID, Business Unit Security by User ID).
Select the business units to which you want the user ID to have access.
Note. PeopleSoft does not deliver any business units that are associated with user IDs. You must make this association using the Business Unit Security by User ID page.
Defining TableSet Security by Permission
ListAccess the TableSet Security by Permission List page (Set Up CRM, Security, TableSet by Permission List, TableSet Security by Permission List).
Select the setIDs to which you want the permission list to have access.
Defining TableSet Security by User IDAccess the TableSet Security by User ID page (Set Up CRM, Security, TableSet by User ID, TableSet Security by User ID).
Select the setIDs to which you want the user ID to have access.
Defining Overall Preferences
Access the Overall Preferences page (Set Up CRM, Security, User Preferences, Overall Preferences).
Note. User preferences are associated with user IDs. When you create user IDs for implementation team members and PeopleSoft users, define preferences for each user.
|
Business Unit |
Select the user's default business unit. Select a business unit that is valid for the pages that the user normally accesses. |
|
SetID |
Select the default setID for this user. The setID represents a set of control table information. SetIDs enable business units to share a set of control table information. |
|
As of Date |
Select the default date to use as the as of date when running date-driven reports and processes. |
|
Localization Country |
Select the country code for the localization country. |
|
Requester |
Enter a default requester ID to appear on requisitions that are initiated by this user from the Manage Material component in PeopleSoft Integrated FieldService or the RMA Form (return material authorization form) component in PeopleSoft Support. Important! If you integrate with PeopleSoft Purchasing, the requester ID must be a valid user ID and requisition requester in PeopleSoft Purchasing. |
|
Role Type ID |
If a self-service user has multiple roles, select the role type to use as the default when signing in to the self-service site. The only supported role types for self-service users are individual consumer (role type 9) and contact (role type 8). |
|
Company Name |
For self-service users who can represent multiple companies, select the company whose data appears when the contact first signs in. |
|
Partner Relationship Type |
Select the type of partner relationship that the user has with the company. This relationship appears when the contact first signs in. For every Partner Users that uses the PARTNER portal must have a user preference record that identifies the Partner Company and the relationship type of the user with the Partner Company. |
|
Market |
Select the preferred market for the user ID. The preferred market associated with the user ID determines what data and functionality are available to the user. |
|
Order Capture Unit |
Select the order capture unit that you want the system to use as a default for the user. This business unit is used by Order Capture, Order Capture Self Service, and product catalog. The system uses this business unit to derive the setID that is used to retrieve product catalogs the selected user can access (including PeopleSoft Order Capture Self Service guest user IDs). If this business unit is not specified, the system looks up the order capture business unit (marked as default business unit) that is defined under Set Up CRM, Business Unit Related, Order Capture Definition, Business Unit, Order Capture Definition. |
|
PIM Preference ID (personal information manager preference ID) |
Select the preference ID that you want the system to use if the user is a personal information manager. |
|
Duplicate Parm Set |
This field is not used now in PeopleSoft CRM. No value is required for this field. |
|
User Interface Mode |
(optional) Select a preferred mode for the GUI (graphical user interface) solution of the Advanced Configurator to display configuration sessions, which are initiated from orders for configuring multilevel product bundles and multilevel installed products. Values are: Expert Step-by-step Super wizard Tabular This field value, if specified, is passed to the Configurator's GUI solution to determine the display mode of configuration sessions. By default, this option is not used in the sample GUI solution that is delivered as part of the multilevel product bundle offering. While this option is potentially available, it's the responsibility of custom GUI solutions to enable it for presenting product configuration sessions. |
|
Select to activate the fields that support alternate character functionality in application pages that are so enabled. The alternate character fields do not appear on application pages until you select this check box. |
|
|
Select if the user is a client manager. When the user accesses the PeopleSoft Strategic Account Planning application, the system opens the My Clients page. |
See Also
Setting Up Alternate Characters
Defining Call Center Preferences
Access the Call Center page (Set Up CRM, Security, User Preferences, Call Center).
Default Business Units and Display Template ID
|
Primary |
Select this check box if you want the system to use the display template, component, market, and business unit as the user's primary default. Selecting a primary business unit provides the system with a default for items that are call-center related. It does not affect functionality that is business-unit driven such as the category/type/detail setup table default or solution searching in self-service. |
|
Template Family |
Select the display template family that you want the system to default to for the user. Once an agent opens a case, however, the agent cannot change the display template family. Depending on how you configure your system, an agent can use different display templates to view information for the same case. |
|
Component |
Select the component that you want the system to default to for the user. Components can be associated with multiple display templates, each of which provides a different presentation of a page. |
|
Business Unit |
Select the business unit that you want the system to default to for the user for the display template, component, and market. |
|
Display Template ID |
Select the display template that you want the system to default to for the user. Display templates enable you to control the appearance and behavior of components (pages or sets of pages) for your various business needs. |
Frequently Used Solution
|
Maximum Solutions to Display |
Enter the maximum number of solutions that are to appear on the Frequently Used Solutions page. |
Enter values in this section of the page if implementing the integration between PeopleSoft CRM HR HelpDesk and Oracle E-Business HCM.
|
Responsibility Name |
Enter the Responsibility Name to be passed to the Oracle E-Business HCM system as part of the security authorization for this user. |
|
Responsibility Application |
Enter the Responsibility Application to be passed to the Oracle E-Business HCM system as part of the security authorization for this user. |
|
Security Group Name |
Enter the Security Group Name to be passed to the Oracle E-Business HCM system as part of the security authorization for this user. |
|
Organization ID |
Enter the Organization ID to be passed to the Oracle E-Business HCM system as part of the security authorization for this user. |
Solution
Use this section to enter default values to be populated on the solution dashboard pagelets.
At runtime, these values can be modified through the personalization option on the corresponding pagelet. Runtime changes are updated on this page as well.
|
Product SetID and Product |
Enter the setID and name of the default product to use for populating the Top Solutions by Product pagelet. |
|
Category SetID and Category |
Enter the setID and name of the default category to use for populating the Top Solutions by Category pagelet. |
|
Library SetID and Library Name |
Enter the setID and name of the default solution library to use for populating the Top Solutions by Library pagelet. |
SLA (Service Level Agreement)
Use this section to enter default values to be populated on the case SLA dashboard pagelets for the corresponding vertical families, Support, HelpDesk, HR HelpDesk and Higher Education.
At runtime, these values can be modified through the personalization option on the corresponding pagelet. Runtime changes are updated on this page as well.
|
View By |
Select the default value to appear on the View By field of the SLA pagelets when they are launched initially. Available values are Priority and Status. |
|
SLA Unit |
Select the business unit by which the case information on the SLA pagelets is filtered and displayed. |
|
Manager |
Select the manager of the provider groups by which the case information on the pagelet is filtered and displayed. This value is used only for the SLA pagelet that is available in the Manager Dashboard. |
Case Backlog
Use this section to enter default values to be populated on the case backlog dashboard pagelets for the corresponding vertical families, Support, HelpDesk, HR HelpDesk and Higher Education.
At runtime, these values can be modified through the personalization option on the corresponding pagelet. Runtime changes are updated on this page as well.
|
Backlog View By |
Select the default value to appear on the View By field of the case backlog pagelets when they are launched initially. Available values are Priority and Status. |
|
Backlog Unit |
Select the business unit by which the case information on the case backlog pagelets is filtered and displayed. |
|
Manager |
Select the manager of the provider groups by which the case information on the pagelet is filtered and displayed. This value is used only for the case backlog pagelet that is available in the Manager Dashboard. |
Case Arrivals versus Closures
Use this section to enter default values to be populated on the case arrivals versus closures dashboard pagelet for the corresponding vertical families, Support, HelpDesk, HR HelpDesk and Higher Education.
At runtime, these values can be modified through the personalization option on the corresponding pagelet. Runtime changes are updated on this page as well.
|
Arrival View By |
Select the default value to appear on the View By field of the case arrivals versus closures pagelet when it is launched initially. Available values are Day, Week and Month. |
|
Arrival Unit |
Select the business unit by which the case information on the case arrivals versus closures pagelet is filtered and displayed. |
|
Manager |
Select the manager of the provider groups by which the case information on the pagelet is filtered and displayed. This value is used only for the case arrivals versus closures pagelet, which is only available in the Manager Dashboard. |
See Also
Defining Call Center Business Units and Display Template Options
Working with Services Operational Dashboards, Understanding Services Operational Dashboards
Defining Sales PreferencesAccess the Sales page (Set Up CRM, Security, User Preferences, Sales).
Sales Defaults
|
Sales Business Unit |
Select the assigned business unit. |
|
Tree Name |
Select the default sales territory tree to which the sales user can be assigned. |
|
Assignment Group |
Select in what kind of assignment group that you want this sales user to appear. Note. Assignment group is part of territory assignment criteria. |
|
Field Delimiter |
Choose to use delimiters other than the comma, such as the semicolon. This is used for lead import. |
|
Select to enable the user to automatically insert contacts for a company, person, lead, or opportunity to the user's My Contacts list. The insert is triggered when the user clicks the Add to My Contacts toolbar button and the user is either an account owner or account team member for the company, person, lead, or opportunity. |
See Also
Setting Up Sales Security and Personalization
Defining Change Management PreferencesAccess the Change Management page (Set Up CRM, Security, User Preferences, Change Management).
Select the values that you want the system to display by default for the user on to the Change Request page in PeopleSoft HelpDesk.
See Also
Defining Account Preferences
Access the Account page (Set Up CRM, Security, User Preferences, Account).
Select the values that you want the system to use when it assigns accounts to the user.
See Also
Getting Started with PeopleSoft Bill Presentment and Account Management
Defining Roles with Access to Sensitive
Worker InformationAccess the Secured Worker Role page (Set Up CRM, Security, Secured Worker Role, Secured Worker Role).
Note. This security applies to the worker component only, not the case. You may use a HelpDesk for Human Resources case template, which displays some of these fields in the Case component, without checking these security options.
Role Access to Data
|
Role Name |
Select the role that needs access to sensitive and semisensitive data. The roles that are defined in the example are from sample data that PeopleSoft delivers with the application. If you want to create your own roles and use them here, you must first define them in the Roles component. Select PeopleTools, Security, Permissions & Roles, Roles. |
|
Confidential Information |
Select this check box to enable the role to have access to these worker fields: Gender, DOB (date of birth), Age, National ID, and Employee Status. |
|
Home Contact Methods |
Select this check box to enable the selected role to have access to these worker fields: Home Address, Home Phone, Home Email, and Home Pager. |
|
Correct Job Details |
Select this check box to allow the selected role to view and change all existing rows and to add new rows with no effective date restrictions. Otherwise, the selected role can change only future rows and enter new rows with an effective date greater than the current row. |
See Also
Defining EIP Options for Integration to PeopleSoft or Oracle E-Business HCM
Implementing Self-Service SecurityTo implement self-service security, use the Security Privilege (RB_SRTY_PRIV_DELTA), Role Privilege (RB_SRTY_PRIV_DFLT), Guest Registration (RX_GUEST_REG_TMPLT), Customer Registration (RX_CUST_REG_TABLE), Representative Registration Table (RX_REP_REG_TABLE), Security Privilege (RB_SRTY_PRIV), and Registration Text Setup (RX_REGTXT_SETUP), components.
This section provides overviews of privilege codes and custom privilege codes and discusses how to:
Establish privilege codes and custom privilege codes.
Assign privileges to users.
Assign privileges to roles.
Set up existing customer user registration templates.
Register business users.
Set up guest users.
Set up terms and conditions for self-service users.
Set up terms of service for self-service users.
Set up privacy policies for self-service users.
Understanding Privileges Codes
The self-service functionality within PeopleSoft CRM applications includes a predefined set of privilege codes. Assign these privilege codes to users or roles to provide security for particular types of transactions, as defined in the usage column in this table:
|
Privilege Code |
Description |
Usage |
Is Amount Associated? |
|
ORDERSAVE |
Save orders. |
Enable users to save orders. (The button is available or unavailable.) |
No. |
|
QUOTESAVE |
Save quotes. |
Enable users to save quotes. (The button is available or unavailable.) |
No. |
|
ADDRMAINT |
Maintain existing address. |
Enable users to update existing addresses. (The button is available or unavailable.) |
No. |
|
ADDRMAINTCNT |
Maintain existing contact. |
Enable users to update existing contacts. |
No. |
|
ADDRNEW |
Add new address. |
Enable users to add new addresses. (The button is available or unavailable.) |
No. |
|
ADDRNEWSITE |
Convert address to site. |
Enable users to convert the address to site. (The button is available or unavailable.) |
No. |
|
ADDRNEWCNTCT |
Add new contact person. |
Enable users to add a new contact person. (The button is available or unavailable.) |
No. |
|
NEWACCT |
Create new account. |
Enable users to create a new account. |
No. |
|
VIEWALLORDRS |
View all orders. |
Enable users to view all orders placed by others with an amount less than the amount specified. (The rows are available or unavailable.) |
Maybe. You can use the operator code for less than (<) or less than or equal to (<=) to include a dollar amount. |
|
VIEWALLQUOTS |
View all quotes. |
Enable users to view all quotes that were placed by others with an amount that is less than the amount specified. (The rows are available or unavailable.) |
You can use the operator code for less than (<) or less than or equal to (<=) to include a dollar amount. |
Understanding Custom Privilege Codes
You can define your own privilege codes and associate them with transactions on the User Privileges page and Role Privileges page. After you define the privilege codes, you must add the custom code to the transaction that has the custom security level.
To define a privilege code that prevents consumers from ordering more than 100,000 USD worth of goods:
Define the Order Amount privilege code (CUSTORDAMT).
On the Role Privileges page, assign the privilege code to the individual consumer role and specify that the amount must be less than 100,000 USD.
On the FieldChange event of the Order Submit button, add the following code:
Declare Function IsTransactionAuthorized PeopleCode FUNCLIB_RB.SRTY_PRIV_CD
Field⇒ Formula; Local number &output_msg_set_nbr, &output_msg_nbr; If Not IsTransactionAuthorized(&roleType, &strPersonID, &numBOIDCustomer, CUSTORDAMT, &numAmount, &output_operator_cd, &output_amount_qty,
&output_msg_set_⇒ nbr, &output_msg_nbr) Then If All(&output_msg_set_nbr, &output_msg_nbr) Then Error MsgGet(&output_msg_set_nbr, &output_msg_nbr, "Message Not Found."); End-If; End-If;
In the preceding code example, pass &roleType as 9 (the Individual Consumer role). Pass &strPersonId as the person ID, and pass &numBOIDCustomer as the customer's business object ID. The privilege code is CUSTORDAMT, which is your defined custom privilege code. &numAmount is the amount of the customer's order. The remaining parameters are output parameters that you do not need to pass.
Use the delivered PeopleSoft CRM self-service code as an example to customize security of other transactions.
Pages Used to Implement Self-Service Security
|
Page Name |
Definition Name |
Navigation |
Usage |
|
RB_SRTY_PRIV |
Set Up CRM, Security, Self-Service, Privilege Codes, Security Privilege Code Setup |
Define the privileges that are associated with the privilege codes. |
|
|
RB_SRTY_PRIV_DELTA |
Set Up CRM, Security, Self-Service, User Privileges, Assign User Privileges |
Assign user privileges. |
|
|
RB_SRTY_PRIV_DFLT |
Set Up CRM, Security, Self-Service, Role Privileges, Assign Role Privileges |
Assign privileges to roles. |
|
|
RX_CUST_REG_TABLE |
Set Up CRM, Security, Self-Service, Existing Customer Registration, Existing Customer User Registration Setup |
Create templates of records and fields to be used on the User Registration Setup page. |
|
|
RX_REP_REG_TABLE |
Set Up CRM, Security, Self-Service, Business User Registration, Business User Registration Setup |
Register business users. |
|
|
RX_GUEST_TEMPLATE |
Set Up CRM, Security, Self-Service, User Registration, User Registration Setup |
Register guest users. |
|
|
RX_REGTXT_SETUP |
Set Up CRM, Security, Self-Service, Terms and Conditions, Self Service Registration |
Set up terms and condition statements for users completing self-service registration. |
|
|
RX_TERMS_SETUP |
Set Up CRM, Security, Self-Service, Terms and Conditions, Terms of Service |
Set up terms of service statements for users completing self-service registration. |
|
|
RX_PRVACY_SETUP |
Set Up CRM, Security, Self-Service, Terms and Conditions, Privacy Policy |
Set up privacy policy statements for users completing self-service registration. |
Establishing Privilege Codes and Custom
Privilege CodesAccess the Security Privilege Code Setup page (Set Up CRM, Security, Self-Service, Privilege Codes, Security Privilege Code Setup).
Enter a description of the privilege code that you are adding.
Assigning Privileges to UsersAccess the Assign User Privileges page (Set Up CRM, Security, Self-Service, User Privileges, Assign User Privileges).
Define user privileges by associating a person with a business contact and assigning privilege codes. The business contact is typically a customer that the person represents. The user privileges enable you to define self-service security more specifically than the role privileges.
For example, suppose that a contact's role privileges do not enable the contact to update customer address information. If you need to enable a particular contact to update addresses, you could do that by assigning the user privilege to that contact. Conversely, suppose that a contact's role can submit a quote, but you want to revoke a particular contact's privilege to submit quotes. You do that by adding the privilege for submitting quotes and then selecting the Revoke check box.
|
Business Contact Name and Privilege |
Select the business contact's name and the privilege code. |
|
Revoke |
Select to revoke a privilege. |
|
Operator and Amount |
For transactions that are dependent on an amount, you can define privileges that are associated with particular amounts. If the system authenticates the user for the amount, it displays the appropriate information. For the Amount field, only numeric values are relevant; the system does not take the currency into account. |
|
Message Set Number and Message Number |
Associate a default message in case of authorization failure. If authorization fails, the transaction that failed can display the default message or its own message. |
PeopleSoft Order Capture Self Service is delivered with two privilege codes that are built to use privilege amounts: View All Orders (VIEWALLORDRS) and View All Quotes (VIEWALLQUOTS). These privileges are associated with an amount that further restricts access to order or quotes over a certain dollar amount.
Assigning Privileges to Roles
Access the Assign Role Privileges page (Set Up CRM, Security, Self-Service, Role Privileges, Assign Role Privileges).
Only two business object roles (as defined in the Customer Data Model) are supported with PeopleSoft CRM self-service. These are consumer and contact. View the sample data for the role privileges and follow the sample as a guideline. If you have transactions for which data filtration is based on an amount, use the Amount field.
|
Amount |
Use this field if you have transactions for which data filtration is based on an amount. |
|
Message Set Number and Message Number |
Associate a default message in case of authorization failure. If authorization fails, the transaction that failed can display the default message or its own message. |
Setting Up Existing Customer User Registration
TemplatesAccess the Existing Customer User Registration Setup page (Set Up CRM, Security, Self-Service, Existing Customer Registration, Existing Customer User Registration Setup).
Use this page to set up templates for the fields and records that you want to use for customer registration. Once you save the template, you can select it from the Template field within the Customer Registration Fields group box on the User Registration Setup page.
When you set up existing customer user registration, you specify the information that customers enter to verify their status as existing customers. The system uses this as a template that appears for customers to enter the information
Note. For security reasons, set up at least two keys that are known only to the user.
Registering Business Users
Access the Business User Registration Setup page (Set Up CRM, Security, Self-Service, Business User Registration, Business User Registration Setup).
To administer self-registration as a business user (a contact of a company), use the Business User Registration Setup page to establish a company code and password (company key).
The company name is the company for whom you are setting up the registration keys. When a self service user or external company administrator uses the company key to register, the user that is created by the system is tied to the company defined on this page.
|
Company Key |
Enter a value that you provide to a company administrator so that their users can self-register and gain access to the site. The company code and key are used to authenticate users who attempt to register at the self-service site. |
|
Max Registrations Allowed (maximum registrations allowed) |
Enter the number of users that are permitted to register with this specific company code. |
|
Assign contact Roles |
Select Sold To, Bill To, or Ship To to establish the capacity of the business users that represents the company. |
Setting Up Guest Users
Access the User Registration Setup page (Set Up CRM, Security, Self-Service, User Registration, User Registration Setup).
Self-service security is controlled by privileges that you establish and assign to guest user IDs. When a user registers, the system clones the currently active guest ID, with all its access privileges, to create the new user ID, and then creates the necessary customer or consumer record in the CRM database.
See Setting Up Guest IDs to Access Self-Service Sites.
To administer registration through PeopleSoft CRM self-service, you must set up a guest user ID. The guest user acts as an administrator and provides the defaults that are necessary to establish new users.
|
User ID |
Displays the guest user ID, which is used to make the self-service site available to anonymous users. You can add several guest users. Associate each guest user with a different business unit that is defined on the User Preferences page. By defining several guest users, you can provide access to different self-service sites that support different segments of the business. For example, suppose that the user ID GUEST is associated with business unit US001, which sells sporting good products. The user ID GUESTCOMM is associated with business unit COM01, which sells telecommunications products. When you implement these sites, you can define both guest users, and users can access either site depending on the guest user ID that they supply. Similarly, you can make the language of a site dependent on the guest user ID. |
|
Password |
Enter the exact password that authenticates the guest user. The user ID and password in combination are either appended to the URL string that provides direct access to the site or is placed in the config.properties file in PeopleTools installation. Refer to the installation instructions for more information about installing direct access to your website. |
|
Password Never Expires and Password Expires in Days |
Select one of these values to indicate when the password expires. If you select Password Expires in Days, enter the number of days. |
|
Consumer Name |
Select the template that you want to use for the consumer name. Guest users visiting the self-service site might create their own accounts but only provide minimal information, such as user ID, password, name, email, phone, and address information. The guest user does not enter other required information, such as currency, payment method, and carrier information, which appears by default from the template consumer. |
|
Process Profile and Primary |
Assign an appropriate permission list that has access to run batch processes. This permission list is copied to the new user that is created through self-service. |
|
Template |
Select the template that contains the fields and records that you want to use for guests using self-service registration. |
|
Terms and Conditions |
Select the template that contains the terms and conditions, terms of service, and privacy statements that you want to use for guests using self-service registration. |
|
Catalog and Customer Care |
Select the item to which you want to direct self-service users. |
|
Role Name |
Grant roles for consumer and business users by selecting role names from the lists in the Grant Consumer Role(s) and Grant Business User Role(s) grids. You can add as many roles as you want. When a consumer is created, the consumer roles that you specify are assigned to the new consumer user; and when a business user is created, the business user roles that you specify are assigned to the new business user. To enable guest users to create their own user IDs, you must define the roles that a guest user can grant to create self-service users. For example, in the delivered sample data, the GUEST role and the PeopleTools role UPG_ALLPAGES can grant the consumer role. When the VP1 user signs in to set up the guest user registration, that user can select the consumer role. When the guest user or an anonymous user registers as a consumer, the system assigns the new user to the consumer role. |
See Also
Setting Up Customer Self-Service
Setting up Terms and Conditions for Self-Service
UsersAccess the Terms and Conditions - Self Service Registration page (Set Up CRM, Security, Self-Service, Terms and Conditions, Self Service Registration).
Enter the text for the terms and conditions that you want users to see during self-service registration.
Setting up Terms of Service for Self-Service
UsersAccess the Terms and Conditions - Terms of Service page (Set Up CRM, Security, Self-Service, Terms and Conditions, Terms of Service).
Enter the text for the terms of service that you want users to see during self-service registration.
Setting up Privacy Policies for Self-Service
UsersAccess the Terms and Conditions - Privacy Policy page ( Set Up CRM, Security, Self-Service, Terms and Conditions, Privacy Policy).
Enter the text for the privacy policy that you want users to see during self-service registration.
Defining Application Security
To define application security, use these components:
Security Profile Definition (RSEC_PROFILE_DEFN).
Security Membership Definition (RSEC_MEMBER_DEFN).
Security View Definition (RSEC_VIEW_DEFN).
Security Function Definition (RSEC_FUNC_DEFN).
Security Function Group (RSEC_FUNC_GROUP).
Security Object Definition (RSEC_OBJECT_DEFN).
Security Builder (RSEC_BUILDER_RUN).
Security Static Transfer Menu (RSEC_STAT_MENU).
This section discusses how to:
Define security objects.
Add membership list names and descriptions.
Select membership objects and object members.
Select the membership type.
Add members to a static membership list.
Choose the dynamic criteria for the membership list.
Add view list names and descriptions.
Select view objects and options.
Select the view type.
Add members to static view list.
Choose the dynamic criteria for the view list.
Define functional options.
Define functional option groups.
Add functional option groups and view lists to the security profile.
Add membership lists to the security profile.
Set run controls for the list build process.
Enter static member transfer paths.
Pages Used to Define Application Security|
Page Name |
Definition Name |
Navigation |
Usage |
|
RSEC_OBJECT_DEFN |
Set Up CRM, Security, CRM Application Security, Security Object, Security Object |
Define the characteristics of the security object. |
|
|
RSEC_MEMBER_SMRY |
Set Up CRM, Security, CRM Application Security, Add Membership List, Add Membership List |
Enter the membership list name and description. |
|
|
Add Membership List |
RSEC_SRTY_WIZ1 |
Click Next at the bottom of the first Add Membership List page. |
Select the membership object and the members to which you want the security object to apply. |
|
Add Membership List |
RSEC_SRTY_WIZ2 |
Click Next at the bottom of the second Add Membership List page. |
Select the membership type. |
|
Add Membership List (static) |
RSEC_ML_PARTNER RSEC_ML_CUSTOMER RSEC_ML_PART_C RSEC_ML_PERSON RSEC_ML_ROLE |
Select Static and then click Next at the bottom of the third Add Membership List page. |
Select the partners, partner contacts, customers, people, or roles that you want to add to the membership list. |
|
Add Membership List (dynamic) |
RSEC_PARTNER_SRCH RSEC_CUSTOMER_SRCH, RSEC_PART_CON_SRCH RSEC_PRSN_SRCH |
Select Dynamic and then click Next at the bottom of the third Add Membership List page. |
Choose the dynamic criteria that you want to use to select either customers, partners, partner contacts, or persons. |
|
RSEC_VIEW_SMRY |
Set Up CRM, Security, CRM Application Security, Add View List, Add View List |
Enter the view list name and description. |
|
|
Add View List |
RSEC_SRTY_WIZ1 |
Click the Next button from the first Add View List page. |
Select the security object and the members to which you want the security object to apply. |
|
Add View List |
RSEC_SRTY_WIZ2 |
Click Next from the second Add View List page. |
Select the view type. |
|
Add View List (static) |
RSEC_VL_CATALOG RSEC_VL_CUSTOMER RSEC_VL_HOLD RSEC_VL_RA_METRICS |
|
View the criteria that you chose to select customers. |
|
Add View List (dynamic) |
RSEC_CUSTOMER_SRCH |
Click Next at the bottom of the third Add View List page. |
Choose the dynamic criteria that you want to use to select customers. |
|
RSEC_FUNC_DEFN |
Set Up CRM, Security, CRM Application Security, Functional Option, Functional Option |
Define functional options, including enabling amount-related fields, conditional operators, application classes, and messages. |
|
|
RSEC_FUNC_GROUP |
Set Up CRM, Security, CRM Application Security, Functional Option Group, Functional Option Group |
Group functional options. |
|
|
RSEC_PROFILE |
Set Up CRM, Security, CRM Application Security, Add Security Profile, Security Profile |
Define a security profile. |
|
|
RSEC_PROFILEMEMBER |
Set Up CRM, Security, CRM Application Security, Add Security Profile, Membership |
Add membership lists to the security profile. |
|
|
RSEC_BUILDER_RUN |
|
Set run controls for the List Build process. |
|
|
RSEC_STAT_MENU |
Set Up CRM, Security, CRM Application Security, Static Menu Transfer Path, Static Menu Transfer Path |
Enter static menu transfer paths. |
Defining Security ObjectsAccess the Security Object page (Set Up CRM, Security, CRM Application Security, Security Object, Security Object).
|
Object Type |
Select either Membership or View Privilege. The Object type determines whether the Security Object is used for defining Membership List or View List. |
|
View Record |
View record is used to resolve the list of members for a dynamic membership or view list. The view record must be a distinct subset of the search record that is used in defining the search for dynamic criteria. |
|
Security List Record |
Select the record where you want the system to store the results of the query or static list that is associated with the security object. The security list record may vary for each security object. |
|
Object Source Navigation |
Select the object source to which you want the system to navigate while creating dynamic membership or view lists. Selecting the object source that corresponds to the security object that you are creating provides for the proper transfer of the object source during the creation of dynamic membership or view lists. Data searches that are enabled for application security are only available as part of the selection. It is important to choose the correct search definition for the security object. |
|
Static List Navigation |
Select the static list that you want the system to navigate to during the creation of the security profile. This is the navigation that is used for entering static list data or viewing static list data that is either dynamically created or manually entered. You set up static list navigations on the Static Menu transfer page. The system builds the Static List page with the static list record as a level 1 grid. |
|
Cache Option |
Select the cache option that you want the system to use for the security object. The caching option is mainly used for partner and customer security. Basically, when a customer or a partner is added or updated in the Customer Data Model (CDM), it tells the system how often to cache the list members in the list tables and run the Application Engine job that creates the dynamic queries. |
|
Security Object Options |
Select one or multiple security object options values:
|
|
Related Security Objects |
Select the security objects that you want to be available with a security profile. For example, if a Membership-type security object is defined and associated with two related View-type security objects, then if a Security Profile is created using the same Membership object, only the two related objects that were specified on the Security Object page will be visible as options in the Security Object drop down list that appears after selecting the Add View List option for that Security Profile. Warning! Note that as delivered, the system is designed to only process certain combinations of membership and view objects, and that these combinations apply only to certain products (applications) within the system. These combinations are shown in the accompanying table. Only these combinations should be used when setting up your data. Other combinations are not supported in the system as delivered, and would require customized coding to implement. |
When adding values to the Related Security Objects field, the supported combinations are:
|
Membership Object |
View Object |
Product (Application Usage) |
|
ACCOUNTHOLDER (Financial Account Holder) |
ACCOUNT (Financial Account) |
Financial Services Industry |
|
CUSTOMERMEMBER (Customer) |
CATALOG (Catalog) |
Order Capture |
|
PARTNER (Partner) |
CATALOG (Catalog) |
Order Capture |
|
PARTNER (Partner) |
CUSTOMER (Customer) |
All |
|
PARTNER (Partner) |
METRIC (Performance Metric) |
Marketing |
|
PARTNERCONTACT (Partner Contact) |
CATALOG (Catalog) |
Order Capture |
|
PARTNERCONTACT (Partner Contact) |
METRIC (Performance Metric) |
Marketing |
|
PERSON (Person) |
CATALOG (Catalog) |
Order Capture |
|
PERSON (Person) |
HOLDCODE (Hold Code) |
Order Capture |
|
ROLE (Role) |
HOLDCODE (Hold Code) |
Order Capture |
Adding Membership List Names and DescriptionsAccess the Membership List page (Set Up CRM, Security, CRM Application Security, Add Membership List, Add Membership List).
Enter a name for the membership list that you want to create. Select the Active status. Enter text that describes the type of membership list that you are creating.
Selecting Membership Objects and Object
MembersAccess the Add Membership List page (click Next at the bottom of the first Add Membership List page).
|
Security Object |
Select the security object that you want to use for your membership list:
Note. You can also create your own security object and select it from this list. You would, however, need to call the delivered security APIs at runtime to access security. |
|
Membership Applies To |
Indicate to whom you want the membership list to apply. Select:
|
|
Next |
Click to go to the next page. The system displays a new page based on the selections that you have made on the previous Add Membership List pages. |
Selecting the Membership TypeAccess the Add Membership List page (click Next at the bottom of the second Add Membership List page).
|
Membership Type |
Select from these values:
|
|
Next |
Click to go to the next page. The system displays a new page based on the selections that you made on the previous pages. |
Adding Members to a Static Membership ListAccess the Add Membership List (static) page (select Static and then click Next at the bottom of the third Add Membership List page).
This page displays different fields based on the security object you selected on the previous page. Select the setID (if this field appears) and the role, customer, partner, partner contact, or person that you want to add to the membership list. Click the Add button to add new members.
Choosing the Dynamic Criteria for the Membership
ListAccess the Add Membership List (dynamic) page (select Dynamic and then click Next at the bottom of the third Add Membership List page).
Select or enter the criteria that you want to use to create a membership list. The system uses the criteria that you select to create a dynamic membership list. To view the results of the criteria that you enter, click the Preview button. When you are satisfied with the results, click the Finish button at the bottom of the page.
If a security object (for example, customer or partner) that returns in the search result has multiple addresses, the system displays all addresses as individual entries in the search result regardless of other search criteria. For example, if the object that returned is associated with two addresses, one in CA (California) and the other in NY (New York), you see both entries in the search result even if the search criteria indicate that only CA entries should be returned.
Adding View List Names and DescriptionsAccess the View List page (Set Up CRM, Security, CRM Application Security, Add View List, Add View List).
Enter a name for the view list that you want to create. Select the Active status. Enter text that describes the type of view list that you are creating.
Selecting View Objects and OptionsAccess the Add View List page (click the Next button from the first Add View List page).
|
Security Object |
Select the security object that you want to use for your view list. Choose from one of these delivered values:
Note. You can also create your own security object and select it from this list. |
|
View Applies To |
Select one of these values to indicate to whom you want the view list to apply:
|
|
Next |
Click to go to the next page. The system displays a new page based on the selections that you made on the previous Add View List pages. |
Selecting the View TypeAccess the Add View List page (click Next from the second Add View List page).
|
View Type |
Select one of these values:
|
|
Next |
Click to go to the next page. The system displays a new page based on the selections that you made on the previous pages. |
Adding Members to Static View ListAccess the Add View List (static) page (for catalog, hold codes, and metrics, click Next from the second Add View List page).
This page displays different fields based on the security object that you selected on the previous page. Select the setID (if this field appears) and the catalog, customer, hold code, or performance metric that you want to add to the view list.
Choosing the Dynamic Criteria for the View
ListAccess the Add View List (dynamic) page (click Next at the bottom of the third Add View List page).
Select or enter the criteria that you want to use to create a view list. The system uses the criteria that you select to create a dynamic view list. To see the results of the criteria that you enter, click the Preview button. When you are satisfied with the results, click the Finish button at the bottom of the page.
Defining Functional Options
Access the Functional Option page (Set Up CRM, Security, CRM Application Security, Functional Option, Functional Option).
|
Functional Option and Description |
Enter a name for the functional option and then enter a description. |
|
Revoke Wins |
Conflicts may happen when a user is associated with multiple security profiles using functional options that conflict or when the same security profile has overrides for conflicting functional options. Select this check box if you want the system to not override the security for the functional option that you are creating when there are conflicts within or among different security profiles. Note. If one functional option group grants an option and another revokes it, the revoke takes precedence. If the Revoke Wins check boxes are not selected in the same scenario, the option is granted. |
|
Related to Amount |
Select to enable amount-related fields during the setup of functional option groups and specific functional options within the security profile. |
|
Maximum Amount Wins |
Select this check box to indicate that you want the maximum amount to win when there are functional options that conflict within or among different security profiles |
|
Use Conditional Operator |
Select to enable the conditional operator field during the setup of functional option groups and specific functional options within the security profile for amount-related fields. |
|
Base Currency |
Select the currency that is used most often for the functional option that you are creating. |
|
Application Class ID, Application Class Path, and Option Value Translate Field |
Use these fields if you are writing PeopleCode programs required to evaluate the functional option. Select the ID and path of the application class that the system carries out when a user accesses the function or when the program runs. Also, you can specify a value translate field with values that will be interpreted by the calling application to perform a specific functional action. For example, the display template uses a translate field that makes the fields display-only or changeable. |
|
Message Set Number and Denial Reason |
Select the message that you want the system to display if a user is denied access to the function. |
Defining Functional Option Groups
Access the Functional Option Group page (Set Up CRM, Security, CRM Application Security, Functional Option Group, Functional Option Group).
Use functional option groups to group functional options. You may then associate the functional option groups with security profiles. Creating functional option groups and using them with security profiles can help make security maintenance faster and more efficient.
|
Functional Option Group and Description |
Enter a name for the functional option group and then enter a description. |
Functional Option Tab
|
Functional Option |
Select the functional options that you want to include in the functional option group. |
|
Option Value |
Select the value that you want to use for the functional option. This field is available for entry only if a translate field was set up on the functional option. |
|
Revoke |
Select this check box if you want the system to override the security for the functional option when there are conflicts within or among different security profiles.
Note. Revoke applies to the functional option only (for
example, does a user have authorization to transfer money). If one functional
option group says yes and another says no, the functional option that has
the Revoke Wins check box selected wins and resolves
the conflict. |
|
Add Function Option |
Click to add a new row in the functional option grid. |
Amount Related Tab
The fields that appear on this page are used if the functional option is associated with an amount field.
|
Conditional Operator |
Select the conditional operator (for example, equal to, less than, greater then, and so on) that you want to use for the functional option. |
|
Amount |
Enter the amount that you want associated with the conditional operator for the functional option. |
|
Denial Reason |
Select the reason that you want the system to display if the user is denied access to the transaction related to the functional option. For example, let's say you have given order capture representatives the ability to override prices. At some point in the season, you may want all of them to be denied from overriding prices on the items that you sell. You can go to the functional option group definition and set the Revoke Wins check box. From that point onward, the order capture representatives are denied from doing price overrides. You can set up similar situations for leads, opportunities, cases, and so on. |
Adding Functional Option Groups and View
Lists to the Security ProfileAccess the Security Profile page (Set Up CRM, Security, CRM Application Security, Add Security Profile, Security Profile).
Defining security profiles involves the granting of view lists and/or functional options. You then grant or associate one or multiple membership lists with the security profile. An enterprise administrator or enterprise channel manager should know how to create and maintain security profiles, as well as understand how security is impacted when a security profile changes.
Warning! Inactivating a security profile removes the associated membership and view lists
|
Name and Description |
Enter a name for the security profile and then enter a description. |
|
Add Functional Option Group |
Click to access the Functional Options Group page, where you can select the functional option groups that you want to include in the security profile. You can also use this page to view the functional options that are associated with the functional option group. The Enterprise Administrator who is assigning the Functional Option Groups must be aware of the groups that make sense for a given Membership list. Out of the box, all functional options and functional options groups that are delivered by PeopleSoft work with the 'Role' Security Membership Object. The only exception is the Financial Account Holders. |
|
Add View List |
Click to access the Add View List page, where you can select the view lists that you want to include in the security profile. |
|
|
Click to access the Refresh Dynamic Lists page, where you can set up a process to periodically refresh the lists that you have associated with the security profiles that you created. View lists and Membership lists that are built based on dynamic criteria are refreshed. |
Adding Membership Lists to the Security
ProfileAccess the Security Profile - Membership page (Set Up CRM, Security, CRM Application Security, Add Security Profile, Membership).
|
Add Membership List |
Click to access the Add Membership List page, where you can select the membership lists that you want to include in the security profile. |
|
|
Click to access the Refresh Dynamic Lists page, where you can set up a process to periodically refresh the lists that you have associated with the security profiles that you created. View lists and Membership lists that are built based on dynamic criteria are refreshed. |
Setting Run Controls for the List Build
ProcessAccess the Refresh Dynamic Lists page (Set Up CRM, Security, CRM Application Security, Refresh Dynamic Lists, Refresh Dynamic Lists).
Use this page to refresh the lists, security objects, and profiles that you have created to implement security for your PeopleSoft CRM environment. If the content of the lists, objects, and profiles changes frequently, you can set up this process to run daily, every few minutes, or every few hours.
Note. When a new user registers in Order Capture Self Service, they will not have immediate permission to view the product catalog. Application security needs to be triggered to get the appropriate product catalog access for the person who has just registered.
|
Process Type |
Select one of these values based on the type of list that you want to refresh:
|
|
Process Scope |
Select one of these lists or objects that you want to refresh:
Note. If you select All Objects, you do not need to specify the objects that you want to refresh. If you select any other value, you must use the field that corresponds to your selection to select a list, profile, or object name. |
Entering Static Menu Transfer PathsAccess the Static Menu Transfer page (Set Up CRM, Security, CRM Application Security, Static Menu Transfer Path, Static Menu Transfer Path).
Use this page to create static menu transfer paths for entering or viewing static list data that is either dynamically created or manually entered. The static list navigations that you create on this page appear in the Static List Navigation drop-down list box on the Security Object page. Static list navigation is used when you create a security profile.