11g Release 7 (11.1.7)
Part Number E20376-07
Home
Contents
Book
List
Contact
Us
|
Oracle® Fusion Applications Compensation Management Implementation Guide 11g Release 7 (11.1.7) Part Number E20376-07 |
Home |
Contents |
Book List |
Contact Us |
|
Previous |
Next |
This chapter contains the following:
Manage Benefit Programs and Plans
Define Benefit Rates and Coverage
Defining benefits involves three categories of setup tasks.
Set up benefits objects. Organize the objects into hierarchies to help efficiently configure and maintain benefits packages. While defining benefits objects, you can also make configurations to automate administration of corporate policies regarding eligibility, enrollment, rates, and coverages.
Set up benefits peripheral components. You typically use or reuse these components while defining different benefits objects.
Set up general components, such as third-party administrators, benefits carriers, regulatory bodies, and reporting groups.
Fusion Benefits configuration flexibly supports a wide variety of implementation strategies. While making trade-off decisions, such as processing time versus ongoing maintenance effort, you consider whether to control characteristics such as participant eligibility at a general level, at a detailed level, or at a combination of general and detailed levels.
Later documentation details the benefits object hierarchy, setup override rules, and configuration examples. At this point of this overview topic, the important points are:
A benefits object hierarchy organizes a benefits program, plan types, plans in program or plans not in program, and options from top to bottom, general to detailed.
Depending on the outcomes of strategic implementation trade-off decisions, you have the flexibility to configure most aspects of a benefits package at more than one level in the hierarchy.
Population of all four levels of a benefits object hierarchy is not required.
The following diagram shows the four levels of benefits object hierarchy: benefits program, plan types in program or not in program, plans in program or plans not in program, and options from top to bottom, general to detailed.

The sequence for creating benefits hierarchy objects differs from the resulting hierarchical order. You can create new objects as needed at any time. However, because some benefits hierarchy objects are referenced during the definition of other benefits hierarchy objects, it is more efficient to create these objects in the order shown in the figure. Benefits object hierarchy architecture is further described in the related topic: Benefits Hierarchy Objects: How They Work Together.
This figure illustrates the most efficient sequence for creating benefits hierarchy objects: plan types, options (if used), plans, then programs.

Begin by creating one or more plan types. Plan types organize plans into groups that provide similar categories of benefits, such as health, savings, education, and so on. At the plan type level of the hierarchy, you can efficiently administer corporate benefits policies that apply across all plans within that benefit category or type.
When creating an option, you can optionally associate one or more existing plan types. This restricts the availability of the option to plans that belong to the named plan types.
When using the plan configuration process to define benefit plan details, you must associate one existing plan type, and can optionally tie existing options to the plan.
When using the program configuration process to define program details, you can associate existing plan types and existing plans with the program.
The following figure illustrates some of the dependencies among setup data components, showing several types of setup components organized around the periphery of the main benefits objects. Some types of components are delivered and some types are not.
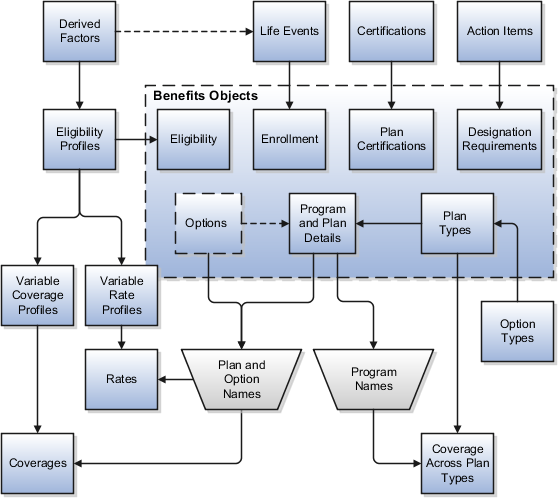
Here is additional information about some of the setup components in the figure.
A lengthy list of derived factors is delivered.
Various combinations of derived factors can be used to define different eligibility profiles.
Some temporal and scheduled life events are delivered.
On the Create Life Events page, you can extend the list of available life events by creating as many of your own unique life events as you need. You can set up life events so that they will be triggered by certain temporal derived factors, such as age or length of service. Life events are reusable, and can be used to control enrollment at the program, plan, and option levels.
The enrollment certification types and determination rules are delivered.
You cannot extend the available list of certification types or determinations rules, but you can rename the existing lookup values that appear in those fields. You can select different combinations of types and rules, and then set up the association with plans on the plan configuration process certification page.
A set of action items is delivered.
You cannot extend the list of available action items, but you can rename them on the Manage Action Items page. You can associate action items with designation requirements at the plan type level or at the plan level, but not at both levels within the same object hierarchy.
No eligibility profiles are delivered.
You can create as many eligibility profiles as you need. Eligibility profiles are reusable. You can associate eligibility profiles at the following levels: option in plan, plan, plan in program, plan type in program, and program. Eligibility profiles are also used in definitions for variable rate and variable coverage profiles. An eligibility profile must be specified when you create variable rate or variable coverage profiles.
A set of option types is delivered for selection when you define your plan type objects.
Option types control internal processing. For example, plan types in the Health coverage category are processed differently than plan types for Savings . The delivered list of option types is not extensible.
Rates and coverages setup follows plan and option setup because rates and coverages are specific to named plans and options.
Rates and coverages can be associated at many levels in your configuration, such as plan, option in plan, and option in plan in program.
Variable rate and coverage profiles can be associated with rates and coverages, respectively, so that the calculated results vary with factors that change over time, such as age group or work location.
If you define coverage across plan types, that setup occurs after setting up the affected programs.
You must select one existing program and one or more existing plan types during setup of coverage across plan types.
Note
You will not always perform setup for all of the components shown in the figure.
The tasks included in the Define General Benefits task list are independent of specific benefit programs and plans, and are not required to deploy benefits. However, if you intend to use objects included in the task list, you should complete those tasks before setting up benefits programs and plans.
Some of these tasks are related to setting up organizations. For example, you set up beneficiary organizations so that employees can select them when they make benefits elections. You set up benefits carriers as external organizations to associate with benefits plans. You set up third-party administrators to identify organizations that are benefits suppliers or that provide services to your benefits programs.
Another organizational setup task is Manage Regulatory Bodies. After you complete it you might record and update statutory requirements, or the rules that are enacted by governmental bodies that regulate how you administer certain programs and plans.
Another task in this task list is Configure Enrollment Action Items. Complete this task before you enable enrollment. During this task, you can edit the text of action items to better conform to the needs of your organization. Enrollment actions include items such as beneficiary and dependent certification requirements and primary care physician designation.
This topic identifies benefits extensible lookups. Review these lookups, and update them as appropriate to suit enterprise requirements.
Extensible benefits lookups are categorized as follows:
Benefits relationships lookups
Person factors lookups
Process name lookups
Regulations lookups
Health care services and primary care physician lookups
The extensible benefits relationships lookup is described in the following table:
|
Lookup Type |
Description |
|---|---|
|
BEN_BENEFIT_RELATION_NAME |
Benefits usage, such as absence, default, or unrestricted |
Extensible person factors lookups are described in the following table:
|
Lookup Type |
Description |
|---|---|
|
BEN_STUDENT_STATUS |
Student type, such as full-time or part-time |
|
REGISTERED_DISABLED |
Registered disabled values, such as yes, yes-fully disabled, yes-partially disabled, or no |
The extensible process name lookup is described in the following table:
|
Lookup Type |
Description |
|---|---|
|
BEN_PROCESS |
Benefits process name, such as evaluate absence plan participation, or assign corrective potential life event |
Extensible regulations lookups are described in the following table:
|
Lookup Type |
Description |
|---|---|
|
BEN_REGN_ADMN |
The type of regulatory administration by a governing agency, such as enforced by or issued by |
|
BEN_REGY_PL_TYP |
The type of regulatory plan, such as fringe, other, pension, or welfare |
|
BEN_REGY_PRPS |
The purpose of a regulatory body associated with a benefits object, such as audit, enforces, qualifies, or requires plan disclosure |
Extensible health care services type and primary care physician lookups are described in the following table:
|
Lookup Type |
Description |
|---|---|
|
BEN_PRDCT |
Provider category, such as exclusive provider organization, medium, point of service, or premium |
|
BEN_PCP_CD |
Requirement or ability of participants to select a primary care physician during enrollment, such as optional |
|
BEN_PCP_DSGN |
Primary care physician designation status for a plan, such as none, optional, or required |
|
BEN_PCP_SPCLTY |
Primary care physician specialty, such as emergency medicine |
|
BEN_PCP_STRT_DT |
Primary care physician started date, such as first of next month, first of next month occurring after 15 days, later of enrollment start or when designated |
|
BEN_PRMRY_CARE_PRVDR_TYP |
Primary care physician type, such as dentist, general practitioner, cardiologist, or pediatrician |
Record and update rules, policies, or statutory requirements enacted by regulatory bodies that govern benefit plans. You can record multiple regulations in a single integrated Microsoft Excel workbook and upload in volume. After recording them, you can associate regulations with benefit reporting groups for reporting purposes.
The basic process for managing benefit regulations using the workbook is:
Generate the workbook.
Record regulations and associate them with benefit reporting groups.
Upload edits.
Resolve errors.
On the Plan Configuration work area:
In the Tasks pane, under Manage General Benefits, click Manage Regulations.
In the Search Results section, click Prepare in Workbook.
Add new rules, policies, or statutory requirements in the Regulation section. Associate regulations with regulatory bodies in the Regulatory Body section. The workbook columns are the same as the fields in the Create Regulations dialog boxes.
The workbook uses the Changed cell to automatically identify the rows that you edit.
After you complete your edits, click Upload. Only those rows marked as changed are uploaded into the application tables.
Restriction
You cannot edit regulations in the workbook if they uploaded successfully. To edit the regulations after upload, you must search for the regulation on the Manage Regulations page. Then select the regulation and click the Edit icon.
The application automatically updates the Status value in each row of the workbook. If there are errors that require review, the upload rolls back the change in the application and sets the row status in the workbook to Upload Failed. It then continues to the next row in the workbook. Double-click Update Failed in the Status cell to view the error. Fix any data issues in the workbook and upload the new changes.
You can download person benefit group information to the integrated Microsoft Excel workbook. Use the integrated workbook to view and edit person benefit group assignments for multiple persons and groups. Then, upload your changes back into the application database. Repeat these steps as many times as required to accommodate revisions.
The basic process for managing person benefit groups using the workbook is:
Generate and populate the workbook.
Edit, add, and delete person benefit groups in the workbook.
Upload edits.
Resolve errors.
On the Plan Configuration work area:
In the Tasks pane, click Manage Benefit Groups.
In the Search Results section, click Upload Person Benefit Groups.
In the Upload Person Benefit Groups dialog box, enter a session effective date and click Prepare in Workbook.
After the download is complete, you can view, edit, add, and delete existing person benefit group assignments.
Editing person benefit group assignments: You may edit the Benefits Group column; edits in other columns are not uploaded.
Restriction
You cannot edit or enter the effective date in the workbook. To change the effective date, you must generate a new workbook with the new session effective date. You can also edit the date directly in the application, using the Plan Configuration work area, Manage Benefit Groups task.
Adding person benefit group assignments: You can insert a row to add a new person benefit group assignment. The workbook automatically adjusts the symbol in the Changed cell to mark the rows that you edit or add.
Deleting person benefit group assignments: To delete records from the application database, double-click the Mark for Deletion cell in the workbook rows that you want to delete. When you are ready, click Delete Selected Rows.
Warning
Deleted data cannot be retrieved.
When you are ready, in the workbook click Upload.
The rows that are marked as changed are uploaded into the application database. The session effective date that you set when generating the workbook becomes the start date for any edits or new group assignments that you entered in the workbook. Prior group assignments for each edited row are end dated as of the previous day and the history is retained.
For each row marked for deletion in the workbook, the application permanently deletes all of the related effective-dated records from the application database.
As the application processes the upload request, it updates the Status cell in each workbook row. If there are errors for a row, the process rolls back the change and sets the row status to Upload Failed. Then, it continues to the next row in the workbook. Double-click Update Failed to view the errors. Fix any data issues in the workbook and upload again.
This topic deals with using the integrated Microsoft Excel workbook to create and upload reporting groups. Use a reporting group to maintain a collection of benefit programs and plans that you group together for reporting purposes, such as for administrative use or to meet regulatory requirements.
The basic process for managing reporting groups using the integrated workbook is:
Generate the workbook.
Create reporting groups and add details to existing groups.
Upload edits.
Resolve errors.
On the Plan Configuration work area:
In the Tasks pane, click Manage Reporting Groups.
In the Search Results section, click Prepare in Workbook.
Create reporting groups: Add a new reporting group and associate benefit programs and plans with the reporting group using the provided choice lists. You can also select which regulatory bodies and regulations govern the reporting group. The columns and choice lists in the workbook are the same as the fields and choice lists on the Edit Reporting Groups page in the application.
Adding details to existing reporting groups: You cannot change existing data for a reporting group. However, you can add new details to an existing reporting group. For example, associate an additional program with an existing reporting group by entering the name of the reporting group in the Component Program section. Then, select the program and enter the effective start date.
Restriction
To edit existing reporting group data, in the application you must go to the Manage Reporting Groups page, search for and select the reporting group, and click the Edit icon.
The workbook uses the Changed cell to automatically identify the rows that you edit.
After you complete your edits, click Upload. Only those rows marked as changed are uploaded into the application database.
The application automatically updates the Status value in each row of the workbook. If there are errors that require review, the upload rolls back the change in the application and sets the row status in the workbook to Upload Failed. It then continues to the next row in the workbook. Double-click Update Failed in the Status cell to view the error. Fix any data issues in the workbook and upload the new changes.
You can download person benefit balance information to the integrated Microsoft Excel workbook. Use the integrated workbook to view and edit the benefit balance value, primary assignment, and benefits relationship entries for multiple persons. Also add and delete person benefit balances. Then, upload your changes back into the application database tables. Repeat these steps as many times as required to accommodate revisions.
The basic process for managing person benefit balances using the workbook is:
Generate and populate the workbook.
Edit, add, and delete person benefit balances in the workbook.
Upload edits.
Resolve errors.
On the Plan Configuration work area:
In the Tasks pane, click Manage Benefit Balances.
In the Search Results section, click Prepare in Workbook.
In the Upload Person Benefit Balances dialog box, enter a session effective date and click Prepare in Workbook.
After the download completes, you can view, edit, add, and delete person benefit balances.
Restriction
You cannot edit or enter the effective date in the workbook. To change the effective date, you must generate a new workbook with the new session effective date. You can also edit the date directly in the application, by searching for the person in the Enrollment work area, then going to the Manage Person Benefit Balances task.
Editing person balances: You may edit the Value, Primary Assignment, and Benefits Relationship columns; edits in any other columns are not uploaded.
Adding person balances: You can insert a row to add a new person balance. For each new balance, you must enter a value in either the Primary Assignment or Benefits Relationship cell, but not both. The workbook automatically adjusts the symbol in the Changed cell to mark the rows that you edit or add.
Deleting person balances: To delete records from the application database tables, double-click the Mark for Deletion cell in the workbook rows that you want to delete. When you are ready, click Delete Selected Rows.
Warning
Data deleted as part of the upload cannot be retrieved.
When you are ready, in the workbook click Upload.
The rows that are marked as changed are uploaded into the application database. The session effective date that you set when you generated the workbook becomes the start date for any edits or new person benefit balances that you entered in the workbook. Prior balances for each edited row are end dated as of the previous day and the history is retained.
For each row marked for deletion in the workbook, the application permanently deletes all of the related effective-dated records from the application database.
As the application processes the upload request, it updates the Status cell in each workbook row. If there are errors for a row, the process rolls back the change and sets the row status to Upload Failed. Then, it continues to the next row in the workbook. Double-click Update Failed to view the errors. Fix any data issues in the workbook and upload again.
Generate a new workbook after the successful upload to verify your edits.
Configure how benefits relationships are associated by default when you hire a worker or add additional assignments. Benefits professionals group worker assignments for benefits enrollment and processing. You must make the following choices for each combination of legal entity and benefits usage, such as unrestricted or life events:
Specify the default benefits relationship for new hire assignments.
Specify whether to use different benefits relationships for workers who have multiple assignments.
If you enable multiple assignment processing for benefits, you must also specify the pattern to associate additional worker assignments with benefits relationships by default. Benefits professionals can update or modify the default relationships for individual workers.
Every worker has at least one benefits relationship. Specify the default benefits relationship at the legal entity level for different usages, such as unrestricted or life events, within the enterprise for the initial worker assignment when a worker is hired.
Initially, you must make one choice between two mutually exclusive options for each combination of usage and legal entity within the enterprise:
Disable multiple assignment processing for benefits processing.
Enable and configure multiple assignment processing for benefits processing.
If you do not enable multiple assignment processing for benefits processing, then all worker assignments are associated with the default benefits relationship that you select for the combination of usage and legal entity. In this configuration, benefits professionals cannot select alternative benefits relationships because each worker has only one benefits relationship. Consequently, you cannot configure other options for multiple assignment processing for benefits for the usage and legal entity combination.
If you enable multiple assignment processing for benefits processing, configure the default pattern of associating the benefits relationships with additional worker assignments for each legal entity and usage.
Select one default option for new assignments from among these choices:
Include new assignments in the configured default benefits relationship.
Do not include new assignments in any benefits relationship.
Include new assignments in the primary benefits relationship for the worker, which might be the default benefits relationship or another benefits relationship designated as primary.
Additionally, if the newly created assignment can be included in a benefits relationship, configure whether or not it becomes the primary assignment in the benefits relationship when another assignment is already designated as the primary assignment.
Note
When you enable multiple assignment processing for benefits processing for a usage and legal entity combination, benefit relationship-related processing options and user interface fields are displayed on the user interface. User interface pages in benefits service center that display the option to select a benefits relationship for a worker include participant benefits summary, override enrollment, manage person life events, process open enrollment, and process life event.
Benefits relationships control how a worker's benefits are grouped for processing. A worker might have different sets of benefits attached to different benefits relationships.
Benefits entities that are affected by benefits relationships include:
Potential life events
Life events
Eligibility records
Electable choices
Enrollment options
Dependent coverage
Beneficiary designations
Primary care physician designations
Deductions
A default benefits relationship is configured for each legal entity and usage of benefits processing within the enterprise. It is automatically associated with new hires and workers with only one assignment. If multiple assignment processing is enabled for benefits processing, the pattern of benefits relationships associated with additional worker assignments by default is configured for each legal entity and usage. Benefits professionals can change the configuration of benefits relationships associated with individual workers and can change the work assignments associated with the worker's benefits relationships.
A worker might have assignments that are associated with different benefits relationships. The following six examples list different ways that worker assignments might be structured within an organization and how the benefits relationships would be associated. The configuration table for each example lists the legal entities, work relationships, employment terms, assignments, and benefits relationships. Each scenario lists the impact that each structure has on life events, electable choices or enrollment options, and benefits eligibility.
Configuration: Only one assignment and one benefits relationship exist.
|
Legal Entity |
Work Relationship |
Employment Terms |
Assignment |
Benefits Relationship |
|---|---|---|---|---|
|
Galaxy UK |
1 |
Architect |
Architect |
A (default) |
Processing: Life events, electable choices or enrollment options, and benefits eligibility are evaluated based on the assignment in this benefits relationship.
Configuration: Two sets of work relationships, employment terms and assignments exist, one for each legal entity. The person has two sets of benefits, one for each legal entity. Each assignment is associated with a different benefits relationship.
|
Legal Entity |
Work Relationship |
Employment Terms |
Assignment |
Benefits Relationship |
|---|---|---|---|---|
|
Galaxy UK |
1 |
Architect |
Architect |
A (default for the legal entity) |
|
Galaxy US |
2 |
Consultant |
Consultant |
B (default for the legal entity) |
Processing: This table shows the basis for benefits evaluation and processing for each data type:
|
Data Type |
Benefits Evaluation Processing Basis |
|---|---|
|
Life events |
Primary assignment from each legal entity |
|
Electable choices or enrollment options |
One set of data for each legal entity |
|
Eligibility |
Use eligibility to provide benefits from the appropriate legal entity. Eligibility criteria are defined at the legal entity level or globally. |
Configuration: One benefits relationship is associated with different employment terms and assignments.
|
Legal Entity |
Work Relationship |
Employment Terms |
Assignment |
Benefits Relationship |
|---|---|---|---|---|
|
Galaxy US |
1 |
Architect |
Architect |
A (default) |
|
Galaxy US |
1 |
Consultant |
Consultant |
A |
Processing: This table shows the basis for benefits evaluation and processing for each data type:
|
Data Type |
Benefits Evaluation Processing Basis |
|---|---|
|
Life events |
Primary assignment |
|
Electable choices or enrollment options |
One set of data for each life event |
|
Eligibility |
Attributes defined at global person level are used for both life events. Assignment-level attributes are used in the respective life events. |
Configuration: Separate benefits relationships are associated with each assignment.
|
Legal Entity |
Work Relationship |
Employment Terms |
Assignment |
Benefits Relationship |
|---|---|---|---|---|
|
Galaxy US |
1 |
Architect |
Architect |
A (default) |
|
Galaxy US |
1 |
Consultant |
Consultant |
B |
Processing: This table shows the basis for benefits evaluation and processing for each data type:
|
Data Type |
Benefits Evaluation Processing Basis |
|---|---|
|
Life events |
Separate life events created for Architect and Consultant assignments |
|
Electable choices or enrollment options |
One set of data for each life event |
|
Eligibility |
Attributes defined at global person level are used for both life events. Assignment-level attributes are used in the respective life events. |
Configuration: Two assignments are associated with one benefits relationship, and another assignment with a second benefits relationship.
|
Legal Entity |
Work Relationship |
Employment Terms |
Assignment |
Benefits Relationship |
|---|---|---|---|---|
|
Galaxy US |
1 |
Architect |
Architect |
A (default) |
|
Galaxy US |
1 |
Product Manager |
Product Manager |
A |
|
Galaxy US |
1 |
Consultant |
Consultant |
B |
Processing: This table shows the basis for benefits evaluation and processing for each data type:
|
Data Type |
Benefits Evaluation Processing Basis |
|---|---|
|
Life events |
Separate life events are created for the assignments in benefits relationships A and B |
|
Electable choices or enrollment options |
One set of data for each life event |
|
Eligibility |
Attributes defined at the global person level and assignment level are used for life events. |
Configuration: Many assignments are associated with one or more benefits relationships.
|
Legal Entity |
Work Relationship |
Employment Terms |
Assignment |
Benefits Relationship |
|---|---|---|---|---|
|
Galaxy US |
1 |
Product Manager |
Orlando |
A |
|
Galaxy US |
1 |
Product Manager |
Dallas |
A |
|
Galaxy US |
1 |
Product Manager |
Atlanta |
B |
|
Galaxy US |
1 |
Consultant |
San Francisco |
C |
|
Galaxy US |
1 |
Consultant |
Los Angeles |
D |
Processing: This table shows the basis for benefits evaluation and processing for each data type:
|
Data Type |
Benefits Evaluation Processing Basis |
|---|---|
|
Life events |
Separate life events created for the assignments in each benefits relationship |
|
Electable choices or enrollment options |
One set of data for each life event |
|
Eligibility |
Attributes defined at global person level are used for all life events. Assignment-level attributes are used in the respective life events. |
Benefits extracts enable you create a file, or XML extract, that contains enrollment information about participants in a plan, or multiple plans that are provided by a specific carrier.
You generate one extract file for each carrier. If a carrier provides more than one plan, only one extract is required that contains information related to all plans provided by that carrier. For example, if ten plans are provided by four different carriers, you run four separate extracts, one for each carrier.
All extracts have the same format, regardless of which carrier receives the extract. Each extract contains only information relevant to the plans carried by a specific provider, but all have the same extract layout. You can contract with Oracle's partner, BenefitsXML, which provides a service to transform and deliver the extract data to the specification of each individual carrier.
For more information on BenefitsXML, see http://www.benefitsxml.com.
To configure the plan carrier details and extract options, use the Manage Plan Carriers task in the Plan Configuration work area.
If you choose not to use this partner, you can use your own resources to transform and deliver the output in the extract file directly to each plan carrier according to their specifications. The Upload Custom Layout button enables you to specify the layout for the individual carrier and accommodates additional file formats, such as CSV, XML, or fixed length. You must ensure that fields mapped in the custom layout equate to columns in the database tables.
To run and monitor extracts, use the Manage Extracts task in the Evaluation and Reporting work area. For a particular carrier, you select whether to run a full extract or an extract that includes only the changes since you ran the previous extract. Generally, you run a full extract after an enrollment period is closed and enrollments are completed. You run subsequent extracts on a periodic or scheduled basis, in either full or changes only mode. It is common practice to schedule your extracts to run after your regular payroll runs.
You can view, query, and download extracted records for a specific extract run when it is completed.
An implementor or developer can create a custom layout to transform the format of extracted benefits enrollment information into the exact specifications of a particular carrier. This topic provides a sample custom layout and descriptions of the tags you need to create a custom layout that meets the exact specifications supplied by the carrier. The custom layout that you upload to the plan carrier's extract options becomes the default layout for the plan carrier.
This figure sketches the structure of the XML tags in the custom layout.
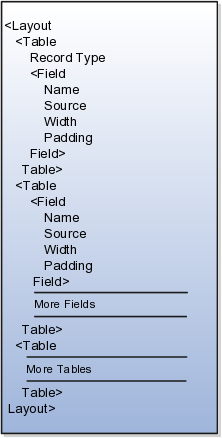
The data source for a field on the custom layout can be:
A column on the benefits extract staging tables
A column on one of the other tables listed in the Source tag description
A constant into which you enter the exact value
Tip
To identify table column names, you can use the data model query builder in Oracle BI Publisher. Search for the table name and view the columns.
This topic provides:
Description of the XML tags
Table aliases
Sample custom layout
This section describes each XML tag and lists its attributes, elements (subtags), and parent tags.
Description: Root tag.
Attributes: None
|
Elements (Subtags) |
Parent Tag |
|---|---|
|
Table |
None |
Description: The Database table from which the data has to be extracted.
Attributes: 1. tableName: Supported values = {BEN_EXTRACT_REQ_DETAILS,BEN_EXTRACT_REQUEST, DUAL,PER_ALL_PEOPLE_F,PER_PERSONS,PER_ALL_ASSIGNMENTS_M,PER_PEOPLE_LEGISLATIVE_F,BEN_PL_F,BEN_PL_TYP_F,BEN_OPT_F,BEN_PGM_F }
|
Elements (Subtags) |
Parent Tag |
|---|---|
|
1. RecordType: 2. Field: See Field tag description |
Layout |
Description: Describes how the data should be delimited/laid out in the extract file.
Attributes: Supported values: {FIXEDWIDTH, CSV}
Note
Anything other than CSV will default to FIXEDWIDTH.
|
Elements (Subtags) |
Parent Tag |
|---|---|
|
None |
Table |
Description: A field corresponds to one column in the extracted document. The text in this column can be sourced from a database table, an SQL function, or a constant.
Attributes: None
|
Elements (Subtags) |
Parent Tag |
|---|---|
|
Table |
Description: Name of the field
Attributes: None
|
Elements (Subtags) |
Parent Tag |
|---|---|
|
None |
Field |
Description: Source of data for the current field. If the source is a table, the value passed will be the column name. If multiple tables are involved, a fully qualified column name is recommended. The aliases are given in the list of allowed tables.
SQL functions in place of column names: Values in this tag are considered as column names if the type is set to TABLE. The column name is directly used while constructing a query. Hence, an SQL function can be used on a column.
Example 1
<Source type="TABLE">GENDER_FLAG</Source>
Example 2
<Source type="TABLE">DECODE(GENDER_FLAG,'F',1,2)</Source>
Attributes:
type:
Supported values = {TABLE, CONSTANT}
TABLE means data should come from a database table.
CONSTANT means data should be what is given in the value column of this tag.
table: This tag should be used only if the intended column is not from the table given in 'tableName' attribute of this Table tag. If this tag is not used, the column will be searched for in the table given in 'tableName'.
Supported values:
{BEN_EXTRACT_REQ_DETAILS
PER_ALL_PEOPLE_F
PER_PERSONS
PER_ALL_ASSIGNMENTS_M
PER_PEOPLE_LEGISLATIVE_F
BEN_PL_F
BEN_PL_TYP_F
BEN_OPT_F
BEN_PGM_F
|
Elements (Subtags) |
Parent Tag |
|---|---|
|
None |
Field |
Description: Intended width of this field in the extract file. The number passed would be the number of character spaces on the file.
Attributes: Supported values = positive integers.
|
Elements (Subtags) |
Parent Tag |
|---|---|
|
None |
Field |
Description: This describes the alignment of data in each column.
Attributes: Supported values: {LEFT, RIGHT}
|
Elements (Subtags) |
Parent Tag |
|---|---|
|
None |
Field |
|
Allowed Table |
Alias |
|---|---|
|
BEN_EXTRACT_REQ_DETAILS |
REQ |
|
PER_ALL_PEOPLE_F |
PEO |
|
PER_PERSONS |
PER |
|
PER_ALL_ASSIGNMENTS_M |
ASG |
|
PER_PEOPLE_LEGISLATIVE_F |
LEG |
|
BEN_PL_F |
PLN |
|
BEN_PL_TYP_F |
TYP |
|
BEN_OPT_F |
OPT |
|
BEN_PGM_F |
PGM |
<?xml version="1.0" encoding="utf-8"?>
<Layout>
<Table tableName="DUAL">
  <RecordType>FIXEDWIDTH</RecordType>
  <Field>
    <Name>"Record Type"</Name>
    <Source type="CONSTANT">001</Source>
    <Width>3</Width>
    <Padding>Left</Padding>
  </Field>
</Table>
<Table tableName="BEN_EXTRACT_REQ_DETAILS">
  <RecordType>CSV</RecordType>
  <Field>
    <Name>"Last Name"</Name>
    <Source type="TABLE">LAST_NAME</Source>
    <Width>25</Width>
    <Padding>Left</Padding>
  </Field>
  <Field>
    <Name>"First Name"</Name>
    <Source type="TABLE">FIRST_NAME</Source>
    <Width>50</Width>
    <Padding>Left</Padding>
  </Field>
  <Field>
    <Name>"Filler"</Name>
    <Source type="CONSTANT">XXXXXXXXXX</Source>
    <Width>10</Width>
    <Padding>None</Padding>
  </Field>
  <Field>
    <Name>"Plan Name"</Name>
    <Source type="TABLE">PLAN</Source>
    <Width>70</Width>
    <Padding>Left</Padding>
  </Field>
  <Field>
    <Name>"Coverage Start Date"</Name>
    <Source type="TABLE">COVERAGE_START_DATE</Source>
    <Width>15</Width>
    <Padding>Left</Padding>
  </Field>
  <Field>
    <Name>"SSN"</Name>
    <Source type="TABLE">NATIONAL_IDENTIFIER</Source>
    <Width>12</Width>
    <Padding>Left</Padding>
  </Field>
  <Field>
    <Name>"Gender"</Name>
    <Source type="TABLE">DECODE(GENDER_FLAG,'F',1,2)</Source>
    <Width>1</Width>
    <Padding>Left</Padding>
  </Field>
  <Field>
    <Name>"Person Number"</Name>
    <Source type="TABLE" table="PER_ALL_PEOPLE_F">PERSON_NUMBER</Source>
    <Width>30</Width>
    <Padding>Left</Padding>
  </Field>
  <Field>
    <Name>"Country of Birth"</Name>
    <Source type="TABLE" table="PER_PERSONS">COUNTRY_OF_BIRTH</Source>
    <Width>30</Width>
    <Padding>Left</Padding>
  </Field>
  <Field>
    <Name>"Assignment type"</Name>
    <Source type="TABLE" table="per_all_assignments_m">assignment_type</Source>
    <Width>30</Width>
    <Padding>Left</Padding>
  </Field>
  <Field>
    <Name>"Legislation code"</Name>
    <Source type="TABLE" table="per_people_legislative_f">LEG.LEGISLATION_CODE</Source>
    <Width>30</Width>
    <Padding>Left</Padding>
  </Field>
  <Field>
    <Name>"Legislation code"</Name>
    <Source type="TABLE" table="ben_pl_f">PLN.PL_ID</Source>
    <Width>30</Width>
    <Padding>Left</Padding>
  </Field>
</Table>
<Table tableName="DUAL">
  <RecordType>FIXEDWIDTH</RecordType>
  <Field>
    <Name>"Record Type"</Name>
    <Source type="CONSTANT">999</Source>
    <Width>3</Width>
    <Padding>Left</Padding>
  </Field>
  <Field>
    <Name>"Record Type"</Name>
    <Source type="SYSTEM">RECORDCOUNT</Source>
    <Width>3</Width>
    <Padding>Left</Padding>
  </Field>
</Table>
</Layout>
Yes. Use the integrated Microsoft Excel workbook to view and edit person benefit group assignments for multiple persons and groups. Then, upload your changes back into the application database. To generate the integrated workbook, start on the Plan Configuration work area, Manage Benefit Groups page. In the Search Results section, click Prepare the Workbook.
Yes. Use the integrated workbook to view and edit the benefit balance value, primary assignment, and benefits relationship entries for multiple persons. Also, add and delete person benefit balances. Then, upload your changes back into the application database. To generate the workbook, start on the Plan Configuration work area, Manage Benefit Balances page. In the Search Results section, click Prepare in Workbook.
You add eligibility criteria to an eligibility profile, and then associate the profile with an object that restricts eligibility.
The following figure shows the relationships between eligibility components.
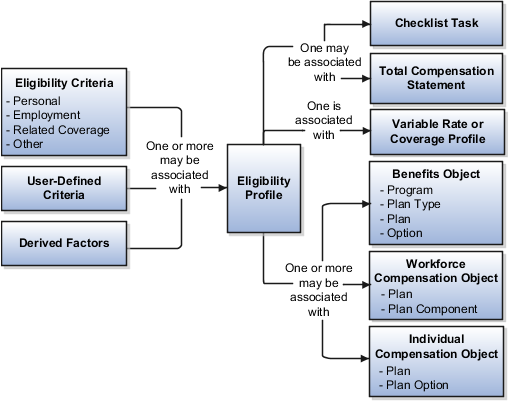
You can add different types of eligibility criteria to an eligibility profile. For many common criteria, such as gender or employment status, you can select from a list of predefined criteria values. However, you must create user-defined criteria and derived factors before you can add them to an eligibility profile.
When you add an eligibility criterion to a profile, you define how to use it to determine eligibility. For example, when you add gender as a criterion, you must specify a gender value (male or female) and whether to include or exclude persons who match that value.
You can associate an eligibility profile with different kinds of objects:
Associate an eligibility profile with a variable rate or variable coverage profile to establish the criteria required to qualify for that rate or coverage.
Associate an eligibility profile with a checklist task to control whether that task appears in an allocated checklist.
Associate an eligibility profile with a total compensation statement to apply additional eligibility criteria after statement generation population parameters.
Associate one or more eligibility profiles with a benefits or compensation object to establish the eligibility criteria for specific plans and options.
Derived factors define how to calculate certain eligibility criteria that change over time, such as a person's age or length of service. You add derived factors to eligibility profiles and then associate the profiles with objects that restrict eligibility.
You can create six different types of derived factors: age, compensation, length of service, hours worked, full-time equivalent, and a combination of age and length of service.
For each factor that you create, you specify one or more rules about how eligibility is determined. For example, the determination rule for an age derived factor specifies the day on which to evaluate the person's calculated age for eligibility. If the determination rule is set to the first of the year, then the person's age as of the first of the year is used to determine eligibility.
For the full-time equivalent factor, you specify the minimum and maximum full-time equivalent percentage and whether to use the primary assignment or the sum of all assignments when evaluating eligibility. For example, if the percentage range is 90 to 100 percent for the sum of all assignments, then a person who works 50 percent full-time on two different assignments is considered eligible.
Other settings define the unit of measure for time or monetary amounts, rounding rules, and minimums and maximums.
The following scenarios illustrate how to define different types of derived factors:
Benefits administrators frequently use age factors to determine dependent eligibility. You can also use age as a factor when determining life insurance rates. Age factors typically define a range of ages, referred to as age bands, and rules for evaluating the person's age. The following table illustrates a set of age bands that could be used to determine eligibility for life insurance rates that vary based on age.
|
Derived Factor Name |
Greater Than or Equal To Age Value |
Less Than Age Value |
|---|---|---|
|
Age Under 25 |
1 |
25 |
|
Age 25 to 34 |
25 |
35 |
|
Age 35 to 44 |
35 |
45 |
|
Age 45 to 54 |
45 |
55 |
|
Age 55 to 64 |
55 |
65 |
|
Age 64 or Older |
65 |
75 |
The determination rule and other settings for each age band are the same:
|
Field |
Value |
|---|---|
|
Determination Rule |
First of calendar year |
|
Age to Use |
Person's |
|
Units |
Year |
|
Rounding |
None |
A derived factor for length of service defines a range of values and rules for calculating an employee's length of service. The following table illustrates a set of length-of-service bands that could be used to determine eligibility for compensation objects such as bonuses or severance pay.
|
Derived Factor Name |
Greater Than or Equal To Length of Service Value |
Less Than Length of Service Value |
|---|---|---|
|
Service Less Than 1 |
0 |
1 |
|
Service 1 to 4 |
1 |
5 |
|
Service 5 to 9 |
5 |
10 |
|
Service 10 to 14 |
10 |
15 |
|
Service 15 to 19 |
15 |
20 |
|
Service 20 to 24 |
20 |
25 |
|
Service 25 to 29 |
25 |
30 |
|
Service 30 Plus |
30 |
999 |
The determination rule and other settings for each length-of-service band are the same:
|
Field |
Value |
|---|---|
|
Period Start Date Rule |
Date of hire (This sets the beginning of the period being measured.) |
|
Determination Rule |
End of year (This sets the end of the period being measured.) |
|
Age to Use |
Person's |
|
Units |
Year |
|
Rounding |
None |
A derived factor for compensation defines a range of values and rules for calculating an employee's compensation amount. The following table illustrates a set of compensation bands that could be used to determine eligibility for compensation objects such as bonuses or stock options.
|
Derived Factor Name |
Greater Than or Equal To Compensation Value |
Less Than Compensation Value |
|---|---|---|
|
Less than 20000 |
0 |
20,000 |
|
Salary 20 to 34000 |
20,000 |
35,000 |
|
Salary 35 to 49000 |
35,000 |
50,000 |
|
Salary 50 to 75000 |
50,000 |
75,000 |
|
Salary 75 to 99000 |
75,000 |
100,000 |
|
Salary 100 to 200000 |
100,000 |
200,000 |
|
Salary 200000 Plus |
200,000 |
999,999,999 |
The determination rule and other settings for each compensation band are the same:
|
Field |
Value |
|---|---|
|
Determination Rule |
First of year |
|
Unit of Measure |
US Dollar |
|
Source |
Stated compensation |
|
Rounding |
Rounds to nearest hundred |
The Age to Use value that you select is an important aspect of an age derived factor. This value determines whose birth date is used to calculate the derived age.
In most cases, you use the Person's value in the Age to Use field to define an age derived factor for either a participant or dependent eligibility profile. In this case, each person's birth date is used to calculate the age criterion by which eligibility is evaluated for that person.
For example, if you select Person's as the Age to Use value, and associate the age derived factor with a dependent eligibility profile, each dependent's eligibility is evaluated based on the age calculated from his or her own birth date.
You might select another predefined value in the Age to Use field if you intend to evaluate participant or dependent eligibility or rates based on someone else's age, such as a spouse, child, or other dependent.
Note
If you choose Inherited Age, the evaluation is based on the date of birth as defined in the person extra information flexfield.
If you select Person's oldest child as the Age to Use value, and associate this derived factor with a dependent eligibility profile, eligibility for all dependents is evaluated based on the age of the participant's oldest child. Consequently, when the oldest child reaches the maximum age of eligibility, for instance, all dependents become ineligible.
You can define your own criteria to meet any special needs of your organization. For example, if your organization employs deep sea divers and offers different benefits or benefits rates based on how deep they dive, you can create Depth of Diving as a new eligibility criterion.
The data for the eligibility criterion must be stored in a table that is accessible to the application. If the data is stored in either the Person or Assignment table, you can select the table and column from a list, and then specify the lookup type used to validate input values. You can also allow a range of valid values if the field stores a numeric value or a date.
Note
To select the correct values for the column and lookup fields, you must have a basic understanding of the structure of the table that stores the eligibility criterion information.
If the data is stored in a table other than the Person or Assignment table, you must first create a formula to retrieve the data from the table, and then set the formula type to User-Defined Criteria.
You can define two sets of criteria on the User-Defined Criteria page. The participant must meet the criteria defined in either set to be considered eligible (or to be excluded from eligibility if the Exclude check box is selected when the criteria is added to an eligibility profile).
After you have created your user-defined criteria, you can add it to an eligibility profile.
The following scenarios illustrate how to define different types of user-defined criteria. In each example, you must first create the user-defined criteria and then add it to an eligibility profile and set the criteria values to use in the profile.
A commercial diving company wants to offer different benefit rates to employees who dive to depths greater than 330 feet. This data is stored for each employee in a custom attribute called Dive_Depth in the Person table. To define eligibility based on diving depth, set the following values on the Create or Edit User-Defined Criteria page:
|
Field |
Value |
|---|---|
|
Table |
Person |
|
Column |
Dive_Depth_Attribute |
|
Lookup |
Dive_Depth_Validation |
|
Enable range validation one |
Selected |
Save the user-defined criteria, and then add it to an eligibility profile. Set the following values on the User-Defined Criteria tab, which is under the Other tab on the Create or Edit Eligibility Profile page:
|
Field |
Value |
|---|---|
|
Set 1 Meaning |
329 |
|
Set 1 To Meaning |
9999 |
|
Exclude |
Deselected |
Save the eligibility profile and associate it with a variable rate profile.
An employer wants to exclude work-at-home assignment from eligibility for a transportation benefit option. To accomplish this, set the following values on the Create or Edit User-Defined Criteria page:
|
Field |
Value |
|---|---|
|
Table |
Assignment |
|
Column |
Work_at_home |
|
Lookup |
YES_NO |
|
Enable range validation one |
Deselected |
Save the user-defined criteria, and then add it to an eligibility profile. Set the following values on the User-Defined Criteria tab:
|
Field |
Value |
|---|---|
|
Set 1 Meaning |
Yes |
|
Exclude |
Selected |
Save the eligibility profile and associate it with the transportation benefit option.
A company wants to offer a spot incentive bonus to hourly employees who worked 100 percent of their scheduled shift hours in a three month period. To determine eligibility for the bonus, create a formula that calculates scheduled hours less worked hours for each week in the previous three months. If the result of successive calculations is less than or equal to zero, then the formula returns a result of Yes. The first step is to create the formula. Once the formula has been defined, create a user-defined criterion to run the formula. Enter the following values on the Create or Edit User-Defined Criteria page:
|
Field |
Value |
|---|---|
|
Access One Formula |
Worked_Sched_Hours_Percent |
|
Enable range validation one |
Deselected |
Save the user-defined criteria, and then add it to an eligibility profile. Set the following values on the User-Defined Criteria tab:
|
Field |
Value |
|---|---|
|
Set 1 Meaning |
Yes |
|
Exclude |
Deselected |
Save the eligibility profile and associate it with the bonus compensation object.
Note
For very complex scenarios, your organization or implementation team can write a custom program to evaluate eligibility, and then create a formula that calls the custom program.
This example illustrates how to define eligibility criteria based on the number of hours an employee is scheduled to work within a specified period of time.
You want to limit eligibility for a benefits offering to employees who were scheduled to work between 30 and 40 hours each week or between 130-160 each month as of the end of the previous quarter. To do this, add two different ranges on the Range of Scheduled Hours tab, which is under the Employment tab on the Create or Edit Eligibility Profile page.
Set the values for the first range as shown in this table:
|
Field |
Value |
|---|---|
|
Sequence |
1 |
|
Minimum Hours |
30 |
|
Maximum Hours |
40 |
|
Scheduled Enrollment Periods |
Weekly |
|
Determination Rule |
End of previous quarter |
Set the values for the second range as shown in this table:
|
Field |
Value |
|---|---|
|
Sequence |
2 |
|
Minimum Hours |
130 |
|
Maximum Hours |
160 |
|
Scheduled Enrollment Periods |
Monthly |
|
Determination Rule |
End of previous quarter |
An eligibility profile defines criteria used to determine whether a person qualifies for a benefits offering, variable rate profile, variable coverage profile, compensation object, checklist task, or other object for which eligibility must be established.
The following are key aspects of working with eligibility profiles:
Planning and prerequisites
Specifying the profile type, usage, and assignment usage
Defining eligibility criteria
Excluding from eligibility
Assigning sequence numbers
Adding multiple criteria
Viewing the criteria hierarchy
Before you create an eligibility profile, consider the following:
If an eligibility profile uses derived factors, user-defined formulas, or user-defined criteria to establish eligibility, you must create these items before you create the eligibility profile.
If you are defining eligibility criteria for a checklist task, variable rate profile, or variable coverage profile, you must include all criteria in a single eligibility profile, because these objects can be associated with only one eligibility profile. You can, however, associate multiple eligibility profiles with benefits offerings , compensation objects and the Performance Management object.
Eligibility profiles are reusable, so use names that identify the criteria being defined rather than the object with which the profile is associated. For example, use "Age-20-25+NonSmoker" rather than "Supplemental Life-Min Rate."
When you create an eligibility profile, you specify whether the profile applies to participants or dependents.
Use participant profiles to define criteria for a person who has a work relationship with the legal employer as an employee, contingent worker, or nonworker.
Use dependent profiles for participants' spouses, family members, or other individuals who qualify as dependents. Dependent profiles can be associated with only benefit plans and plan types.
An eligibility profile's usage determines the type of objects with which the profile can be associated. For example, set the profile usage to:
Benefits to make the profile available to associate with benefits objects, such as programs, plans, plan types, options, variable rate profiles, and variable coverage profiles
Compensation to make the profile available to associate with individual and workforce compensation plans as well as total compensation statements
Global to make the profile available to multiple business processes
Goals to make the profile available to associate with goals when creating a goal plan or mass assigning goals, or to associate with goal plans
For Performance Management, you can select any usage.
When you create an eligibility profile, you specify which assignment to use with it. For profiles where usage is Compensation or Performance, select Specific Assignment. For Performance Management eligibility profiles, you must select the Participant type and Specific Assignment as the assignment to use.
Criteria defined in an eligibility profile are divided into categories:
Personal: Includes gender, person type, postal code ranges, and other person-specific criteria
Employment: Includes assignment status, hourly or salaried, job, grade, and other employment-specific criteria
Derived factors: Includes age, compensation, length of service, hours worked, full-time equivalent, and a combination of age and length of service
Other: Includes miscellaneous and user-defined criteria
Related coverage: Includes criteria based on whether a person is covered by, eligible for, or enrolled in other benefits offerings.
Some criteria, such as gender, provide a fixed set of choices. The choices for other criteria, such as person type, are based on values defined in tables. You can define multiple criteria for a given criteria type.
For each eligibility criterion that you add to a profile, you can indicate whether persons who meet the criterion are considered eligible or are excluded from eligibility. For example, an age factor can include persons between 20 and 25 years old or exclude persons over 65. If you exclude certain age bands, then all age bands not explicitly excluded are automatically included. Similarly, if you include certain age bands, then all age bands not explicitly included are automatically excluded.
You must assign a sequence number to each criterion. The sequence determines the order in which the criterion is evaluated relative to other criteria of the same type.
If you define multiple values for the same criteria type, such as two postal code ranges, a person needs to satisfy at least one of the criteria to be considered eligible. For example, a person who resides in either postal range is eligible.
If you include multiple criteria of different types, such as gender and age, a person must meet at least one criterion defined for each criteria type.
Select the View Hierarchy tab to see a list of all criteria that you have saved for this profile. The list is arranged by criteria type.
You can define multiple criteria in an eligibility profile or create separate profiles for individual criterion. To determine the best approach, consider the following:
Does the object you are defining eligibility for support multiple eligibility profiles?
What is the best approach in terms of efficiency and performance?
If you are defining eligibility criteria for a checklist task, variable rate profile, or variable coverage profile, you must include all criteria in a single eligibility profile, because these objects can be associated with only one eligibility profile. You can, however, associate multiple eligibility profiles with benefits offerings and compensation objects.
For optimum performance and efficiency, you should usually attach profiles at the highest possible level in the benefits object hierarchy and avoid duplicating criteria at lower levels. Plan types in program, plans in program, plans, and options in plans inherit the eligibility criteria associated with the program. For example, to be eligible for a benefits plan type, a person must satisfy eligibility profiles defined at the program level and at the plan type in program level.
However, it is sometimes faster to create more than one profile and attach the profiles at various levels in the hierarchy. For example, you might exclude employees from eligibility at the program level who do not have an active assignment. At the level of plan type in program, you might exclude employees who do not have a full-time assignment. Finally, at the plan level, you might exclude employees whose primary address is not within a service area you define.
Note
Eligibility criteria can be used to include or exclude persons from eligibility. Sequencing of criteria is more complicated when you mix included and excluded criteria in the same profile. For ease of implementation, try to keep all excluded criteria in a separate eligibility profile.
This example demonstrates how to create a participant eligibility profile used to determine eligibility for variable life insurance rates. The profile includes two eligibility criteria: age and tobacco. Once the eligibility profile is complete, you can associate it with a variable rate profile.
The following table summarizes key decisions for this scenario.
|
Decisions to Consider |
In this Example |
|---|---|
|
What is the profile type? |
Participant |
|
What type of object is associated with this profile? |
Variable rate for benefits offering |
|
What types of eligibility criteria are defined in this profile? |
Age derived factor (must have been previously defined) Uses Tobacco criteria |
|
What are the criteria values? |
Age: Under 30 Tobacco Use: None |
|
Should persons meeting these criteria be included or excluded from eligibility? |
Included |
The following figure shows the tasks to complete in this example:
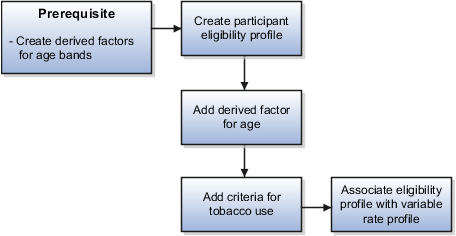
Note
In this example, you create one eligibility profile that defines the requirements for a single variable rate. Typically, you create a set of eligibility profiles, one for each variable rate. When you have completed all steps described in this example, you can repeat them, varying the age and tobacco use criteria, to create a separate profile for each additional rate.
|
Field |
Value |
|---|---|
|
Name |
Age Under 30+Non-Smoking |
|
Profile Usage |
Benefits |
|
Description |
Participant, age under 30, non smoker |
|
Status |
Active |
|
Assignment to Use |
Any assignment |
Note
You can reuse this eligibility profile by associating it with other objects that restrict eligibility, including benefits offerings, compensation plans, and checklist tasks.
The following examples illustrate scenarios where eligibility profiles are needed and briefly describe the setup required for each scenario.
A 401(k) savings plan is restricted to full-time employees under 65 years of age. To restrict eligibility for the plan, you must first create a derived factor for the age band of 65 and older, if one does not already exist. Then create an eligibility profile. Set the Profile Usage to Benefits and the Profile Type to Participant. Add the following criteria:
|
Criteria Type |
Name |
Values |
|---|---|---|
|
Employment |
Assignment Category |
Full-Time |
|
Derived Factor |
Age |
Select the age derived factor you created previously, and then select the Exclude check box. |
Associate the eligibility profile with the 401(k) plan.
A bonus is offered to all employees who received the highest possible performance rating in all rating categories. To restrict eligibility for the bonus, create an eligibility profile. Set the participant type to Participant, profile usage to Compensation or Global, and use in assignment to Specific Assignment. Add the following criteria for each rating category:
|
Criteria Type |
Name |
Values |
|---|---|---|
|
Employment |
Performance Rating |
Select the performance template and rating name, and then select the highest rating value. |
Associate the eligibility profile with the bonus compensation object.
A new hire checklist contains tasks that do not apply to employees who work in India. To restrict eligibility for the tasks, create a participant eligibility profile. Set the Profile Usage to Checklist and the Profile Type to Participant. Add the following criteria:
|
Criteria Type |
Name |
Values |
|---|---|---|
|
Employment |
Work Location |
Select India as the work location, and then select the Exclude check box. |
Associate the eligibility profile with each checklist task that does not apply to workers in India.
Grandfathered eligibility enables participants who have been enrolled in a benefit to retain eligibility to elect that benefit when they would otherwise not be eligible to elect it.
Setting up grandfathered eligibility involves creating a benefits group and an eligibility profile based on the benefits group. You associate the eligibility profile with the benefits offering, and associate the benefits group with the individuals who qualify to be grandfathered into the offering.
This figure shows creating a benefits group, using it in an eligibility profile, and associating the profile to a benefits offering and the group to its members.

These are the basic steps:
Create a benefits group named descriptively, such as Grandfathered Eligibility. Select Navigator - Plan Configuration. Then click Manage Benefit Groups in the task pane.
Select the Manage Eligibility Profiles task and create an eligibility profile using these criteria:
|
Criteria Type |
Criteria Name |
Value |
|---|---|---|
|
Other |
Benefit Groups |
Select the grandfathered benefits group that you created. |
On the eligibility step of the plan configuration process, select the grandfathered eligibility profile for the benefits offering and make it required.
Assign the benefits group to workers who qualify for the benefit.
Either assign to individuals using the Manage Person Habits and Benefit Groups task in the Benefits Service Center, or assign to many workers in a batch load.
Define postal code ranges and services areas to use as eligibility criteria using the integrated Microsoft Excel workbooks. You group postal codes into ranges, and in turn group ranges into service areas. Service areas define geographical regions as eligibility criteria when work location is not adequate. You can create multiple postal code ranges and service areas in a single integrated workbook. Then, upload them into the application database. Repeat these steps as many times as required to accommodate revisions.
The basic process for managing postal code ranges and services areas using the workbook is:
Generate the workbook.
Edit postal code ranges and service areas in their respective worksheets.
Upload edits.
Resolve errors.
On the Plan Configuration work area:
In the Tasks pane, under Manage Eligibility, click Manage Benefit Service Areas.
In the Search Results section of either the Postal Code Ranges or Service Areas tab, click Prepare in Workbook.
Add new postal code ranges in the Load Postal Code Ranges worksheet. The columns in the Postal Code Ranges section of the worksheet are the same as the Create Postal Code Ranges dialog box fields.
Add new service areas and edit existing ones in the Load Service Areas worksheet. The columns in the Service Areas section of the worksheet are the same as the Create Service Area dialog box fields. For each service area that you add, enter the postal code ranges that comprise the service area. You can enter multiple postal code ranges for a single service area. Do so by naming the service area in the first column of the Postal Code Ranges section of the worksheet for each postal code row.
Restriction
The postal code ranges must already be in the application database before you can enter them in the worksheet rows. Upload any new postal code ranges first, before uploading your service area edits.
The workbook uses the Changed cell in both worksheets to automatically identify the rows that you edit.
After you complete your edits, click Upload. Only those rows marked as changed are uploaded into the application tables.
The Worksheet Status field is updated only if the server or database becomes inaccessible during upload.
Restriction
You cannot edit postal code ranges in the worksheet if they uploaded successfully. To edit the postal code ranges after upload, you must search for the range on the Manage Postal Code Ranges and Service Areas page, Postal Code Ranges tab. Then, select the range and click Edit.
The application automatically updates the Status value in each row of the workbook. If there are errors that require review, the upload rolls back the change in the application and sets the row status in the workbook to Upload Failed. It then continues to the next row in the workbook. Double-click Update Failed in the Status cell to view the error. Fix any data issues in the workbook and upload the new changes.
When you upload the service area worksheet with postal code ranges that were not successfully uploaded, the data in the Service Area section may upload successfully. However, any rows in the Postal Code Ranges section of the worksheet with values not yet uploaded, have an error status indicating invalid postal code range.
If you define multiple values for the same criteria type, such as two postal code ranges, a person needs to satisfy at least one of the criteria to be considered eligible. For example, a person who resides in either postal range is eligible. If you include multiple criteria of different types, such as gender and age, a person must meet at least one criterion defined for each criteria type.
If you add only one eligibility profile to an object, then the criteria in that profile must be satisfied, even if the Required option is not selected. If you add multiple eligibility profiles, the following rules apply:
If all profiles are optional, then at least one of the profiles must be satisfied.
If all profiles are required, then all of the profiles must be satisfied.
If some but not all profiles are required, then all required profiles must be satisfied and at least one optional profile must also be satisfied.
A life event is a change to a person or a person's employment that affects benefits participation. Examples of life events are changes in worker assignment, anniversary of employment, and marriage. Life events affect benefits processing for a worker.
Aspects of life events that are related to benefits processing are:
Type
Status
The four types of life events are explicit, temporal, scheduled, and unrestricted. You configure explicit life events during implementation. They can include either personal or work-related changes, such as an address change or assignment transfer. Temporal life events occur with the passage of time, such as the sixth month of employment, and are predefined. For temporal events, you use derived factors associated with plan design eligibility factors. Scheduled life events are assigned. Open enrollment periods are an example of a scheduled life event. Unrestricted life events are for benefit enrollments that are not time-dependent, such as savings plan enrollments. Participants can make enrollment changes at any time.
Two life event statuses are important for benefits processing, potential and active. Potential life events are detected life events, but they do not generate enrollment actions. Potential life events are processed by the participation evaluation process. If potential life events meet plan design requirements, they become active life events, which can generate enrollment opportunities.
In addition to life events statuses that affect benefits processing, you can update individual life event statuses for a worker. Life events statuses that you can set include closed, backed out, and voided. Closing a life event prevents further enrollment processing of the life event. Backing out a life event rescinds any updates to worker records that are generated by the participation evaluation process. You can back out only life events in the started status or processed status. Voiding a life event rescinds any updates and prevents further processing.
You configure explicit life events during implementation. They can include either personal or work-related changes, such as an address change or assignment transfer. Define an explicit life event by specifying its processing characteristics and the database changes that generate it. Use criteria similar to those that define eligibility profiles and variable rate profiles.
Aspects of explicit life events include:
Type
Definition
Detection
The two types of explicit life events are person change and related person change. A person change is a change in HR data that you define to indicate that a person has experienced a life event. A related person change is a change in HR data that you define to indicate that a person has experienced a related-person life event.
To define changes to a person's record that generate a life event, you specify database table and column values that, when changed, are detected and processed as a life event. For example, you might define that a life event occurs when the database value of a person's marital status changes from single to married. An example of a related-person life event is when a participant's child, who is older than 26, becomes disabled. The participant's record can be updated to reflect this and the child can be designated as a dependent.
Note
If you do not find criteria among choices in selection lists of table and column objects, you can use a formula to generate a life event.
Associate the person change that you define with a life event. You can link multiple person changes to a single life event and you can link a single person change to more than one life event.
Specify the new value for this combination of database table and column that, when detected, indicates that a life event has occurred. A person change can be defined to be detected based on:
A new value
A change from a specific old value to a specific new value
Any change to a value
A change from any value to no value
A change from no value to any value
You can use a formula to define more complex conditions for detecting a life event.
If you define a life event based on changes to more than one table, the life event is detected when a data change in one of the tables meets the person change criteria. For life events that entail multiple changes to the same table, the person must satisfy all person change criteria associated with the table for the life event to be detected.
A scheduled life event is an assigned life event, such as an open enrollment period.
Types of scheduled life events are:
Administrative
Open enrollment
Assign administrative life events to a person or group when the terms and conditions of a benefit plan change significantly and participants must be allowed to re-evaluate their elections. This type of life event is also used during implementation to upload data initially. Examples of administrative life events include renegotiation of contract rates or addition of a new benefit.
The open enrollment life event determines eligibility for an open enrollment period. Open enrollment periods typically recur on a scheduled basis, such as an annual health and welfare benefits enrollment or a quarterly savings plan enrollment.
Use unrestricted life events for benefit enrollments that are not time-dependent, such as savings plan enrollments. Participants can make enrollment changes at any time.
The two types of unrestricted life event are:
Unrestricted
Unrestricted life events have a one day enrollment period and remain in the started status until the next unrestricted life event is started.
Unrestricted Open
You can configure the enrollment period for unrestricted open life events.
These aspects are common to both unrestricted and unrestricted open life events:
A new unrestricted life event is started every time an attempt is made to alter the benefits enrollment. Any previous unrestricted life event is closed at that time. Consequently, from the worker's or benefits professional's perspective, unrestricted life events have no enrollment period limitation.
Unrestricted life events in started status are closed when evaluation processing occurs.
Processing an unrestricted life event with an effective date that is prior to existing unrestricted events will result in the later events being backed out, but does not affect any other types of life events.
All temporal life events are predefined. Temporal life events occur with the passage of time, such as the sixth month of employment.
Aspects of temporal life events include:
Types
Detection rules
Implementation
The predefined temporal life events use derived factors and include:
Derived age
Derived combination of age and length of service
Derived compensation
Derived hours worked in period
Derived length of service
Derived total percentage of full time
When you run the participation evaluation process in scheduled, life event, or temporal mode, a life event is created when the minimum or maximum boundary is crossed as specified in the definition of the applicable derived factor.
When you create or edit a life event, select from among these options for the temporal detection rule:
Do not detect past or future temporal events
This option prevents the detection of past temporal events while the application processes this life event.
Do not detect past temporal events
The second option prevents temporal event detection while the application processes the specified life event. Use this rule with open and administrative events, or explicit events, when you do not want to detect temporal events.
Never detect this temporal life event
This option prevents the automatic detection of a specific temporal event. Set this rule for any seeded temporal event, for example, age change or length of service change, that you do not want to detect, such as during mid-year changes.
Use predefined temporal life events that are calculated from derived factors in plan and program design configuration, in conjunction with eligibility profiles or variable rate profiles attached to eligibility profiles.
Use one or more benefit object hierarchies to organize and maintain your benefits offerings. Administrative policies and procedures, such as eligibility requirements, life event definitions, costs, and coverage limits that are set at a higher level cascade to objects at lower levels, unless overridden by more specific rules defined at a lower point in the hierarchy.
This figure shows a benefits object hierarchy for a health insurance benefits offering that is populated at all four available levels: program, plan type, plan, and option.

Note
The icons shown in the figure also appear next to benefits objects in various places throughout the application. The icons serve to quickly identify the benefits object function: program, plan type, plan, or option
Within the health insurance program are two plan types: medical and dental. Two medical plans are within the medical plan type, and two dental plans are within the dental plan type.
At the fourth level are options to enroll the employee plus family, employee plus spouse, or employee only. Once defined, options can be reused. For example, the option to enroll the employee plus spouse is available to both the health maintenance organization and the preferred provider organization medical plans, but is not available to either dental plan. The employee option is associated with all plans in this hierarchy.
Note
It is not necessary to populate all four levels of the benefits object hierarchy.
When plans do not offer options, the options level of the hierarchy is not populated.
When a benefits offering such a savings plan is not organized under a program, and is subsequently identified as a plan not in program, the program level is not populated. The plan type becomes the top level, followed by the plan not in program at the next lower level. Options, if any, would populate the lowest level of the hierarchy.
The following figure shows a hierarchy where the program level is not populated.

The plan type contains a plan not in program. The dashed lines indicate that if the plan not in program does not offer options, then the option in plan level is not populated. In that case, the hierarchy would have only two levels: plan type and plan not in program.
Each program represents a package of related benefits and appears at the top level of its own hierarchy. Plan types, plans, and options appear at subordinate levels of the hierarchy. For example, a health insurance program spans medical, dental, and vision categories of expense coverage. All plans in a program inherit the program's currency definition.
A plan type is a category of plans, such as medical or dental insurance. Use plan types to efficiently define, maintain, and apply one set of administrative rules for all benefit plans of the same type.
A plan is a specific offering within the plan type. A health maintenance organization and a preferred provider organization are examples of specific medical insurance plans.
An option is an electable choice within a plan, such as coverage for an employee, employee plus spouse, or the employee's immediate family. Options are reusable. Once defined, you can associate an option with one or more plans and plan types. When you associate an option with a plan type, you make that option available for selection in all plans of that plan type.
You typically set up several components for later use while implementing and maintaining program and plan configurations.
The components specify rules that validate values or determine benefits eligibility. You can set up new, or edit existing components at any time. Because some components are used while defining other components, set up the components in the following sequence when possible.
Action items
Derived factors
Eligibility profiles
Life events
Variable rate profiles and variable coverage profiles
Variable rates and coverages
Standard rates and coverages
You can define enrollment and beneficiary designation requirement action items which, if not provided, cause either enrollment in the benefit offering to be suspended or beneficiary enrollment to be suspended. You can define different certification requirements for different action items.
Derived factors typically change with time, such as age, length of service, and compensation. You can use any of the available derived factors as decision criteria in a participant eligibility profile. You can use the Age derived factor in a dependent coverage eligibility profile.
After you define participant eligibility profiles and dependent coverage eligibility profiles, you can attach them to the appropriate level of the benefits object hierarchy to administer policies regarding who can participate in the benefits objects. You can attach multiple profiles to one object. Each profile can contain required criteria and optional criteria. For example, a profile could specify that eligible employees must work full time, and either have been employed for at least two years, or be assigned to a manager grade. You also associate eligibility profiles to a variable rate profiles and variable coverage profiles.
You can administer benefits policies based on life events that occur to participants, such as the birth of a dependent or a work location change. You can set up certification requirements, designation requirements, and adjust rates and coverages based on predefined life events or events that you define. You can set up life events based on derived factors, such as age, length of service, and compensation.
Life events are defined separately from any benefits object or rate so that a single life event can have multiple uses.
Enrollment requirements - You can link qualifying life event definitions to the enrollment requirements for a benefits object. Subsequent occurrence of the life event causes participation evaluation processing to consider the person's eligibility for that object.
Enrollment coverage - You can vary the amount of coverage available for a plan based on a life event. You define the standard coverage amount for the plan or option in plan and the coverage level available for those participants who experience the life event. You can also limit a currently enrolled participant's ability to change coverage levels.
Depending on your business requirements, you can associate one or more variable rate profiles and variable coverage profiles with rates and coverages, respectively.
The variable rate profile definition offers several delivered calculation methods. Also, the selected variable rate profile calculation can be defined to either replace or add to the standard rate calculation. Each eligibility profile can have one or more associated derived factor criteria, such as Age, Length of Service, and Compensation.
For example, you want the calculated rate for a participant's life insurance to vary depending on the participant's age. Participants in the 31 to 40 age group pay $3, those aged 41 to 50 pay $4, and those 51 to 60 pay $5. Configure three variable rate profiles, each with an eligibility profile matching the appropriate Age temporal attribute.
Note
Eligibility Profile is a required field when defining variable rate and coverage profile details.
You attach standard rates to a benefits object to specify monetary contributions and distributions to be made by the employee and employer. A variety of standard rate calculation methods are predefined, or you can define your own formulas for this purpose. When a participant enrolls in a plan, participation evaluation processing enters the calculated result on a payroll element for the employee. Informational rates typically used for additional reporting do not use payroll elements.
Standard and variable coverages work similarly to standard and variable rates. Several calculation methods are predefined. You can create and attach variable coverage profiles to coverages using a method that is similar to the way that you create and attach variable rate profiles to rates. Also, variable coverage profile definitions require that you specify an eligibility profile, to which you can optionally attach one or more derived factors. Therefore, variable coverage calculated results can vary depending on the calculation method, associated eligibility profile, and temporal events.
Setup effort and operating performance vary depending on where eligibility criteria are defined within the benefits object hierarchy. Generally, you should associate criteria at the highest level that provides the needed degree of control. If a plan or option has specific requirements that are not common to the levels above it, then it is appropriate to associate criteria at that lower level.
Within the program configuration eligibility page, eligibility requirements can be defined at three levels: program, plan type in program, and plan in program. Within the plan configuration eligibility page, eligibility requirements can be defined at two additional levels: plan and option in plan.
When more than one set of eligibility requirements apply to a given circumstance, the eligibility criteria are cumulative. In other words, criteria set at a detailed level are in addition to, and do not override, criteria set at a general level.
The following figure shows the eligibility determination hierarchy with components organized from top to bottom, general to detailed.

This example of wellness program eligibility illustrates an efficient approach to specifying eligibility requirements when criteria change at different levels of the hierarchy.
A legal employer is setting up a benefits offering. Eligibility for the program and its plans and options vary, depending on employment status, location, and gender criteria. The wellness program is for current and retired employees only. The program contains two plan types: medical and recreational. Within the medical plan type are two plans: the health maintenance organization plan and the preferred provider organization plan. Within the recreational plan type are two plans. The headquarters plan provides access to an on campus recreation facility for current and retired employees who work or live near headquarters. The field plan is for retired employees and current employees located at remote locations. Field options in plan consist of several national fitness franchises. The Esses franchise restricts membership to the female gender.
The following figure shows the wellness program eligibility determination hierarchy, with eligibility requirements set at the wellness program, field plan in program, and Esses franchise option in plan levels.
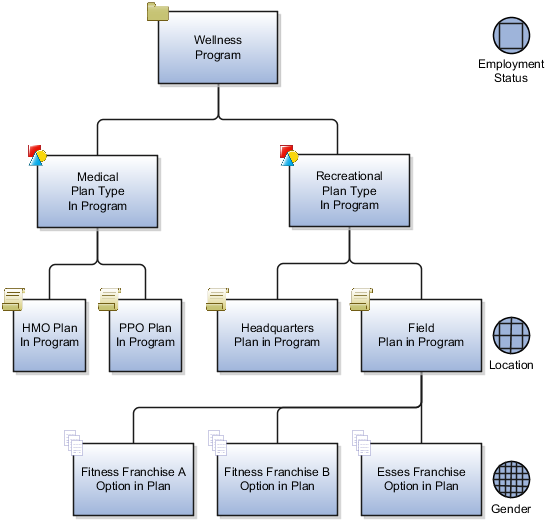
The intended program eligibility configuration requires three eligibility profiles set at three different levels of the hierarchy.
An employment status eligibility profile at the wellness program.
A location eligibility profile at the field plan in program. This is the highest level in the hierarchy at which this filter can be applied without inadvertently screening (for example, medical plan participants by location).
A gender eligibility profile at the Esses option in plan. Again, this filter is positioned at the highest level in the hierarchy that affords control of membership gender for only the Esses franchise.
The eligibility determination hierarchy works like a set of increasingly finer sieves, with the program level serving as the coarse sieve.
Because program-level eligibility criteria are evaluated first, the employment status criteria associated at the wellness program level includes only current and retired employees, which causes all persons who are not current or retired employees to be ineligible for further consideration for any objects at lower levels of the hierarchy.
Next, the location eligibility profile on the field plan excludes current employees who live near headquarters from joining off-campus facilities.
Finally, the gender eligibility profile associated with the Esses field plan option includes female membership only.
Eligibility criteria set at lower levels in the hierarchy are in addition to and do not override higher-level criteria. For example, the gender eligibility profile set up at the Esses plan option level includes females, but those females must also satisfy the employment status and location criteria set up at higher levels.
This strategy reduces processing time because the eligible population for consideration diminishes as the eligibility evaluation proceeds down the hierarchy. Although it is possible to attach an eligibility profile to each plan or option individually, that approach is much less efficient both in terms of setup and performance.
John is a retired employee who still lives near headquarters. As a retired employee, John meets the high-level criteria and therefore has access to the on-campus recreation facility plan. Because John is not a current employee working at headquarters, he is not excluded by the field-plan-level criteria for joining a national fitness franchise. Finally, the Esses plan option is not available to John, due to the plan-option-level gender criterion.
Setup effort and operating performance vary depending on where enrollment criteria are defined in the hierarchy. Generally, you should associate criteria at the highest level that provides the needed degree of control. If a plan or option has specific requirements that are not common to the levels above it, then it is appropriate to associate criteria at that lower level.
The following figure shows the enrollment determination hierarchy organized from top to bottom, left to right, general to detailed.

Enrollment requirements defined at a lower level in the hierarchy override those definitions cascading from above.
At the left, the hierarchy shows the three enrollment configuration levels that are available on the program configuration enrollment page. The three enrollment requirement levels available during program configuration (organized from general to detailed) are program, plan type in program, and plan in program. Below the program enrollment configurations are the two enrollment configuration levels that are available on the plan configuration Enrollment page: plan and option in plan. Option in plan enrollment requirements set up on the plan configuration enrollment page override any definitions that have been set up at a higher level, such as the plan in program level of the program configuration enrollment page.
From the life event tabs that appear on the program configuration enrollment page and the plan configuration enrollment page, you can set up enrollment requirements associated with one or more life events at any of the available hierarchy levels.
Shown at the right side of this figure is a hierarchy of five enrollment configurations that are available from the Life Event tabs on the program and plan enrollment pages. Again arranged from general to detailed, these life event enrollment configurations are life event in program, life event in plan type in program, life event in plan in program, life event in plan, and life event in option in plan. Because life events are more specific, the life event configurations override their corresponding parallel configurations appearing immediately to their left in this figure.
For example, enrollment requirements at the life event in option in plan override those set up above, such as for the life event in plan. The life event in option in plan setup also overrides setup at the left for the option in plan.
This wellness program enrollment example illustrates an efficient approach for specifying enrollment requirements when criteria change at different levels of the hierarchy.
A legal employer is setting up an open enrollment period for the wellness program to recur every November. The wellness program contains two plan types: recreational and medical. The medical plan type includes a health maintenance organization (HMO) plan in program and a preferred provider organization (PPO) plan in program. Within the medical plans are options for covering the employee, employee plus spouse, and employee plus family.
This program enrollment configuration requires two enrollment period requirements set at different levels of the hierarchy.
An open enrollment period at the program level
An additional enrollment period at the life event in plan level
First, we set up the open enrollment period at the wellness program level, because during that period, enrollment is available for all objects within the wellness program. Enrollment requirements set at a general level of the hierarchy cascade to lower levels, unless you specifically override them at a lower point in the hierarchy. To provide additional enrollment opportunities when a life event istriggered by adding a child to the participant's family, we attach an overriding enrollment requirement at the level of the medical plan.
Enrollment criteria set at lower levels in the hierarchy override higher-level criteria. For example, the program level enrollment period does not allow enrollment at any time other than November. However, life event set up at the plan level overrides the program level criteria. This set up creates an overriding enrollment opportunity whenever a child joins a participant's family.
This strategy reduces maintenance and processing time because the program level criteria controls enrollment for all persons, with one exception for a specific life event.
Jane adopts a child into her family during June. As a current employee, Jane participates in the wellness program, medical plan type, PPO medical plan, employee plus spouse option. Although the open enrollment period for the wellness program occurs only in November, Jane does not need to wait for the open enrollment period. The life event in plan override provides an immediate enrollment opportunity to change the enrollment option to employee plus family. However, Jane must wait for the open enrollment period to change enrollment in any object within the recreational plan type.
Create benefits plans by using one of these methods, which are available on the Manage Plans page:
Complete the Quick Create Plan page.
Prepare and upload an integrated Microsoft Excel workbook.
Complete the plan configuration process.
Complete the Create Plan page accessed from the Quick Create Program page.
After creating a plan not in program, you can validate the completeness of the plan and options configuration.
The Quick Create Plan page is useful when you want to quickly set up the essential framework of a benefit plan configuration. You can also create many standard rates to associate with the plan or option. This method enables you to create one plan type and multiple options in one place. Otherwise, you have to use first the Manage Plan Types task and then the Manage Benefit Options task.
You can immediately associate an existing, or newly created, plan type and options with the benefit plan.
You can quickly configure essential characteristics for a plan in program or not in program. When you set Usage as Not in program, an additional section appears. Use this section to specify currency, defined rate frequency, and communicated rate frequency, all of which are otherwise inherited from the overarching program configuration.
When you use the Quick Create Plan page, several plan characteristics are automatically set to commonly used values. If you must edit those default settings,, you can use the plan configuration process to retrieve the plan in program or plan not in program. Then, you can edit or add details at any time.
You cannot use the Quick Create Plan method to edit any existing object.
The integrated workbook method is useful when you want to set up one or more benefit plans quickly. Enter basic plan details using the workbook. Save the file locally to share the plan designs with others. Then, upload the finalized plans to the application database. Use the Plan Configuration work area pages to edit and add configuration details.
You cannot edit an existing benefit plan using this method.
The plan configuration process provides you with the complete set of benefit plan characteristics, and therefore the greatest flexibility for setting up and maintaining plans.
This method is the only one that enables you to edit an existing plan, regardless of the method used to create the plan.
If you are midway through the plan configuration process and discover that you have not completed the setup for an object that you require for your plan configuration, you must:
Leave this process.
Go to the relevant task for setting up the missing object.
Complete that auxiliary setup.
Return to this process and complete the plan configuration.
Another method to create a plan in program is available while you are using the Quick Create Program page to set up the essential framework of a program configuration. Click Create Plan to open the Create Plan Basic Details dialog box. Use this dialog box to specify the essential characteristics of a plan in program without having to go to the Manage Benefit Plan Details task.
The Create Plan Basic Details page enables you to associate the new plan with an existing plan type and multiple existing options. When you return to the Quick Create Program page, you can immediately associate the newly created plan with the program.
The validation process identifies errors early in the setup process and enables the implementor to quickly resolve any issues that may occur. Plans in program are validated as part of the program validation.
In the Programs and Plans page, Plans tab, Search Results section, select a plan not in program and click Validate. On the Plan Hierarchy page, select an option and click Validate.
You can hover over those fields with icons to view a description of the status.
Quick create plan functionality defines essential configuration for benefits plans.
Consider the following aspects of quick create plan functionality while deciding whether this method is appropriate for configuring a particular benefits plan:
Capabilities
Automatic settings
Editing saved plans
The ability to very quickly set up a large quantity of items produces a significant time savings. For example, you can quickly create numerous standard rates, and then update them with further details later.
You can use quick create plan functionality to:
Set up temporary plans for.
Testing and proof of concepts.
Confirming understanding of plan configuration requirements.
Supporting agile development techniques.
Pre-sales customer demonstrations.
Set up essential plan configuration, and then use the edit plan configuration functionality to add new or edit existing configuration at a later time.
Create and attach objects without exiting to other tasks.
Create a plan type and attach the plan to the plan type without exiting to the Manage Plan Types task.
Create options and attach them to the plan without exiting to the Manage Plan Options task.
Create an option in plan level employee and employer standard rate without exiting to the Manage Benefit Rates task.
Create an option in plan level coverage flat amount without exiting to the Manage Benefit Plan Coverage task.
When you use quick create plan functionality, the following field values are automatically set.
The plan status is set to Pending.
The statuses of any associated plan options are set to Active.
The types for any associated rates are set to standard rates.
The types for any associated coverages are set to standard coverages.
Program year periods are automatically selected for the range of two years before and one year after the current year. All plan year periods are of type calendar year.
For any associated eligibility profile, the Required criteria match check box is not selected.
The enrollment rule is set to Current - can keep or choose; new - can choose.
The plan function is set to Regular.
If the plan usage is set to In program, then Enable unrestricted enrollment is disabled.
If the plan usage is set to Not in program, Enable unrestricted enrollment is enabled. You can either select or not select that field.
If you enable unrestricted enrollment, then
Rate Start Date and Coverage Start Date are set to Event.
Previous Rate Start Date and Previous Coverage Start Date are set to One day before event.
Enrollment life event is set to Unrestricted.
Enrollment Period Start Date and Enrollment Period End Date are set to As of Event Date.
Close Enrollment Period Date is set to When elections are made.
No automatic settings are made for:
Dependent or beneficiary designation
Primary care physician designation
Note
You can later use Manage Benefit Plan Details configuration process to retrieve existing plan configurations and then edit any of the automatic settings. You can also add definitions that were not specified during the quick create process.
You cannot use quick create plan functionality to edit any field of any saved plan. After you use quick create plan functionality to save a plan definition, you use manage benefit plan details functionality to retrieve the existing plan configuration. At that time, you can edit existing previously unspecified settings.
After retrieving a quick create plan, you can:
Change plan status.
Add predefined options. You can also change option status.
Add plan year periods for fiscal years.
Add or remove standard rates, and add imputed rates, and variable rates. You can select from several available predefined rate calculation methods or define your own rate calculation formulas.
Add or remove standard coverages, and add variable coverages. You can select from several available predefined coverage calculation methods or define your own coverage calculation formulas.
Add or remove eligibility profiles. You can also select the Required criteria match check box for any associated eligibility profile.
Configure requirements for:
Scheduled and life event enrollment
Dependent and beneficiary designation
Primary care physician designation
The validation report is available during program and plan configuration. It enables easy diagnosis of common mistakes during plan and program setup. By identifying errors early in the configuration process, you can focus on testing more complex scenarios rather than diagnosing routine errors. This tool can be used as an aid while building a plan design or to verify integrity after completion and before manual testing.
On the Programs and Plans page, Program tab, Search region, select the program to validate and click the Validate button. Select a plan and option on the Program Hierarchy page, and click the Validate button. The program Validation Results page is generated that displays the output of the validation process.
On the Programs and Plans page, Plans tab, Search region, select a plan not in program and click the Validate button. On the Plan Hierarchy page, select an option and click the Validate button.
For the selected path in the hierarchy, the validation covers a range of setup objects, such as year periods, life events, action items, and rates. Some examples of issues assessed during validation include: plans or programs with no associated plan years, programs with no included plans, and missing configuration where values are required.
The output is a tabular display with the following indicators for each setup object and each level in the specified hierarchy path.
|
Description of the Cell Contents |
Status |
|---|---|
|
Green with check mark |
Setup is required and exists |
|
Green with red x |
Setup is required and does not exist (error) |
|
White with green check mark |
Setup is optional and exists |
|
White with question mark |
Setup is optional and does not exist |
|
Plain green |
Optional level not configured. Setup would be required if the level is added |
|
Plain white |
Optional level not configured. Setup would be optional if the level is added |
|
Gray |
Setup is not applicable |
You can hover over those cells with icons to view a description of the status.
Waive plans and waive options enable participants to decline enrollment opportunities for which they are otherwise eligible.
Consider the following aspects
Benefits of including waive plans and options in plan configurations
Creating and using waive plans
Creating and using waive options
By deploying waive plans and waive options, you can use predefined reports to show enrollment results for those employees who have chosen to waive plans and options. Such reports are useful when considering whether to redesign your benefits offerings. Correlation of demographic data with waive enrollments helps discern benefits pricing issues and coverage issues with respect to the nature of benefits that are currently offered.
You typically define a waive plan or option when you want the waive plan or option to appear to the participant as an electable choice amongst other plans or options. Clear choices avoid misunderstandings. For example, the business requirement may be to automatically enroll employees into a basic medical insurance plan by default, unless the employee explicitly opts out of all medical insurance plans. When employees manually elect a waive plan that is clearly presented amongst other medical plans, their intentions to opt out are clear. If medical coverage issues later occur, it is clear that the employees explicitly chose to not be enrolled in either the default plan or any other medical plan offering, and that their choice was not made in the absence of knowledge of available alternatives.
You can create a waive plan to enable eligible persons to decline participation at the plan type level. To designate a plan as a waive plan, set the plan function field to Waive in the plan configuration basic details section.
After you create the waive plan, use the plans and plan types section of the program configuration basic details page to select and add the waive plan to the table of plans associated with the plan type in that program. When an eligible person elects the waive plan, that person declines enrollment in all plans within that plan type.
Similarly, you can attach a waive option in addition to the regular options in a plan to enable eligible persons to decline participation at the plan level.
After you create the waive option, use the options section of the plan configuration basic details page to select and add the waive option to the table of options associated with the plan. When an eligible person elects the waive option, that person declines enrollment in all options within that plan.
If a plan type contains only one existing plan, consider attaching a waive option to the existing plan instead of adding a waive plan to the plan type.
Note
Do not attach a waive plan or waive option to plan configurations that require eligible persons to elect at least one regular option from a group of options or at least one regular plan from a group of plans.
The defined rate frequency and communicated rate frequency values establish the time basis for rate amounts that are either used internally or displayed to participants.
The defined rate frequency determines the time basis of rates used in calculations or stored for other internal use.
The communicated rate frequency determines the time basis of rates that appear to participants.
Defined rate frequency, communicated rate frequency, and program default currency are program-level attributes. An exception occurs in plan configuration, where setting the plan usage field to Not in program causes the defined rate frequency, communicated rate frequency, and plan default currency fields to appear. In that special case, these attributes are required to be specified as part of the plan-not-in-program configuration. After the defined rate frequency, communicated rate frequency, and currency are appropriately defined for benefits programs or plans not in program, you can use the Create Rates page to define named rates for specific objects within those hierarchies.
The time basis of costs defined in the Additional Information section of the Create Rates page is always determined by the relevant defined rate frequency.
For example, a health and welfare program includes the dental plan type. The dental plan type includes the dental preferred provider organization (PPO) plan and the dental health maintenance organization (HMO) plan. The dental PPO plan includes options for covering the employee, employee plus spouse, and so on. The default program currency for the health and welfare program, to which the dental plan type and dental PPO plan are associated, is set to US Dollars. The defined rate frequency of the health and welfare program is Monthly. On the calculation tab of the Create Standard Rates page for the dental PPO plan, employee plus spouse option, the calculation method is set to Flat amount, and that flat amount value is set to 32.50.
The rate inherits the currency defined for the programs or plans not in program to which the benefits object is associated. In this example, the currency for the health and welfare program is US Dollars. Therefore the defined rate is the flat amount: 32.50 US Dollars monthly. That defined rate is stored for use in subsequent calculations.
The communicated rate frequency determines the time basis of costs that appears to participants. The rate communicated to participants differs from the defined rate if the communicated rate frequency is different from the defined rate frequency. For example, the defined rate frequency is monthly, with 12 monthly periods in a year, while the communicated rate has the frequency of the participant's payroll period, such as 26 biweekly periods in a year.
To convert from the defined rate to the communicated rate, the annual cost is first calculated. The annual cost for employee plus spouse participation in the dental insurance plan is:
(32.50 US Dollars per month) * (12 months per year) = 390 US Dollars per year
To continue the example, dental insurance costs are deducted from participants' biweekly paychecks. The communicated rate frequency is set to Per pay period. There are 26 payroll periods in the plan year period.
The communicated rate is the annual cost divided by the number of periods in a year at the communicated rate frequency:
(390 US Dollars per year) / (26 payroll periods per year) = 15.00 US Dollars per payroll period.
You can define dependent designation requirements either at the plan type in program level or the plan level of the benefits object hierarchy. On the program configuration Basic Details page for a given program, you must select one of these dependent designation levels:
Null
Plan type in program
Plan
When the dependent designation level is null or blank, the Designation Requirements page of the program configuration is disabled. Designation requirements cannot be specified because the dependent designation level is not configured for the program.
When the dependent designation level is set to Plan type in program, the plan types currently attached to this program appear as rows in the table located in the header section of the program configuration Designation Requirements page. To define designation requirements for a particular plan type in this program, highlight the plan type name in the table, and then configure the designation requirements in the tabbed region of the page.
When the dependent designation level is set to Plan, the Designation Requirements page of the program configuration is disabled. You can configure designation requirements at the plan level on the Designation Requirements page of the plan configuration.
Enrollment rules limit enrollment options based on whether the participant is currently enrolled in the benefits object.
Enrollment rules are affected by two settings: the person's enrollment status and the selected enrollment option.
Enrollment statuses:
Current: Participants who are enrolled in the benefits object at the present time
New: Persons who are not currently enrolled
Note
Neither of these two enrollment statuses means that continued participation or new enrollment is necessarily granted for the next coverage period. Enrollment for the next period is determined by enrollment options.
Enrollment options:
Can choose: Allowed to make new elections.
Can keep: Allowed to keep their current elections.
Can keep or choose: Allowed to either keep their current elections or make new elections.
Keep or choose, starts new: Allowed to keep current elections or make new elections. The coverage ends at the configured end date for the processed life event and restarts the next day. However, the participant must explicitly reelect coverage amounts, even though the coverage amount may stay the same.
Choose only: Must make an explicit election to stay enrolled.
Keep only: Must keep current elections.
Lose only: Must disenroll from current elections.
Assign automatically: Enrolled automatically and cannot disenroll.
Nothing: Cannot make elections for this benefits object.
Formula: Use a formula that you have previously defined to determine electability based on enrollment status. The formula must be of the type Enrollment Opportunity.
Each choice in the enrollment rules field represents a combination of options.
For example:
Current - keep only; new - nothing means that currently enrolled participants must retain their current set of elections to stay enrolled. Persons who are not currently enrolled are not allowed to make elections for this benefits object.
Current - nothing; new - assign automatically means that currently enrolled participants cannot make elections for this benefits object, while persons who are not currently enrolled are automatically enrolled and cannot disenroll.
Default enrollment rules limit enrollment options based on whether the participant is currently enrolled in the benefits object.
Default enrollment rules are affected by two settings: the person's enrollment status and the selected enrollment option or plan.
Default enrollment statuses:
Current: Participants who are presently enrolled in the benefits object
New: Persons who are not currently enrolled
Note
Neither of these two enrollment statuses means that continued participation or new enrollment is necessarily granted by default for the next coverage period. Default enrollment for the next period is determined by default enrollment options.
Default enrollment options:
Defaults: Enroll in the default enrollment for the benefit object.
Same enrollment and rates: Do not change enrollment or rate.
Same enrollment but default rates: Do not change enrollment but assign the default rate.
Nothing: Do not enroll the person in the benefit object.
Formula: Use a formula that you have previously defined for this default treatment. The formula must be of the type Default Enrollment.
A default enrollment rule pairs each of the two enrollment statuses with a feasible enrollment option. For example, New - nothing; current - default means that if a person is not yet enrolled in a given benefit, then do not make a default enrollment for that person in that benefit. If a person is already enrolled in a benefit, then automatically enroll that person in the designated default enrollment for that benefit.
This topic illustrates examples of setting up enrollment validation across plans when enrollment in one plan affects enrollability in other plans or depends upon enrollment in other plans.
Scenario: The employer requires enrollment in both a high-deductible health plan (HDHP) and a health savings account plan (HSA).
Setup: You can use one of the following methods to enforce enrollment in both plans:
If the entire worker population must enroll in HSA with HDHP, you can enforce enrollment by:
Setting up both plans for default enrollment upon new hire
Or configure the automatic enrollment method on both plans
In either method, set up each plan type with a minimum plan enrollment of 1.
Create an eligibility profile tied to one of the plans, such as the HDHP using the Other criteria type and the Participation in Another Plan criteria. Select the other plan, such as the HSA plan, as the criteria value. Do not select Exclude. This method uses the participation in one plan as an eligibility criteria for the other plan during validation.
Create an eligibility profile tied to one of the plans, such as the HDHP, using the Related Coverage criteria type and the Covered in Another Plan criteria. Select the other plan, such as the HSA plan, as the criteria value. Do not select Exclude.
Create a post election coverage calculation formula that enforces coverage in both plans. Select the plan in the plan hierarchy on the enrollment step of the plan configuration process, and then select the post election formula in the Further Details section of the General tab.
Note
There might be cases where you want to control enrollments by selecting the post election formula at the plan type or the option level of the program or plan hierarchy.
Scenario: The employer excludes enrollment in a flexible spending account plan (FSA) if electing the health savings account plan (HSA).
Setup: Create an eligibility profile tied to the HSA plan using the Other criteria type and the Participation in Another Plan criteria. Select the FSA plan as the criteria value and select Exclude. Assign this eligibility profile to the HSA plan.
Scenario: The employer does not permit enrollment in spouse and child supplemental life insurance unless the employee is enrolled in the employee supplemental life insurance.
Setup: You can use one of the following methods to enforce this requirement:
Create a participant eligibility profile tied to the spouse and dependent plans, using the Related Coverage criteria type and the Covered in Another Plan criteria. Select the employee supplemental life plan as the criteria value. Do not select Exclude.
Create a post election coverage calculation formula that enforces coverage in the employee plan. Select the spouse and dependent plans in the plan hierarchy on the enrollment step of the plan configuration process, and then select the post election formula in the Further Details section of the General tab.
Unsuspend rules define the coverage and rate start dates to use when a suspended enrollment becomes unsuspended. You can set up one unsuspend rule for a coverage and a different unsuspend rule for the corresponding rate.
When a required action item is completed, the relevant elections are unsuspended if there are no other incomplete required action items. If a required action item is not completed, and the action is due before the close of enrollment, then the Close Enrollment process provides an audit log listing of the action items that failed. Similarly, if the Close Enrollment Action Items process runs with force close, an audit log again lists the action items that failed. In either case, the suspension and any interim rate and coverage will carry forward. Subsequent participation evaluation processing for this participant will generate an error.
Note
The unsuspend rule controls the start date of the enrollment if the unsuspend date is equal to or later than the original start date.
If you do not select an unsuspend rule, the start date is the date on which the enrollment is unsuspended.
If you assign interim coverage while an enrollment is suspended, the interim enrollment is ended one day before the coverage start date of the unsuspended enrollment.
The sets of predefined rules are identical for the Unsuspend Enrollment Rule and the Unsuspend Rate Rule:
As of completed date - Sets the enrollment coverage or rate start date equal to the effective date on which the enrollment is unsuspended.
Recalculate with completed date and enrollment start - If the computed start date is earlier than the effective date of the unsuspension, recomputes the start date using the unsuspended date as the life event date or notification date, depending on your life event definition. The rate start and end dates are recalculated based on the coverage start date of the unsuspended enrollment.
Use existing enrollment start date - Uses the original coverage or rate start date, even if this date is before the suspension end date.
The following are examples of some commonly used unsuspend rules.
First of month after completed
The start date is the first day of the next month that follows the date that required action items are completed.
For example, action complete: March 10th. Start date: April 1st.
Similar rules are predefined for start dates to occur on the first day of the next year, half year, quarter, and semi-month.
First of month on or after completed
This rule is much the same as the previous rule, with the exception that if the action is completed on the first day of the period, then the start date occurs on the same day.
For example, action complete: July 1st. Start date: July 1st.
Action complete: July 2nd. Start date: August 1st.
Similar rules are predefined for start dates to occur on the first day of the year, half year, quarter, and semi-month
First of pay period after completed
The start date is the first day of the next payroll period to occur after action items are completed.
First of last pay period plan year after completed
The start date is the first day of the last complete payroll period in the plan year.
For example, a calendar year period with biweekly pay periods beginning on December 6th and December 20th. Action complete: November 10th. Start date: December 6th, which is the first day of the last complete pay period for the plan year. The payroll period starting on December 20th is considered to be the first pay period of the next plan year.
First of last month plan year after completed
Assuming a calendar plan year, the start date would typically be December 1st of the plan year in which the required action items are completed.
Formula
A formula that you define can be used to derive an unsuspend start date when the predefined rules do not fit your needs.
Pairing incompatible start and end date rules during plan configuration can cause processing errors due to overlapping dates.
To reduce such errors and assist with plan configuration, consult the following general guidelines for start date rule compatibility with end date rules:
General guidelines and definitions
Rates, coverages, and dependent coverages
Enrollment periods
For rates, coverages, and dependent coverages, the previous rate or coverage period should end the day before a new rate or coverage begins. Enrollment periods are different in that you create a window of time during which a person has enrollment opportunities. Thus, the enrollment period must end at a time after the enrollment period begins.
Start dates are always computed based on the occurred on date of the life event being processed, unless the rule specifies otherwise. For example, Later of event or notified computes the start date based on the life event occurred on date or the life event notification date, depending on which date occurs later.
Most end date rules, with the exception of rules beginning with 1 prior, are also based on the event being processed. 1 prior means the end date should be one day before the start date of a new rate or coverage. If rates or coverages are completely ending, and will not be superseded by other rates or coverages, the part of the rule that follows 1 prior applies. For example, a health insurance participant voluntarily terminates employment. Although no new coverage period will follow, the 1 prior, or month end rule causes health insurance coverage to remain in effect until the end of that month.
You can define formulas to derive any end date when predefined end date rules do not fit your needs. However, the end date returned by your formula must not cause overlapping dates.
Note
Pairings of start and end date rules are recommendations only, and are not enforced by the application.
All rates and coverages start date rules, with the exception of Elections, can be paired with any previous end date rule that begins with 1 prior. The 1 prior rules can only be used when the start date is computed during the Evaluate Life Event Participation process.
In keeping with the guideline that previous rate and coverages periods should end one day before new rates or coverages begin, pairs of start and end dates that achieve that date relationship are generally compatible. For example:
|
Rate Start Date Rule |
Compatible Previous Rate Period End Date Rule |
|---|---|
|
Event |
One day before event date |
|
As of event |
One day before event |
|
First of month |
End of month |
|
First of next month |
End of month |
|
First of month after later event or notified |
End of month using later of event or notified |
|
First of month on or after event |
End of month using later of event or notified |
|
First of month after enrollment start |
End of month after enrollment end |
|
First of quarter |
End of quarter |
Note
A commonly used rule is 1 prior, or month end. If no new rate or coverage will start, coverage is often extended to the end of the month, and the rate ends with the pay period following the event.
All enrollment period start date rules can be paired with any of the three end date rules listed below:
Forty-five days after enrollment period start
Sixty days after enrollment period start
Ninety days after enrollment period start
The following start date rules must be paired with an end date rule that ends with after enrollment period start or a formula.
First of next half year
First of next pay period
First of next semimonthly period
First of next year
The following start date rules are compatible with end rules that specify a number of days after the later of the event date or the notification date:
As of event date
First of next half year after later event or notified
First of next month after later event or notified
First of next pay period after later event or notified
First of next year after later event or notified
First of semi-month after later event or notified
Later event or notified
Later of sixty days before later event or notified
Later of thirty days before event or notified
Action items are steps that must be taken or documents that must be provided to complete enrollment in a benefits offering.
The following are key aspects of certifications and action items:
Certification and action item types
Required and suspended enrollment options
Action items include designation of dependents, beneficiaries, and primary care providers, as well as furnishing of dependent social security numbers, beneficiary addresses, or other items of information. Certification documents, such as birth certificates, marriage certificates, proof of good health, evidence of insurability, and proof of student status, are also action items. You can define certification requirements for any of the following situations:
General enrollment in a benefits offering
Enrollment following a specific life event
Restrictions based on coverage or benefits selected
Coverage or benefits restrictions for specific life events
Designation of dependents
Designation of beneficiaries
You define action items on the Edit Plan Certifications and Edit Plan Designation Requirements pages in the Plan Configuration work area.
A certification requirement action item may include one or more individual certifications, such as proof of good health or evidence of insurability, that must be provided to fulfill the requirement. When you add a certification, you can select the Required option and then set the Determination Rule, which controls when the certification is required. For example, a certification might be required only when a participant is enrolling for the first time or it may be required for every life event. If you select multiple certifications, then a participant must provide all required certifications and at least one optional certification to fulfill the requirement. For example, you might require that a participant provide either a Marriage Certificate or a Domestic Partner Affidavit when designating a spouse dependent. In this case, you would select the Required option for the certification requirement action item, but not for each of the individual certifications.
Selecting the Required option for other action items, such as designation of a beneficiary, dependent, or primary care physician, does not affect processing, but can be useful for tracking an action item in internal reports.
If you select the Suspend Enrollment option for an action item, then a suspension reminder appears to the participant or benefits administrator during enrollment. Enrollment in the benefits offering is suspended until the action item is completed. Interim coverage, if any, is applied, and no further life event processing can take place for the person while enrollment is suspended. If the action item is not completed by its due date, the action item appears on the close action item audit log, the close enrollment audit log, and the participation evaluation error report until the requirement is met.
You cannot select the Suspend Enrollment option for an individual certification; you configure suspension for a certification requirement action item, which may include multiple individual certifications. If you configure suspended enrollment for a certification requirement with multiple certifications, then all required certifications and at least one optional certification must be provided to avoid suspension of enrollment.
For example, if you create a certification requirement with two required and five optional certifications, then the two required certifications and at least one of the optional ones must be satisfied for the certification requirement to be complete. If you configure this certification requirement for suspended enrollment, and only one of the required certifications is provided, then the action item is incomplete and results in suspended enrollment.
Note
You define interim coverage on the Edit Plan Enrollment page in the Plan Configuration work area.
The following examples illustrate how to associate designation requirements with benefits offerings.
Scenario: Enrollment in an Employee+1 medical plan option requires designation of a dependent and certification of good health for the designated dependent.
Setup: On the Edit Plan Designation Requirements page in the Plan Configuration work area, create an action item that requires designation of a dependent. In the Dependent Action Items section on the Dependents tab, select the Required and Suspend Enrollment options for the action item, and set a due date. Next, add a certification requirement. Select the Required and Suspend Enrollment options for the certification requirement. Finally, add certifications for a marriage certificate, domestic partner affidavit, birth certificate, and adoption certificate. Do not select the Required option for the individual certifications, so that furnishing any one of the documents satisfies the requirement. On the Edit Plan Enrollment page, define interim coverage for this plan to be the Employee Only option.
Result: When a participant enrolls in the Employee+1 option, they have an opportunity to designate a dependent. They receive a reminder about the pending certificate. Enrollment in the Employee+1 plan is suspended, and Employee Only coverage is in effect until one of the certification documents is provided.
Note
You can also define dependent designation action items and certifications for a particular life event.
You can define two kinds of action items for the designation of beneficiaries: action items that cause enrollment of the entire benefit offering to be suspended if not completed, and action items that cause enrollment of only the beneficiary to be suspended. This example illustrates how to set up both types.
Scenario: Enrollment in a life insurance plan requires designation of a beneficiary. It also requires that the beneficiary's address is provided. Enrollment in the plan is suspended if no beneficiary is designated, but enrollment for the designated beneficiary alone is suspended if no address is provided.
Setup: On the Edit Plan Designation Requirements page in the Plan Configuration work area, create an action item for designation of a beneficiary. In the Action Items for Suspending Plan Enrollment section on the Beneficiaries tab, select the Required and Suspend Enrollment options for the action item, and set a due date. Then, in the Action Items for Suspending Beneficiary Enrollment region, add another action item for the beneficiary's address. Select the Required and Suspend Enrollment options, and set a due date.
Result: When a participant enrolls in the plan, they designate a beneficiary, but do not furnish an address. They receive a reminder about the pending action item. Enrollment in the plan is completed for the participant, but enrollment for the beneficiary is suspended until an address is provided.
The following examples illustrate how to associate enrollment and benefits-based certification requirements with benefit offerings.
Scenario: Enrollment in a life insurance plan requires a proof of good health or evidence of insurability certification to be obtained from the employee's physician and supplied to the benefits department.
Setup: On the Edit Plan Certifications page in the Plan Configuration work area, create a general enrollment certification requirement. Select the Required and Suspend Enrollment options, and set a due date for the certification. Define interim coverage for the plan, if not already defined, on the Edit Plan Enrollments page.
Result: When a person attempts to enroll in the plan, they receive a reminder about the pending certification. Interim coverage goes into effect immediately and remains in effect until the certification is provided.
Scenario: Enrollment in a life insurance plan requires proof of good health or evidence of insurability certification for a new employee, but not for existing employees who are updating benefits during open enrollment.
Setup: On the Edit Plan Certifications page in the Plan Configuration work area, create an enrollment certification requirement for the New Hire life event. Select the Required and Suspend Enrollment options, and set a due date for the certification. Do not define interim coverage.
Result: When a new hire attempts to enroll in the plan, they receive a reminder about the pending certification. Enrollment in the plan is suspended and no coverage is available until the certification is provided.
Scenario: Enrollment in a life insurance plan exceeding $100,000 coverage requires proof of good health or evidence of insurability certification, but enrollment in plans with coverage below that amount does not.
Setup: On the Edit Plan Certifications page in Plan Configuration work area, create a benefits certification requirement. Select the Required and Suspend Enrollment options, and set a due date for the certification. On the Edit Plan Enrollment page, define interim coverage to be a plan with coverage equal to $100,000.
Result: When a participant attempts to enroll in a plan with coverage exceeding $100,000, they receive a reminder about the pending certification. Enrollment in the plan is suspended and interim coverage in the $100,000 plan is in effect until the certification is provided.
Note
You can also define benefits certification requirements for a particular life event. For example, you might require certification for the Gain Dependent life event if coverage exceeds $100,000.
The configuration of action items determines what happens during enrollment processing. For example, failure to provide required action items can result in suspended enrollment or simply cause delinquent items to appear in benefits administration reports.
The following action item settings affect processing:
|
Setting |
Description |
|---|---|
|
Suspend Enrollment |
When enabled, notifies participant of pending action item during enrollment and causes suspension of enrollment until the item is completed. |
|
Determination Rule |
Determines when the item is required, such as always or only for initial enrollment. |
|
Due Date |
Determines when the item begins appearing on audit and error reports generated by enrollment processing. |
Interim coverage setup also affects enrollment processing, as described in the next section. Interim coverage is defined for a plan or option on the Edit Plan Enrollment page in the Plan Configuration work area.
If enrollment is suspended due to incomplete action items, then interim coverage, if configured, applies and no further life event processing takes place until the action items are completed.
Note
Incomplete or past-due action items for one benefits relationship do not stop processing of events for another benefits relationship for the same person.
Reporting of pending action items and certificates occurs as part of enrollment processing. Benefits administrators can use these reports to follow up as needed.
|
Process |
Reporting |
|---|---|
|
Close enrollment action items |
Any past-due required action items appear in the audit log, as well as any incomplete action items that are configured to suspend enrollment. |
|
Close enrollment |
Any past-due required action items appear in the audit log, as well as any incomplete action items that are configured to suspend enrollment. |
|
Participation evaluation |
Any incomplete action items that are configured to suspend enrollment for a person appear in the error report. |
The following scenarios illustrate how subsequent life events are processed for a participant with an open action item.
Scenario: Life Event A is processed on 1/15/2010. An outstanding action item exists with a due date of 1/30/2010, and it is configured for suspension. Enrollment is suspended, and interim coverage exists. On 1/28/2010, the benefits administrator attempts to process Life Event B, which has an occurred date of 1/20/2010.
Result: Life Event B cannot be processed until the suspension is resolved for Life Event A. The action item associated with Life Event A appears on the audit report after action item processing, and the participant's name appears on the error report after participation evaluation processing. Contact the participant and attempt to resolve the action item. Once the action item is complete, enrollment for Life Event A is completed and Life Event B can be processed.
Scenario: Life Event A is processed on 1/15/2010. An outstanding action item for beneficiary designation exists, and suspended enrollment is configured for the beneficiary designee only, not for the benefits offering itself.
Result: Enrollment is suspended only for the beneficiary, not for the entire offering. Future life events can be processed for the participant.
Scenario: Life Event A is processed on 1/15/2010. An outstanding action item exists with a due date of 1/30/2010, and it is configured for suspension. Enrollment is suspended, but no interim coverage exists. On 1/28/2010, the Benefits Administrator attempts to process Life Event B.
Result: Life Event B cannot be processed because the participant is not currently enrolled.
Scenario: Life Event A is processed on 1/15/2010. An outstanding action item exists with a due date of 1/30/2010, and it is configured for suspension. Enrollment is suspended, and interim coverage exists. On 1/25/2010, Life Event B is processed with an occurred date of 1/1/2010.
Result: Life Event A is backed out, along with any pending action items. Life Event B is processed (unless the Timeliness setup for the Life Event prevents life events from being backed out in this situation).
Setup for benefits certification coverage restrictions at the plan level varies depending on whether the Restriction Type is set to Benefit restriction applies or Option restriction applies. You can set up restrictions for the entire plan or for specific life events for the plan. You cannot set up restrictions based upon coverage calculation amounts, if the Restriction Type is set to Option restriction applies.
The Benefit Amount Restrictions section of the certifications page, benefits certifications tab, general configuration sub tab, targets both first time enrollments and changes in enrollments. For first time enrollments, you can specify the Minimum, Maximum, and Maximum with Certification coverage amounts. For enrollment changes, you can also specify Maximum Increase and Maximum Increase with Certification amounts.
Elections submitted outside of these specifications trigger enrollment suspension. If interim rules are defined on the plan configuration enrollment page, then the interim coverage is applied during suspension.
You can impose benefits certification restrictions in plans that have coverages that use either the Flat range calculation method or the Flat amount calculation method with the Participants enter value at enrollment check box selected.
Typical scenarios do not call for simultaneously setting all benefits amount restriction fields.
The Plan or Option Sequence Restrictions section also targets both first time enrollments and changes in enrollments. Here, you can specify the Minimum Sequence Number, Maximum Sequence Number, and Maximum Sequence Number with Certification. For enrollment changes, you can also specify Maximum Sequence Number Increase and Maximum Sequence Number Increase with Certification.
Elections submitted outside of these specifications trigger enrollment suspension. If interim rules are defined on the plan configuration enrollment page, then the interim coverage is applied during suspension.
Plan configurations that include options and are associated with coverages that use the Multiple of compensation calculation method can impose option restrictions. When option restrictions apply, the Restrictions on Changes field is enabled. When configured, choices seen during enrollment are limited by the rule selected there. For example, No restrictions allows all available options to be seen, while Increase only allows just those options that are greater than the current election to be seen.
The application determines whether an option represents an increase or decrease with respect to the currently elected option based on the sequence numbers assigned to the options as they appear in the table of the Options section of the plan configuration basic details page.
Typical scenarios do not call for simultaneously setting all option restriction fields.
Some benefits provide options for different levels of coverage, such as life insurance coverage that is offered in multiples of a participant's annual salary. You can define sequence restrictions to limit the number of levels of increase from one enrollment period to the next or due to occurrence of a life event. You can also set the minimum and maximum sequence levels that can be selected with and without certification.
You define sequence number restrictions on the Benefit Certifications General Configuration tab in the Certification Details region of the Create or Edit Plan Certifications page.
A life insurance plan has options for $10k, $20k, $30k, $40k, and $50k, associated respectively with sequence numbers 1 through 5. A participant with existing coverage of $10k can only jump one level up to $20k without certification and two levels, to $30k, with certification of good health or evidence of insurability.
To set up this scenario, first select Option restriction applies for the Restriction Type, and then set the sequence restriction values in the Plan or Option Sequence Restriction region as follows:
|
Field |
Value |
|---|---|
|
Maximum Sequence Number Increase |
1 |
|
Maximum Sequence Number Increase with Certification |
2 |
A supplemental life insurance plan has four coverage options with sequence numbers 1 through 4. You want to restrict the highest level of coverage (sequence number 4) to only those participants who provide certification.
To set up this scenario, first select Option restriction applies for the Restriction Type, and then set the sequence restriction values in the Plan or Option Sequence Restriction region as follows:
|
Field |
Value |
|---|---|
|
Maximum Sequence Number |
3 |
|
Maximum Sequence Number with Certification |
4 |
When you define a benefits plan, it is not necessary that the plan be placed in a program. However, there are advantages to associating a plan with a program.
In general, associate a plan with a program when:
Participants typically enroll in the plan at the same time that they enroll in other plans in the program.
Participation eligibility requirements defined for the program also apply to the plan.
Plans not in a program enable participants to enroll and disenroll multiple times throughout the year. For example, a retirement savings plan not in program that allows unlimited, unrestricted enrollment changes.
In general, do not associate a plan with a program when:
Participants typically enroll in the plan at a different time than other plans in the program.
Participation eligibility requirements defined for the program differ substantially from those defined for the plan.
Benefits that the plan provides differ substantially from the benefits provided by other plans in the program.
Create benefits programs by using one of these methods, which are available on the Manage Programs page:
Complete the Quick Create Program page.
Prepare and upload the integrated Microsoft Excel workbook.
Complete the program configuration guided process.
After creating a program, you can validate the completeness of the configuration.
The Quick Create Program page is useful when you want to quickly set up the essential framework of a benefit program configuration. This method enables you to create plans in program and life events to associate with those plans in one place. Otherwise, you have to use first the Manage Plans task and then the Manage Life Event task.
You can immediately associate existing and newly created plans and life events with the benefit program.
When you use Quick Create Program page, several program characteristics are automatically set to commonly used values. If you must edit those default settings, you can use the program configuration process to retrieve the programs, plans in program, and life events created using the Quick Create Program page. Then, you can edit or add details at any time.
You cannot use the Quick Create Program method to edit any existing program.
The integrated workbook method is useful when you want to set up one or more benefit programs quickly. Enter basic program details using the workbook. Save the file locally to share the program designs with others. Then, upload the finalized programs into the application database. Use the Plan Configuration work area pages to edit and add program configuration details.
You cannot edit an existing benefit program using this method.
The program configuration process offers the complete set of program characteristics, and therefore the greatest flexibility for setting up and maintaining benefits programs.
This method is the only one that enables you to edit an existing program, regardless of the method used to create the program.
If you are midway through the program configuration process and discover that you have not completed the setup for an object that you require for your program configuration, you must:
Leave this process.
Go to the relevant task for setting up the missing object.
Complete that auxiliary setup.
Return to this process and complete the program configuration.
The validation process identifies errors early in the setup process and enables the implementor to quickly resolve issues that may occur. On the Programs and Plans page, Program tab, Search Results section, select the program to validate and click Validate. On the Program Hierarchy page, select a plan and option and click Validate. The application generates the program Validation Results page, which displays the output of the validation process.
You can hover over those fields with icons to view a description of the status.
Attach enrollment life events to a program to trigger program enrollment opportunities when those life events occur.
Use the create life events feature to make new enrollment life events available for attachment to the quick create program.
You can:
Select one or more predefined life event configurations.
Create one user-defined life event at a time.
In the user-defined life event section, enter the new life event name and select its type. You must either associate user-defined events to already existing person changes, or create new person changes and then link the new person changes to the life event using the edit life event page.
Each check box in the available life event configurations section represents a commonly used life event configuration. Each predefined life event configuration contains the triggering mechanism setup and ties to the appropriate tables and columns as required to automatically generate that life event when corresponding personal data changes. You can optionally select one or more of these life events to make them available for attachment to a program. Selected life events appear in the enrollment life event available list with the name displayed on the check box label. Life events that are disabled have already been activated in this implementation. A uniqueness check prevents creation of life events that rely on an already existing set of table and column designations for triggering an event. Each set of life event triggers must be unique across the same implementation.
You can view the current benefits object hierarchy and a summary of configuration settings for any created program. Highlight the row for the retrieved program, and then scroll to the right side of the table. Click the icon in the Hierarchy column or the Summary column to view the corresponding page.
On the Overview page, Programs and Plans tab, click the Prepare in Spreadsheet button in the Search Results region of either the Plans tab or the Programs tab to open a spreadsheet to enter and upload multiple programs or plans, and associated objects, at one time. You can save the spreadsheet locally and upload it when you complete it. The default characteristics of plans or programs that you upload from the spreadsheet are the same as those created using the Quick Create buttons for either plans or programs.
With the exception of a scheduled unrestricted open life events, which do have a specified enrollment window, unrestricted enrollment updates can be submitted throughout the year. They do not require a prerequisite occurrence of a formal personal or work-related life event.
A savings plan is an example of a benefit for which you typically enable the unrestricted enrollment type.
You cannot enable unrestricted enrollment and use life event processing in the same plan.
Use the Manage Eligibility Profiles task to create an eligibility profile that uses the Work Location criteria in the Employment criteria type.
If the work location definition does not correspond to the provider location, use the Manage Benefit Service Area task to define the provider's service area by listing the relevant postal codes. Then use that service area to define an eligibility profile that uses the Service Area criteria in the Personal criteria type.
Assign the eligibility profile to the benefits offering that you want to restrict. Only offerings for which the participant is eligible appear to the worker as enrollment opportunities during enrollment.
Yes, you can edit the meaning of the existing certifications lookup codes in the Enrollment Action Items lookup type, which includes Beneficiary designation, Dependent coverage, Proof of event, and Proof of good health. This change only modifies the display text of the certification. For example, you might want to rename Proof of good health to Evidence of insurability. Use the Define Lookups pages, which you can access by starting in the Setup and Maintenance work area and searching for lookup tasks.
Previous rate and coverage end rules that begin with the phrase 1 prior terminate the rate or coverage period one day before the subsequent period starts.
For example, if the previous coverage end is 1 prior or quarter end, and coverage start is First of next month, then the previous coverage ends on the last day of the current month.
If no coverage start is specified, or no next rate or coverage starts, then the second part of the rule goes into effect. In this example, the previous coverage would terminate at the end of the quarter. For example, if a job termination life event is triggered, and no rate start or coverage start is associated with processing the job termination life event, the existing rate or coverage stops at the end of the quarter.
Participation processing identifies persons who are found ineligible for participation.
Tracking ineligible persons causes person eligibility records to appear in the Benefits Service Center Eligibility Override page. If you use eligibility override functionality to make a person eligible, a corresponding electable record appears in the Benefits Service Center, Benefits Status Summary section, Electable tab.
Tracking ineligible persons can impact performance. Run a trial in a test instance for ineligible participants to monitor and benchmark run times based on participant population size, your plan configuration, and hardware capacity. An advantage of tracking ineligible persons is that a benefits administrator can make an ineligible person eligible with out the need for reprocessing.
Note
You must track ineligible persons if you determine benefits eligibility based on length of service temporal factors.
Benefits managers are allowed to override eligibility requirements for plan participation under special circumstances. For example, enable participation eligibility override to allow negotiated benefits packages for new hires.
Note
All plans and options in this program inherit this setting unless you specify differently at the plan or option in plan levels.
Enabling participation eligibility override can impact performance. Run a trial in a test instance with participation eligibility override enabled to monitor and benchmark run times based on participant population size, your plan configuration, and hardware capacity.
To verify existing predefined data and formula compilation, you can run the Benefits Setup Diagnostic Test from the Help - Troubleshooting - Run Diagnostic Tests menu.
After setting up a benefits program, you can run the Program Information Diagnostic Test from the Help - Troubleshooting - Run Diagnostic Test Helpmenu. You can also validate the program setup using the Validate button on the Manage Programs page.
Rates determine costs for purchasing benefit coverage, such as life or health insurance. Coverages define monetary amounts available to enrolled participants in the event of a claim, such as for medical expenses.
Rates usually determine an amount of monetary contributions paid by the employee, the employer, or a combination of both. Rates can also determine amounts distributed from the employer to the employee, such as for tuition reimbursement.
A variety of calculation methods for standard rates are delivered with the application. When a rate varies based on criteria, you can associate variable rate profiles to further adjust or replace the standard rate when those criteria apply. For example, you can adjust a rate based on combinations of location, length of service, and participant's age.
When you create a variable rate profile, you select one calculation method and attach one eligibility profile that defines criteria to qualify for an adjusted rate. You can associate multiple variable rate profiles to a given standard rate, and control the sequence in which multiple adjustments are applied.
Coverages define the level of benefits that a participant receives according to a benefits contract. A variety of calculation methods for standard coverages are also delivered with the application. As with variable rate profiles, you can associate variable coverage profiles to adjust coverage according to applicable criteria. You can also apply limits and rounding rules to the initial calculation to derive the final coverage.
You can create benefit rates in several different ways, depending on the type of rate and the complexity of the calculation. You must decide whether to use:
Standard rate
Variable rate profiles
Variable formula
If a rate does not vary based on any factors, define the rate on the standard rate page. For example, if a dental plan rate is a flat amount of 8.00 per month regardless of age or other factors, a standard rate is appropriate.
If a rate varies based on a factor, such as age, smoking status, or compensation amount, create a variable rate profile for each rate amount. For example, if a life insurance plan costs more for a smoker than a nonsmoker, you would create two variable rate profiles, one for smokers and another for non smokers. Each variable rate profile would be associated with an eligibility profile for the appropriate smoking status. The rate for a smoker might be 10.00, while the rate for a nonsmoker might be 5.00.
Note
You can only attach one eligibility profile to a variable rate profile.
If a rate varies based on multiple factors, such as age and smoking status, use the same logic to a create variable rate profiles and associated eligibility profiles for each set of factors affecting the rate, as shown here.
Age is less than 25 and person is nonsmoker
Age is less than 25 and person is smoker
Age is 26 to 40 and person is nonsmoker
Age is 26 to 40 and person is smoker
and so on
Create the variable profiles first and then add them to the standard rate.
Generally, you define variable rate profiles so that persons who meet certain criteria are eligible to receive the variable rate. However, you can also define a variable rate profile so that persons who meet the criteria are excluded from receiving the variable rate. In such cases, the standard rate for the benefit applies to these persons.
A variable rate profile can define an amount that is added to, multiplied by, subtracted from, or used instead of the standard rate for participants who meet the eligibility criteria. A variable profile's treatment rule (add to standard rate, multiply by standard rate, subtract from standard rate, or replace) defines how the rate defined in the profile is applied to the standard rate.
If a variable rate is based on a complex calculation, you can define one or more fast formulas to compute the rate and then associate the formulas with the standard rate.
Example: A company provides a payroll service to hundreds of companies and allows its customers the ability to set up their own individual contribution schedules. Companies assign their employees to tiers that determine contribution amounts, as shown in this table.
|
Company A |
Company B |
|---|---|
|
Tier 1 - Employee contribution amount: 100.00 Tier 2 - Employee contribution amount: 150.00 Tier 3 - Employee contribution amount: 200.00 |
Tier 1 - Employee contribution amount: 50.00 Tier 2 - Employee contribution amount: 75.00 Tier 3 - Employee contribution amount: 100.00 |
Note
You can associate variable rate profiles or a variable formula to a standard rate; you cannot associate both.
Rates define contribution and distribution amounts for specific benefits offerings. Rates are calculated by applying a calculation method to values you define or ones that are entered by the participant during enrollment. You can also define limiters and rounding rules to apply to the initial calculation to derive the final rate.
The following calculation methods are available for computing rates:
|
Calculation Method |
Description |
|---|---|
|
Flat amount |
Flat amount is predefined or entered during enrollment. |
|
Multiple of compensation |
Calculates rate as multiple of participant's compensation amount |
|
Multiple of coverage |
Calculates rate as multiple of total coverage amount |
|
Multiple of parent rate |
For child rates only, calculates rate as multiple of the parent (primary activity) rate |
|
Multiple of parent rate and coverage |
For child rates only, calculates rate as multiple of both parent rate and coverage amount |
|
Multiple of coverage and compensation |
Calculates rate as multiple of both coverage and compensation |
|
No standard value used |
Uses rate defined in variable rate profiles |
|
Set annual rate equal to coverage |
Uses total coverage as the annual rate amount |
|
Post enrollment calculation formula |
Calculates rate based on election information entered during enrollment using a formula you define |
|
Calculate for enrollment formula |
Calculates rate on enrollment using a formula you define |
The calculation method you select works in conjunction with other settings to compute the final rate.
For calculations using multiples, you can specify the operation, such as simple multiplication, percentage, or per hundred.
For calculations based on compensation, you can specify the compensation factor that defines the basis for the compensation calculation, such as weekly stated salary or stated annual salary.
You can specify rounding and limiters for calculated results.
If you enable participant input, you can set valid ranges, default values, and increment values, as applicable. The default values are used if you recalculate rates and no user input is available.
For a participant whose enrollment coverage date falls within the month, you can define settings for a prorated rate.
If the rate varies based on one or more factors, such as age, you can create variable rate profiles and add them to the standard rate. When you create a variable rate profile, you select one of the calculation methods and attach an eligibility profile that defines the criteria a participant must satisfy to qualify for the rate. You also select a treatment rule for the profile, which determines whether the variable rate is added to, multiplied by, subtracted from, or replaces the standard rate. You can associate multiple variable rate profiles with a single standard rate.
The calculation method and other settings defined for a rate determine when and how the rate is calculated. For example, the rate may be calculated prior to enrollment, upon enrollment, or after enrollment has been completed.
|
Inputs to Calculation |
Calculated Rate |
Calculation Details |
|---|---|---|
|
Compensation Amount: 25,000 (value derived by applying a Compensation Factor of Stated Annual Salary) Multiplier: 1 Operator: Per ten thousand |
2.5 |
(1/10,000) x 25,000 |
|
Inputs to Calculation |
Calculated Rate |
Calculation Details |
|---|---|---|
|
Coverage Amount: 200,000 Multiplier: 1 Operator: Per ten thousand |
20 |
(1/10,000) x 200,000 |
|
Inputs to Calculation |
Calculated Rate |
Calculation Details |
|---|---|---|
|
Multiplier: 0.0001 Multiple of Compensation Operator: Multiply by Compensation Amount: 25,000 (value derived by applying a Compensation Factor of Stated Annual Salary) Multiple of Coverage Operator: Per ten thousand Coverage Amount: 100,000 |
25 |
((.0001 x 25,000) / 10,000) x 100,000 |
|
Inputs to Calculation |
Calculated Rate |
Calculation Details |
|---|---|---|
|
Multiplier: 2 Parent Rate Operator: Multiply by Parent Rate: 2.5 (value derived from selected Parent Rate Name) |
5 |
2 x 2.5 |
|
Inputs to Calculation |
Calculated Rate |
Calculation Details |
|---|---|---|
|
Multiplier: 1 Coverage Operator: Per ten thousand Coverage Amount: 200,000 Parent Rate Operator: Multiply by Parent Rate: 2.5 (value derived from selected Parent Rate Name) |
50 |
((1 x 2.5) / 10,000) * 200,000 |
This example demonstrates how to create a benefit rate for an employee payroll contribution to a life insurance plan. The rate varies depending on the participant's age, so it is associated with multiple variable rate profiles.
The following table summarizes key decisions for this scenario.
|
Decision to Consider |
In this example |
|---|---|
|
Is this a standard or imputed rate? |
Standard |
|
What is the activity type for this rate? |
Employee payroll contribution |
|
Does this rate vary based on one or more factors? |
Yes |
|
What calculation method should be used for the standard rate? |
No standard values used. The calculation method for each rate is defined exclusively in the variable rate profile. |
|
What calculation method should be used for the variable rate profiles? |
Flat rate |
The following diagram shows the task to complete in this example:

Note
The process of creating variable coverages follows the same flow and involves similar tasks, including creating variable coverage profiles, creating a base coverage, and associating variable coverage profiles with the base coverage.
Age_20-29
Age_30-39
Age_40-49
Age_50-59
Age_60-69
Age_70-greater
Life_Age_20-29
Life_Age_30-39
Life_Age_40-49
Life_Age_50-59
Life_Age_60-69
Life_Age_70-greater
|
Field |
Value |
|---|---|
|
Profile Name |
Life_Age_20-29 |
|
Tax Type Rule |
After Tax |
|
Activity Type |
Employee Payroll Contribution |
|
Treatment Rule |
Replace |
|
Defined Rate Frequency |
Biweekly |
|
Eligibility Profile |
Select the eligibility profile for this age band. |
|
Status |
Active |
|
Calculation Method |
Flat Amount |
|
Value |
4.00 |
|
Field |
Value |
|---|---|
|
Profile Name |
Life_Age_30-39 |
|
Value |
6.00 |
|
Field |
Value |
|---|---|
|
Profile Name |
Life_Age_40-49 |
|
Value |
8.00 |
|
Field |
Value |
|---|---|
|
Profile Name |
Life_Age_50-59 |
|
Value |
10.00 |
|
Field |
Value |
|---|---|
|
Profile Name |
Life_Age_60-69 |
|
Value |
15.00 |
|
Field |
Value |
|---|---|
|
Profile Name |
Life_Age_70-greater |
|
Value |
22.00 |
|
Field |
Value |
|---|---|
|
Rate Name |
Life Rate |
|
Legal Employer |
Select your legal employer. |
|
Plan |
Select the life insurance plan you created for this rate |
|
Activity Type |
Employee payroll contribution |
|
Tax Type Code |
After Tax |
|
Payroll Element |
Select the payroll element associated with this rate |
|
Element Input Value |
Select the input value for this rate |
|
Calculation Method |
No standard values used |
Imputed income refers to certain forms of indirect compensation that US Internal Revenue Service Section 79 defines as fringe benefits and taxes the recipient accordingly. Examples include employer payment of group term life insurance premiums over a certain monetary amount, personal use of a company car, and other non-cash awards.
If a plan is subject to imputed income, you must create an imputed rate, in addition to the standard rates for the plan. You must also create a shell plan to record the imputed income calculation. You typically associate variable rate profiles with the imputed rate, because imputed income taxes vary based on a person's age.
The following figure illustrates the general steps involved in creating imputed rates:
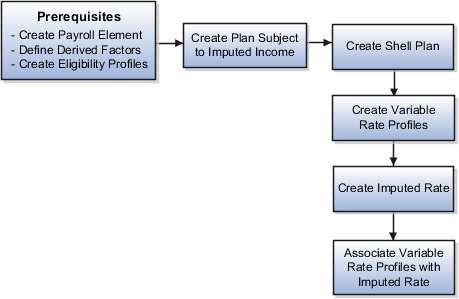
Perform the following tasks before you create an imputed rate.
Define the payroll element for the rate.
Define derived factors for each age band (or any other factors) for which the rate varies, such as ages 20-25, 26-30, and so on.
Define an eligibility profile for each age band and attach the appropriate derived factors.
Define any other objects required by the specific rate, such as formulas.
Create the plan that is subject to imputed income. Set the Subject To Imputed Income field to the appropriate person type for this rate, such as participant, spouse, or dependent.
Create another plan to hold the results of the imputed income calculation, using the following settings:
Set the plan type to Imputed Shell.
Set the plan function to Imputed Shell.
Set the imputed income calculation to the person type (participant, spouse, or dependent) that is subject to imputed income.
Note
The imputed income calculation assumes that the employer pays 100% of the benefit, and does not subtract employee contributions from the calculation.
Create variable rate profiles for each variable rate, using the following settings:
Set the activity type to Imputed Benefit.
Select the appropriate eligibility profile for the age band.
Set the calculation method to Flat Amount.
Enter the rate amount.
Provide additional information as applicable for the rate.
From the Standard Rates tab, click the Create menu and then click Create Imputed Rate. In the Imputed Shell Plan field, select the shell plan you created earlier. Provide additional rate information as applicable.
Select and add the variable rate profiles to the imputed rate.
Elements are components in the calculation of employee pay. An element can contain multiple input values, which you define when you create the element. These items of information are called input values because they are the inputs to calculations performed by the payroll application. Input values hold information for calculating the element's run result. An input value can hold units of one type, such as money or hours.
When you create a benefit rate, you select the Element Input Value to which the rate corresponds. That way, when the application calculates the rate for a person and benefits offering, the result can be captured and transferred to payroll.
If you are defining a rate for an absence plan and you need to associate more than one input value with the rate, select the Extra Input Formula that calculates the values to be returned to the other input values. Use the Extra Inputs tab to associate the formula results with the appropriate input values.
The partial month determination rule calculates the contribution or distribution amount when a participant's enrollment coverage date falls within a month. You can choose from the following options:
All
None
Prorate value
Formula
Wash formula
The amount is calculated as if the participant was enrolled for the entire month.
The amount is calculated as if the participant was not enrolled at all for the entire month.
The standard contribution/distribution is prorated based on the percentage of the month the participant was enrolled. If you choose this option, click Add in the Proration Details region to define proration details, including:
Percentage
Rounding rule or formula for rounding the calculated prorate value
Prorate period
Which months the proration details apply to (months with 28 days, 29 days, and so on)
Proration formula, if applicable
Start and stop coverage rule, if applicable
You can define more than one set of proration details if, for example, the details differ depending on the number of days in a month.
A formula is used to calculate the rate. If you choose this option, select the formula to use. You must have already defined the formula before you can select it here.
A wash formula is applied to the rate to determine whether or not participants receive a contribution or distribution. If you choose this option, enter the day of the month (1-31) to be used as the wash rule day. Participants do not receive a contribution or distribution if their start date occurs after the wash rule day or their end date occurs before the wash rule day.
In the Value Passed to Payroll field on the Create or Edit Rates page, select the amount that you want to pass to a participant's payroll element entry on enrollment. Your choices are:
The amount that the participant is told to expect for their contribution or distribution.
The amount that is defined for the rate, which may be different than the amount communicated to the participant.
An estimate based on a fixed number of pay periods. For example, a biweekly payroll might occasionally have 25 or 27 pay periods in a calendar year, depending on the setup. Likewise, a weekly payroll might have 51 or 53 periods. When you select this option, the calculation uses the usual number of pay periods, which would be 26 for biweekly or 52 for weekly.
The actual per-pay-period amount based on defined calculations. If you do not select a value, the calculation uses the per-pay-period amount. You can prorate only per-pay-period amounts.
The defined amount annualized.
Note
When using a formula to define rate periods, select Annual amount, Defined amount, or Communicated amount.
You can generate the integrated Microsoft Excel workbook in which you download standard benefit rates that match your search criteria. Use the integrated workbook to edit those rates, for example, to reflect annual changes in contribution. Then, upload your changes into the application database. Repeat these steps as many times as required to accommodate revisions.
The workbook enables you to edit existing rates, not add new ones.
The basic process for editing benefit rates using the workbook is:
Generate and populate the workbook.
Edit workbook search results.
Upload edits.
Resolve errors.
On the Manage Benefit Rates page Standard Rates tab, click Edit Rates in Workbook to generate the workbook. In the search section at the top of the workbook, you must select a calculation formula. This acts as a filter for the records that the application adds as rows in the Search Results section after you click Search. You can also use the Rate Display Type, Effective As-of Date, and Status Rule fields to further filter your search result records.
Currently, the application is limited to a maximum of 500 rows when it generates the workbook, to manage application performance.
After the download is complete, edit data only in the search results cells with a white background. Edits in search results cells with a nonwhite background are not uploaded or could cause upload errors. The workbook uses the Changed cell to automatically identify the rows that you edit.
Edit the following objects in the Plan Configuration work area, rather than in the workbook: variable rate profiles, variable rules, extra inputs, partial month determination, and annual rates.
After you complete your edits, click Upload. Only those rows marked as changed are uploaded into the application database. During the upload, for records marked as changed:
For records marked as changed, the workbook upload:
End dates the original benefit rate record by setting the effective end date to the day before the effective as-of date that you used as part of your download filter.
Adds a new benefit rate record with your edits. The effective start date is the same as your effective as-of date and the effective end date is the original effective end date.
Changed rows are moved to the bottom of the workbook.
The application automatically updates the Status cell in each row of the workbook. If there are errors that require review, the upload rolls back the change in the application database and sets the row status in the workbook to Upload Failed. Then, it continues to the next row in the workbook. Double-click Update Failed in the Status cell to view the error. Fix any data issues in the workbook and upload the new changes.
To validate the changes, return to the Manage Benefit Rates page, Standard Rates tab and search for the changed rate.
Coverages define the level of benefits coverage a participant receives under plans such as life insurance. Coverages are calculated by applying a calculation method, also called a determination rule, to values you define or ones that are entered by the participant during enrollment. You can also define limiters and rounding rules to apply to the initial calculation to derive the final coverage.
The following determination rules are available for computing coverages:
|
Calculation Method |
Description |
|---|---|
|
Flat amount |
Flat amount is predefined or entered during enrollment. |
|
Flat range |
Flat amount must be within a predefined range. |
|
Flat amount plus multiple of compensation |
Calculates coverage as flat amount plus multiple of compensation |
|
Flat amount plus multiple of compensation range |
Calculates coverage as flat amount plus multiple of compensation within a predefined range |
|
Multiple of compensation |
Calculates coverage as multiple of compensation |
|
Multiple of compensation plus flat range |
Calculates coverage as multiple of compensation plus flat amount that is within a predefined range |
|
Multiple of compensation range |
Multiple of compensation must be within a predefined range. |
|
No standard value used |
Uses coverage defined in variable coverage profiles |
|
Same as annualized elected activity rate |
Uses annualized elected activity rate for coverage amount |
|
Post enrollment calculation formula |
Calculates coverage based on election information entered during enrollment using a formula you define |
The calculation method you select works in conjunction with other settings to compute the final coverage.
For calculation methods using multiples, you can specify the operation, such as simple multiplication, percentage, per hundred, and per thousand.
For calculations based on compensation, you can specify the compensation derived factor that defines the basis for the compensation calculation.
You can specify rounding and limiters for calculated results.
If you enable participant input, you can set valid ranges and default values. The default values are used if you recalculate coverages and no user input is available.
If coverage varies based on one or more factors, such as age, you can create variable coverage profiles and add them to the base coverage. When you create a variable coverage profile, you select one of the calculation methods and attach an eligibility profile that defines the criteria a participant must satisfy in order to qualify for the coverage. You also select a treatment rule that determines whether the variable coverage amount is added to, multiplied by, subtracted from, or replaces the base coverage. You can associate multiple variable coverage profiles with a base coverage.
The calculation method and other settings defined for a coverage determine when and how it is calculated. For example, the coverage may be calculated prior to enrollment, upon enrollment, or after enrollment has been completed.
|
Inputs to Calculation |
Calculated Rate |
Calculation Details |
|---|---|---|
|
Multiplier: 2 Operator: Multiply by Compensation Amount: 25,000 (value derived by applying a Compensation Factor of Annual Salary) |
50,000 |
2 x 25,000 |
|
Inputs to Calculation |
Calculated Coverage |
Calculation Details |
|---|---|---|
|
Minimum: 2 Maximum: 6 Increment Amount: 2 Default Value: 4 Operator: Multiply by Compensation Amount: 25,000 (value derived by applying a Compensation Factor of Annual Salary) |
100,000 (using default) |
4 x 25,000 |
|
Inputs to Calculation |
Calculated Coverage |
Calculation Details |
|---|---|---|
|
Flat Amount: 50,000 Multiplier: 2 Operator: Multiply by Compensation Amount: 25,000 (value derived by applying a Compensation Factor of Annual Salary) |
100,000 |
50,000 + (2 x 25,000) |
|
Inputs to Calculation |
Calculated Coverage |
Calculation Details |
|---|---|---|
|
Flat Amount: 50,000 Minimum: 2 Maximum: 6 Increment Amount: 2 Default Value: 4 Operator: Multiply by Compensation Amount: 25,000 (value derived by applying a Compensation Factor of Annual Salary) |
150,000 (using default) |
50,000 + (4 x 25,000) |
|
Inputs to Calculation |
Calculated Coverage |
Calculation Details |
|---|---|---|
|
Minimum: 30,000 Maximum: 50,000 Default Value: 40,000 Increment Amount: 10,000 Multiplier: 2 Operator: Multiply by Compensation Amount: 50,000 (value derived by applying a Compensation Factor of Annual Salary) |
140,000 (using default) |
40,000 + (2 x 50,000) |
Some benefit programs restrict the amount of coverage that a participant can elect across plan types. The following scenario illustrates how to define the maximum coverage amount across two life insurance plan types.
Suppose your organization has a program with two plan types: group term life insurance and non-group term life insurance. Within the group plan type, you offer an employee group term life insurance plan, which provides coverage equal to two times earnings up to a maximum of $200,000. Within the non-group plan type, you offer a plan that has a maximum coverage level of $120,000. You want to set a maximum coverage of $300,000 across the two plans.
To accomplish this, create a coverage across plan type record for the program and set the maximum amount to $300,000. Optionally, you can set a minimum coverage amount.
Note
The across plan type maximum coverage cannot be less than the lowest maximum coverage of any plan in the plan type. Thus, the across plan type maximum in this example cannot be less than $120,000.
Limiters establish the minimum and maximum variable rate or coverage amount before it is added to, subtracted from, or multiplied by the standard rate or coverage. Ultimate limiters establish the minimum and maximum variable rate or coverage amount after it added to, subtracted from, or multiplied by the standard rate amount. For example, the ultimate high limit value sets the absolute maximum rate amount when the Add to treatment rule is selected, whereby the variable rate calculated result is added to the standard rate calculation.
Yes. You can generate the integrated Microsoft Excel workbook in which you download standard benefit rates that match your search criteria. Use the integrated workbook to edit those rates, for example, to reflect annual changes in contribution. Then, upload your changes back into the application database. To generate the workbook, on the Manage Benefit Rates page Standard Rates tab, click Edit Rates in Workbook.
The workbook enables you to edit existing rates, not add new ones.
Follow these two steps:
On the enrollment step in the program configuration process, select the program level row of the hierarchy. On the General tab, enter a percentage in the Spouse Insurance Coverage Maximum field and the Dependents Insurance Coverage Maximum field.
Select the appropriate insurance plan type row in the program hierarchy on the enrollment step, and scroll to the plan type further details below. In the enrollment section of the General tab, select the Subject to dependent's insurance coverage maximum percentage option and the Subject to spouse's insurance coverage maximum percentage option.
You can configure how plans are grouped and displayed on each step in the self-service guided enrollment process and on each administrator enrollment tab
This topic discusses the following decision points:
Grouping plans for enrollment
Configuring enrollment display
Configuring rate display
Group plan types into display categories in the Manage Plan Types task. For each plan type:
Specify a category for displaying plans in self-service enrollment steps.
Specify a category for displaying plans in administrative enrollment tabs.
You can group plan types together for display by assigning the same display category to multiple plan types. For example, you could group several different life insurance plan types together into a single Life Insurance display category. For a single plan type, you can choose a different category for self-service display compared to the administrative display.
When you create new plans, you assign each to a plan type. Each plan inherits the enrollment display category of its assigned plan type.
Use the Manage Plan Grouping page to configure the visibility and display names of plan type enrollment categories for:
Steps in the self-service enrollment guided process
You can change the names of the plan type category groupings, which correspond to self-service enrollment step names, and you can control whether each step is visible. You can also enter a description of the plan grouping to associate with the selected enrollment display name. Participants see this description during self-service enrollment.
Tabs for administrator usage
You can change the names of the plan type groupings, which correspond to tabs in the Benefits Service Center enrollment tasks. You can also specify whether to display each tab.
You can modify only the name and visibility of plan groupings, but you cannot create new groupings on this page. If you decide not to display a plan grouping for self-service enrollment, the benefits administrator can still enroll a participant in that plan grouping if it is displayed for administrator usage.
Click the button for the plan in the Rate Column Display column to configure the name and visibility of rate columns on each step in the self-service enrollment guided process.
You can specify which columns to display on each plan grouping step in the enrollment process. However, the Primary Rate column cannot be hidden.
For example, you can display rate column 2 on the medical step, but not on the dental step.
You can name the displayed rate columns differently on different enrollment steps.
For example, you can name the first two rate columns Employee Cost and Employer Cost on the medical enrollment step, and name them Pretax and After-Tax on the insurance enrollment step.
It is important to understand that the taxation is not affected by the column name that you enter.
A note is a record attached to a business object that is used to capture nonstandard information received while conducting business. When setting up notes for your application, you should consider the following points:
Note Types
Note Type Mappings
Note types are assigned to notes at creation to categorize them for future reference. During setup you can add new note types, and you can restrict them by business object type through the process of note type mapping.
After note types are added, you must map them to the business objects applicable to your product area. Select a business object other than Default Note Types. You will see the note types only applicable to that object. If the list is empty, note type mapping doesn't exist for that object, and default note types will be used. Select Default Note Types to view the default note types in the system. Modifying default note types will affect all business objects without a note type mapping. For example, you have decided to add a new note type of Analysis for your product area of Sales-Opportunity Management. Use the note type mapping functionality to map Analysis to the Opportunity business object. This will result in the Analysis note type being an available option when you are creating or editing a note for an opportunity. When deciding which note types to map to the business objects in your area, consider the same issues you considered when deciding to add new note types. Decide how you would like users to be able to search for, filter, and report on those notes.
Note
Extensibility features are available on the Note object. For more information refer to the article Extending CRM Applications: how it works.
A benefits space is a forum in which participants can share their benefits-related questions, concerns, and experiences. It can be helpful to participants as they select benefits offerings and providers. If you enable benefits spaces, a link appears on the benefits overview page. Before enabling this feature, carefully consider the terms and agreement for participation in the space and any issues of liability on the part of your organization.
Set the Social Networking Features Enabled profile option to "Y" on the Manage Social Networking Profile Option Values page. If you enable this profile option, users can access the following features:
Kudos
Message board
Activity stream
Connections
Personal status
Note
If you disable social networking features, users can continue to access the bookmarks they created from the Bookmarks region in the Activities and Interests card on the My Portrait tab. Also, the spaces that users are a member of continue to appear in the Spaces region.