JavaScript is required to for searching.
Skip Navigation Links
Exit Print View
Sun Blade X4-2B Installation Guide
Oracle Technology Network
Library
PDF
Print View
Feedback
search filter icon
search icon

Document Information

Using This Documentation

Product Description

Installing the Server Module

Configuring Preinstalled Oracle Solaris OS

Configuring Preinstalled Oracle VM Software

Preinstalled Oracle VM Image BIOS Boot Mode Restriction

Oracle VM Server Configuration Worksheet

Related Information

Configure Preinstalled Oracle VM Server

Updating Oracle VM Software

Getting Started With Oracle VM

Related Information

Configuring Preinstalled Oracle Linux OS

Getting Server Firmware and Software Updates

Controlling System Power

Troubleshooting Installation Issues

Index

Configure Preinstalled Oracle VM Server

These instructions describe how to configure only the preinstalled Oracle VM Server on your server module. Oracle VM also has other components, such as Oracle VM Manager, that must be installed or already up and running to support the virtual machine environment.

Before You Begin

Gather the necessary organizational and network environment information needed to configure the software. See Oracle VM Server Configuration Worksheet.

  1. Log in to the server module's Oracle ILOM.

    Skip this step if you are already logged in to the server module's Oracle ILOM.

    Choose one of the following methods:

  2. Start the host console.

    Chooseone of the following methods:

    • Oracle ILOM web interface:
      1. Click Remote Control > Launch Remote Console.
      2. Wait while the server boots, and the GRUB menu appears.
    • Oracle ILOM CLI:
      1. Type: -> start /HOST/console
      2. When prompted, type y to confirm:
        Are you sure you want to start /HOST/console (y/n)? y
        Serial console started.
      3. Wait while the server boots, and the GRUB menu appears.
      4. Press the up or down arrow to pause at this menu.

        Note - If you do not press a key within five seconds, the default selection (serial port) is used.

      See Accessing Oracle ILOM for more information about connecting to the Oracle ILOM console web interface.

    For more information about connecting to Oracle ILOM console CLI, see Set Up Server Module Using Local Serial Connection.

  3. Power on or restart the server:

    Choose one of the following methods:

    • Power on the server:
      • Oracle ILOM web interface:
        1. Click Host Management > Power Control.
        2. Click Power On from the menu.
      • Oracle ILOM CLI:
        1. Type:-> start /System
        2. When prompted, type y to confirm:
          Are you sure you want to start /SYS (y/n)? y
          
          Starting /System
    • Restart the server:
      • Oracle ILOM web interface:
        1. Click Host Management > Power Control,
        2. Click Reset from the menu.
      • Oracle ILOM CLI:
        1. Type -> reset /System.
        2. When prompted, type y to confirm:
          Are you sure you want to reset /System (y/n)? y
          
          Performing hard reset on /System

    The server module begins the host boot process. The server boots. The GRUB menu appears.
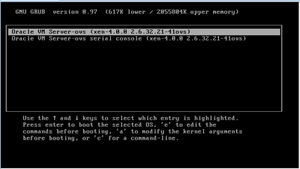

    image:Graphic showing Oracle VM GRUB menu.
  4. To pause at the GRUB menu, press any key, other than Enter, within five seconds.

    Note - If you do not press a key within five seconds, the GRUB menu disappears from the screen and the display is directed to the serial port by default.
  5. From the GRUB menu, use the up and down arrow keys to select a display option, and press Enter.

    Choose one of the following options.

    • To display output to the video port, select the first option on the list and press Enter:
      Oracle VM Server - ovs (xen-4.0.0 2.6.32.32-41ovs)
    • To display output to the serial port, select the second option on the list and press Enter:
      Oracle VM Server - ovs serial console (xen-4.0.0
      2.6.32.21-41ovs)

      Note - If you choose to display output to the video port, you must connect a VGA display and input device (USB keyboard and mouse) to a multi-port cable attached to the server module's UCP port. See 4. Access Server Module Management Tools for information about attaching devices to the server.
  6. Follow the Oracle VM installer onscreen prompts to configure the software using the organization and network information you collected earlier.
  7. When installation is complete, end your console session using one of the following methods:
    • Oracle ILOM web interface: Close the Remote Console window, and then log out of Oracle ILOM.
    • Oracle ILOM CLI: Press Esc followed by the ( character (Shift+9) to terminate the serial redirect session, and then log out of Oracle ILOM.
  8. Update your Oracle VM software, if necessary.

    See Updating Oracle VM Software.

Related Information