2 Getting Started with Oracle Access Management Administration and Navigation
This chapter describes the initial steps needed to log in and navigate around the Oracle Access Management Console.
This chapter contains the following sections:
-
Logging In to and Signing Out of Oracle Access Management Console
-
Introduction to the Oracle Access Management Console and Controls
-
Introduction to System Configuration and Policy Configuration Tabs
2.1 Prerequisites
All tasks in this book presume that you have Oracle Access Management 11.1.2 deployed as described in the Oracle Fusion Middleware Installation Guide for Oracle Identity and Access Management.
Before you begin tasks in this book, be sure to review information in this chapter:
-
Learn about "Starting and Stopping Servers in Your Deployment".
-
Learn about the Oracle Access Management Console as described in "Introduction to the Oracle Access Management Console and Controls".
-
Verify the administrative LDAP group defined in the primary user identity store.
2.2 Starting and Stopping Servers in Your Deployment
Oracle Access Management Administrators can access the Oracle Access Management Console, which is deployed on the WebLogic Administration Server (AdminServer), only when the WebLogic Administration Server is running. If the Oracle Access Management Console is protected by a Webgate, the OAM Server must also be running. Node Manager must also be running.
For more information, see:
2.2.1 Starting Node Manager
Node Manager must be running before you can start and stop the WebLogic administration server (AdminServer), or WebLogic managed servers hosting OAM Servers.
After installing and configuring Oracle Identity Manager, you must configure Node Manager to use it with the WebLogic Administration Console (AdminServer) or Oracle Enterprise Manager Fusion Middleware Control. This configuration is done only once, as described in "Configuring the Node Manager" in Oracle Fusion Middleware Administrator's Guide for Oracle Identity Manager.
Ensure that the Node Manager is running by running the following script. Oracle WebLogic Administration Server does not do this automatically.
$WLS_HOME/server/bin/startNodeManager.sh
See Also:
Oracle WebLogic Server Administrator Guide for detailed information.-
Navigate to your $WLS_HOME/server/bin.
-
Enable Start Scripts: Run
setNMPropsto start the stack and instruct Node Manager to enable the use of start scripts (StartScriptEnabled=true):./setNMProps.sh
-
Start Node Manager:
./startNodeManager.sh
2.2.2 Starting and Stopping AdminServer
Starting the AdminServer the first time can take an unusually long time: 12-15 minutes, for example. This process must not be interrupted or terminated. Otherwise, policy data might be corrupted.
The following procedure describes starting and stopping the WebLogic AdminServer using the scripts located in your $DOMAIN_HOME/bin:
-
Unix:
startWebLogic.shorstopWebLogic.sh -
Windows:
startWebLogic.cmdorstopWebLogic.cmd
WARNING:
If the startWebLogic.cmd (Windows; or startWebLogic.sh command on Linux) is stopped for any reason (whether accidently or a system crash or a reboot, for example), policy data might be corrupted. This would require removal and recreation of the domain and rerunning the RCU to create the OAM schema.
-
Navigate to your
$DOMAIN_HOME/bin. -
Start AdminServer:
-
Unix:
./startWebLogic.sh -
Windows:
run startWebLogic.cmd
-
-
Stop AdminServer:
-
Unix:
./stopWebLogic.sh -
Windows:
run stopWebLogic.cmd
-
2.2.3 Starting and Stopping OAM Servers
You can perform all start and stop operations for managed WebLogic Servers hosting Oracle Access Management Servers (OAM Servers) from either a command prompt or the Oracle WebLogic Server Administration Console or the Oracle Enterprise Manager Fusion Middleware Control.
The following procedure describes starting and stopping the OAM Server using the scripts located in $DOMAIN_HOME/bin (.sh scripts for Unix systems; .cmd scripts for Windows Systems):
-
Unix:
startManagedWebLogic.shorstopManagedWebLogic.sh -
Windows:
startManagedWebLogic.cmdorstopManagedWebLogic.cmd
Both the Managed Server name and the AdminServer URL are required for these operations. For example, if the managed server is named oam_server1 and the AdminServer URL is http://examplewlsadminhost.example.com:7001, the start and stop commands run on a Unix system would look like these:
startManagedWebLogic.sh oam_server1 http://examplewlsadminhost.example.com:7001

stopManagedWebLogic.sh oam_server1 http://examplewlsadminhost.example.com:7001
-
Navigate to
$DOMAIN_HOME/bin. -
Start OAM Server:
-
Unix: ./
startManagedWebLogic.shMANAGED_SERVER_NAMEADMIN_SERVER_URL -
Windows: run
startManagedWebLogic.cmdMANAGED_SERVER_NAMEADMIN_SERVER_URL
-
-
Stop OAM Server:
-
Unix: ./
stopManagedWebLogic.shMANAGED_SERVER_NAMEADMIN_SERVER_URL -
Windows: run stopManagedWebLogic.cmd
MANAGED_SERVER_NAMEADMIN_SERVER_URL
-
2.3 Introduction to Oracle Access Management Administrators
A single default LDAP group, the WebLogic Server Administrators group, is set in the Default User Identity Store (Embedded LDAP). During initial deployment, using the Oracle Fusion Middleware Configuration Wizard, the Administrator userID and password are set. These credentials grant access to:
-
Oracle Access Management Console to register and manage system configurations, security elements, and policies.
-
WebLogic Server Administration Console to view the Summary of Server Configuration (Cluster, Machine, State, Health, and Listening Port) of deployed OAM Servers within the WebLogic Server domain, and also to Start, Resume, Suspend, Shutdown, or Restart SSL on these servers.
For details about the WebLogic Server Administration Console, see Oracle Fusion Middleware Administrator's Guide.
-
Custom Administrative command-line tools (WebLogic Scripting Tool, also known as WLST) provide an alternative to the Oracle Access Management Console for a specific set of functions
-
Remote registration tool for registering and updating agents, Application Domains, and policies
Table 2-1 describes the Administrator Role that is recognized by Oracle Access Management and WebLogic, and the default LDAP group to which the Role is mapped in the common Default System User Identity Store.
Table 2-1 Role Mapping from an LDAP Group to Administrator
| Administrator Role | Description and LDAP Group |
|---|---|
|
Administrator's Role |
The LDAP group defined within the user identity store designated as the System Store grants users full system and policy configuration privileges. Default Group = Administrators Note: Specifying a different LDAP group prohibits WebLogic Administrators from logging in to Oracle Access Management Console or from using administrative command-line tools. Unless explicitly stated, the term Administrator in this guide refers to the Oracle Access Management Administrator. |
Initially, administrative users must log in to the Oracle Access Management Console using the WebLogic Administrator credentials set during initial configuration. However, your enterprise might require independent sets of Administrators: one set of users responsible for Oracle Access Management administration and a different set for WebLogic administration. For more information, see "Managing the Administrators Role".
Note:
Concurrent configuration updates are not supported. Only one Administrator should be allowed to modify the system configuration at any given time. Administrators performing updates concurrently will result in an inconsistent state within the system configuration of the Oracle Access Management Console.2.4 Logging In to and Signing Out of Oracle Access Management Console
The Oracle Access Management Console provides administrative access to Oracle Access Management services and configuration. This section describes how to log in to and sign out of the Oracle Access Management Console.
Note:
If you have Oracle Identity Navigator installed to access multiple consoles from one URL, see the Oracle Fusion Middleware Administrator's Guide for Oracle Identity Navigator.This section provides the following topics:
2.4.1 Logging In to the Oracle Access Management Console
When accessing the Oracle Access Management Console, the WebLogic Server (AdminServer) host and port must be specified. In the sample URL https://examplewlsadminhost.example.com:7001/oamconsole:
-
HTTPS represents the Hypertext Transfer Protocol (HTTP) with the Secure Socket Layer (SSL) enabled to encrypt and decrypt user page requests and the pages returned by the Web server
-
examplewlsadminhost.example.com refers to fully-qualified domain name of the computer hosting the Oracle Access Management Console
-
7001 refers to the designated bind port for the Oracle Access Management Console, which is the same as the bind port used for AdminServer (the WebLogic Server Administration Console)
-
/oamconsole/refers to the Oracle Access Management Console Log In page
Note:
If you specify and OAM Server host and port (as you would to access the ODSM console), the AdminServer redirects to the managed server which produces a 404 Not Found error.The Oracle Access Management Console log in page is shown in Figure 2-1.
Figure 2-1 Default Oracle Access Management Console Log In Page
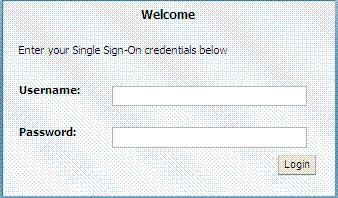
Description of "Figure 2-1 Default Oracle Access Management Console Log In Page"
Note:
Ensure that you use the correct administrative credential for log in. Initially, the LDAP group for the Oracle Access Management Console Administrator is the same as the LDAP group defined for the WebLogic Server Administration Console (Administrators) and the common Default System User Identity Store store is the WebLogic Embedded LDAP.To log in to Oracle Access Management Console
-
In a browser window, enter the URL to the Oracle Access Management Console using the appropriate protocol (HTTP or HTTPS). For example:
https://hostname:port/oamconsole/In the sample URL shown here:
-
HTTPS represents the Hypertext Transfer Protocol (HTTP) with the Secure Socket Layer (SSL) enabled to encrypt and decrypt user page requests and the pages returned by the Web server
-
hostname refers to fully-qualified domain name of the computer hosting the Oracle Access Management Console (AdminServer)
-
port refers to the designated bind port for the Oracle Access Management Console, which is the same as the bind port for the AdminServer
-
/oamconsole/refers to the Oracle Access Management Console Log In page
-
-
On the Log In page, enter the Oracle Access Management Console Administrator credentials. For example:
Username: Admin_login_id
Password: Admin_password
Language: English (see "Choosing a Language for Oracle Access Management Login")
-
Click the Log In button or press the Enter key.
-
Proceed as follows:
-
Successful: Policy Configuration and System Configuration tabs appear on the left; Welcome page is on the right. Tour the console, as described in "Introduction to System Configuration and Policy Configuration Tabs" or start performing tasks on your own.
-
Not Successful: See "Administrator Lockout".
-
2.4.2 Signing Out of Oracle Access Management Console
The Sign Out link appears in the upper-right corner of the Oracle Access Management Console, as shown in Figure 2-2. You select the Sign Out link to conclude your session. Oracle recommends that you also close the browser window after signing out.
Figure 2-2 Sign Out Link, Oracle Access Management Console

Description of "Figure 2-2 Sign Out Link, Oracle Access Management Console"
To sign out of Oracle Access Management Console
-
Click the Sign Out link in the upper-right corner of the console.
-
Close your browser window.
2.5 Choosing a Language for Oracle Access Management Login
Oracle Access Management 11.1.2.1 supports language selection through a drop down list of languages on the login form combined with use of the OAM_LANG_PREF language preference cookie. Table 2-2 lists the supported languages and applicable language codes.
Table 2-2 Language Codes For Login Pages
| Language Code | Language | Administrators |
|---|---|---|
|
ar |
Arabic |
|
|
cs |
Czech |
|
|
da |
Danish |
|
|
de |
German |
German |
|
el |
Greek |
|
|
en |
English |
English |
|
es |
Spanish |
Spanish |
|
fi |
Finnish |
|
|
fr |
French |
French |
|
fr-CA |
Canadian French |
Canadian French |
|
he |
Hebrew |
|
|
hr |
Croatian |
|
|
hu |
Hungarian |
|
|
it |
Italian |
Italian |
|
ja |
Japanese |
Japanese |
|
ko |
Korean |
Korean |
|
nl |
Dutch |
|
|
no |
Norwegian |
|
|
pl |
Polish |
|
|
pt-BR |
Brazilian Portuguese |
Brazilian Portuguese |
|
pt |
Portuguese |
|
|
ro |
Romanian |
|
|
ru |
Russian |
|
|
sk |
Slovak |
|
|
sv |
Swedish |
|
|
th |
Thai |
|
|
tr |
Turkish |
|
|
zh-CN |
Simplified Chinese |
Simplified Chinese |
|
zh-TW |
Traditional Chinese |
Traditional Chinese |
To accomplish a very specific login experience, implement a custom login page using the customization facilities in Oracle Access Management as described in Oracle Fusion Middleware Developer's Guide for Oracle Access Management.
Note:
Prior to the release of 11.1.2.1, Oracle Access Manager relied on the Browser Language preference (Accept-Language HTTP Header) to determine the language in which the login page was rendered. The default, if the language could not determined, was English (en-us). This behavior is supported going forward until existing applications have migrated to the 11.1.2.1 model.This section provides the following topics:
2.5.1 Selecting A Language for Oracle Access Management Login
Oracle Access Management provides the language selection methods described in Table 2-3. The order of these items in the table illustrate the preference order. The preference order can be configured in the Oracle Access Management Console.
Table 2-3 Oracle Access Management Language Selection Methods
| Method | Description |
|---|---|
|
Server Override |
Allows the OAM Server to determine the language. It is intended to support scenarios where the User Agent cannot reliably indicate its language preference(s) or where the administrator needs to override other selection mechanisms for operational reasons. |
|
Preference Cookie |
A domain cookie (similar to ORA_FUSION_PREFS) that contains the user's language preferences. It is intended to allow lang preferences maintained by an application(s) personalization facilities to be used. Note: Multiple DNS domain support for the Preference Cookie is a limitation today. The solution will include Resource Webgates using the OAM Front-Channel protocol in combination with local resource cookie enhancements to manage preference cookie semantics across DNS domains. |
|
Browser Language |
Allows User Agents (Browsers, REST Clients, HTTP Clients) to specify the user's language preference via an HTTP Accept-Language header. |
|
Default Language |
Used if Oracle Access Management cannot determine the user's language preference based on the specified selection mechanisms. |
Language preferences are disabled until explicitly enabled. By default, the login form does not include the list of language values until the application locales are specified.
Note:
Language Selection is only available in the ECC login page; it is not currently available in the DCC login page.2.5.2 Understanding the Language Preference Cookie
The language preference cookie, OAM_LANG_PREF is a domain scoped cookie as described in Table 2-4.
Table 2-4 OAM_LANG_PREF Cookie
| Parameters | Description |
|---|---|
|
Name |
OAM_LANG_PREF |
|
Domain |
Domain-scoped cookie |
|
Path |
/ |
|
Value |
[Cookie version] [separator] [UTF-8 BASE64(name-value pairs)] For example: v1.0~kqhkiG9w0BAQQFADCB0TELM |
|
ExpirationTime |
Persistent | Session (default) – Specified in OAM configuration |
|
Secure Flag |
No |
|
preferredLanguage |
BCP47/RFC4647. Specifically, the value space should conform to what is formally called the "language priority list". |
|
defaultLanguageMarker |
true (reconcile cookie with application maintained preferences) |false (read from cookie). |
|
Cookie Lifecycle |
Oracle Access Management and other applications can perform create, read, update, and delete operations. |
2.5.3 Propagating Language Preference and Application Integration
Oracle Access Management will propagate the language selected by the user to applications as described in Table 2-5.
Table 2-5 Application Integration for Language Preference
| Method | Description |
|---|---|
|
HTTP Accept-Language Header |
This enables application to integration without code change. This is a major advantage over the other options. We can expect this to be good for most applications that respond to the browser locale setting. This is the standard practice in internationalizing a Web application. We expect this to be able to become the standard option for all ADF based products, as well as any application that responds to browser locale. Note: OAM Agents ensure that the Accept-Language reflects the language selected. Also, ServletFilters could be used to make this happen. |
|
Access Manager Policy Response |
Access Manager stores the language selection in the attribute langPref in the session namespace. For instance: This attribute can be passed to downstream applications using an HTTP Header and/or Cookie through the Access Manager Policy Response. The name of the Header and/or Cookie is a deployment time assignment. |
|
Preference Cookie |
When the language selected during login differs from the value stored in the Preference Cookie, Oracle Access Management will update the " |
|
IdentityContext |
The language preference can be propagated as a custom claim in the IdentityContext. Select "oracle:idm:claims:session:attributes" as the claim name and then specify the session attribute using the following notation: " The claim will be created with the name of " |
2.5.4 Configuring Your Language Preference
Use the configOAMLoginPagePref WebLogic Scripting Tool command to configure the login page language preferences. Information regarding this WLSTcommand can be found in the Oracle Fusion Middleware WebLogic Scripting Tool Command Reference.
2.6 Introduction to the Oracle Access Management Console and Controls
The Oracle Access Management Console is a Web-based program that provides function-level tabs and controls, as well as page-level tabs and controls. This section introduces the Oracle Access Management Console.
The Oracle Access Management Console provides the system and policy configuration management functions required by Oracle Access Management Administrators. You can enter the URL to the Oracle Access Management Console in a browser window:
https://example:port/oamconsole
In the sample URL, hostname refers to computer that hosts the Oracle Access Management Console; port refers to the HTTP port number on which the console host listens; /oamconsole refers to the Log In page.
Note:
Concurrent configuration updates are not supported. Only one Administrator should be allowed to modify the system configuration at any given time. Administrators performing updates concurrently will result in an inconsistent state within the system configuration of the Oracle Access Management Console.This section provides a quick introduction to orient you to the Oracle Access Management Console.
2.6.1 Console Layout and Controls
Figure 2-3 provides a look at the Oracle Access Management Console as it appears immediately after log in.
Figure 2-3 Oracle Access Management Console Welcome Page
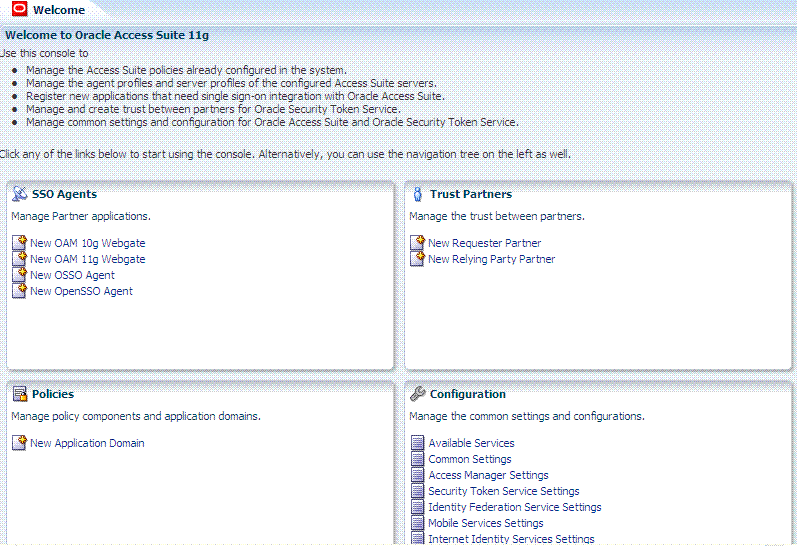
Description of "Figure 2-3 Oracle Access Management Console Welcome Page"
The Oracle Access Management Console provides named function tabs on the left above the search controls and a menu and tool bar above the navigation tree. Open pages appear on the right. Currently the Welcome page is open.
Following topics provide more information:
See Also:
"Selecting Controls in the Console"2.6.1.1 Welcome Page and Shortcuts
Initially, the Welcome page is open and active on the right side of the console. Sections on the Welcome page include a brief description of a specific function and one or more shortcuts (links that you can select) to initiate certain tasks immediately as explained in Table 2-6.
Table 2-6 Welcome Page and Shortcuts
| Welcome Page Shortcut Section | Description |
|---|---|
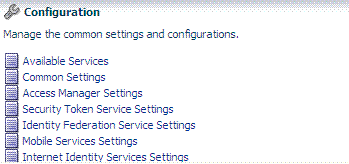 |
See the following topics for more information on each of the choices on the Configuration Shortcuts panel:
|
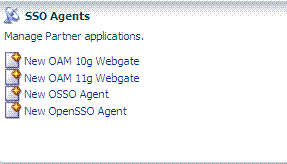 |
Click New ... to launch a fresh Create Agent page. See Also: "About the System Configuration Tab" |
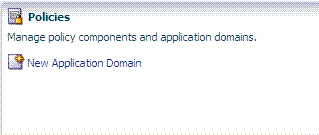 |
Click New Application Domain to launch a fresh Application Domains page. See Also: "About the Policy Configuration Tab" |
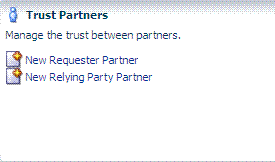 |
Click New ... to launch a fresh page where you can enter appropriate details for a requester partner or relying party partner. See Part VIII, "Managing Oracle Access Management Security Token Service"for more information. |
2.6.1.2 Function-Level Tabs and Controls
Table 2-7 introduces the function-level tabs in the Oracle Access Management Console.
Table 2-7 Function Tabs and Descriptions
| Function Tab Name | Description |
|---|---|
|
Policy Configuration |
Provides access to definitions for Shared Components and Application Domains. This tab is active and the related navigation tree is visible for browsing on the left side of the screen when you enter the console. See "About the Policy Configuration Tab" for more information. |
|
System Configuration Note: This is not the active tab when you enter the console. |
Provides access to system-level definitions as shown here. 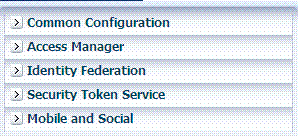
See "About the System Configuration Tab" for more information. |
The following topics provide more information about specific controls:
See Also:
"Selecting Controls in the Console"2.6.1.2.1 Navigation Tree
A navigation tree for the active configuration tab is provided on the left side of the console. Named nodes identify groups under which you can choose individual instances on which to take action.
The nodes in the navigation tree for the Policy Configuration and System Configuration tabs are shown in Figure 2-4. Notice the menu and tool bars above each navigation tree.
Figure 2-4 Navigation Trees with Menu and Tool Bars
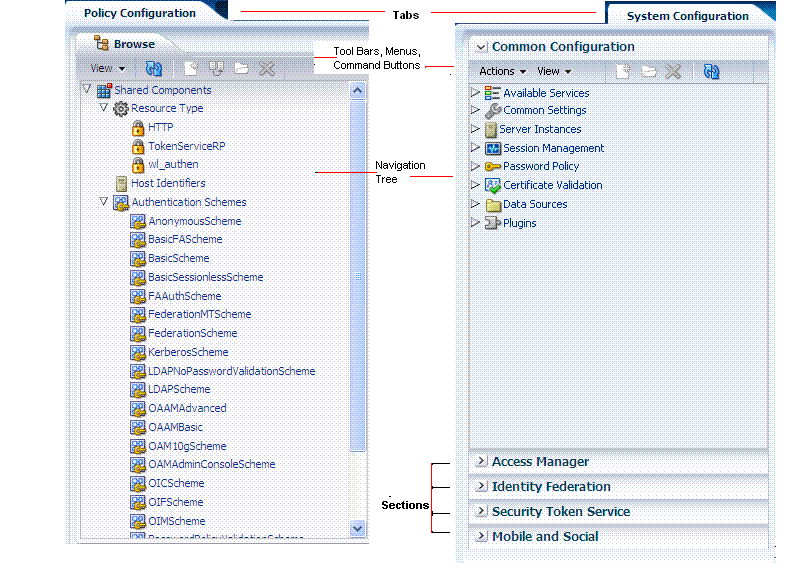
Description of "Figure 2-4 Navigation Trees with Menu and Tool Bars"
2.6.1.2.2 Menu and Tool Bar
Menus provide commands that you can use to take action on the selected item in the navigation tree. Many menu commands are also provided as command buttons in a tool bar for quick access. A menu and tool bar appear above each navigation tree in the console as in Figure 2-5.
Figure 2-5 Menu and Tool Bar Above Common Configuration Navigation Tree
Description of "Figure 2-5 Menu and Tool Bar Above Common Configuration Navigation Tree"
A different collection of menus and command buttons is available, depending upon the tab or subtab you are viewing. Additionally, certain configuration pages within the console include tables that provide a menu and tool bar.
Command buttons appear in full color when the related function is available for use. When a function cannot be used, the command button (or menu item) appears grey. For instance, you can open a node and edit or delete a selected registration or definition. Table 2-8 provides a description of each command button in the tool bar.
Table 2-8 Command Buttons in the Tool Bar
| Button | Definition | Description |
|---|---|---|
|
Create |
Opens a fresh page under the selected node in the navigation tree, which you can fill in to add a new configuration of the selected type. The new page opens as the active page on the right side of the navigation tree. This is available when you can add a new configuration, for instance, under Server Instances, or a specific Agent type, or a user identity store, or a non-HTTP Resource Type or Host Identifier or Application Domain. Alternatively, use the Create command on the Actions menu as described in Table 2-10. |
|
|
Open |
Opens the selected instance in the navigation tree. |
|
|
Edit |
Opens the selected instance in the navigation tree to view or modify. The configuration page opens as the active page on the right side of the navigation tree. Alternatively, double click the instance name to display a page for editing. |
|
|
Delete |
Removes the selected configuration. A deleted configuration is removed from the navigation tree and is no longer accessible to the system. For instance, if you delete an Agent configuration, the Agent is no longer registered and cannot be used. Alternatively, use the Delete command on the Actions menu as described in Table 2-10. |
|
|
Refresh |
Revives the navigation tree, in the same way a Web browser refreshes a Web page. |
|
|
Detach |
Separates the selected item (a results table on a configuration page, for instance) and displays it alone as a full page. Note: If you are viewing a detached table, you can click this button to re-attach it to the corresponding page and restore the standard page view. |
Most commands available as buttons in the tool bar are also available on a menu.
See Also:
2.6.1.2.3 View Menu
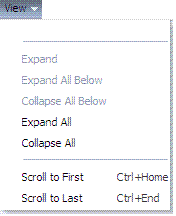
Figure 2-6 illustrates the View menu, which is available for use with both the Policy Configuration and System Configuration tabs.
Unavailable items (those that cannot be used on the selection in the navigation tree) appear in grey. View menu command descriptions are provided in Table 2-9.
Table 2-9 View Menu Command Descriptions
| Command | Description |
|---|---|
|
Expand |
Immediately reveal items within the selected node in the navigation tree. This does not open or activate a configuration page. Alternatively, click the icon beside the node in the navigation tree. |
|
Expand All Below |
Immediately reveal everything within the selected node. For example, click Application Domains and then click Expand All Below to see all Application Domains. |
|
Collapse All Below |
Immediately close the selected node and conceal its content. This does not close an open page. |
|
Expand All |
Immediately reveal all nodes and instances in the navigation tree. This has no impact on open pages. |
|
Collapse All |
Immediately conceal all nodes and instances in the navigation tree. This has no impact on open pages. |
|
Scroll to First Ctrl+Home |
Locates and displays the first item in the navigation tree or results table. |
|
Scroll to Last Ctrl+End |
Locates and displays the last item in the navigation tree or results table. |
2.6.1.2.4 Actions Menu
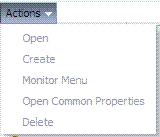
This menu is available only when the System Configuration tab is active. Figure 2-7 illustrates the Actions menu, which provides appropriate commands for the selected instance in the navigation tree. For example, if you have an identity store instance selected in the navigation tree one of the commands on the Actions menu enables you to monitor the instance.
Certain commands on this menu mirror functions that are available by using command buttons in the tool bar. Unavailable items (those that cannot be used on the selection in the navigation tree) appear in grey. Actions menu command descriptions are provided in Table 2-10.
Table 2-10 System Configuration, Actions Menu, Command Descriptions
| Command | Description |
|---|---|
|
Open |
Opens the configuration page for the selected instance in the navigation tree. This is not available when you have a node selected in the navigation tree. Alternatively, double-click the instance name in the navigation tree to open a page. |
|
Create |
Activates a fresh page that you can fill in to define a new configuration. Alternatively, click the Create (+) button in the tool bar as described in Table 2-8. |
|
Monitor Menu |
Available when you have an instance that can be monitored. For instance, if you have selected a Server instance in the navigation tree you can choose Monitor Menu to display associated information for the instance. For more information, see Chapter 10. Note: This item is disabled when you do not have an instance selected that can be monitored. |
|
Open Common Properties |
Disabled in this release. Replaced by Common Settings in the Common Configuration section of the System Configuration tab. |
|
Delete |
Removes the selected instance registration. The deleted registration is removed from the navigation tree and is no longer accessible to the system. For instance, if you delete an agent registration, the Agent is no longer registered and cannot be used. Alternatively, click the Delete (x) button in the tool bar as described in Table 2-8. |
2.6.1.3 Content Pages and Page Controls
Like the Welcome page, any open content pages appear on the right side of the console. A named tab identifies each open page, like the tabs on manila folders. The tab of the active page is white. The active page is visible and generally provides a work space where you can add, view, or modify related settings.
Up to ten pages can be open simultaneously per configuration tab: Policy Configuration tab or System Configuration tab. Only the named tabs of opened pages for the currently active configuration tab are shown.
Only the active page is visible, with as many named tabs of other open pages that can fit on one line. You can click a named tab to activate the corresponding page. When named tabs of open pages do not fit on one line, a pointer is provided that enables you to open and choose from a list of concealed pages. Figure 2-8 illustrates multiple pages open at the same time. You can see named tabs for each page and controls to access pages that are concealed (or to close the active page or close multiple pages).
Figure 2-8 Tabs of Open Pages, and Page Controls

Description of "Figure 2-8 Tabs of Open Pages, and Page Controls"
Each page appears only once. No warning is issued if you attempt to open the same page multiple times. However, the page is only one time.
Note:
There is no warning if you open the page for the same item more than once.The controls that you can use with open pages are described in Table 2-11.
See Also:
"Selecting Controls in the Console"Table 2-11 Controls for Open Pages
| Page Control | Definition | Description |
|---|---|---|
 |
View a list of concealed pages |
Click the pointer to display the list of concealed pages when you cannot view all open pages simultaneously. |
|
Close Active Page |
Click this button to close the active page. Note: Closing a page before clicking Apply discards any changes or additions without warning. The changes are lost. You can use this to cancel changes you do not want to retain. |
|
|
Close Multiple Pages |
Note: Closing a page before clicking Apply discards any changes or additions without warning. The changes are lost. You can use this to cancel changes you do not want to retain. |
2.6.2 Elements on a Page
Pages in the console contain one or more graphical user interface elements as described in Table 2-12. For an example of each element in the console, see Figure 2-8 or log into the console and have a look.
Table 2-12 Page Elements and Descriptions
| Page Element | Description |
|---|---|
|
Named tab |
Identifies each open page on the right side of the console. Also, displays a page of related, lower-level settings. See Figure 2-2 for an example. |
|
Page controls |
Enables you to close one or more pages. See Table 2-11. |
|
Apply button |
Submits changes or additions made to the page. |
|
Named text box |
Enables you to enter relevant details in the named field using the keyboard. |
|
Option button |
Enables you to choose one of several options. For example, you can click an option button to define a state (Enabled vs. Disabled) or a security mode (Open vs. Simple vs. Cert). |
|
Tables |
Displays current specifications or space for new specifications. Tables have independent command buttons independent from page-level and option buttons. |
|
Command buttons for tables |
Enables you to: Add a fresh row or definition to the table. Remove the selected row or definition from the table. |
|
Drop down lists (list) |
Found on certain pages to provide a menu of choices from which to choose when supplying information. |
2.6.3 Selecting Controls in the Console
This section describes how to select the desired node or instance in the navigation tree, and selecting commands and page controls in the console. The usual selection guidelines apply.
Table 2-13 describes selections and controls.
Table 2-13 Selection Tasks and Controls
| Task | Control | Description |
|---|---|---|
|
Expand (open) a node |
Click the Expand button (>) beside the desired node in the navigation tree to reveal nodes or instances within it. |
|
|
Collapse (close) a node |
Click the Collapse button (V) beside the desired node in the navigation tree to conceal nodes or instances beneath it. |
|
|
Display View menu |
Right-click mouse button |
Right-click the desired node in the navigation tree to display a pop-up View menu. |
|
Activate |
Click mouse button |
Click to activate the desired:
|
|
Open |
Click Item, Select Open command button |
Click the item, click the Open command button:
|
|
Highlight |
Drag cursor |
Drag the cursor across text in a box to highlight its content. |
|
Select |
Click mouse button |
Click the desired item on which to operate. For example, click the desired:
|
2.7 Introduction to System Configuration and Policy Configuration Tabs
The active tab appears white. A View menu is always available. An Actions menu is available with only the System Configuration tab.
This section provides a quick tour to orient you to major Oracle Access Management functions available on the following tabs:
2.7.1 About the System Configuration Tab
The System Configuration tab provides several sections that group related functions:
-
Common Configuration
-
Access Manager
-
Security Token Service
-
Identity Federation
-
Mobile and Social
Click the section name to open the navigation tree, companion menus, and tool bar above the tree.
2.7.2 About the Policy Configuration Tab
The Policy Configuration tab in the Oracle Access Management Console gives Administrators access to authentication and authorization policies and shared single sign-on (SSO) components.
The Browse subtab provides a view of the navigation tree. The Search subtab provides a view of your search results for policy elements.
See "Console Layout and Controls" for details on navigating and selecting command buttons, page controls, and menu items in the console.
You can also use commands on the View menu to expand the selected node in the navigation tree or to expand all nodes simultaneously. For instance, click Expand All from the View menu to see all nodes and related instances at one time.
2.8 Viewing Configuration Details in the Console
Oracle Access Management Administrators can view configuration details of individual agents, servers instances, data sources, shared components, and Application Domains from the Oracle Access Management Console.
In this example, you will view configuration details for an OAM Agent (Webgate). However, you can use similar steps to view configuration details for server instances, data sources, Application Domains, or shared components.
Alternatively, you can use custom WLST commands to view agent and server details.
To view configuration details using the console
-
Go to the Oracle Access Management Console and log in as usual. For example:
https://hostname:port/oamconsoleIn the sample URL, hostname refers to computer that hosts the Oracle Access Management Console; port refers to the HTTP port number on which the console host listens; /oamconsole identifies the Oracle Access Management Console.
-
System Configuration.
-
Click the System Configuration (or Policy Configuration) tab.
-
In the navigation tree, click the desired section name to display its content. For example:
Access Manager
-
Expand Node: Click the expansion icon beside the desired node (or from the View menu, click Expand All).
-
Open Node: Double-click the name (or click to highlight the name, then click the folder icon in the tool bar.)
-
Open a Unique Instance: Double-click the desired instance name to view its configuration or click the instance and click the Edit button (pencil) in the tool bar.
-
View the page and note any specific details of interest.
-
Close the page by clicking the X control in the upper-right corner.
-
-
Policy Configuration: Click to activate the Policy Configuration tab. Expand, open, view, and close nodes and instances and pages as you would in the System configuration tab.
2.9 Conducting Searches Using the Console
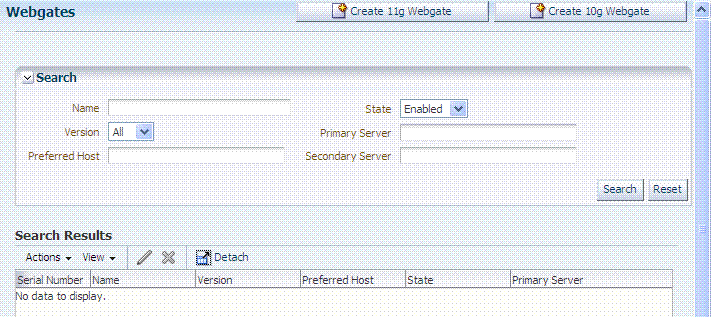
The Oracle Access Management Console provides search controls for specific elements (Agents, Application Domains, and Resources are some examples). A sample Search page is shown here. This page is used for OAM Agent searches.
Search pages differ depending on the entity you are trying to find. In all searches, you can leave a field blank to display everything or use a wildcard (*) character when you do not know the exact name you seek. However, capitalization in your search criteria must match capitalization of the item you seek.
Some search controls include the ability to save your search criteria. From the search results table, you can choose an item to open for viewing or editing.
2.10 Using Online Help
At any time while using the Oracle Access Management Console, you can click the Help link at the top of the page to get more information. Online Help topics link to information in an online version of this book.
Generally speaking, topics that are displayed by selecting Help in the Oracle Access Management Console appear in only English and Japanese languages. Online Help is not translated into the ADMIN languages.
You can click the Welcome tab to display a list of topics that describe actions you can take. For specific help topics, use the following procedure.
To locate a specific help topic
-
From the Oracle Access Management Console, click a tab or named node in the navigation tree.
-
Click Help in the upper-right corner of the console.
-
Review the page that appears in a new window and select one of the following links to:
-
More—Click this link to view more information.
-
How?—Click this link to see steps to perform a task related to your help search.
-
Contents—In the left Help pane, expand Contents to see all help topics as well as all topics in the online manual.
-
Search—Displays a search window where you can enter your help search criteria.
-
-
Click the following buttons, as needed:
-
View—Displays a set of viewing options.
-
Arrows—Return to the previous page or go forward to the next page.
-
Printer Icon—Prints the page.
-
Envelope Icon—Emails the page.
-
2.11 Command-Line Tools
Several command-line tools are available to perform various tasks using the keyboard rather than the console. After using these commands, configurations will be available in the console:
-
Remote registration tool,
oamreg, enables remote registration of Agents, and creation of default Application Domains. -
Upgrade Assistant (UA) enables you to transfer OSSO 10g configuration to Oracle Access Management
-
Oracle WebLogic Scripting Tool (WLST) provides a number of custom OAM command-line alternatives for tasks you can perform in the Oracle Access Management Console.
2.12 Logging, Auditing, Monitoring Performance
Logging is the mechanism by which components write messages to a file. These messages can be logged at different levels of granularity. Oracle Access Management components use the same logging infrastructure and guidelines as any other component in Oracle Fusion Middleware 11g.
In Oracle Fusion Middleware, auditing provides a measure of accountability and answers to the "who has done what and when" types of questions. Oracle Access Management uses the Oracle Fusion Middleware Common Audit Framework to support auditing for a large number of user authentication and authorization run-time events, and administrative events (changes to the system). The Oracle Fusion Middleware Common Audit Framework provides uniform logging and exception handling and diagnostics for all audit events.
Administrators can monitor performance and log messages for Access Manager and Security Token Service using Oracle Fusion Middleware Control.
For more information, see Part III, "Common Logging, Auditing, Performance Monitoring and Tuning".
