In this field:
Do this:
Step Name
You can click the link to view a graphical representation of the workflow, with the current step highlighted. Be aware that workflows can often be very large. If you are viewing a large workflow, you can enlarge the canvas screen to make it easier to see all the steps to the workflow progression.
To enlarge the canvas, you can drag the window sides until the workflow fits in the window, or you can quickly maximize the canvas. To maximize the canvas, click the icon in the upper-right corner of the window. To restore the canvas window to its normal size, click the Restore icon.

Description
Enter an optional description to help identify the workflow.
Duration
Choose the time length for this step.
Override Task Due Date
Allows user to override due date for an individual task.
Allow Decline Step Task
Click Yes if you want the assignees to have the ability to decline an action on an assigned task.
Enable Step for Integration
Click the radio button if you want this step to be available for integration with an external system, such as Web Services. If you make the step available for integration, the user can use the external system to view a read-only copy of the BP at that step.
Note: If you select this option, the Completion Policy field (see below) will be set to “Single,” and the Assignment Policy field for the following step must be set to “Preassigned.”
Assignment Policy
For User Select (default), the individual who creates a record (such as an invoice) from this workflow instance can choose the users to assign to this task from the list of assignees for this step. For Preassigned, every user on the assignee list is automatically assigned to the step when the record is created.
Assignees
Select the users to assign to this step. These users will receive task notifications, instructing them to take action at this step. When you click the Select button, you can choose one these options:
| • | User Picker: Unifier displays the User/Group Picker window. Choose one or more users or groups to add as assignees. |
| • | Dynamic: Choose a step in the workflow from the Select Step pop-up window. The assignees from that step become the assignees used on this step. You cannot choose Dynamic when adding assignees to the first step (Creation) in the workflow. |
You can constrain the list of assignees for this step by selecting the Additional conditions to filter assignees check box. To constrain the list of assignees, you need to create a query to filter the assignees using criteria you specify. To do this, click the Define button and specify a field comparison. For information on creating this type of query, see "About Queries".
Allow Cc
Allows assignees to add cc users who will receive a view-only copy of the BP record. Choose one of the options:
| • | No: Does not allow sending copies to other users. |
| • | Yes: Click Select to create the list of users or groups from whom the BP users can choose to Cc. (This option also activates the Allow Add Cc functionality.) |
| • | Preassigned: Click Select to choose the users who will be automatically cc’d. No other users can be copied. |
| • | Preassigned and Allow Add Cc: Click Select to choose the users who will be automatically cc’d. The Allow Add Cc option is set to Yes. |
Note: You cannot allow Ccs on the Create step.
Allow Add Assignees
Allows assignees to add additional assignees in addition to those defined in the Assignees field to the current step. Assignees can add the additional assignees before accepting the task. This is done by clicking the Edit menu and choosing Add Assignees to Current Step.
For example, user A has been sent a BP for review. User A wishes to add user B as an assignee to the review step as well. Before clicking Accept Task, user A chooses Edit > Add Assignees to Current Step and adds user B. User B is notified (depending on e-mail preferences) of the new task. Both user A and user B can accept the task and participate in the review step of the workflow.
Note: You cannot add assignees on the Create step.
Allow Add Cc
This option has two functions:
1. When the Allow Cc field is set to Preassigned and Allow Add Cc, this option is set to Yes automatically. It enables BP users at runtime to copy additional users on a BP step that already has a preassigned cc user. This is done on the action form of the BP during the regular workflow step by selecting the Cc button. Click Select and choose the users/ or groups that can be copied.
2. This option becomes available (choose Yes or No) if Allow Cc is set to Yes. Similar to Allow Add Assignees, this option allows assignees to send a copy of the current step of the BP to additional users in addition to those defined in the Add Cc field. Assignees can add the additional cc users before accepting the task. This is done by clicking the Edit menu and choosing Copy Users to Current Step.
For example, user A has been sent a BP for review. User A wishes to add user B as an assignee to the review step as well. Before clicking Accept Task, user A chooses Edit > Add Assignees to Current Step and adds user B. User B is notified (depending on e-mail preferences) of the new task. User A can accept the task and participate in the review step of the workflow. User B can review the view-only copy.
Note: You cannot add Ccs on the Create step.
Step Editors
Optionally, you can define one or more editors per each defined step in the business process workflow setup. Editors are users who can edit the business process without being granted explicit record-level permission or as assignees of the step. This allows users other than the assignee to edit the business process record. If you are an Editor on a business process step, you can open and edit any record on the step.
Editors can be added on these BP types:
| • | Line Item |
| • | Cost (all types, including Lease and Line Item with Multiple Codes) |
| • | Document |
| • | Simple |
| • | RFB |
| • | Text |
The Editor functionality has these attributes:
| • | The user who is designated as an editor must have a minimum of View User Records to the BP log in question. |
| • | All edits are done through the BP Log. |
| • | Editors cannot edit a workflow record until the task assignee accepts the task, and saves the draft. |
| • | Editors cannot be defined on the creation step of a business process. |
| • | Editors can be defined on the end step. |
| • | Editors can be defined on a workflow step only if the Completion Policy is Single. (Primavera Unifier will generate an error if Completion Policy is set to All Majority or Consensus.) |
| • | Editor on a task receive notification each time a draft is created. |
| • | If multiple editors and the assignee are editing the business process record draft, the data saved by the last update will overwrite all previous updates. |
| • | Edits performed on the End step of a workflow business process affect the record directly, as no draft exists. |
| • | Edits that occur on the end step are captured in the audit listing the editor who performed the edit. |
| • | Edits performed by record editors appear in the Audit log. |
Note: You cannot assign editors on the Create step.
Discussion Group
Specify assignees for discussion groups on the BP.
Note: You cannot assign discussion groups on the Create step.
Step Revisiting
If a step is rejected and sent back for clarification or editing, this option determines to whom the BP can be sent back (which assignees will be available for selection):
| • | Include only previous action takers: Only the assignee users who were selected when the workflow moved into that step originally are eligible to be reselected. |
| • | Include all step assignees: All assignee users are eligible to be selected. |
Note: You cannot specify step revisiting on the Create step.
Completion Policy
Choose one of the following:
| • | Single: If any assignee completes the task, no matter which action is taken, the record moves forward to the next step. |
| • | All-Majority: All assignees are required to respond. If there is no clear majority, Primavera Unifier uses the resolving action to determine what path through the workflow to take. |
| • | All-Consensus: All assignees are required to respond. If there is no consensus (all must agree on the action), Primavera Unifier uses the resolving action to determine what path through the workflow to take. |
Note: You cannot assign a completion policy on the Create step.
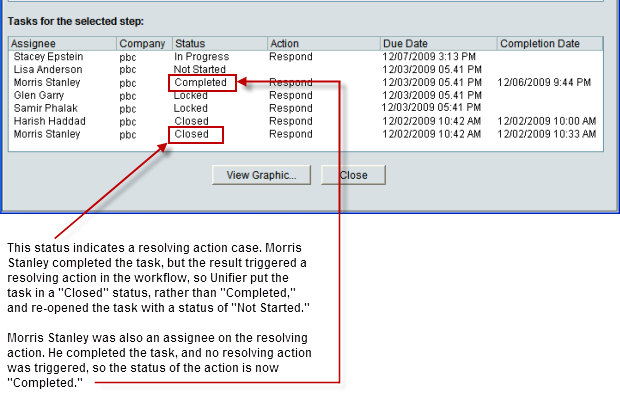
Resolving Action
This moves the step to either a following step, a previous step, or a conditional step that essentially “re-addresses” the task. This step must be completed before the workflow can continue. The assignees on this resolving action step can include the original task assignees and can also include new assignees.
Note: You cannot assign a resolving action on the Create step.
Overdue Policy
You can choose to send late notifications to all assignees if the step passes its duration.
Note: You cannot assign an overdue policy on the Create step.
Commenting
You may select either of these options regarding commenting. These refer to the general comments on BP forms, as well as comments regarding individual file attachments on document-type BPs.
| • | Allow hiding of comments: Allows users to hide comments. The comments will remain as part of the record, and administrators and others with permissions can view the comments, which are not visible to others without the view permission. |
| • | Allow deletion of comments: Allows users with permission to delete comments previously added to the BP record. |
| • | Allow cc users to add general comments: Allows users copied on a step to add general comments without accepting the task. Not available on the end step. |
Note: You cannot include comments on the Create step.
Note: Task assignees can also add general comments without accepting the task if they have been given the Add General Comments permission on the business process. With this permission, they can add a general comment to any BP record they can view (workflow or non-workflow), regardless of the workflow step (including the End step), and regardless of the assignee or Cc settings. For more information on this permission, see the Permissions chapter in the Primavera Unifier and uDesigner Reference Guide.
Email Response: Enable response via email
By default, this checkbox is unchecked. When enabled, this allows users who receive e-mail that is sent out when a workflow reaches the current step to respond and take actions in Primavera Unifier via e-mail. The checkbox appears on all workflow steps other than the creation step. The e-mail that the user receives includes hyperlinks to workflow actions.
Note: You cannot enable email response on the Create step.
Note: To enable the attachment of files to e-mail responses to workflow actions, this option must be selected as well as the Add Attachments option on the Options tab in the Action Form design in Primavera uDesigner.
Email Attachments:
| • | Include both record and line item attachments |
| • | Include record information as attachment |
Select to specify the content and format of e-mail attachments. You can include business process record and line item attachments, as well as business process record information. Also, you can override the attachment format set in the General tab if necessary.
Note: You cannot enable email attachments on the Create step.
Override default format
If you have specified a default record format on the General tab, you can use this check box to override the default format. For example, you can use the General tab to specify that the default record format for both email notifications and records saved in the Document Manager be in PDF format. If necessary, you could then use the Override default format check box to override the format and choose Custom for the notification only.
Email Content
You can add additional information that will be sent out as part of task notification.
Note: You cannot add additional information on the Create step.
Cash Flow Default Template
This option only appears in WBS code-based Base Commit business processes. It allows you to enable the auto-creation of a commitment-level cash flow curve at runtime for the business process record. The curve is based on the selected commitment-level cash flow template, and is created upon being sent from the step.
| • | Click Add and choose a template. |
For more information, see Setting up auto-creation of cash flow curves from contracts.
Additional Information
Save Record information to Document Manager
Select this check box if the record information (including BPcomments and attachments) should be automatically saved at this step in the Document Manager.