Install RHEL Manually
Before You Begin
-
Prepare the server storage drives. For more information, refer to the Configure Server Drives for OS Installation in Sun Server X4-4 Installation Guide .
-
You should have already selected your BIOS boot mode (Legacy or UEFI) as described in Preparing to Install the OS.
-
You should have already done the preparation for a local or remote installation as described in Preparing to Install the OS. Then perform one of the following:
-
Local installation: Have the OS distribution media available to insert into the attached physical CD/DVD-ROM drive or USB port.
-
Remote installation: Perform one of the following:
-
If your OS distribution media is a DVD-ROM or USB image, insert it into the remote client's DVD-ROM drive or USB port and mount it through the Oracle ILOM Remote Console KVMS > Storage menu.
-
If you are using an ISO image of the OS distribution media, ensure that the image is mounted through the Oracle ILOM Remote Console KVMS > Storage menu.
-
-
Review the OEM OS installation guide available with the media kit.
Note - If you already have an operating system besides Linux installed (for example, the Solaris OS), it appears as a partition during the installation process. If you choose to install RHEL on that partition, it overwrites the OS. If you wish to preserve the partition, you must install RHEL on a different partition.
-
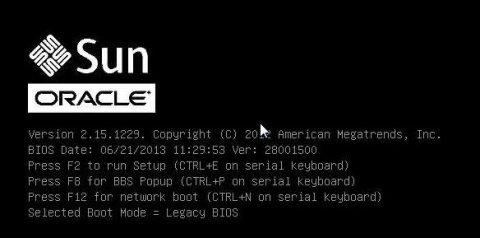
Power on or reboot the server.
If you are using the remote installation method, you can power on or reboot the server through Oracle ILOM.
BIOS messages appear.
Note - BIOS messages, including the BIOS menu selection list, can go by quickly. If you miss the messages, power cycle the server and hold down the F8 key during boot until the BBS Popup menu appears.
-
Watch the screen until you see a list of selections and then press F8 to select "BBS
Popup."
After a delay, a "select boot device" menu appears with a list of possible boot devices.
-
Select a boot device from the list, as follows:
-
For a local installation, insert the Linux distribution media into the server's CD/DVD drive, select it from the list of devices and press Enter.
-
For a remote installation, select the client's remotely mounted virtual CD/DVD drive and press Enter.
Control passes to the OS installation program on the media.
-
-
Identify logical and physical network interface names. Do the following:
-
At the boot prompt type: linux rescue and then press Enter.
The Choose a Language screen appears.
-
In the Choose a Language screen, select the appropriate language, and click OK.
The Keyboard Type screen appears.
-
In the Keyboard Type screen, select the appropriate configuration, and then click OK.
The Setup Network screen appears.
-
In the Setup Network screen, click No.
The Rescue screen appears.
-
In the Rescue screen, click Skip.
The user shell appears.
-
At the command prompt (#) in the user shell, type the following command to
display all network interfaces, and then press Enter.
# ifconfig -a
The output of the Linux named network interfaces appear.
If you have multiple network interfaces and the output of interfaces scrolls off the top of the screen, you can display the output per interface.
-
To view the output of each network interface, type the following at the command prompt, and
then press Enter:
# ifconfig eth#
where eth# is the interface number. For example, if you type:
# ifconfig eth0
the output for eth0 appears:
eth0 Link encap:Ethernet HWaddr 00:14:4F:8D:52:BE inet addr:10.182.92.196 Bcast:10.182.93.255 Mask:255.255.254.0 inet6 addr: fe80::214:4fff:fe8d:52be/64 Scope:Link UP BROADCAST RUNNING MULTICAST MTU:1500 Metric:1 RX packets:14461296 errors:0 dropped:0 overruns:0 frame:0 TX packets:1061312 errors:0 dropped:0 overruns:0 carrier:0 collisions:0 txqueuelen:1000 RX bytes:1282625453 (1.1 GiB) TX bytes:118834056 (113.3 MiB) Interrupt:54 Base address:0xc000- The eth0 entry in the first column refers to the Linux logical named interface. This first column in the output identifies the logical names Linux or RHEL assigned to the network interface.
- The 00:14:4F:8D:52:BE entry in the second column (first row) refers to the physical MAC address of the network port.
- Record the logical network interface name with the physical port MAC address for future reference. You need to refer to this record when configuring the network interfaces during the Oracle Linux or RHEL OS installation.
-
At the boot prompt type: linux rescue and then press Enter.
-
When you are done, reboot the server and restart the OS installation program using the
following command:
# reboot
- Repeat steps 2 and 3 to select the boot device that contains the OS media. Then proceed to step 7.
-
Do one of the following at the boot prompt, depending on which type of interface you want to
use:
-
For Text mode, type the following command from the boot prompt:
boot: linux text
- For Graphical mode, press Enter at the boot prompt.
-
For Text mode, type the following command from the boot prompt:
- Refer to the Red Hat Enterprise Linux Installation Guide to guide you through the remainder of the installation process.
Next Steps