| StorageTek Tape Analytics Installation and Configuration Guide Release 2.0.1 E41585-03 |
|


 Previous |
 Next |
| StorageTek Tape Analytics Installation and Configuration Guide Release 2.0.1 E41585-03 |
|
Previous |
Next |
You must authenticate users before they can be allowed access to STA. Local user creation and role assignment is handled within the STA application, and is described in "Configuring Users." This chapter describes configuring an external security service provider (SSP) for STA: Open LDAP and IBM Resource Access Control Facility (RACF).
To configure Open LDAP for STA, follow the steps below.
Go to the WebLogic console login screen using the HTTP (default is 7001) or HTTPS (default is 7002) port number you selected during STA installation.
http(s)://yourHostName:PortNumber/console/
Log in using the WebLogic Admin Console username and password you defined during STA installation.
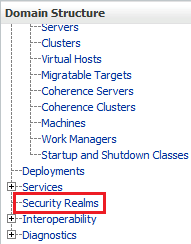
Under Domain Structure (left side of screen), click Security Realms.
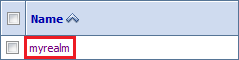
Under Realms, select myrealm (select the name itself, not the check box).
Click the Providers tab.

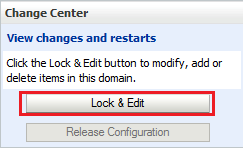
Under Change Center (top left of screen), click Lock & Edit.
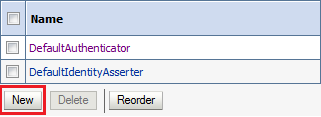
Under Authentication Providers, click New.
Enter the name of the authentication provider (for example, openLdapAuthenticator), and select OpenLDAPAuthenticator in the Type list. Click OK.
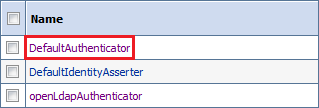
Select DefaultAuthenticator (select the name itself, not the check box).
Change the Control Flag to Sufficient, and then click Save.
Click the Providers locator link (near top of screen) to return to the Authentication Providers screen.

Under Authentication Providers, select the Open LDAP authenticator name you created in Step 8 (select the name itself, not the check box).

Change the Control Flag to Sufficient, and then click Save.
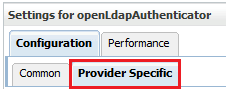
Click the Provider Specific tab.
Enter the following parameters. These settings apply to the lses-ldap1 server and are specific to each customer environment.
Host = lses-ldap1
Port = 389
Principal = leave blank
Credential = leave blank
User Base DN = ou=people,dc=oracle,dc=eng
User From Name Filter = (&(cn=%u)(objectclass=inetOrgPerson))
User Object Class = inetOrgPerson
Group Base DN = ou=groups,dc=oracle,dc=eng
Group From Name Filter = (&(cn=%g)(objectclass=groupofnames))
Click Save.
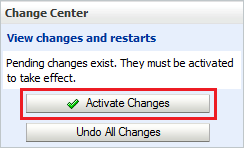
Under Change Center (top left of screen), click Activate Changes.
(Optional) Test the configuration by performing the following:
Log out of the WebLogic console.
Stop and restart STA using the STA command. For information on command usage, see the STA Administration Guide.
# STA stop all
# STA start all
Log back in to the WebLogic console.
Go to Security Realms > myrealm > Users and Groups.
Within the Users and Groups tabs, verify entries exist in the Provider column for the Open LDAP provider.
To configure STA for RACF authentication, perform the following tasks:
Task 2, "Enable Mainframe Support for STA RACF Authorization"
Task 5, "Import the Certificate File and Private Key File (Optional)"
|
Note: STA supports third-party products that are compatible with IBM RACF — for example, CA's ACF-2 and Top Secret. It is up to the person installing STA, or a security administrator, to issue the commands appropriate for the security product installed. |
RACF requirements are stated in the STA Requirements Guide.
The mainframe side of the RACF service for STA is provided by a CGI routine that is part of the SMC component for ELS 7.0 and 7.1. This CGI routine is called by the SMC HTTP server and uses RACF profiles defined in the FACILITY class.
For STA to use RACF as a means of access authentication, on the mainframe, you must set up an SMC Started Task that runs the HTTP server. You can find details on how to do this in the ELS document Configuring and Managing SMC.
|
Note: The SMC Started Task must match the AT-TLS rule that has been defined. Alternately, allow the AT-TLS definition to use a generic jobname (for example, SMCWFoot 1 ). |
Footnote 1 If you are using a value-supplied STC identifier (for example, JOBNAME.JOB), this will cause a CGI routine connection failure.
The port number used for the HTTP server must match the one defined in the WebLogic console, and the host must match the IP name for the host where the SMC task runs.
|
Note: An existing SMC can be used if it exists on the host where RACF authorization is to be performed. In this case, use the port number of the existing HTTP server when you are performing the WebLogic configuration. |
AT-TLS is an encryption solution for TCP/IP applications that is transparent to the application server and client. Packet encryption and decryption occurs in the z/OS TCPIP address space at the TCP protocol level. AT-TLS requirements for RACF authorization are stated in the STA Requirements Guide.
The following RACF commands list the status of the various RACF objects that you will define in the configuration process:
RLIST STARTED PAGENT.* STDATA ALL
RLIST DIGTRING *ALL
RLIST FACILITY IRR.DIGTCERT.LISTRING ALL
RLIST FACILITY IRR.DIGCERT.LST ALL
RLIST FACILITY IRR.DIGCERT.GENCERT ALL
RACDCERT ID(stcuser) LIST
RACDCERT ID(stcuser) LISTRING(keyringname)
RACDCERT CERTAUTH LIST
To configure AT-TLS, do the following:
Activate AT-TLS
Specify the following parameter in the TCPIP profile data set to activate the AT-TLS function:
TCPCONFIG TTLS
This statement may be placed in the TCP OBEY file.
Configure the Policy Agent (PAGENT)
The Policy Agent address space controls which TCP/IP traffic is encrypted.
Enter the PAGENT started task JCL.
For example:
//PAGENT PROC
//*
//PAGENT EXEC PGM=PAGENT,REGION=0K,TIME=NOLIMIT,
// PARM='POSIX(ON) ALL31(ON) ENVAR("_CEE_ENVFILE=DD:STDENV")/-d1'
//*
//STDENV DD DSN=pagentdataset,DISP=SHR//SYSPRINT DD SYSOUT=*
//SYSOUT DD SYSOUT=*
//*
//CEEDUMP DD SYSOUT=*,DCB=(RECFM=FB,LRECL=132,BLKSIZE=132)
Enter the PAGENT environment variables. The pagentdataset data set contains the PAGENT environment variables.
For example:
LIBPATH=/lib:/usr/lib:/usr/lpp/ldapclient/lib:.
PAGENT_CONFIG_FILE=/etc/pagent.conf
PAGENT_LOG_FILE=/tmp/pagent.log
PAGENT_LOG_FILE_CONTROL=3000,2
_BPXK_SETIBMOPT_TRANSPORT=TCPIP
TZ=MST7MDT
In this example, /etc/pagent.conf contains the PAGENT configuration parameters. Use your own time zone for the TZ parameter.
Configure PAGENT.
For example:
TTLSRule TBI-TO-ZOS
{
 LocalAddr localtcpipaddress
 RemoteAddr remotetcpipaddress
 LocalPortRange localportrange
 RemotePortRange remoteportrange
 Jobname HTTPserverJobname
 Direction Inbound
 Priority 255
 TTLSGroupActionRef gAct1~TBI_ICSF
 TTLSEnvironmentActionRef eAct1~TBI_ICSF
 TTLSConnectionActionRef cAct1~TBI_ICSF
}
TTLSGroupAction gAct1~TBI_ICSF
{
 TTLSEnabled On
 Trace 2
}
TTLSEnvironmentAction eAct1~TBI_ICSF
{
 HandshakeRole Server
 EnvironmentUserInstance 0
 TTLSKeyringParmsRef keyR~ZOS
}
TTLSConnectionAction cAct1~TBI_ICSF
{
 HandshakeRole ServerWithClientAuth
 TTLSCipherParmsRef cipher1~AT-TLS__Gold
 TTLSConnectionAdvancedParmsRef cAdv1~TBI_ICSF
 CtraceClearText Off
 Trace 2
}
TTLSConnectionAdvancedParms cAdv1~TBI_ICSF
{
 ApplicationControlled Off
 HandshakeTimeout 10
 ResetCipherTimer 0
 CertificateLabel certificatelabel
 SecondaryMap Off
}
TTLSKeyringParms keyR~ZOS
{
 Keyring keyringname
}
TTLSCipherParms cipher1~AT-TLS__Gold
{
 V3CipherSuites TLS_RSA_WITH_3DES_EDE_CBC_SHA
 V3CipherSuites TLS_RSA_WITH_AES_128_CBC_SHA
}
where:
localtcpipaddress
local TCP/IP address (address of HTTP server)
remotetcpipaddress
remote TCP/IP address (address of STA client). This can be ALL for all TCP/IP addresses
localportrange
local port of HTTP server (specified in the HTTP or SMC startup)
remoteportrange
remote port range (1024-65535 for all ephemeral ports)
HTTPserverJobname
jobname of the HTTP Server
certificatelabel
label from certificate definition
keyringname
name from RACF keyring definition
Activate RACF Classes
Enter the following commands to activate RACF classes. Either the RACF panels or the CLI can be used.
The RACF classes include:
DIGTCERT
DIGTNMAP
DIGTRING
SERVAUTH CLASS must be RACLISTed to prevent PORTMAP and RXSERV from abending.
SETROPTS RACLIST(SERVAUTH)
RDEFINE SERVAUTH **UACC(ALTER) OWNER (RACFADM)
RDEFINE STARTED PAGENT*.* OWNER(RACFADM) STDATA(USER(TCPIP) GROUP(STCGROUP)
RDEFINE FACILITY IRR.DIGTCERT.LISTRING UACC(NONE) OWNER(RACFADM)
RDEFINE FACLITY IRR.DIGTCERT.LIST UACC(NONE) OWNER(RACFADM)
RDEFINE FACILITY IRR.DIGTCERT.GENCERT UACC(NONE) OWNER (RACFADM)
Define RACF Keyrings and Certificates
Enter the following RACF commands to create Keyrings and certificates:
RACDCERT ID(stcuser) ADDRING(keyringname)
where:
stcuser: RACF user id associated with the TCPIP address space
keyringname: Name of the keyring, must match the Keyring specified in the PAGENT configuration
RACDCERT ID(stcuser) GENCERT CERTAUTH SUBJECTSDN(CN('serverdomainname') O('companyname') OU('unitname') C('country')) WITHLABEL('calabel') TRUST SIZE(1024) KEYUSAGE(HANDSHAKE,DATAENCRYPT,CERTSIGN)
|
Note: This is the CA certificate for the STA system. |
where:
stcuser: RACF user id associated with the TCPIP address space
serverdomainname: Domain name of the z/OS server (for example, MVSA.COMPANY.COM)
companyname: Organization name
unitname: Organizational unit name
country: Country
calabel: Label for certificate authority (for example, CATBISERVER)
RACDCERT ID(stcuser) GENCERT SUBJECTSDN(CN('serverdomainname') O('companyname') OU('unitname') C('country')) WITHLABEL('serverlabel') TRUST SIZE(1024) SIGNWITH(CERTAUTH LABEL('calabel'))
|
Note: This is the SERVER certificate. |
where:
stcuser: RACF user id associated with the TCPIP address space
serverdomainname: Domain name of the z/OS server (for example, MVSA.COMPANY.COM)
companyname: Organization name
unitname: Organizational unit name
country: Country
serverlabel: Label for the server certificate (for example, TBISERVER)
calabel: Label for certificate authority, specified in the CA certificate definition
RACDCERT ID(stcuser) GENCERT SUBJECTSDN(CN('clientdomainname') O('companyname') OU('unitname') C('country')) WITHLABEL('clientlabel') TRUST SIZE(1024) SIGNWITH(CERTAUTH LABEL('calabel'))
|
Note: This is the CLIENT certificate. |
where:
stcuser: RACF user id associated with the TCPIP address space
clientdomainname: Domain name of the STA client (for example, TBIA.COMPANY.COM)
companyname: Organization name
unitname: Organizational unit name
country: Country
clientlabel: Label for the server certificate –TBICLIENT
calabel: Label for certificate authority, specified in the CA certificate definition.
Enter the following commands to connect the CA, SERVER, and CLIENT certificates to the keyring specified in the PAGENT configuration:
RACDCERT ID(stcuser) CONNECT(CERTAUTH LABEL('calabel') RING('keyringname') USAGE(CERTAUTH))
where:
stcuser: RACF user id associated with the TCPIP address space
calabel: Label for certificate authority, specified in the CA certificate definition
keyringname: Name of the keyring, must match the Keyring specified in the PAGENT configuration
RACDCERT ID(stcuser) CONNECT(ID(stcuser) LABEL('serverlabel') RING('keyingname') DEFAULT USEAGE(PERSONAL)
where:
stcuser: RACF user id associated with the TCPIP address space
serverlabel: Label for the server certificate
keyringname: Name of keyring, must match the Keyring specified in the PAGENT configuration
RACDCERT ID(stcuser) CONNECT(ID(stcuser) LABEL('clientlabel') RING('keyingname') USEAGE(PERSONAL)
where:
stcuser: RACF user id associated with the TCPIP address space
clientlabel: Label for the client certificate
keyringname: Name of keyring, must match the Keyring specified in the PAGENT configuration
Enter the following commands to export the CA and client certificates to be transmitted to STA:
RACDCERT EXPORT (LABEL('calabel')) CERTAUTH DSN('datasetname') FORMAT(CERTB64)
where:
calabel: Label for certificate authority, specified in the CA certificate definition
datasetname: Data set to receive the exported certificate
RACDCERT EXPORT (LABEL('clientlabel')) ID(stcuser) DSN('datasetname') FORMAT(PKCS12DER) PASSWORD(' password ')
where:
clientlabel: Label for the client certificate
stcuser: RACF user id associated with the TCPIP address space
datasetname: Data set to receive the exported certificate
password: Password for data encryption. Needed when the certificate is received on STA. The password must be eight characters or more.
The export data sets are now transmitted to STA, and FTP can be used. The CA certificate is transmitted with an EBCDIC to ASCII conversion. The CLIENT certificate is transmitted as a BINARY file and contains both the client certificate and its private key.
The profiles are defined in the FACILITY class. The first of the profiles is called SMC.ACCESS.STA and determines whether a user has access to the STA application.
A user who requires access to STA must have READ access to this profile. The other profiles are all shown as SMC.ROLE.nnn and are used to determine which roles the user has once logged on.
|
Note: The only role defined to STA is StorageTapeAnalyticsUser. To obtain this role, you must request your userid to be added to the SMC.ROLE.STORAGETAPEANALYTICSUSER profile with READ access. |
This procedure can be valuable to test that public and private keys have been generated successfully and that user IDs and passwords with the appropriate permissions have been defined correctly.
The test can be done using any browser, but Firefox is used here as an example.
In Firefox, click Tools and then Options.
Select the Advanced tab and then the Encryption tab.
Click the View Certificates button.
Click the Authorities tab in the Certificate Manager dialog box, and then select the certificate file to import.
Click Import.
Click the Your Certificates tab, and then enter the private key file to import.
Click Import.
Click the OK button to save and exit the dialog box.
To test the CGI routine from a browser, enter the following URL, where host, port, userid, and password are set to appropriate values.
https://host:port/smcgsaf?type=authentication&userid=userid
&password=password&roles=StorageTapeAnalyticsUser
The resultant output indicates whether or not the user is authorized to access STA and the StorageTapeAnalyticsUser role.
|
Note: The STA RACF authorization facility does not support changing the password of mainframe user IDs. If a user ID password expires, STA indicates this, and the password must be reset through normal mainframe channels before attempting to log in to STA again. |
The RACF Security Service Provider (or RACF SSP) must be installed as a plug-in into WebLogic.
If the RACF SSP has been installed, the STA installer should put the RACF SSP in the appropriate location within WebLogic. If it has not been installed, place the RACF security jar file into the directory named:
/Oracle/Middleware/wlserver_10.3/server/lib/mbeantypes/staRACF.jar
Install the required PTFs on the MVS system. These PTFs allow for authentication with RACF or other third-party security software when you are logging on to the STA. For PTF requirements, see the STA Requirements Guide.
The Application Transparent TLS (AT-TLS) has been configured on MVS so that the port number defined to the SMC HTTP Server and WebLogic is encrypted to the server.
Before proceeding, ensure you possess two files: the MVS server certificate (in ASCII format) and the STA client private key (in binary PKCS12 format). The MVS system administrator has given you the password to the PKCS12 file.
Place the certificate in Oracle/Middleware/user_projects/domains/tbi/cert.
Convert the certificate from the DER format to the PEM format.
openssl pkcs12 -clcerts -in PKCS12DR.xxxxxx -out mycert.pem
You will be asked to enter the Import Password (given to you with the certificate), a new PEM password, and password verification.
Using the Java keytool command, import the certificate file into the /Oracle/Middleware/jdk1.6.0_xx/jre/lib/security/cacerts file with the following command:
/Oracle/Middleware/jdk1.6.0_xx/jre/bin/keytool -importcert -alias tbiServer -file certificate -keystore /Oracle/Middleware/jdk1.6.0_xx/jre/lib/security/cacerts -storetype jks
To configure WebLogic for RACF authentication, follow the procedure in "Reconfigure WebLogic to use a Different Security Certificate."
Go to the WebLogic console login screen using the HTTP (default is 7001) or HTTPS (default is 7002) port number you selected during STA installation.
http(s)://yourHostName:PortNumber/console/
Log in using the WebLogic Admin Console username and password you defined during STA installation.
Under Domain Structure (left side of screen), click Security Realms.
Under Realms, select myrealm (select the name itself, not the check box).
Under Change Center (top left of screen), click Lock & Edit.
Select the Providers tab.
Under Authentication Providers, click New.
Enter the name of the authentication provider (for example, RacfAuthenticator) and select RacfAuthenticator in the Type list. Click OK.
In the Type list, the RACF jar file should be listed. If it is not, stop and restart STA using the STA command. For information on command usage, see the STA Administration Guide.
Under Authentication Providers, make sure the RACF provider is last in the list. The DefaultAuthenticator and DefaultIdentityAsserter must always be the first two items in this list.
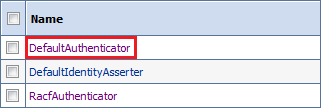
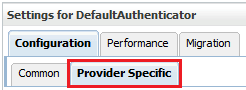
Click DefaultAuthenticator (select the name itself, not the check box).
Change the Control Flag to Sufficient, and then click Save.
Select the Provider Specific tab, and then click Save.
Click the Providers locator link to return to the Authentication Providers screen.

Under Authentication Providers, select the RACF authenticator name you created in Step 8 (select the name itself, not the check box).

Change the Control Flag to Sufficient, and then click Save.
Select the Provider Specific tab.
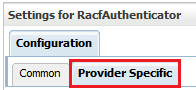
Enter the Host name (for example, mvshost.yourcompany.com) and Port number (for example, 8700) where the MVS system is running, and then click Save.
Under Change Center (top left of screen), click Activate Changes.
Log out of WebLogic.
Stop and restart STA using the STA command. For additional information on using the STA command, see the STA Administration Guide.
# STA stop all
# STA start all
|
 Copyright © 2012, 2014, Oracle and/or its affiliates. All rights reserved. Legal Notices |
|