|
Siebel CRM Desktop for Microsoft Outlook Administration Guide > Customizing Siebel CRM Desktop > Adding Custom Dialog Boxes >
Specifying the Layout of the Dialog Box
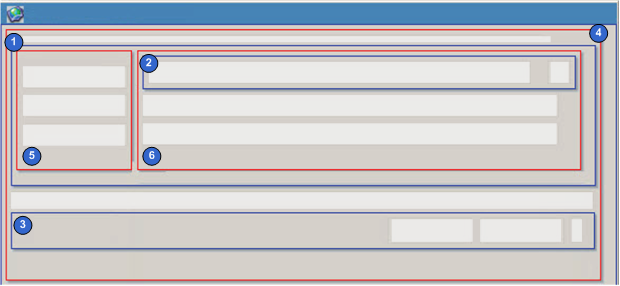
Figure 11 illustrates the layout of the dialog box that a page layout publisher displays when you create the layout for your custom dialog box. Each blue box represents a horizontal layout, each red box represents a vertical layout, and each light-shaded box represents a cell.
Figure 11. Layout of the Dialog Box
|
Explanation of Callouts The Layout of the custom dialog box includes the following items:
- A horizontal block that contains the controls.
- A horizontal block that contains the autocomplete control and the button that CRM Desktop uses for the autocomplete control.
- A horizontal block that contains the OK and Cancel buttons. This block sets the horizontal position for these buttons.
- A vertical block that creates the start padding.
- A vertical block that contains the controls for fields.
- A vertical block that contains the controls for captions.
You place the vertical blocks that contain controls for fields and captions in the first horizontal block.
For more information, see Guidelines for Sizing Controls in Cells. To specify the layout of the dialog box
- Use an XML editor to open the dialogs.xml file.
- Add the following code. You enclose each block in a cell, and you include at least one cell that contains each control. This code starts with the first horizontal block. It also adds controls for the combobox, autocomplete list, buttons, button labels, and edge:
<script><script>
<dialog id="Competitor Dlg">
<layout sizable="false" id="General" caption="#dlg_competitor_caption"
small_icon="app_small_icon">
<appearance height="130" width="350"position="parent_center">
</appearance>
<cell>
<stack layout="horz" padding="5">
<cell>
<stack layout="vert" padding="5">
<cell size="5"/>
<cell>
<stack layout="horz" spacing="3">
<cell size="100">
<stack layout="vert" spacing="3">
<cell size="22">
<static id="lbl_competitor_name" tab_order="1">
<text>#head_competitor_name</text>
</static>
</cell>
<cell size="22">
<static id="lbl_relationship_role" tab_order="2">
<text>#lbl_relationship_role</text>
</static>
</cell>
<cell size="22">
<static id="lbl_reverse_relationship_role" tab_order="3">
<text>#lbl_reverse_relationship_role</text>
</static>
</cell>
</stack>
</cell>
<cell>
<stack layout="vert" spacing="3">
<cell size="22">
<stack layout="horz" spacing="2">
<cell>
<autocomplete id="CompetitorId" tab_order="4">
<field>CompetitorId</field>
<source type="Account"format=":[:(AccountName):]">
</source>
</autocomplete>
</cell>
<cell size ="22" attraction="far">
<button id="btn_AccountId" image="lookup_button" tab_order="5">
<text>...</text>
</button>
</cell>
</stack>
</cell>
<cell size="22">
<combobox id="RelationshipRole" tab_order="6">
<field>RelationshipRole</field>
<items format=":[:(Label):]" value_column="Value" has_null_item="true">
<source type="auto" name="Opportunity.CompetitorRelationshipRolePicklist"> </source>
<order_by>
<order ascend="true">SortOrder</order>
</order_by>
</items>
</combobox>
</cell>
<cell size="22">
<combobox id="ReverseRelationshipRole" tab_order="7">
<field>ReverseRelationshipRole</field>
<items format=":[:(Label):]" value_column="Value" has_null_item="true">
<source type="auto" name="Opportunity.CompetitorReverseRelationshipRolePicklist">
</source>
<order_by>
<order ascend="true">SortOrder</order>
</order_by>
</items>
</combobox>
</cell>
</stack>
</cell>
</stack>
</cell>
<cell size="15">
<edge id="close_border"/>
</cell>
<cell size="25">
<stack layout="horz">
<cell>
</cell>
<cell size="80">
<button id="btn_ok" tab_order="15">
<text>#btn_ok</text>
</button>
</cell>
<cell size="10"></cell>
<cell size="80">
<button id="btn_cancel" tab_order="16">
<text>#btn_cancel</text>
</button>
</cell>
</stack>
</cell>
</stack>
</cell>
</stack>
</cell>
</layout>
</dialog>
Guidelines for Sizing Controls in Cells
You can apply the following guidelines when you size controls in cells:
- You must place each control in a cell. The size of the cell that contains the control determines the size of the control.
- If you place a cell in a horizontal block, then you can set the horizontal size of this cell.
- If you place a cell in a vertical block, then you can set the vertical size of this cell.
- You cannot set the vertical size of a cell that you place in a horizontal block, and you cannot set the horizontal size of a cell that you place in a vertical block. A cell includes only one size attribute. CRM Desktop examines the parent layout type of the cell to determine how the size relates to the vertical or the horizontal orientation.
- If you do not set a size for a control, then CRM Desktop stretches the control so that it consumes all the available area in the cell. If you set the size for only some cells, then CRM Desktop sizes the cell according to the dimensions you specify, and expands each other cell that you do not specify size so that it consumes all the available area in the cell where it resides.
- In this example, you add a size for some cells to more accurately position the control that each cell contains.
|