Defining Learning Resources
To define equipment, use the Equipment (LM_EQP_TBL) component. You can use the LM_EQP_TBL component interface to load data into the table for this component. To define materials, use the Material (LM_MTRL_TBL) component. You can use the LM_MTRL_TBL component interface to load data into the table for this component. To define facilities and room, use the Facilities (LM_FCLTY_TBL) component.
After you set up resource types for equipment, materials, instructors, and rooms, you define the specific resources that are available for the classes that you schedule. You also define your facilities and the rooms within those facilities.
This topic provides overviews of equipment management and attachments, lists common elements, and discusses how to:
Define equipment.
Copy equipment.
Define materials.
Define facilities.
Set up facility equipment and attachments.
Set up facility rooms.
Enter facility room details.
Pages Used to Define Learning Resources
|
Page Name |
Definition Name |
Navigation |
Usage |
|---|---|---|---|
|
Equipment |
LM_EQP_TBL |
|
Define equipment by equipment types that you have created. You can supplement the definition with attachments such as manufacturers' user manuals. You can then assign the equipment to session templates, session patterns, facilities, and rooms within facilities. |
|
Equipment Copy |
LM_EQP_COPY |
Click the Copy Equipment button on the Equipment page. |
Copy equipment by creating multiple new records of an equipment item that you have defined. You have some control over what attributes are copied. |
|
Material |
LM_MTRL_TBL |
|
Define materials by material types that you have created. You can then assign these materials to classes. |
|
Facility |
LM_FCLTY_TBL |
|
Define a facility by associating a holiday schedule with it and setting up contact details. |
|
Equipment and Attachments |
LM_FCLTY_EQP |
|
Assign facility-wide equipment—that is, equipment not confined to a particular room in the facility—by associating items of equipment with the facility. Also add related attachments. |
|
Rooms |
LM_FCLTY_ROOM |
|
Define rooms for a facility. |
|
Room Detail |
LM_ROOM_TBL |
|
Create, view, enter and edit details of the rooms that you want to define for a facility. |
Understanding Equipment Management
Equipment constitutes all of the individual pieces of equipment available in the system. After you define equipment types, define the individual pieces of equipment that are available as resources and attach them to facilities or rooms.
This list explains the relationship between equipment and facilities and rooms:
When equipment is attached to a facility, it indicates equipment that is available for scheduling by sessions—that is, by session pattern or directly into sessions.
Once associated with a facility, equipment is added to a library of available equipment.
You cannot add equipment to a session pattern or session until you have associated it with a facility.
You can, however, add to a room any item of equipment not currently assigned to a facility or room.
When equipment is attached to a room, it simply indicates that the item is permanently assigned or affixed to the room and is not available to be scheduled by anyone else, anywhere else.
When you define a room within a facility, you can set a cost for the use of the room.
You should calculate the cost, if any, of any equipment that the room has in its definition and build those costs into the room cost, because room-level equipment costs are not automatically mapped to the class.
An alternative to building room-level equipment costs into a room cost is to apply the equipment cost manually on the Class Costs page.
See Understanding Class Costing.
It is also important to know what equipment comes with a room so that you don't unnecessarily reserve facility-level equipment when the room already has it. The additional item may incur additional costs, whereas the cost of the room's equipment may already be built into the room cost.
The associated cost of any facility-level equipment booked for a session is automatically mapped to the class.
The system enables you to view the equipment that comes with the room that you have selected when scheduling a class in a facility.
Understanding Attachments
Several of the resources management pages have fields for attachments. What you attach to a page likely depends on the page where you make the attachments. Here are some examples:
Facility: driving directions to the facility, bus routes and timetables, site map.
Equipment: electronic copy of user manual.
Rooms: fixed feature user instructions (complex lighting, screens, curtains, mechanical platforms).
To add an attachment, click the Add Attachment button. Then either enter the path to and the name of the attachment, or click the Browse button to locate the attachment, and click the Upload button. After you upload the attachment, the system displays the attachment file name in the description field. You can edit this description.
To display room attachments to learners, select the Display check box next to the attachment description.
To delete an attachment, select the check box next to the attachment description and click the Delete Attachment button.
Note: Your system configuration determines the size of the files that you can attach.
Equipment Page
Use the Equipment page (LM_EQP_TBL) to define equipment by equipment types that you have created.
You can supplement the definition with attachments such as manufacturers' user manuals. You can then assign the equipment to session templates, session patterns, facilities, and rooms within facilities.
Image: Equipment page
This example illustrates the fields and controls on the Equipment page.
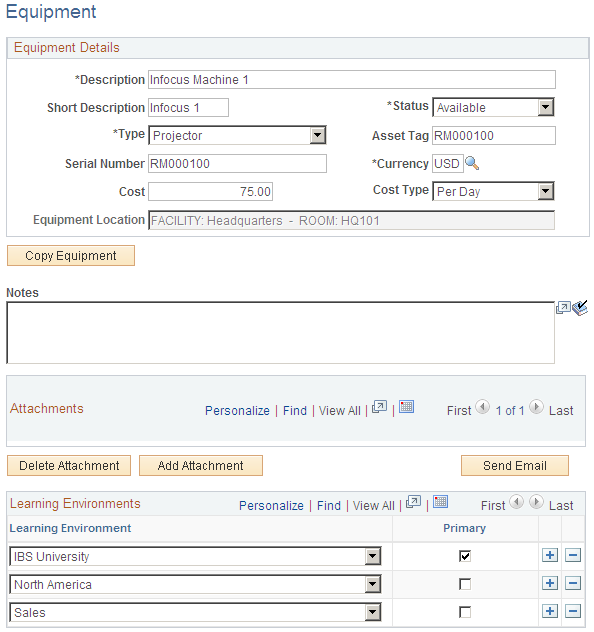
Equipment Details
Learning Environments
Use these fields to specify the learning environments for which this equipment is valid.
Equipment Copy Page
Use the Equipment Copy page (LM_EQP_COPY) to copy equipment by creating multiple new records of an equipment item that you have defined.
You have some control over what attributes are copied.
Image: Equipment Copy page
This example illustrates the fields and controls on the Equipment Copy page.
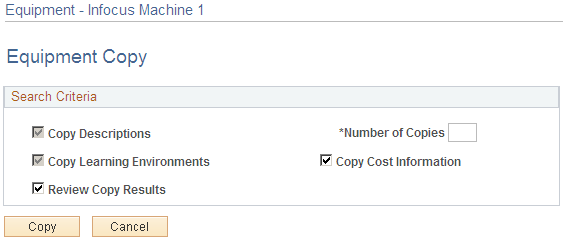
If you have a number of items of a particular type, you can set up one item and then copy that item, specifying the number of copies. When the system has generated the copies, you can edit the attributes, such as serial number.
Select the equipment attributes that you want copied and specify the number of copies that you want. Descriptions and learning environments are always copied, so these options are preselected and cannot be cleared.
When you click the Copy button, the system produces new records, each with a new ID. To view the copies immediately—so that you can apply unique attributes such as serial number and asset tag—select the Review Copy Results check box. The system presents you with a grid containing all the copies it has made. In the grid, you can modify the attributes to make each item unique.
Material Page
Use the Material page (LM_MTRL_TBL) to define materials by material types that you have created.
You can then assign these materials to classes.
Image: Material page
This example illustrates the fields and controls on the Material page.
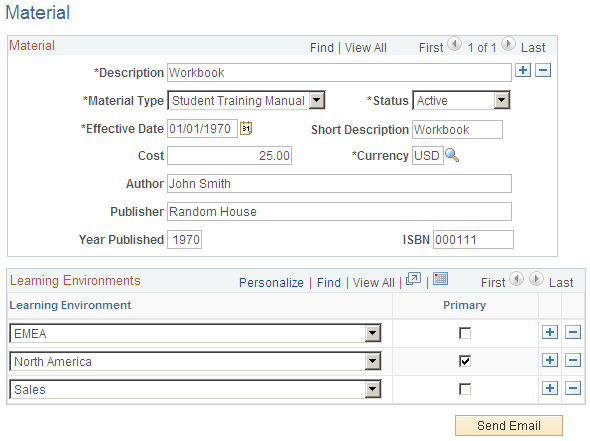
Material
Learning Environments
Use these fields to specify the learning environments for which this material is valid.
Facility Page
Use the Facility page (LM_FCLTY_TBL) to define a facility by associating a holiday schedule with it and setting up contact details.
Image: Facility page
This example illustrates the fields and controls on the Facility page.
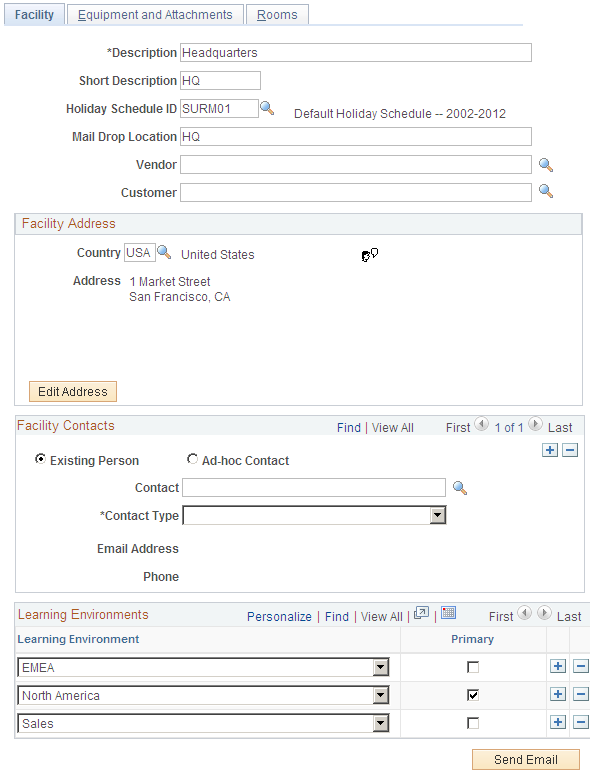
When you schedule sessions for a class, you specify the facility in which the class's sessions take place.
Defining a facility has three parts. You need to define:
Basic facility-wide data, such as address, contact, and attachments.
The facility's rooms, specifying their location by building and floor and the equipment that comes with each room.
The facility's equipment inventory from which items can be allocated for a scheduled class.
Equipment and Attachments Page
Use the Equipment and Attachments page (LM_FCLTY_EQP) to assign facility-wide equipment—that is, equipment not confined to a particular room in the facility—by associating items of equipment with the facility.
Also add related attachments.
Image: Equipment and Attachments page
This example illustrates the fields and controls on the Equipment and Attachments page.
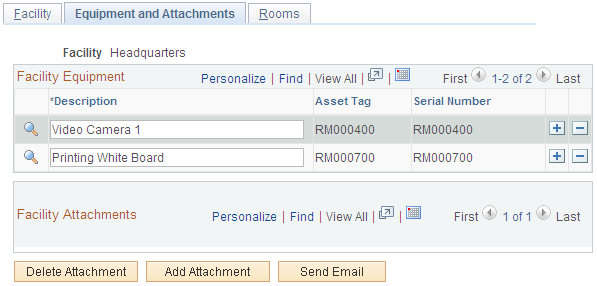
Only equipment that you assign to a facility here is available for attachment to a session pattern, session template, or session.
Rooms Page
Use the Rooms page (LM_FCLTY_ROOM) to define rooms for a facility.
Image: Rooms page
This example illustrates the fields and controls on the Rooms page.
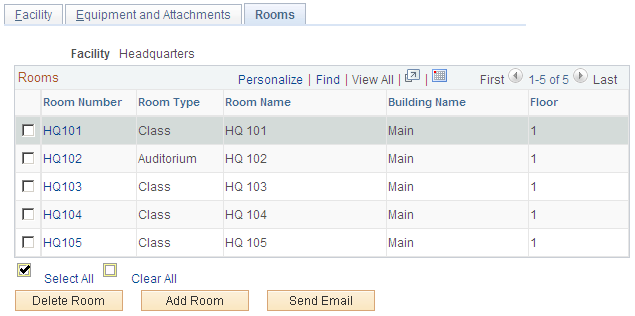
To edit the details of a room, click the Room Number link to access the Room Details page.
To add a room, click the Add Room button to access the Room Details page.
Room Detail Page
Use the Room Detail page (LM_ROOM_TBL) to create, view, enter and edit details of the rooms that you want to define for a facility.
Click the room number link on the Rooms page for a room already attached to a facility.
Click the Add Room button on the Rooms page when defining or attaching more rooms.
Image: Room Detail page
This example illustrates the fields and controls on the Room Detail page.
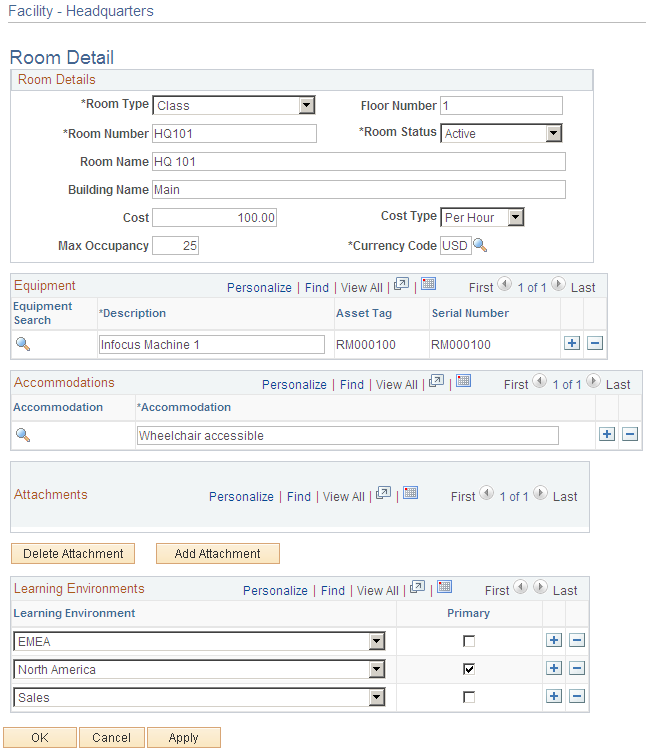
Enter details of the room, such as type, number, and name, and identify the building the room is in and the floor it is on. Enter the maximum occupancy allowed. Also, enter the cost of using the room per cost type unit. Note that this is the room cost only; if costs are associated with the equipment that comes with the room, you can build that cost into the room cost. Alternatively, you can add the equipment cost manually on the Class Costs page.
See Understanding Class Costing.
Equipment, Accommodations, and Attachments
You can assign equipment, accommodations, and attachments to a room by clicking the search or add buttons to find previously defined equipment, accommodations, and stored attachments. After you attach a room to a session, you can click the Details link on the Session Details page to view the rooms details on the Room Detail page (LM_ROOM_ADMIN_DTL), which are the same details that you see in the Room Detail setup page (LM_ROOM_TBL).
Learning Environments
Specify the learning environments for which this room is valid. For new rooms, the system displays the learning administrator's environment as the default. By adding other learning environments, you enable administrators of those environments access to this room.
Important! If you are adding new rooms, be sure that your learning environment is listed here. If it's not, you will lose the ability to access this room after you leave this component.
This object must be associated with at least one learning environment. In this field, select the primary environment with which this object is associated. You cannot remove the primary learning environment from this page without first selecting another environment as the primary. You can change the primary learning environment on this page at any time.