Oracle® Enterprise Manager Ops Center
Discovering and Managing I/O Domains in Oracle SuperCluster Software v2.0
12c Release 2 (12.2.2.0.0)
E57678-01
June 2015
This guide provides an end-to-end example for how to use Oracle Enterprise Manager Ops Center.
Introduction
Oracle Enterprise Manager Ops Center provides comprehensive lifecycle management for Oracle Solaris, Oracle Linux, SUSE Linux, Red Hat Linux, and Microsoft Windows operating systems in your data center.
Starting with Oracle SuperCluster Software v2.0, you can create new I/O domains outside of Oracle Enterprise Manager Ops Center. The logical domain is displayed in the Navigation pane; however the operating system will not appear automatically. To monitor or manage the new I/O domain operating system, you must discover it manually.
In this document, you learn how to manually discover and manage I/O domains in Oracle SuperCluster Software v2.0.
See Related Articles and Resources for links to related information and articles about discovering and managing other assets.
What You Will Need
You will need the following:
-
An Oracle SuperCluster Software v2.0 system discovered by Oracle Enterprise Manager Ops Center.
-
Hostname or IP address of the I/O domain operating system.
-
Credentials of the I/O domain operating system. (If the I/O domain OS credentials are not changed manually, they share the default credentials.)
-
Access to Oracle Enterprise Manager Ops Center using Ops Center Admin role to create credentials and discover operating systems.
Discover the I/O Domain Using a Discovery Profile
A discovery profile is a combination of an asset type, a set of host names or IP addresses, and a set of credentials. You can use discovery profiles to locate specific systems and to specify how the discovered assets should be managed, with or without an Agent Controller.
The tasks that are covered in this section are as follows:
Create Credentials
Assets are managed using a set of credentials. You can create new credentials or use existing credentials to discover assets.
When creating credentials, if your target OS supports root login, enter a root user (or other privileged user) and leave the Privileged Role field blank. If the target OS does not support root login, then enter a non-root user that can login to the OS and also specify a root/privileged user in the Privileged Role field.
To create credentials, perform the following steps:
-
In the Navigation pane, click Plan Management, then click Credentials.
-
In the Actions pane, click Create Credentials.
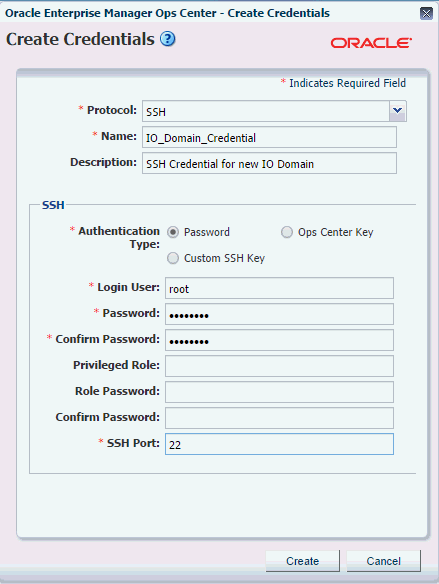
Description of the illustration create_credentials.gif
-
In the Protocol field, select SSH from the drop-down list.
-
In the Name field, enter a name for the credential.
-
(Optional) In the Description field, enter a description.
-
Select Password as the Authentication Type.
-
Custom SSH Key: If you prefer not to use password-based SSH credentials, you can create a SSH key to access to the operating system.
-
Ops Center Key: A new SSH key pair is generated. During discovery, Oracle Enterprise Manager Ops Center configures key-based authentication by installing the generated public key in the login account. Note that different credentials must be used to discover the Operating System before the new public key has been installed.
-
-
In the Login User field, enter a user name to login.
-
In the Password field, type a password. Retype the same password in the Confirm Password field.
Note:
If a non-privileged user logs in, Oracle Enterprise Manager Ops Center runs the ”su” command to elevate the user to a root/privileged user. -
(Optional) Enter a name and password for the Privileged Role. Also, confirm the role password. The privileged role password is created with the same default root password; however, the privileged role password is required if you change the login credentials manually.
-
Enter the SSH port number. The SSH port number is populated by default. Default value is 22.
-
Click Create. The user credential is created.
Create an OS Discovery Profile
You can create an OS discovery profile and then run a discovery using the profile. You can provide some discovery information, such as the targeted IP addresses and the discovery credentials during profile creation or when the profile is run.
A Tag is a set of information attached to an asset. Each tag consists of a tag name, which is drawn from a list of values appropriate for each asset, and a tag value, which can be any text string. You can also create your own tag name. For example, an asset could have a tag with a tag name of oracle.cloud.resource.creation.time and a value of 12 June. Tags can be used to associate information with assets, and to group assets based on tags or tag values. You can add tags to assets during or after discovery.
-
In the Navigation pane, click Plan Management.
-
Under Profiles and Policies, click Discovery.
-
In the Actions pane, click Create Profile.
-
Enter a name and description for the I/O domain discovery profile.
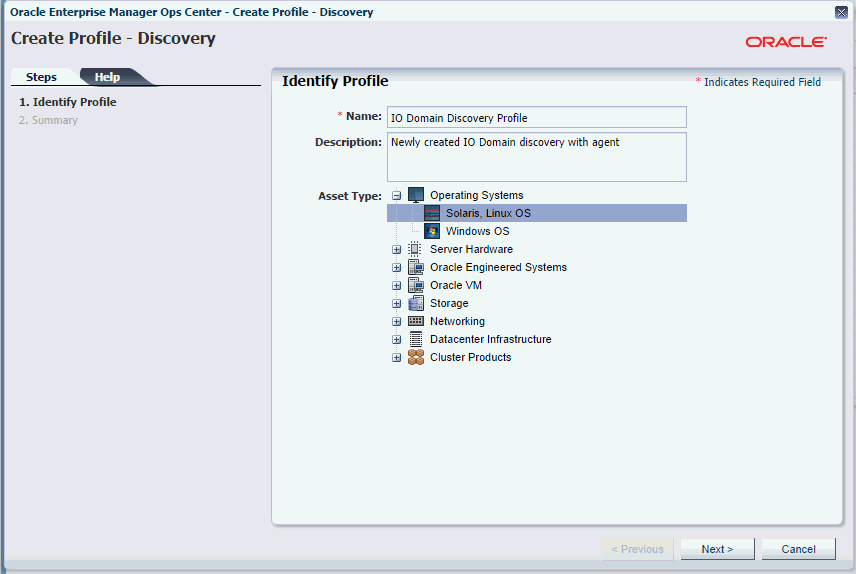
Description of the illustration identity_profile.gif
-
In the Asset Type, under Operating Systems, select Solaris, Linux OS. Click Next.
-
(Optional) Click the plus icon (highlighted in red in the following figure) to add tags to the I/O domain. Select a tag name and enter a value for the tag. Click Next.

Description of the illustration tags.gif
-
(Optional) Enter the IP Ranges. Click the plus icon (highlighted in red in the following figure) to add IP Ranges.
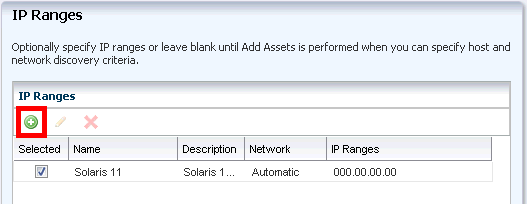
Description of the illustration ip_wiz.gif
-
Enter values in the respective fields and click Add, then click Next.
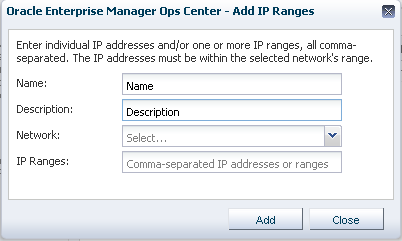
Description of the illustration ip_ranges.gif
-
Name: A name for the IP range.
-
Description: A description for the IP range, so that it can be identified and reused.
-
Network: The managed network with which the host names or IP addresses are associated. This is used to route the discovery to the correct Proxy Controller. When a Proxy Controller cannot reach the assets' network, the discovery will fail. Select Automatic to route the job to the most appropriate Proxy Controller.
-
IP Ranges: The IP range to be targeted.
-
-
-
In the Discovery Credentials wizard, click Select to choose a SSH protocol. Under Management, select Deploy Agent Controller option, then click Next.
Note:
If the new I/O domain shares the same password with some other OS, you can select the existing credentials.Note:
Do not check the Enable Oracle VM for SPARC management option.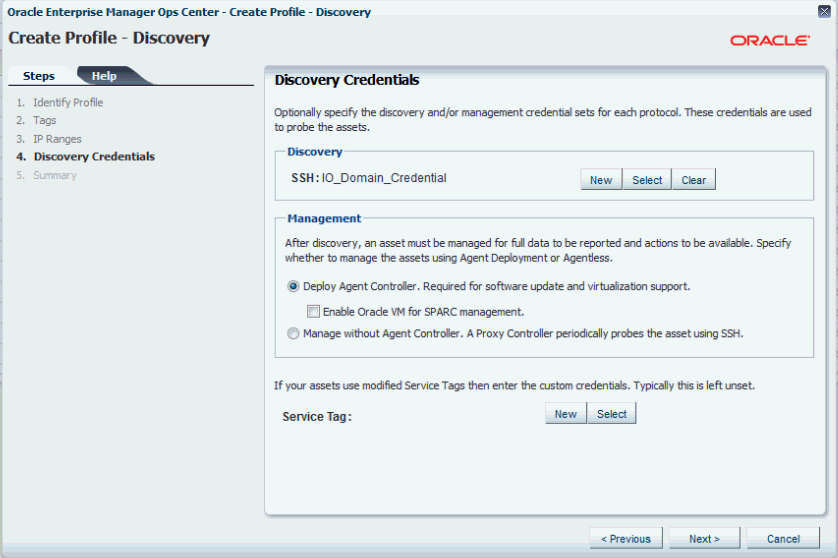
Description of the illustration discovery_credintials.gif
-
Review the summary information, then click Finish to create a Discovery Profile.
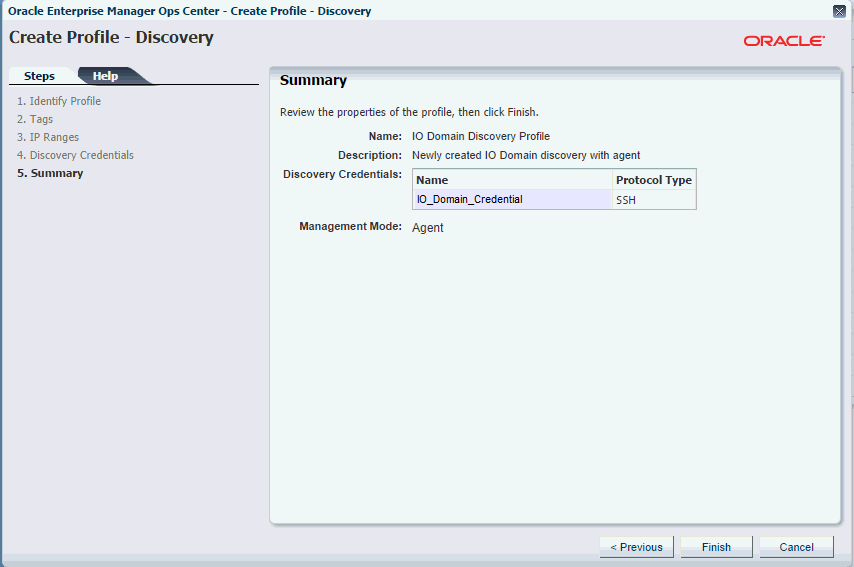
Description of the illustration disc_pro_summary.gif
Add the I/O Domain Operating System Using the Discovery Profile
After you have created a discovery profile, you can run it to discover and manage the I/O domain operating system.
This procedure assumes that you have already created a discovery profile with an IP range, a specified network, and discovery and management information.
Note:
You can discover multiple I/O domains if they share the same login information.Note:
The I/O domain OS can be discovered only after the I/O domain has started.-
Click All Assets in the Assets section of the Navigation pane.
-
Click Add Assets in the Actions pane.
-
Select Add and Manage Various Types of Assets via Discovery Probes, then click Next.
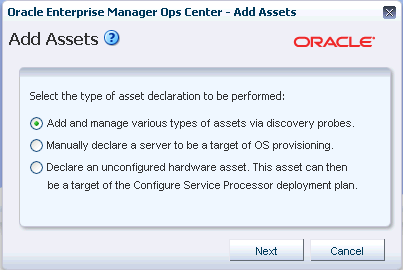
Description of the illustration add_assets.gif
-
Select the newly-created I/O domain discovery profile.
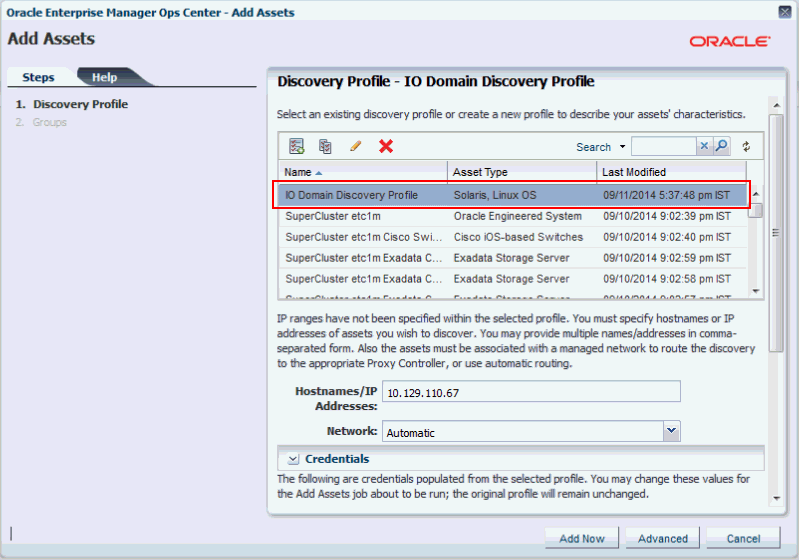
Description of the illustration add_io_domain.gif
-
In the Hostnames/IP Addresses field, enter the IP address or host name of the server.
-
Click Add Now to launch the discovery. The discovery job is launched and might take around 60 minutes to complete.
What's Next?
After the discovery job completes successfully, verify if the OS of the I/O domain is present.
-
In the Navigation pane, under Assets, expand Oracle Engineered Systems.
Note:
If the newly created I/O domain is not visible, refresh the control domain that manages the new I/O domain. -
Select the Operating System of the I/O domain. Click on the Dashboard tab and verify the OS and Agent Managed fields.

Description of the illustration io_dom_os.gif
-
If it is managed by an Agent, the Libraries and Storage tabs are present in the center pane. Click the Summary tab to check the version number of the Agent. Ideally, the Agent version must be same as that of the Ops Center version.
-
If the OS is not managed by an Agent, use the OS to create non global zones.
-
Related Articles and Resources
The following chapters in the Oracle Enterprise Manager Ops Center Feature Reference Guide contain more information:
Documentation Accessibility
For information about Oracle's commitment to accessibility, visit the Oracle Accessibility Program website at http://www.oracle.com/pls/topic/lookup?ctx=acc&id=docacc.
Oracle customers that have purchased support have access to electronic support through My Oracle Support. For information, visit http://www.oracle.com/pls/topic/lookup?ctx=acc&id=info or visit http://www.oracle.com/pls/topic/lookup?ctx=acc&id=trs if you are hearing impaired.
Oracle Enterprise Manager Ops Center Discovering and Managing I/O Domains in Oracle SuperCluster Software v2.0, 12c Release 2 (12.2.2.0.0)
E57678-01
Copyright © 2007, 2015, Oracle and/or its affiliates. All rights reserved.
This software and related documentation are provided under a license agreement containing restrictions on use and disclosure and are protected by intellectual property laws. Except as expressly permitted in your license agreement or allowed by law, you may not use, copy, reproduce, translate, broadcast, modify, license, transmit, distribute, exhibit, perform, publish, or display any part, in any form, or by any means. Reverse engineering, disassembly, or decompilation of this software, unless required by law for interoperability, is prohibited.
The information contained herein is subject to change without notice and is not warranted to be error-free. If you find any errors, please report them to us in writing.
If this is software or related documentation that is delivered to the U.S. Government or anyone licensing it on behalf of the U.S. Government, then the following notice is applicable:
U.S. GOVERNMENT END USERS: Oracle programs, including any operating system, integrated software, any programs installed on the hardware, and/or documentation, delivered to U.S. Government end users are "commercial computer software" pursuant to the applicable Federal Acquisition Regulation and agency-specific supplemental regulations. As such, use, duplication, disclosure, modification, and adaptation of the programs, including any operating system, integrated software, any programs installed on the hardware, and/or documentation, shall be subject to license terms and license restrictions applicable to the programs. No other rights are granted to the U.S. Government.
This software or hardware is developed for general use in a variety of information management applications. It is not developed or intended for use in any inherently dangerous applications, including applications that may create a risk of personal injury. If you use this software or hardware in dangerous applications, then you shall be responsible to take all appropriate fail-safe, backup, redundancy, and other measures to ensure its safe use. Oracle Corporation and its affiliates disclaim any liability for any damages caused by use of this software or hardware in dangerous applications.
Oracle and Java are registered trademarks of Oracle and/or its affiliates. Other names may be trademarks of their respective owners.
Intel and Intel Xeon are trademarks or registered trademarks of Intel Corporation. All SPARC trademarks are used under license and are trademarks or registered trademarks of SPARC International, Inc. AMD, Opteron, the AMD logo, and the AMD Opteron logo are trademarks or registered trademarks of Advanced Micro Devices. UNIX is a registered trademark of The Open Group.
This software or hardware and documentation may provide access to or information about content, products, and services from third parties. Oracle Corporation and its affiliates are not responsible for and expressly disclaim all warranties of any kind with respect to third-party content, products, and services unless otherwise set forth in an applicable agreement between you and Oracle. Oracle Corporation and its affiliates will not be responsible for any loss, costs, or damages incurred due to your access to or use of third-party content, products, or services, except as set forth in an applicable agreement between you and Oracle.