Install Oracle VM Server Manually Using Local or Remote Media
Before you begin, review the installation prerequisites in Before You Begin.
-
Access the host console.
For instructions, see Accessing the Host Console.
-
Ensure that the installation media is available to boot.
For instructions, see Preparing the Boot Media.
-
Power on or reset the server.
For example, to reset the server, do one of the following:
-
From the local server, press the Power button on the front panel of the server (for approximately 1 second) to power off the server, and then press the Power button again to power on the server.
-
From the Oracle ILOM web interface, select Host Management → Power Control, and then select Reset from the Select Action list box.
-
From the Oracle ILOM command-line interface, type reset /System.
The server begins the boot process.

Note - The next events occur very quickly; therefore, focused attention is needed for the following steps. Watch carefully for these messages as they appear on the screen for a brief time. You might want to enlarge the size of your screen to eliminate scroll bars. -
-
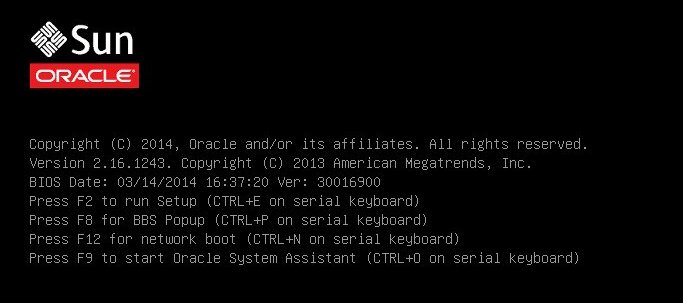
In the BIOS screen, press the F8 key to specify a temporary boot device for the Oracle VM Server installation.
The Please Select Boot Device menu appears.
-
In the Please Select Boot Device menu, select either the external or virtual CD/DVD device as the boot device, and then press Enter.
The device strings listed in the Boot Device menu are in the following format: device type, slot indicator, and product ID string.
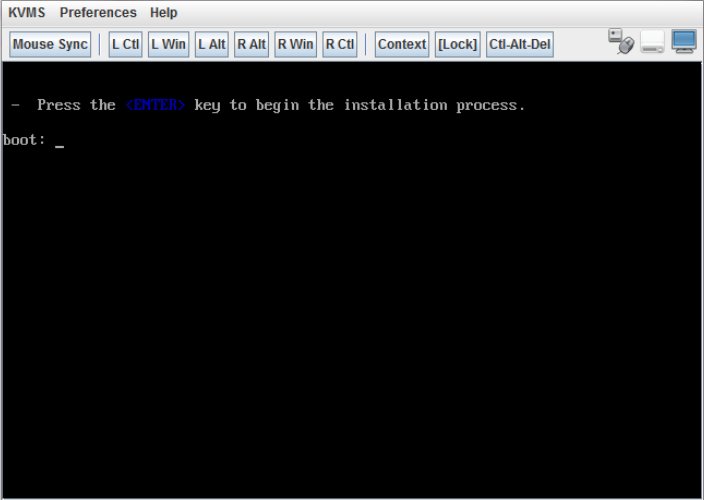
After a few seconds, the splash screen for Oracle VM Server appears.

-
Press Enter to begin the installation.
If you do not press a key, after one minute, the installer automatically starts. The installer is only available in text mode.
-
Refer to the Oracle VM Installation and Upgrade Guide for Release 3.3 at http://docs.oracle.com/cd/E50245_01/index.html.
The Oracle VM Installation and Upgrade Guide for Release 3.3 provides step-by-step instructions for installing Oracle VM.
- Follow the on-screen prompts to install Oracle VM Server and Oracle VM Server Agent.
-
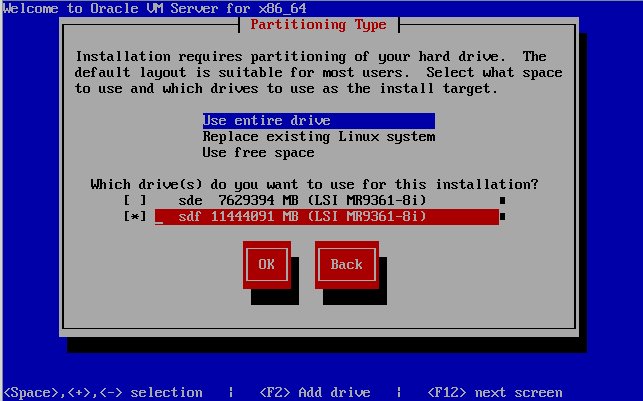
As you progress through the on-screen prompts, the Partitioning Type screen appears.

Note - Although the next step is described in the Oracle VM Installation and Upgrade Guide for Release 3.3 at: http://docs.oracle.com/cd/E50245_01/index.html, it is included here because you must exercise caution when you select the drive onto which to install Oracle VM Server. -
In the Partitioning Type screen, do the following:
-
Select one of following partition layouts:
-
Use entire drive
-
Replace existing Linux system
-
Use free space
-
-
Select the drive(s) you want to use for the installation.

Caution - In the Partitioning Type screen, the Oracle SSM drive is the Oracle System Assistant USB flash drive. You might have to scroll to the bottom of the screen to see this drive. You should never select the Oracle SSM drive as the software installation drive. Installing Oracle VM Server to the Oracle SSM drive will overwrite the Oracle System Assistant software and Oracle System Assistant will have to be restored. For instructions for restoring Oracle System Assistant, see the Oracle X5 Series Servers Administration Guide at http://www.oracle.com/goto/x86AdminDiag/docs.
- Select OK to continue the installation.
-
Select one of following partition layouts:
-
To complete the installation, refer to the Oracle VM installation documentation and follow the instructions.
Refer to the Oracle VM Installation and Upgrade Guide for Release 3.3 at http://docs.oracle.com/cd/E50245_01/index.html .
Note - The Oracle VM installation will require two passwords: one for the root Oracle VM Server account and one for the Oracle VM Agent. -
After completing the installation of Oracle VM Server and Oracle VM Agent, do one of the following:
-
If you do not have an Oracle VM Manager configured to manage the Oracle VM Server, you will need to install it before proceeding to Post Installation Tasks for Oracle VM Server.
For instructions for installing Oracle VM Manager, refer to the Oracle VM Installation and Upgrade Guide for Release 3.3 at http://docs.oracle.com/cd/E50245_01/index.html.
-
If you already have an Oracle VM Manager configured to manage the Oracle VM Server, proceed to Post Installation Tasks for Oracle VM Server.
-