Creating Project Requests and Templates
To create project requests and templates, use the Project Requests (BC_PROJ_REQUEST1) component.
This section provides an overview of the options that are available for creating project requests and templates and discusses how to:
Establish project requests and templates.
Add file attachments.
Define relationships to other project requests.
Assign milestones.
Review approval status history.
Update approval status.
Specify save options.
Adjust dates.
Resolve issues.
Pages Used to Create Project Requests and Templates
|
Page Name |
Definition Name |
Navigation |
Usage |
|---|---|---|---|
|
Project Request |
BC_PROJ_REQUEST1 |
|
Create project requests and templates. |
|
Project Request - Attachments |
BC_PROJ_ATTACH |
|
Associate file attachments with a project request. |
|
Project Request - Dependency |
BC_PRJREQST_DPN |
|
Designate project requests upon which the current project request depends and view project requests that depend on the current project request. |
|
Project Request - Dependency Comments |
BC_PRJREQST_DPN_CM |
Click the Comments button on the Project Request - Dependency page. |
Enter comments about a dependency relationship. |
|
Project Request - Milestones |
BC_PRJREQST_MST |
|
Enter project request milestones and indicate their status. |
|
Project Request - Status History |
PPK_PROJREQ_AUD |
|
Review an audit trail of workflow approval status entries for the project request. |
|
Project Approval |
BC_PRJ_APPROVAL |
This page is automatically accessed when a user selects a project request from the worklist. |
Modify the approval status for a project request. |
|
Save Options |
PPK_SAVE_OPTIONS |
Click Save As on the Project Request page |
Saves a project request or template as either a new project request or a new template. |
|
Project Request Date Change Option |
BC_EST_DATE_CHANGE |
Click the Move button on the Project Request - Costs page or the Project Request - Benefits page. This page appears automatically if you change the project request's estimated start date or estimated end date to a date that is in a different fiscal period. |
Advance or delay a project request's estimated start date, estimated end date, or dates that are associated with costs and benefits. |
|
Project Request Validation Errors |
PPK_ERROR_REPORT |
Appears automatically if errors occur when you attempt to save a project request. |
Review project request errors and correct them by linking to the page upon which each error occurs. |
Understanding the Options That Are Available for Creating Project Requests and Templates
The following options are available to create project requests and templates:
Create a new project request from scratch.
Create a new template from scratch.
Create a new project request from a template.
Create a new project request from an existing request.
Create a new template from an existing project request.
Create a new template from an existing template.
Established security controls whether given individuals can use each of these options. If they are granted the privilege to edit templates, they can create new templates or update existing templates. If they only have view privileges for templates, they cannot create new templates; if they open a template, they cannot edit it, but they can create a new request from that template.
When you create a new template or project request from an existing template or project request, you specify which fields to include by using the Save Options page. Also, if the estimated start or finish dates fall within a different fiscal period than those of the originating template or project request, you can specify whether to move associated costs or benefits accordingly by using the Project Request Date Change Options page. Similarly, if you modify any associated costs or benefits such that they occur during a fiscal year and period that is outside of the date range that is defined by the estimated start and end dates, the system enables you to move either or both of those dates by using the Project Request Date Change Options page.
Before you can save the new project request, the system performs validation checks for the data, and if any errors exist, the Project Request Validation Errors page automatically appears, with links that enable you to navigate to the source of each error. All errors must be resolved before you can save the project request.
Project Request Page
Use the Project Request page (BC_PROJ_REQUEST1) to create project requests and templates.
Image: Project Request page
This example illustrates the fields and controls on the Project Request page. You can find definitions for the fields and controls later on this page.
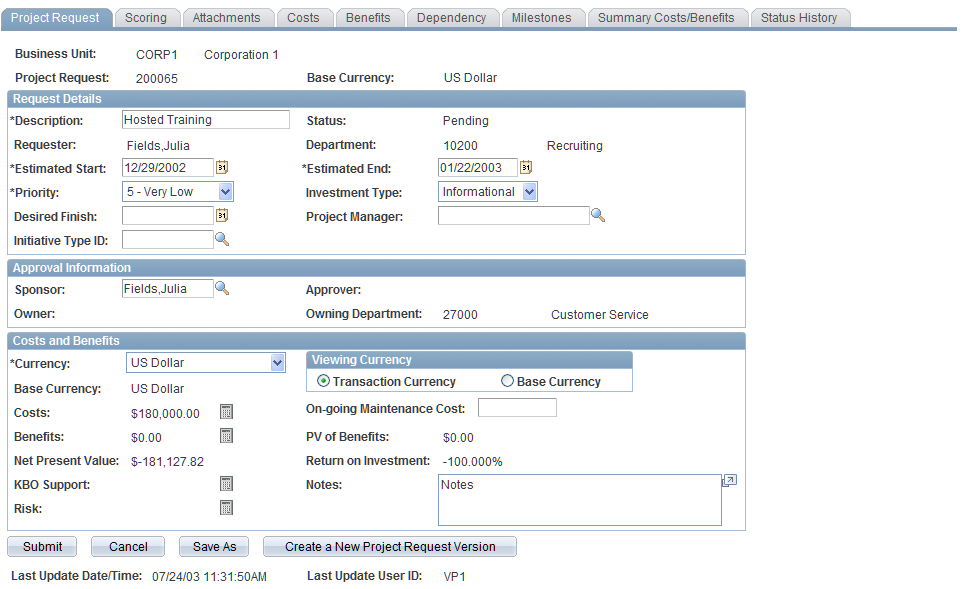
The fields that are available on this page depend on whether the current record is a project request or a template; the ID field label will be either Project Request or Template, accordingly.
Request Details
| Requester |
Displays the name of the user that created the project request. This field is unavailable for entry. |
| Priority |
Select the project request's priority. You establish priorities by using the Priorities page. See Priorities Page. |
| Estimated Start, Estimated End, and Desired Finish |
Enter the corresponding project request dates. The system uses these dates to determine present value (PV), and the estimated start and estimated end dates are used to generate the project's start date and end date, respectively, if the project request results in a project. |
 |
Click the Choose a date button to make a selection in date fields. |
| Initiative Type ID |
Select an initiative type identifier that classifies the type of work that is needed. This field is required if you are integrating with Program Management; otherwise, it is optional. When you select the initiative type, the system automatically populates the Owner and Approver fields, based upon the Initiative Type table. You establish initiative types by using the Initiative Type page. See Initiative Types. |
| Status |
Displays the current status of the project request. This field is display-only for all status values except approved, and its value is either assigned by the system when an individual creates, submits, approves, declines, costs, or returns a project request, or assigned by a project approver using the Project Request Approval page. Possible status values are: Pending: Indicates that the project request is created, but not yet submitted. The system assigns this status when the project request is first saved. Submitted: Indicates that the project request has been submitted and is waiting for the approver to take action on it. This value is assigned:
Costing: Indicates that the project request has been sent to a project or program manager to obtain a more precise cost estimate before a decision is made to approve or decline the request. A project approver can modify the status of a project request to Costing only when its current state is Submitted and when the cost estimate that is entered by the requester needs further validation by the project or program manager. Operationally Approved: Indicates that the project request is submitted, approved by the owner, and awaiting funding department manager approval. This status is available only when funding department manager approval is activated at the installation level. If funding department manager approval is required, then when an owner approves a request, its status changes to operationally approved instead of being changed directly to approved. Approved: Indicates that the project request was submitted and has been approved by the owner. The system automatically changes the status of any other versions of the project request to canceled. When a project request is approved, if you have edit access for approved project requests, the only value that you can change the status to is Canceled. Canceled: Indicates that the project request is canceled. A project request can be canceled only when its current status is either pending, returned, or approved. After a project request has a Canceled status, its status cannot change. Declined: Indicates that the project request is submitted but denied approval. Either the project request approver or a funding department manager can deny a project request. After a project request has a Declined status, its status cannot change. Returned: Indicates that the project request is submitted, and that the approver or a funding department manager returned it to the user who submitted it for additional work. The system assigns this status by using workflow. To continue processing a returned request, click the Submit button to start the approval process again. |
| Investment Type |
Select an investment type from the values that are in the drop-down list box to describe the nature of the project request. This field is used for informational purposes only. |
| Department |
This field is used for informational purposes only and is the department of the individual whose name is entered in the Requester field that is on the project request. This department value is not the department to which costs or benefits are attributed. You attribute costs and benefits with a specific department by entering them using the Costs and Benefits pages that are within the Project Request component (BC_PROJ_REQUEST). |
| Project Manager |
Select the name of a project manager, if this position is determined. This field is required when an approver changes the project request status to costing. |
| Integration Template |
This field is required if you are integrating with PeopleSoft Program Management; otherwise, it does not appear. Integration templates are defined in Project Costing, and they are populated in Program Management during the extract, transform, and load (ETL) process. When a project request has a PeopleSoft Program Management project ID associated with it, this field becomes display-only. See PeopleSoft Project Costing : Structuring PeopleSoft Project Costing: "Creating Templates for Integration with Other Applications" |
| Project ID |
Click this link to access the General Information page (PROJECT_GEN_01A) in Program Management. This link is available only if Program Management integration is enabled, workflow is enabled, and the project request status is either costing or approved. |
Approval Information
The fields that are in this group box are used by approval workflow, which is activated when you submit a project request for approval.
Costs and Benefits
This group box displays calculated costs and benefits information.

Project Request Versions
This grid appears only if you have created multiple versions of a project request. It includes a row for each version that lists its project request ID, description, and status, and the project request ID of the project request of which it is a version
Click a project request ID to view that version. The project request ID of the currently viewed version is display-only.
Actions
Project Request - Attachments page
Use the Project Request - Attachments page (BC_PROJ_ATTACH) to associate file attachments with a project request.


Project Request - Dependency page
Use the Project Request - Dependency page (BC_PRJREQST_DPN) to designate project requests upon which the current project request depends and view project requests that depend on the current project request.
Use this page to identify other project requests upon which this request depends. If other project requests are dependent on this request, they appear in the Project Requests dependent upon this Project Request grid. This data is used only for informational purposes.

Project Request - Milestones page
Use the Project Request - Milestones page (BC_PRJREQST_MST) to enter project request milestones and indicate their status.
Image: Project Request - Milestones page
This example illustrates the fields and controls on the Project Request - Milestones page. You can find definitions for the fields and controls later on this page.
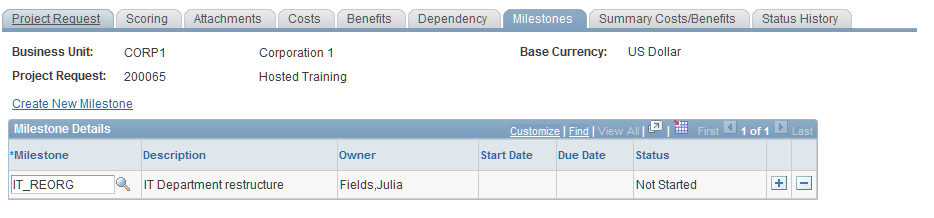
| Create New Milestone |
Click to access the Milestone page, where you can add a new milestone definition. |
Insert rows as needed to document project request milestones.
Project Request - Status History page
Use the Project Request - Status History page (PPK_PROJREQ_AUD) to review an audit trail of workflow approval status entries for the project request.
Image: Project Request - Status History page
This example illustrates the fields and controls on the Project Request - Status History page. You can find definitions for the fields and controls later on this page.
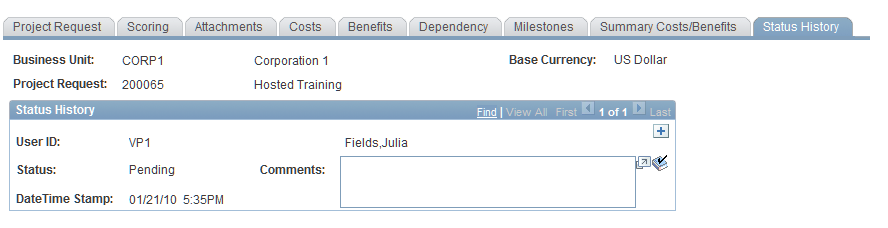
This page displays all status changes for the life cycle of the project request and any comments that the approver makes during the workflow approval process. In addition, you can insert comments on this page to have them date and time stamped. After a comment is entered here, the system does not allow it to be edited.
Updating Approval Status
By using your worklist, access the Project Approval page.
Enter comments to document the action that you are taking, and then click the appropriate button.
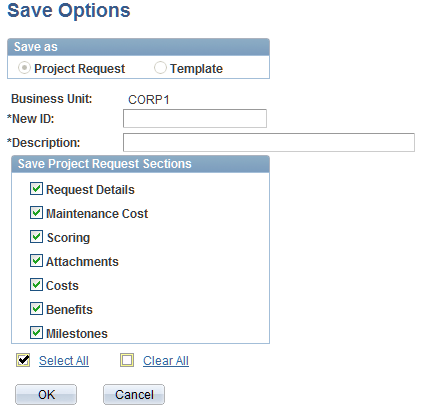
Save Options
Use the Save Options page (PPK_SAVE_OPTIONS) to saves a project request or template as either a new project request or a new template.
Image: Save Options page
This example illustrates the fields and controls on the Save Options page. You can find definitions for the fields and controls later on this page.
|
Option for Save Project Request Sections |
Fields |
|---|---|
|
Request Details |
Business Unit |
|
|
Investment Type |
|
|
Initiative Type ID |
|
|
Owner |
|
|
Approver |
|
|
Start Date (project requests only, not templates) |
|
|
End Date (project requests only, not templates) |
|
|
Priority (project requests only, not templates) |
|
|
Desired Finish (project requests only, not templates) |
|
|
Project Manager (project requests only, not templates) |
|
|
Base Currency |
|
|
Currency |
|
Maintenance Cost |
Maintenance Cost |
|
Scoring |
Score Group |
|
|
Score Type |
|
|
Gross Score |
|
|
Net Score |
|
|
Overall Score |
|
|
Risk Level |
|
|
Adj. (+/- %) |
|
|
Support Level |
|
Attachments |
Attached File |
|
|
Description |
|
|
Approver |
|
|
Owner |
|
|
Owning Department |
|
Costs |
Rate Type |
|
|
Cost Detail fields: GL Unit, Department, Account, Year, Period, Amount, Capitalize |
|
Benefits |
Rate Type |
|
Cost Detail fields: GL Unit, Department, Account, Year, Period, Amount, Capitalize |
|
|
Milestones |
Milestone ID |
Project Request Date Change Option
Use the Project Request Date Change Option page (BC_EST_DATE_CHANGE) to advance or delay a project request's estimated start date, estimated end date, or dates that are associated with costs and benefits.
Click the Move button on the Project Request - Costs page or the Project Request - Benefits page. This page appears automatically if you change the project request's estimated start date or estimated end date to a date that is in a different fiscal period.
Image: Project Request Date Change Option page
This example illustrates the fields and controls on the Project Request Date Change Option page. You can find definitions for the fields and controls later on this page.
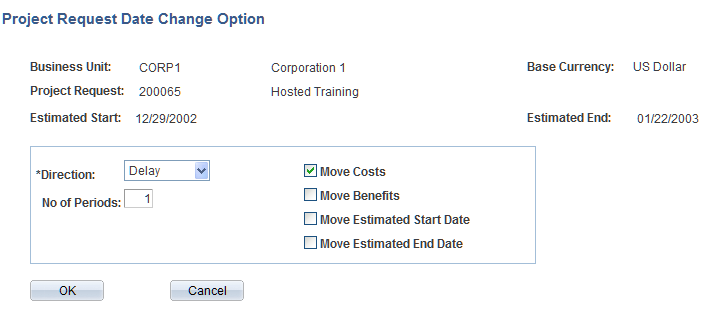
The options that are selected by default when you access this page depends upon the source of the page activation:
If you access the page by clicking the Move button on the Project Requests - Costs page, the value in the No of Periods field becomes 0 by default and the Move Costs check box is selected.
If you access the page by clicking the Move button on the Project Requests - Benefits page, the number of periods becomes 0 by default and the Move Benefits check box is selected.
If the page appears automatically because of a change to the estimated start date, the Move Estimated Start Date check box is unavailable for entry, all of the other options are selected, and the value in the No of Periods field by default becomes the number of periods by which the estimated start date has changed.
If the page appears automatically because of a change to the estimated finish date, the Move Estimated Finish Date check box is unavailable for entry, all of the other options are selected, and the value in the No of Periods field by default becomes the number of periods by which the estimated end date has changed.
Project Request Validation Errors page
The Project Request Validation Errors page appears automatically if errors occur when you try to save a project request.
To resolve an error, review the message text, and then click a link in the Context column to access the field that is causing the error.