
Setting Up Payment Processing
To define external commands, use the External Command component (PMT_EXT_COMM_CMP_GBL).
This section lists the pages and functionality that are involved in Financial Gateway electronic banking payment processing:
Payment Grouping Rules
Definitions of rules that determine what payments can be grouped together in the same file.
Layout Catalog
See Layout Catalog Page.
Code Mappings
See Code Mappings Page.
(Optional) Event Code Definition
Node Definition (required only if you are using Integration Broker to transmit payment files)
See Setting Up PeopleSoft Integration Broker for Bank Statements, Payments, and Payment Acknowledgements.
(Optional) Encryption Profile
(Optional) External Commands
Captures the setup information that is needed to call third-party toolkits to provide encryption and communication of payment files. External commands can be used when you are transmitting payment files using FTP.
Bank Integration Layouts
This component is the main setup component where file layouts, output type, and integration options are associated with a bank.
External Accounts - Payment Methods - Electronic Layouts
Captures how each account's payment method is settled and in what layout. Payments can be settled through the Financial Gateway Dispatch Payments or Payables' Pay Cycle Manager.
How you set up the payment processing functionality depends on the implementation. Because each organization or bank has differing payment layout requirements, delivering all possible layout variations to suit all needs would be exceedingly difficult. If you use the delivered functionality and do not need to make any modifications or changes, you have fewer setup tasks.
If you are creating new layouts or editing existing layouts for an organization's payment processing requirements, you need to first create the payment layout and all its supporting functionality. Specifically, you need to define payment grouping rules and code mappings, and you must also create the file layout objects and formatting logic for new (or modified) payment layouts.
Note: If you create new layouts or modify existing ones for an organization's payment processing requirements, you must add them to the Layout Catalog.
Pages Used Exclusively for Setting Up Payment Processing
|
Page Name |
Definition Name |
Navigation |
Usage |
|---|---|---|---|
|
Payment Grouping Rules |
PMT_CHUNK_DEFN |
|
Define fields to include for a specified payment grouping rule. |
|
Bank Integration Layouts |
BANK_INTEGRATION |
|
Define layouts and transformation programs for a specific bank. |
|
External Accounts - Payment Methods |
PYMNT_BANK |
|
Define the payment methods that are supported for an account, payment processing options, and EFT file attributes. For each account, you can enter multiple payment methods. |
|
External Command |
PMT_EXT_COMM_PG |
|
Optional if output type is file. This is the external command to carry out after the file is output. Define command line information to carry out an external toolkit. This enables you to integrate with third-party toolkits (such as security and communications toolkits) and define command parameters that call executable files, batch files, and command-line functions. |
Payment Grouping Rules Page
Use the Payment Grouping Rules page (PMT_CHUNK_DEFN) to define fields to include for a specified payment grouping rule.
Image: Payment Grouping Rules page
This example illustrates the fields and controls on the Payment Grouping Rules page.
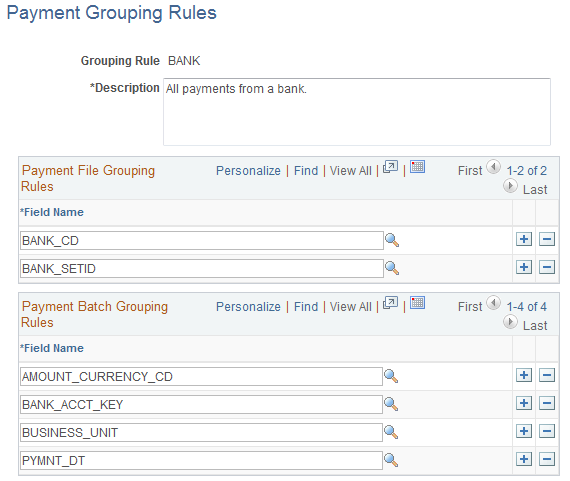
Each payment layout specification defines rules for grouping payments into the file. Grouping rules determine how payments are grouped together into payment files. Certain layouts require a different file for every payment, and other layouts require a separate file for each different business date in a file. For example, the SWIFT MT103 payment layout requires that only one payment exist in a file; therefore, the associated grouping rule is SINGLEPAYMENT.
Other layouts have different rules. For example, CCD+ files can contain payments from multiple accounts and multiple processing dates, so the grouping rule is BANK, and payments for this bank can be included in the same file. For layouts requiring payments to be processed on the same day, you can use the BANKDATE file grouping rule. You can change file grouping rules to accommodate a layout with a specific bank's requirement. To define a file grouping rule, enter the fields to group for a payment type.
There are essentially three layers of filtering that determines how payments are grouped together:
Initially the system groups all payments by bank code, setID, payment layout, and payment method.
This level of filtering is hard coded in the system and cannot be changed or overwritten.
Next, the payment file grouping rules, entered in the top grid, further define how the payments are grouped together, thus determining how many payment files are ultimately created during the payment load process.
Finally, the payment batch grouping rules define how payments within a file are grouped together.
PeopleSoft delivers the following grouping rules:
|
Payment File Grouping Rule |
Description |
|---|---|
|
BANK |
All payments from a bank. |
|
BANKACCOUNT |
All payments from a specified bank account. |
|
BANKACCOUNTDATE |
All payments from a bank account and on a payment date. |
|
BANKDATE |
All payments from a bank and on a payment date. |
|
SINGLEPAYMENT |
One payment per file. |
Payment Batch Grouping Rules
This set of fields adds an additional level of filtering that further defines how payment lines and payments are grouped together in a file. Because some payment layouts have additional requirements, this feature allows users to further define the logic for grouping payments. An example is the payment layout using ISO 20022 XML messages (credit transfer initiation and STP credit transfer). After the payments have been grouped together in a file based on the file grouping rules, they can be further grouped by fields such as business unit, source system, currency code, payment date, and payment ID. The maximum number of additional grouping fields is ten.
Bank Integration Layouts Page
Use the Bank Integration Layouts page (BANK_INTEGRATION) to define layouts and transformation programs for a specific bank.
Image: Bank Integration Layouts page
This example illustrates the fields and controls on the Bank Integration Layouts page. You can find definitions for the fields and controls later on this page.
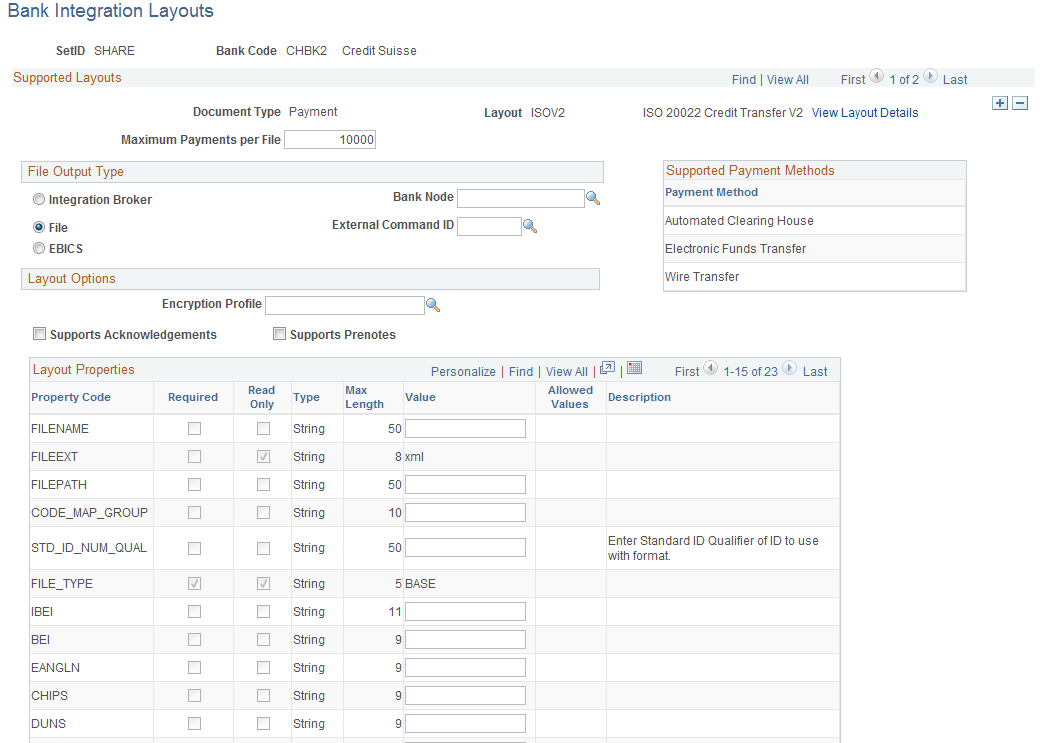
File Output Type
| Integration Broker |
Select to publish the layout as an IP message to the Integration Broker. |
| File |
Select to send the layout to a file. Requires that the FILENAME, FILEEXT, and FILEPATH layout properties be defined. |
| EBICS |
Select to indicate this layout follows EBICS protocol requirements. For more information about using the EBICS protocol for SEPA payments, see Understanding SEPA. |
| Bank Node |
The node to which the Integration Broker Node message will be published. Required if Message output type is selected. |
| External Command ID (optional) |
An option that is active only if the output layout type is File. This is the external command to carry out after the file is sent. External commands are a way to carry out a third-party communication or security toolkit. They enable the output FILEPATH and FILENAME to be passed to a third-party application to initiate additional processing. |
Layout Options
Supported Payment Methods
This group box displays payment methods that are supported by this layout.
Layout Properties
A payment layout can have a number of layout properties. Three layout properties are available, however, that all payment layouts contain. This table provides examples of how to set up each of them.
|
Field |
Description |
|---|---|
|
FILENAME |
Determines the filename when data are sent to a file or published into the Integration Broker. You can leave this property blank and the default will be BANKNAME + FILEID, or you can override and create your own naming convention. For example: BANKNAME_%FILEID%_ %yyyyMMdd_HHmmss% At runtime the FILEID (%FILEID%) and Date bind variables will be bound to create a filename of: BANKNAME_00000017_ 20031118_104316 The date bind value is flexible and can be altered to change the date format. Refer to the PeopleTools PeopleCode documentation on the DateTimeToLocalizedString function, specifically the pattern formats available. For another example: BANKNAME_%FILEID%_ %ddMMyyyy_HHmmss% At runtime equals: BANKNAME _00000018_18112003_105448 |
|
FILEEXT |
File extension to add to the filename. Do not include a dot (.) in this field; the system will automatically add one between FILENAME and FILEEXT. |
|
FILEPATH |
The output directory to which the files are written. If this field is left blank, the system will send it to the default Process Scheduler file output location. Use this option only when layouts have an output type of File. The value must end in a back slash or forward slash (\ or /), depending on your operating system. For example, using Windows, "c:\temp" is invalid; it must be "c:\temp\". |
Creating Payment Layouts
To create a new payment layout:
Work with the organization or financial institution and develop the requirements for the payment layout.
If a usable file layout object is delivered by PeopleSoft, analyze the gap between the delivered file layout object and the layout requirements.
Define a new file layout object.
You can save a delivered file layout object with another file name and then edit it, or you can create a new file layout object.
Implement the formatting logic.
PeopleSoft delivers the formatting logic in application classes that are included in the TR_FORMAT Payment package. Use the delivered application classes, extending the logic of an existing class (or extend from the BaseFormatter application class) so as to take advantage of the delivered logic.
For example, suppose that you want to create a new CDDFormatter file layout object that includes PeopleSoft-delivered logic and also enters a value in an optional field, Individual ID, in the entry detail record for tracing purposes. To do this, use the following code for the application class NewCCDFormatter:
import TR_FORMAT:Payment:CCDFormatter;
class NewCCDFormatter extends CCDFormatter
		method populateEntryDetail (&rec as Record);
end-class

/* constructor */
method NewCCDFormatter
		%Super = create CCDFormatter ();
end-method

/* override parent method here */
method populateEntryDetail
		/+ &rec as Record +/

		%Super.populateEntryDetail (&rec);

		Local &myIndividualIDVal;

		/* add logic to get your &myIndividualIDVal here */

		&rec.ACH_INDIVIDUAL_ID.Value = &myIndividualIDVal;

end-method;
You can either create an Application Engine to call the new formatter class or specify in the layout to use the new formatter class. If choosing the Application Engine approach, write a wrapper Application Engine to invoke the new formatter class and pass in your File Layout object name.
To do this, you can copy an application class invoker Application Engine, changing the payment formatter name (such as CCDFormatter) to the new payment layout name, and changing the file layout object name to the new file layout object name.
Define a new Layout Catalog entry.
In addition to any parameters that you must define for this new Layout Catalog entry, define a transformation program name to the wrapper Application Engine or the new formatter class that you created in step 4.
To use the new layout, set up a bank account payment method (on the Banking, Administer Bank Integration, External Accounts, Payment Method page).
External Command Page
Use the External Command page (PMT_EXT_COMM_PG) to define command line information to carry out an external toolkit.
Optional if output type is File. This is the external command to carry out after the file is output. This enables you to integrate with third-party toolkits (such as security and communications toolkits) and define command parameters that call executable files, batch files, and command-line functions.
Image: External Command page
This example illustrates the fields and controls on the External Command page. You can find definitions for the fields and controls later on this page.
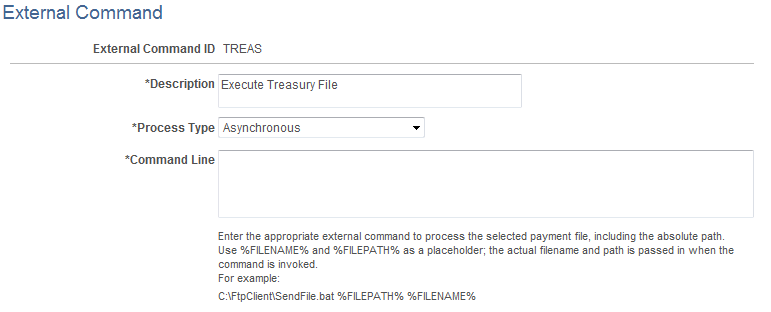
Optional if output type is file. This is the external command to execute after the file is created. External commands are a way to execute a third-party communication or security toolkit. They allow the output Filepath and Filename to be passed to a third party to initiate additional processing.