
Setting Up and Maintaining Contacts
To define contacts, use the Contact Information component. Use the CONTACT_INFO component interface to load data into the tables for this component.
This section provides an overview of staffing front office setup pages and discusses how to:
Define internal or external contacts.
Link contacts to customers and specify security options.
Select communication preferences and enter contact credit card information.
Set up contact type and phone information.
Complete contact user profiles.
Enter staffing front office contact information.
Add and view orders.
Associate marketing activity events with contacts.
View contact history.
Add contact agendas.
Add contact history.
Enter contact related employees.
Add target qualifications.
Enter target job titles.
View and add forms.
Add new forms.
View and add attachments.
Pages Used to Set Up and Maintain Contacts
|
Page Name |
Definition Name |
Navigation |
Usage |
|---|---|---|---|
|
Contact Information - Maintain Contacts |
CONTACT |
|
Create and maintain information about each contact. |
|
Contact Customers |
CONTACT_CUST_PAGE |
|
Build relationships between contacts and customer IDs served by the contact or with which they are associated. If a contact is associated with only one customer, enter that customer on this page. If the contact is a broker, for example, use this page to establish relationships with the multiple customers the broker serves. Set up security options on the Self Service Security tab. |
|
Contact Customers - Credit Cards |
CONTACT_CCARD_INFO |
Click the Credit Cards link on the Contact Customers page. |
View, add, and delete credit card data associated with this customer. This page indicates that credit card data is locally stored and processed, that is, part of a traditional credit card implementation. |
|
Contact Customers - Credit Card Address |
CONTACT_CUST_ADDR |
Click the Credit Card Address link for a credit card on the Contact Customer - Credit Cards page. |
View the customer credit card payment address associated with a contact. |
|
Contact Customers - Credit Card Profiles |
CONTACT_CCARD_INFO |
Click the Credit Cards link on the Contact Customers page. |
View, add, and delete permanent credit card profiles for use on systems that use a hosted credit card implementation. A credit card profile indicates that complete credit card data is stored and processed on a third-party system. |
|
Contact Customers - Documentation |
CONTACT_ADDTL_INFO |
Click the Documentation link for a customer on the Contact Customers page. |
Select the type of documents for the external customer to receive, and the preferred communication method. |
|
Contact Information - Contact Phone and Type |
CONTACT_PHONE_PAGE |
|
Enter phone information and contact types for internal and external contacts. |
|
Contact User Profile |
CONTACT_USER_PROF |
|
Enter the information that enables contacts to access self-service transactions, and enter the roles to which the contact will be assigned. |
|
Staffing Information |
CONT_STAF_INFO |
Click the Staffing Information link on the Maintain Contacts page. |
Enter contact information for use in Staffing Front Office. |
|
Order |
FO_ORDER_HDR |
|
View and add orders associated with this contact. |
|
Marketing Activity |
CONT_MRKTNG_ACTIV |
Select 030 - Marketing Activities from the Go To drop-down list on the Staffing Information page. |
Enter the type of marketing events for which you want this contact to be included. |
|
Review History |
FO_HISTORY |
Select 040 - View History in the Go To drop-down list on the Staffing Info page. |
Review the history items associated with the contact. |
|
Agenda Detail |
FO_AGENDA_DETAIL |
Select 050 - Add Agenda from the Go To drop-down list on the Staffing Info page. |
View agenda details and add agenda items for contacts. |
|
History Detail |
FO_HISTORY_DTL |
Select 060 - Add History from the Go To drop-down list on the Staffing Info page. |
View history details. |
|
Related Employees |
CONTACT_EMP |
Select 070 - Related Employees from the Go To drop-down list on the Staffing Info page. |
Enter the IDs of the employees that the contact usually requests for staffing services. |
|
Target Qualifications |
CONT_QUALIFS |
Select 080 - Target Qualifications from the Go To drop-down list on the Staffing Information page. |
Enter the target qualifications that the contact requests most often. This information can be used in Opportunity searches. |
|
Resource Qualifications - Select Qualification Profile |
RS_SELQUALPROFILE |
Click the Profile button on the Target Qualifications page. |
Add target qualifications from a qualification profile. |
|
Resource Qualifications - Search for Qualifications |
RS_QUALIF_SRCH |
Click the List button on the Target Qualifications page. |
Add target qualifications from the qualifications list. |
|
Resource Qualifications - Select Competencies |
RS_SO_COMP |
Click the Competency Tree button on the Target Qualifications page. |
Add target qualifications from a competency tree. |
|
Target Job Title |
CONT_JOBTITLE |
Select 090 - Target Job Titles from the Go To drop-down list on the Staffing Information page. |
Enter the job titles that the individual contacts request most often. This information can be used for Opportunity searches. |
|
Forms |
CONT_FORMS |
Select 100 - Forms from the Go To drop-down list on the Staffing Information page. |
Review the forms associated with the contact. |
|
Forms Detail |
CONT_FORMS_DTL |
Click the Add New Form button on the Forms page. |
Associate a new form with the contact record and enter the appropriate values for the fields in the form. Forms enable you to capture information that is not already captured in other fields in the component. The fields in each form are defined through system configuration. |
|
Attachments |
CONT_ATTACHMENT |
Select 110 - Attachments from the Go To drop-down list on the Staffing Information page. |
Add attachments to contacts. |
Understanding Front-Office Staffing Setup Pages
Of the pages described in this section, only these are applicable to Staffing Front Office:
Staffing Information.
Marketing Activity.
Related Employees.
Target Qualifications.
Resource Qualifications - Select Qualification Profile.
Resource Qualifications - Search for Qualifications.
Resource Qualifications - Select Competencies.
Target Job Title.
Forms.
Forms Detail.
Attachments.
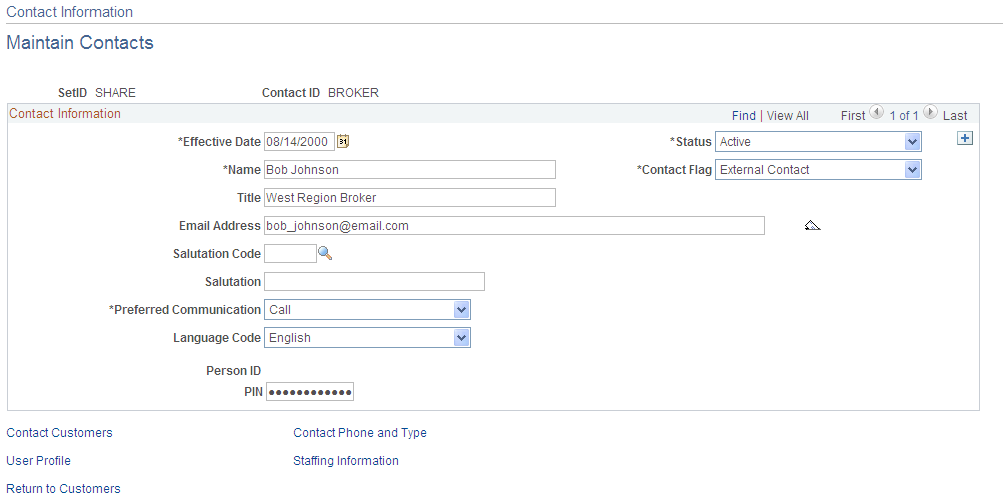
Contact Information - Maintain Contacts Page
Use the Contact Information - Maintain Contacts page (CONTACT) to create and maintain information about each contact.
Image: Contact Information - Maintain Contacts page
This example illustrates the fields and controls on the Contact Information - Maintain Contacts page. You can find definitions for the fields and controls later on this page.
Contact Information – Contact Customers Page
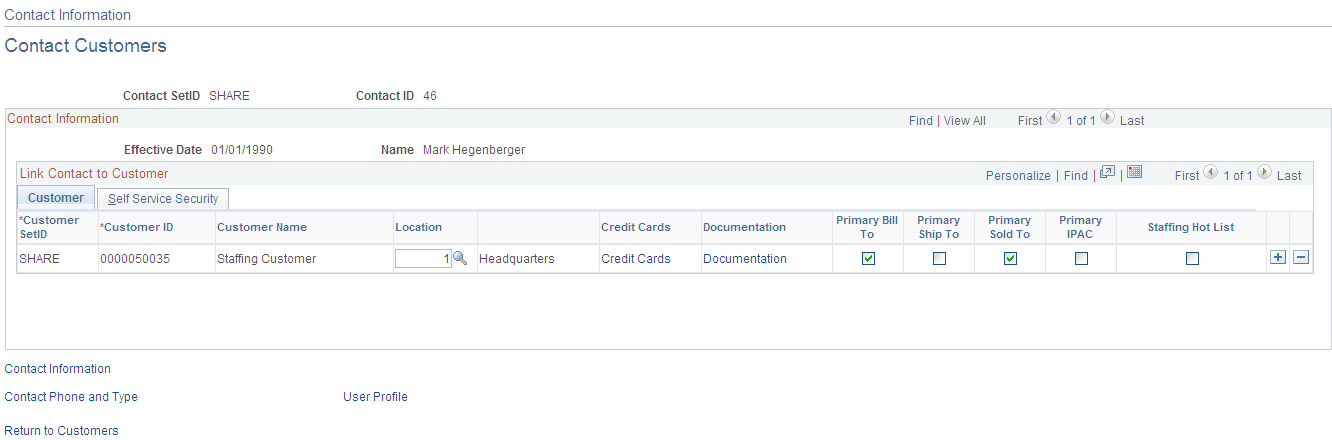
Use the Contact Information - Contact Customers page (CONTACT_CUST_PAGE) to build relationships between contacts and customer IDs served by the contact or with which they are associated.
If a contact is associated with only one customer, enter that customer on this page. If the contact is a broker, for example, use this page to establish relationships with the multiple customers the broker serves. Set up security options on the Self Service Security tab.
Click the Contact Customer Information link on the Maintain Contacts page.
Click the Contact Customer Information link on the other pages in the Contact Info component.
Image: Contact Information - Contact Customers page
This example illustrates the fields and controls on the Contact Information - Contact Customers page.
Customer Tab
Self Service Security Tab
Contact Customers - Credit Cards (or Credit Card Profiles) Page
The credit card information for a customer that is created and maintained in a PeopleSoft system depends on whether the system is set up with a traditional credit card implementation or a hosted credit card implementation. The Credit Cards page indicates that credit card data is locally stored and processed, that is, part of a traditional credit card implementation. The Credit Card Profiles page is used to store only enough credit card information to create a profile that can be referenced between the PeopleSoft system that utilizes a hosted credit card implementation and the external credit card host.
Using the Contact Customers - Credit Cards Page in a Traditional Implementation
Use the Contact Customers - Credit Cards page (CONTACT_CCARD_INFO) to view, add, or delete credit card data associated with this customer.
Image: Contact Customers - Credit Cards page
This example illustrates the fields and controls on the Contact Customers - Credit Cards page. You can find definitions for the fields and controls later on this page.

| SetID and Contact ID |
Displays the value defined on the Maintain Contacts page. |
| Customer SetID and Customer ID |
Displays the value defined on the Contact Customers page. |
| Credit Card Type |
Select the type of credit card the contact will use. These values must already be set up on the Card Type page (). See Card Type Page and |
| Card Number |
Enter the credit card number. The system performs a number of validations that are specified by the parameters you set up on the Credit Card Type page and Note: Security access should not be granted to the Credit Card Info page if it violates country-specific or legislative legal requirements about storing credit card numbers with customer records in the database. This practice is illegal in some European countries. |
| Primary Card |
View the default credit card number that appears on the Credit Card Data page during sales order entry. |
| First Name and Last Name |
Enter the cardholder's name in the two name fields. If the name on the card includes a middle initial, include the middle initial in the First Name field. |
| Expiration Month and Expiration Year |
Use MM and YYYY formats. For example, if the credit card expires in March 2002, enter 03 in the Credit Card Expiration Month field and 2002 in the Credit Card Expiration Year field. |
| Address Sequence Number |
Displays the value established on the General Information - Address page. |
| Credit Card Address |
Click the link associated with a credit card to access the Contact Customer Address page (CONTACT_CUST_ADDR) and view the customer who is associated with the contact and who will be used as the payment address for the credit card. |
| Display Unmasked Card Number |
If the user has access to the credit card security component, this field appears. If this option is selected, the system displays the unencrypted credit card number. You may need to grant users access if they must verify the entire credit card number. |
Using the Contact Customers - Credit Card Profiles Page in a Hosted Implementation
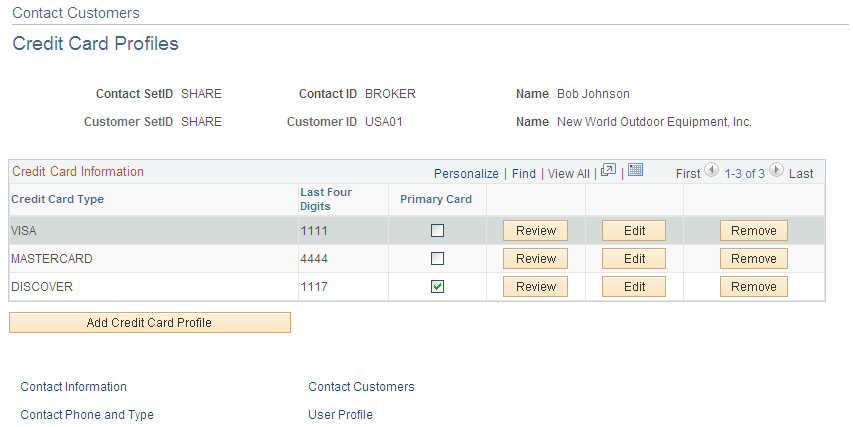
Use the Contact Customers - Credit Card Profiles page (CONTACT_CCARD_INFO) view, add, and delete permanent credit card profiles for use on systems that use a hosted credit card implementation. A credit card profile indicates that complete credit card data is stored and processed on a third-party system.
Image: Contact Customers - Credit Card Profiles page
This example illustrates the fields and controls on the Contact Customers - Credit Card Profiles page. You can find definitions for the fields and controls later on this page.
| Credit Card Type |
Displays the type of credit card. These values must already be set up on the Credit Card Type page in Enterprise Components. See Card Type Page and Prerequisites. |
| Last Four Digits |
Displays the last four digits of the credit card number. The complete credit card number is stored and processed by the third-party payment service. |
| Primary Card |
Select one credit card profile as the default profile. |
| Review |
Click this button to review the credit card profile information on file in the PeopleSoft system. |
| Edit |
Click this button to edit the credit card profile information on file in the PeopleSoft system. |
| Remove |
Click this button to remove this credit card profile information from the PeopleSoft system. |
| Add Credit Card Profile |
Click this button to add a permanent credit card profile on the Credit Card Profiles - Add Credit Card page. The complete credit card information is stored and processed by the third-party payment service. |
Contact Customers - Documentation Page
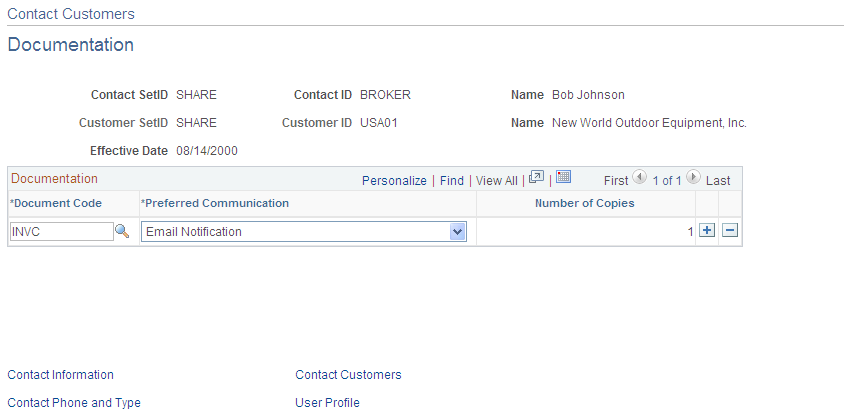
Use the Contact Customers - Documentation page (CONTACT_ADDTL_INFO) to select the type of documents for the external customer to receive, and the preferred communication method.
Image: Contact Customers - Documentation page
This example illustrates the fields and controls on the Contact Customers - Documentation page. You can find definitions for the fields and controls later on this page.
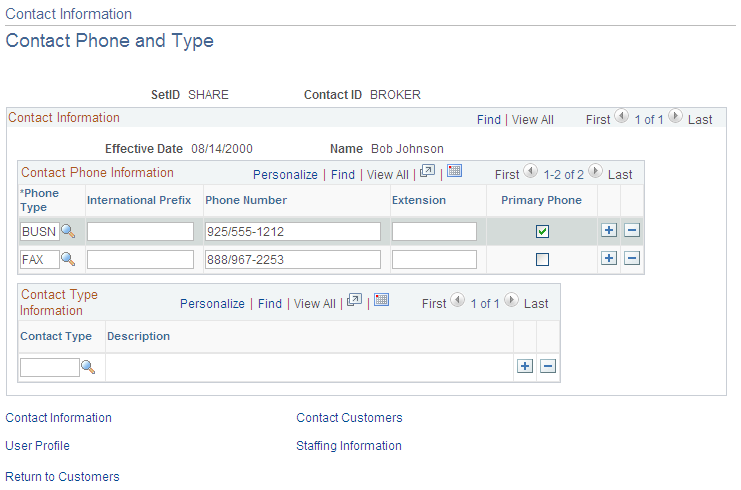
Contact Information - Contact Phone and Type Page
Use the Contact Information - Contact Phone and Type page (CONTACT_PHONE_PAGE) to enter phone information and contact types for internal and external contacts.
Click the Contact Phone and Type link on the Maintain Contacts page.
Click the Contact Phone and Type link on the other pages in the Contact Info component.
Image: Contact Information - Contact Phone and Type page
This example illustrates the fields and controls on the Contact Information - Contact Phone and Type page. You can find definitions for the fields and controls later on this page.
Contact Information - User Profile Page
Use the Contact Information - User Profile page (CONTACT_USER_PROF) to enter the information that enables contacts to access self-service transactions, and enter the roles to which the contact will be assigned.
Click the User Profile link on the Maintain Contacts page.
Click the User Profile link on the other pages in the Contact Info component.
Use the Contact User Profile page to establish security for self-service transactions. Enter a password, add security permissions, and identify the role that the contact can access during self-service transactions.
Logon Information
Contact Information - Staffing Information Page
Use the Contact Information - Staffing Information page (CONT_STAF_INFO) to enter contact information for use in Staffing Front Office.
Agenda Events
Contact Owners
The Go To drop-down list options enable you to access pages documented in subsequent sections of this topic.
Marketing Activity Page
Use the Marketing Activity page (CONT_MRKTNG_ACTIV) to enter the type of marketing events for which you want this contact to be included.
Select 030 - Marketing Activities from the Go To drop-down list on the Staffing Information page.
Agenda Detail Page
Use the Agenda Detail page (FO_AGENDA_DETAIL) to view agenda details and add agenda items for contacts.
Add an agenda item for this contact by completing as many of the Agenda Detail fields as possible for which you have information.
Related Employees Page
Use the Related Employees page (CONTACT_EMP) to enter the IDs of the employees that the contact usually requests for staffing services.
Target Qualifications Page
Use the Target Qualifications page (CONT_QUALIFS) to enter the target qualifications that the contact requests most often.
This information can be used in Opportunity searches.
Select 080 - Target Qualifications from the Go To drop-down list on the Staffing Information page.
This page view changes depending on which button you click. Each of the resulting pages functions similarly to corresponding pages described in the customer qualifications sections.
Target Job Titles Page
Use the Target Job Title page (CONT_JOBTITLE) to enter the job titles that the individual contacts request most often.
This information can be used for Opportunity searches.
Select 090 - Target Job Titles from the Go To drop-down list on the Staffing Information page.
Forms Page
Use the Forms page (CONT_FORMS) to review the forms associated with the contact.
This page lists all the forms previously associated with a contact record. From this page you can associate additional forms by clicking the Add a New Form button.
Forms Detail Page
Use the Forms Detail page (CONT_FORMS_DTL) to associate a new form with the contact record and enter the appropriate values for the fields in the form.
Forms enable you to capture information that is not already captured in other fields in the component. The fields in each form are defined through system configuration.
Attachments Page
Use the Attachments page (CONT_ATTACHMENT) to add attachments to contacts.