
Adding General Customer Information
To add general customer information, use the General Information (CUSTOMER_GENERAL), Customer ID Nbrs and SIC Codes (CUST_ALT_INFO), Customer Attachments (CUST_ATT), Customer Carriers (CUST_CARRIER), Customer Hierarchy (CUST_HIERARCHY), Customer Messages (CUST_MSG), Customer Product Aliases (CUST_PROD_ALIAS), Customer Product Catalogs (CUST_PROD_CATALOG), Customer Region Codes (CUST_REGN_CODE), and Customer Ship Date Exceptions (CUST_SHIP_EXCPT) components.
This section provides overviews of adding customers, enterprise integration points (EIPs), and staffing pages, and discusses how to:
Add customer names and levels, and assign roles.
View role designations for bill to customers.
Enter indirect customer information for ship to customers.
View and modify additional role designations for sold to customers.
View customer relationships and customer correspondence groups.
Select name and address information and tailor dunning letters, finance charge invoices, and statements.
View remit from customer details.
View corporate customer groups.
Enter optional customer data.
Set up and review customer credit profiles.
Assign individual customers to customer groups.
Set up tax-exempt certificate information.
Enter customer value-added tax (VAT) information.
Enter customer notes.
Attach multimedia files to customers.
Attach messages to customers.
Enter additional billing, purchasing, payment, and write-off options for bill to customers.
Enter delivery and shipping parameters.
Set up delivery exception dates.
Enter pricing and product information.
Select classifications, set up customer hierarchies, assign syndicated data types, and establish channels.
Specify available catalogs.
Set up product aliases.
Enter Supplier Managed Inventory (VMI) Information for the ship to customer.
Enter tax ID, supplier ID, web addresses, stock symbols, and subcustomer information.
Enter customer Debt Management Service (DMS) information.
Enter individual debtor information for DMS.
Enter individual debtor employment information for DMS.
Enter debtor bank information for DMS.
Enter staffing information.
Enter target qualifications.
Add qualifications from a profile.
Add qualifications from a list.
Add qualifications from a competency tree.
Enter target job titles.
Enter career master information.
Enter benefits information.
Enter customer sales data information.
Enter customer sales profile information.
Enter customer location sales profile information.
Enter competitor information.
Enter lines of business information.
Enter job supplements information.
Enter forms information.
Add forms.
Enter customer event lists.
Create master contract rates.
Enter worksite master information.
Enter customer field definitions.
Enter federal registration information.
Pages Used to Add General Customer Information
|
Page Name |
Definition Name |
Navigation |
Usage |
|---|---|---|---|
|
General Information - General Info |
CUST_GENERAL1 |
|
Add or review customers' names and level information, and assign associated roles. You can also enter one or more addresses for customers and assign descriptions to each location. |
|
Phone Information |
CUST_ADDR_PHONEPOP |
Click the View Phone Information link on the General Info page. |
Enter customers' phone information. |
|
Alternate Character Type |
CUST_ACNAME1_SEC |
Click the Alt Name 1 link on the General Info page. |
Enter customer names in alternate characters. This option is available only if you enable alternate character sets for the user on the User Preferences - Overall Preferences page. |
|
General Information - Bill To Selection |
CUST_BILLTO_SELECT |
Click the Bill To Selection link on the General Info page. |
View role designations for bill to customers and associated sold to customers. |
|
General Information - Ship To Selection |
CUST_SHIPTO_SELECT |
|
Enter indirect customer information for ship to customers and view associated sold to customers. |
|
General Information - Sold To Selection |
CUST_SOLDTO_SELECT |
Click the Sold To Selection link on the General Info page. |
View or modify additional role designations for sold to customers. Associate ship to, bill to, and broker customers. View customer relationships and customer correspondence groups. |
|
General Information - Correspondence Selection |
CUST_CRSPD_SELECT |
|
View or modify correspondence options. |
|
General Information - Correspondence Options |
CUST_CRSPD_OPT1 |
Click the Correspondence Options link on the General Information - Correspondence Selection page. |
Select name and address information to use in statement, invoice, and letter headers. You can also override remit-to-location default values from the business unit and tailor Dunning letters, finance charge invoices, and statements for individual customers. |
|
General Information - Remit From Selection |
CUST_REMIT_SELECT |
Click the Remit From Selection link on the General Info page. |
View remit from customer details and other customer relationships. |
|
General Information - Corporate Customer Selection |
CUST_CORP_SELECT |
Click the Corporate Selection link on the General Info page. |
View corporate customer groups and other customer relationships. Corporate customers act as an umbrella over multiple customers with other role designations. The system maintains credit information for both corporate customers and bill to customers. |
|
General Information - Additional General Info |
CUST_GENERAL2 |
Select 0020 - Additional General Info in the More field on the General Info page. |
Enter optional customer data. |
|
General Information - Credit Profile - General |
CUST_CREDIT_PRFL1 |
Click the Go To Credit page link on the Dun and Bradstreet page. Select 0030 - Credit Profile in the More field on the General Info page. |
Set up and review customer credit profiles. You can also enter credit limits and additional credit parameters for bill to and corporate customers. |
|
Risk Score Details |
AR_RISK_DETAIL |
Click the Risk Score link on the General Information - Credit Profile page |
Review details of risk score calculation. |
|
General Information - Region Code Info |
CUST_REGION_CODE |
Select 0050 - Region Code Info in the More field on the General Info page. |
Associate customers with multiple regions for multiple purposes, such as pricing, sales analysis, and transit lead-time calculations. |
|
General Information - Customer Group Info |
CUST_GROUP_INFO |
Select 0070 - Customer Group in the More field on the General Info page. |
Assign individual customers to customer groups. Group customers with similar traits and define processing criteria for the entire group instead of individual customers. Customers can share the same account distribution, pricing arbitration plan, pricing structures, reports, sales contracts, transportation lead times, and taxes. |
|
General Information - Tax Exempt Certificate Info |
CUST_TAXEXMPT_INFO |
Select 0080 - Tax Exempt Certificates in the More field on the General Info page. |
Set up tax-exempt certificate information. |
|
General Information - Customer VAT Info (general information - customer value-added tax information) |
CUST_VAT_INFO |
Select 0090 - VAT Info in the More field on the General Info page. |
Enter customer VAT information. |
|
Customer Hierarchy |
CUST_CORP_SELECT |
Click the Correspondence Selection, Remit From Selection, or Corporate Selection links to view the related multilevel customer hierarchy. |
View the multilevel customer hierarchy for the selected customer. |
|
General Information - Notes and General Information - Notes |
CUST_NOTES |
|
Enter information for standard notes to reuse for multiple customers or for custom notes with unique messages. For example, you might have a standard note announcing a seasonal promotion or a note thanking a customer for a particularly large order. |
|
General Information - Attachments and General Information - Attachments |
CUST_ATTACHMENTS |
|
Attach multimedia files, such as PowerPoint presentations, Word documents, ScreenCams, or Excel spreadsheets, to customers. |
|
General Information - Messages and General Information - Customer Messages |
CUST_MESSAGES |
|
Associate messages with customers to communicate timely news and process the action associated with the message. |
|
General Information - Bill To Options |
CUST_BILLTO_OPT |
|
Enter additional billing and purchasing options for bill to customers. You can also enter customer payment options and payment terms as well as default write-off tolerances for customer account maintenance in PeopleSoft Receivables. |
|
General Information - Ship To Options |
CUST_SHIPTO_OPT1 |
|
Enter delivery and shipping parameters. You can also enter domestic and export shipping options. |
|
Carrier Account Numbers |
CUST_3RD_PARTY_IN |
Click the Carrier Account Numbers link on the General Information - Ship To Options page. |
Enter account numbers for customers' carriers. |
|
Ship Exception Dates |
CUST_SHIPTO_EXCPT |
Click the Exception Ship Dates link on the General Information - Ship To Options page. |
Set up standard times when shipments should not be delivered to customers. |
|
General Information - Sold To Options |
CUST_SOLDTO_OPT |
|
Enter pricing and product information. |
|
Hierarchy |
CUST_SOLD_HIERARCH |
Click the Hierarchy link on the General Information - Sold To Options page. |
Select a classification, set up customer hierarchies, assign syndicated data types, and establish channels. The customer hierarchy is, from highest to lowest level, division, region, and territory. Currently PeopleSoft standard processing does not use the fields on the Hierarchy page. |
|
VMI Options (Supplier managed inventory options) |
CUST_SHIPTTO_OPT2 |
Click the VMI Options link on the General Information - Ship To Options page. |
Specify VMI ship to options. |
|
Product Catalog |
CUST_SOLD_PRODCTLG |
Click the Product Catalog link on the General Information - Sold To Options page. |
Specify available catalogs. You can modify product offerings for sold to customers by creating product catalogs that contain only those products that each customer requires. You can create two types of catalogs: inclusive catalogs, which contain all of the products that are available to customers, and exclusive catalogs, which contain the products to withhold from customers. |
|
Product Aliases |
CUST_SOLD_PRDALIAS |
Click the Product Aliases link on the General Information - Sold To Options page. |
Set up product aliases. You can enter products on orders or quotations using the sold to customer's part number (product alias) or system product IDs. Both numbers appear on the order line. |
|
VMI Options (Supplier managed inventory options) |
CUST_SOLDTO_OPT2 |
Click the VMI Options link on the General Information - Sold To Options page. |
Specify VMI sold to options. |
|
Miscellaneous General Info |
CUST_GENERAL_MISC |
|
Enter web addresses, stock symbols, currency codes, rate types, support team codes, and subcustomer codes. |
|
General Information - Supplier Info |
CUST_VENDOR_INFO |
Click the Supplier Information link on the Miscellaneous General Information page. |
View supplier information for the supplier whom you specify on the General Information - Additional General Info page. |
|
DMS Customer 1 (Debt Management Service customer 1) |
DMS_CUSTOMER_1 |
Click the DMS Information link on the Miscellaneous General Info page. This link appears only if you have enabled DMS processing on the Installation Options - Receivables page. |
Enter DMS agency information for individuals or corporations. |
|
DMS Customer 2 (Debt Management Service customer 2) |
DMS_CUSTOMER_2 |
Click the DMS Information link on the Miscellaneous General Info page. This link appears only if you have enabled DMS processing on the Installation Options - Receivables page. |
Enter individual debtor information for DMS. |
|
DMS Customer 3 (Debt Management Service customer 3) |
DMS_CUSTOMER_3 |
Click the DMS Information link on the Miscellaneous General Info page. This link appears only if you have enabled DMS processing on the Installation Options - Receivables page. |
Enter individual debtor employment information for DMS. |
|
DMS Customer 4 (Debt Management Service customer four) |
DMS_CUSTOMER_4 |
Click the DMS Information link on the Miscellaneous General Info page. This link appears only if you have enabled DMS processing on the Installation Options - Receivables page. |
Enter employee debtor bank information such as the bank name, address, and account type. This page is available only if you enter employer information on the DMS Customer 3 page. |
|
Staffing Information |
CUST_STAF_INFO |
Select 0180 - Staffing Information in the General Info Links drop-down list box. |
Enter customer information that is specific to Staffing Front Office, including customer owners and related contacts. |
|
Target Qualifications |
FO_CUST_QUALIFS |
Select 0180 - Staffing Information in the General Info Links drop-down list box. Select 0090 - Target Qualification in the Staffing Links drop-down list box. |
Enter the target qualifications of the resources that this customer normally requests. This information can be used for opportunity searches. |
|
Resource Qualifications - Select Qualification Profile |
RS_SELQUALPROFILE |
Click the Profile button on the Target Qualifications page. |
Add target qualifications from a qualification profile. |
|
Resource Qualifications - Search for Qualifications |
RS_QUALIF_SRCH |
Click the List button on the Target Qualification page. |
Add target qualifications from the qualifications list. |
|
Resource Qualifications - Select Competencies |
RS_SO_COMP |
Click the Competency Tree button on the Target Qualification page. |
Add target qualifications from a competency tree. |
|
Target Job Title |
FO_CUST_JOBTITLE |
Select 0180 - Staffing Information in the General Info Links drop-down list box. Select 0110 - Target Job Titles in the Staffing Links drop-down list box. |
Enter job titles of the resources that customers commonly request. This information can be used for opportunity searches. |
|
Career Master |
FO_CUST_CAR_MASTR |
Select 0180 - Staffing Information in the General Info Links drop-down list box. Select 0120 - Career Master in the Staffing Links drop-down list box. |
Enter information about how the customer is billed for career placements and who conducts interviews and reference checks. |
|
Benefits |
FO_CUST_BENEFITS |
Select 0180 - Staffing Information in the General Info Links drop-down list box. Select 0140 - Benefits in the Staffing Links drop-down list box. |
Enter benefits information that the customer offers its employees. |
|
Customer Sales Data |
FO_CUST_SALES_DATA |
Select 0180 - Staffing Information in the General Info Links drop-down list box. Select 0150 - Customer Sales Data in the Staffing Links drop-down list box. |
Enter information about the customer for the purpose of supporting the Staffing business development process. |
|
Customer Sales Profile |
FO_CUST_SALES_PROF |
Select the Sales Profile link on the Customer Sales Data page. |
Enter any additional sales information for this customer. |
|
Location Sales Profile |
FO_CT_SLS_LOC_PROF |
Select the Location Sales Profile link on the Customer Sales Data page. |
Enter any additional sales information for this customer location. |
|
Competitors |
FO_CUST_COMPETITRS |
|
Enter information about other staffing firms with which you compete for the customer. Alternatively, you can enter information to identify competitors of customers. |
|
Lines of Business |
FO_CUST_SRVC_AREA |
Select 0180 - Staffing Information in the General Info Links drop-down list box. Select 0170 - Lines of Business in the Staffing Links drop-down list box. |
Enter the lines of business in which the customer operates. |
|
Job Supplement |
FO_CUST_JOB_SUPP |
Select 0180 - Staffing Information in the General Info Links drop-down list box. Select 0180 - Job Supplements in the Staffing Links drop-down list box. |
Enter additional information about certain job descriptions. |
|
Forms |
FO_CUST_FORMS |
Select 0180 - Staffing Information in the General Info Links drop-down list box. Select 0190 - Forms in the Staffing Links drop-down list box. |
Use this page to review forms currently associated with the customer record. From this page you can also click the Add New Form button to associate more forms with the customer record. |
|
Forms Detail |
FO_CUST_FORMS_DTL |
Click the Add New Form button on the Forms page. |
Associate additional forms with customer records. Forms can be configured to capture extra information about the customer that is not already captured in the delivered fields in the application. |
|
Worksite Master |
CUST_WRKSTE_MSTR |
Select 0190 - Worksite Master in the General Info Links drop-down list box. |
Enter additional information about a customer worksite by associating forms with a customer work address. |
|
Default Customer Event Lists |
FO_CUST_EVL |
Select 0180 - Staffing Information in the General Info Links drop-down list box. Select 0200 - Customer Event Lists in the Staffing Links drop-down list box. |
Define default event lists to use on PeopleSoft Staffing Front Office job orders. |
|
Contract Rates |
FO_MC_RATES |
Select 0180 - Staffing Information in the General Info Links drop-down list box. Select 0210 - Master Contract Rates in the Staffing Links drop-down list box. |
Capture pay rate, bill rate and markup %, which have been negotiated and agreed upon by the staffing company and the customer. |
|
Customer Fields
|
CUST_CSF |
Select 0200 - Customer Fields in the General Info Links drop-down list box. |
Select the Customer Field Definition templates that you can use when creating orders and assignments for a customer. These templates enable you to capture additional information in the order and assignment that can be sent to PeopleSoft Billing and used for invoice printing or reporting purposes. |
|
Prenote History |
CUST_PRENOTE |
Click the View Prenote History link on the Bill To Options page. |
Set up prenote requirements for the direct debit payment method. |
Understanding Adding Customers
When adding new customers to the database, begin by entering the required information in the Customer component.
Use the CUSTOMER_MAIN_CI component interface to load the main customer information, customer teams, and addresses into the component tables. Use the CUSTOMER_BILLTO_CI component interface to load billing-related data such as bill to options, customer correspondence, and customer credit into the component tables. Use the CUSTOMER_SOLDTO_CI component interface to load sold to-related information such as sold to options, product catalogs, customer hierarchy, customer product aliases, and brokers into the component tables. Use the CUSTOMER_SHIPTO_CI component interface to load ship to-related information such as ship to options, customer exception calendars, carrier account information, and indirect customers into the component tables. Use the CUSTOMER_MISC_CI component interface to load miscellaneous information such as region codes, customer group, standard industry codes, VAT information, notes, attachments, and messages into the component tables.
You can also use the following component interfaces: Use the CUSTOMER Component Interface with EIP messaging to load specific customer information for setting up a customer. The CUSTOMER Component Interface uses all of the records within the CUSTOMER_GENERAL component.
Enter information that applies to one or more customer roles. You can override many of these settings at other points in the system.
When you add a customer, the customer ID might be NEXT by default. You can enable the system to assign the next number in sequence, as determined by the automatic numbering option that you set on the Automatic Numbering page. You can override the incremental assignment of IDs by entering another character combination in its place, or you can manually assign a customer ID.
Note: You can quickly create customers using Quick Customer Create.
Understanding Enterprise Integration Points
PeopleSoft software is delivered with many enterprise integration points (EIPs) to send and receive customer and customer group data with a third-party system or another PeopleSoft application, such as CRM. These EIPs are implemented by means of service operations within PeopleSoft Integration Broker.
Oracle delivers the service operations in PeopleSoft Integration Broker with a default status of Inactive. You must activate each service operation before attempting to send or receive data from a third-party source or another PeopleSoft system, such as CRM.
If you are integrating with PeopleSoft CRM databases, we recommend that you synchronize the customer table by performing a full batch publish to the subscribing system and provide updates to the subscribing system with incremental messages. Customers may be maintained in both PeopleSoft SCM and CRM. When this situation occurs, customer ID auto numbering should be maintained in the SCM database.
Use the information in the following table and refer to the setup instructions in the PeopleSoft Supply Chain Management Integrations 9.1 Documentation, "Implementing Integrations," Setting Up Service Operations section.
|
Service Operation |
Direction and Type |
Handlers |
Chunking Available? |
Integrates With |
|---|---|---|---|---|
|
CUSTOMER_FULLSYNC |
Inbound/Outbound Asynchronous |
CustomerFullSync |
No |
CRM, Third-party |
|
CUSTOMER_FULLSYNC_EFF |
Inbound/Outbound Asynchronous |
NA |
No |
CRM, Third-party |
|
CUSTOMER_GROUP_FULLSYNC |
Inbound/Outbound Asynchronous |
CustomerGroupFullSync |
No |
CRM, Third-party |
|
CUSTOMER_GROUP_FULLSYNC_EFF |
Inbound/Outbound Asynchronous |
NA |
No |
CRM, Third-party |
|
CUSTOMER_GROUP_SYNC |
Inbound/Outbound Asynchronous |
CustomerGroupSync CustomerGroupSyncEff |
No |
CRM, Third-party |
|
CUSTOMER_GROUP_SYNC_EFF |
Outbound Asynchronous |
NA |
No |
CRM, Third-party |
|
CUSTOMER_GROUP_SYNC_REQ CUSTOMER_GROUP_SYNC_REQ_CALLBACK |
Inbound/Outbound Asynchronous, Request/Response |
CustomerGroupSync |
No |
Customer Data Hub, Third-party |
|
CUSTOMER_SYNC |
Inbound/Outbound Asynchronous |
CustomerSync CustomerSyncEff |
No |
CRM, Third-party |
|
CUSTOMER_SYNC_REQ CUSTOMER_SYNC_REQ_CALLBACK |
Inbound/Outbound Asynchronous, Request/Response |
CustomerSync |
No |
Customer Data Hub, Third-party |
|
CUSTOMER_SYNC_EFF |
Inbound/Outbound Asynchronous |
NA |
No |
CRM, Third-party |
See the product documentation for PeopleTools: PeopleSoft Integration Broker
Understanding Staffing Pages
The following pages, which are described in this section, are applicable only for staffing use. Most of the pages are used by the Staffing Front Office application; the Customer Field Definition page is used by PeopleSoft Pay/Bill Management.
Staffing Information.
Worksite Master.
Customer Field Definitions.
Target Qualifications.
Resource Qualifications - Select Qualification Profile.
Resource Qualifications - Search for Qualifications.
Resource Qualifications - Select Competencies.
Target Job Titles.
Career Master.
Benefits.
Customer Sales Data.
Competitors.
Lines of Business.
Job Supplement.
Forms.
Add New Form.
Default Customer Event Lists.
Contract Rates.
This table lists comments for some of the Staffing Front Office pages:
|
Page |
Comments |
|---|---|
|
Career Master |
Enables you to record information about how career placements should be processed for a customer including, placement fee schedules, reference checks, and interviews. |
|
Job Supplement |
Provides additional information about the safety precautions or equipment that is used for a specific job. You can also use the job supplement to store information about the nature of a particular type of job. The question and answer fields that appear on the Worksite Master page are set up during system implementation. Note: You do not need to enter a job supplement every time that the customer places a similar job order. Add a new job supplement to the customer record only if the safety precautions, equipment, or physical requirements of a job are substantially different from the other job supplements that are on record for the customer. |
|
Forms |
Enables you to collect information about customers. This could include additional information about the safety precautions, physical requirements, or equipment that an applicant or employee uses for a specific job order, or any information that organization may want to collect. |
|
Worksite Master |
Stores additional information about the customer's physical plant, office environment, or campus, and helps to describe work opportunities to candidates and to orient employees to assignments that they have accepted. To create a worksite master record, you must first create customer and contact records. The question and answer fields that appear on the Worksite Master page are set up during system implementation. To make any changes to the list of available forms or to the content of the forms, contact the system administrator. |
|
Default Customer Event Lists |
Configure a Standard Event List as their default event list to be used for all user defined order types and then configure another unique event list to be used for specific user defined order types. So if the order type is listed specifically, the system will default the event list associated to that specific user defined order type. |
|
Contract Rates |
Enable the staffing system user to capture pay rate, bill rate and markup %, which have been negotiated and agreed upon by the staffing company and the customer. Ultimately, the rates entered here will be used to default on assignments. The rates established here will be used as the corresponding default values on the Billing tab of the Order. |
Customer Information - General Info Page
Use the Customer Information - General Info page (CUST_GENERAL1) to add or review customers’ names and level information and assign associated roles. You can also enter one or more addresses for customers and assign descriptions to each location.
Image: Customer Information - General Info page (1 of 2)
This example illustrates the fields and controls on the General Information - General Info page (1 of 2). You can find definitions for the fields and controls later on this page.
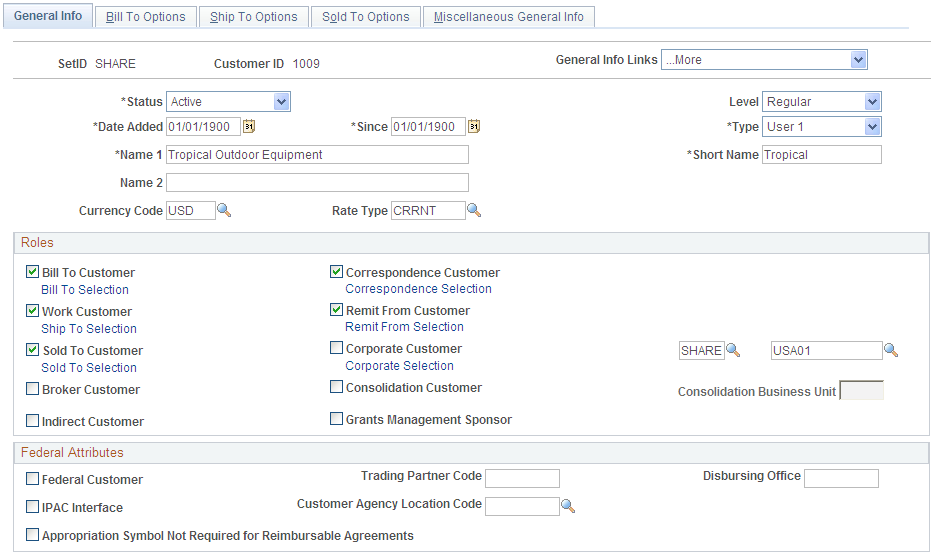
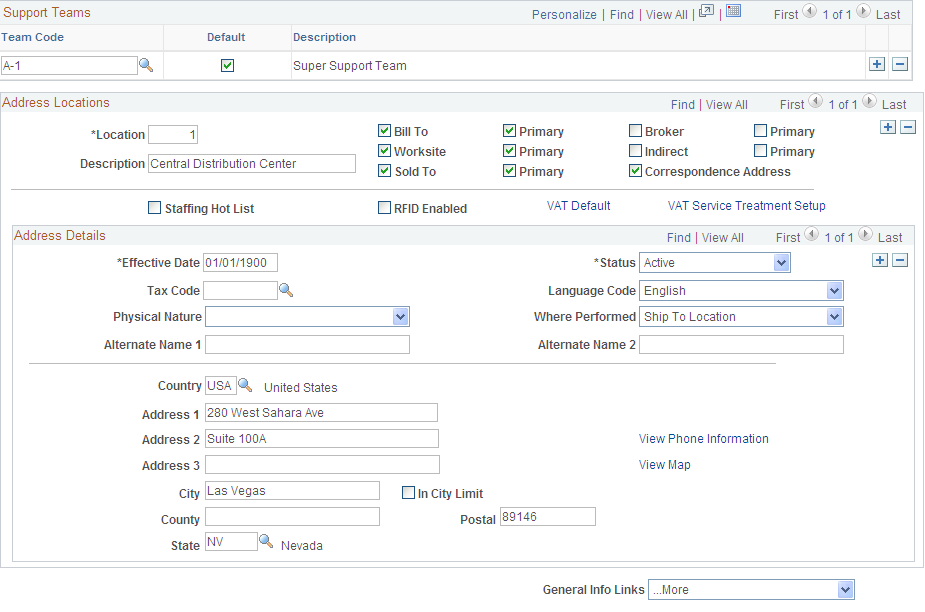
Image: Customer Information - General Info page (2 of 2)
This example illustrates the fields and controls on the Customer Information - General Info page (2 of 2). You can find definitions for the fields and controls later on this page.
See Understanding Counter Sales.
Financial Sanctions
Financial sanctions screening validates customer information with a variety of national and security lists.
Roles
Note: When you define customers who participate in intercompany transfers, you must select the Bill To, Ship To, and Sold To customer roles.
Correspondence, Remit From, and Corporate Hierarchies
Use the Correspondence, Remit From, or Corporate Hierarchy links page. (Click the Correspondence Selection link, Remit From Selection link, or the Corporate Hierarchy Selection links on the Customer - General Information page.) to view related information about various customers
Image: Correspondence Customer Hierarchy - Customer Hierarchy page
This example illustrates the fields and controls on the Correspondence Customer Hierarchy - Customer Hierarchy page. You can find definitions for the fields and controls later on this page.
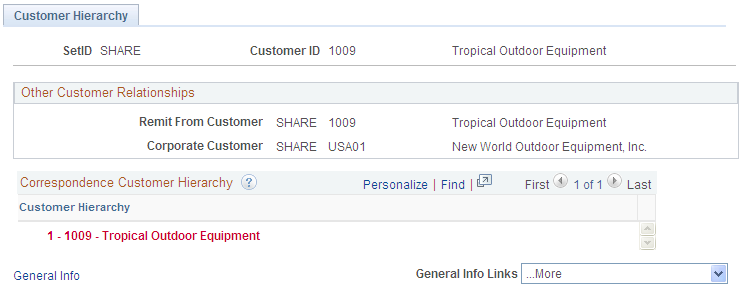
Image: Remit From Customer Hierarchy - Customer Hierarchy page
This example illustrates the fields and controls on the Remit From Customer Hierarchy - Customer Hierarchy page. You can find definitions for the fields and controls later on this page.
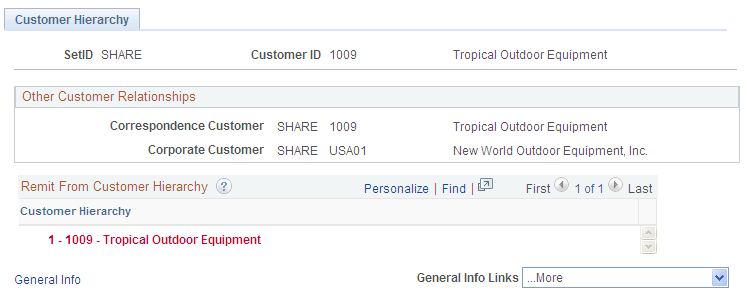
Image: Corporate Customer Hierarchy – Customer Hierarchy page
This example illustrates the fields and controls on the Corporate Customer Hierarchy – Customer Hierarchy page. You can find definitions for the fields and controls later on this page.

When you add or update a customer, you can select the check box next to the Correspondence Customer, Remit From Customer, and Corporate Customer on the Customer Information – General Information page to indicate that this customer is a parent customer in for each of these roles when you on of the selection links. You have the option to select one, two, or all three of these customer roles as parents. When you click the selection link next to each role, the Customer Hierarchy page appears with the selected role's hierarchy. You can set up or update customers that you want to belong to the 1001 hierarchy for all three customer roles.
Important! Even if there are multiple SetIDs associated with the customers that appear in the customer hierarchy, only one SetID appears on the Customer Hierarchy page or the Collections Workbench - Customer Hierarchy tab. This setID appears based on the setup on the
Federal Attributes
Support Teams
Address Locations and Details
All customer roles must have an associated primary address, as well as Name1, Short Name, Currency Code, Currency Rate Type, and Default Support Team field values. You can enter one address for all of the customer roles or separate addresses for each role.
The address type check boxes are available when you select the corresponding customer role on the General Information - Ship To Options page. Select any of the address types.
Note: On the Country - Address Format page, select the fields that appear for each country and then assign user-defined labels. Consequently, the fields that appear on this page might not match the fields that are described.
General Information - Bill To Selection Page
Use the General Information - Bill To Selection page (CUST_BILLTO_SELECT) to view role designations for bill to customers and associated sold to customers.
General Information - Ship To Selection Page
Use the General Information - Ship To Selection page (CUST_SHIPTO_SELECT) to enter indirect customer information for ship to customers and view associated sold to customers.
Click the Ship To Selection link on the General Info page.
Click the Ship to Selection link on the General Info - Ship To page.
General Information - Sold To Selection Page
Use the General Information - Sold To Selection page (CUST_SOLDTO_SELECT) to view or modify additional role designations for sold to customers.
Associate ship to, bill to, and broker customers. View customer relationships and customer correspondence groups.
General Information - Correspondence Selection Page
Use the General Information - Correspondence Selection page (CUST_CRSPD_SELECT) to view or modify correspondence options.
Click the Correspondence Selection link on the General Info page.
Select 0030 - Correspondence Options in the More field on the General Info page.
Customer Correspondence Group
General Information - Correspondence Options Page
Use the General Information - Correspondence Options page (CUST_CRSPD_OPT1) to select name and address information to use in statement, invoice, and letter headers.
You can also override remit-to-location default values from the business unit and tailor Dunning letters, finance charge invoices, and statements for individual customers.
Click the Correspondence Options link on the General Information - Correspondence Selection page.
Image: General Information - Correspondence Options page (1 of 2)
This example illustrates the fields and controls on the General Information - Correspondence Options page (1 of 2). You can find definitions for the fields and controls later on this page.
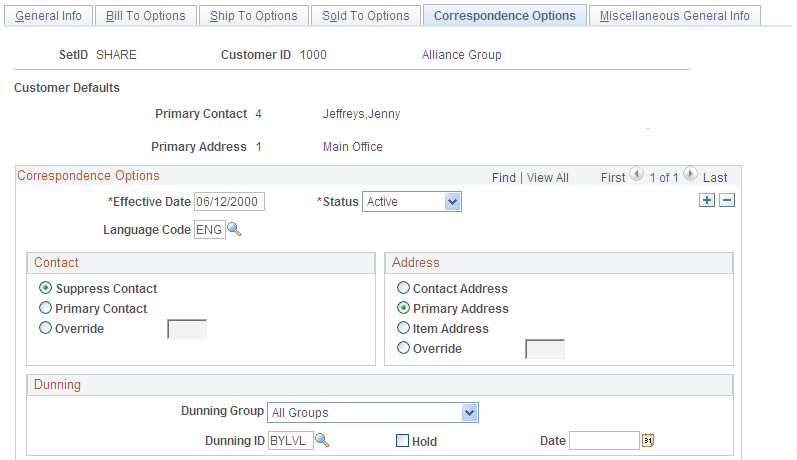
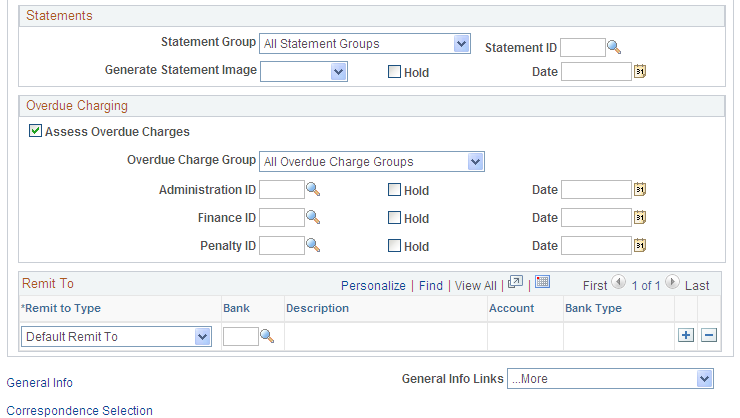
Image: General Information - Correspondence Options page (2 of 2)
This example illustrates the fields and controls on the General Information - Correspondence Options page (2 of 2). You can find definitions for the fields and controls later on this page.
Customer Defaults
Contact
In correspondence, the contact name appears as the first line of the address and is the salutation for Dunning letters.
Address
Contact, primary, and override addresses are all customer-based correspondence approaches. All items for a customer appear on the same letter, statement, or invoice.
The item address is an item-based correspondence approach, in which items for a customer are divided among letters, statements, and invoices according to the address that is associated with the item. Assign an address to individual items in the Location field on the Completing the Pending Item 2 page.
Remit To
Dunning ID, Statements, Overdue Charging
| Dunning ID, Overdue Charging, and Statements |
The options in these group boxes enable you to override the default IDs that you set at the business unit level. Dunning and statement IDs determine when to exclude items from correspondence and when not to send the letter or statement. Overdue charging generates overdue charge documents for a customer, creates new overdue charge items that you can post to a customer's account, or both. To apply different guidelines to a customer, select a valid ID and group in each of the three sections of this page. If you override the default value, the ID appears here; if you accept the default value, it doesn't appear here. |
| Dunning Hold, Assess Overdue Charges, and Statement Hold |
Select any of these check boxes to prevent the system from creating letters, finance charges, or statements for this customer. These check boxes are useful when, for example, a customer's account is in dispute and you don't want to send any correspondence until you resolve the issue. The associated hold date appears when you apply a document hold to a customer. The current date appears as the hold date by default. Note: The system ignores document holds when you request a statement, finance charge, or Dunning letter for a single customer or a single correspondence customer. |
| Dunning Group, Overdue Charge Group, and Statement Group |
Select to group customers for statement, Dunning letter, and overdue charge processing. When you run the Statements process (AR_STMTS), the Overdue Charge process (AR_OVERDUE), or the Dunning process (AR_DUNNING), specify to generate only statements, overdue charge invoices, or Dunning letters for customers in a specific group. Select one of the options for assigning a customer to a group. |
| Generate Statement Image |
Select Yes to generate statement images for this customer and display them on the Collections Workbench, Correspondence tab, or No to turn off the functionality. The value you select in this field overrides the setting at the Receivables business unit level. If this field is blank, the system uses the selection on the Receivables Options - General 1 page. |
General Information - Remit From Selection Page
Use the General Information - Remit From Selection page (CUST_REMIT_SELECT) to view remit from customer details and other customer relationships.
General Information - Corporate Customer Selection Page
Use the General Information - Corporate Customer Selection page (CUST_CORP_SELECT) to view corporate customer groups and other customer relationships.
Corporate customers act as an umbrella over multiple customers with other role designations. The system maintains credit information for both corporate customers and bill to customers.
| Corporate Customer Group |
View all the customers who are attached to the corporate customer. |
General Information - Additional General Info Page
Use the General Information - Additional General Info page (CUST_GENERAL2) to enter optional customer data.
Alternate Customer Information
SIC Codes
General Information - Credit Profile - General Page
Use the General Information - Credit Profile - General page (CUST_CREDIT_PRFL1) to set up and review customer credit profiles.
You can also enter credit limits and additional credit parameters for bill to and corporate customers.
Click the Go To Credit page link on the Dun and Bradstreet page.
Select 0030 - Credit Profile in the More field on the General Info page.
Credit Profile
Collection Information
Dispute Information
Credit Check Information
Credit Limit
Corporate Credit Limit
Note: Corporate Customers need not be Bill-To customers to use corporate credit checking. Hence, corporate level credit check calculation is allowed for all corporate customers, regardless of the corporate customer role.
Hold If Outstanding AR Balance
General Information - Customer Group Info Page
Use the General Information - Customer Group Info page (CUST_GROUP_INFO) to assign individual customers to customer groups.
Group customers with similar traits and define processing criteria for the entire group instead of individual customers. Customers can share the same account distribution, pricing arbitration plan, pricing structures, reports, sales contracts, transportation lead times, and taxes.
General Information - Tax Exempt Certificate Info Page
Use the General Information - Tax Exempt Certificate Info page (CUST_TAXEXMPT_INFO) to set up tax-exempt certificate information.
Note: In PeopleSoft Billing, you can include the certificate information on the customer's invoice.
General Information - Customer VAT Info Page
Use the General Information - Customer VAT Info page(general information - customer value-added tax information) page (CUST_VAT_INFO) to enter customer VAT information.
VAT Registration
Exception Data
Note: If the country that you select on the VAT Country Definition page does not allow VAT suspensions, then you cannot select S (suspended) as an exception type.
VAT Defaults
General Information - Notes Page
Use the General Information - Notes page (CUST_NOTES) to enter information for standard notes to reuse for multiple customers or for custom notes with unique messages.
For example, you might have a standard note announcing a seasonal promotion or a note thanking a customer for a particularly large order.
Customer Notes
Note: If you bill multiple sales orders on one invoice, use line notes. Header notes might contradict one another or be duplicates.
General Information - Attachments Page
Use the General Information - Attachments page (CUST_ATTACHMENTS) to attach multimedia files, such as PowerPoint presentations, Word documents, ScreenCams, or Excel spreadsheets, to customers.
Attachment Information
General Information - Messages Page
Use the General Information - Messages page (select 0120 − Messages in the More field on the General Info page).to identify and work with messages
Note: Message codes with an action of Reject apply only to the sold to customer. Message codes with an action of Hold create holds on the sales order.
General Information - Bill To Options Page
Use the General Information - Bill To Options page (CUST_BILLTO_OPT) to enter additional billing and purchasing options for bill to customers.
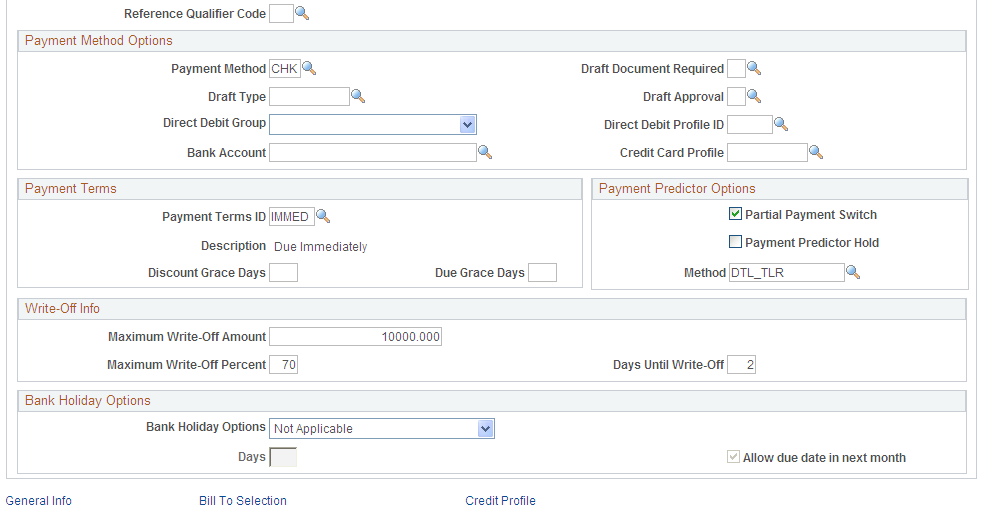
You can also enter customer payment options and payment terms as well as default write-off tolerances for customer account maintenance in PeopleSoft Receivables.
Image: Bill To Options page (1 of 2)
This example illustrates the fields and controls on the Bill To Options page (1 of 2). You can find definitions for the fields and controls later on this page.
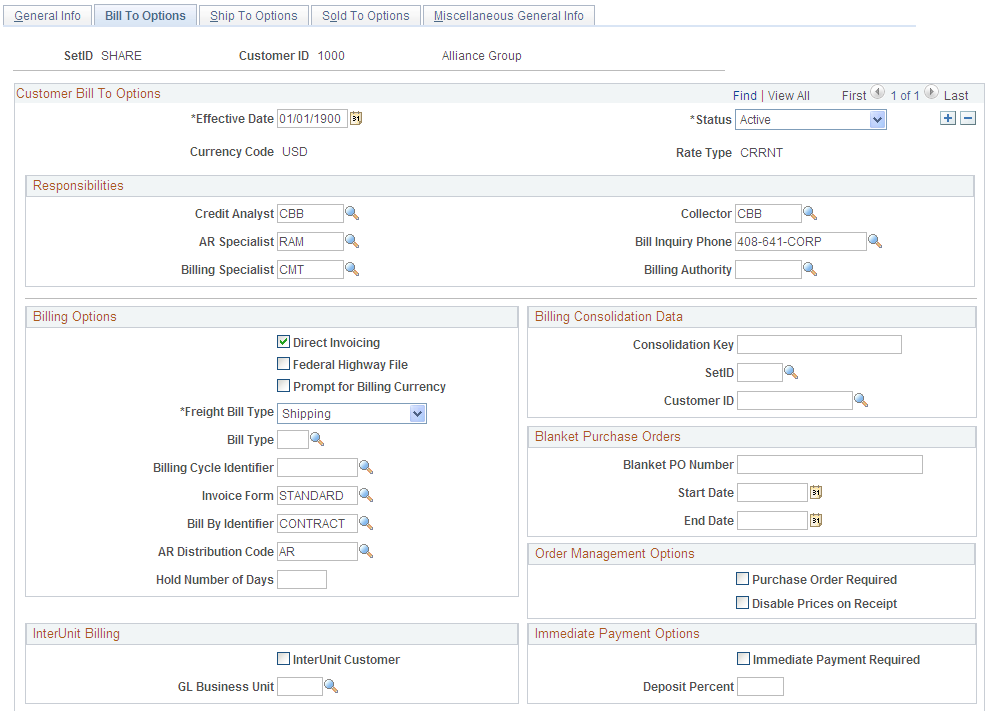
Image: Bill To Options page (2 of 2)
This example illustrates the fields and controls on the Bill To Options page (2 of 2). You can find definitions for the fields and controls later on this page.
Responsibilities
Note: The system stores collector, credit analyst, and team member (formerly salesperson) codes on the Receivables item record; when you change these personnel assignments for a customer, existing open items retain the previous collector, credit analyst, and team member or salesperson.
Billing Options
Billing Consolidation Data
Note: Use the Customer ID and Consolidation Key fields to enable the PeopleSoft Billing Interface to consolidate bills for bill to customers. To determine consolidation on a case-by-case basis, leave these fields blank and enter consolidation information through the Billing Interface.
Interunit Billing
Blanket Purchase Orders
Immediate Payment Options
Payment Method Options
Payment Terms
Prenote for Direct Debit
A direct debit prenote is a zero-amount electronic payment, which is sent to the customer's bank to confirm the accuracy of the customer's bank information with the information that is set up in the PeopleSoft application. You need to populate the fields in Prenote for Direct Debit for the Create Direct Debits process in PeopleSoft Receivables to create prenotes, which are sent to the customer's bank for confirmation.
Payment Predictor Options
Define rules for the Payment Predictor process (ARPREDCT) for the customer.
Bank Holiday Options
Note: Define holidays on the Business Calendar page, and then assign a calendar to a bank account on the External Accounts - Account Information page.
Write-Off Info
Change the default tolerances that the Automatic Maintenance process (AR_AUTOMNT) and maintenance worksheet use to write off items for a customer, if needed. The default is no limit.
eBill Payment Options
General Information - Ship To Options Page
Use the General Information - Ship To Options page (CUST_SHIPTO_OPT1) to enter delivery and shipping parameters.
You can also enter domestic and export shipping options.
Ship To Customer Options
Ship To Options
Just In Time Parameters
Demand Fulfillment Options
Note: PeopleSoft Inventory considers partial schedules and cancel backorder requirements when it processes demand for the customer. For example, if you select Yes in the Cancel Backorder field, the PeopleSoft Inventory system does not create an automatic backorder after an initial partial shipment.
Domestic and Export Shipment Options
Required Documents
When documents are required for all shipments outside of the U.S. for a particular ship to customer, select the check boxes in this group box for the required documents.
Export Flags
Ship Exception Dates Page
Use the Ship Exception Dates page (CUST_SHIPTO_EXCPT) to set up standard times when shipments should not be delivered to customers.
| Copy |
Click to copy exception shipment schedules. |
General Information - Sold To Options Page
Use the General Information - Sold To Options page (CUST_SOLDTO_OPT) to enter pricing and product information.
Sold To Customer Options
Order Number Preference
Select how you want the product ID field to be populated. The system product ID appears along with the other values on the order, buying agreement, and RMA.
Pricing Options
VMI Options
Hierarchy Page
Use the Hierarchy page (CUST_SOLD_HIERARCH) to select a classification, set up customer hierarchies, assign syndicated data types, and establish channels.
The customer hierarchy is, from highest to lowest level, division, region, and territory. Currently PeopleSoft standard processing does not use the fields on the Hierarchy page.
Sold To Hierarchy
| Classification |
Classify customers as major or minor customers based on their priority or profitability, for example. |
Hierarchy
Syndicated
Product Catalog Page
Use the Product Catalog page (CUST_SOLD_PRODCTLG) to specify available catalogs.
You can modify product offerings for sold to customers by creating product catalogs that contain only those products that each customer requires. You can create two types of catalogs: inclusive catalogs, which contain all of the products that are available to customers, and exclusive catalogs, which contain the products to withhold from customers.
Product Aliases Page
Use the Product Aliases page (CUST_SOLD_PRDALIAS) to set up product aliases.
You can enter products on orders or quotations using the sold to customer's part number (product alias) or system product IDs. Both numbers appear on the order line.
VMI Options Page
Use the VMI Options (Supplier managed inventory options) page (CUST_SOLDTO_OPT2 ) to specify VMI sold to options.
VMI Options
Customer Order Defaults
Customer Item Tracking
Replenishment Parameters
Miscellaneous General Info Page
Use the Miscellaneous General Info page (CUST_GENERAL_MISC) to enter web addresses, stock symbols, currency codes, rate types, support team codes, and subcustomer codes.
Miscellaneous General Information
Sub Customer Information
Note: The number of subcustomer fields that are available in this group box, which may include SubCustomer 1, and SubCustomer 2, depends on the number of qualifiers (one, two, or none) that you enable during installation on the Installation Options - Overall/GL page.
DMS Customer 1 Page
Use the DMS Customer 1 (Debt Management Service customer 1) page (DMS_CUSTOMER_1) to enter DMS agency information for individuals or corporations.
Click the DMS Information link on the Miscellaneous General Info page.
This link appears only if you have enabled DMS processing on the Installation Options - Receivables page.
DMS Customer 2 Page
Use the DMS Customer 2 (Debt Management Service customer 2) page (DMS_CUSTOMER_2) to enter individual debtor information for DMS.
Click the DMS Information link on the Miscellaneous General Info page.
This link appears only if you have enabled DMS processing on the Installation Options - Receivables page.
Enter the name, gender, and birth date.
| Generation |
Select as applicable: Jr., Sr., I, II, III, IV, or V. |
Enter any alias name information as appropriate.
DMS Customer 3 Page
Use the DMS Customer 3 (Debt Management Service customer 3) page (DMS_CUSTOMER_3) to enter individual debtor employment information for DMS.
Click the DMS Information link on the Miscellaneous General Info page.
This link appears only if you have enabled DMS processing on the Installation Options - Receivables page.
For individual debtors, enter the employer's name and address information.
| Federal Military Emp (federal military employee) |
For federal military employees, select the employment status. Values are Active, Retired, and Neither. |
For individual debtors, enter the phone information for the place of employment. Enter the individual's job title and salary.
DMS Customer 4 Page
Use the DMS Customer 4 (Debt Management Service customer four) page (DMS_CUSTOMER_4) to enter employee debtor bank information such as the bank name, address, and account type.
This page is available only if you enter employer information on the DMS Customer 3 page.
Click the DMS Information link on the Miscellaneous General Info page.
This link appears only if you have enabled DMS processing on the Installation Options - Receivables page.
| Description |
Enter the name of the bank. |
| 1st Account Type, 2nd Account Type, and 3rd Account Type |
Enter the types of bank accounts. Values are Checking, Savings, and Money Market. |
Staffing Information Page
Use the Staffing Information page (CUST_STAF_INFO) to enter customer information that is specific to Staffing Front Office, including customer owners and related contacts.
Customers Owners
Target Qualifications Page
Use the Target Qualifications page (FO_CUST_QUALIFS) to enter the target qualifications of the resources that this customer normally requests.
This information can be used for opportunity searches.
Select 0180 - Staffing Information in the General Info Links drop-down list box.
Select 0090 - Target Qualification in the Staffing Links drop-down list box.
Resource Qualifications - Select Qualification Profile Page
Use the Resource Qualifications - Select Qualification Profile page (RS_SELQUALPROFILE) to add target qualifications from a qualification profile.
Select a qualification profile and click the OK button to populate the Target Qualification page with a set of predefined qualifications. The profiles can be set up by a system administrator for public use, or they can be set up by individual users for personal use.
Resource Qualifications - Search for Qualifications Page
Use the Resource Qualifications - Search for Qualifications page (RS_QUALIF_SRCH) to add target qualifications from the qualifications list.
The Currently Selected Qualifications group box appears when you access the page and reflects what qualifications are already entered on the Target Qualifications page.
Search Criteria
Search Results
The Search Results group box appears only after you define search criteria and click the Search button.
Currently Selected Qualifications
The qualifications already selected, including any qualifications that you added from the Search Results group box, appear here. To add these to the Target Qualifications page, click the OK button.
Resource Qualifications - Select Competencies Page
Use the Resource Qualifications - Select Competencies page (RS_SO_COMP) to add target qualifications from a competency tree.
Competencies
Expand a competency folder to view the child categories within, and click any of the child folders to view the individual competencies. Click a competency to add it to the Currently Selected Qualifications group box, and click the OK button to add the competencies to the Target Qualification page.
The competency tree is set up by a system administrator through Tree Manager.
Target Job Titles Page
Use the Target Job Title page (FO_CUST_JOBTITLE) to enter job titles of the resources that customers commonly request.
This information can be used for opportunity searches.
Select 0180 - Staffing Information in the General Info Links drop-down list box.
Select 0110 - Target Job Titles in the Staffing Links drop-down list box.
Career Master Page
Use the Career Master page (FO_CUST_CAR_MASTR) to enter information about how the customer is billed for career placements and who conducts interviews and reference checks.
Select 0180 - Staffing Information in the General Info Links drop-down list box.
Select 0120 - Career Master in the Staffing Links drop-down list box.

Benefits Page
Use the Benefits page (FO_CUST_BENEFITS) to enter benefits information that the customer offers its employees.
Select 0180 - Staffing Information in the General Info Links drop-down list box.
Select 0140 - Benefits in the Staffing Links drop-down list box.
Each field on this page is a free-form text field that is limited to 50 characters, except the Comments text box, which allows 256 characters. Enter a description of each benefit that is offered by the customer. For any benefits that are not listed, use the Comments text box.
Customer Sales Data Page
Use the Customer Sales Data page (FO_CUST_SALES_DATA) to enter information about the customer for the purpose of supporting the Staffing business development process.
Select 0180 - Staffing Information in the General Info Links drop-down list box.
Select 0150 - Customer Sales Data in the Staffing Links drop-down list box.
Peak Seasons
Location Data
Peak Seasons
Enter peak season information for this location.
Competitors Page
Use the Competitors page (FO_CUST_COMPETITRS) to enter information about other staffing firms with which you compete for the customer.
Alternatively, you can enter information to identify competitors of customers.
Select 0180 - Staffing Information in the General Info Links drop-down list box.
Select 0160 - Competitors in the Staffing Links drop-down list box.
Rates
Lines of Business Page
Use the Lines of Business page (FO_CUST_SRVC_AREA) to enter the lines of business in which the customer operates.
Select 0180 - Staffing Information in the General Info Links drop-down list box.
Select 0170 - Lines of Business in the Staffing Links drop-down list box.
Lines of business are broad categories of job sectors that the staffing company normally services. Lines of business are defined through system configuration. Examples may include Health Care, Technology, Legal, Clerical, or any other available appropriate description for the customer.
Job Supplements Page
Use the Job Supplement page (FO_CUST_JOB_SUPP) to enter additional information about certain job descriptions.
Select 0180 - Staffing Information in the General Info Links drop-down list box.
Select 0180 - Job Supplements in the Staffing Links drop-down list box.
Job Supplement Information
Forms Page
Use the Forms page (FO_CUST_FORMS) to use this page to review forms currently associated with the customer record.
From this page you can also click the Add New Form button to associate more forms with the customer record.
Select 0180 - Staffing Information in the General Info Links drop-down list box.
Select 0190 - Forms in the Staffing Links drop-down list box.
Form Detail Page
Use the Forms Detail page (FO_CUST_FORMS_DTL ) to associate additional forms with customer records.
Forms can be configured to capture extra information about the customer that is not already captured in the delivered fields in the application.
Default Customer Event Lists Page
Use the Default Customer Event Lists (FO_CUST_EVL) page to set up specific event lists for a customer for use on the Job Order page. You can set up standard event lists for the customer and set up specific event lists for each order type.
Select 0180 - Staffing Information in the General Info Links drop-down list box.
Select 0200 - Customer Event Lists in the Staffing Links drop-down list box.
Image: Default Customer Event Lists Page
This example illustrates the fields and controls on the Default Customer Event Lists Page. You can find definitions for the fields and controls later on this page.
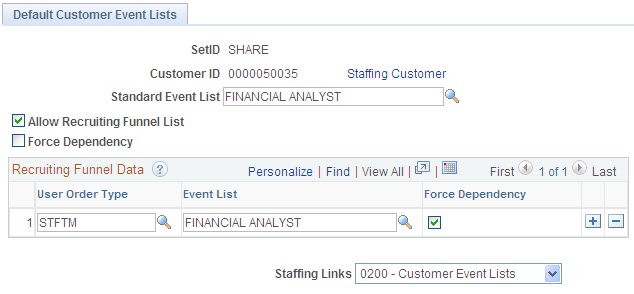
Header Information
Contract Rates Page
Use the Contract Rates page (FO_MC_RATES) to capture pay rate, bill rate and markup %, which have been negotiated and agreed upon by the staffing company and the customer.
Select 0180 - Staffing Information in the General Info Links drop-down list box.
Select 0210 - Master Contract Rates in the Staffing Links drop-down list box.
Worksite Master Page
Use the Worksite Master page (CUST_WRKSTE_MSTR) to enter additional information about a customer worksite by associating forms with a customer work address.
Complete all the fields for which you have information and click Save.
Customer Fields Page
Use the Customer Fields page (CUST_CSF) to select the Customer Field Definition templates that you can use when creating orders and assignments for a customer.
These templates enable you to capture additional information in the order and assignment that can be sent to PeopleSoft Billing and used for invoice printing or reporting purposes.
Federal Agency Inquiry Page
Use the Federal Agency Inquiry page (select 0300 – Federal Registration in the General Info Links drop-down list box on the General Info page) to create a new customer
Note: The 0300 – Federal Registration option is displayed in the General Info Links drop-down list box only for customers created from within the FedReg component.