5 Managing Volumes
This chapter describes how to manage LTFS-LE volumes using the LTFS-LE BUI. The following topics are included:
Volume Requirements
LTFS-LE supports the following tape media:
-
LTO-1.5T
Oracle's StorageTek 1.5 Terabyte LTO cartridge, used with IBM and HP LTO5 tape drives.
-
LTO-2.5T
Oracle's StorageTek 2.5 Terabyte LTO cartridge, used with IBM and HP LTO6 tape drives.
-
LTO-6.4T
Oracle's StorageTek 6.4 Terabyte LTO cartridge, used with IBM and HP LTO7 tape drives.
-
T10000T2
Oracle's StorageTek 5 Terabyte T10000 cartridge used with Oracle's StorageTek T10000C and T10000D tape drives.
Note:
LTFS-LE does not support a mixture of T10000C and T10000D tape drives within an LTFS-LE partition (or library if it is not partitioned).Refer to the StorageTek Linear Tape File System, Library Edition Planning and Installation Guide for more details about supported tape drives and media.
Refer to the StorageTek T10000 Operator's Guide for information about the T10000C tape drive and associated media.
Refer to your IBM or HP drive publications for information about IBM or HP LTO tape drives and associated media.
LTFS Format Specification Version 2.2
LTFS-LE volumes must be formatted to meet version 2.2 of the open source LTFS format specification. This specification enables data to be written to tape in a self-describing manner, as required by LTFS-LE.
You can use the LTFS-LE BUI to format a compatible tape cartridge for use with LTFS-LE. You can also reformat an LTFS-LE volume, which erases all data from the physical cartridge.
See "Formatting Volumes" for more information.
Viewing Volumes using the Manage Volumes Page
Use the Manage Volumes page in the LTFS-LE BUI to view the status of your tape volumes. To access this page, click the Storage tab and select Volumes from the selection panel.
The following figure shows the Manage Volumes page:
Figure 5-1 LTFS-LE BUI Manage Volumes page
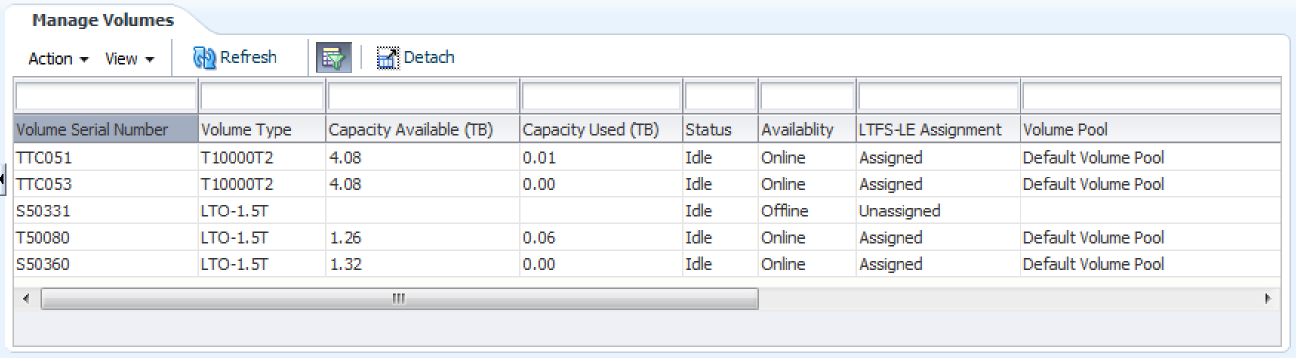
Description of ''Figure 5-1 LTFS-LE BUI Manage Volumes page''
As shown in Figure 5-1, this page lists all tape volumes discovered in the library. For each volume, the following information is displayed:
-
Volume Serial Number
-
Volume Type
The type of cartridge: T10000T2, LTO-1.5T, LTO-2.5T, or LTO-6.4.
-
Capacity Available (TB)
The amount of free space on the cartridge, in Terabytes.
-
Capacity Used (TB)
The amount of used space on the cartridge, in Terabytes.
-
Status
Indicates whether the volume is idle or processing.
-
Availability
Displays whether the volume is online or offline. LTFS-LE can only access data from online volumes.
Initially, all LTFS-LE formatted volumes are automatically placed online. Non LTFS-LE formatted volumes are placed offline.
-
LTFS-LE Assignment
Displays whether the volume is assigned or unassigned to LTFS-LE. LTFS-LE can only write data to assigned volumes.
Initially, all LTFS-LE formatted volumes are automatically assigned. Non LTFS-LE formatted volumes are unassigned.
-
Volume Pool
Displays whether the volume is included in the LTFS-LE default volume pool.
Performing Volume Management Tasks
You can use the LTFS-LE BUI to perform the following volume management tasks:
Formatting or Unformatting Volumes for LTFS-LE
LTFS-LE volumes must be formatted in the LTFS 2.2 format. This open source specification enables data to be written to tape in a self-describing manner, as required by LTFS-LE.
You can use the LTFS-LE BUI to do the following:
-
Format a compatible volume for use with LTFS-LE.
-
Format an LTFS-LE volume, which deletes all data from the physical cartridge.
-
Unformat an LTFS-LE volume to reuse the volume in a non LTFS-LE setting. LTFS-LE deletes all data from the volume.
Note:
When you assign an unformatted volume to LTFS-LE, the volume is automatically formatted. See "Assigning Volumes" for more information.Formatting Volumes
To format a volume using the LTFS-LE BUI:
Note:
If you re-format an LTFS-LE formatted volume, LTFS-LE deletes all data from the physical cartridge.-
Place the volume offline.
-
Remove the volume from the default volume pool.
-
Click the Storage tab and select Volumes from the selection panel.
The Manage Volumes page appears.
-
Click a volume in the listing to select it.
-
Click the Action drop-down menu and select Format Volume.
A confirmation dialog box appears.
-
When the confirmation message appears, click OK.
The Select Drive dialog box appears.
-
From the Select Drive dialog box, use the drop-down menu to select a drive for the format operation and click OK to format the volume.
The volume is formatted, and the event is recorded in the event logs displayed on the LTFS-LE Dashboard. See Chapter 6, "Monitoring the LTFS-LE System" for more information.
Important T10000C/T10000D consideration:
If you are reformatting an existing T10000C volume (T2-5000 volume type) as a T10000D volume, you will be presented with a series of confirmation messages before the volume is formatted. Remember that when you format a volume, all data is removed from the volume.
-
Assign the volume to LTFS-LE. See "Assigning Volumes".
When you assign a volume, LTFS-LE automatically places it
Onlineand adds it to the default volume pool.
Unformatting Volumes
When you unformat an LTFS-LE volume, the LTFS-LE format headers (metadata and data partitions) are removed from the volume and it becomes a standard, non-LTFS-LE volume.
To unformat a volume using the LTFS-LE BUI:
-
Place the volume offline. See "Placing Volumes Offline".
-
Remove the volume from the default volume pool. See "Removing Volumes from the Default Volume Pool".
-
Unassign the volume from LTFS-LE. See "Unassigning Volumes".
-
Click the Storage tab and select Volumes from the selection panel.
The Manage Volumes page appears.
-
Click a formatted volume in the listing to select it.
-
Click the Action drop-down menu and select Unformat Volume.
A confirmation dialog box appears.
-
Click OK to close the dialog box. or cancel to cancel
The Select Drive dialog box appears.
-
From the Select Drive dialog box, use the drop-down menu to select a drive for the unformat operation and click OK.
A warning message appears.
-
When the warning message appears, click OK to unformat the volume or Cancel to cancel the operation.
The volume is unformatted, and the event is recorded in the LTFS-LE Dashboard.
Assigning or Unassigning Volumes to LTFS-LE
To manage volumes using LTFS-LE, you must assign the volumes to the LTFS-LE application.
When you assign a volume to LTFS-LE, it is automatically placed online and added to the default volume pool. When you assign a non-formatted volume, the volume is automatically formatted for use with LTFS-LE.
Assigning Volumes
To assign one or more volumes using the LTFS-LE BUI:
-
Click the Storage tab and select Volumes from the selection panel.
The Manage Volumes page appears.
-
Click the Action drop-down menu and select Assign/Unassign Volumes.
-
Select one or more volume names from the Unassigned Volumes column and use the arrow buttons to move the drives to the Assigned Volumes column.
-
Click the single arrow button to move only the selected volumes.
-
Click the double arrow button to move all volumes.
-
-
Click Apply. A confirmation dialog box appears, indicating that your input has been validated.
-
Click OK to close the dialog box.
-
On the Assign/Unassign Volumes page, click OK.
The Manage Volumes page is updated to indicate that the volumes are
AssignedandOnline. The drives are also added to the default volume pool.Note:
The Manage Volumes page may indicate aPendingstatus until processing completes. When a volume is pending, no other action may be performed on that volume.
Unassigning Volumes
To unassign one or more volumes:
-
Click the Storage tab and select Volumes from the selection panel.
-
Place the volumes offline. See "Placing Volumes Offline".
-
Remove the volumes from the default volume pool. See "Removing Volumes from the Default Volume Pool".
-
Click the Action drop-down menu and select Assign/Unassign Volumes.
The Assign/Unassign Volumes page appears.
-
Select one or more volume names from the Assigned Volumes column and use the arrow buttons to move the drives to the Unassigned Volumes column.
-
Click the single arrow button to move only the selected volumes.
-
Click the double arrow button to move all volumes.
-
-
Click Apply. A confirmation dialog box appears, indicating that your input has been validated.
-
Click OK to close the dialog box.
-
On the Assign/Unassign Volumes page, click OK.
The Manage Volumes page is updated and to indicate that the volumes are
Unassigned.Note:
The Manage Volumes page may indicate aPendingstatus until processing completes. When a volume is pending, no other action may be performed on that volume.
Placing Volumes Online or Offline
The LTFS-LE BUI enables you to place volumes online or offline.
The following functions require the volume to be online:
-
Reading or writing data
-
Finalizing a volume
The following functions require the volume to be offline:
-
Ejecting the volume
-
Vaulting the volume
-
Formatting the volume
-
Assigning or unassigning the volume to LTFS-LE
-
Assigning or unassigning the volume to the default volume pool
-
Placing all drives of a particular type offline simultaneously
Placing Volumes Online
To place one or more volumes online using the LTFS-LE BUI:
-
Click the Storage tab and select Volumes from the selection panel.
The Manage Volumes page appears.
-
Click the Action drop-down menu and select Change Online/Offline Status.
-
Select one or more volume names from the Offline Volumes column and use the arrow buttons to move the drives to the Online Volumes column.
-
Click the single arrow button to move only the selected volumes.
-
Click the double arrow button to move all volumes.
-
-
Click Apply. A confirmation dialog box appears, indicating that your input has been validated.
-
Click OK to close the dialog box.
-
On the Change Volumes Online/Offline Status page, click OK.
The Manage Volumes page is updated to indicate that the volume is
Online. If this fails to occur, you can click the Refresh button to reload the display.Note:
The Manage Volumes page may indicate aPendingstatus until processing completes. When a volume is pending, no other action may be performed on that volume.
Placing Volumes Offline
To place one or more volumes offline using the LTFS-LE BUI:
-
Click the Storage tab and select Volumes from the selection panel.
The Manage Volumes page appears.
-
Click the Action drop-down menu and select Change Online/Offline Status.
The Change Volumes Online/Offline Status page appears.
-
Select one or more volume names from the Online Volumes column and use the arrow buttons to move the volumes to the Offline Volumes column.
-
Click the single arrow button to move only the selected volumes.
-
Click the double arrow button to move all volumes.
-
-
Click Apply. A confirmation dialog box appears, indicating that your input has been validated.
-
Click OK to close the dialog box.
-
On the Change Volumes Online/Offline Status page, click OK.
The Manage Volumes page is updated to indicate that the volume is
Offline. If this fails to occur, you can click the Refresh button to reload the display.
Note:
-
The Manage Volumes page may indicate a
Pendingstatus until processing completes. When a volume is pending, no other action may be performed on that volume. -
An LTO7 drive can read an LTO5 cartridge. However, LTFS-LE does not support read only mode. If you have an LTO5 volume and take all LTO5 and LTO6 drives offline (with LTO7 drives online), LTFS-LE automatically places the LTO5 volume offline.
Adding or Removing Volumes from the LTFS-LE Default Volume Pool
LTFS-LE utilizes a default volume pool containing the volumes LTFS-LE may use to store data.
LTFS-LE Release 1.0 does not support the creation of additional volume pools. You can include mixed volume types in the default volume pool.
When you create the library, LTFS-LE automatically adds all LTFS-LE formatted volumes to the default volume pool. You can also use the LTFS-LE BUI to add or remove one or more volumes as necessary.
Adding Volumes to the Default Volume Pool
To add one or more drives to the default drive pool:
To use these columns:
-
Click the Settings tab and select Drive Pool Settings from the selection panel.
The Drive Pool Settings page appears.
-
Locate the Volumes not in Pool and Volumes in Pool columns.
-
The Volumes not in Pool column displays volumes that are eligible to be added to the default volume pool.
-
The Volumes in Pool column includes volumes that are included in the default volume pool.
Note:
Volumes must be offline to be visible in these columns. See "Placing Volumes Offline" for more information. -
-
Select one or more volume names from the Volumes not in Pool column and use the arrow buttons to move the volumes to the Volumes in Pool column.
-
Click the single arrow button to move only the selected volumes.
-
Click the double arrow button to move all volumes.
-
-
Click Apply. A confirmation dialog box appears, indicating that your input has been validated.
-
Click OK to close the dialog box.
-
On the Volume Pool Settings page, click OK. A confirmation dialog box appears, indicating that your volume pool settings have been saved.
-
Click OK to close the dialog box.
-
Click the Storage tab and select Volumes from the selection panel.
The Manage Volumes page appears, and the Volume Pool column indicates that the volumes are now included the default volume pool.
-
To begin using these volumes, place them online. See "Placing Volumes Online" for more information.
Removing Volumes from the Default Volume Pool
To remove one or more volumes from the default drive pool:
-
Click the Settings tab and select Volume Pool Settings from the selection panel.
-
Locate the Volumes not in Pool and Volumes in Pool columns.
-
The Volumes not in Pool column displays volumes that are not included in the default volume pool.
-
The Volumes in Pool column includes volumes that are included in the default volume pool.
Note:
Volumes must be offline to be visible in these columns. See "Placing Volumes Offline" for more information. -
-
Select one or more volume names from the Volumes in Pool column and use the arrow buttons to move the volumes to the Volumes not in Pool column.
-
Click the single arrow button to move only the selected volumes.
-
Click the double arrow button to move all volumes.
-
-
Click Apply. A confirmation dialog box appears, indicating that your input has been validated.
-
Click OK to close the dialog box.
-
On the Volume Pool Settings page, click OK. A confirmation dialog box appears, indicating that your volume pool settings have been saved.
-
Click OK to close the dialog box.
-
Click the Storage tab and select Volumes from the selection panel.
The Manage Volumes page appears, and the Volume Pool column indicates that the volumes are not included the default volume pool.
Importing Volumes
You can use either of the following methods to import volumes into the LTFS-LE library:
-
Entering Volumes Using ACSLS
-
Entering Volumes Using the LTFS-LE BUI Enter Action
Entering Volumes Using ACSLS
To enter volumes using ACSLS:
-
The operator inserts one or more LTFS-LE compatible volumes into the library CAP.
-
Using the ACSLS "cmd_proc" the operator directs these volumes to the appropriate ACS or library partition dedicated to Oracle's LTFS-LE software.
-
LTFS-LE detects the new volumes and processes the volumes.
-
LTFS-LE checks each new volume for LTFS-LE compatibility. If a volume is incompatible, LTFS-LE places it offline and unassigned, and an error is recorded in the LTFS-LE event log.
-
LTFS-LE checks whether each new volume is formatted for LTFS-LE.
-
If a volume is formatted for LTFS-LE, LTFS-LE assigns it to LTFS-LE, places it online, and adds it to the default volume pool. Volume and file information is added to the global namespace, and the volume is available for use.
-
If a volume is not formatted for LTFS-LE, LTFS-LE leaves the volume unassigned and offline.
To use these volumes, assign them to LTFS-LE. When you assign a volume, it is automatically formatted for use with LTFS-LE. See "Assigning Volumes".
-
Entering Volumes Using the LTFS-LE BUI Enter Action
To enter a volume using the Enter action in the LTFS-LE BUI:
-
From the LTFS-LE BUI, click the Storage tab and select Volumes from the selection panel.
The Manage Volumes page appears.
-
Click the Action drop-down menu and select Enter Volume.
The Enter Volume dialog box appears.
-
Enter the ACS, LSM, and CAP location for the volumes you want to enter.
-
Click OK to signal LTFS-LE to detect and process the volumes, or click Cancel to exit the dialog box.
-
LTFS-LE checks each volume for LTFS-LE compatibility. If the volume is incompatible, LTFS-LE places it offline and unassigned, and an error is recorded in the LTFS-LE event log.
-
LTFS-LE checks whether each volume is formatted for LTFS-LE.
-
If a volume is formatted for LTFS-LE, LTFS-LE assigns it to LTFS-LE, places it online, and adds it to the default volume pool. Volume and file information is added to the global namespace, and the volume is available for use.
-
If a volume is not formatted for LTFS-LE, LTFS-LE leaves the volume unassigned and offline.
To use these volumes, assign them to LTFS-LE. When you assign a volume, it is automatically formatted for use with LTFS-LE. See "Assigning Volumes".
-
Exporting Volumes
You can use either of the following methods to export volumes from the LTFS-LE library using the LTFS-LE BUI:
-
When you eject a volume, the volume and its associated files are removed from the LTFS-LE global namespace.
-
When you vault a volume, the volume remains offline in the LTFS-LE global namespace, and indicates a vaulted status. After a volume is vaulted, you may reenter it into the LTFS-LE system if the volume data has not been modified in any way.
In both cases, it is recommended that you first finalize the volume.
Both export methods maintain the LTFS-LE volume format, allowing the cartridge to be read in any environment with Oracle's StorageTek LTFS, Open Edition (LTFS-OE) installed. IBM or HP LTFS applications may also be used, however, these applications may or may not read LTO6 cartridges.
Finalizing a Volume
As a best practice, always finalize a volume before exporting it from the library.
When a volume is finalized, any unwritten metadata or unapplied file deletes are applied to the volume. This action ensures that the actions on the global namespace are reflected on the physical volume.
To finalize a volume:
-
Click the Storage tab and select Volumes from the selection panel.
-
Ensure that the volume you want to finalize is Online. See "Placing Volumes Online".
-
Click the volume in the listing to select it.
-
Click the Action drop-down menu and select Finalize.
The volume is finalized. This event is recorded in the LTFS-LE Dashboard. See "Monitoring Recent Events".
Ejecting Volumes
Note:
Ensure that you set the ACSLS mount retention time (for ejecting volumes) to zero. Refer to your Oracle StorageTek ACSLS publications for more information.To eject a volume:
-
As a best practice, it is recommended that you finalize the volume before ejecting it. See "Finalizing a Volume" for more information.
-
Place the volume offline. See "Placing Volumes Offline".
-
Click the Storage tab and select Volumes from the selection panel.
The Manage Volumes page appears.
-
Click the Action drop-down menu and select Eject Volume.
The Eject Volume dialog box appears.
-
Under Volume Ejection Parameters, enter the ACS, LSM, and CAP for the eject.
-
In the Select Volumes column, click the volume you want to eject and use the arrow buttons to move it to the column on the right.
-
Click Apply.
-
When the confirmation message appears, click OK.
Once the volume is ejected, it is no longer displayed on the Manage Volumes page.
-
Remove the ejected cartridge from the library CAP.
Vaulting Volumes
LTFS-LE enables you to vault a volume for offline storage.
To vault a volume:
-
As a best practice, it is recommended that you finalize the volume. See "Finalizing a Volume" for more information.
-
Place the volume offline. See "Placing Volumes Offline".
-
Click the Storage tab and select Volumes from the selection panel.
The Manage Volumes page appears.
-
Click a volume in the listing to select it.
-
Click the Action drop-down menu and select Vault Volume.
The Vault Volume dialog box appears.
-
Under Vault Volume Parameters, enter the ACS, LSM, and CAP for the vault.
The Manage Volumes page displays the updated information and the volume returns a Vault status. If this fails to occur, you can click the Refresh button to reload the display.
-
In the Select Volumes column, click the volume you want to vault and use the arrow buttons to move it to the column on the right.
-
Click Apply.
A confirmation dialog box appears.
-
Click OK to close the dialog box.
-
In the Vault Volume dialog box, click OK to vault the volume.
Once the volume is vaulted, the Manage Volumes page is updated to indicate a Vaulted status for the volume.
-
Remove the vaulted cartridge from the library CAP.
After a volume is vaulted, you may reenter it into the LTFS-LE system if the volume data has not been modified in any way.
Deleting Unavailable Volumes
LTFS-LE enables you to remove volumes with a status of Unavailable from the LTFS-LE system, including the LTFS-LE BUI and global namespace.
To remove one or more unavailable volumes:
-
Click the Storage tab and select Volumes from the selection panel.
The Manage Volumes page appears.
-
Click the Action drop-down menu and select Delete Unavailable Volumes.
The Delete Unavailable Volumes page appears. All unavailable volumes are listed in the Unavailable Volumes column.
-
Select one or more unavailable volume names from the Unavailable Volumes column and use the arrow buttons to move these volumes to the Volumes to Delete column.
-
Click the single arrow button to move only the selected volumes.
-
Click the double arrow button to move all volumes.
-
-
Click Apply. A confirmation dialog box appears, indicating that your input has been validated.
-
Click OK to close the dialog box.
An information dialog box appears, confirming successful deletion.
-
Click OK to close the dialog box.
The Manage Volumes page appears, and the deleted volumes are no longer included in the listing.