3 Operator Tasks
This chapter discusses operator tasks which fall into the following broad categories: basic tasks, menu system tasks, and Data Path Key Management (DPKM) settings.
Many tasks are performed by using the physical operator panel switches (see "Operator Panel Controls and Indicators") and power switch of the rack-mounted T10000 tape drive while some involve using the drive menu system (see "Menu System Overview").
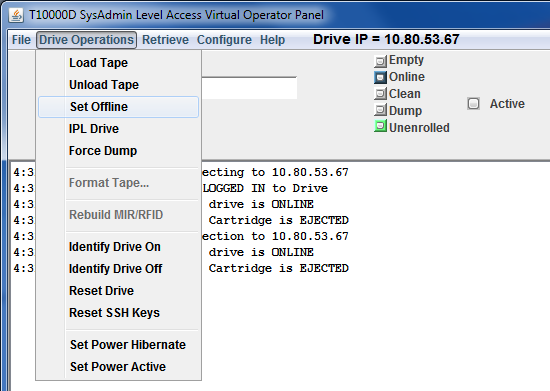
You can choose to use the Virtual Operator Panel (VOP) instead of using the physical operator panel. Many of the drive and cartridge tasks are performed by using the VOP Drive Operations menu (see Figure 3-1) such as load or unload a tape, set the drive offline, IPL the drive, and force a dump. Hibernation controls are also available for the T10000C and T10000D tape drives. Refer to the VOP documentation for additional information regarding program installation, drive connections, and the VOP user interface.
For operator tasks relating to drives within a library, consult the operator guide for your specific library.
The scope of tasks documented depends on the functionality of the particular library. Library information might describe drive cleaning only or provide a broad range of tasks (for example using the drive operator panel, cleaning a drive, and manually mounting or dismounting a cartridge).
Basic Tasks
The basic tasks include:
Power-on Rack Mount Drives
To apply power to the rack mount tray:
-
Verify connection of the rack mount tray to an AC power outlet or power strip.
-
Make sure that all interface cables are fully seated.
-
Set the power switch on the rear panel to on (|) [see Figure 2-3, "Rack Mount Chassis Rear Panel"].
Both drives power-on and start performing an initial program load (IPL).
Note:
The power indicator flashes while the IPL is in progress. It is the left most operator panel indicator (see Figure 2-2, "Operator Panel"). Various messages relative to the IPL sequence appear in the operator panel display window. These messages do not require operator action.The drive successfully completes an IPL when:
-
The drive power indicator is steady.
-
An asterisk (*) appears in the operator panel display window.
-
Power-off Rack Mount Drives
Note:
The drive tray switch removes power from both tape drives in a dual-drive rack mount drive tray.To remove power from the rack mount tray:
-
Make sure there is not a job or application running on the host that is using the tape drive(s). If there is, stop that job or application.
-
Make sure a cartridge is not loaded in the tape drive(s).
-
Set the rear panel power switch to off (O), see Figure 2-3, if needed.
Cartridge Procedures
This section provides instructions for performing tasks related to the tape cartridge.
Write-Protect or Write-Enable a Cartridge
-
Locate the write-protect switch beside the cartridge door.
-
Move the write-protect switch to the desired setting.
The symbols (see Figure 3-2) indicate the following status:
Locked–(lock image shown closed) Write-protected.
The switch is to the right (toward the cartridge door) when the cartridge is positioned with the hub down and the label edge away from you.
Note:
The tape drive can read data from the data cartridge. Write operation attempts will fail.Unlocked–(lock image shown open) Write-enabled (unprotected).
The switch is to the left (away from the cartridge door). The tape drive can read data from or write data to the data cartridge.
Illustration Legend:
1 - Write-protect switch
2 - Unlocked position
3 - Locked position
Cartridge Handling Precautions
Caution:
Be certain that a data cartridge never comes close to strong electrical fields or any form of magnet or magnetic field.-
Avoid electrical or magnetic fields.
Magnetic fields are present near disk drives and electric motors. As the size of the electric motor increases, the magnetic field usually strengthens). Items containing buzzers of any form produce alternating current electrical fields strong enough to partly erase a magnetic tape.
Caution:
You must keep cartridges dry to prevent media damage. -
Keep cartridges dry.
Never store cartridges on a floor where moisture might be present or near air conditioners or air handlers.
Air conditioners might leak water as a function of cooling the air, and air handlers might be adding moisture to the air as a function of controlling the environment in a computer room.
Caution:
Do not drop or handle cartridges roughly. -
Avoid dropping or handling cartridges roughly.
There is a hub locking mechanism within the T10000 data cartridge, but it has limitations on just how much braking it provides. Rough handling of a data cartridge could cause the locking mechanism or brake to slip, resulting in a loose tape. Loose tapes are easily damaged by a tape drive.
To Identify a Defective Cartridge
Look for cartridge problems before you load a cartridge into a drive or library:
-
Cracked or broken case (including the access door)
-
Dirty case
-
Missing, broken, or cracked leader (open the tape access door, see Figure A-2)
Note:
Your service representative can usually replace a broken leader. -
Damaged write-protect switch
-
Liquid in the data cartridge case
-
Loose label
-
Other obvious damage
Also see "Dropped Cartridges" for additional information.
Manually Load a Cartridge
Manual loading is commonly done on rack mounted drives. For a library failure, you might have to manually load a data cartridge.
A T10000C or T10000D drive automatically hibernates to save power after a period of inactivity. When hibernating, the drive cannot detect the presence of a cartridge. The library monitors whether a drive is hibernating and commands the drive to wake up whenever a mount is forthcoming.
Hibernation poses a problem when a user opens the library door and attempts to manually mount a cartridge.
Note:
With some library code levels (for example SL8500 FRS_6.02 and SL3000 FRS_2.81), hibernating drives remain in the hibernation state and will neither detect nor load a manually inserted cartridge. Always strive to use the most current library code version.To force the drive out of hibernation, you can either power cycle the drive or use VOP.
The drive remains awake until after a mount or dismount sequence, but resumes it's auto-hibernation behavior after the cartridge has been extracted.
To Load a Cartridge
Note:
A T10000 tape drive accepts T10000 cartridges only.To load a cartridge into a T10000 tape drive, do the following:
-
Look into the drive cartridge slot to make sure there are no obstructions.
-
Make sure the cartridge is not defective (see "To Identify a Defective Cartridge").
-
Make sure the cartridge write-protect switch is in the proper position.
Note:
For any cartridge on which data is to be written, set the write-protect switch to the unlocked position (see Figure 3-2). -
Hold the cartridge by the finger grips (Figure 1-8, "T10000 Cartridge") with the hub side down, and carefully insert the cartridge into the tape drive loading slot.
-
Push the cartridge all the way into the slot.
Push on the label edge of the cartridge because there is not enough room for your fingers (finger grip recessions do not exist on the bezel of a library drive). You must overcome some resistance to fully seat the cartridge.
When you fully seat the cartridge, the data cartridge lowers onto the file reel motor hub assembly.
Note:
When manually loading a library-attached drive, make sure the library hold-off signal to the drive is disabled. Otherwise, the drive will not accept a manual load. -
When a cartridge loads, observe that the rack mounted operator panel display window indicates one of the following:
- Ready A when the tape is ready and is a VolSafe cartridge.
- Ready F when the tape is ready and file protected.
- Ready H when a higher density, non-VolSafe cartridge is ready and not file-protected in a lower density tape drive.
- Ready L when a lower density, non-VolSafe cartridge is ready and not file-protected in a higher density tape drive.
- Ready U when the tape is ready and not file protected.
Note:
See "To Unload a Cartridge" if a cartridge fails to load.
Manually Unload a Cartridge
Manual unloading is commonly done on rack mounted drives. For a library failure, you might have to manually unload a data cartridge.
To Unload a Cartridge
Note:
A T10000 tape drive does not eject the cartridge from the tape drive as is commonly done by other cartridge tape drives.Use the following procedure to remove a cartridge from the drive.
-
Make sure the tape drive is not in use.
This is done by checking the following:
-
There are no active jobs, applications, or programs using this drive.
-
The rack mount operator panel activity indicator is steady and not flashing.
-
The display window (VOP or operator panel) does not indicate any activity relative to tape movement (such as reading, writing, or locating).
Caution:
Possible data loss: Do not push the Unload button while a data cartridge is in use.
-
-
Unload the tape drive.
Rack mounted tape drive:
-
Press the operator panel Unload button and wait for the drive to raise the cartridge to the unload position.
The display should show an asterisk (*) when the operation is complete.
Note:
If the drive is offline, the asterisk alternates withOffline.
VOP unload:
-
Select Unload Tape from the Drive Operations menu or use the Shift+U keyboard shortcut.
Caution:
Do not forcibly remove a cartridge. -
-
Remove the cartridge.
Any resistance to removing the cartridge, beyond the usual friction between the cartridge case and the drive, might indicate that the cartridge leader is not fully rewound. See "Cartridge Leader Not Fully Rewound" for instructions.
Rack mount drives:
-
Use the finger grips on the cartridge (see Figure 1-8) and carefully withdraw the cartridge from the drive slot.
Library-attached drives:
-
Grasp the top and bottom of the cartridge with your finger tips and carefully withdraw the cartridge from the drive slot.
-
Cartridge Leader Not Fully Rewound
If you believe the cartridge leader is not fully rewound:
-
Use the operator panel (rack-mount drives only), VOP, or library software (if it supports that function) to attempt another load operation.
-
If the cartridge loads properly, perform an unload operation.
When the unload completes, the cartridge unloads.
Should the operation fail to correct the situation, contact your service representative about a possible stuck cartridge.
Tape Drive Cleaning
Caution:
Equipment damage: Do not wet-clean the tape drive. Do not clean the tape drive unless the Clean indicator lights.The tape drive Clean indicator lights after the drive either transports a predetermined length of tape or records a predetermined number of errors. The tape-to-head contact values are: T10000A tape drive = 1,000,000 meters,T10000B tape drive = 300,000 meters, T10000C tape drive = 10,000,000 meters, and T10000D tape drive = 10,000,000 meters.
You should use a cleaning cartridge to clean the tape drive when the Clean indicator is lit.
Note:
You can use the cleaning cartridge approximately 50 times before discarding it (see "Cleaning Cartridges").To Clean the T10000 Tape Drive
-
Make sure the tape drive is not in use.
Note:
If there is a tape loaded in the tape drive, make sure the application or job that was using that tape drive is no longer running before proceeding. -
Unload any data cartridge in the tape drive. See "To Unload a Cartridge" if a data cartridge is loaded in the tape drive.
-
Insert a cleaning cartridge in the tape drive.
-
After the cartridge loads, the activity light flashes.
-
The activity and clean indicators turn off when cleaning is completed, and the tape drive unloads the cleaning cartridge.
The cleaning cartridge has been used to its maximum number of cleaning cycles, if the tape drive immediately ejects the cleaning cartridge and the message
Exp ClCartappears in the tape drive's front panel display screen (a similar message is displayed on the VOP if that program is being used to monitor the tape drive).Note:
Discard the expired cleaning cartridge and insert a new cleaning cartridge into the tape drive.A cleaning cartridge failure occurred, if the message
CHKxxxxappears in the tape drive's front panel (xxxxis the FSC).Tip:
Try the procedure again with a different cleaning cartridge. If the problem persists, contact your service representative.Caution:
Tape damage: Do not forcibly remove a tape cleaning cartridge. -
-
Remove the cleaning cartridge from the tape drive.
Note:
Any resistance to removing the tape cleaning cartridge, beyond the usual friction between the cleaning cartridge case and the tape drive, probably indicates that the cartridge leader is not fully rewound (see "Manually Unload a Cartridge").
This completes the cleaning process and the tape drive is ready to resume normal operations.
Initial Program Load (IPL)
To recover from certain errors, you will perform a forced IPL. When the IPL starts, the following things happen:
-
The drive power indicator flashes.
-
Various IPL sequence messages appear in the operator panel display window. These messages require no action on your part.
After the drive successfully completes an IPL:
-
The drive power indicator is steady.
-
An asterisk (*) appears in the operator panel display window.
Note:
If there is a dump present, the operator panel display window alternates between the asterisk and the dump message. The dump present indication stops when you load a tape cartridge.
Use a physical switch on the operator panel or a menu command in the VOP to initiate the drive IPL.
To Start an IPL of the Drive from the Operator Panel
Note:
The rack mount drive must be powered-on.-
Make sure there is not a job or application running on the host that is using this tape drive. If there is, stop that job or application.
-
Make sure a data cartridge is not loaded.
-
Press the operator panel IPL button (see Figure 2-2, "Operator Panel").
To Start an IPL of the Drive Using VOP
To IPL the drive using the VOP program (see Figure 1-5):
-
Make sure there is not a job or application running on the host that is using this tape drive. If there is, stop that job or application.
-
Make sure a data cartridge is not loaded.
-
Make sure the drive is
offline(click Online, if the drive is not offline).The Online button turns gray to indicate that the drive is offline.
Note:
You can set the drive offline by selecting Set Offline from the Drive Operations menu. -
Select IPL from the Drive Operations menu to start the IPL process.
Menu System Tasks
You can perform the following tasks from the menu system:
-
Place the drive online
-
View the drive configuration settings
-
Place the drive offline
-
Rebuild the MIR
-
Change the drive configuration settings
To Place the Drive Online (Operator Panel)
Note:
In an open systems, multiple-host setting using a switch unit that has a port blocked to this tape drive, unblock that port before proceeding.To change the tape drive state from offline to online:
-
Press the operator panel Menu button until
Offlineappears in the display window.Note:
If you are within a submenu, press the Menu button untilExitappears in the display window and press the Select button to enter the main menu. -
Press the operator panel Select button to toggle the drive state.
Onlineappears in the display window, indicating the drive state is now online. -
Press the Menu button until
Exit Menu?appears in the display window. -
Press the Select button to exit the menu system.
-
Bring the tape drive back online to the host by using one of the following methods:
To Place the Drive Online (VOP)
Note:
In an open systems, multiple-host setting using a switch unit that has a port blocked to this tape drive, unblock that port before proceeding.On the VOP screen, there are two methods to place the drive offline:
Use the menu bar:
-
Open the Drive Operations menu (click Drive Operations in the menu bar or use the Alt+d keyboard shortcut).
-
Select the Set Online command or use the Shift+o keyboard shortcut.
The second drive status indicator/button changes to blue when the tape drive is online.
Use the status indicator:
If the tape drive is offline, the button next to the label Online is gray.
-
Click the button to change the state to Online.
The button color changes to blue when the tape drive is online.
To View the Configuration (Operator Panel)
Note:
See Chapter 4, "Menu System" for compete information and guidelines.-
Press the operator panel Menu button to enter the menu system:
-
If
Onlineappears in the tape drive's front panel display, go to step 2. -
If
Offlineappears, press the Select button to toggle the drive state (see "To Place the Drive Online (Operator Panel)").Note:
It is important that you view configuration settings in the online state, because you cannot accidently change settings in this drive state. To change settings, you must first set the drive to the offline state (see "To Place the Drive Offline (Operator Panel)").
-
-
Press the Menu button until
View CFG ?appears in the window display. -
Press the operator panel Select button (Yes) to enter view configuration submenus.
The first configuration setting appears in the operator panel display window.
-
Press either the Menu or the Select button to step through the configuration settings.
Note:
In the drive online state, the Select button has the same function as the Menu button, unless you are answering a displayed question. -
Press either the Menu or Select button until
Exit CFG ?appears in the display window. -
Press the Select button (Yes) to exit the configuration submenus, or press the Menu button (No) to repeat the view configuration sequence.
-
Press the Menu button until
Exit Menu?appears in the display window. -
Press either the Select button (Yes) to exit the menu system or the Menu button (No) to return to the online/offline selection menu.
To View the Configuration (VOP)
Note:
The drive must be in the online state.-
Select Retrieve from the menu bar or use the Alt+r keyboard shortcut to open the menu.
-
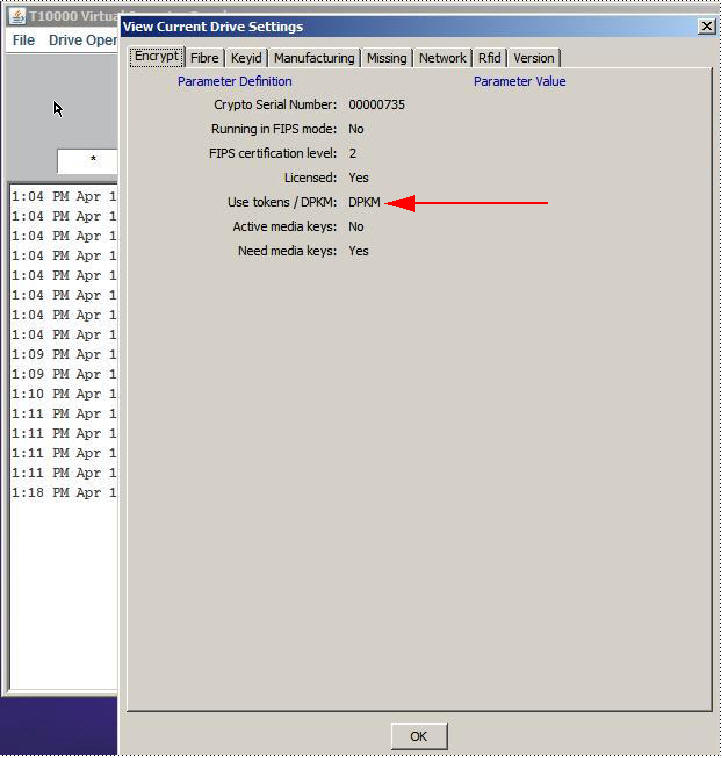
Select View Drive Data or use the Shift+v keyboard shortcut to access the View Current Drive Settings dialog box.
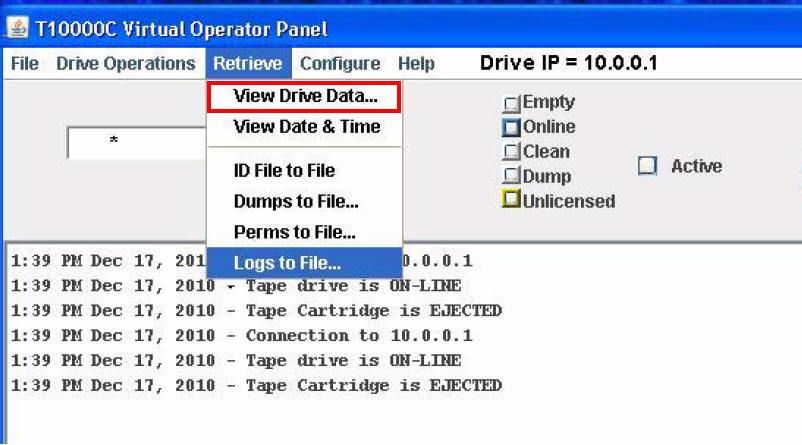
A new dialog box containing several tabs (such as: Encrypt, Fibre, Keyid, Manufacturing, Missing, Network, Rfid, and Version) appears.
Note:
See the VOP documentation for complete information and instructions.To Place the Drive Offline (Operator Panel)
-
Stop all I/O activity from the host.
In mainframe environments, set the tape drive offline for all host paths to the tape drive by using one of the following Vary commands:
-
MVS:
V<address>offline -
VM:
Vary off,<address>
In open systems environments, do one of the following:
-
Stop the job that is using the tape drive.
-
In a multi-host setting, stop any job that is using the tape drive and then, if there is a switch unit in use, block the port in that switch to the tape drive.
-
-
Press the operator panel Menu button.
Onlineappears in the display window, indicating the current state of the drive. -
Press the operator panel Select button to toggle the drive state.
Offlineappears in the display window, indicating a successful transition to the offline state. -
Press the Menu button until
Exit Menu?appears in the display window. -
Press the Select button to exit the menu system.
Note:
If you selectExit Menu?, the display alternates between Offline and the normal message after a cartridge is loaded as a reminder that the drive is still in the offline state.
To Place the Tape Drive Offline (VOP)
-
Cease all I/O activity from the host.
In mainframe environments, set the tape drive offline for all host paths to the tape drive by using one of the following Vary commands:
-
MVS:
V<address>offline -
VM:
Vary off,<address>
In open systems environments, do one of the following:
-
Stop the job that is using that tape drive.
-
In a multi-host setting, stop any job that is using the tape drive and then, if there is a switch unit in use, block the port in that switch to the tape drive.
-
-
Click Online.
If the tape drive is online, the button is blue. You click the blue button to change it to gray, indicating that the tape drive is offline.
Note:
You can also set the drive offline by selecting Set Offline from the Drive Operations menu.
Rebuilding the MIR
This section discusses the rebuilding of the MIR. This is an abnormal situation as the tape drive automatically builds and changes the MIR as the tape is used. The rebuild process is only used when the MIR on a tape becomes damaged or corrupted.
Note:
This can be a lengthy process, especially on a fully written cartridge. Rebuilding the MIR for a full data cartridge could take 90 minutes (T10000A formatted cartridge) or longer.To Rebuild the MIR (Operator Panel)
Note:
Make sure the write protect switch on the data cartridge is set to the unlocked position.This process rebuilds an MIR from the rack mount drive tray operator panel.
-
Set the drive to the offline state.
See "To Place the Drive Offline (Operator Panel)" as needed.
-
Press the Menu button until
Drv Menu?appears in the display window. -
Press the Select button (Yes) once.
The display window now shows the beginning of drive utilities submenus.
-
Press the Menu button until
Build MIRappears. -
Press the Select button to begin the MIR rebuilding process.
Ld Cust Tpappears in the display window.Note:
The drive unloads any loaded cartridge. Remove the cartridge. -
Insert a write-enabled cartridge with a defective MIR.
See "To Load a Cartridge" as needed.
When the rebuild completes, the cartridge is unloaded.
Note:
See "Cartridge Leader Does Not Rewind" if the cartridge does not unloadCaution:
Tape damage: Any resistance to removing the cartridge, beyond the usual friction between the data cartridge case and the tape drive, probably indicates that the leader is not fully rewound. Do not forcibly remove a cartridge. -
Remove the cartridge from the drive.
If there are other cartridges for MIR rebuilding, for each cartridge repeat step 6 and step 7.
When you have rebuilt all cartridges with defective MIRs, continue with the next step.
-
Press the Menu button once.
Exit Drv?appears in the display window. -
Press the Select button (Yes) to exit the drive utilities submenus, or press the Menu button (No) to repeat the utilities submenu sequence.
-
Return the drive to an online state
See "To Place the Drive Online (Operator Panel)" as needed.
Cartridge Leader Does Not Rewind
If you believe the cartridge leader is not fully rewound:
-
Attempt another load operation by pushing the cartridge back into the tape drive.
-
If it loads properly, use the tape operator panel Unload button to attempt an unload operation.
-
Grasp the cartridge and remove it from the drive.
Do not forcibly remove a cartridge.
Should the operation fail to correct the situation, contact your service representative about a possible stuck cartridge.
To Rebuild the MIR (VOP)
-
Make sure the tape drive is in the offline state.
If the display shows Online, click Drive Operations and select Set Offline. This sets the tape drive to the
Offlinestate. -
Select Rebuild MIR/RFID from the Drive Operations menu.
In older versions of VOP, this function is present in the Format Tape submenu.
Tip:
You can stop this function before you load a cartridge by clicking Abort in the Format Tape dialog box. -
Follow the on-screen prompts and directions.
After a successful MIR rebuild, the cartridge automatically unloads.
See "MIR Rebuild Fails (VOP)" if the MIR rebuild does not complete successfully.
Caution:
Tape damage: Any resistance to removing the data cartridge, beyond the usual friction between the data cartridge case and the tape drive, might indicate that the leader is not fully rewound (see "Cartridge Leader Does Not Rewind"). -
Remove the cartridge from the drive.
If more than one tape has a defective MIR, load the next cartridge into the tape drive when the VOP screen displays the prompt to load a customer cartridge. Repeat Step 4 and Step 5 until all defective MIRs have been rebuilt.
-
Click Done on the format selection dialog box after you have repaired all cartridges with defective MIRs.
-
Click Drive Operations and select Set Online.
This completes the rebuild of the MIR on one or more cartridges. The tape drive is now back online and ready for normal operations.
MIR Rebuild Fails (VOP)
If the MIR rebuild fails:
-
The message part of the VOP screen contains a failure message and an FSC.
-
The tape drive does not automatically eject the cartridge.
To unload the cartridge:
-
Click Drive Operations and select Unload Tape.
The cartridge unloads.
-
Remove the cartridge from the drive.
-
Attempt another rebuild of the MIR.
If the rebuild operation fails again, the MIR part of the tape in that cartridge is defective. Manually unload the cartridge following the first two steps of this procedure.
Change the Drive Configuration
Note:
The drive must be offline to change most configuration parameter values and typically requires an IPL to invoke a change.You can change drive configuration parameter values using the drive menu system or the Configure menu of VOP. Certain configuration parameters must be changed with VOP as there is not an equivalent menu item.
Note:
VOP is the preferred tool for viewing and changing drive configuration parameters. Make every effort to use VOP instead of the physical operator panel on the rack mount chassis.Data Path Key Management Procedures
You must use VOP to perform the data path key management (DPKM) procedures.
To View Current Drive Settings - Encrypt Tab (DPKM)
To view the current drive encryption settings:
-
Select View Drive Data from the Retrieve menu, and click the Encrypt tab.
Note:
The Use tokens/DPKM parameter value is DPKM as identified by the arrow in the following illustration. -
Click OK to return to the main VOP window.
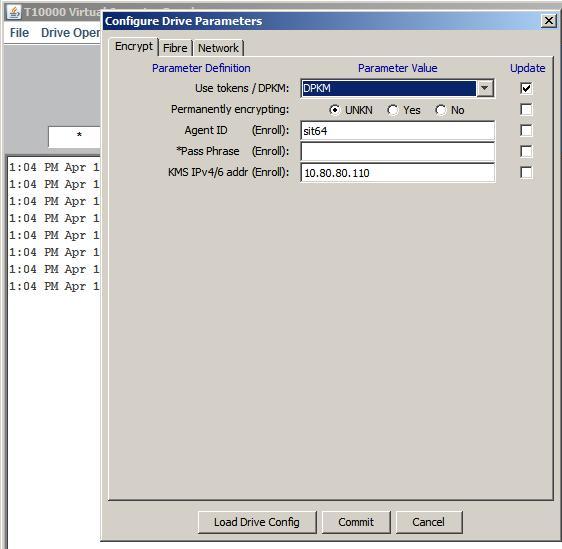
To Turn DPKM On
-
Set the drive offline.
-
Select Drive Data from the Configure menu.
-
Select Encrypt from the Configure Drive Parameters dialog box.
-
Select DPKM for the Use tokens/DPKM parameter.
Note:
A check mark appears in the Update box adjacent to the parameter. -
Click Commit at the bottom of the dialog box.
Note:
The drive performs an initial program load (IPL).See "Data Path Key Management" for additional information.
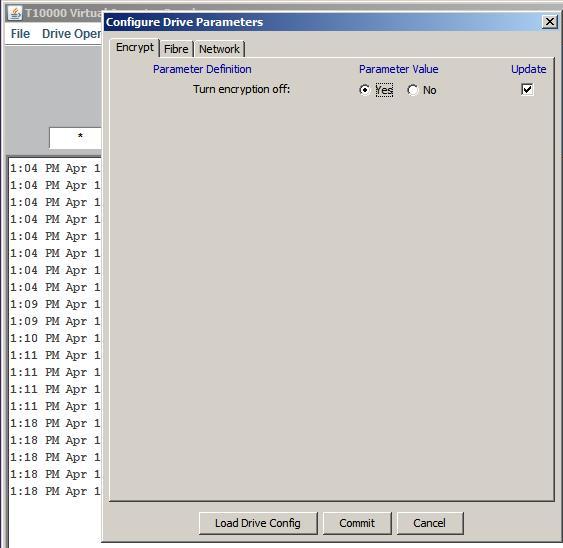
To Turn DPKM Off
-
Set the drive offline.
-
Select Drive Data from the Configure menu.
-
Select Encrypt from the Configure Drive Parameters dialog box.
-
Select the Yes option for the Turn encryption off parameter.
Note:
A check mark appears in the Update box adjacent to the parameter. -
Click Commit at the bottom of the dialog box.
Note:
The drive performs an initial program load (IPL).