| Oracle® Health Sciences Adverse Event Integration Pack for Oracle Health Sciences InForm and Oracle Argus Safety Installation Guide for On-Premise Deployment Release 1.0.2 E49877-01 |
|
|
PDF · Mobi · ePub |
| Oracle® Health Sciences Adverse Event Integration Pack for Oracle Health Sciences InForm and Oracle Argus Safety Installation Guide for On-Premise Deployment Release 1.0.2 E49877-01 |
|
|
PDF · Mobi · ePub |
This section discusses post-installation configurations for the Adverse Event: InForm and Argus Safety integration, including:
Section 8.1, "Creating a File Adapter Control Directory in Oracle WebLogic Server"
Section 8.5, "Configuring Argus Safety to Use Extension Profiles"
Note:
Before you use the integration for a trial, follow the trial setup steps provided in Oracle Health Sciences Adverse Event Integration Pack for Oracle Health Sciences InForm and Oracle Argus Safety Implementation Guide.Note:
Be sure to install patch set 1.0.2 for the integration. You can download it from MOS as patch 16949125.When a Read File Adapter is deployed on multiple SOA servers, multiple composite instances are created for a single file. A control directory for File Adapter high availability must be created when the integration SOA server is clustered. This control directory ensures that all Read File Adapters do not read the same file simultaneously.
For example, when ReportDrugSafetyReportReadFileAdapter is deployed on a two-node SOA server cluster, the control directory ensures that there is only one composite instance per incoming file.
Log into the Oracle WebLogic Server Administration Console.
To access the console, navigate to http://servername:portnumber/console.
Click Deployments in the left pane for Domain Structure.
Click File Adapter under Summary of Deployments on the right pane.
Click the Configuration tab.
Click the Outbound Connection Pools tab, and expand javax.resource.cci.ConnectionFactory to view the configured connection factories.
Click eis/HAFileAdapter.
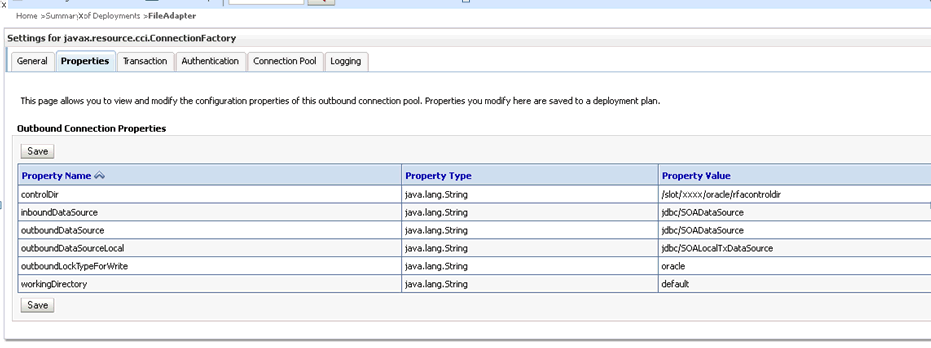
The Outbound Connection Properties screen for the connection factory corresponding to high availability is displayed.
Update the controlDir property as follows:
Set the property to the directory structure where the control files can be stored.
If multiple WebLogic Server instances run in a cluster, this must be a shared location. The directory specified must be write accessible to all WebLogic server instances.
Specify the directory path in the controlDir property.
Press Enter.
Figure 8-1 Outbound Connection Properties
Click Save.
The Save Deployment Plan screen is displayed.
Click OK to save the deployment plan.
For more information, see Oracle® Fusion Middleware User Guide for Technology Adapters 11g Release 1.
For information about enabling customization, see Oracle® Health Sciences Adverse Event Integration Pack for Oracle Health Sciences InForm and Oracle Argus Safety Implementation Guide.
You must install patch set 16949125 for the integration before proceeding with post-installation steps. The patch is available on My Oracle Support (https://support.oracle.com). For information on how to install the patch set, see Oracle® Health Sciences Adverse Event Integration Pack for Oracle Health Sciences InForm and Oracle Argus Safety 1.0.2 Patch Set Readme.
For questions or problems, contact Oracle Support for AIA.
To install the integration in Argus, perform the following steps:
Section 8.4.1, "Configuring a Custom Package for Encoding Products with Investigational Licenses"
Section 8.4.3, "Turning Off PMDA Validations for the PMDA PIP Profile in the Argus ESM_PKG"
Section 8.4.4, "Configuring Post-Save Functionality in Argus Safety"
If you do not have the Argus 7.0.3.1 patch set installed, run this procedure to set the E2B import logic to encode products correctly. Perform this procedure before you create integration profiles.
Copy the folder <AIA_HOME>\data\AEInFormandArgus\sql\ArgusCustomImpUtl to the Argus Interchange server. This folder contains the SQL script to use in this procedure.
Connect to the Argus database using SQL*PLUS as the esm_owner.
Run ArgusCustomImpUtl\<Argus Version>\custom_esm_imp_utl_<Argus Version>.plb. Argus_Version must be 607, 701, 702, or 703, depending on the version of Argus Safety that is installed.
You will be prompted for the esm_user database user twice. Each time you are prompted, enter the esm owner username (for example, esm_owner).
You set up Argus E2B profiles on the Argus Interchange server. The profile you create depends on the version of Argus Safety you are using and whether you are creating a profile for the FDA or PMDA.
If you are using the multi-tenant feature of Argus Safety:
Create one reporting destination for each enterprise.
Create in, out, and ack archive directories to hold E2B+ and acknowledgement files. Within each of these directories, create a sub-directory for each enterprise.
For information about these directories, see Chapter 4.
Note:
You must install the Adverse Event: InForm and Argus Safety integration patch set 1.0.2 (patch # 16949125) before you set up an Argus E2B profile. The patch is available on MOS.This section contains instructions for:
Section 8.4.2.1, "Setting Up an FDA-based Extension Profile"
Section 8.4.2.2, "Setting Up a PMDA-based Extension Profile"
Note:
If you create a profile and then run a second profile creation script, the following message displays:ORA-00001: unique constraint (ESM_OWNER.PK_LM_ESM_ARGUS_MAPPING) violated
You may ignore this error. It occurs because some data that is shared between profiles is inserted in a database table when the first profile is created and, since the data exists, when subsequent profiles are created a unique constraint violation occurs.
Use one of the following procedures, as appropriate for the version of Argus Safety in use, to set up an FDA extension profile.
For Argus 6.0.7:
Navigate to the SOA_Server directory <AIA_HOME>/data/AEInFormandArgus/sql/ArgusProfile/FDA/6.0 and copy the ich-icsr-v2.1-FDA-PIP.dtd file to the Interchange server folder <Oracle_Home>\Argus\ESMService\DTDFiles\.
Copy all the files from the SOA_Server directory <AIA_HOME>/data/AEInFormandArgus/sql/ArgusProfile/FDA/6.0 to a folder on the Argus ESM server (for example, C:\Temp_config_folder).
On the Argus Interchange server, open a command prompt and navigate to the folder where you copied the scripts in step 2.
Note:
You must install the Adverse Event: InForm and Argus Safety integration patch set 1.0.2 (patch # 16949125) before you set up an Argus E2B profile. The patch is available on MOS.The Argus DTD will be updated to include additional fields to support custom extension fields, non-custom extension fields, and non-E2B extension fields.
Run Setup_Safety_Integration_Profile.bat. The scripts in this batch file import the custom extension fields, non-custom extension fields, and non-E2B extension fields that need to be added to the integration-specific DTD.
Enter the database name, ESM owner's username (for example, esm_owner), password, and log file path (C:\Temp_config_folder\profilecreationoutput.log).
Press Enter.
For Argus 7.0.1, 7.0.2, and 7.0.3:
Navigate to the SOA_Server directory <AIA_HOME>/data/AEInFormandArgus/sql/ArgusProfile/FDA/7.0 and copy the ich-icsr-v2.1-FDA-PIP.dtd file to the Interchange server folder <Oracle_Home>\Argus\InterchangeService\DTDFiles\.
Copy all the files from the SOA_Server directory <AIA_HOME>/data/AEInFormandArgus/sql/ArgusProfile/FDA/7.0 to a folder on the Argus Interchange server (for example, C:\Temp_config_folder).
On the Argus Interchange server, open a command prompt and navigate to the folder where you copied the scripts in step 2.
Note:
You must install the Adverse Event: InForm and Argus Safety integration patch set 1.0.2 (patch # 16949125) before you set up an Argus E2B profile. The patch is available on MOS.The Argus DTD will be updated to include additional fields to support custom extension fields, non-custom extension fields, and non-E2B extension fields.
Run Setup_Safety_Integration_Profile.bat. The scripts in this batch file import the custom extension fields, non-custom extension fields, and non-E2B extension fields that need to be added to the integration-specific DTD.
Note:
Run Setup_Safety_Integration_Profile.bat for each enterprise separately.Enter the database name, enterprise short name, ESM owner's username (for example, esm_owner), password, and log file path (C:\Temp_config_folder\profilecreationoutput.log).
Note:
If Argus Safety is installed in single-tenant mode, do not provide an enterprise short name. Instead, press Enter.Press Enter.
Use one of the following procedures, as appropriate for the version of Argus Safety in use, to set up an PMDA extension profile.
For Argus 6.0.7:
Navigate to the SOA_Server directory <AIA_HOME>/data/AEInFormandArgus/sql/ArgusProfile/PMDA/6.0 and copy the ich-icsr-v2.1_PMDA_PIP.dtd and ichicsr-sjis-PIP.dcl files to the Interchange server folder <Oracle_Home>\Argus\ESMService\DTDFiles\.
Copy all the files from the SOA_Server directory <AIA_HOME>/data/AEInFormandArgus/sql/ArgusProfile/PMDA/6.0 to a folder on the Argus ESM server (for example, C:\Temp_config_folder).
On the Argus Interchange server, open a command prompt and navigate to the folder where you copied the scripts in step 2.
Note:
You must install the Adverse Event: InForm and Argus Safety integration patch set 1.0.2 (patch # 16949125) before you set up an Argus E2B profile. The patch is available on MOS.The Argus DTD will be updated to include additional fields to support custom extension fields, non-custom extension fields, and non-E2B extension fields.
Run Setup_Safety_Integration_Profile.bat. The scripts in this batch file import the custom extension fields, non-custom extension fields, and non-E2B extension fields that need to be added to the integration-specific DTD.
Enter the database name, ESM owner's username (for example, esm_owner), password, and log file path (C:\Temp_config_folder\profilecreationoutput.log).
Press Enter.
For Argus 7.0.3:
Navigate to the SOA_Server directory <AIA_HOME>/data/AEInFormandArgus/sql/ArgusProfile/PMDA/7.0 and copy the ich-icsr-v2.1_PMDA_PIP.dtd and ichicsr-sjis-PIP.dcl files to the Interchange server folder <Oracle_Home>\Argus\InterchangeService\DTDFiles\.
Copy all the files from the SOA_Server directory <AIA_HOME>/data/AEInFormandArgus/sql/ArgusProfile/PMDA/7.0 to a folder on the Argus Interchange server (for example, C:\Temp_config_folder).
On the Argus Interchange server, open a command prompt and navigate to the folder where you copied the scripts in step 2.
Note:
You must install the Adverse Event: InForm and Argus Safety integration patch set 1.0.2 (patch # 16949125) before you set up an Argus E2B profile. The patch is available on MOS.The Argus DTD will be updated to include additional fields to support custom extension fields, non-custom extension fields, and non-E2B extension fields.
Run Setup_Safety_Integration_Profile.bat. The scripts in this batch file import the custom extension fields, non-custom extension fields, and non-E2B extension fields that need to be added to the integration-specific DTD.
Note:
Run Setup_Safety_Integration_Profile.bat for each enterprise separately.Enter the database name, enterprise short name, ESM owner's username (for example, esm_owner), password, and log file path (C:\Temp_config_folder\profilecreationoutput.log).
Note:
If Argus Safety is installed in single-tenant mode, do not provide an enterprise short name. Instead, press Enter.Press Enter.
You must update the ICH-ICSR V2.1 MESSAGE TEMPLATE - FDA PIP Argus profile if you:
Created an Argus profile before applying the patch set
Had an FDA Profile from Device and Drug Adverse Event: Siebel AECM and Argus Safety integration pack on your Argus 6.0 environment before applying the patch set
Upgraded Argus Safety from 7.0.1 to a higher version after applying the patch set
To update an existing Argus profile, follow these steps:
Navigate to the SOA_Server directory <AIA_HOME>/data/AEInFormandArgus/sql/ArgusProfile/FDA/<version> (where version is 6.0 or 7.0, depending on your version of Argus).
Copy the ich-icsr-v2.1-FDA-PIP.dtd file to the Interchange server folder <Oracle_Home>\Argus\ESMService\DTDFiles\.
After the patch set is successfully installed on the SOA server, copy all Argus profile creation SQL scripts from $AIA_HOME/data/AEInFormandArgus/sql/ArgusProfile/FDA/<version> (where version is 6.0 or 7.0, depending upon your version of Argus) to a temporary directory on the Argus Interchange server.
On the Argus Interchange Server, open the ESM Mapping Utility.
You must select a specific enterprise name if you are using multi-tenant Argus.
Select Profile - ICH-ICSR V2.1 MESSAGE TEMPLATE - FDA PIP from the Profile drop-down list.
Select Administrator, then select Delete Profile.
Note:
If the Delete Profile option appears to be disabled, expand the profile element (for example, SAFETYREPORT[A.1]) and click any child node (for example, SAFETYREPORTVERSION). Navigate to Administrator, then select Delete Profile.Click Yes.
If you are using Argus Safety version 7.0.2 or lower, the following error message is displayed on the ESM Mapping Utility:
Unhandled exception has occurred in your application. If you click Continue, the application will ignore this error and attempt to continue. If you click Quit, the application will close immediately. Contact your System Administrator - Continue, Quit.
If you are using Argus Safety version 7.0.3 or higher, the following error message is displayed on the ESM Mapping Utility:
Profile ICH-ICSR V2.1 MESSAGE TEMPLATE - PFA PIP cannot be deleted, as it is being used in Reporting Destination.
Click Continue. You can ignore the message because you are deleting the profile that is referred to in the reporting destination configuration on the Argus Console. The profile will be created in the steps that follow.
Open the command prompt and navigate to the temporary directory where the profile creation scripts are copied.
Run Setup_Safety_Integration_Profile.bat.
These scripts import the custom extension fields, non-custom extension fields, and non-E2B extension fields that are added to the integration-specific DTD.
Enter the database name, enterprise short name (for Argus 7.0 and later), ESM owner's user name (for example, esm_owner), password, and log file path (for example, C:\Temp_config_ folder\profilecreationoutput.log).
Note:
For single-tenant Argus, do not provide an enterprise short name. Instead, press Enter.When the script runs, it generates unique constraint violation errors as follows:
ORA-00001: unique constraint (ESM_OWNER.PK_CFG_PROFILE) violated
ORA-00001: unique constraint (ESM_OWNER.PK_LM_ESM_ARGUS_MAPPING) violated
These errors occur if a profile with the same name exists. While deleting the profile in step 4, data from LM_ESM_ARGUS_MAPPING and CFG_PROFILE tables are not deleted. However, you can ignore these errors because the profile scripts insert the same data into these tables.
After the script completes, the profile is updated for the E2B import process specific to the Argus Safety version in use.
If you have Argus J enabled and do not have the Argus 7.0.3.1 patch set installed, follow this procedure to turn off PMDA validations for the Argus PMDA PIP profile.
The folder <AIA_HOME>\data\AEInFormandArgus\sql\ArgusESMPkg has sub-directories for Argus versions 6.0 and 7.0. Each sub-directory contains the version-specific SQL scripts used in this procedure. Copy the contents of the folder for your version of Argus Safety to the Argus Interchange server.
Connect to the Argus database using SQL*PLUS as the ESM_OWNER user.
Run esm_pkg_h.plb.
When prompted for esm_user database user, enter the username of the esm owner database (for example, esm_owner).
Run esm_pkg.plb.
When prompted again for esm_user database user, enter the username of the esm owner database (for example, esm_owner).
After creating integration profiles, perform the following procedure to enable post- save functionality in Argus Safety.
Copy the folder <AIA_HOME>\data\AEInFormandArgus\sql\ArgusPostSave to the Argus Interchange server. This folder contains the SQL scripts to use in this procedure.
Connect to the Argus database using SQL*PLUS as the esm_owner.
Run Custom_AutopsyResults_PIP.sql.
Run GrantAutopsyResults_PIP.SQL.
Log into the ESM Mapping Utility.
Select integration profile ICH-ICSR V2.1 MESSAGE TEMPLATE - FDA PIP from the drop down list.
Navigate to ICHICSR->SAFETYREPORT->PATIENT->PATIENTDEATH->PATIENTAUTOPSYYESNO.
On the right side, select the Enable Post-Save check box.
Click Save.
If you are using Argus 6.0.7 or Argus 7.0.3, Argus J is enabled, and an integration-specific PMDA profile was created, select integration profile ICH-ICSR V2.1 MESSAGE TEMPLATE - PMDA PIP from the drop down list and repeat steps 6 through 8.
Open the Argus Safety Web application. For multi-tenant Argus, select the enterprise and navigate to the Argus Safety application for that enterprise.
Open Argus Console and select System Configuration, then System Management (common profile switches) screen, and then Case Form Configuration in the navigation on the left side of the screen.
On the right side of the screen, select the Custom Routine after Commit check box (under Custom Routine).
In the text box next to Custom Routine after the Commit check box, specify the PL/SQL function name as ESM_OWNER.Custom_AutopsyResults_PIP.
If a different custom routine is already configured in the text box, you must edit that custom routine to invoke ESM_OWNER.Custom_AutopsyResults_PIP.
Click Table Config.
Add CASE_DEATH table to the list of selected tables.
Save the case form configuration.
To configure Argus Safety for use with the FDA extension profile, perform the following steps:
Open the Argus Console.
From the browser, navigate to the Reporting Destination folder.
Click Add New to create new agency details to serve as a reporting destination.
Enter the agency information in the Agency Information pane. Table 8-1 provides field description and example values.
Table 8-1 Agency Information Tab Field Descriptions for FDA
| Fields | Description |
|---|---|
|
Agency Name |
Enter INFORM-ARGUS-INTEGRATION. This agency is for the integration only and should not be used for sending reports to regulatory agencies. The E2B files received by this agency use a format that is different from the standard E2B format that can be sent to regulatory authorities such as FDA. For example, the positions of companynumb element and primarysourcecountry element have been swapped to ensure that the companynumb element is in all acknowledgement files that are auto-generated by Argus due to M2 validation failure. |
|
Report for Marketed Licenses |
Contains the default value Always. |
|
Report for Investigational Licenses |
Contains the default value Always. |
Click the Local Company Contact tab and enter the contact details. Table 8-2 provides the field description and an example value.
Click the EDI tab and enter values in the fields. Table 8-3 provides field description and example values.
Table 8-3 EDI Tab Field Description for FDA
| Fields | Description |
|---|---|
|
SGML or XML |
Select XML. This field represents the format of incoming E2B files and outgoing acknowledgement files. |
|
Agency Identifier |
Enter INFORM_01. This value should match the sender identifier in the E2B file. |
|
Company Identifier |
Enter ARGUS_01. This value should match the receiver identifier in the E2B file. |
|
Method |
Select E2B-XML transmission. |
|
Message Profile |
Select the ICH ICSR V2.1 MESSAGE - TEMPLATE - FDA PIP extension profile from the Message Profile list. |
|
ACK Profile |
Select the ICH-ICSR V 1.1 ACKNOWLEDGMENT TEMPLATE - FDA acknowledgment profile from the ACK Profile list. |
|
File Name |
Enter Safety######.xml as the file name pattern of the incoming file. |
|
URL of Message DTD |
Enter the extension DTD file path. For example, |
|
URL of ACK DTD |
Enter the acknowledgment DTD file path. For example, |
Click Save. The Argus Console dialog box is displayed.
Click OK. Oracle Argus Safety is configured for the E2B extension for the selected agency.
Note:
In multi-tenant Argus Safety, different enterprises can have the same agency and company identifier values. For configuring the E2B folder, see "Configuring Folders for XML File Sharing".If you have Argus J enabled, follow this procedure to configure Argus Safety for use with the PMDA extension profile. You must have the Argus J privilege to enter data into J fields.
Open the Argus Console.
From the browser, navigate to the Reporting Destination folder.
Click Add New to create new agency details to serve as a reporting destination.
Enter the agency information in the Agency Information pane. Table 8-4 provides field description and example values.
Table 8-4 Agency Information Tab Field Descriptions for PMDA
| Fields | Description |
|---|---|
|
Agency Name |
Enter INFORM-ARGUS-INTEGRATION-JAPAN. This agency is for the integration only and should not be used for sending reports to regulatory agencies. The E2B files received by this agency use a format that is different from the standard E2B format that can be sent to regulatory authorities such as PMDA. For example, the positions of companynumb element and primarysourcecountry element have been swapped to ensure that the companynumb element is in all acknowledgement files that are auto-generated by Argus due to M2 validation failure. |
|
Agency Name J |
Enter INFORM-ARGUS-INTEGRATION-JAPAN. This agency is for the integration only and should not be used for sending reports to regulatory agencies. The E2B files received by this agency use a format that is different from the standard E2B format that can be sent to regulatory authorities such as PMDA. For example, the positions of companynumb element and primarysourcecountry element have been swapped to ensure that the companynumb element is in all acknowledgement files that are auto-generated by Argus due to M2 validation failure. |
|
Report for Marketed Licenses |
Contains the default value Always. |
|
Report for Investigational Licenses |
Contains the default value Always. |
Click the Local Company Contact tab and enter the contact details. Table 8-2 provides the field description and an example value.
Click the EDI tab and enter values in the fields. Table 8-3 provides field description and example values.
Table 8-6 EDI Tab Field Description for PMDA
| Fields | Description |
|---|---|
|
SGML or XML |
Select SGML. This field represents the format of incoming E2B files and outgoing acknowledgement files. |
|
Agency Identifier |
Enter INFORM_01J. This value should match the sender identifier in the E2B file. |
|
Company Identifier |
Enter ARGUS_01J. This value should match the receiver identifier in the E2B file. |
|
Method |
Select E2B-Binary transmission. |
|
Message Profile |
Select the ICH ICSR V2.1 MESSAGE - TEMPLATE - PMDA PIP extension profile from the Message Profile list. |
|
Message Profile 2 |
Select the ICH ICSR V2.1 MESSAGE - TEMPLATE - PMDA J extension profile from the Message Profile list. |
|
ACK Profile |
Select the ICH-ICSR V 1.1 ACKNOWLEDGMENT TEMPLATE - PMDA acknowledgment profile from the ACK Profile list. |
|
File Name |
Enter Safety######.sgm as the file name pattern of the incoming file. |
|
SGML Declaration File |
Select ichicsr-sjis-PIP.dcl. This field represents the control file used by the SGML parser to parse incoming files. |
|
Encoding |
Enter UTF-8. |
|
URL of Message DTD |
After you complete the other fields in the table, this field is disabled. |
|
URL of ACK DTD |
After you complete the other fields in the table, this field is disabled. |
Click Save. The Argus Console dialog box is displayed.
Click OK. Oracle Argus Safety is configured for the E2B extension for the selected agency.
Note:
In multi-tenant Argus Safety, different enterprises can have the same agency and company identifier values. For configuring the E2B folder, see "Configuring Folders for XML File Sharing".To exchange E2B and acknowledgement files between Argus Safety and the SOA server, you must create folders and configure them. For folder details, see Chapter 4.
Note:
If you are using multi-tenant Argus Safety, you need to create folders and configure each enterprise separately.To configure the folders, perform the following steps:
On the Argus ESM server, open the ESM Mapping Utility as follows: click Start, select All Programs, select Oracle, then select ESM Mapping.
Enter the user name, password, and database name to run the mapping tool.
For a multi-tenant Argus Safety installation, select the enterprise name from the drop-down list.
In the ESM Mapping Utility, navigate to Administrator, and select setup.ini.
In the Multiple Database section, double-click on the database name to set up system directories for E2B exchange.
The Service DB Setup screen displays.
Note:
If the Argus database is new, you may not see a database name. To create a database, select Add New Process and double click. This opens the Service DB Setup screen.For entering the values in the Service DB Setup screen, see Table 8-7.
In the System Directories pane, select INFORM-ARGUS-INTEGRATION from the list.
The fields that appear in the System Directories pane depend on the version of Argus in use.
Table 8-7 Field Descriptions for the Service DB Setup Screen
| Fields | Description |
|---|---|
|
Database Section |
|
|
Database Name |
Enter the database name (for example, AS70xx). |
|
Unique Database ID |
Enter unique database ID (for example, 123). |
|
User ID |
Enter the database user name. |
|
Password |
Enter the database password. |
|
Process |
For Argus 6.0.x, enter For Argus 7.0.x, enter |
|
Receive Process |
For Argus 6.0.x, enter For Argus 7.0.x, enter |
|
Archive Folder |
Select the folder for archiving the files (for example, You created this folder as one of the Prerequisites. |
|
Receive Processes |
Enter the value |
|
Process Elapse Time |
Enter the value |
|
Time Out Section |
|
|
EDI Transmit Time Out value (File is not picked up by Gateway) |
Enter the value |
|
Physical Media Transmit Time Out value (File is not picked up manually) |
Enter the value |
|
Receive ACK Time Out value (ACK is due for transmitted reports) |
Enter the value |
|
Processing Time Out value (E2B Report not Processed by User) |
Enter the value |
|
XML Transmit Time Out value (File is not picked up by Gateway) |
Enter the value |
|
Binary Transmit Time Out value (File is not picked up by Gateway) |
Enter the value |
|
MDN Time Out Value (For E2B Reports which have received Bus ACK) |
Enter the value |
|
System Directories Section (for Argus 7.0.x) |
|
|
Enterprise Short Name |
Select the enterprise short name (for example, ent1). |
|
Agency Name |
Select INFORM-ARGUS INTEGRATION agency configured in the Argus Console, Reporting Destination. |
|
Local Company |
The value displayed is based on the Reporting Destination Configuration. |
|
Incoming Folder |
Specify the folder path for incoming files. The path is the same for FDA and PMDA extension profiles. You created this folder as one of the Prerequisites. For multi-tenant Argus, agencies from two different enterprises cannot share the same folder for incoming E2B files. Therefore, the following folder structure is required:
For single-tenant Argus, the folder structure is as follows:
|
|
Outgoing Folder |
Specify the folder path for outgoing files. The path is the same for outgoing acknowledgements for FDA and PMDA extension profiles. You created this folder as one of the Prerequisites. For multi-tenant Argus, the folder structure is as follows:
For single-tenant Argus, the folder structure is as follows:
|
|
System Directories Section (for Argus 6.0.x) |
|
|
Agency Name |
Select INFORM-ARGUS-INTEGRATION-JAPAN agency configured in the Argus Console, Reporting Destination. |
|
Local Company |
The value displayed is based on the Reporting Destination Configuration. |
|
XML Incoming Folder |
Specify the folder path from the FDA extension profile for incoming files. You created this folder as one of the Prerequisites. The folder structure is as follows:
|
|
XML Outgoing Folder |
Specify the folder path from the FDA extension profile for outgoing files. You created this folder as one of the Prerequisites. The folder structure is as follows:
|
|
Binary Incoming Folder |
Specify the folder path from the PMDA extension profile for incoming files. You created this folder as one of the Prerequisites. The folder structure is as follows:
|
|
Binary Outgoing Folder |
Specify the folder path from the PMDA extension profile for outgoing files. You created this folder as one of the Prerequisites. The folder structure is as follows:
|
Enter the values in the corresponding fields and click Save.
Click OK.
Click OK on the Service INI File Setup screen.
To change parameters on the SOA server to increase the performance of the integration, perform the following steps:
Navigate to the Enterprise Manager (EM) Console:
http://<server name>:<port number>/em/
Navigate to farm_soa_domain, select SOA, then right-click soa-infra.
Select SOA Administration, then select Mediator Properties.
Change the default value of ResequencerLockerThreadSleep from 10 to 1.
To change the transaction timeout values on the SOA server to suit your environment, perform the following steps:
Log into the WebLogic Console.
Navigate to soa_domain and then Services.
Click the JTA tab.
Increase the default value of Java Transaction API (JTA) timeout to a value that is long enough time to complete transactions, but not so long that it impacts performance.
Oracle recommends that you increase the Extended Architecture (XA) Transaction timeout for the XA data source as described in http://docs.oracle.com/cd/E28271_01/admin.1111/e10226/soainfra_config.htm#BHCDIBCE.
In a clustered SOA server environment, perform the following configurations to ensure that all composites in a flow participate in one global transaction:
Navigate to the EM Console:
http://<server name>:<port number>/em/
Navigate to farm_soa_domain, select SOA, then right-click soa-infra.
Select SOA Administration, then select Common Properties.
In theServer URL property, enter the load-balancer URL for your server cluster (for example, http(s)://lbhost:lbport/).
Note:
Be sure to use the ending backslash (/). If it is omitted, the function will not work correctly.Open the WebLogic Console.
Navigate to the Domain Structure/<domain name>/environment/Clusters page.
Select the cluster name.
Click the Configuration/HTTP tab.
Enter values in the following fields:
Frontend Host: Enter the host DNS address of the load balancer.
Frontend HTTP Port: Enter the port number of the load balancer.
Frontend HTTPS Port: If SSL communication is enabled, use this field instead of Frontend HTTP Port.
Restart the node manager, admin, and SOA servers.
The Acknowledgement flow requires InForm Adapter. If you do not have InForm Adapter or are not using it, you can disable the Acknowledgement flow by shutting down the following services through Enterprise Manager (EM):
ReportDrugSafetyReportReadAckFileAdapter
ReportDrugSafetyReportResponseArgusReqABCSImpl
HealthSciencesDrugSafetyReportResponseEBS
ReportDrugSafetyReportResponseInFormProvABCSImpl
To shut down the services, perform the following steps:
Navigate to the EM Console:
http://<server name>:<port number>/em/
Log in with the server admin user name.
Navigate to soa-infra/services/default.
The list of services is displayed.
Click on the service to shut down, then click Shut Down.
Click Yes in the confirmation window.
Note:
To restart a service, click Start Up.
|
Copyright © 2013, Oracle and/or its affiliates. All rights reserved. Legal Notices |
|