3 Using Oracle RTD Base Marketing With Slices
This chapter contains procedures for using Oracle RTD with Slices. It contains the following topics:
-
Section 3.1, "Introduction to Oracle RTD Base Marketing With Slices"
-
Section 3.2, "Oracle RTD Base Marketing With Slices in Detail"
-
Section 3.3, "Oracle RTD Base Marketing Ref-Slices Usage Example"
3.1 Introduction to Oracle RTD Base Marketing With Slices
Oracle RTD for Marketing Optimization with Slices is similar to the Marketing Optimization application except that the Slices application adds an additional security layer. In order to achieve this layer, the Slices-based application adds two new concepts, Slices and Slice-Based Roles.
The important concepts you need to understand are:
-
Security Module with Slices-based Application in Decision Manager
-
Oracle RTD for Marketing Optimization With Slices Perspectives
3.1.1 Security Module Without Slices in Decision Manager
Security is established at the choice group level; for example, if a user has permission on a Campaign choice group then they can access ALL campaign choices. This security model is based on an ALL or NONE policy that does not allow you to grant access to a subset of choices in a choice group instead of all choices. The following illustration demonstrates this relationship.
Description of the illustration secmodsansslices.gif
3.1.2 Security Module with Slices-based Application in Decision Manager
With Slices enabled, security is established at the choice level. In the following figure, the Slice1 permission enables a user to view a subset of choices in a choice group; for example, a user with Campaign choice group permission and Slice1 permission cannot see all campaign choices but only those which have been linked to Slice1 permission.

Description of the illustration secmodwithslices.gif
3.1.3 Slices
Slices define reusable sets of permissions for a given role. It allows you to partition a choice universe into multiple domains, called slices. Choice domains are either independent or can be shared across organizations. Slices are an optional feature. 
Description of the illustration slices_01.gif
The following illustration shows how specific slices are selected.
Description of the illustration slices_02.gif
3.1.4 Slice-based Roles
Roles are organizational entities within the Decision Manager user base. They are mapped to a Decision Manager application role, which is mapped to multiple enterprise groups and users and then ultimately mapped to the enterprise users. With Slices, a user can have multiple Roles. They then choose which of the roles to join when they log in to Decision Manager. In the following image, the user is selecting to join the role Shared Role.

Description of the illustration slices_03.gif
3.1.4.1 Slice Permissions for Roles
On Slices, Roles can have the following permissions:
-
Create slices
-
Read slices
-
Update+Delete slices
The following figure shows the slices that the selected role, Acquisition Super User Role can access.
Description of the illustration slices_04.gif
As indicated, while the Acquisition Super User Role can only view Cross Sell Slice and Shared Slice, it does have view, modify, and create permission for Acquisition Slice.
The following figure shows which Slices a user with Cross Sell Super User Role can create, view and modify.
Description of the illustration slices_05.gif
3.1.5 Interrelationship of Choice Group, Slice, and Role
The Oracle RTD Decision Management application RTD for Marketing Optimization with Slices uses the following Decision Graph objects of interest:

Description of the illustration slices_06.gif
This illustration represents relationships by the arrowed lines, according to the following conventions:
-
In lines with a single arrow, the direction of the arrow indicates a one-to-many relationship. Double arrow lines represent many-to-many relationships.
-
A solid line represents a mandatory relationship, and a broken line represents an optional relationship
So, for example (with the relationships described as generically as possible):
-
Each Role can access, modify or create zero, one, or more Slices
-
Each Slice is linked to zero, one, or more choice groups like campaign, offer, and so on.
3.1.6 Oracle RTD for Marketing Optimization With Slices Perspectives
The Slices and Roles perspectives list respective choices as shown in the following image:
Description of the illustration slices_07.gif
The following diagrams show examples of Roles and Slices displayed in Decision Manager. The first diagram shows examples of General RTD for Marketing Optimization with Roles perspectives:
Description of the illustration slices_08.gif
This diagram shows examples of General RTD for Marketing Optimization with Slices perspectives:
Description of the illustration slices_09.gif
3.2 Oracle RTD Base Marketing With Slices in Detail
This section describes Oracle RTD Base Marketing with Slices in detail. It contains the following topics:
3.2.1 Creating Projects
The context can be either Main Repository or an active project. User can choose current role from combo box. Some users with slice administration permissions can assign roles to newly created projects.
-
Click New Project.
-
In Create Project window:
-
Enter project Name and optionally Description and Audit Trail Comment.
-
Type is a required field. You can either leave the default value, Incremental Changes, or select another value.
-
The ”Roles that can see this project” lists all Slice-based Roles assigned to the logged-in user. By default all Roles linked to this user are selected. The user can change this default selection and select only those roles for which this project needs to be visible.
-
The ”Roles that can make changes in this project” lists all Slice based Roles assigned to the logged-in user. By default all Roles linked to logged-in user are selected, enabling you to make changes; however, you can change this default selection and select only those Roles that you can modify in this project.
-
-
Click OK.
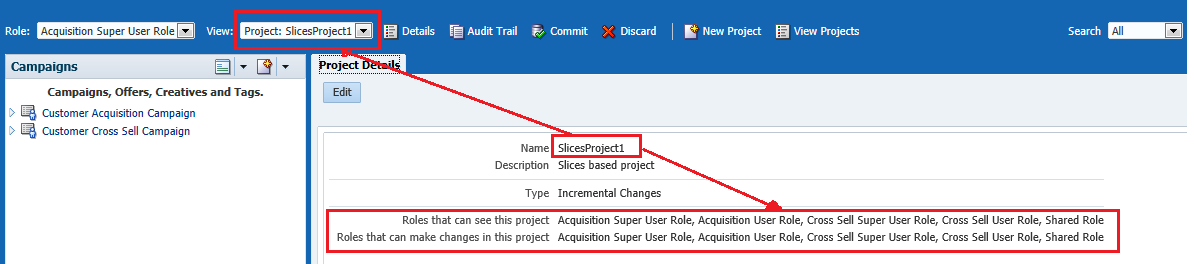
After the project is created, the context is automatically switched to the new project, as displayed in the View box, and the project details display all the Roles with which the project is associated.
-
Commit the Project.
Once all the required Roles, Slices and components the project needs to be committed by clicking on commit button.
3.2.2 Creating Roles
A Role can be created if a user is having Create permission on Role choice group. In addition, to assign a Slice to this new Role, the user should select a Role (from the Role drop-down) having Read, Update and Create permissions on Slices.
-
Click the Create icon and select the Role choice group, as shown here:
Description of the illustration slices_12.gif
-
Enter Role name and Description if required, as shown in the following example, and click Next.
Description of the illustration slices_13.gif
-
The Slices page appears, as shown in the following example. This page allows user to assign Slices so that they have permission to view, create (default slices to be used for choice creation) or update slices. By default, none of the Slices are selected for the Role, as shown below.
You are not required to assign a Slice to a Role when you create it. A Role can exist with 0 or more slices but a Role that is not linked to any slice cannot view choices associated with a Slice.
You should select appropriate slices for Slices I can see, Slices I can modify and Default slices for new choices so that the user in this Role is restricted to only those Slices and, in turn, to its choices.
Description of the illustration slices_14.gif
-
Select Slices by clicking the arrow buttons, as shown below. Different Slices can be selected for the Slices I can see, Slices I can modify and Default slices for new choices fields.
Description of the illustration slices_15.gif
-
Click OK.
The Role is created. To see details of the Slices selected, click the Slices tab.
Note:
The Role SliceBasedRole1 created in the above example will not be listed in Role drop-down because the Role drop down only lists those roles defined and selected for the user insecurity.xml. Assign the created Role to a user as you would for any other application role.
For additional details, see Section 2.3.5.1, "Define Slice-based Roles in security.xml" and Section 2.3.5.3, "Create an Application Role for a Slice-based Role in security.xml" in the Oracle Real-Time Decisions Base Application Decision Management Installation and Configuration Guide.
3.2.2.1 Current Role
A user acts in Decision Manager within the scope of one of the roles to which he or she belongs.
The topmost drop-down in the user interface is a role selector. This drop-down lets you select a role among all the roles to which you belong.
The project drop-down consists of the Main Repository and all the projects of the current role.
The active and committed project lists are filtered to the current role.The current role choice group, page, and perspective permissions act as a filter to restrict what the current user can do while acting in that role:
-
For instance a user could be an administrator with CRUD permission on all choice groups but, when acting in a specific role, he or she would only be able to do the actions allowed in that role.
-
On the other hand, a user with not many permissions could act in a role that allows a lot of things, but he or she would still be restricted to the subset that he already has permission to.
-
Some pages might only be for some roles, which allows the user, for instance, to hide or make read-only some attributes for some roles even if he or she can edit that attribute in other roles.
-
Some perspectives might only be for some roles, which allows the user to restrict the perspectives that one can see in a given role (for example, no administration perspective when acting as a basic user).
3.2.3 Creating Slices
A Slice partitions choices into domains that can be shared across an organization. A Slice allows users to grant permission at the Choice level instead of Choice Group level.
A Slice can be viewed, created, modified or deleted if the user has on of the following:
-
Standard Role: Create, Read, Update or Delete permission on Slice Choice Group (
security.xml). -
Current Role: The Role selected by user would determine whether Slice can be Created, Read, Updated or Deleted.
-
Current Project: The Slices linked to the project would determine whether Slice can be Read, Updated or Deleted.
To create a Slice, do the following:
-
Select the role from Role drop-down and the project in which this Slice needs to be created.
-
Select ’Slice' from Create drop-down to create a new Slice choice.
Description of the illustration slices_16.gif
-
Enter Slice and description if required.
Description of the illustration slices_17.gif
-
Click OK to create a Slice.
Description of the illustration slices_18.gif
Note that there is no Edit/Delete button as Slice itself cannot be edited or deleted after its creation.
3.2.4 Creating a Choice linked to a Slice
Choice belongs to 1 or more Slices. Currently selected role serves as filter for list of choices.
A Choice is displayed when its slices are assigned to a currently selected role. For each of the Choices created, a relationship <Newly created Choice from ChoiceGroups like Campaign, Offer etc> to the Slice is created.
To create a Choice linked to a Slice, do the following:
-
Select appropriate Role and Project. Enter Name and click Next.
Description of the illustration slices_19.gif
-
Select Slices which needs to be linked with this Campaign choice. Multiple choices can be selected.
By default, the slices selected in ”Default slices for new choices” for Role ”Acquisition Super User Role” would be chosen as selected which can be modified.
Description of the illustration slices_20.gif
-
Enter relevant data in Attributes and Rules page and click Next.
-
Confirm page would give details on Slices selected. The ”Belongs to Slice” would list all the slices that this choice is associated with. The slices listed in ”Belongs to Slice” would be allowed to read, update and delete this choice.
Description of the illustration slices_21.gif
3.2.5 Assign the Role to a User
The Slice based Role created in Decision Manager is mapped to an application role. This role either can be:
-
Defined to have Choice group permission (Standard role like CLMSliceAdministrator) along with Slice-based role responsibilities.
OR
-
Used along with another Role that has only choice group permission, which would require creating a user with both a Standard Role and a Slice-based Role.
Note:
For more details on this step, see the Oracle Real-Time Decisions Base Application Decision Management Installation and Configuration Guide.To assign a Role to a User, do the following:
-
The Role SliceBasedRole1 created in Section 3.2.2, "Creating Roles" should be defined in the ref-slices application's
security.xmlby using the code specified in the following example Regenerate the code and the build and deploy the CLM binaries.<application-role> <name> SliceBasedRole1</name></application-role>
-
Assign this Role to a user , for example clmsliceuser, that already has a Role with a Choice Group permission, like CLMSliceAdministrator. To assign this Role, use either Enterprise Manager or WebLogic or assign it directly through
jazn-data.xml. -
Restart the application server and log in to Decision Manager as clmsliceuser.
-
Ensure that the Role drop-down lists SliceBasedRole1.
Description of the illustration slices_22.gif
Note:
Note that the project in which SliceBasedRole1 was created is committed, otherwise it would not be available for use and and would not appear on the Role drop-down.3.2.6 Default Roles and Slices in Base Marketing with Slices
This section lists the default Roles and Slices in Oracle RTD Base Marketing with Slices:
The default Slice-based roles available for user are:
-
Acquisition Super User Role
-
Acquisition User Role
-
Shared Role
-
Cross Sell Super User Role
-
Cross Sell User Role
The default Slices available for user are:
-
Acquisition Slice
-
Shared Slice
-
Cross Sell Slice
Listing Default Slices and Slice-based Roles
In order to list the default Slices and Slice-based Roles, the following SQL queries should be executed against the database defined in DM_SLICES datasource:
-
ils/load ils.sql -
ils/insert ils config.sql -
insert ils data.sql -
ils/insert marketing data.sql -
ils/insert sample slices.sql
3.3 Oracle RTD Base Marketing Ref-Slices Usage Example
This section contains a real time example configuration showing how Slices are used. This configuration is organized by these concepts:
3.3.1 Definition
A set of choices are shared and visible by everybody. Channels, placement, slots and slot types as defined in RTD Base Marketing are such shared choices.
Another set of choices are campaigns, offers and creatives for the US web site. These campaigns, offers and creatives are editable by users of the US online marketing department and visible by users of the UK online marketing department.
Another set of choices are campaigns, offers and creatives for the UK web site. These campaigns, offers and creatives are editable by users of the UK online marketing department and visible by users of the US online marketing department.
Another set of choices are campaigns, offers and creatives for the US email marketing. These campaigns, offers and creatives are editable by users of the US email marketing department and visible by users of the UK email marketing department.
Another set of choices are campaigns, offers and creatives for the UK email marketing. These campaigns, offers and creatives are only visible by users of the UK email marketing department and visible by users of the US email marketing department.
The US online marketing department is divided in 2 groups, one in charge of Travel offers and creatives and one in charge of Cooking offers and creatives. These belong to campaigns that span both Travel and Cooking. Everybody in these groups can see all the campaigns, offers and creatives of the US online marketing department, but they can only edit offer and creatives in their department. And, when creating a creative, it can only belong to an offer of their group. And all offers must either be in the travel group or the cooking group.
Within each of these 2 groups, some users specialize in the creation and management of offers while other users specialize in the creation and management of creatives.
3.3.2 Application Roles
The following application roles are defined:
-
Shared
-
US Online Marketing
-
UK Online Marketing
-
US Email Marketing
-
UK Email Marketing
-
US Travel Group
-
US Cooking Group
-
Manager
-
Offers Editor
-
Creatives Editor
3.3.3 Role Based Access Control
The following choice group permissions are assigned to these application roles to restrict what can be done when acting in these roles:
| Permissions | Roles |
|---|---|
| Shared | R all, CUD on the shared choice groups (Channel, Placement, Slot, Slot Type) |
| US Online Marketing | R all, C Campaign, UD Campaign Offer Creative |
| UK Online Marketing | R all, C Campaign, UD Campaign Offer Creative |
| US Email Marketing | R all, C Campaign, UD Campaign Offer Creative |
| UK Email Marketing | R all, C Campaign, UD Campaign Offer Creative |
| US Travel Group | R all, CUD Offer Creative |
| US Cooking Group | R all, CUD Offer Creative |
The following choice group permissions are defined to grant to users permissions for what they can do when acting in any role:
| Permissions | Roles |
|---|---|
| Manager | CRUD all |
| Offers Editor | R all, CUD Offer |
| Creatives Editor | R all, CUD Creative |
3.3.4 Enterprise Users and Groups
Enterprise users and groups belong to at least two application roles, one for each of the roles he or she want to act as and one for his or her overall RBAC permissions.
For example:
-
A graphic designer in the US Travel Group will have application roles ”US Travel Group” and ”Creatives Editor”. When this graphic designer logs in and acts as part of ”US Travel Group”, he will not be able to create, update or delete offers because he is only a ”Creatives Editor”.
-
A manager of the US Online Marketing department will have application roles ”US Online Marketing”, ”US Travel Group”, ”US Cooking Group” and ”Manager”. When this manager logs in and acts as part of ”US Travel Group”, he will not be able to create, update or delete campaigns because the role he acts as, ”US Travel Group”, forbids it.
3.3.5 Roles
The following roles are defined and map to their corresponding application roles:
-
Shared
-
US Online Marketing
-
UK Online Marketing
-
US Email Marketing
-
UK Email Marketing
-
US Travel Group
-
US Cooking Group
3.3.6 Slices
The following slices are defined:
-
Shared
-
US Online Marketing
-
UK Online Marketing
-
US Email Marketing
-
UK Email Marketing
-
US Travel Group
-
US Cooking Group
3.3.7 Role Slices
The following table shows three sets of slices for each group:
| Role | C Slices | R Slice | U+D Slices |
|---|---|---|---|
| Shared | Shared | Shared | Shared |
| US Online Marketing | US Online Marketing | Shared
US Online Marketing UK Online Marketing |
US Online Marketing |
| UK Online Marketing | UK Online Marketing | Shared
US Online Marketing UK Online Marketing |
UK Online Marketing |
| US Email Marketing | US Email Marketing | Shared
US Email Marketing UK Email Marketing |
US Email Marketing |
| UK Email Marketing | UK Email Marketing | Shared
US Email Marketing UK Email Marketing |
UK Email Marketing |
| US Travel Group | US Online Marketing
US Travel Group |
Shared
US Online Marketing UK Online Marketing US Travel Group |
US Travel Group |
| US Cooking Group | US Online Marketing
US Cooking Group |
Shared
US Online Marketing UK Online Marketing US Cooking Group |
US Cooking Group |
The relationship type Creative to Offer is marked as using relationship filtering All. This is for the requirement ”when creating a creative, it can only belong to an offer of their group”:
-
Assume you have a Travel offer called ”Hawaii”. It will have slices US Online Marketing and US Travel Group (to side).
-
Now, in a US Cooking Group project, you create a Ratatouille creative. It will have slices US Online Marketing and US Cooking Group (from side).
-
You cannot select ”Hawaii” as the parent offer of your Ratatouille creative because the US Travel Group to slice is missing on the from side.
The relationship type Offer to Campaign is marked as using the relationship filtering All. For example, based on the previous logic, this prevents you from having UK Online Marketing offers under US Online Marketing campaigns, as above.
The requirement ”all offers must either be in the travel group or the cooking group” is satisfied as follows:
-
When you are in a US Travel Group or US Cooking Group project, any choice you create or update has the US Travel Group or US Cooking Group slice for the requirement ”all offers must either be in the travel group or the cooking group”.
-
In such a project, you can attach these offers to US Online Marketing campaigns because the All filter is satisfied: all of the to slices (US Online Marketing) are in all of the from slices (US Online Marketing and US Travel Group or US Cooking Group).
-
If you create a US Online Marketing project, RBAC restrictions in US Online Marketing forbids you from creating an offer (which would not belong to either US Travel Group or US Cooking Group slices) so you cannot have an offer in a US Online Marketing campaign that is neither US Travel Group nor US Cooking Group.
-
If you create a US Online Marketing project, RBAC restrictions in US Online Marketing allows you to change any offers, so you could change the parent campaign of an existing offer. But these offers will always already be US Travel Group or US Cooking Group and the filter will require that they stay under a US Online Marketing campaign.
3.3.8 Projects
Projects have a role and thus can only contain modifications permissible by this role. The following section describes one example:
-
A user has roles US Online Marketing, US Travel Group, US Cooking Group. He sees these three in the Current Role drop-down and selects US Online Marketing.
-
The project drop-down is filtered to only show projects for the US Online Marketing role. In this case, with no such projects, he only sees Main Repository.
-
The user can see all choices possessing the read slices of the current role, so he can see all shared choices and all US Online marketing choices (from both Travel and Cooking groups).
-
He creates a project which is automatically the current role, US Online Marketing.
-
He is able to update or delete all choices in the US Online Marketing campaign/offer/creative tree, including offers and creatives of both Travel and Cooking groups, because such offers and creatives have the US Online Marketing slice. He is, therefore, also able to cascade delete a campaign and all Travel and Cooking offers and creatives under it.