2 Installing and Preparing to Use the Life Cycle Management Tools
This chapter describes the prerequisites for deploying Oracle Identity and Access Management.
Before deploying Oracle Identity and Access Management using the Oracle Identity and Access Management Deployment Wizard, you must complete all prerequisites described in this section.
This chapter contains the following sections:
-
Section 2.1, "Verifying Certification, System Requirements, and Interoperability"
-
Section 2.2, "Running the Health Check Utility to Verify Basic System Requirements"
-
Section 2.4, "Obtaining the LCM Tools and Oracle Identity and Access Management Software Repository"
-
Section 2.5, "About the Deployment Repository and LCM Tools Directory Structure"
-
Section 2.6, "About Preparing a Database for an Oracle Identity and Access Management Deployment"
-
Section 2.7, "Locating the Required Java Development Kit (JDK)"
-
Section 2.8, "Installing the Oracle Identity and Access Management Lifecycle Tools"
-
Section 2.10, "Optionally Running Repository Creation Utility (RCU) to Create the Required Schemas"
2.1 Verifying Certification, System Requirements, and Interoperability
The certification matrix and system requirements documents should be used in conjunction with each other to verify that your environment meets the necessary requirements for installation.
- Step 1 Verifying Your Environment Meets Certification Requirements
-
Make sure that you are installing your product on a supported hardware and software configuration. For more information, see the certification document for your release on the Oracle Fusion Middleware Supported System Configurations page.
Oracle has tested and verified the performance of your product on all certified systems and environments; whenever new certifications occur, they are added to the proper certification document right away. New certifications can occur at any time, and for this reason the certification documents are kept outside of the documentation libraries and are available on Oracle Technology Network.
- Step 2 Using the System Requirements Document to Verify Certification
-
The Oracle Fusion Middleware System Requirements and Specifications document should be used to verify that the requirements of the certification are met. For example, if the certification document indicates that your product is certified for installation on 64-Bit Oracle Linux 5, this document should be used to verify that your Oracle Linux 5 system has met the required minimum specifications, like disk space, available memory, specific platform packages and patches, and other operating system-specific items. System requirements can be updated at any time, and for this reason the system requirement documents are kept outside of the documentation libraries and are available on Oracle Technology Network.
- Step 3 Verifying Interoperability Among Multiple Products
-
The Oracle Fusion Middleware Interoperability and Compatibility Guide for Oracle Identity and Access Management document defines interoperability, defines compatibility, and describes how multiple Fusion Middleware products from the same release or mixed releases may be used with each other. You should read this document if you are planning to install multiple Fusion Middleware products on your system.
2.2 Running the Health Check Utility to Verify Basic System Requirements
After you review the certification and system requirements information, you can run the Oracle Identity and Access Environment Health Check Utility to automatically check your environment before you use the LCM Tools.
For more information, see the following topics:
-
Section 2.2.1, "Understanding the Oracle Identity and Access Environment Health Check Utility"
-
Section 2.2.2, "Running the Environment Health Check Utility Before Installing the LCM Tools"
2.2.1 Understanding the Oracle Identity and Access Environment Health Check Utility
The Oracle Identity and Access Environment Health Check Utility is a utility that you can use to verify various configurations and perform validation checks against your Oracle Identity and Access Management setup. You can run the Health Check Utility any number of times during the post-configuration stage of a manual deployment of Oracle Identity and Access Management to assist you in verifying your installation and configuration.
When you run the Health Check Utility, the utility retrieves data from your environment, uses the data to run a set of validation checks, and generates a report that provides detailed information about any issues the utility finds for each of the items it checks.
For information about the Oracle Identity and Access Environment Health Check Utility, see "Understanding the Oracle Identity and Access Environment Health Check Utility" in Oracle Fusion Middleware Verifying Your Oracle Identity and Access Management Environment.
2.2.2 Running the Environment Health Check Utility Before Installing the LCM Tools
Before you install the LCM Tools or run the Deployment Wizard, Oracle recommends that you run the Environment Health Check Utility to verify that your environment meets the minimum requirements for running the deployment wizard and creating the response file.
For this reason, you can download the Environment Health Check Utility independently of the LCM Tools, and you can run it before you have installed any Oracle Identity and Access Management or LCM software.
To perform the initial verification before running the Deployment Wizard:
-
Download the Oracle Identity and Access Management Health Check Utility and unpack it in a directory on your local disk.
For more information about where to obtain the utility, see the Oracle Identity and Access Management Download, Installation, and Configuration ReadMe file on the Oracle Technology Network (OTN).
-
Download and install a supported Java Development Kit (JDK).
At the time this document was published, the recommended JDK was Oracle JDK 1.7.0_55+, which can be downloaded from the Java SE Development Kit 7 Downloads page on OTN.
For the latest information about supported configurations, see the Oracle Fusion Middleware 11g Release 1 (11.1.1.x) Certification Matrix on the Oracle Fusion Middleware Supported System Configurations page on OTN.
Note that you can also get a supported JDK as part of the LCM Tools repository download. For more information, see Section 2.4 and Section Section 2.7.
-
Set the
JAVA_HOMEenvironment variable to the full path of your JDK directory. -
Change directory to the following directory where downloaded and unpacked the Environment Health Check Utility:
cd download_directory/healthcheck/bin -
Run the following command to perform the pre-installation validation checks:
./idmhc.sh -manifest ../config/PreInstallChecks_mandatory_manual.xml
Note:
For more information about the pre-installation checks performed by the Environment Health Check Utility, see "PreInstallChecks_mandatory_manual.xml" in Oracle Fusion Middleware Verifying Your Oracle Identity and Access Management Environment. -
If any health checks fail, refer to the output in the Health Check Utility log files and reports to find the corrective actions. Note that the log file location will be printed on the screen after the utility is executed.
The reports provide the status of each check and a list of corrective actions for any checks that fail validation. You can manually fix the issues and rerun the utility any number of times to ensure all checks are successful. For more information about the log files and reports, see "Analyzing Health Check Reports" in Oracle Fusion Middleware Verifying Your Oracle Identity and Access Management Environment.
2.3 Understanding the Directory Server Requirements for Oracle Identity and Access Management
For topologies that require an LDAP directory, you can either have the LCM Tools automatically create and configure a new directory instance for you, or you can manually prepare an existing LDAP directory for use with Oracle Identity and Access Management.
For more information, see the following topics:
2.3.1 What LDAP Directories Are Supported by Oracle Identity and Access Management?
The following directory services are supported by the LCM Tools and the Oracle Identity and Access Management software:
-
If you using the LCM tools to automatically create a new directory service, you can create a new Oracle Unified Directory (OUD) or Oracle Internet Directory (OID) directory.
-
If you are preparing an existing directory instance, you can use an existing OUD, OID, or Microsoft Active Directory instance.
2.3.2 What Topologies Require an LDAP Directory?
You must create a new LDAP Directory or configure an existing LDAP Directory:
-
If you are deploying the Oracle Access Manager Only topology, because Oracle Access Manager requires a supported LDAP directory instance
-
If you are installing both Oracle Identity Manager and Oracle Access Manager and you plan to integrate the two products.
2.3.3 How Do I Prepare an Existing LDAP Directory for Oracle Identity and Access Management
If you decide that you want to use an existing LDAP directory service that you've already installed and configured, then you must prepare the existing directory for use with Oracle Identity and Access Management.
The procedure you use depends upon the Oracle Identity and Access Management topology and products you are installing. Chapter 3 contains the following procedures for preparing your existing LDAP directory for Oracle Identity and Access Management:
2.4 Obtaining the LCM Tools and Oracle Identity and Access Management Software Repository
Before you can use the LCM Tools to automate the deployment of Oracle Identity and Access Management, you must locate and download the Oracle Identity and Access Management Deployment Repository.
The repository is packaged as a set of downloadable archives. When unpacked, these archives provide you with the LCM Tools and the various software installers required to install and configure Oracle Identity and Access Management sofware.
For information about locating and downloading the repository, see the Oracle Fusion Middleware Download, Installation, and Configuration Readme Files.
2.5 About the Deployment Repository and LCM Tools Directory Structure
When you unpack the downloadable archives for the Oracle Identity and Access Management Deployment Repository, you create a Repository home directory. This directory is one of several key directories identified in Figure 2-1.
Table 2-1 describes each of these key directories, their purpose and how they get created.
Note that the diagram shows a recommended directory structure for a single-host deployment, where all the key directories are created on a common disk (in this example, /u01). In fact, you can create these directories on shared storage volumes, as long as the directories are accessible, writable, and identified in the file Locations screen of the Deployment Wizard when you are creating the response file.
For more information about using the Deployment Wizard to create the response file, see Chapter 4.
Figure 2-1 Diagram of the Complete LCM Home Directory Structure
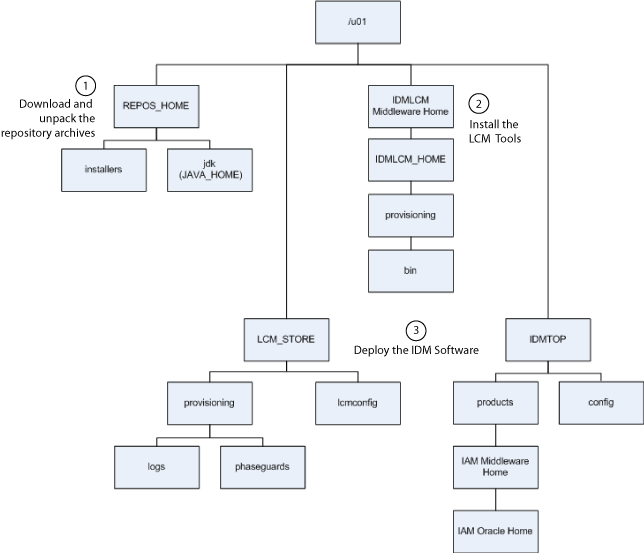
Description of ''Figure 2-1 Diagram of the Complete LCM Home Directory Structure''
Table 2-1 Key Directories Used by the LCM Tools
| Directory | Purpose | When Created | Where to Specify During Install and Deployment |
|---|---|---|---|
|
REPOS_HOME |
Contains the required Java Development Kit (JDK) and all the product installers required to install and configure Oracle Identity and Access Management. |
This directory is created when you unpack the Repository archives from the Oracle Technology Network (OTN). |
Enter the value of the REPOS_HOME in the Software Repository Location field of the Deployment Wizard when you are creating a response file. |
|
IDMLCM_HOME |
Oracle home for the LCM Tools. From this directory structure, you run the LCM Deployment Wizard. |
This directory is created by the LCM Tools installer. |
Enter in the Oracle Home Directory field in the IDM LCM Tools Installer. |
|
IDMTOP |
Top-level directory for the Oracle Identity and Access Management environment. It consists of:
|
The IDMTOP directory, as well as its subdirectories, are created by the LCM Tools during the deployment of the Oracle Identity and Access Management software. |
In the Deployment Wizard, when creating the response file:
Note: The configuration location is set to a location inside the IDMTOP directory by default; however, you can have the Deployment Wizard create the directory in any accessible location. The |
|
LCM_STORE |
Contains the logs, topology.xml, and other software artifacts required by the LCM tools. |
The LCM_STORE directory is created by the LCM Tools during deployment of the Oracle Identity and Access Management software. |
Enter the value of the LCM_STORE variable in the Life Cycle Management Store Location field. |
Note:
It is important that minimum privileges are assigned to UNIX users in the Repository home (REPOS_HOME). In order to do this, navigate to the extracted Repository home, and run the following command. This updates the permissions on the content of the repository.chmod -R 755 *
2.6 About Preparing a Database for an Oracle Identity and Access Management Deployment
Before you can install and configure Oracle Identity and Access Management, you must install and configure a supported database. The database is used to host the required schemas for each of the Oracle Identity and Access Management components.
You can use an existing database or you can use the database installation software that is included in the downloadable LCM Tools Repository.
-
To use the software available in the LCM Tools Repository, download the repository, using the instructions in Section 2.4, and then navigate to the following directory to install the database:
REPOS_HOME/installers/database/For information about locating the REPOS_HOME directory, see Section 2.5.
-
If you want to use an existing database, see the section "RCU Requirements for Oracle Databases" in the Oracle Fusion Middleware System Requirements and Specifications to be sure your database meets the minimum system requirements for the LCM Tools and the Oracle Identity and Access Management software.
Note that starting with Oracle Identity and Access Management 11g Release 2 (11.1.2.3), you can optionally install the schemas in the database, using the LCM Tools. This means you no longer have to install the schemas manually using the Repository Creation Utility.
2.7 Locating the Required Java Development Kit (JDK)
After you expand the archives and create the Repository home (REPOS_HOME), you can find an expanded copy of the supported Java Development (JDK) in the following directory:
REPOS_HOME/jdk
Before you start the LCM Tools installer, set the JAVA_HOME system variable to point to this directory.
2.8 Installing the Oracle Identity and Access Management Lifecycle Tools
The Oracle Identity and Access Management Deployment Wizard is a component of the Oracle Identity and Access Management Lifecycle Tools, which also includes the Oracle Identity and Access Management Patching Framework. You must install the tools by running an installer, which is located in the Oracle Identity and Access Management deployment repository.
For more information, see the following topics:
2.8.1 Locating and Starting the LCM Tools Installer
The installation script for the Oracle Identity and Access Management Lifecycle Tools (IAM Deployment Wizard and IAM Patching Tools) resides in the following directory:
REPOS_HOME/installers/idmlcm/Disk1
where REPOS_HOME is the Oracle Identity and Access Management deployment repository that contains all the installers required to deploy a new Oracle Identity and Access Management environment.
To begin installing the tools, change to that directory and start the script.
On UNIX:
cd REPOS_HOME/installers/idmlcm/Disk1
./runInstaller -jreLoc <full path to the JRE directory>
For example:
./runInstaller -jreLoc REPOS_HOME/jdk
2.8.2 Summary of the LCM Tools Installer Screens
Table 2-2 describes each of the LCM Tools installer screens.
Table 2-2 Installation Flow for Identity Management LCM Tools
| Screen | Description and Action Required |
|---|---|
|
Welcome |
Review the information on the Welcome page, and click Next. |
|
Specify Inventory Directory |
This screen appears if this is the first time you are installing Oracle software on a UNIX host or if you installed software previously on the UNIX host, but did not create a central inventory. The Inventory Directory is used to keep track of all Oracle products installed on this host. For the purposes of this guide:
If you want to create a central Inventory Directory or learn about the advantages of doing so, see Section 2.8.3. |
|
Prerequisite Checks |
On this screen, verify that checks complete successfully, then click Next. |
|
Specify Install Location |
On the Specify Install Location page, enter the following information:
Click Next. |
|
Installation Summary |
Verify the information on this screen, then click Install to begin the installation. |
|
Installation Progress |
This screen shows the progress of the installation. When the progress shows 100% complete, click Next to continue |
|
Installation Complete |
On the Installation Complete page, click Finish. |
2.8.3 Specifying an Inventory Directory
If you are running on a UNIX platform, and you have not previously installed an Oracle product on this host, or if you installed software previously on the UNIX host, but did not create a central inventory, then the Specify Inventory Directory screen will appear during the installation.
The Specify Inventory Directory screen prompts you for the location of the Inventory Directory. The Inventory Directory is used to keep track of all Oracle products installed on this host.
You can save a local inventory directory just for the software you are currently installing, or you can create a central inventory directory for all Oracle software installed on the host, even software installed by other users.
A central inventory directory can be especially important when you are performing life cycle operations, such as patching, test-to-production, or when upgrading your software to a newer version.
To create a central inventory directory:
-
In the Operating System Group ID field, select the group whose members you want to grant access to the inventory directory.
All members of this group can install products on this host and write to the inventory directory.
Click OK to continue.
-
The Inventory Location Confirmation dialog prompts you to run the
inventory_directory/createCentralInventory.shscript asrootto create the/etc/oraInst.locfile.The /etc/oraInst.loc file is a pointer to the central inventory and must be present for silent installations. It contains two lines:
inventory_loc=path_to_central_inventoryinst_group=install_groupThe standard location for this file is
/etc/oraInst.loc, but it can be created anywhere. If you create it in a directory other than/etc, you must include the-invPtrLocargument and enter the location of the inventory when you run theIdentity and Access Management Deployment Wizardor therunIAMDeployment.shscript.
2.9 Applying Patches and Workarounds
The LCM Tools Repository will sometimes include patches that will be applied automatically during the automatic deployment of Oracle Identity and Access Management.
In addition, there might be cases where additional patches are required to address specific known issues. See the section "Downloading and Applying Required Patches" in the Oracle Fusion Middleware Identity Management Release Notes for a list of patches to apply. You must apply the patches to ensure that your software operates as expected.
Before starting the deployment, download any patches that are listed in the Release Notes, plus any other patches that are appropriate for your environment. Unzip each patch to the directory appropriate for the product, as listed in Table 2-3. If the directory does not exist, create it.
Patches are available for download from http://support.oracle.com. You can find instructions for deploying each patch in the enclosed README.html file.
After unzipping the patch, make sure that the Patch Directory (as listed in Table 2-3) contains a directory which is a number. That directory contains directories and files similar to:
-
etc
-
files
-
README.txt
This is the directory layout for most patches. In some cases, such as bundle patches, the layout might be similar to:
bundle_patch_no/product/product_patch_no
In this case make sure that it is product_patch_no which appears in the Patch Directory not bundle_patch_no.
If a bundle patch contains fixes for multiple products make sure that the individual patches appear in the correct Patch Directory as listed below.
Table 2-3 Product Patch Directories
| Product | Patch Directory |
|---|---|
|
Oracle Access Management Access Manager |
|
|
Oracle HTTP Server |
|
|
WebGate |
|
|
Oracle Identity Manager |
|
|
SOA Suite |
|
|
WebLogic Server |
|
|
suwrapper |
|
|
Oracle Unified Directory |
|
|
Oracle Internet Directory |
|
|
Business Intelligence Publisher (BIP) |
|
|
Mobile Security Manager |
|
|
Mobile Security Access Server |
|
2.9.1 Mandatory Patches Required for Installing Oracle Identity Manager
There are some mandatory patches that must be applied for installing and configuring Oracle Identity Manager. For more information about these patches, see the section Mandatory Patches Required for Installing Oracle Identity Manager in the Oracle Fusion Middleware Identity Management Release Notes.
In addition, Oracle Identity Manager also requires specific database patches. For more information, see the section Patch Requirements in the Oracle Fusion Middleware Identity Management Release Notes.
2.10 Optionally Running Repository Creation Utility (RCU) to Create the Required Schemas
Starting with Oracle Identity and Access Management 11g Release 2 (11.1.2.3), you can use the LCM Tools to install the required schemas as part of the deployment process.
Optionally, you can choose to use the Oracle Identity and Access Management version of RCU to install the schemas before you install and run the LCM Tools.
Important:
If you choose to run RCU yourself, then be sure to use the version provided in the LCM Tools Repository; otherwise, the Oracle Identity and Access Management configuration might fail.For more information, see the following:
-
Section 2.10.1, "Locating and Starting RCU to Prepare for an Automated Deployment"
-
Section 2.10.2, "Using RCU to Install the Required Oracle Identity and Access Management Schemas"
2.10.1 Locating and Starting RCU to Prepare for an Automated Deployment
If you choose to install the schemas manually using RCU, then you can locate the RCU software in the following directory:
REPOS_HOME/installers/fmw_rcu/linux/rcuHome.zip
In this path, REPOS_HOME is the Oracle Identity and Access Management deployment repository that contains all the installers required to deploy a new Oracle Identity and Access Management environment.
Extract the contents of the rcuHome.zip file to a directory of your choice; this directory is referred to as the RCU_HOME directory.
Start the RCU from the bin directory inside the RCU_HOME directory.
On UNIX:
cd RCU_HOME/bin
./rcu
2.10.2 Using RCU to Install the Required Oracle Identity and Access Management Schemas
The options you select when running RCU will vary, depending upon the topology you want to deploy. For more information about the topologies supported by the :LCM Tools, see Section 1.4, "Understanding the Supported Oracle Identity Manager Topologies".
After you start RCU, use the instructions in "Creating Schemas" in the Oracle Fusion Middleware Repository Creation Utility User's Guide, and refer to the following topics:
-
Section 2.10.2.1, "Considerations When Using RCU to Install the Schemas for an Automated Deployment"
-
Section 2.10.2.2, "Selecting the Required Schemas for Supported Automated Installation Topologies"
2.10.2.1 Considerations When Using RCU to Install the Schemas for an Automated Deployment
As you navigate through the RCU screens and select the required schemas, note the following important considerations:
-
Installing required schemas as part of deployment process is supported only on Linux platforms.
This is because underlying RCU support is only available on Linux and not on other unix platforms. Customers from other platforms like Solaris, AIX and HP Itanium need to install required schemas manuallly using Oracle Identity and Access Management version of RCU.
-
Be sure to select one password for all schemas you install.
This is a requirement of the LCM Tools automated installation.
-
If you are deploying an integrated, OIM, OAM, and OMSS environment, then you can use either separate, dedicated databases for OIM and OAM or a single consolidated database.
If you are using a consolidated database, then you must different prefixes for the OAM and OIM schemas, and you must create two separate OPSS schemas, one for each domain. This will allow you to upgrade the OIM or OAM separately at a later time.
-
Be sure to remember the schema prefix, host, port, servicename, username, and password that you provide when creating the schemas using RCU. You will need to provide this information when you create the deployment response in Chapter 4, "Creating a Deployment Response File".
2.10.2.2 Selecting the Required Schemas for Supported Automated Installation Topologies
When you run RCU, create and load only the following schemas for the Oracle Identity and Access Management component you are installing—do not select any other schemas available in RCU:
-
If you are deploying the Oracle Identity Manager (OIM) Only topology, then select the Identity Management - Oracle Identity Manager schema.
When you select the Identity Management - Oracle Identity Manager schema, the following schemas are also selected, by default:
-
SOA and BPM Infrastructure - SOA Infrastructure
-
SOA and BPM Infrastructure - User Messaging Service
-
AS Common Schemas - Oracle Platform Security Services
-
AS Common Schemas - Metadata Services
-
Oracle Business Intelligence - Business Intelligence Platform
-
-
If you are deploying the Oracle Access Manager (OAM) Suite and Oracle Mobile Security Suite (OMSS) Only topology, then select the Identity Management - Oracle Mobile Security Manager schema.
By default, Oracle Mobile Security Suite is installed (but not fully configured) with Oracle Access Management. You can choose to configure Oracle Access Management only or configure Oracle Access Management with Oracle Mobile Security Suite. For both configuration options, you must select the Identity Management - Oracle Mobile Security Manager schema.
When you select the Identity Management - Oracle Mobile Security Manager schema, the following schemas are also selected, by default:
-
AS Common Schemas - Oracle Platform Security Services
-
AS Common Schemas - Metadata Services
-
AS Common Schemas - Audit Services
-
Identity Management - Oracle Access Manager
-
-
If you are deploying the OIM-OAM-OMSS Integrated with Directory topology, then you must run RCU twice, once to install the schemas required for OIM and once to install the schemas required for Oracle Access Manager and Oracle Mobile Security Services.
Be sure to use a different schema prefix each time you run RCU. For more information, see Section 2.10.2.1.