2 Accessing Applications Using
Logon Manager
Logon Manager lets you use a single password to log on to any password-protected application on your desktop, your network, and the Internet. It works "out-of-the-box" (without programming or additional network infrastructure) with virtually all applications, including Windows, Web, proprietary, and host/mainframe applications.
Logon Manager is intelligent agent software. It remembers your credentials—your username/ID, password, and other information-for each application or Web site and automatically responds to its logon requests.
2.1 Getting Started Using Logon Manager
After Logon Manager is installed, the Logon Manager Tray Icon appears on your Windows system tray in the lower-right corner of your screen.
If you do not see this icon, start Logon Manager:
-
Click Start, then Programs.
-
Point to Oracle, then Logon Manager.
-
Click Logon Manager.
The Logon Manager Tray Icon now appears in your Windows system tray. See the System Tray Icon Menu Options.
After the Logon Manager software is installed on your workstation, the Setup Wizard guides you through the procedure for providing your primary logon information.
This procedure is performed the first time you start the program.
The remainder of this chapter covers these topics:
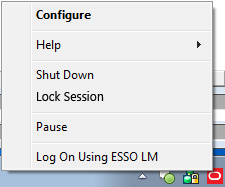
2.1.1 The System Tray Icon Menu
Click the Logon Manager Tray Icon in your Windows system tray to display a shortcut menu of program functions, which are described below.
Note:
The Lock Session option is available only for configurations that include Kiosk Manager.If you do not see the system tray icon, start Logon Manager:
-
Click Start, then Programs.
-
Point to Oracle, then Logon Manager.
-
Click Logon Manager.
2.1.1.1 System Tray Icon Menu Options
The following table provides a list of System Tray Menu options and their functions.
| Option | Function |
|---|---|
| Configure | Launches the Logon Manager, which displays stored accounts, allows you to add, delete and modify accounts, and manage configuration settings. |
| Help | Displays a submenu of options:
|
| Shut Down | Shuts down Logon Manager. |
| Pause | Turns off Logon Manager logons, including the Auto-Prompt and Auto-Recognize features, and the Log On Using Logon Manager menu option, below.
Note: You administrator has the option to limit the length of time that you can pause Logon Manager, or disable it completely. |
| Lock Session | Locks the current session (if Kiosk Manager is installed). |
| Log On Using Logon Manager | Engages Logon Manager to supply information to a logon request. You can use this option to engage Logon Manager when Auto-Recognize is disabled.
Note: If Auto-Recognize is enabled, Logon Manager automatically recognizes logon requests and supplies your stored logon information. If you have not already set up the application or Web site logon, Logon Manager prompts you to do so. |
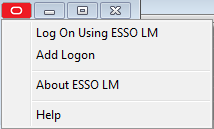
2.1.2 The Title Bar Button Menu
You can put the Logon Manager Title Bar Button on all application window title bars. The button lets you log on quickly to applications and Web sites you've already configured and add new accounts as you work.
You can set the Title Bar Button to display a shortcut menu for using or adding logons, or you can omit the menu and use the Title Bar Button as a one-click logon command.
2.1.2.1 Showing or Hiding the Title Bar Button
To show or hide the Title Bar Button:
-
Open Logon Manager.
-
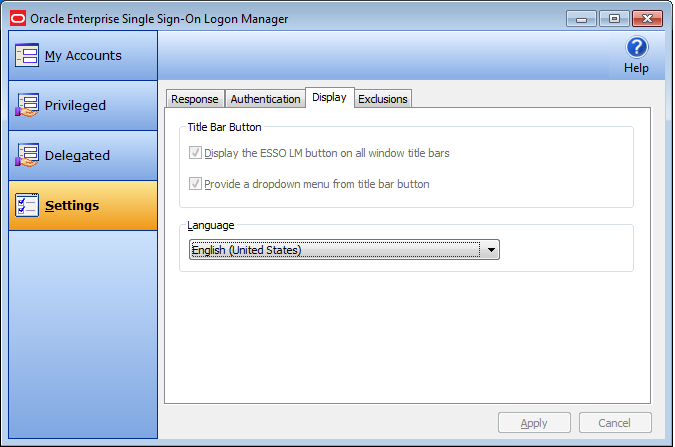
Click the Settings panel, and select the Display tab.
-
Check Display the Logon Manager button on all window title bars to activate the title bar button.
-
Check Provide a dropdown menu from title bar button to activate the shortcut menu, or clear the check box to deactivate the menu. If you clear this option, clicking the Title Bar Button initiates a logon to the active application.
-
When you have completed your changes, do one of the following:
-
Click Apply to confirm your changes and close Logon Manager.
-
Click Apply to confirm your changes (without closing Logon Manager), and select another Settings tab.
-
Click Cancel to discard your changes.
-
Note:
To hide the Title Bar Button and menu at any time, click the Title Bar Button on any application title bar and select Hide Title Bar Button.2.2 Using Logon Manager
Logon Manager displays stored accounts, and allows you to add, delete, and modify accounts and manage configuration settings.
To display the Logon Manager, click the Logon Manager Tray Icon in the Windows system tray to display the shortcut menu. Click Configure.
-
As you add or create accounts, the available accounts are displayed in the My Accounts tab of Logon Manager.
-
Logon Manager configuration options are available in the Settings panel.
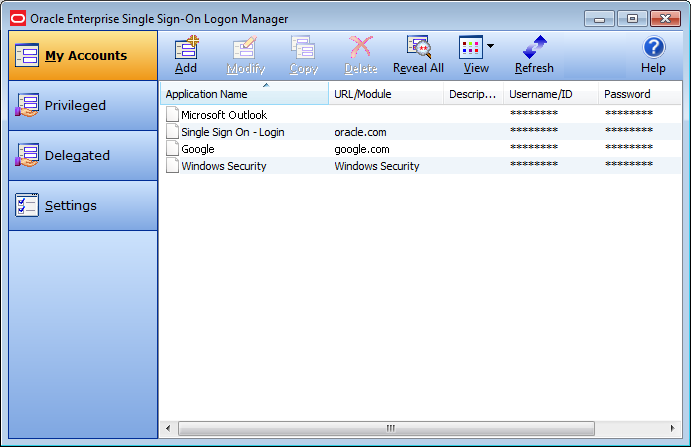
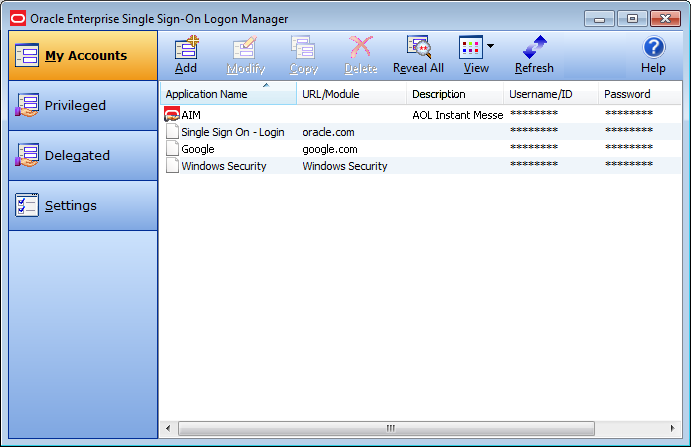
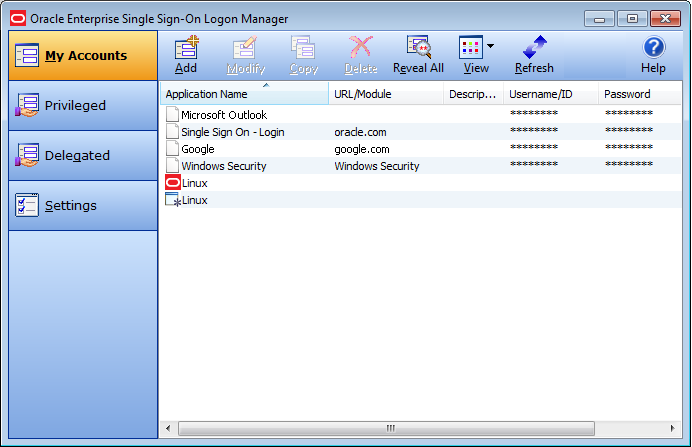
2.2.1 My Accounts Panel
The My Accounts panel displays all of your stored accounts, and allows you to add, delete, copy, and modify accounts. For faster access, the Modify, Copy, and Delete controls are also available in a context menu accessible by right-clicking the desired application in the list. The following table lists the controls on this panel.
| Icon | Label | Purpose |
|---|---|---|
| Add | Launches the New Logon dialog to set up a new account. | |
| Modify | Launches the Modify Account dialog, which allows you to modify account information or automatic behavior for individual accounts. You can also access this function by right-clicking the desired application and selecting Modify from the context menu that appears. | |
| Copy | Duplicate a selected account. The new account appears in the list with a "(2)" at the end of the application name. You can also access this function by right-clicking the desired application and selecting Copy from the context menu that appears. | |
| Delete | Remove a selected account from Logon Manager. A confirmation request appears: "Are you sure you want to delete the selected item from your system?" Select Yes or No.
You can also access this function by right-clicking the desired application and selecting Delete from the context menu that appears. Use Shift+Click or Control+Click to select several items to delete at one time.* *Multiple item selection is new as of version 11.1.1.5.0. |
|
| Reveal All | This icon becomes active when the Details view is selected, and at least one account is defined. Reveal All displays all Username/IDs and passwords in Logon Manager. (This feature is only available if the administrator has activated it.) | |
| View | Allows you to change how accounts display, if at least one account is defined. Can display as Icons, as a List, or with full Details (similar to Windows Explorer View options). When Details is selected, the Reveal All option is enabled. (This feature is available if the administrator has not deactivated it.) | |
| Refresh | Updates account settings with changes from your administrator. (This feature is available if the administrator has not deactivated it.) | |
| Help | Launches the Logon Manager help file. |
2.2.1.1 Accounts That Share Credentials
Your administrator might configure two or more accounts to share the same username and password in a credential sharing group. If the credentials for one account change, the credentials for the other accounts in the credential sharing group also change.
In some cases, where you need multiple credentials for a single application (for example, having multiple mail accounts in Microsoft Outlook), you may need to exclude those additional "identities" (each with different credentials) from this feature. In such an instance, you have the option to exclude the new account. This capability is configured by your administrator.
2.2.1.2 Accounts Without Configured Credentials
Some accounts may appear in Logon Manager in gray, italicized text with a gray icon. If you attempt to use such an account or modify it (by selecting it and clicking Modify), this message appears:
Credential corresponds to an application that is not currently configured in Logon Manager.
This message typically appears when Logon Manager has been upgraded from a previous version. It means that your credentials are safely stored, but the application configuration (that tells Logon Manager where to put the credentials) needs to be upgraded as well. Contact your administrator to acquire the updated accounts.
2.2.1.3 Language Settings
Logon Manager can run in many different languages, depending on which version you are running, and which language packs are installed.
Depending on your configuration, you can change the language of the Agent through the Logon Manager.
-
Open Logon Manager.
-
Select the Settings panel and then the Display tab.
-
Select from the list of available languages in the Language dropdown.
All Logon Manager dialogs and help screens will display in the selected language.
2.3 Using the Setup Wizard to Configure Logon Manager
Before you begin using Logon Manager, the Setup Wizard checks to make certain that Logon Manager has all the information it needs. This is also called the First Time Use Wizard (FTU). You must provide the information requested in order to use Logon Manager.
Note:
If you cancel the Setup Wizard, it will re-appear each time you try to start Logon Manager until you have completed the setup.2.3.1 Setup Wizard Tasks
The wizard takes you through either or both of the following tasks:
-
Establishing yourself as a new Logon Manager user by selecting how you will log on.
-
Adding account information for specific applications
Note:
The Setup Wizard may skip either of the above tasks, depending on the installation options selected and your network's configuration.2.3.2 Setup Tasks to Perform
This page lists the setup tasks necessary for your local installation of Logon Manager.
Click Next to begin setup.
2.3.2.1 Selecting Your Primary Logon Method
Logon methods, also referred to as authenticators, are ways to access your password-protected applications. You can select to install more than one authenticator, but the primary logon method you select determines the first authenticator that Logon Manager uses.
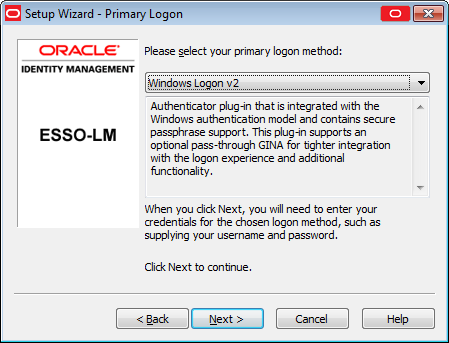
When you first set up Logon Manager, you are prompted to choose your primary logon method. The credentials you provide to the authenticator—your username/ID, password, and other information—identify you as an authorized user of your workstation and network.
In most cases, your primary logon is Windows Logon v2, and your primary account credentials are your Windows username/ID, password, and network domain.
Logon Manager lets you use your primary logon method for any other situation in which you need a password, including most Windows applications, host/mainframe applications, and password-protected Web sites. It uses your primary logon information to verify that you are the same user that initially logged on.
-
From the drop-down list box, choose the authenticator you will use as your primary logon method. In a typical installation, this is Windows Logon v2. This means you will use your Windows password to access password-protected applications.
-
Depending on your network resources and administration, you may have other primary logon methods to choose from. The available authenticators for Logon Manager are:
-
Windows Logon v2. Enables logging on to Logon Manager by logging on to Windows.
If you choose Windows Logon v2, one or more passphrase questions may appear, depending on your system configuration. These are used for additional security. Enter the answer to the displayed question or questions (note the minimum length) and click OK.
-
Windows Logon. Enables logging on to Logon Manager by logging on to Windows. (This authenticator has been deprecated as of version 11.1.2.)
-
LDAP. Enables logging on to Logon Manager by logging on to an LDAP directory.
-
LDAP v2. Enables logging on to Logon Manager by logging on to an LDAP directory.
If you choose LDAP v2, one or more passphrase questions may appear, depending on your system configuration. These are used for additional security. Enter the answer to the displayed question or questions (note the minimum length) and click OK.
-
Entrust. Enables logging on to Logon Manager by logging on to the Entrust PKI and Entelligence client.
-
Proximity Card. Supports authentication with HID Proximity Cards.
-
Smart Card. Enables logging on to Logon Manager using an MS-CAPI-capable smart card.
If you choose Smart Card, one or more passphrase questions may appear, depending on your system configuration. These are used for additional security. Enter the answer to the displayed question or questions (note the minimum length) and click OK.
-
Read-Only Smart Card. Enables logging on to Logon Manager using a Read-Only Smart Card.
-
RSA SecurID. Enables logging on to Logon Manager using one-time passwords generated by RSA SecurID tokens.
-
Authentication Manager. Adds the capability to allow multiple logon methods to authenticate to Logon Manager. It supports a variety of strong authenticator options such as smart cards, proximity cards, and read-only smart cards.
-
Universal Authentication Manager. This option is available if you have also installed the Universal Authentication Manager client, and adds the capability to authenticate to Logon Manager through the following strong authenticator options.
-
Windows Password. Your standard Windows password.
-
Fingerprint. Requires you to scan one or more fingerprints during enrollment.
-
Smart Card. Enables logging on to Logon Manager using an MS-CAPI-capable smart card.
If you choose Smart Card, one or more passphrase questions may appear, depending on your system configuration. These are used for additional security. Enter the answer to the displayed question or questions (note the minimum length) and click OK
-
Proximity Card. Supports authentication with HID Proximity Cards.
-
Challenge Questions. Offers an interview during enrollment, in which you will be presented with a series of pre-configured questions. At authentication, you must provide the same answers to one or more of these questions.
Note:
If you select one of the Universal Authentication Manager logon methods above, and you have not previously enrolled with any of these methods, you will be prompted to enroll. You cannot use the selected logon method until you enroll.
-
-
-
When you have made your selection, click Next to continue.
For more information about enrolling in and using Universal Authentication Manager, see Chapter 5, "Using Universal Authentication Manager for Strong Authentication."
2.3.2.2 After You Select a Primary Logon Method
Depending on your choice of authenticator(s), you may have to perform additional steps to complete the wizard.
-
For Windows logons:
If you choose Windows Logon as your primary logon method, a Windows network logon prompt appears. Enter your Windows Network password for the displayed username and domain and click OK.
-
For Smart Card logons:
If you choose Smart Card as your primary logon method, a smart card prompt appears. Insert the smart card and then enter your PIN. Click OK.
-
For Windows Logon v2, Smart Card, or LDAP v2:
If you choose Windows Logon v2, Smart Card, or LDAP v2, one or more passphrase questions may appear, depending on your system configuration. These are used for additional security. Enter the answer to the displayed question or questions (note the minimum length) and click OK.
Note:
You can change your passphrase anytime later by selecting the Change Passphrase option whenever you confirm your primary logon method.
2.3.2.3 Adding Application Logons
Note:
This page appears if your administrator has provided a list of pre-configured applications. This lets you store your logon credentials for each application.-
Enter your Username/ID, Password, and any other requested information for each application you use. You may need to retype one or more items to confirm.
-
Click Next to continue.
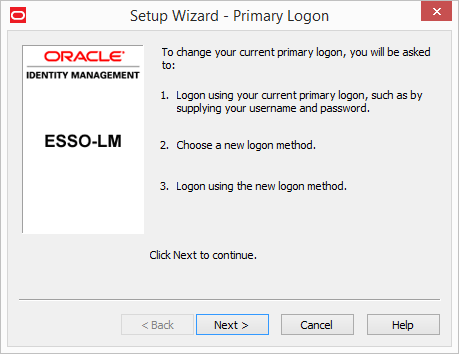
2.3.3 Changing Your Primary Logon Method
You can change your primary logon method at any time, and you can install or remove authenticators as needed.
Click the Logon Manager Tray Icon on the Windows system tray to display the shortcut menu and select Configure.
-
Select the Settings panel in Logon Manager.
-
Click the Authentication tab.
-
Under Primary Logon Method, click Change.
-
The Setup Wizard appears with a list of steps you'll follow to change your primary logon. Click Next to continue.
-
You are prompted for your current primary logon. Enter your primary logon password, then click OK.
-
The Setup Wizard displays the primary logon selection page. Select a primary logon method from the drop-down list box, then click Next to continue.
-
You receive a prompt for your new primary logon credentials. Enter your user ID and password, and enter or select any additional information, then click OK.
Note:
If your new primary logon is a smart card, you are prompted to insert the card into the reader and enter your personal identification number (PIN). If your new primary logon is a biometric device, you are prompted to place your finger on the fingerprint reader. -
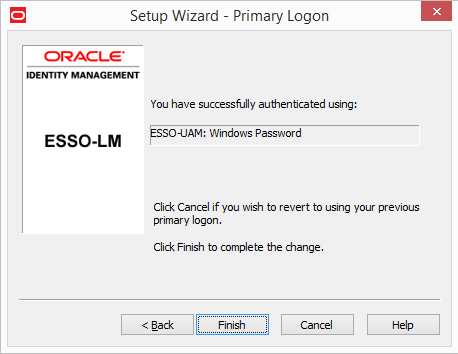
The Setup Wizard confirms that your new authentication is successful.
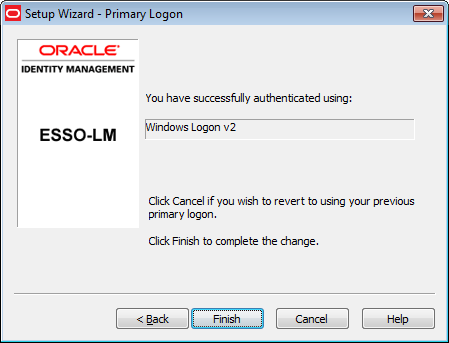
You can either:
-
Click Cancel to cancel the change and restore your previous primary logon method.
or
-
Click Finish to complete your primary logon change. The Primary Logon Method dialog appears. Click Close to close it.
-
2.3.4 Confirming Your Primary Logon Method
You can configure Logon Manager to check periodically to make sure that you are the same user who initially logged on to a workstation.
When you start a password-protected application, if a specific interval of time has passed since the last automatic logon (the default is 15 minutes), Logon Manager asks for your primary logon password. If you are using a logon method other than a password (smart card, token, biometric) as your primary logon, you are prompted for the appropriate authentication method (PIN, fingerprint, and the like).
Logon Manager also automatically performs this check when you modify your application passwords, perform other account management tasks, or if the application itself requires it.
You can change the interval, or turn this feature off, by changing the Timer setting in the Authentication tab of the Settings panel.
2.3.5 Installing Additional Primary Logon Methods
When you installed Logon Manager, you had the option of installing one or more authenticators. If you did not install all authenticators at that time, you can use this procedure to install them. Currently installed authenticators are listed in the Primary Logon Method dialog.
Note:
The following procedures for installing and removing primary logon methods are typically reserved for your administrator to perform.-
Open Control Panel and double-click Programs and Features.
-
Select Logon Manager.
-
Click Change.
-
The Logon Manager InstallShield Wizard appears. Read the screen, then click Next.
-
Select the Modify option, then click Next.
-
Click the plus sign ("+") next to Authenticators to expand the list.
-
Click the X icon next to the authenticator you want to install.
-
From the shortcut menu, select This feature will be installed on the local hard drive.
-
Repeat steps 7 and 8 to install additional authenticators.
-
Click Next.
-
Read the screen, then click Next.
-
Follow the screen prompts.
2.4 Creating and Managing Accounts
An account is an application and the set of credentials that you use to authenticate to it. Depending on your configuration, you can have multiple logons for a single application, and each one is considered an account.
Logon Manager provides the means to create, modify, and delete accounts. It also allows you to exclude applications that you do not want the program to respond to (your administrator can also exclude programs as desired, in which case you will not have the option to configure a logon for them).
This section discusses how to work with accounts.
2.4.1 Creating Accounts
Logon Manager provides two ways for you to create accounts:
-
You can create accounts with Logon Manager, which lets you configure, edit and manage credentials.
-
You can create accounts "on the fly," as you launch applications that require credentials. This happens in one of two ways:
-
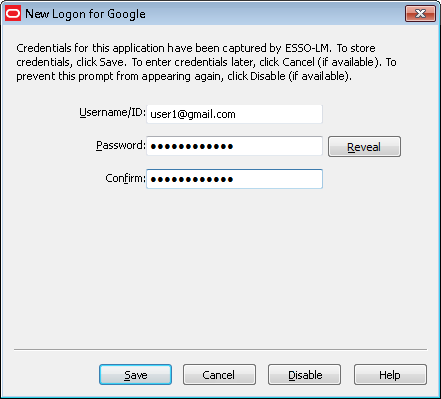
Automatic credential capture. By default, Logon Manager captures credentials automatically as you enter them, when you first encounter an application that requires a logon. Depending on your configuration, you might then be required to review and approve your credentials. See Automatic Credential Capture for more information.
-
Using Auto-Prompt. If your administrator disables automatic credential capture, Logon Manager detects an application's logon request and displays the New Logon dialog. You can then save your credentials as you log on. See Setting Up Accounts Using Auto-Prompt for more information.
-
Many applications require you to submit the same credential in more than one field, such as applications for which you must enter and confirm your password, or Web pages that have accounts in multiple locations. Other applications require you to enter credentials for additional fields besides your username and password. Your administrator must preconfigure such applications in order for you to take advantage of full Logon Manager functionality.*
*This functionality is new as of version 11.1.1.5.0.
2.4.1.1 Exclusions Configured by the Administrator
In certain instances, your administrator might configure your user account to be prohibited from accessing specific applications. If you attempt to add credentials for such an application, you will receive a message indicating that your account has been excluded for that application, and you will not be able to save Logon Manager credentials. Additionally, applications that the administrator excludes after you have created an account will cease responding, and will be removed from your Accounts list.
2.4.2 Using Logon Manager to Set Up Accounts That You Select
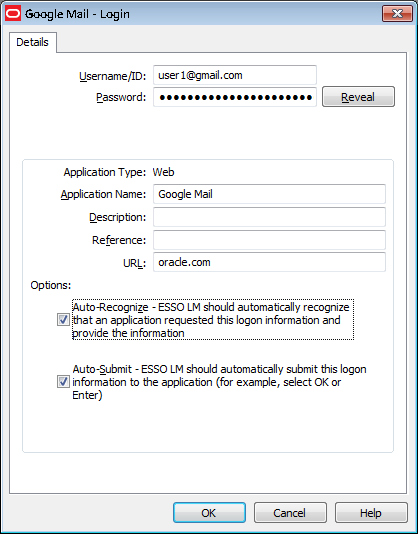
In Logon Manager, click Add to set up a new account. The New Logon dialog appears.
In most instances, your installation of Logon Manager already contains applications that your administrator has pre-configured. Any such application will be available for you to select during this procedure. The next sections describe how to use the New Logon dialog to add accounts for each application type.
The procedure is similar for each type. You identify the application and then provide your credentials—username/ID, password, and any other information the application requires you to enter.
If you attempt to add an account for a Windows application that is not configured in Logon Manager, you are asked to identify the username/ID and password fields by pointing and clicking on these fields.
You are also given the option to create more than one account for a single application. This is useful for applications for which you have more than one set of credentials; for example, if you have multiple email accounts from one account.
When Logon Manager detects an application for which you have more than one account, it displays the Logon Chooser dialog, which lets you select the account to use.
2.4.2.1 Adding an Account for a Listed Windows Application
To add an account for a Windows application:
-
In the New Logon dialog, select the Windows option and select an application from the drop-down list box. If the application you want to add is not listed, see Adding an Account for an Unlisted Windows Application.
-
Click Next. The New Logon dialog appears, prompting you to enter credentials.
-
Enter your Username/ID for the application, enter your Password, and confirm it. You can display the password by clicking Reveal.
Note:
Depending on the requirements of the application you are setting up, you may be prompted for additional fields, such as Domain Name for Microsoft Outlook.Similarly, some applications may not require a username/ID. In such cases, the Username/ID box will be unavailable.
If you are setting up an RSA SecurID application, you will be asked to enter your PIN and Software Token. Your PIN is set up through the RSA middleware. The Software Token field automatically populates as it detects the serial number of the available token.
-
Do one of the following:
-
Click Finish. Logon Manager returns you to the My Accounts panel, which now lists the account you have just created.
or
-
If the setting is available, and you so choose, select Add another set of credentials, then click Finish. Logon Manager adds the account to the My Accounts panel and re-displays the New Logon dialog.
Note:
If you are adding a new account for an existing application that is part of a credential sharing group, select Exclude from credential sharing group. If this is the first account you have created for this application, leave this check box unselected. See Credential Sharing Groups for more information.
-
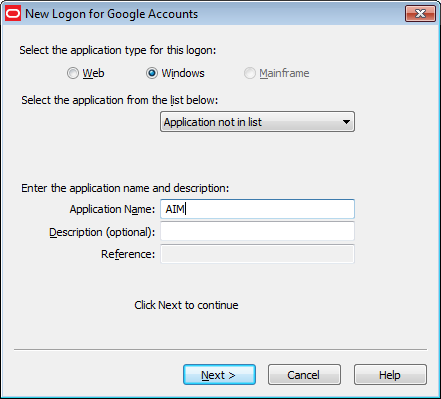
2.4.3 Adding an Account for an Unlisted Windows Application
Depending on your administrator's preference, you may be able to add logons for applications that aren't in your predefined applications list. The following describes this process.
-
Open the Windows application for which you want to set up an account. This is the target application.
Note:
If the target application requires more than two fields for authentication, this procedure requires an administrator to create a template for it. Contact your administrator for assistance. -
When the target application's logon dialog displays, switch back to Logon Manager. Arrange the windows so that both Logon Manager and the target application's logon dialog are visible.
-
In the New Logon dialog, select the Windows option and select Application not in list (the default) from the drop-down list box.
-
Enter the Application Name of the target application and (optionally) a Description.
-
Click Next.
-
The New Logon displays two icons.
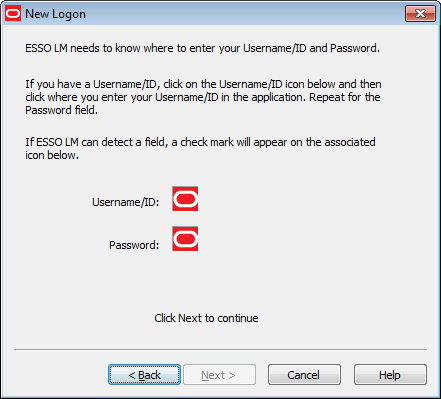
-
Click the Username/ID icon, and click in the username or user ID field of the target application's logon dialog. A green check mark appears over the icon.
-
Click the Password icon, and click in the password field of the target application's logon dialog. A green check mark appears over the icon.
-
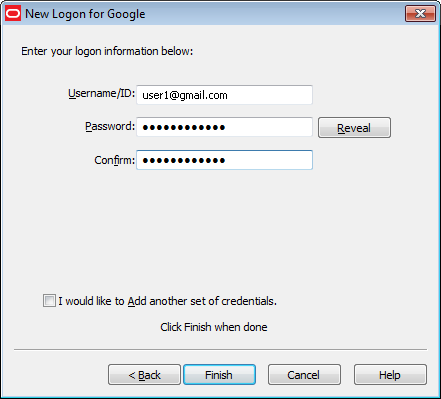
Click Next. The New Logon dialog appears, prompting you to enter credentials.
-
Enter your Username/ID for the application, and then your Password. Retype your password in the Confirm Password field. (You can display the password by clicking Reveal.)
-
Do one of the following:
-
Click Finish. Logon Manager returns you to the My Accounts panel, which now lists the account you have just created.
or
-
If the setting is available and you so choose, select Add another set of credentials, to repeat the process. Then click Finish. Logon Manager adds the account to the My Accounts panel and re-displays the New Logon dialog.
Note:
If you are setting up an RSA SecurID application, you will be asked to enter your PIN and Software Token. Your PIN is set up through the RSA middleware. The Software Token field automatically populates as it detects the serial number of the available token.
-
2.4.4 Adding an Account for a Web Site
-
In the New Logon dialog, select the Web option, then select a Web site from the drop-down list. If the Web site you want to add is not listed, see Adding an Account for an Unlisted Web Site.
-
Click Next. The New Logon dialog appears, prompting you to enter credentials.
-
Enter your Username/ID for the application, and then your Password. Retype your password in the Confirm Password field. (You can display the password by clicking Reveal.)
-
Do one of the following:
-
Click Finish. Logon Manager returns you to the My Accounts panel, which now lists the account you have just created.
or
-
If the setting is available and you so choose, select Add another set of credentials, to repeat the process. Then click Finish. Logon Manager adds the account to the My Accounts panel and re-displays the New Logon dialog.
Note:
If you are adding a new account for an existing application that is part of a credential sharing group, select Exclude from credential sharing group. If this is the first account you have created for this application, leave this check box unselected. See Accounts That Share Credentials for more information.
-
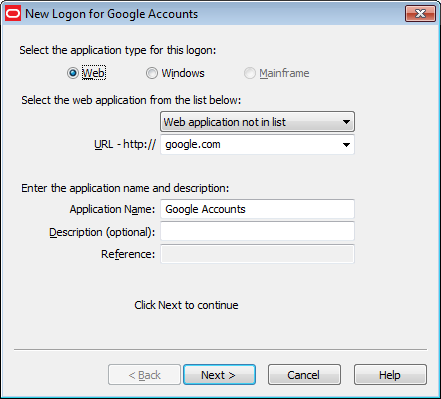
2.4.5 Adding an Account for an Unlisted Web Site
-
In the New Logon dialog, select the Web option. Select Web application not in list (the default option) from the drop-down list box. A text box for entering a Web address appears.
Note:
If the target Web site requires more than two fields for authentication, this procedure requires administrator resources. Contact your administrator for assistance. -
Enter the URL of the Web site for which you want to set up an account.
Do not include the URL protocol, such as http:// or https:// in the URL.
-
Enter the Application Name and (optionally) a Description.
-
Click Next. The New Logon dialog appears, prompting you to enter credentials.
-
Enter your Username/ID for the application, and then your Password. Retype your password in the Confirm Password field. (You can display the password by clicking Reveal.)
-
Do one of the following:
-
Click Finish. Logon Manager returns you to the My Accounts panel, which now lists the account you've just created.
or
-
If the setting is available and you so choose, select Add another set of credentials, to repeat the process. Then click Finish. Logon Manager adds the account to the My Accounts panel and re-displays the New Logon dialog.
-
2.4.6 Adding an Account for a Host/Mainframe Application
-
In the New Logon dialog, select the Mainframe option and select an application from the drop-down list box. Enter the target application in the Application Name field, and (optionally) a Description.
-
Click Next. The New Logon dialog appears, prompting you to enter credentials.
-
Enter your Username/ID for the application, and then your Password. Retype your password in the Confirm Password field. (You can display the password by clicking Reveal.)
-
Do one of the following:
-
Click Finish. Logon Manager returns you to the My Accounts panel, which now lists the account you've just created.
or
-
If the setting is available and you so choose, select Add another set of credentials, to repeat the process. Then click Finish. Logon Manager adds the account to the My Accounts panel and re-displays the New Logon dialog.
-
2.4.7 Setting Up Accounts Using Auto-Prompt
To use the Auto-Prompt feature, it must be activated on the Response tab of the Settings panel.
-
Open Logon Manager.
-
Click the Settings panel, and select the Response tab.
-
Make sure that the Auto-Prompt check box is selected. If not, select it, then click Submit.
Note:
The Auto-Prompt feature is enabled by default upon installing Logon Manager. Your administrator might enable or disable Auto-Prompt for all users.
When Auto-Prompt is enabled, Logon Manager automatically detects when you have encountered a password-protected application or Web site. If you already provided credentials for that application or Web site, Logon Manager automatically enters your credentials in the appropriate fields and logs you on.
Example for an account for which you have already provided credentials:
You launch Lotus Notes, an application for which you have already provided credentials. As soon as the program opens, Logon Manager recognizes this logon screen's request for credentials.
Logon Manager enters your password in the appropriate field and clicks the OK button, logging you on to Lotus Notes.
Example for an account for which you have not provided credentials:
By contrast, you launch an application or Web site for which you have not yet provided credentials.
When Logon Manager detects an application for which you have not previously stored credentials, it displays the New Logon dialog, prompting you to add account information for the application (unless your administrator has disabled the Auto-Prompt feature).
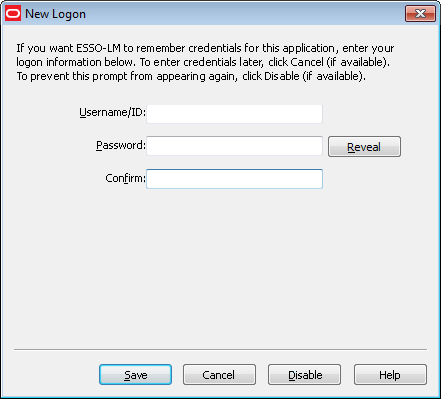
When presented with the New Logon dialog, do one of the following:
-
If you want to add an account for the application, fill in the displayed fields and click OK. Logon Manager stores the information and automatically logs you on to this application whenever you launch it.
-
If you want to defer adding an account for the application temporarily, click Cancel (if available). The next time you launch the application, Logon Manager prompts you to add an account.
-
If you want to disable the new logon prompt for the detected application permanently, click Disable (if available). Logon Manager no longer prompts you to add an account for the application and adds it to the disabled application list on the Exclusions tab of the Settings panel.
Note:
If you choose to disable the application, you can re-enable it by selecting Log On Using Logon Manager from the Logon Manager tray icon.If you decide in the future that you want Logon Manager to prompt you for your credentials automatically the next time you launch the application, remove the application from the Exclusions list.
2.4.7.1 Credential Sharing Groups
Your administrator can create groups of accounts that use the same credentials, referred to as credential sharing groups. For the first account being added from the credential sharing group, the New Logon dialog, with empty fields, appears so that the user can enter credentials. Users from the group who create subsequent accounts receive the New Logon dialog with fields that are empty and editable, or pre-populated and unavailable for editing, depending on your administrator's preferences.
If your administrator configures the credential sharing group so that members have the option to create an account outside the group, the New Logon dialog contains the setting, Exclude account from credential sharing groups. In that case, you have the ability to edit the shared credential fields with the information of your choice. Check Exclude account from credential sharing groups to make the shared fields available for editing.
2.4.8 Automatic Credential Capture
Your administrator might configure applications to capture your credentials transparently. When you launch such an application, Logon Manager waits for you to enter credentials and captures them as you enter them. Depending on your administrator's configuration, when you finish entering credentials in this mode, one of the following occurs:
-
Logon Manager captures your credentials without notifying you.
-
A balloon tip appears in the system tray menu, notifying you that the credentials are being captured. You will not be required to verify them afterward.
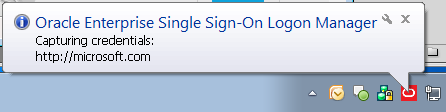
-
A balloon tip appears in the system tray menu, notifying you that the credentials are being captured, and then the New Logon dialog appears with fields already populated with your input. You can then verify that the information is correct, or edit it if necessary, and click Save.
If you previously added an application to the list on the Exclusions tab, or your administrator has excluded your user account from the application (see Exclusions Configured by the Administrator in the section, Managing Accounts, for more information), Logon Manager ignores the application. It does not capture any credentials that you add, and does not present the New Logon dialog or inform you that credentials have not been captured.
This feature is new as of version 11.1.1.5.0.
2.4.9 Modifying Accounts
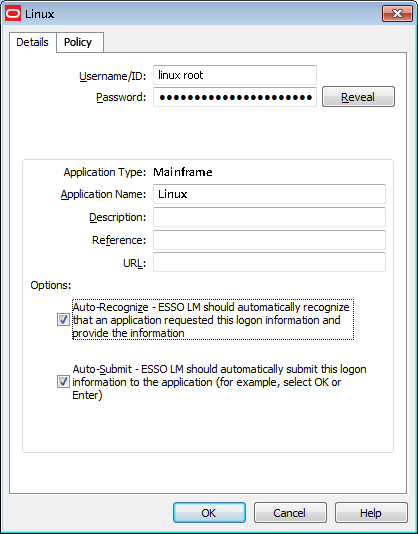
You can modify account information or automatic behavior for individual accounts by clicking the Modify icon in the My Accounts view, or by double-clicking the account. From this dialog, you can:
-
Change the Username/ID, Password or other fields that the account sends to the application.
-
Edit the application information. Edit Username/ID, Password, ApplicationName and Description.
-
Turn on or off the automatic response options for selected accounts.
-
Auto-Recognize. This setting specifies whether Logon Manager should automatically provide credentials when an application requests them.
When this feature is enabled, Logon Manager recognizes applications and Web sites and logs you on automatically.
When this feature is not enabled, you must manually request that Logon Manager respond to the logon request. You can do this from the system tray icon menu. Select Log On Using Logon Manager.
The Auto-Recognize check box can have three different states:
-
A blank checkmark means it is off for the selected application.
-
A checkmark means it is on for the selected application.
-
A green box means that the global setting defines the action for the selected application.
-
-
Auto-Submit. This setting specifies whether Logon Manager should automatically submit the credentials to the application. For example, select OK, Submit, or Enter to initiate the logon.
Note:
Depending on your system configuration, the Auto-Recognize and Auto-Submit options may or may not be available.To set Auto-Recognize globally for all applications, use the Auto-Recognize option in the Response tab of the Settings panel.
The setting in this dialog overrides the global Auto-Recognize setting.
2.4.9.1 Modifying an Account
-
Open Logon Manager.
-
On the My Accounts panel, select an account.
-
Highlight the account from the list, and either click the Modify icon or double-click the account. The modify dialog for the selected account appears.
Note:
If the account is displayed in gray text, this message appears when you click Modify: "Credential corresponds to an application that is not currently configured in Logon Manager." See Accounts Without Configured Credentials for more information. -
Modify the information as needed.
-
When you have completed your changes, click OK.
2.4.10 Special Logon Situations
After you have created accounts, and in the course of daily activities, there might be occasions when Logon Manager encounters an application for which it can respond in more than one way, or for which it needs additional information from you. When this happens, one of the following dialogs appears.
-
Action Chooser
-
Logon Chooser
-
Retry Logon
-
Logon Loop
2.4.10.1 Using the Action Chooser
When Logon Manager detects an application that displays its logon and password change fields in the same window, the Action Chooser dialog prompts you to choose whether you want to log on to the application or change your password for the application.
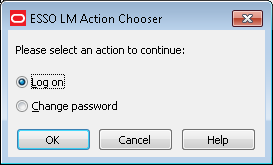
To choose the desired action:
-
Select the action.
-
Click OK.
2.4.10.2 Using the Logon Chooser
You might have two or more different credential sets for the same application. If so, you can set Logon Manager to recognize those accounts and prompt you to choose which one to log on with.
When you open the application or Web site, the Logon Chooser prompts you to select the account you want to use.
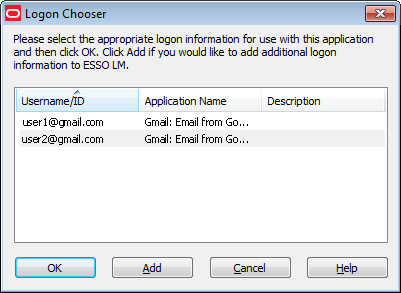
All columns can be sorted by clicking on the column name heading. Once a sort order is selected, the order is retained and the same column is sorted the next time this dialog appears.
Do one of the following:
-
Select the account you want to log on with and click OK.
-
Click Add to add another account for this application.
-
Click Cancel to close this dialog. Logon Manager will not log you on to the application.
2.4.10.3 Retry Logon Dialog
When you enable the Auto-Recognize function, Logon Manager automatically detects and responds to logon and password-change requests from applications and Web sites.
If you entered the wrong password when you set up the account, or perhaps changed the application's password from another workstation, Logon Manager will supply an incorrect password. When this happens, the application repeats the logon request and Logon Manager displays the Retry Logon dialog, prompting you to review the accuracy of your Username/ID, Password, and, if necessary, any additional logon fields.
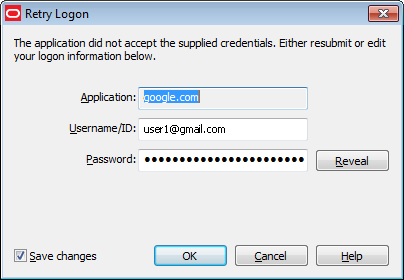
The Retry Logon dialog box appears if you entered the wrong password, or if the password was changed from another computer. This dialog prompts you to review the accuracy of your Username/ID, Password, and, if necessary, any additional logon fields.
Do one of the following:
-
Reveal the password you've entered by clicking Reveal.
-
Edit your account information as needed and click OK to try logging on again.
Note:
The Save Changes check box ensures that Logon Manager uses the same credentials the next time it logs you on to this application or Web site. Uncheck this option if you do not want the new credentials you entered to be saved for future use. -
Click Cancel to stop any further logon attempts for the application or Web site until you either restart or modify the account in Logon Manager.
2.4.10.4 Logon Loop
Some applications, such as Web mail services, display their logon page upon logout, which causes Logon Manager to recognize the logon form and automatically log you back on to the application. This creates an endless "logon loop," preventing you from logging out of the application. To prevent this loop from occurring, the administrator can choose to enable the logon grace period feature, which forbids Logon Manager from logging on to an application within a set time period since the last logon.
Your administrator may also configure Logon Manager to ask whether you want to log on to an application again when you log out. In either case, Logon Manager will not automatically log you on to the application until the grace period expires or until you close and reopen the application, whichever happens first.
If you are experiencing logon loops, contact your administrator about enabling the grace period feature.
2.4.11 Delegating Your Account Credentials to Another User
Delegating account credentials provide a means for one user to give another user temporary access to his application credentials. Situations where this typically happens would be if you are going to be out of the office for vacation, or you have recruited a colleague to help you meet a tight deadline. In instances such as these, you would need someone other than yourself to be able to access your applications and data on your behalf. Your administrator can configure applications so that you have the ability to assign and receive access to another user's accounts within Logon Manager, using the Delegated Credentials feature.
2.4.11.1 Delegated Credentials in Logon Manager
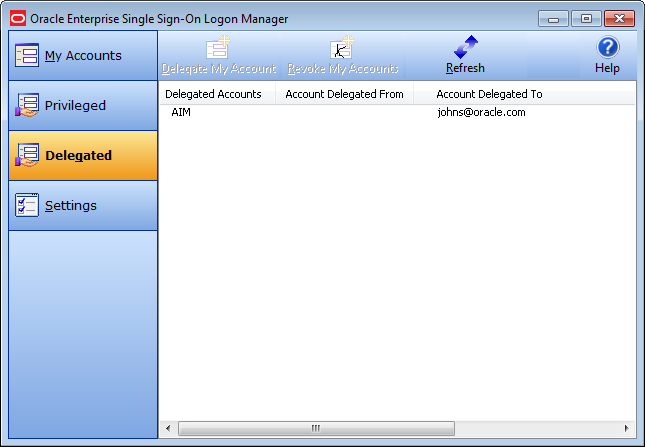
When your configuration includes the ability to delegate and receive credentials, you will see a Delegated option in the left pane of Logon Manager.
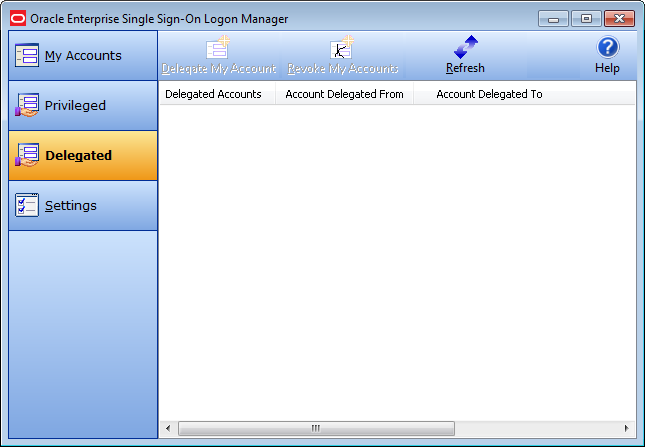
The Delegated settings allow you to view and manage incoming and outgoing delegated accounts. If an account has been delegated to you, the Account Delegated From column lists the delegator. If you have delegated an account to another user, the Account Delegated To column lists the delegatee.
Use the icons across the top of the Delegated Accounts menu to delegate and revoke credentials.
| Icon | Label | Purpose |
|---|---|---|
| Delegate My Account | Initiates the account delegation process. You will be prompted to designate another user to receive your account credentials and specify the conditions for the account access.
After you delegate an account, it appears in the Delegated Accounts column. |
|
| Revoke My Account | Allows you to discontinue another user's access to your accounts. This icon is only enabled if the selected account was delegated. | |
| Refresh | Synchronizes delegated account changes with the repository. Synchronization occurs automatically when the delegator initiates or revokes a delegation. |
2.4.11.2 Delegating an Account to Another User
To delegate an account:
-
In the Delegated view of Logon Manager, select the account that you want to delegate.
-
Click the Delegate My Account icon.
-
Enter your password at the prompt.
-
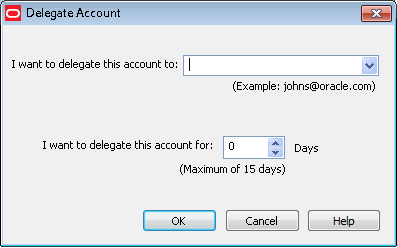
In the dialog that appears, specify the delegatee and configure a delegation policy.
-
To specify the delegatee:
-
Enter the delegatee's username (typically the user's email address).
or
-
Select a user from the user history dropdown list (a list of users to whom you have delegated credentials in the past).

-
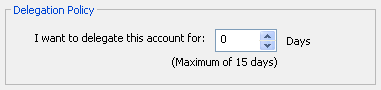
-
To configure the policy, set the number of days that the delegatee can use this account. The maximum number of days appearing below this setting reflects what the administrator has set in the template policy.
-
-
Click OK.
The account is delegated and the server receives an instruction to delegate the credential. After you complete the delegation process, the account appears on the Delegated tab in your Delegated Accounts list.
2.4.11.3 Receiving a Delegated Account from Another User
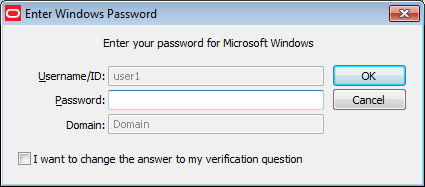
When another user delegates an account to you, you will be prompted to enter your Windows password.
After you authenticate, a prompt appears, asking you whether you accept the delegation.

When you confirm your acceptance, the delegated account appears in the My Accounts tab of Logon Manager, with a special icon indicating that it is delegated to you.
The account also appears in the Delegated Accounts column of the Delegated tab, with the name of the user who has delegated the account to you.
2.4.11.4 Viewing Delegated Account Properties
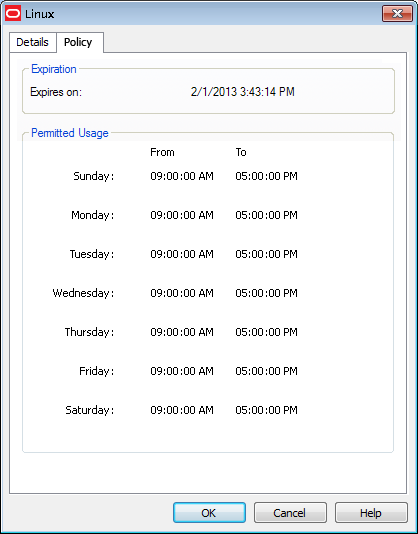
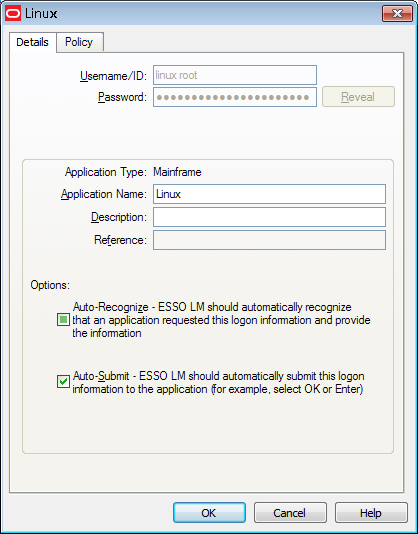
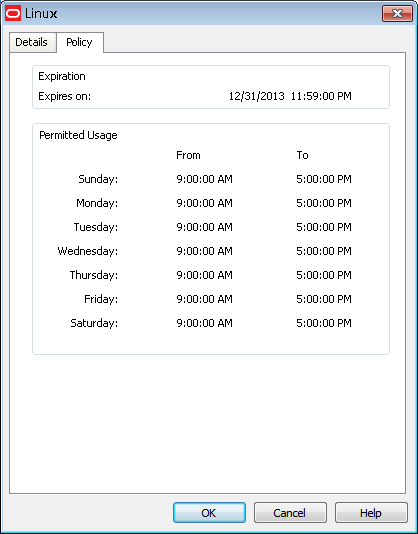
To view the properties of an account that has been delegated to you, select the account in Logon Manager, and select the Modify icon. The account's Properties window appears. The Details tabs lists general information about the account that you typically see in this dialog. Additionally, there is a Policy tab for a delegated account.
Select the Policy tab to view the delegation policy's properties: the date and time that the delegation expires, and the days and hours during which you can use the account.
2.4.11.5 Updating Delegated Credentials
You can change the policy of a delegated account by repeating the original delegation process. In order to apply a policy update to an existing delegatee, you must revoke the account and redelegate it.
2.4.11.6 Revoking Delegated Credentials
To revoke credentials prior to the expiration date and time set in the policy:
-
On the Delegated tab, select the account whose credential you want to revoke.
-
Click the Revoke My Account icon.
-
Enter your password in the authentication dialog.
-
When prompted with the Confirm Revoke dialog, click Yes.
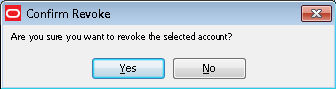
The delegatee's name no longer appears next to that account in the Delegated tab.
If you are the delegatee, when the delegator revokes the account, you will receive a prompt to authenticate. After you enter your credentials, the account no longer appears in your list of delegated accounts.
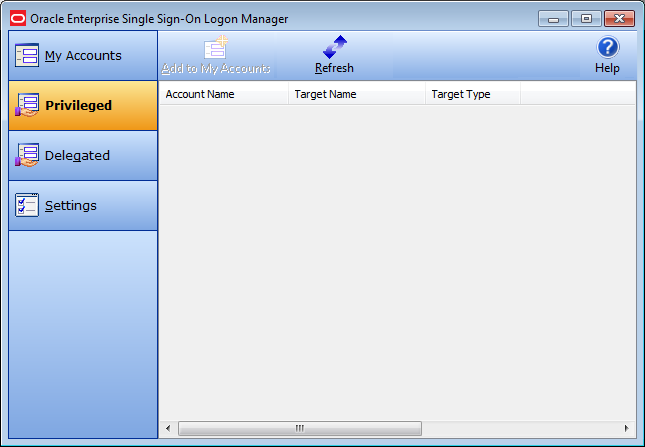
2.4.12 Working with Privileged Accounts
Privileged accounts apply to users responsible for key Information Technology resources, such as servers and databases. When you have been assigned the use of a privileged account, that account appears in the Privileged tab of Logon Manager.
In order for you to use a privileged account, an administrator of the account must have authorized your access to the account, the account must be available for checkout, and the checkout must be within the timeframe during which you are authorized to do so.
2.4.12.1 Displaying and Using Privileged Accounts
To display your privileged accounts:
-
Open Logon Manager and select the Privileged tab.
-
Click Refresh and fill in the fields in the Authentication dialog that appears. When the screen refreshes, you will see a list of all available privileged accounts assigned to you.
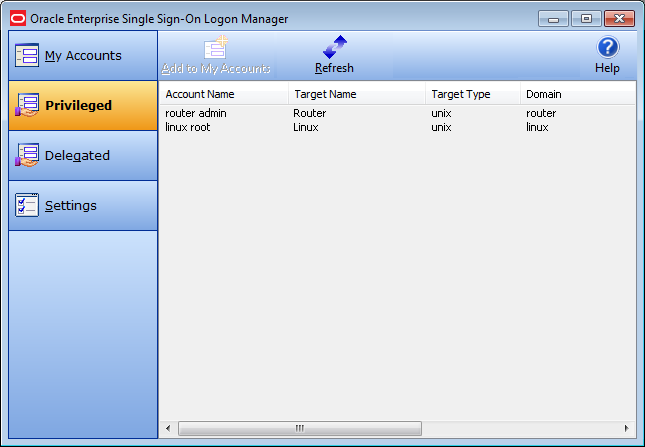
-
From the list, select the privileged account you want to work with, and click Add to My Accounts. You will be prompted to reauthenticate. After a moment, a popup message informs you that the account is available for use.
It now appears in the My Accounts window with a special icon indicating its status.
Note:
If you have previously checked out this account and the checkout is still in effect, you will receive a message that the account is already checked out when you attempt to check it out again. -
Proceed to log on to the account. Depending on how your administrator has configured the account, you might be required to provide your Windows password before Logon Manager authenticates you.
After you have checked out the account and for the duration of your permission to access it, you can work with it as you would any other account in Logon Manager.
2.4.12.2 If an Account Is Unavailable
If you attempt to check out an account that is unavailable for any reason, you will receive a popup message informing you of the reason why you cannot check out the account. The account might not be available for one of the following reasons:
-
Your attempt occurs outside of the policy's schedule. Review the account's properties to verify that you are working within the permitted schedule.
-
The Provisioning Gateway server might be unavailable. Contact your administrator for help.
-
An unspecified system error has occurred. Contact your administrator for help.
2.4.12.3 Viewing Privileged Account Properties
To view the properties of a privileged account, select the account in Logon Manager, and select the Modify icon. The account's Properties window appears. The Details tabs lists general information about the account that you typically see in this dialog. Additionally, there is a Policy tab for a provisioned account.
Select the Policy tab to view the privileged account's policy properties: the date and time that the account expires, and the days and hours during which you can use the account.
2.4.12.4 Checking In a Privileged Account
Privileged accounts can be checked in manually in Logon Manager, due to expiration as per the account policy settings, or outside of Logon Manager, by you or the policy administrator.
To check in a privileged account in Logon Manager:
-
Click the My Accounts tab in Logon Manager.
-
Select the privileged account you want to check in.
-
Click the Delete icon, and confirm the deletion when prompted.
2.5 Settings
The Settings panel in the Logon Manager lets you control Logon Manager configuration options.
Note:
Throughout the settings tabs, the Apply and Cancel buttons are unavailable until you make a change. After a change is made, you can implement the changes by clicking Apply, or discard the changes by clicking Cancel.Changes made on the settings tabs take effect after you click Apply.
To view or modify Logon Manager settings:
-
Open Logon Manager.
-
Click the Settings panel.
-
The following tabs are available:
-
Response
-
Authentication
-
Display
-
Exclusions
-
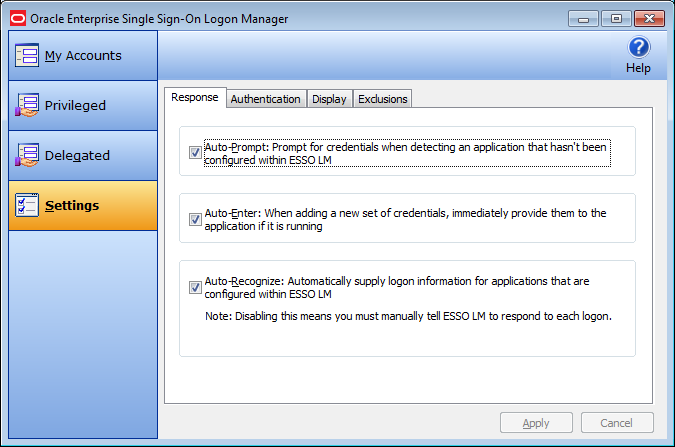
2.5.1 Response Tab Settings
The Response tab lets you control Logon Manager account features.
Note:
Your administrator may enable, disable or override any of the settings described below.2.5.1.1 Auto-Prompt
The Auto-Prompt setting specifies whether Logon Manager should prompt for credentials when it detects a credential request from an application that does not have an account set up in Logon Manager.
See Setting Up Accounts Using Auto-Prompt for more information.
2.5.1.2 Auto-Enter
The Auto-Enter setting specifies whether Logon Manager should attempt to provide credentials to an application immediately after you create the account.
When this feature is enabled, Logon Manager immediately logs on to an application or Web site once you have set up an account for that application or Web site.
2.5.1.3 Auto-Recognize
The Auto-Recognize setting specifies whether Logon Manager should automatically provide credentials when an application requests them.
When this feature is enabled, Logon Manager recognizes applications and Web sites and logs you on automatically.
When this feature is not enabled, you must manually request Logon Manager to respond to the logon request. You can do this from the system tray icon menu. Select Log On Using Logon Manager.
2.5.1.4 Viewing or Modifying Response Settings
-
Open Logon Manager.
-
On the Settings panel, click the Response tab.
-
When you have completed your changes, do one of the following:
-
Click Apply to confirm your changes (without closing Logon Manager), then select another settings tab.
or
-
Click Cancel to discard your changes.
-
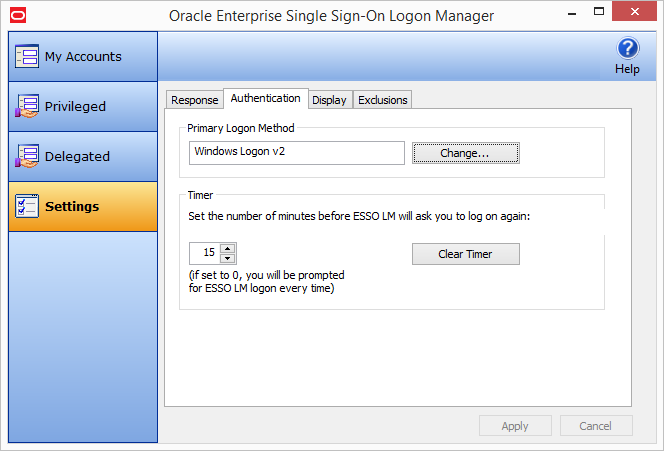
2.5.2 Authentication Tab Settings
The Authentication tab lets you control Logon Manager authentication features.
Note:
Your administrator may enable, disable or override any of the settings described below.2.5.2.1 Primary Logon Method
You can authenticate to Logon Manager through various logon methods. The Primary Logon Method is the authentication method you select to use. You can have multiple installed authenticators but can only have one Primary Logon Method.
This setting gives you the ability to choose which logon method will be the primary authentication mechanism.
To change your logon method, click Change. The Primary Logon Setup Wizard displays.
See Changing Your Primary Logon Method for more information.
2.5.2.2 Timer
Logon Manager can prompt you to authenticate at a specified time interval. You can determine the length of time before authenticating again.
Use the up and down arrows to enter a time limit (between 0 and 999 minutes); after this interval, Logon Manager asks for your password before performing any credential-related task.
If the timer setting is set to zero, Logon Manager asks for your password before every credential-related task.
The Clear Timer button forces you to enter your password upon your next credential-related task, without waiting for the expiration time.
2.5.2.3 Viewing or Modifying Authentication Settings
-
Open Logon Manager.
-
On the Settings panel, click the Authentication tab.
-
When you have completed your changes, do one of the following:
-
Click Apply to confirm your changes (without closing Logon Manager), then select another settings tab.
or
-
Click Cancel to discard your changes.
-
2.5.3 Display Tab Settings
The Display tab of the Settings panel lets you control Logon Manager display options.
Note:
Your administrator may enable, disable or override any of the settings described below.2.5.3.1 Title Bar Button and Dropdown Menu
When checked, the Title Bar Button setting activates a Logon Manager icon in the upper-right corner of all window title bars.
When double-clicked, this button tells Logon Manager to attempt to log on to the application (same functionality as the Log On Using option in the System Tray Icon menu).
You also have the option to display a dropdown menu when you click the Logon Manager Title Bar Button.
These two settings can be enabled via the checkboxes labeled Display the Logon Manager button on all window title bars, and Provide a dropdown menu from title bar button.
2.5.3.2 Language
Logon Manager can run in many different languages, depending on which version you are running, and which language packs are installed.
You can view the languages that are available in the Language dropdown.
Choose the desired language for Logon Manager. All Logon Manager dialogs and help screens will display in the selected language.
2.5.3.3 Viewing or Modifying Display Settings
-
Open Logon Manager.
-
On the Settings panel, click the Display tab.
-
When you have completed your changes, do one of the following:
-
Click Apply to confirm your changes (without closing Logon Manager), then select another settings tab.
or
-
Click Cancel to discard your changes.
-
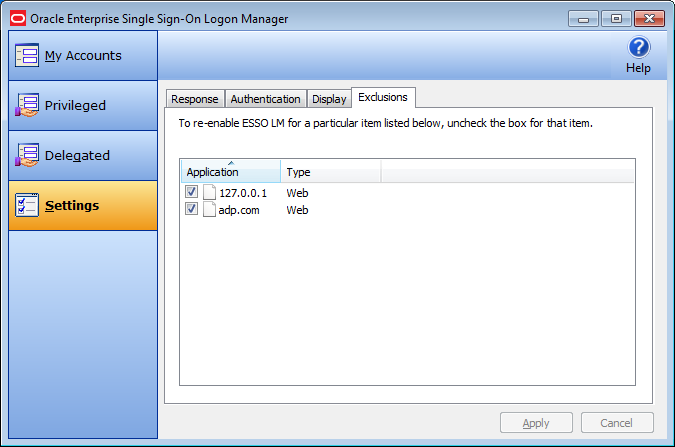
2.5.4 Exclusions Tab Settings
The Exclusions tab lets you review and restore Auto-Prompt capability for application logons that you have previously told Logon Manager to ignore.
Note:
Your administrator may enable, disable, or override any of the settings described below.When you launch a password-protected application for which you do not have a Logon Manager account, Logon Manager recognizes it. If your administrator has configured your system to use automatic credential capture, Logon Manager captures your credentials as you enter them. If automatic credential capture is disabled, Logon Manager asks you if you want to create a new account. You have the following options:
-
Enter credentials for the account and click Save.
-
Choose to dismiss the logon dialog for now, and click Cancel.
-
Permanently dismiss the logon dialog and click Disable. This selection adds the application to the Exclusions list.
If at a later time you decide to add an account for an application that you have previously excluded, you can remove the application from the Exclusions list by clearing its checkbox, thereby allowing Logon Manager to prompt you to create an account the next time you launch the application.
See Setting Up Accounts Using Auto-Prompt and Automatic Credential Capture for more information about these features.
2.5.4.1 Restoring Auto-Prompt for an Excluded Application
-
Open Logon Manager.
-
On the Settings panel, click the Exclusions tab.
-
This panel contains the list of applications that Logon Manager is currently set to ignore.
-
Click to clear the check boxes of the applications for which you want Auto-Prompt restored, then click Apply, or click Cancel to discard your changes.
When you refresh the window, the items you deselected are no longer in the Exclusion list. The next time you launch the password-protected application that you cleared, Logon Manager asks you if you want to create an account.
2.6 Managing Passwords
This section describes how to manage and change passwords within Logon Manager and target applications.
Most applications allow you to change your password at any time while others require you to change passwords periodically, such as every 30 days. You can use Logon Manager to apply and keep track of these changes.
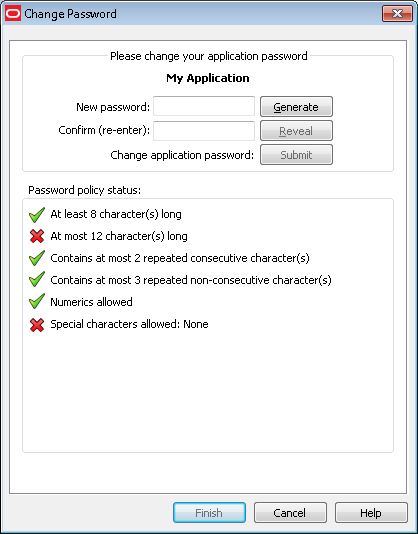
2.6.1 Changing Your Application Password
Logon Manager's automated password change functionality increases security by eliminating the potential for poor password selection and poor password management. It also increases usability by saving you the trouble of creating, changing, and remembering passwords.
Logon Manager detects when an application requests a password change. Depending on your configuration, Logon Manager either:
-
Automatically generates a new password that conforms to a password policy (the rules that govern what a valid password can be) that your administrator sets.
-
Presents the Change Password dialog, which provides you with the option to automatically generate a password or choose your new password.
You may change your password manually or you may be requested to change your password in response to a system-generated prompt. In both scenarios, the following steps apply (with one exception, as explained in step 1).
-
When an application requests a password change, Logon Manager prompts with the Change Password dialog (unless the administrator has configured Logon Manager to perform the change automatically).
Note:
If the application displays its logon and password change fields in the same window, the Action Chooser prompts you to choose whether you want to log on or change your password when you launch the application. Logon Manager displays the appropriate screen based on your choice. -
To change the password, do one of the following:
-
Manually enter a password by typing in and confirming the password.
Note:
As you enter the new password, the Password policy status changes. Your new password must comply with each of these rules in order to be valid. As you type your password, the rules it complies with are automatically checked. When all of the rules are checked, your password is valid. The Submit button becomes active after all password policies have been met.The "Special Characters Allowed" policy indicates the specific special characters that are allowed to be used in a password. If any special characters are not allowed, this policy states: "Special characters allowed: None."
-
Click the Generate button to have Logon Manager automatically generate the password.
-
To view the password, click Reveal.
-
Click Submit.
-
If the application accepts the password change, a message appears indicating that the password has been accepted. Click OK and Logon Manager saves the password.
If the application rejects the password, a message appears advising you of such. You can either try a different password and resubmit, or click the Cancel button.
Note:
If the password has met the password policy set up by the administrator, but has been rejected by the application, contact your system administrator.
-
2.7 Using Kiosk Manager
Depending on your work environment, your Agent configuration might include Kiosk Manager. Kiosk Manager delivers a secure, easy to use, and easy to administer solution that addresses the needs of traditional single sign-on in a kiosk environment. The Kiosk Manager has a client-side Agent that suspends or closes inactive sessions and shuts down all applications seamlessly.
Only an administrator can close Kiosk Manager.
Note:
In order for you to log on to your own session, your administrator must set up a synchronization for you. If this is your first time using Logon Manager, when you log onto Kiosk Manager, the Logon Manager Setup Wizard (FTU) appears. Follow the prompts (click Help if you need assistance). Select the appropriate authentication method for the Primary Logon Method.2.7.1 Desktop Manager
The Desktop Manager is a logon dialog that manages Kiosk Manager sessions. End users can start and unlock sessions, and administrators can terminate sessions, shut down, restart, and exit Kiosk Manager.
The Desktop Manager contains the following information and choices:

2.7.1.1 Administration Menu
Click the Administration menu on the top of the Desktop Manager. These menu options might or might not be available, depending on your system configuration.
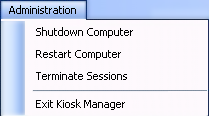
| Command | Function |
|---|---|
| Shutdown Computer | This option shuts down the kiosk. A confirmation window may appear asking if you are sure you want to shut down this computer. An Authenticate as Administrator dialog may appear prompting you to enter administrative credentials before performing this action. |
| Restart Computer | This option restarts the kiosk. A confirmation window may appear asking if you are sure you want to restart this computer. An Authenticate as Administrator dialog may appear prompting you to enter administrative credentials before performing this action. |
| Terminate Sessions | This option allows administrators to terminate open sessions. The Terminate Sessions Authentication dialog appears prompting the administrator to enter credentials before performing this action. |
| Exit Kiosk Manager | This option allows administrators to exit Kiosk Manager. The Authenticate as Administrator dialog appears prompting you to enter administrative credentials before performing this action. |
| Reset Password | Depending on your system's configuration, this option may appear. This option initiates the Password Reset Web application, which allows you to reset your password. See Reset Password below. |
2.7.1.2 Session Logon
The Desktop Manager provides a list that displays all open sessions. If your name does not appear in the list, enter your name to start a new session. After a session is initiated, the Connect to Server dialog appears, prompting you for your password. Enter your password and click OK.
| Session Option | Function |
|---|---|
| Log On text field | If your name does not appear in the Open Sessions list, enter your user name in this field and click Log On. A new session will be created for you. This field is editable. |
| Log On button | Click this button after entering a user name in the field. Double-clicking a user name from the Open Sessions list automatically initiates this function. |
| Cancel button | This button is available to terminate a logon in process. This button is enabled after a logon has been initiated. |
| Open Sessions list | The Open Sessions list contains names of all users that have open sessions on this workstation. Clicking once in the list moves the username to the logon field. Clicking twice attempts to open the session. |
2.7.1.3 Resetting a Password
Depending on your system's configuration, a password reset banner might appear at the top of the Desktop Manager.
Clicking this banner launches the Password Reset Web interface. Enter your User Name, click OK and follow the prompts to reset your password.
2.7.1.4 Terminating Sessions
To terminate a session:
-
From the Desktop Manager Administration menu, click Terminate Sessions.
-
In the Authenticate as Administrator dialog, enter administrative credentials.
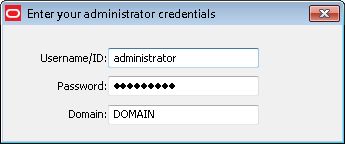
-
Enter your Username/ID, Password, and Domain. Click OK.
The Terminate Sessions dialog prompts you to select a session to terminate.
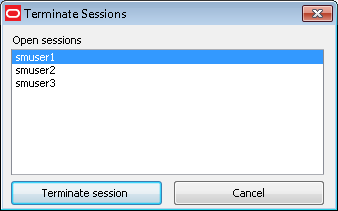
-
Select a session from the Open Sessions list box and click Terminate session. You can select only one session at a time. The session will be removed from the Open sessions list.
-
Click Cancel to close this dialog.
2.7.2 Session Owner Window
The Session owner window might display in the upper right corner of your desktop during a session, depending on your system's configuration.
You can view the session owner or lock your session from this window.

2.7.3 Locking and Unlocking Sessions
Do one of the following to lock a session:
-
Click the Lock Session button on the Desktop Status window.
-
Select the Kiosk Manager tray icon menu and click Lock Session.
-
When configured with smart card, proximity card, or other presence-sensing authenticator, remove the card. Kiosk Manager automatically locks a session if the strong authenticator is no longer present (either removed from the reader or is out of range).
-
Allow the screen saver to launch. Kiosk Manager locks the session when the kiosk screen saver would normally start.
-
Shut down Logon Manager.
-
Perform any activity that would normally lock the desktop. This will cause Kiosk Manager to lock the session.
-
Click Ctrl + Alt + Delete.
It is important to note that if a user locks a session or leaves the kiosk while an application has a dialog open, (such as the "Save As" dialog) and Kiosk Manager is unable to dismiss that dialog, the application may be terminated. It is strongly recommended that users save data before locking a session or leaving the kiosk.
Do one of the following to unlock a session:
-
When configured with smart card, proximity card, or other presence-sensing authenticator, Kiosk Manager automatically initiates a session when a strong authenticator is detected (either inserted into reader or is in range).
-
The current session can be unlocked from the Desktop Manager by selecting your name and re-entering your credentials.