56.5 Configuring Access Manager for RSA SecurID Authentication
Users with valid Oracle Access Management Administrator credentials can enable RSA SecurID authentication.
Prerequisites
See Installation and Configuration Requirements for installation and configuration that is outside the scope of this manual) and which must be completed before you begin SecurID integration with Access Manager.
See Also:
-
Developing Custom Pages in Oracle Fusion Middleware Developer's Guide for Oracle Access Management
To set up SecurID Authentication with Access Manager
-
In your oam-config.xml, set the OAM SecurID Sever serverRequestCacheType parameter to BASIC, as follows:
-
Stop all WebLogic servers (OAM Servers and AdminServer).
-
Locate oam-config.xml in the following path:
$DOMAIN_HOME/config/fmwconfig/oam-config.xml -
Change the
serverRequestCacheTypefromCOOKIE(default) toBASIC, as follows:<Setting Name="serverRequestCacheType" Type="xsd:string">BASIC</Setting>
-
Start all WebLogic Servers (OAM Servers and AdminServer).
-
-
Register a Web agent from the RSA Console that will be used by Access Manager, then copy the agent configuration file (sdconf.rec) as follows:
$DOMAIN_HOME/config/fmwconfig/servers/$SERVER_NAME/oam/sdconf.rec
-
Using the Oracle Access Management Console, create a custom authentication module for RSA, as follows:
-
Click Application Security at the top of the window.
-
Select Create Custom Authentication Module from the Create (+) drop-down menu in the Plug-ins section.
-
Select the General tab and enter the following:
Name: RSA_AUTH -
Select the Steps tab and enter a name for the Step, then choose the RSA SecurID Plugin
Step Name: stepRSA
Plugin Name: RSA SecurID Plugin
OK
-
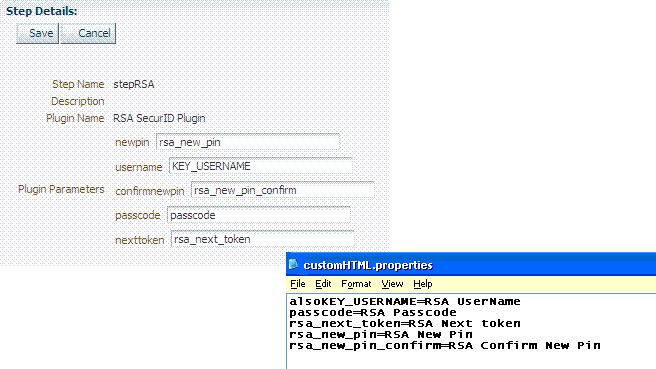
In the stepRSA, Step Details tab, enter and Save the Step Details shown in the next screen, which should also appear in your customhtml.properties file:
-
Steps tab: Add the User Identification Plugin: Enter a name for the Step, then choose the RSA SecurID Plugin:
Step Name: rsa_useridentification Plugin Name: UserIdentificationPlugin OK -
rsa_useridentification, Step Details: Enter and Save the following details for your environment:
KEY_LDAP_FILTER: (uid={KEY_USERNAME})
KEY_IDENTITY_STORE_REF: The registered Default Store.
KEY_SEARCH_BASE_URL: dc=us,dc=example,dc=com
-
-
Orchestrate the steps as follows: stepRSA should be first (to authenticate the user with the RSA Server); designate your User Identification Plugin for the success step.
Initial Step: stepRSA

Name: StepRSA
On Success: rsa_useridentification
On Failure: failure
On Error: failure
Apply
Name: rsa_useridentification On Success: Success On Failure: failure On Error: failure ApplyNote:
The On Failure and On Error fields must both be set to failure.
-
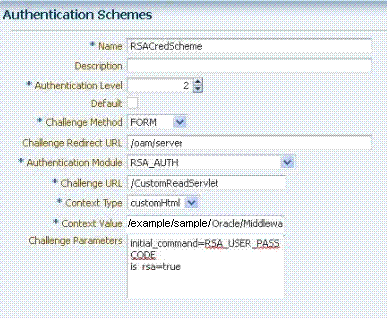
Create a new authentication scheme (RSACredScheme, for example) that uses the custom authentication module that you just created for RSA with a custom HTML login form. Sample values are shown in the following screen:
Note:
The authentication scheme's Context Value specifies the path to your custom HTML login form. Your custom HTML properties file must share the same name as the form (with a .properties extension) in the same directory path. This example uses customhtml.html and customhtml.properties.
Challenge parameters specify the initial RSA command for authentication (RSA_USER_PASSCODE). The
is_rsa=trueparameter and value must be specified for RSA. -
Use this scheme in the Application Domain protecting resources requiring SecurID authentication.
-
Ensure that your custom HTML file is present in:
$DOMAIN_HOME/config/fmwconfig/customhtml.html
The Custom HTML for RSA Login Form requires form action set to
/oam/server/auth_cred_submit, as follows:<form id="loginData" action="/oam/server/auth_cred_submit" method="post" name="loginData"> <div id="oam_credentials" class="input-row"> <span class="ctrl"></span> </div> div class="button-row"> <span class="ctrl"> <input id="login_button" type="submit" value="Login" class="formButton" onclick="this.disabled=true;document.body.style.cursor = 'wait'; this.className='formButton-disabled';form.submit();return false;"/> </span> </div> <div id="oam_error_messages"></div> </form> -
Ensure that your
customHTML.propertiesfile is:-
Named as your custom HTML file with a .
propertiesextension -
Stored in the same path as your custom HTML file
-
Confirmed; settings match the RSA SecurID plugin configuration parameters. For example:
username=Username password=Password passcode=Mother's maiden name rsa_new_pin=RSA New Pin rsa_new_pin_confirm=RSA Confirm New Pin Pin=RSA Pin rsa_sysgen_pin=RSA Create New Pin rsa_sysgen_pin_confirm=RSA System Generated Pin error1=Username not specified -
-
Restart OAM Servers.
-
Test your configuration by accessing the appropriate protected resource and validating the various modes.
-
See "RSA SecurID Issues and Logs" for details if you experience problems.

