22.7 Orchestrating Multi-Step Authentication with Plug-in Based Modules
Context data can also be used to set cookies or headers in the user's login page.
Note:
Oracle strongly recommends using authentication plug-ins to create custom authentication modules.
This section provides the following topics:
-
Access Manager Plug-ins for Multi-Step Authentication Modules
-
Pre-populated Plug-ins for Configuring Access Manager with Multi-Step Authentication
-
Example: Leveraging SubjectAltName Extension Data and Integrating with Multiple OCSP Endpoints
-
Creating a Custom Authentication Module using Bundled Plug-ins
-
Steps and Plug-ins in Customized Step-up Authentication Module
See Also:
Oracle Fusion Middleware Developer's Guide for Oracle Access Management if you want to create custom authentication plug-ins.
22.7.1 Simple Form Versus Multi-Factor (Multi-Step) Authentication
Simple form-based authentication is the default and does not require additional configuration unless you want to customize forms. Authentication plug-ins provide processing that meets your specific multi-step authentication needs.
Simple form-based authentication relies on the default embedded or optional detached credential collector and Web forms that process user logins with Access Manager authentication mechanisms. With simple form-based authentication:
-
All credentials are supplied in one simple form.
-
Upon credential validation and authentication, either success or failure status is returned.
-
Authentication can be retried upon failure.
See Also:
Developing Custom Pages for details about customizing login pages and forms
For dynamic, multi-step authentication, Access Manager provides a number of plug-ins with which you can design and orchestrate your own customized authentication modules. Both the ECC and DCC handle complex multi-factor (multi-step, iterative, and variable) Authentication processing, where:
-
Not all required credentials are supplied at once
-
Depending on the authentication status, PENDING state, expected credentials and context data are returned, expecting those credentials to be supplied in the next round
-
Each intermediate step, submit required credentials and context data for the authentication engine, until a success or failure status is returned.
-
The Authentication plug-in can have multiple steps configured.
Note:
Administrators can install multiple user identity stores for Access Manager. Each identity store can rely on a different LDAP provider. Each authentication plug-in can be configured to use a different user identity store.
Table 22-10 provides more information about these two forms of authentication.
Table 22-10 Simple Form versus Multi-Step Authentication
| Authentication Method | Description |
|---|---|
|
Simple form-based authentication |
Simple form-based authentication relies on Credential Collectors (both ECC and DCC) and Web forms that process user logins using Access Manager authentication mechanisms. This is the default and does not require additional configuration unless you want to customize forms. See Also: Developing Custom Pages for details about customizing login pages and forms |
|
Multi-Step Authentication |
Multi-step authentication requires a custom authentication module composed of two or more authentication plug-ins that transmit information to the backend authentication scheme several times during the login process. All information collected by the plug-in and saved in the context will be available to the plug-in through the authentication process. Context data can also be used to set cookies or headers in the user's login page. Multi-Step authentication relies on:
See Also: Configuring 11g WebGate and Authentication Policy for DCC "Steps and Plug-ins in Customized Step-up Authentication Module" Developing Custom Authentication Plug-ins for details about custom authentication plug-ins |
22.7.2 Access Manager Plug-ins for Multi-Step Authentication Modules
You can create custom plug-in based authentication modules using existing Access Manager. You can also create your own plug-ins, as described in the Oracle Fusion Middleware Developer's Guide for Oracle Access Management.
Note:
Standard (native) Authentication Modules are targeted for deprecation; future enhancements will not be available in the standard modules. Oracle strongly recommends using plug-in based modules as described in "Orchestrating Multi-Step Authentication with Plug-in Based Modules".
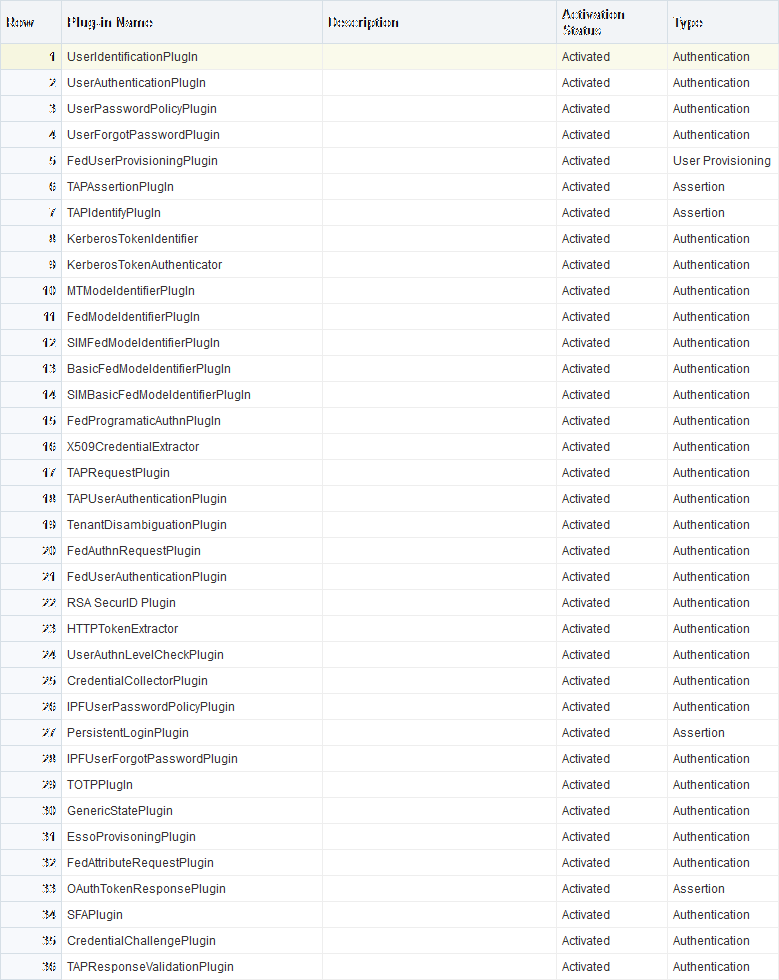
Figure 22-8 shows plug-ins available out of the box. These plug-ins, and any that you create using the SDK and import, appear in a list when you add steps to build a custom authentication module.
Figure 22-8 Access Manager Plug-ins for Customized Authentication Modules
Description of "Figure 22-8 Access Manager Plug-ins for Customized Authentication Modules"
The Name generally defines the component that relies on the plug-in. The Description is optional. The Type column indicates the purpose of the plug-in. Activation Status lets you know if this is active and ready to use.
See Also:
Oracle Fusion Middleware Developer's Guide for Oracle Access Management for details about building your own custom plug-ins. You can import new plug-ins, distribute, activate, deactivate, and remove custom plug-ins.
Whether you use an Oracle-provided plug-in or create one of your own, adding a plug-in when you create a custom authentication module is the same. Each custom module requires the following types of information:
-
General identifies the unique name and optional description for the individual plug-in.
-
Steps identify the specific plug-ins to use, and their execution order, based on the configuration details of each plug-in (including the user identity store to use).
-
Step Orchestration specifies the action to be taken on success or on failure or on error.
Note:
When multi-factor authentication is used, the UserIdentificationPlugin should be invoked in the last pass during the authentication process.
Figure 22-9 shows the Custom Authentication Module within the Access Manager section of the System Configuration tree. Each module has three configuration tabs.
Figure 22-9 Creating Custom Authentication Modules: General

Description of "Figure 22-9 Creating Custom Authentication Modules: General "
Table 22-11 describes the content of the General tab.
Table 22-11 General tab
| Element | Description |
|---|---|
|
Name |
A unique name up to 60 characters. |
|
Description |
Optional; up to 250 characters. |
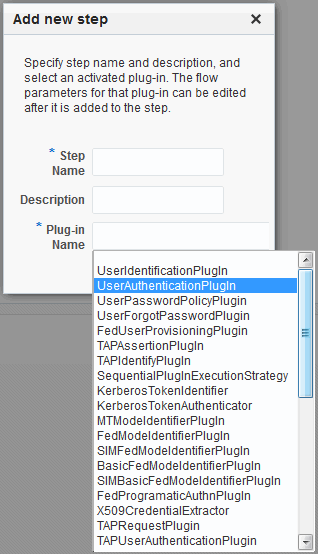
Clicking the Steps tab opens a fresh page where you can add a new step. When you add a new Step, the following dialog box appears. Information that you enter is used to populate the table and Details sections of the page.
Figure 22-10 Adding a Step and Associating a Plug-in
Description of "Figure 22-10 Adding a Step and Associating a Plug-in"
Table 22-12 describes the information required when adding a new step. Each step requires a plug-in and each plug-in requires specific details for proper operation.
Table 22-12 Add New Step Entries, Steps Results Table, and Details Section
| Element | Description |
|---|---|
|
Step Name |
The unique name you enter to identify this step, up to 60 characters. |
|
Description |
The optional description for this step, as entered when adding the step (up to 250 characters). |
|
Plugin Name |
The plug-in that you select for a particular step from the list of imported and activated plug-ins. See Also: Oracle Fusion Middleware Developer's Guide for Oracle Access Management for details about creating custom plug-ins. |
|
Step Details |
Plug-in configuration details must be specified to ensure proper operation. Details might differ depending the chosen plug-in and its requirements. See Also: Table 22-13. |
Table 22-13 describes the Plug-in Parameter Details required by Oracle-provided plug-ins. Absent from this table are the plug-in exceptions (those plug-ins with no initial parameters): KerberosTokenIdentifier, FedAuthnRequestPlugin, and FedUserAuthenticationPlugin.
Table 22-13 Parameter Details for Various Plug-ins
| Plug-in Parameter | Display Name | Description |
|---|---|---|
|
KEY_IDENTITY_STORE_REF |
Identity Store Name |
Most plug-ins require this attribute to ensure that the appropriate user identity store is called during authentication. The following plug-in uses only this property:
For additional Details required by plug-ins that employ this property, see:
|
|
CredentialCollectorPlugIn |
CredentialCollectorPlugIn |
This plugin allows the administrator to configure which credentials will be collected for authentication. Credentials to be collected are configured as step parameters. The plugin validates these parameters and renders the UI to collect the credentials. After user input, the plugin parses the credential parameters and builds the user context with credential objects. NOTE: Plugin error responses are set to the context if the credentials are invalid and the plugin returns failure. The plugin supports the collection of 4 credentials as step level parameters.
The following example illustrates how to collect a username and password.
CRED_PARAM_1=
{ID=KEY_USERNAME},{DISPLAY_NAME=KEY_USERNAME},{TYPE=text}
{ID=KEY_PASSWORD},{DISPLAY_NAME=KEY_PASSWORD},{TYPE=password}
Where ID, DISPLAY_NAME and TYPE are constants. |
|
Actiontype |
Action Type |
Indicates if the plugin wants to REDIRECT or FORWARD to the login page to collect credentials. |
|
loginPageURL |
Login Page URL |
The URL to which the user will be forwarded or redirected for credential collection. |
|
NO_OF_CREDENTIALS |
The number of credentials provided for the plugin instance. If the number of instances is more than 4, the user must update the oam-config file to add additional CRED_PARAMS as plugin parameters. |
|
|
UserIdentificationPlugIn |
UserIdentificationPlugIn |
This native plug-in maps the user to a specific LDAP user record. |
|
KEY_LDAP_FILTER |
LDAP Filter |
The search filter required to identify the user. LDAP attributes are used when defining an LDAP search filter. |
|
KEY_SEARCHBASE_URL |
LDAP Searchbase |
The search base required for the query. The node in the directory information tree (DIT)) under which user data is stored; the highest possible base for all user data searches. |
|
UserAuthenticationPlugIn |
UserAuthenticationPlugIn |
This native plug-in authenticates the supplied username/password credentials against an LDAP directory. |
|
KEY_PROP_AUTHN_EXCEPTION |
Propagate LDAP errors |
Enables (or disables) propagation of LDAP errors. UserAuthenticationPlugIn employs this attribute. |
|
UserAuthnLevelCheckPlugin |
UserAuthnLevelCheckPlugin |
This native plug-in shall determine if the user has been authenticated to the authentication level X - where the value of X is provided by the plugin parameter AUTHN_LEVEL_FOR_PLUGIN. For example, it checks the current Authentication Level of the user with the value specified. In addition, the plug-in specifies a list of parameters to collect depending on whether the Authentication Level check succeeded or failed. |
|
AUTHN_LEVEL_FOR_PLUGIN |
AUTHN_LEVEL_FOR_PLUGIN |
Specify the authentication level as an integer. Multiple steps can use UserAuthnLevelCheckPlugin. However, each Step must have a unique name and AUTHN_LEVEL_FOR_PLUGIN. See Also: "Steps and Plug-ins in Customized Step-up Authentication Module" |
|
UserPasswordPolicyPlugin |
UserPasswordPolicyPlugin |
|
|
PLUGIN_EXECUTION_MODE |
Mode of Operation |
The execution mode of UserPasswordPolicyPlugin. UserPasswordPolicyPlugin is supported only when using LDAP based authentication modules. It does not work with non LDAP authentication modules. Depending upon the configuration, can operate either alone or with other default plug-ins. Values are one of the following:
|
|
POLICY_SCHEMA |
Policy Schema To Use |
Specifies the schema for the password service (used with UserPasswordPolicyPlugin). Only OAM10G is supported. Default: OAM10G |
|
NEW_USERPSWD_BEHAVIOR |
Force Password Change on First Login |
Configures retroactive behavior of the new-user password-policy. Used with UserPasswordPolicyPlugin.Values are either:
Default: FORCECHANGEPASSWORD |
|
DISABLED_STATUS_SUPPORT |
Disabled Account Status Support |
Specifies whether the disabled status is to be supported and acted upon in this password service. Valid values are either True or False. Default: TRUE |
|
URL_ACTION |
Password Management Action URL |
Specifies the URL to which the user is sent for password management. The type of servlet action needed for redirecting the user to the specific password page for expiry and warning pages. Values can be either:
Default: REDIRECT_POST |
|
FedUserProvisioningPlugin |
||
|
KEY_USER_RECORD_ATTRIBUTE_LIST |
List of User Attributes |
For Federation. Comma-separated list of assertion attributes required to create the user record. |
|
KEY_PROVIDERID_ATTRIBUTE_NAME |
Partner Attribute Name |
For Federation. The attribute name of the LDAP user record whose value will be set to the Partner's Identity Provider ID when provisioning the user. This field is optional and if empty, the Partner's Identity Provider ID will not be set in the LDAP user record. |
|
KEY_USERID_ATTRIBUTE_NAME |
User UserID Attribute |
For Federation. Name of the attribute in the assertion attributes that is used as the LDAP UserID. |
|
TAPIdentifyPlugIn |
||
|
KEY_TAP_RETURN_ATTRIBUTE |
Username Mapping Attribute |
Name of the attribute used for account linking by TAPIdentifyPlugIn. |
|
SequentialPlugInExecutionStrategy |
||
|
StrategyName |
Orchestration Strategy |
Name of the plugin orchestration strategy required by SequentialPlugInExecutionStrategy. |
|
KerberosTokenAuthenticator |
||
|
KEY_KEYTAB_FILE |
Location of Keytab file |
Name of the file containing Kerberos principals and encrypted keys required by KerberosTokenAuthenticator |
|
KEY_PRINCIPAL |
OAM Service Principal |
Your OAM Account SPN, required by KerberosTokenAuthenticator. |
|
KEY_KRB_CONFIG_FILE |
Location of Kerberos Configuration file |
Location of the Kerberos configuration properties file, required by KerberosTokenAuthenticator. |
|
KEY_DOMAIN_DNS2DN_MAP |
AD Domain DNS Names to DN Mapping |
Comma-separated list of Active Directory DNS Domains to DN mappings required by KerberosTokenAuthenticator. |
|
X509CredentialExtractor |
||
|
KEY_CERTIFICATE_ATTRIBUTE_TO_EXTRACT |
User Mapping Attribute |
X509 certificate Attribute to be used for user mapping required by X509CredentialExtractor. |
|
KEY_IS_CERT_VALIDATION_ENABLED |
Certificate Validation |
Enable or disable X.509 certificate validation, required by X509CredentialExtractor. |
|
TAPRequestPlugin |
||
|
TAPS2PVersion |
Integration Protocol Version |
Token version for Integration. |
|
TAPPartnerId |
Integration PartnerId |
Integration Partner Identifier. |
|
TAPChallengeURL |
Partner Integration Endpoint URL |
Remote Partner End Point URL. |
|
TAPUserAuthenticationPlugin |
||
|
KEY_USERNAME_ATTRIBUTE |
Username Mapping Attribute |
Name of the attribute used for account linking required by TAPUserAuthenticationPlugin |
|
KEY_CHECK_TOKEN_EXPIRY |
Enable Token Expiration Checking |
Enable or disable Integration token expiration. |
|
TenantDisambiguationPlugin |
||
|
KEY_FEDERATED_TENANTS |
FederatedTenantNames |
Optional names of tenants (comma separated) for whom federated authentication is enabled. Plugin will check with Federation engine if tenant names are not mentioned. |
|
RSA SecurID Plugin |
||
|
username |
Username Parameter |
Name of the username plugin parameter required by RSA SecurID Plugin. |
|
passcode |
Passcode Parameter |
Name of the passcode plugin parameter required by RSA SecurID Plugin. |
|
nexttoken |
Next Token Parameter |
Name of the next token plugin parameter required by RSA SecurID Plugin. |
|
newpin |
New PIN Parameter |
Name of the new pin plugin parameter required by RSA SecurID Plugin. |
|
confirmnewpin |
Confirm New PIN Parameter |
Name of the confirm new pin plugin parameter required by RSA SecurID Plugin. |
|
HTTPTokenExtractor |
||
|
KEY_HEADER_PROPERTY |
HTTP Header Names |
Comma separated list of HTTP Headers. See Configuring an HTTPToken Extractor Plug-in. |
|
KEY_COOKIE_PROPERTY |
HTTP Cookie Names |
Comma separated list of Cookies. See Configuring an HTTPToken Extractor Plug-in. |
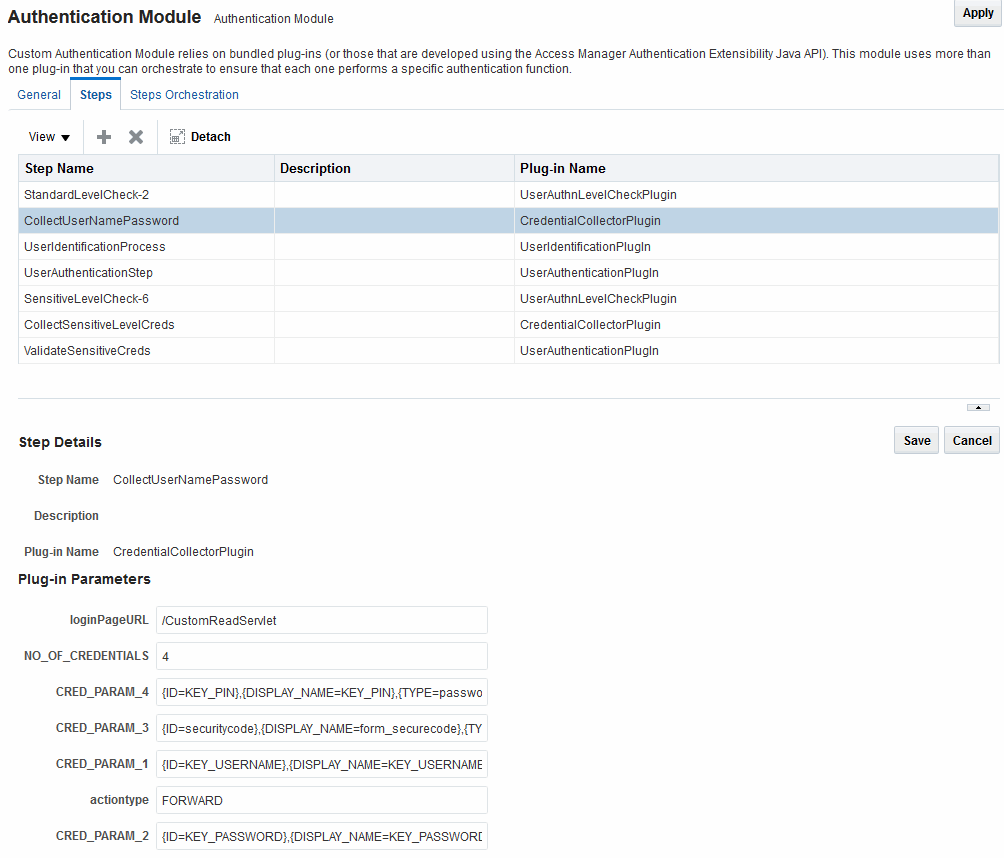
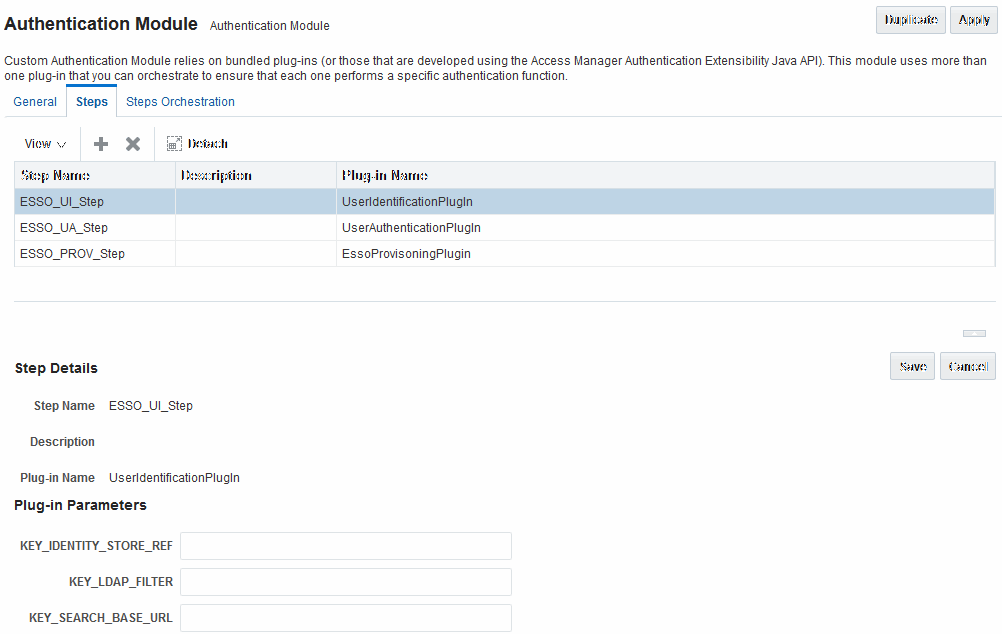
Figure 22-11 illustrates the Steps tab and Details section for a custom authentication module. When adding Steps, there is no data to display in the table. However, when you add one or more Steps to the table, the Details sections are populated.
Figure 22-11 Plug-in Based Authentication Module Steps and Details
Description of "Figure 22-11 Plug-in Based Authentication Module Steps and Details"
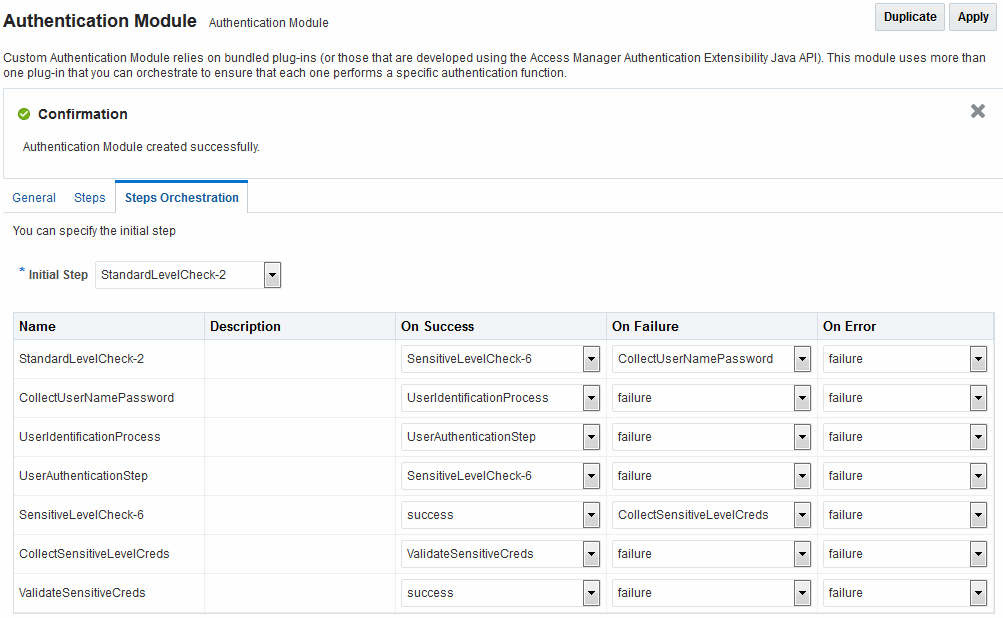
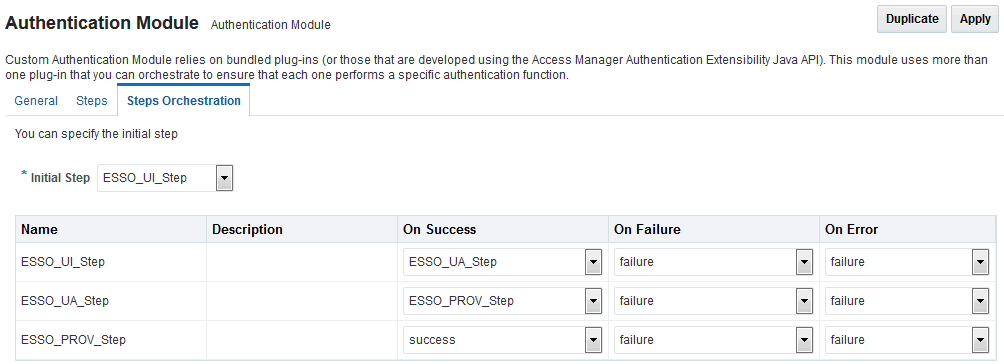
Figure 22-12 illustrates the Steps Orchestration tab of a custom authentication module, which is populated by information for each defined step (and the action you choose for each operational condition).
Figure 22-12 Steps Orchestration for Plug-in Based Authentication Modules
Description of "Figure 22-12 Steps Orchestration for Plug-in Based Authentication Modules"
Table 22-14 describes the elements on the Steps Orchestration tab. The lists available for OnSuccess, OnFailure, and OnError include the following choices:
-
success
-
failure
-
StepName (any step in the module can be selected as the action for an operational condition)
Table 22-14 Steps Orchestration Tab
| Element | Description |
|---|---|
|
Initial Step |
Choose the starting step from those listed. The list includes only those steps defined for this module. |
|
Name |
Each step added to this module is listed by the name that was entered when the step was added. |
|
Description |
The optional description for this step, entered when this step was added. |
|
OnSuccess |
The action selected for successful operation. A list provides actions you can choose:
|
|
OnFailure |
The action selected for failure of this step. A list provides actions you can choose:
|
|
OnError |
The action selected for an error when executing this step. A list provides actions you can choose:
|
22.7.3 Pre-populated Plug-ins for Configuring Access Manager with Multi-Step Authentication
The following topics describe several of the native Custom modules provided with pre-populated plug-ins. You can use these to orchestrate your own custom authentication modules:
See Also:
KerberosPlugin
Use this plug-in when configuring Access Manager for Windows Native Authentication, as described in Configuring Access Manager for Windows Native Authentication.
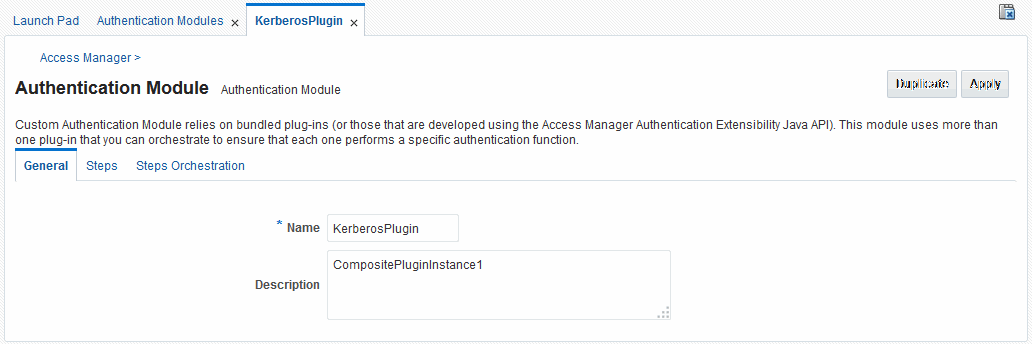
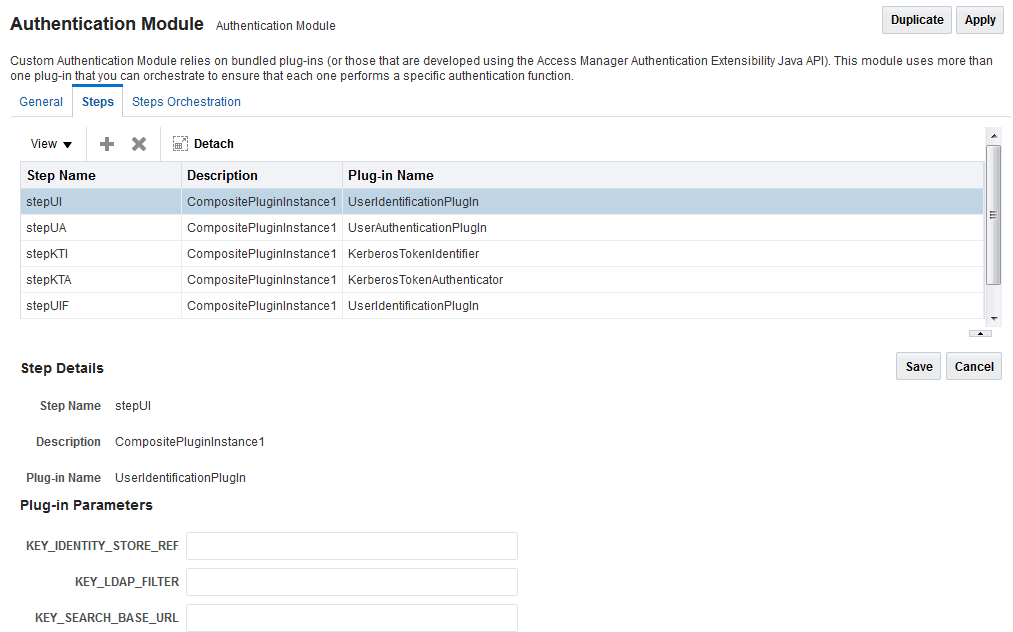
Figure 22-13 shows the KerberosPlugin module that is bundled with Access Manager 11g. This is a credential mapping module that matches the credentials (username and password) of the user who requests a resource to the encrypted "kerberos ticket".
Figure 22-14 shows the default steps and details. Figure 22-15 shows the orchestration of the steps and conditions.
Figure 22-14 Default KerberosPlugin Steps and Details
Description of "Figure 22-14 Default KerberosPlugin Steps and Details"
Figure 22-15 Default KerberosPlugin Steps and Orchestration
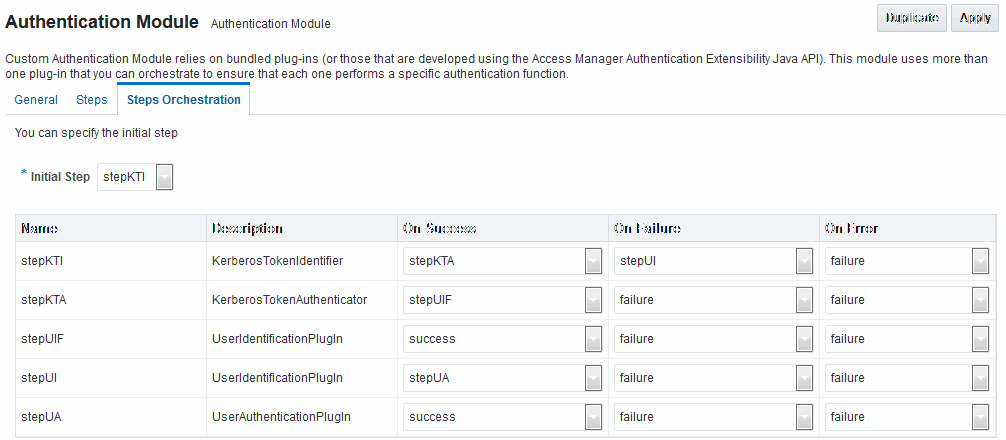
Description of "Figure 22-15 Default KerberosPlugin Steps and Orchestration"
LDAPPlugin
Figure 22-16 shows the LDAPPlugin module that is bundled with Access Manager. By default, LDAPPlugin has 2 steps, shown in Figure 22-17. Figure 22-18 shows the default orchestration of steps for LDAPplugin.
Figure 22-17 Default LDAPPlugin Steps and Details
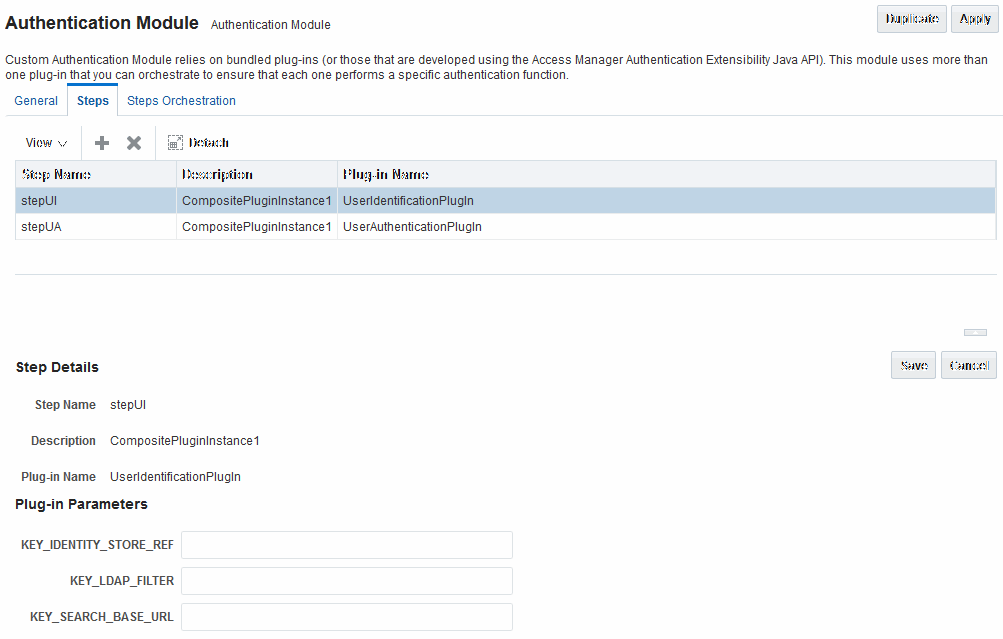
Description of "Figure 22-17 Default LDAPPlugin Steps and Details"
Figure 22-18 Default Orchestration of Steps for LDAPplugin

Description of "Figure 22-18 Default Orchestration of Steps for LDAPplugin"
X509Plugin
Figure 22-19 shows the X509Plugin module that is bundled with Access Manager 11g. The X509Plugin is similar to the LDAPPlugin with additional properties that indicate which attribute of the client's X.509 certificate should be validated against the user attribute in LDAP. Figure 22-20 shows default steps and details for this plug-in. Figure 22-21 shows the default orchestration of steps for the X509Plugin.
Figure 22-20 X509Plugin Default Steps and Details
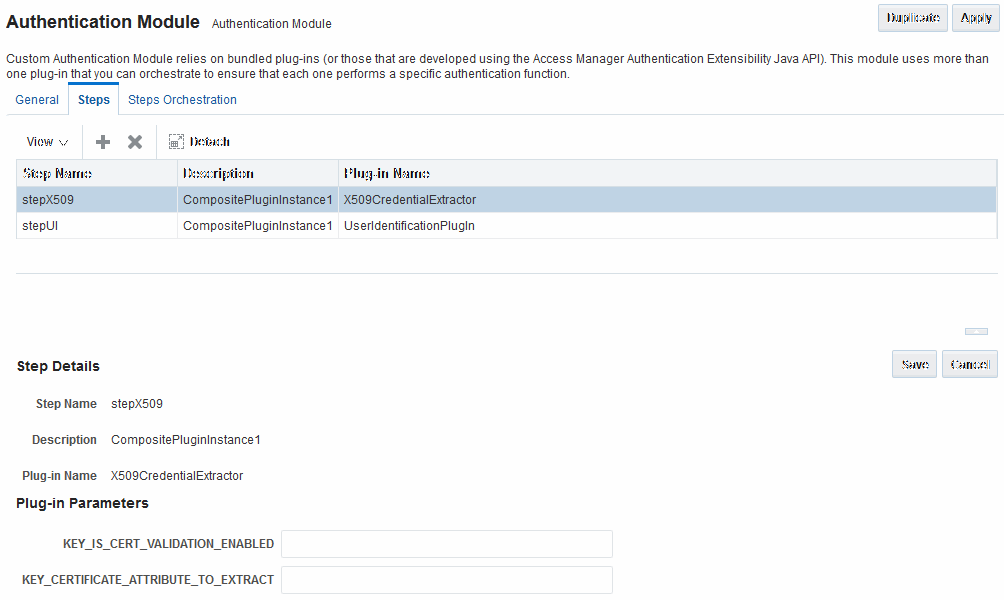
Description of "Figure 22-20 X509Plugin Default Steps and Details"
With this plug-in, the root and sub CA certificates must be added to the $DOMAIN_HOME/config/fmwconfig/amtruststore because the X509CredentialExtractor plug-in loads certificates from this location.
Table 22-15 lists the stepX509 values for Subject and Subject Alternative Names. Such processing is only supported when the X509Plugin is used.
See Also:
Table 22-15 X509 Step Details (KEY_CERTIFICATE_ATTRIBUTE_TO_EXTRACT)
| issuer.D | Subject |
|---|---|
|
subject. |
EDIPI Note: EDIPI refers to the Electronic Data Interchange Personal Identifier. |
|
subjectAltName. |
OTHER_NAME (FASC-N) Note: FASC-N refers to the Federal Agency Smart Credential Number. |
|
subjectAltName. |
RFC822_NAME |
|
subjectAltName. |
UNIFORM_RESOURCE_IDENTIFIER |
Figure 22-21 Default Orchestration for X509Plugin Steps

Description of "Figure 22-21 Default Orchestration for X509Plugin Steps"
See Also:
"Example: Leveraging SubjectAltName Extension Data and Integrating with Multiple OCSP Endpoints"
Password Policy Validation Module and Plug-ins
Oracle provides a Password Policy Validation Module that employs the following plug-ins as individual steps in the authentication process:
-
User Identification Step
-
User Authentication Step
-
User Password Status Step
Figure 22-22 shows the Steps tab. Additional details follow the figure.
Figure 22-22 Password Policy Validation Module Plug-ins
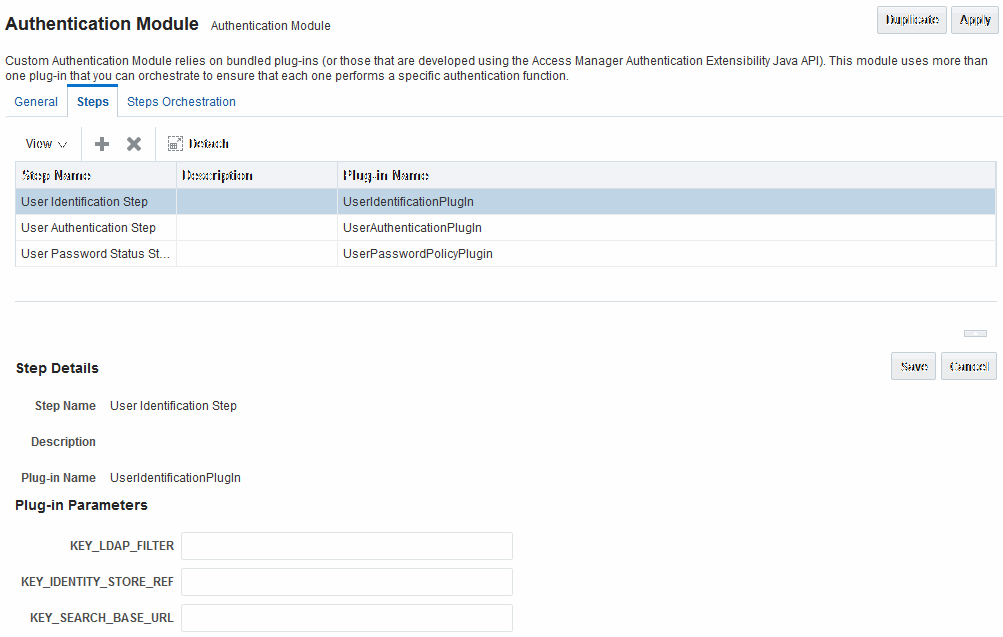
Description of "Figure 22-22 Password Policy Validation Module Plug-ins"
Figure 22-23 shows the Steps Orchestration page for the Password Policy Validation Module plug-ins, which is self explanatory.
Figure 22-23 Steps Orchestration: Password Policy Validation Plug-ins
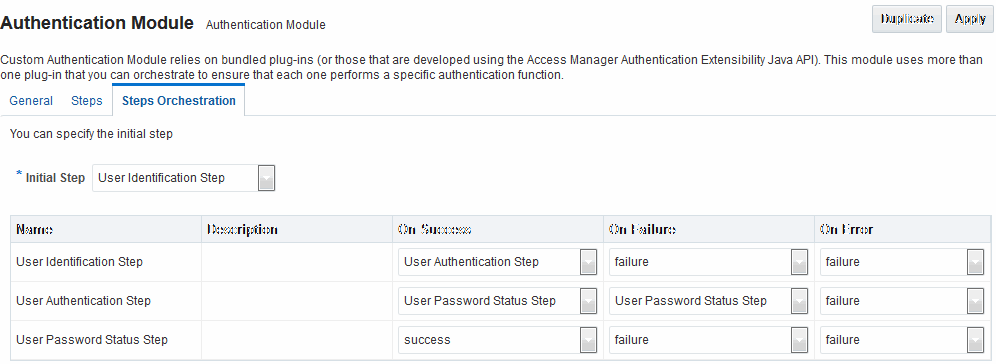
Description of "Figure 22-23 Steps Orchestration: Password Policy Validation Plug-ins"
22.7.4 Example: Leveraging SubjectAltName Extension Data and Integrating with Multiple OCSP Endpoints
Access Manager 11g support for personal identity verification (PIV) cards (a United States Federal smart card), is to use FASC-N and EDIPI attributes from the SubjectaltName extension to map the user during X.509 authentication. While multiple OCSP providers are not supported, you can use an OCSP Gateway or write a custom authentication plug-in that uses the OSDT OCSP APIs to validate against multiple OCSP providers.
The following functionality is available only with the X.509 Plug-in (not the X.509 Authentication module). The Plug-in configuration specifies the LDAP attribute to which the extracted attribute from the X.509 client certificate will be mapped.
-
In the Oracle Access Management Console, click Application Security at the top of the window.
-
In the Plug-ins section, click Authentication Modules.
-
In the list of modules, select the X509Plugin module.
-
In the page that opens, click Duplicate and fill out the fields as follows:
General Tab:
-
Name: CustomX509Plugin.
-
Description: Custom Plug-in for X509.
Steps Tab:
-
Click + to add a step to the plug-in.
-
Enter a Name and Description, then select the X509CredentialExtractor plug-in.
Step Details:
-
KEY_IS_CERT_VALIDATION_ENABLED
true. -
KEY_CERTIFICATE_ATTRIBUTE_TO_EXTRACT (Table 22-15):
subject.EDIPI, subjectAltName.OTHER_NAME (FASC-N), subjectAltName.RFC822_NAME, subjectAltName.UNIFORM_RESOURCE_IDENTIFIER -
Click the Save button.
Add Another Plug-in:
-
Click + to add a different plug-in.
-
Enter the Name, Description, and select UserIdentificationPlugin
Step Details for Second Plug-in:
-
Set KEY_IDENTITY_STORE_REF to the required identity store.
-
Add the LDAP filter to the KEY_LDAP_FILTER attribute. For example:
(&(uid= Unknown macro: {subject.CN} )(mail= Unknown macro: {subject.E} )) -
Add the user search base, if required, to the KEY_SEARCH_BASE_URL attribute.
-
Click the Save button.
-
Proceed to Step Orchestration tab (Step2).
-
-
Orchestrate Steps:
-
Initial Step: Select the X509CredentialPlugin Step from the drop down.
-
On Success: X509CredentialPlugin step, select the UserIdentificationPlugin Step from the drop down list.
-
On Success: UserIdentificationPlugin step, select
Successfrom the drop down list. -
On Failure: Select
Failurefor both X509CredentialPlugin and UserIdentificationPlugin steps. -
On Error: Select
Failurefor both X509CredentialPlugin and UserIdentificationPlugin steps. -
Click the Apply button and review the confirmation window stating that the plug-in has been created successfully.
-
-
Set up the Certificate Validation Module for Certificate Validation and Revocation using OCSP.
See Also:
-
In the Oracle Access Management Console, click Configuration at the top of the window.
-
In the Configuration console, click Certificate Validation.
-
In the Certificate Revocation list, confirm that Enabled is checked, then click Save.
-
In the OCSP/CDP section, enable OCSP, enter the OCSP URL and the Subject of the OCSP Server's certificate, then click Save.
-
On the command line, use the Java keytool application to import the trusted certificates into the $DOMAIN_HOME/config/fmwconfig/amtruststore keystore, as trusted certificate entries.
Note:
Initially the keystore is empty; its password is set the first time the Java keytool application is used.
-
22.7.5 Creating a Custom Authentication Module using Bundled Plug-ins
Users with valid Administrator credentials can create custom authentication module that uses one or more authentication plug-ins.
This procedure outlines general steps for any authentication module (with sample information to configure an authentication X509 module for use with the Online Certificate Status Protocol (OCSP) to maintain the security of a server and other network resources).
See Also:
Prerequisite
Ensure that any user identity store associated with the module is running and includes the required user population.
-
In the Oracle Access Management Console, click Application Security at the top of the window.
-
In the Application Security console, select Create Custom Authentication Module from the Create (+) drop-down list in the Plug-ins section.
-
In the page that appears, enter the Name and optional Description. For example: CustomX509Plugin and Plugin for X509, respectively.
Click Apply to save general information.
-
Add Steps:
-
Click the Steps subtab.
-
Click the Add (+) button above the Steps table.
-
In the Add New Step dialog box, enter a unique Step Name and optional Description.
-
Browse for and select the desired plug-in name (X509CredentialExtractor, for instance) and click OK.
-
Confirm information in the results table.
-
Repeat b through e to add other steps until you have listed all required plug-ins for your module.
-
-
Define Step Details: Use appropriate values for requested parameters (Table 22-12, Table 22-13, Table 22-17 and "Example: Leveraging SubjectAltName Extension Data and Integrating with Multiple OCSP Endpoints"):
-
Click a StepName in the table to reveal required details, enter appropriate values for the requested details.
-
Validate User Cert using OCSP:
Confirm that KEY_IS_CERT_VALIDATION_ENABLED is set to
true.Add the certificate attributes to be extracted with KEY_CERTIFICATE_ATTRIBUTE_TO_EXTRACT (Table 22-15):
subject.EDIPI
subjectAltName.OTHER_NAME (FASC-N)
subjectAltName.RFC822_NAME
subjectAltName.UNIFORM_RESOURCE_IDENTIFIER
-
Click the Save button.
-
Repeat to configure each step appropriately.
-
Ensure that users are provisioned in any user identity stores assigned in the steps.
-
-
Orchestrate Steps: See Table 22-14 as you perform following steps.
-
Click the Steps Orchestration subtab.
-
From the InitialStep list, choose the name of the first step to be used.
-
Select a StepName in the table.
-
From the OnSuccess List, choose a condition (success or failure) or a step name.
-
From the OnFailure List, choose the desired condition or a StepName.
-
From the OnError List, choose the desired condition or a StepName.
-
Repeat Steps c through f to orchestrate operations for each plug-in this module.
-
Review your orchestration.
-
-
Initiate Strategy Validation: Click Apply to initiate validation of your orchestration strategy:
-
Successful Strategy: The orchestration strategy is applied and the module is ready to include in an authentication scheme. Continue with Steps 9 and 10.
-
Invalid Strategy: Click OK in the Error box, then edit your OnSuccess, OnFailure, OnError strategies (or add or remove plug-ins) to correct the problem. Repeat this step until your strategy is successful.
-
-
In the navigation tree, confirm the new Custom Authentication Module is listed, and then close the page when you finish.
-
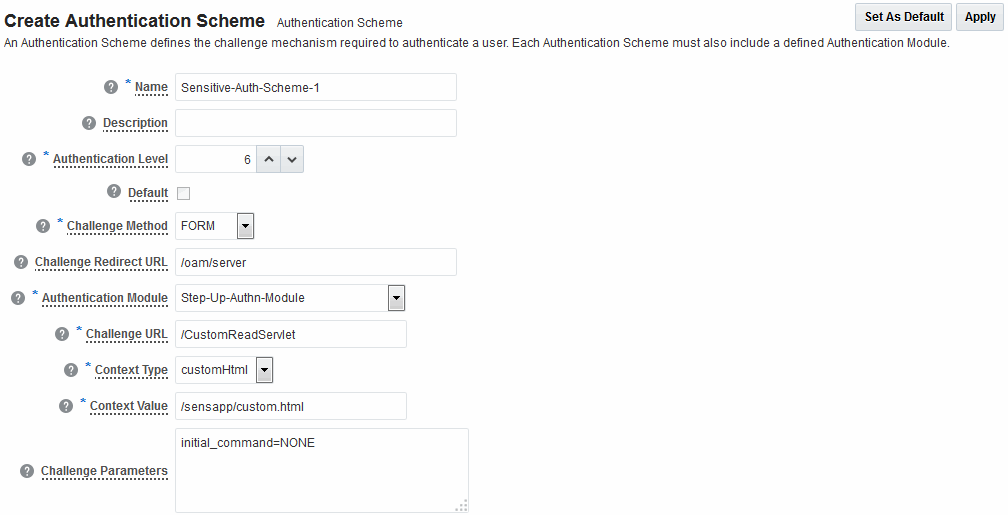
Use your custom module in an authentication scheme, as described in "Managing Authentication Schemes".
22.7.6 Steps and Plug-ins in Customized Step-up Authentication Module
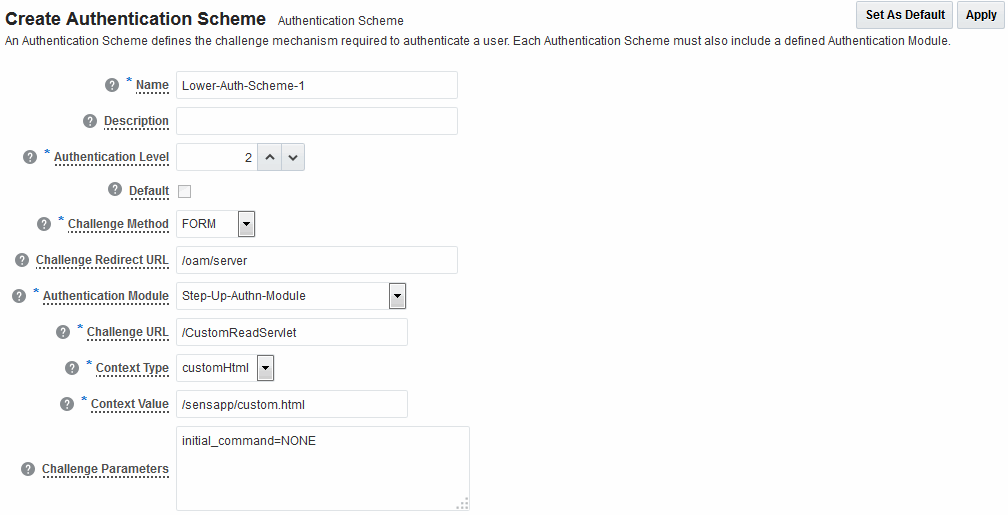
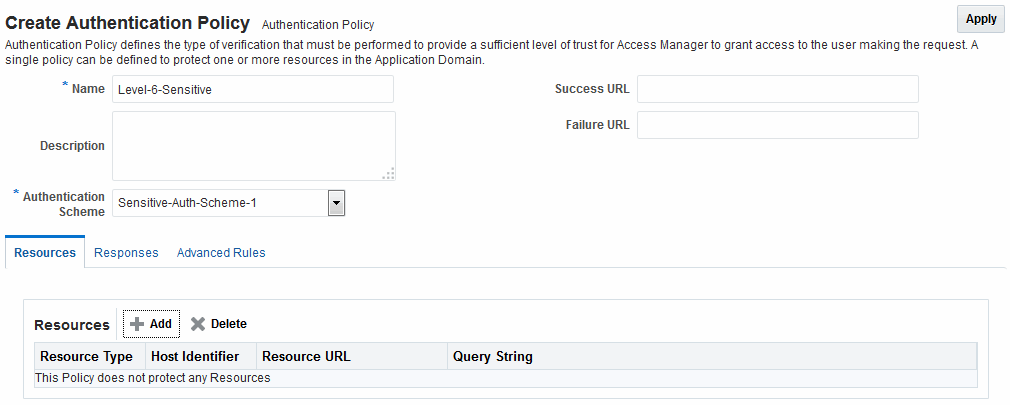
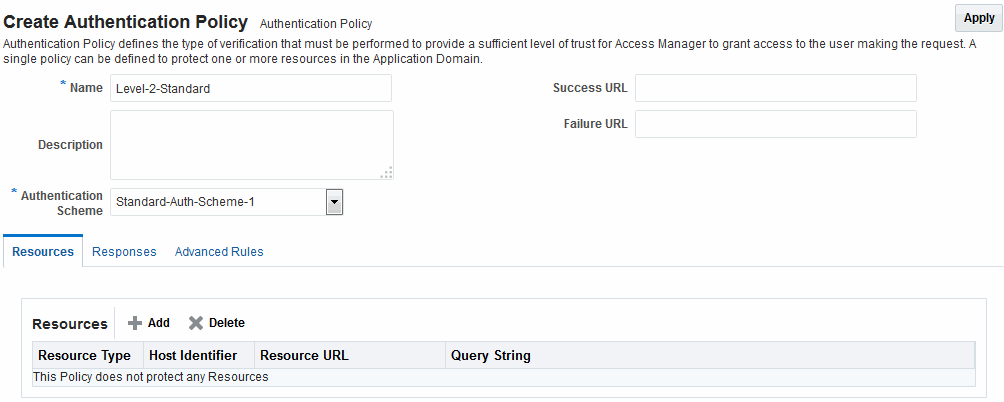
The processing that occurs with a customized step-up authentication module is driven by the steps and plug-ins described in Table 22-16. For more information, see Table 22-13.
Table 22-16 Steps and Plug-ins in a Customized Step-up Authentication Module
| Step # | Step Name | Plug-in Name | Description |
|---|---|---|---|
|
1 |
StandardLevelCheck-2 |
UserAuthnLevelCheckPlugin |
Configurable with the LevelCheck Rule and credentials parameters associated with the SUCCESS or FAILURE outcome resulting from the check. This plugin communicates with the authentication engine to determine the current authentication level of the user and compares it with the plugin level parameter AUTHN_LEVEL_FOR_PLUGIN. It interacts with a custom credential collector and checks the current Authentication Level of the user against the value specified. For example, if 2 is specified for X:
Specifies parameters to collect depending on whether the Authentication Level check succeeded or failed:
|
|
2 |
CollectUserNamePassword |
CredentialCollectorPlugin Flow must start with the Plug-in communicating the credential parameters to collect. The Action must support allowing the Server to mark parameters as immutable. |
This plugin interacts with the credential collector (CustomReadServlet) to allow the administrator to configure the credentials collected for authentication. Credentials to be collected are configured as step parameters. The plugin validates these parameters and renders the UI to collect them. The user provides the credentials that need to be collected in the step parameter. In this example, since in previous step user was not authenticated to level 2, he will be prompted to enter a user name and password.
Credentials to be collected should be specified in this format only for the credential collector to render the UI interface. Also specifies action on:
|
|
3 |
UserIdentificationProcess |
UserIdentificationPlugIn |
Out of the box plug-in that maps the user to a specific LDAP user record:
|
|
4 |
UserAuthenticationStep |
UserAuthenticationPlugin |
Out of the box plug-in that authenticates the supplied username and password credentials against an LDAP directory.
|
|
5 |
SensitiveLevelCheck-6 |
UserAuthnLevelCheckPlugin |
This plugin communicates with the authentication engine to determine the current authentication level of the user and compares it with the plugin level parameter AUTHN_LEVEL_FOR_PLUGIN. It interacts with a custom credential collector and checks the current Authentication Level of the user against the value specified. Specifies parameters to collect depending on whether the check succeeded or failed:
|
|
6 |
CollectSensitiveLevelCreds |
CredentialCollectorPlugin |
This plugin renders the UI for collecting credentials for level 6 authentication. This is similar to CollectUserNamePwd.
|
|
7 |
ValidateSensitiveLevelCreds |
SubjectSetPlugin |
This custom developed plug-in validates the security code against the server.
|
After defining and orchestrating plug-ins in an authentication module, you can use the module in an authentication scheme and use the scheme in a policy.
22.7.7 Configuring Step-up Authentication
You can define step-up authentication using plug-ins within a customized module.
In this example, there are users who need standard level access to pages on the corporate portal and those who need access to sensitive information. For standard applications, authentication credentials include username and password. For sensitive applications, credentials include username, password, and a security code (the later obtained with a custom plugin that validates the code).
22.7.8 Configuring an HTTPToken Extractor Plug-in
You can configure an HTTPToken Extractor plug-in.
To configure:
22.7.9 JSON Web Token Plug-in
In the RSPS2 release, OAM introduced complete support for an OAuth authorization service provided by the Oracle Access Manager Mobile and Social (OAMMS) service. The OAuth Service issues a JSON Web Token (JWT) for accessing Web services subsequent to the user's authentication and/or authorization. Thus, a user can be authenticated with an OAM authentication mechanism and subsequently have both an OAM and a JWT for access to different resources. A typical scenario in which this can be used is when a WebGate protected application is accessed. The user is authenticated by an OAM authentication module and both an OAM token and a JWT are provided. The OAM token is used for access through the WebGate and the JWT can be used to access a Web service or a REST service when needed. (The Web service or REST service is protected by a product like Oracle API Gateway or Oracle Web Services Manager.)
A JSON Web Token Plug-in is now available in OAM. Use this JSON Web Token Plug-in when you need to protect REST or Web services with standard tokens. The JSON Web Token Plug-in issues both an OAM token and a Mobile and Social JWT that can be used for Web services access. Oracle API Gateway and Oracle Web Services Manager can use this JWT for Web services protection as well. See the following sections for additional details.
22.7.9.1 Understanding the JSON Web Token Plug-in
You can use JSON Web Token Plug-in in deployments.
The following flow describes how to use JSON Web Token Plug-in:
-
Configure the Oracle Access Management WebGate to use both OAM authentication and the JSON Web Token Plug-in.
-
When a user accesses a resource protected by the WebGate, the WebGate redirects the user to authenticate with Access Manager.
-
Upon authentication, the plug-in identifies which OAuth service end point should generate the JWT. (OAuth service end points are unique and can be configured to point to a specific OAuth service profile within a specific Identity Domain.) Oracle Access Manager Mobile and Social creates the JWT and the plug-in returns it as a cookie. (The cookie name can be configured in the plug-in configuration.)
-
The Web application intercepts the response and accesses the cookie so that it can be used later for Web service access. Depending on how the web application is deployed, there may be other options to retrieve the JWT. The user can now access the Web resource.
-
When the Web resource needs to access a Web service, it extracts the OAM Mobile and Social JWT and sends it to the Oracle API Gateway.
-
The Oracle API Gateway uses the Oracle OAuth Service REST API to validate the token. It then grants access to the Web service. The Oracle API Gateway can also validate the JWT locally without making a remote call to the OAuth service.
Note:
Currently there is not a mechanism to pass scope to the OAuth service while issuing a JWT with OAM authentication. Consequently, the token should be considered to have global scope.
Both the OAM token timeout and the JWT timeout can be set to the same value to have the same validity. The OAM tokens and JWT are not linked, so they cannot be terminated using single logout.
22.7.9.2 Configuring the JSON Web Token Plug-In
You can configure the JSON Web Token Plug-in.
You will be creating a custom authentication module.
-
In the Oracle Access Management Console, click Application Security at the top of the window.
The Search Authentication Modules screen is displayed.
-
Select Create Custom Authentication Module from the Create (+) drop-down menu in the Plug-ins section.
The General tab is displayed.
-
Enter a name (and optional description) for the custom authentication module.
For this example, we name the module JWTToken AuthnModule.
-
Click the Steps tab and the + (plus sign) to add a new step.
The Add New Step dialog is displayed. Three new steps will be added.
-
Specify a step name (and optional description), select an activated plug-in from the Plug-in name drop down list and click OK.
For this example, the values are StepUI and UserIdentificationPlugin. The flow parameters for that plug-in can be edited after it is added to the step
-
Enter values for the UserIdentificationPlugin parameters and click Save.
-
Click the + (plus sign) to add a second step, enter the name StepUA, select UserAuthenticationPlugin from the drop down list and click OK.
-
Enter values for the UserAuthenticationPlugin parameters and click Save.
-
Click the + (plus sign) to add a third step, enter the name StepOAuth, select OAuthTokenResponsePlugin from the drop down list and click OK.
-
Enter values for the OAuthTokenResponsePlugin parameters and click Save.
-
Click the Steps Orchestration tab to configure the orchestration of the steps in the following order.
-
StepUI
-
StepUA
-
StepOAuth
-
-
Click Apply and close the Custom Authentication Module tab.
-
Click Authentication Schemes from the Launch Pad.
-
Select LDAPScheme and click Duplicate.
A Copy of LDAPScheme screen displays.
-
Change the value of Name to JWTToken AuthnScheme and the value of Authentication Module to JWTToken AuthnModule.
-
Click Save.
-
Configure an Authentication policy with the newly defined JWTToken AuthnScheme Authentication Scheme.
