26.4 Access Tester Console, Navigation, and Controls
Using Access Tester console you can establish a connection to the OAM server, validate protected status of a resource, and confirm authentication and authorization.
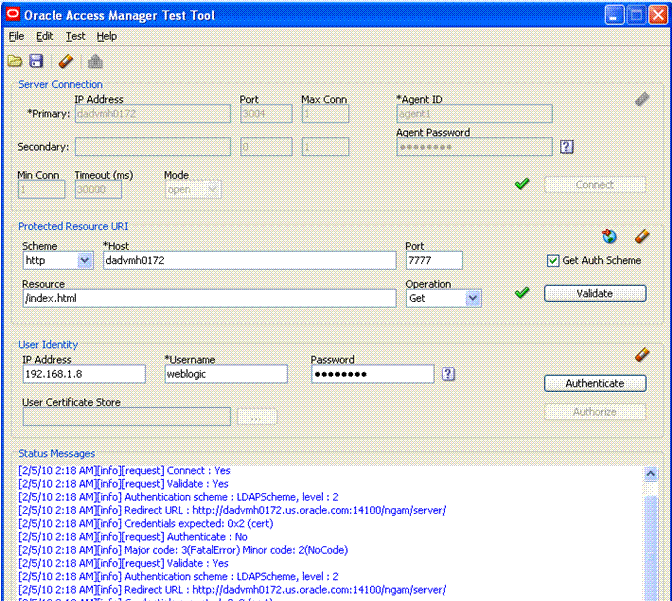
Figure 26-3 shows the fixed-size Access Tester Console. This is the window through which users can interact with the application if the Access Tester is started in Console mode. The window can not be resized. Details follow the screen.
At the top of the main window are the menu names within a menu bar. Under the menu bar is the tool bar. All of the commands represented by buttons in the tool bar are also available as menu commands. The Access Tester Console is divided into four panels, described in Table 26-3.
Table 26-3 Access Tester Console Panels
| Panel Name | Description |
|---|---|
|
Server Connection |
Provides fields for the information required to establish a connection to the OAM Server (a single primary server and a single secondary server), and the Connect button: See also: "Establishing a Connection Between the Access Tester and the OAM Server". |
|
Protected Resource URI |
Provides information about a resource whose protected status needs to be validated. The Validate button is used to submit the Validate Resource server request. See also: "Validating Resource Protection from the Access Tester Console". |
|
User Identity |
Provides information about a user whose credentials need to be authenticated. The Authenticate button is used to submit the Authenticate User server request. See also: "Testing User Authentication from the Access Tester Console". |
|
Status Messages |
Provides a scrollable status message area containing messages displayed by the application in response to user gestures. The Authorize button is used to submit the Authorize User server request. See also: "Observing Request Latency". |
Text fields support right-clicking to display the Edit menu and drag-and-drop operations using the mouse and cursor.
There are four primary buttons through which you submit test requests to the OAM Server. Each button acts as a trigger to initiate the named action described in Table 26-4.
Table 26-4 Command Buttons in Access Tester Panels
| Panel Button | Description |
|---|---|
|
Connect |
Submits connection information and initiates connecting. |
|
Validate |
Submits information provided in the Protected Resource URI panel and initiates validation of protection. |
|
Authenticate |
Submits information provided in the User Identity panel and initiates authentication confirmation. |
|
Authorize |
Submits information provided in the User Identity panel and initiates authorization confirmation. |
See Also:
26.4.1 Access Tester Menus and Command Buttons
Additional Access Tester Console control buttons and command buttons provide a tip when the cursor is on the button.
Table 26-5 identifies additional Access Tester Console buttons and their use.
Table 26-5 Additional Access Tester Buttons
| Command Buttons | Description |
|---|---|
|
Open Folder |
Loads connection configuration details that were saved to an XML file (config.xml, by default). You can refresh the information in the Console by clicking this button. |
|
Disk |
Saves connection configuration details to a file (default name, config.xml). You can add the name of this document to the input script to provide proper connection information to the Access Tester running in command line mode. The Save command button at the bottom of the Console saves the content of the Status Message panel to a log file. |
|
Eraser |
Clears fields on a panel containing the icon. Tool bar action clears all fields except connection fields if the connection has already been established. |
|
Blue Up Arrows |
Captures the last named request to the capture queue with the corresponding response received from the OAM Server. Together, the request and response create a test case. The capture queue status at the bottom of the Console is updated to reflect the number of test cases in the queue. You can save the contents of the capture queue to create a test script containing multiple test cases using the Generate Script command on the Test menu or a command button. |
|
Paper Scroll |
Generates a test script that includes every test case currently in the capture queue, and asks if the queue should be cleared. Do not clear the queue until all your test cases have been captured and saved to a test script. |
|
Paper Scroll with right facing arrow |
Runs a test script against the current OAM Server. The Status message window is populated with the execution status as the script progresses through each test case. |
|
Globe with right facing red arrow |
Imports a copied URI from the clipboard after parsing it to populate fields in the URI panel. |
|
Question Mark |
Displays a dialog showing the password in clear text |
The Access Tester provides the menus described in Table 26-6. All menu items have mnemonics that are exposed by holding down the ALT key (on Windows systems). There are also command accelerators (keyboard activation) available using the CTRL-<KEY> combination defined for each menu command.
Table 26-6 Access Tester Menus
| Menu Title | Menu Commands |
|---|---|
|
File |
Note: To minimize the amount of data entry the Save Configuration and Open Configuration menu (and tool bar command buttons) allow for specific Connection, URI, and Identity information to be saved to (and read from) a file. Thus, it becomes fairly simple to manage multiple configurations. Also, the configuration file can be used as input to the Access Tester when you run it in command line mode and execute a test script. |
|
Edit |
Provides standard editing commands, which act on fields:
|
|
Test |
Note: You can use functions here to capture the last request and response to create a test case that you can save to a test script to be run at a later time. |
|
Help |
The command About, which displays usage information. |
