45.9 Managing a Custom Security Token Service Configuration
The following tasks explain how to manage a custom security token service configuration:
45.9.1 Creating a Validation Template
Users with valid Oracle Access Management Administrator credentials can create a Validation Template with a Token Protocol of Webservice Trust to map the token to the requester.
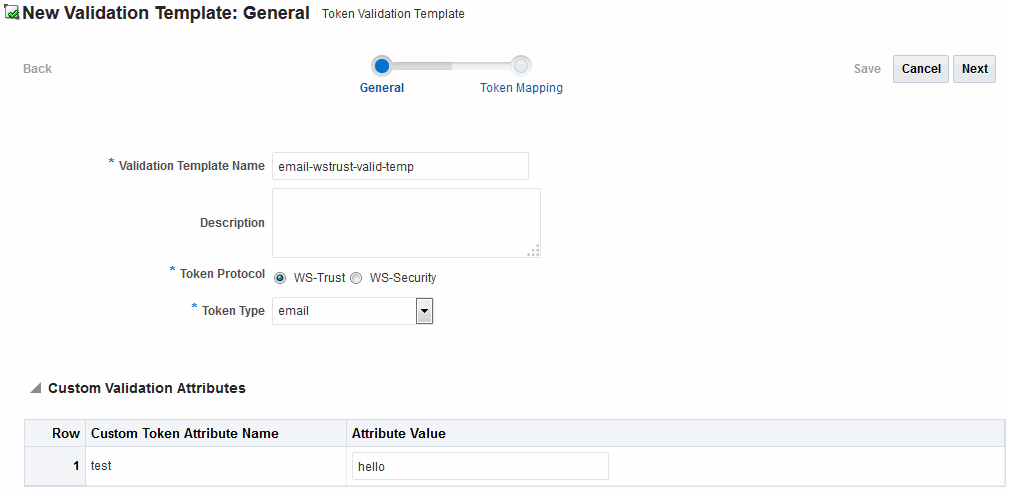
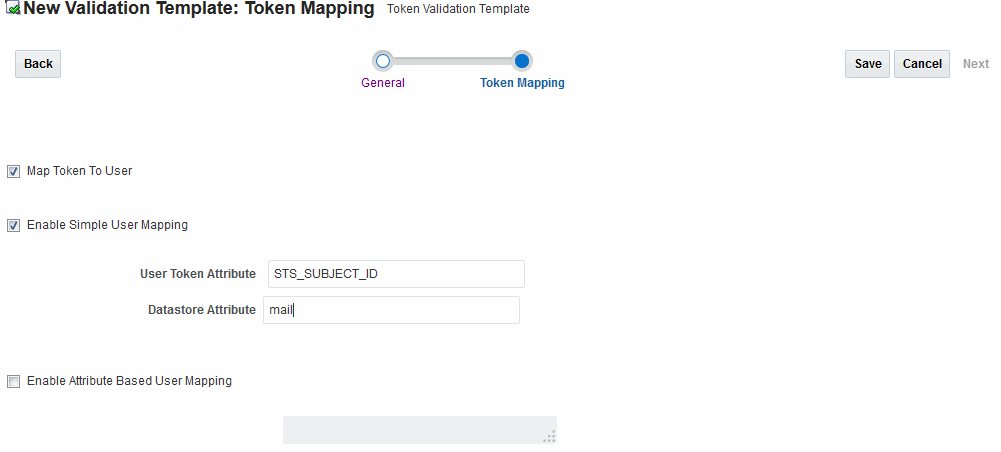
The template in this example can be used for the module classes described earlier in this chapter. Full implementation details are shown in the following figures. As you review these, notice how specifications for this template reference the module class code:
Figure 45-18 General Details: email-wstrust-valid-temp

Description of "Figure 45-18 General Details: email-wstrust-valid-temp"
Figure 45-19 Token Mapping: email-wstrust-valid-temp

Description of "Figure 45-19 Token Mapping: email-wstrust-valid-temp"
To create a validation template for custom module classes:
45.9.2 Creating the Issuance Template for a Custom Token
Users with valid Oracle Access Management Administrator credentials can create a Token Issuance Template.
This is a server side configuration. Each Token Issuance Template indicates how to construct a token, and which signing or encryption to use when constructing a token. Each Token Issuance Template also defines the attributes to be sent as part of the outbound token for mapping, and filtering data. However, Issuance Templates do not list mapping or filtering rules, which are defined in the Relying Party Partner Profile.
You can use the template in this example for the email custom token as described earlier. Implementation details are shown in the following figures, and described in the accompanying procedure. As you review them, you can review how specifications for this template reference the module class code:
Figure 45-20 General Details: email-issuance-temp

Description of "Figure 45-20 General Details: email-issuance-temp "
When you have a custom token type deployed, the Issuance Properties are tailored to accommodate the custom token. For instance, the custom email token type was chosen for the issuance template.
See Figure 45-21.
Figure 45-21 Issuance Properties: email-issuance-temp

Description of "Figure 45-21 Issuance Properties: email-issuance-temp "
This procedure creates a companion Issuance Template for the custom module classes in this chapter. For the example:
-
Ignore the Token Encryption Algorithm, which is not used for the custom token type: email.
-
Fill in a value for the Custom Token Attribute, which is populated from the custom token code.
To create an Issuance Template for custom module classes:
-
In the Oracle Access Management Console, click Federation at the top of the window.
-
Select Token Issuance Templates from the View menu in the Security Token Service section.
-
New Token Issuance Template:
-
Click the New Issuance Template button in the upper-right corner (or click the Add (+) command button above the Search Results table).
-
General: Set the following for use with the custom token in this chapter.
- Issuance Template Name: email-issuance-temp
- Token Type: email
-
Click Save and dismiss the confirmation window (or click Cancel without saving).
-
Issuance Properties: Set the following for use with the custom token in this chapter.
- Custom Token Attribute Value: world
-
Click Apply and dismiss the confirmation window (or click Revert without saving it).
-
Close the definition (or edit it as described in Step 4).
-
-
Edit a Template: Find the desired template, edit details, and click Apply.
45.9.3 Adding the Custom Token to a Requester Profile
You can either edit an existing requester profile to add your custom token to the Token Type Configuration table, or create a new requester profile to use with the custom token.
Either way, configure:
-
Token Type: email (your custom token)
-
Validation Template: email-wstrust-valid-temp
45.9.3.1 Prerequisites for Adding a Custom Token to a Requester Profile
You must define a Custom Token and Validation Template.
45.9.3.2 Adding or Editing a Requester Profile for a Custom Token
You can add or edit a Requester Profile for a custom token from the Security Token Service section.
To add or edit a Requester Profile:
-
In the Oracle Access Management Console Launch Pad, click Federation at the top of the window.
-
Select Partner Profiles from the View menu in the Security Token Service section.
-
Select the Requester Profiles tab.
-
Existing Profile:
-
In the Search Results table of the Requester Profiles page, click the name of the desired profiles.
-
Token and Attributes: Fill in the following details for the custom token in this chapter and then click the Save button at the top of the page.
- Token type:
email - Validation Template:
email-wstrust-valid-temp
- Token type:
-
Click Save, dismiss the confirmation window, and close the page (or click Cancel to dismiss the page without submitting it).
-
Proceed as follows:
-
-
New Profile: Click the New Requester Profile button to display the New Partner Profile page where you enter details:
-
General: Fill in the following details for the custom token in this chapter and then click the Next button at the top of the page.
- Profile ID:
unique_requesterprofile_name - Default Relying Party Profile:
unique_relyingparty_name
- Profile ID:
-
Add Token Type Configuration: Fill in the following details for the custom token in this chapter and then click the Save button at the top of the page.
- Token type:
email - Validation Template:
email-wstrust-valid-temp
- Token type:
-
Proceed as follows:
-
45.9.4 Adding a Custom Token to a Relying Party Profile
You can either edit an existing Relying Party profile, or create a new one to issue the custom token by default, and refer to the Issuance Template and related information.
Either way, configure:
-
Default token to issue: email (your custom token)
-
Issuance Template:
email-issuance-temp
45.9.4.1 Prerequisites for Adding a Custom Token to a Relying Party Profile
Your Custom Token and Issuance Template must be defined.
45.9.4.2 Editing a Requester Profile for a Custom Module
You can edit a requester profile from a custom module using Security Token Service section.
To edit a requester profile:
-
In the Oracle Access Management Console Launch Pad, click Federation at the top of the window.
-
Select Partner Profiles from the View menu in the Security Token Service section.
-
Select the Relying Party Profiles tab.
-
Existing Profile:
-
In the Search Results table of the Relying Party Profiles page, click the name of the desired profile.
-
Click the Token and Attributes tab.
-
Token Type Configuration: Click the Add (+) button above the Token Type Configuration table and enter the following details:
- Token type:
email - Issuance Template:
email-issuance-temp
- Token type:
-
Attributes: Click the Add (+) button above the Attributes table and define the following:
- Attribute name: mail
- Store Type:
Userstore - Include in Token:
(check to enable) - Encryption (leave blank)
- Value (leave blank)
-
Click Apply, dismiss the confirmation window, and close the page (or click Cancel to dismiss the page without submitting it).
-
-
New Profile: Click the New Relying Party Profile button to display the New Partner Profile page where you enter details:
-
General: Fill in the following details for the custom token in this chapter and then click the Next button at the top of the page.
- Profile ID:
unique_relyingparty-name - Default Token:
email
- Profile ID:
-
Click the Token and Attributes tab and perform Steps 2c and 2d and then click Apply.
-
45.9.5 Mapping the Token to a Requestor
If you don't have a Username Validation Template (username-wss-valid-template), use the Oracle Access Management Console to create one to map the token to the requester.
Validation Template Name: username-wss-valid-template
Token Type: Username
Proceed as follows:
45.9.6 Creating an /wssuser EndPoint
If you want to create an /wssuser EndPoint, you need to follow this procedure:
45.9.6.2 Creating an Endpoint
You can create an endpoint using Security Token Service section.
To create an endpoint:
-
In the Oracle Access Management Console Launch Pad, click Federation at the top of the window.
-
Select Endpoints from the View drop-down menu in the Security Token Service section.
-
New Endpoint:
-
Click the Add (+) button above the table (or choose New Endpoint from the Actions menu).
-
Enter the new Endpoint URI: /wssuser
-
Choose the Oracle WSM policy: sts/wss_username_service_policy
-
Choose the Validation Template: username-wss-validation-template.
-
Click Apply to submit the definition and dismiss the confirmation window (or click Revert to dismiss the page without submitting it).
-
Close the page.
-