16.5 Managing Active Server-Side Sessions
This section describes how to locate and delete one or more sessions for a single user, or for all users. It provides the following information:
16.5.1 Session Management Controls
The Session Management page is accessible from the Configuration section of the Oracle Access Management Console.
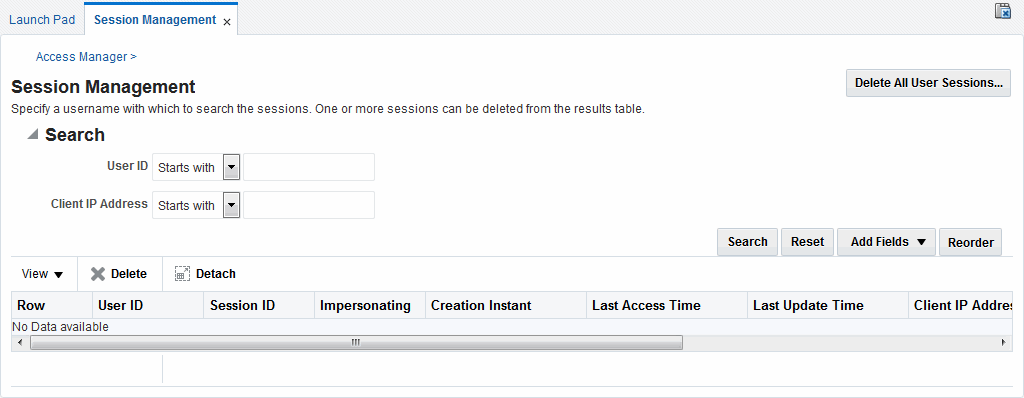
Figure 16-2 illustrates the Session Management page. Additional details follow the figure.
Figure 16-2 Common Configuration: Session Management Page

Description of "Figure 16-2 Common Configuration: Session Management Page"
Table 16-9 describes Session Management page and Search controls that enable you to create a query that is based on filter conditions.
Table 16-9 Session Management Controls and the Results Table
| Name | Description |
|---|---|
|
Delete All User Sessions ... |
Choose this command button to delete the active sessions of all users. Note: A Confirmation window appears where you can confirm or decline the operation. |
|
Saved Search |
Drop down menu that lists any search criteria saved previously for reuse. The list of searches is made available whenever you save search criteria. The drop down menu also has a Personalize ... option in addition to the saved searches. If you choose Personalize, you can change the behavior of the saved search criteria by making new choices such as Set as Default or Run Automatically. |
|
Match All Any |
Enables you to match either any of the criteria you have specified or match all of the criteria you have specified during the search. Note: When a resource is protected |
|
User ID |
Enter a specific userID in the field and then click the Search button to display all active sessions for this user. Incomplete strings and wild cards are allowed. A drop down menu includes options like Starts With, Equals, Contains and the like to assist in your search. |
|
Client IP Address |
Enter a Client IP Address and then click the Search button to display all active sessions for this user. Incomplete strings and wild cards are allowed. The same list is available to assist your Userid search and your Client IP Address. |
|
Search |
Click this button to initiate a search based on criteria in the form. |
|
Reset |
Click this button to clear the form of all criteria. |
|
Add Fields |
Displays a drop down menu from which you can select different options to add to your search form. This can include Client IP Address, ID Store, Impersonating and other options.
After adding an item, notice that a list is available to assist with the search. |
|
Reorder |
Displays a pop-up dialog allowing you to reorder the search fields. |
|
View |
Choose commands from the View menu above the results table to configure the table. Commands include:
|
|
Delete |
Choose this command button (red X) after selecting items in the results table to delete. Note: When session search criteria is generic (using just a wild card (*), for example), there is a limitation on deleting a session from a large list of sessions. Oracle recommends that your session search criteria is fine-grained enough to obtain a relatively small set of results (ideally 20 or less). Also: A Confirmation window appears where you can confirm or decline the operation. |
|
Detach |
Click Detach to expand the results table to a full-page view. Note: If the table is already a detached full-page, click Detach to restore the Session Management page. |
|
Results table (not named) |
After searching for the active sessions of a specific user, results are displayed in the table. Details include:
|
16.5.2 Locating and Managing Active Sessions
Users with valid Administrator credentials can configure the search results table, locate the active sessions of a specific user, delete one or more sessions for a specific user, or delete all sessions for all users.
When a resource is protected by AnonymousScheme, it is not displayed in a session search.
See Also:
Skip any steps that do not apply to your requirements. The OAM Server must be running.
-
In the Oracle Access Management Console, click Application Security at the top of the window.
-
In the Application Security console, click Session Management.
The Session Management Search page appears with the Username field and a results table.
-
Add Fields: From the Add Fields list, choose the desired field name (Table 16-9).
-
Choose Operators: Open the list of operators for the chosen search field, and choose the desired function.
-
Find sessions:
-
In the desired query field, enter your criteria (with or without a wild card (*)).
-
Click the Search button to locate sessions that match either any or all your criteria.
-
Review the results table.
-
Repeat if needed to further refine your search.
-
-
Configure the Results Table: Use functions on the View menu to create the desired results table.
-
Delete sessions:
-
In the results table, click one or more sessions to remove.
-
Click the Delete (x) button to delete the selected sessions.
-
Click Yes to confirm deleting selected sessions (or click No to cancel the delete operation).
-
Notify the user, if needed.
-
-
Delete sessions for all users:
-
Click the Delete All Sessions button in the upper-right corner.
-
Click Yes when you are asked to confirm.
-
-
Close the Session Management page when you finish.
-
Proceed to "Validating Server-Side Session Operations".