53.4 Configuring OAuth Services for Third-Party JWT Bearer Assertions

OAuth Services accepts third-party (non-Oracle) JWT assertions. You must, however, configure a trust relationship by adding the third-party's certificate into the OAuth Services Service Profile keystore. OAuth Services uses the keystore to verify the JWT assertion's digital signature.

Create a separate keystore for each Service Profile that needs its own signing certificate. This section covers the following topics:

53.4.1 Default Service Profile Keystore

The default Service Profile (OAuthServiceProfile) created in the DefaultDomain uses the Java Keystore (JKS) included with Oracle Access Management.

The role of the Service Profile is described in Service Profiles - Identity Federation and OAuth Services The OAuthServiceProfile consists of the following files:

Table 53-6 Default OAuth JKS Keystore File and Settings File

File Path

JKS keystore file

$DOMAIN_HOME/config/fmwconfig/default-keystore.jks

Keystore settings file

$DOMAIN_HOME/config/fmwconfig/jps-config.xml

Note:

Oracle Web Services Manager also uses the default-keystore.jks service. For details see About the Oracle Web Services Manager Keystore (default-keystore.jks).

You can use the following Java keytool command to list all of the private key and certificate information in the default keystore (default-keystore.jks).

keytool -list -keystore default-keystore.jks

Note:

When a new key is added to the OAM keystore, the OAM server needs to be restarted since keystore changes are not automatically refreshed.

53.4.2 Finding Credentials with Oracle Enterprise Manager Fusion Middleware Control Console

You can find the keystore credential with Oracle Enterprise Manager Fusion Middleware Control Console.

To find the keystore credential:

  1. Login to the Oracle Enterprise Manager Fusion Middleware Control Console.

    http://host_name.domain_name:port_number/em

  2. Navigate through WebLogic Domain --> <domain name>.

    <domain name> is the name of the domain in which the information is stored.

  3. Click on the WeblogicDomain found in the right corner.
  4. Select System MBean Browser ---> com.oracle.jps ---> Server:oam_server1 ---> JPS Credential Store.
  5. Navigate through JPS Credential Store Mbean --> Operations --> getPortableCredentialMap.
  6. Enter the p1 parameter as oracle.wsm.security.
  7. Click Invoke.
  8. Expand Data Element2.

    The password value is displayed.

53.4.3 Creating a Non-Default Keystore for a Service Profile

You can create a non-default keystore for a Service Profile.

The steps in this section describe about:

Note:

Any changes made during this procedure require a restart of the OAM server.

53.4.3.1 Creating a Seperate Keystore to Store Third-Party Certificates

You can create a new Java Keystore (JKS) using the keytool utility that is distributed with the Java JDK.

To create a new JKS:

  1. Go to $JDK_HOME/jdk/bin and open a prompt.
  2. Using keytool, generate a key pair:

    keytool -genkeypair -keyalg RSA -dname dname

    -alias aliasname -keypass key_password -keystore keystore

    -storepass keystore_password -validity days_valid

    Where:

    • dname is the X.500 Distinguished Name to be associated with alias, and is used as the issuer and subject fields in the self-signed certificate. This can be any string as long as it's in the correct format (for example, cn=spaces,dc=example,dc=com).

    • aliasname is a short name that identifies the new keystore entry

    • key_password is the password for the new public key

    • keystore is the keystore name, (for example, oauth-xyz-keystore.jks)

    • keystore_password is the keystore password

    • days_valid is the number of days for which the certificate should be considered valid (for example, 1064).

    Creating the Keystore

    keytool -genkeypair -keyalg RSA -dname "cn=spaces,dc=example,dc=com" 
    -alias oauthkey -keypass password123 -keystore oauth-xyz-keystore.jks 
    -storepass passwordxyz -validity 1064
    

53.4.3.2 Loading or Importing the Certificates Into the Keystore

You can use the keytool utility to import the certificates into the keystore.

To import the cerftificates:

  1. Using keytool, type the following command:

    keytool -importcert -alias aliasname -file certfile

    -keystore keystore -storepass keystore_password

    Where:

    • aliasname is a short name that identifies the keystore

    • certfile is the file containing the certificates to load

    • keystore is the keystore name, (for example, oauth-xyz-keystore.jks)

    • keystore_password is the keystore password

    Loading the Certificates

    keytool -importcert -alias oauthkey_123 -file samplekey.cer -keystore oauth-xyz-keystore.jks -storepass passwordxyz
    

53.4.3.3 Adding the Keystore Instance to jps-config.xml

You can configure the keystore service and update the credential store so that OAM can read the keystore and keys correctly.

In the jps-config.xml keystore settings file, add the following new keystore service instance in the <serviceInstances> element.

  1. In a text editor, open the keystore settings file:

    $DOMAIN_HOME/config/fmwconfig/jps-config.xml

  2. Find the <serviceInstances> node for the keystore.provider Provider, and add the following:
    <serviceInstance name="<service-instance-name>" provider="keystore.provider" location="<keystore-location>">
      <property name="keystore.provider.type" value="db"/>
      <property name="keystore.sig.csf.key" value="sign-csf-key"/>
      <property name="keystore.enc.csf.key" value="enc-csf-key"/>
      <property name="keystore.csf.map" value="oracle.oauth.security"/>
      <property name="keystore.pass.csf.key" value="keystore-csf-key"/>
      <property name="keystore.type" value="JKS"/>
      <propertySetRef ref="props.db.1"/>
    </serviceInstance>
    

    Where:

    • service-instance-name = Any service-instance-name

    • keystore-location = Path to the keystore file

    Update jps-config.xml

    <serviceInstance name="oauth-xyz-keystore.db" provider="keystore.provider" location="./oauth-xyz-keystore.jks">
      <property name="keystore.provider.type" value="db"/>
      <property name="keystore.sig.csf.key" value="sign-csf-key"/>
      <property name="keystore.enc.csf.key" value="enc-csf-key"/>
      <property name="keystore.csf.map" value="oracle.oauth.security"/>
      <property name="keystore.pass.csf.key" value="keystore-csf-key"/>
      <property name="keystore.type" value="JKS"/>
      <propertySetRef ref="props.db.1"/>
    </serviceInstance>
    
  3. Find the <jpsContexts> node and add the new service instance into the default context section. (Do not remove any pre-existing service instances.) The following example shows the addition of a <serviceInstanceRef> element with a ref to the oauth-xyz-keystore.db service instance (defined in the previous step).

    Adding the new Service Instance

    <jpsContexts default="default">
      <jpsContext name="default">
         <serviceInstanceRef ref="oauth-xyz-keystore.db"/>
         ... other serviceInstanceRef elements ...
      </jpsContext>
    

53.4.3.4 Creating a CSF Entry for the Keystore Service Instance

You can create the necessary Credential Store Framework (CSF) entries using the WLST commands.

Following are the WLST commands. Restart the server when you are done.

createCred(map="oracle.wsm.security", key="sign_csf_key", user="alias_name", password=keystore_password, desc="Description of the signing key credential")

createCred(map="oracle.wsm.security", key="enc_csf_key", user="alias_name", password=keystore_password, desc="Description of the encryption key credential")

createCred(map="oracle.wsm.security", key="keystore_csf_key", user="oauth", password=keystore_password, desc="Description of the keystore credential")

Where:

  • sign_csf_key = the password for the signing key

  • alias_name = the alias name for the key

  • keystore_password = the keystore password

  • enc_csf_key = the password for the encryption key

  • keystore_csf_key = the password for the keystore

Creating Credential Store Entries

createCred(map="oracle.wsm.security", key="oauth-sign-csf-key", user="ms-oauth-key", password=passwordxyz, desc="Signing key credential")

createCred(map="oracle.wsm.security", key="oauth-enc-csf-key", user="ms-oauth-key", password=passwordxyz, desc="Encryption key credential")

createCred(map="oracle.wsm.security", key="keystore_csf_key", user="oauth", password=passwordxyz, desc="Keystore credential")

53.4.3.5 Adding the Provider Service Name to the Service Profile

You can apply the updated configuration to the Service Profile.

See Creating a Service Profile if you have not yet created an OAuth Service Profile for the third-party service.

  1. Access the Identity Domains page as described in Configuring OAuth Services Components in an Identity Domain and click the identity domain to open it for editing.
  2. Click the Service Profiles tab.
  3. Click the Service Profile name in the table.
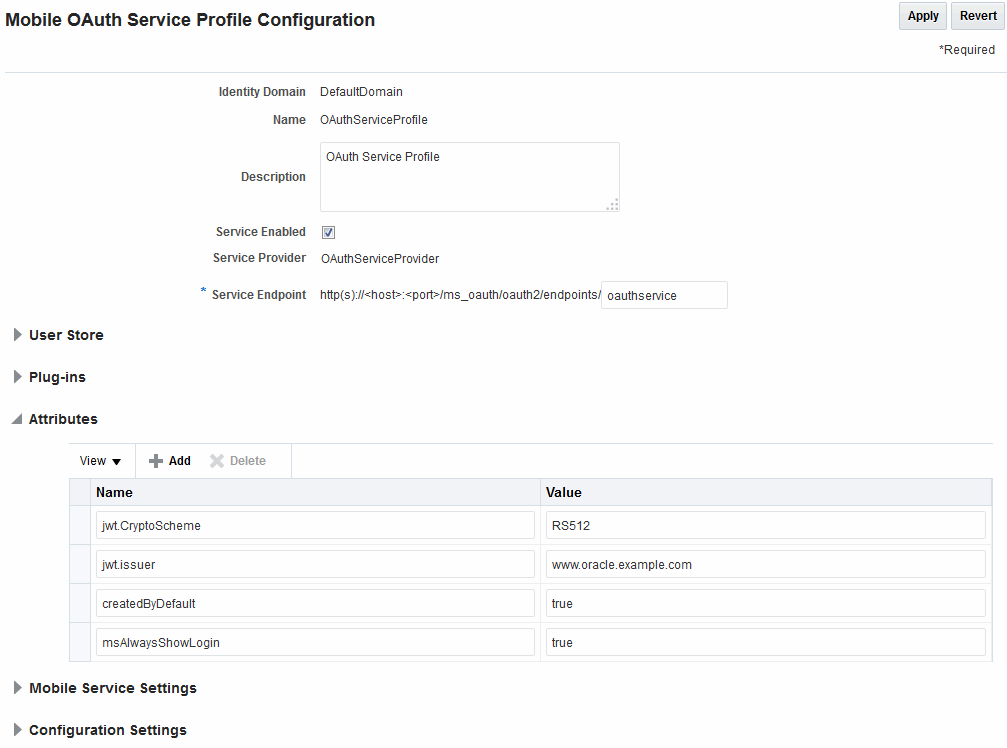
  4. Expand the Attributes section.
  5. Add the keystore service information you configured in Example 52–4, "Adding the new Service Instance" to the Attributes table using the keystore.service name. Refer to the following screen capture.

53.4.4 Configuring a Third-Party JWT Trust Issuer

You can configure OAuth Services to support specific JSON Web Token (JWT) issuers.

All Trusted Issuers must be defined so the OAM Server can validate the token, the thumbprint (x5t) and the key identifier based on this configuration. If there is a trusted entry already available with the same claim, header values and alias name, that entry will be used.

  1. Access the Identity Domains page as described in Configuring OAuth Services Components in an Identity Domain and click the identity domain to open it for editing.
  2. Click the Service Profiles tab.
  3. Click the Service Profile name in the table.

    In this example, OAuthServiceProfile.

  4. Expand the Configuration Settings section and click the Trusted Issuers tab.
  5. Configure the following and click Apply.
    • The certificate alias

    • The URL of the Trusted Issuer

    • The key identifier (KID) of the certificate alias.

    • The X.509 Certificate Thumbprint

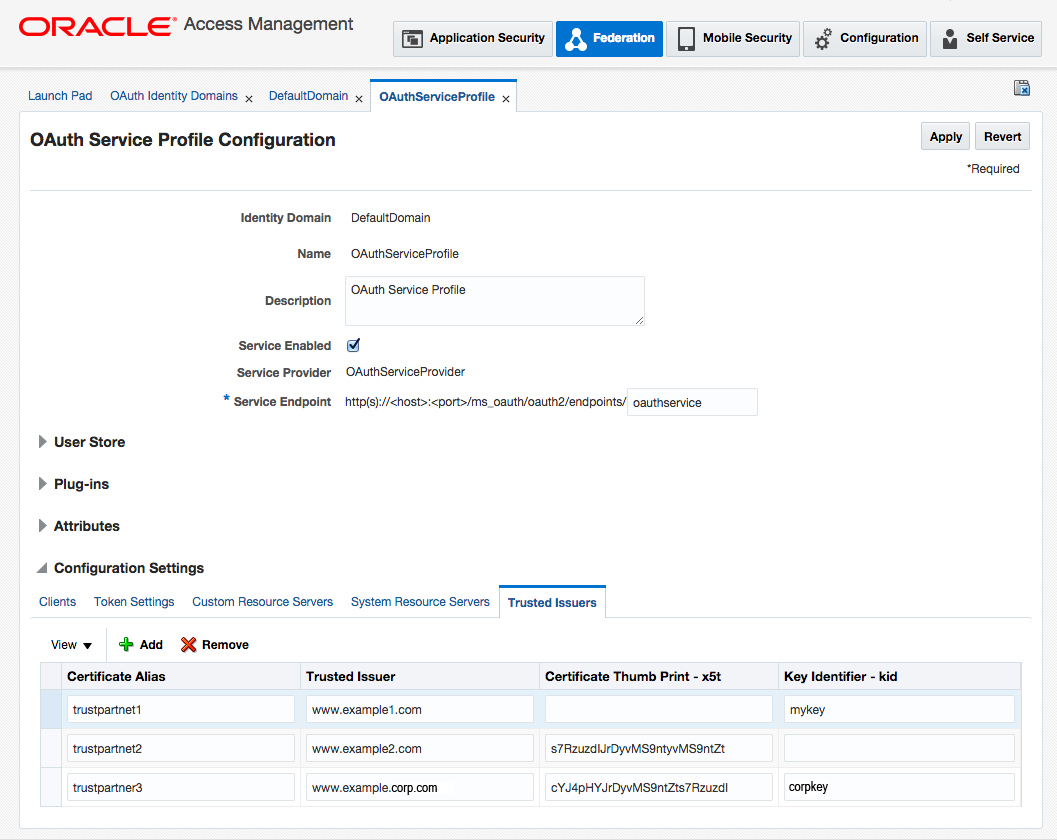
Figure 53-4 is a screenshot of the OAuth Services Service Profile Configuration Page where Trusted Issuers are defined under the Configuration Settings heading. Three Trusted Issuers are configured in it and the following is true of these configurations.

  • If a request comes with an assertion in which the Trusted Issuer is "www.example1.com", the kid header is "mykey" and there is no x5t header, the runtime uses the certificate with the "trustpartner1" alias name.

  • If a request comes with an assertion in which the Trusted Issuer is "www.example2.com", the value of the x5t header is "s7RzuzdlJrDyvMS9ntyvMS9ntZt" and there is no kid header, the runtime uses the certificate with the "trustpartner2" alias name.

  • If a request comes with an assertion in which the Trusted Issuer is "www.example.corp.com", the value of the kid header is "corpkey" and the value of the x5t header is "cYJ4pHYJrDYvMS9ntZts7Rzuzdl", the runtime uses the certificate with the "trustpartner3" alias name.

Figure 53-4 OAuth Services Service Profile Configuration Page
Description of Figure 53-4 follows
Description of "Figure 53-4 OAuth Services Service Profile Configuration Page"