5 Managing Access Policies
Access policies are rules that are assigned to roles and dictate which target systems can be provisioned or deprovisioned to users to whom these roles are assigned. Essentially, it is an automated way of provisioning of target systems to users. This is explained with the help of the following example:
A user belongs to multiple roles created in Oracle Identity Manager. Suppose a role Vision North has a membership rule assigned to it. Membership rules can be designed based on the organization that the user belongs to, such as Organization Name = "Vision North America". Roles can have access policies assigned to them. An access policy states which resource would be provisioned and/or denied to a role when the access policy is applicable. Therefore, when a user is created in the Vision North America organization, it satisfies a membership rule and grants the Vision North role to the user. This in turn triggers the access policy assigned to the role and then provisions or denies the resources mentioned in the access policy.
In this release of Oracle Identity Manager, you can search and then assign access policies to roles from the role wizard of Identity Self Service. You cannot assign roles to access policies in the access policy configuration section of the Identity System Administration.
This chapter describes how to create and use access policies for users and resources in Oracle Identity Manager. It contains the following sections:
-
Provisioning Multiple Instances of the Same Resource via Access Policy
-
Troubleshooting Issues with Evaluate User Policy Scheduled Job
5.1 Terminologies Used in Access Policies
The following terminologies are associated with access policies:
In this release, access policy owner does not have any special privileges. As access policy configuration UI is available in the Identity System Administration, only system administrators can access this feature. Also there are no authorization checks added based on access policy owners in access policy management APIs.
A resource is a logical entity in Oracle Identity Manager that can be provisioned to a user or an organization in Oracle Identity Manager. For example, Microsoft Active Directory (AD), Microsoft Exchange, SAP, UNIX, and Database is modeled as a resource in Oracle Identity Manager.
Resources are templated definitions that are associated with one or more workflows called Provisioning Process in Oracle Identity Manager, which model the lifecycle management, such as how to provision, revoke, enable, and disable.
Resources also have entities called forms associated with them. Forms represent a collection of attributes associated with the resource. For instance, a form associated with AD server includes attributes such as SAM Account Name, Common Name, and User Principal Name. Forms also contain an attribute of type IT Resource (see "IT Resource Type" for details).
Accounts are actual instances of a resource that are created and provisioned to a user or organization in Oracle Identity Manager. For example, an e-mail account on an Exchange server is an account (instance) of resource type Exchange.
Accounts have specific values for the attributes of the associated form.
IT resource type is a logical entity in Oracle Identity Manager used to model a physical target and all its attributes including (but not limited to) the connectivity information and the credentials required to connect to the physical computer. For example, IT resource type AD server is used to model an actual AD server.
These are actual instances of specific IT resource type that represent the actual physical target. They also have specific values for all the attributes of the physical target, such as IP address, port, user name, and password. Two physical AD servers in a deployment are represented by two instances of IT resource type AD Server.
Providing the IT resource instance in access policy defaults for parent data is mandatory.
Account discriminator is a collection of attributes on a form that uniquely identifies the logical entity on which accounts are created. This term is sometimes loosely referred to as a target. For instance, for an AD server, an account discriminator can be a combination of AD server (an attribute of type IT Resource) and Organization Name.
Typically, account discriminators are attributes of type IT Resource.
Attributes are marked as account discriminators by setting the Account Discriminator property of a Form field to True.
5.2 Features of Access Policies
This section describes the various features offered by the policy engine in the following sections:
5.2.1 Direct Provisioning
Whenever an access policy is applied, the resources are directly provisioned/denied without any request being generated.
5.2.2 Revoking or Disabling the Policy
Oracle Identity Manager access policies are not applied to subroles. Policies are only applied to direct-membership users (that is, users who are not in subroles) in the roles that are defined on the access policies. You must specify whether a resource in a policy must be revoked or disabled when the policy no longer applies. Based on your selection, the resources are automatically revoked from the users or disabled when the policy no longer applies to the users. Accounts and entitlements can either be revoked or disabled if policy no longer applies.
For each resource associated with an access policy, you must select any one of the following options:
-
Revoke if no longer applies: Selecting this option revokes the account and the entitlements associated with the access policy when the access policy is no longer applicable.
-
Disable if no longer applies: Selecting this option disables the account and the entitlements associated with the access policy when the access policy is no longer applicable.
When the Revoke if no longer applies option or the Disable if no longer applies option is selected, entitlements are always revoked with the policy no longer applies. If the Disable if no longer applies option is selected, then the entitlements associated with the resource are revoked when the policy no longer applies because the entitlements have been originally granted because of the role grant. The entitlements are added to the resource instance when the role is granted once again.
Note:
During an upgrade to Oracle Identity Manager 11g Release 2 (11.1.2.3.0), policies which had the Revoke if no longer applies option deselected is converted to Disable if no longer applies. Users associated with these policies will not be updated, but any future updates to the policy will result in the user being marked with a Disable if no longer applies flag.If two policies have the same resource in the policy definition with one having the Revoke if no longer applies option selected and the other one with the Disable if no longer applies option, then the Disable if no longer applies option takes precedence over the Revoke if no longer applies option. In other words, resources are disabled (and not revoked) when both the policies no longer apply.
5.2.3 Denying a Resource
While creating an access policy, you can select resources to be denied along with resources to be provisioned for roles. If you first select a resource for provisioning and then select the same resource to be denied, then Oracle Identity Manager removes the resource from the list of resources to be provisioned. In other words, the resources to deny takes precedence.
Note:
If a resource is denied by an access policy, then the resource is always denied, even if a different policy provisions it. Denying of resources is irrespective of access policy priority. Even if an access policy with lower priority denies a resource, it takes precedence over an access policy with higher priority.5.2.4 Evaluating Policies
Access policy evaluation works in the following manner:
-
After role grant to user or update of policy definition, the users for whom policy evaluation is needed are identified and the entry is updated or added in the USER_PROVISIONING_ATTRS table.
-
Flag stored in USER_PROVISIONING_ATTRS. POLICY_EVAL_NEEDED is used to determine users for whom policy evaluation is required.
-
The
Evaluate User Policiesscheduled job is run to invoke policy evaluation and further actions on accounts.By default, this task is enabled and scheduled to run every 10 minutes. See "Predefined Scheduled Tasks" for more information about the Evaluate User Policies scheduled task. -
The scheduled task picks distinct user records (each record in this table is for distinct user) available in USER_PROVISIONING_ATTRS in the default batch size of 500 using 20 threads, which is 25 records per thread in the ascending order of update date. A JMS message is submitted for each user for access policy evaluation.
Access policy evaluation is shown in Figure 5-1.

When the policy is created with Retrofit = true and the policy definition is changed by one of the following manner:
-
When a user is made a part of a role or removed from a role. The policy for the user is evaluated as part of the add or remove operation.
-
If the retrofit flag is set for the policy. The evaluations can happen in the following scenarios:
-
Policy definition is updated. Policies are evaluated for all applicable users.
-
A role is added or removed from the policy definition. Policies are evaluated only for roles that is added or removed.
Note:
In 11g Release 2 (11.1.2.3.0), after the role is applicable to the user, you must run the Evaluate User Policies scheduled job to make access policy applicable. -
A resource is added, removed, or the Revoke If No Longer Applies or Disable If No Longer Applies options are changed for the resource.
When you change the Revoke if no longer applies and Disable if no longer applies options from one to the other, the existing resource instances are not re-evaluated immediately. This policy change takes effect only the next time the policy is evaluated by the Evaluate User Policies scheduled task.
-
When policy data is updated or deleted. This includes both parent and child form data. Policies are evaluated for all applicable users.
-
When roles are assigned to or removed from a policy, then users are immediately marked for policy evaluation irrespective of the setting for Retrofit flag. The Retrofit flag can be used only to determine if users need to be marked for policy evaluation for access policy definition changes, which involves:
-
Priority of the policy changes
-
Resource associated to policy changes
-
The the Revoke If No Longer Applies or Disable If No Longer Applies options change
-
Parent or child data changes. In this scenario, if
Retrofitis set tofalse, then users are not marked for policy evaluation although policy definition has changed.
5.2.5 Evaluating Policies for Reconciled and Bulk Load-Created Accounts
The access policy engine can link access policies to reconciled accounts and to accounts created by the Bulk Load Utility. The access policies are then evaluated using the Evaluate User Policies scheduled job. To enable this feature, ensure the following:
-
Set the values of
XL.AllowAPHarvestingandXL.AllowAPBasedMultipleAccountProvisioningsystem properties toTRUE.See "System Properties in Oracle Identity Manager" for information about these system properties. See "Creating and Managing System Properties" for information about setting the value of a system property.
-
Set the retrofit flag to ON for the policy to be linked by selecting Retrofit Access Policy.
For information about the retrofit flag, see "Creating Access Policies". For information about updating a policy definition, see "Managing Access Policies".
-
Populate the ITResource field in access policy defaults.
If the ITResource field is not populated, then the provisioning engine cannot determine the application instance to be associated with the account and the account will not be visible in the UI.
-
Designate a field on the process form as the discriminator field and set the value of the Account Discriminator property to
True.Then, populate the access policy defaults for the account discriminator field.For information about setting the discriminator field, see "Enabling Multiple Account Provisioning".
After enabling the feature to link access policies to reconciled accounts and to accounts created by the Bulk Load Utility, the access policy harvesting flow is depicted in Figure 5-2.
Figure 5-2 Access Policy Harvesting Flow
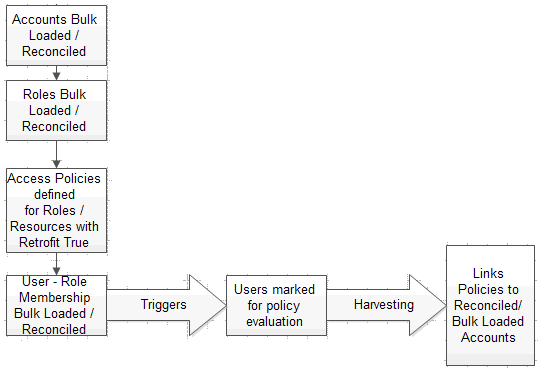
Description of ''Figure 5-2 Access Policy Harvesting Flow''
5.2.6 Access Policy Priority
Policy priority is a numeric field containing a number that is unique for each access policy you create. The lower the number, the higher is the priority of the access policy. For example, if you specify Priority =1, it means that the policy has the highest priority. When you define access policies through Oracle Identity System Administration, the value 1 is always added to the value of the current lowest priority and the resultant value is automatically populated in the Priority field. Changing this value to a different number might result in readjusting the priority of all the other access policies, thus ensuring that the priorities remain consistent. The following actions are associated with the priority number:
-
If the priority number entered is less than 1, then Oracle Identity Manager will change the value to 1 (highest priority).
-
If the priority number entered is greater than M, in which M is the current lowest priority, then Oracle Identity Manager will force to specify the value as less than or equal to M+1.
-
Two access policies cannot have the same priority number. Therefore, assigning an already existing priority number to an access policy will lower the priority by 1 for all policies of lesser priority.
Conflicts can arise from multiple access policies being applied to the same user. Because a single instance of a resource is provisioned to the user through access policies, Oracle Identity Manager uses the highest priority policy data for a parent form. For child forms, Oracle Identity Manager uses cumulative records from all applicable policies.
If there is more than one access policy created for the same resource but granting different sets of entitlements and having different behavior when policy no longer applies, then the access policy with Disable if no longer applies (DLNA) option enabled has the highest priority irrespective of the access policy priorities. For example, if there is an access policy with Revoke if no longer applies (RLNA) option enabled and another policy with DLNA option enabled, then the policy with DLNA option enabled has higher precedence. Irrespective of the order in which the policies are applied, if only the policy with DNLA no longer applies but the other policy with RNLA still applies, then the resource would remain in the Provisioned status. Only after all access policies for that resource are no longer applicable, then the resource would move to the Disabled status.
If a policy with Disable if no longer applies is later converted to Revoke if no longer applies, then existing accounts that are associated with the policy are not updated to RLNA. The change is effective only for accounts to be created in future.
If a policy with RLNA is later converted to DLNA, then the accounts that are already revoked are not impacted. The change is effective only for accounts currently associated with this policy or accounts to be created in the future.
5.2.7 Access Policy Data
There are multiple ways in which process form data is supplied for resources during provisioning. The following is the order of preference built into Oracle Identity Manager:
-
Default values from the form definition using Oracle Identity Manager Design Console
-
Prepopulate adapters
-
Access policy data if resource is provisioned because of a policy
-
Data updated by Process Task
If a given option is available, then the rest of the options that are at a lower order of preference are overridden. For example, if Option 4 is available, then Options 3, 2, and 1 are ignored.
5.2.8 Provisioning Multiple Instances of the Same Resource via Access Policy by Using Account Discriminator
In earlier releases of Oracle Identity Manager, access policies can be used to manage only a single account for a resource object. In other words, if you already have resource provisioned to user (account has been created in the target system) and if another instance of the same resource is to be provisioned to the same user via access policy, then it is not possible in earlier releases of Oracle Identity Manager. To achieve the functionality of provisioning multiple instances of resource to a user, prior to access policy enhancement in Oracle Identity Manager 11g Release 2 (11.1.2.3.0), you must clone the connector that represents the target system in Oracle Identity Manager. Cloning of connector was error prone needed lot of effort for testing/maintenance of cloned resource. Access Policy enhancement done for provisioning of multiple instances of resource in Oracle Identity Manager 11g Release 2 (11.1.2.3.0) saves the time and effort on cloning connectors.
A target system, such as UNIX server, Active Directory (AD) server, database, SAP, or JD Edwards, is the external system to Oracle Identity Manager that must be provisioned to users in Oracle Identity Manager. The target system is represented by an entity called resource in Oracle Identity Manager. The server on which target system is installed is represented by IT resource in Oracle Identity Manager. And the login credentials provided to user accessing this target system is represented by an account in Oracle Identity Manager. A user can have multiple accounts on a single target system. For example, one account can be a service (administrator) account and another a regular account. Therefore, it is mandatory to have two accounts for a same user in a single target system. In addition, it is possible to have different instances of target system, such as multiple UNIX servers, database servers, and AD servers. As a result, it is required to create accounts on each instance of the target system for the same user. For implementation details, see "Creating Separate Accounts for the Same User and Same Resource on a Single Target System".
In Oracle Identity Manager 11g Release 2 (11.1.2.3.0), access policies can provision multiple accounts in the same target system as well as a single account in multiple instance of the same target system. While evaluating access policies and provisioning resources to user, Oracle Identity Manager checks if the resource has already been provisioned to the user or not. This is determined by checking the resource key (OBJ_KEY) of the resource provisioned to user. To have multiple instances to be provisioned through access policy, another criteria called account discriminator along with OBJ_KEY is required to distinguish the multiple instances of the same resource. Therefore, access policy checks the resource key as well as account discriminator to decide if the resource has been provisioned or not.
The account discriminator is a field on a process form (account data) that distinguishes two accounts of the same user, which can be present on the same target system or different target systems. For example:
-
If user Jane.Doe is to be provisioned two accounts on two different UNIX servers, then IT resource can be used as account discriminator.
-
If user John.Doe is to be provisioned two accounts on the same database instance, then distinct login IDs can be used as account discriminator.
See Also:
"Provisioning Multiple Instances of the Same Resource via Access Policy" for the steps to provision data from multiple target systems5.3 Creating Access Policies
You can define an access policy for provisioning resources to users who have roles defined in the policy by using the Access Policy Wizard.
Note:
-
Identity Audit policies (SoD) are not evaluated during the creation of an access policy.
-
The association of a role to an access policy is done as part of role management and not via the access policy UI.
To create an access policy:
-
Login to Oracle Identity System Administration.
-
Under Policies, click Access Policies. The Manage Access Policies window is displayed.
-
Click Create Access Policy to open the access policy creation page.
-
Enter information in the required fields indicated with an asterisk (*), such as access policy name and description.
Note:
The following special characters are not allowed in the access policy name:Semicolon (;)
Hash (#)
Percentage (%)
Equal to (=)
Bar (|)
Plus (+)
Comma (,)
Forward slash (/)
Back slash (\)
Single quote (')
Double quote (")
Less than (<)
Greater than (>)
-
From the Policy Owner list, select USER or ROLE as the policy owner type. Based on your selection, click the lookup icon and select a user or role as the policy owner.
If you do no select a policy owner type, then the access policy is created with the default policy owner type as USER and policy owner as the logged-in user.
If you select a policy owner type and do not select a policy owner value, which is USER or ROLE, and click Continue, then a validation error is displayed that does not allow you to proceed to the next screen.
-
Select Retrofit Access Policy to retrofit this access policy when it is created.
If you select the Retrofit Access Policy option, then the access policy is applied to all the roles to which this access policy is associated. For information about assigning access policies to roles, see "The Access Policies Tab" in Performing Self Service Tasks with Oracle Identity Manager.
If you do not select this option, then existing role memberships are not taken into consideration.
-
Click Continue.
The Create Access Policy - Step 2: Select Resources (to provision) page is displayed.
-
Specify the resource to be provisioned for this access policy.
Search for resources by using the filter search menu.
-
Select the name of the resource from the results table, and then click Add.
-
The names of the desired resources to provision appear in the Selected list. If you want to create an access policy that only denies resources, click Continue without selecting a resource.
-
To unassign the selected resources, select the resource in the Selected list and click Remove.
-
-
Click Continue.
If there is a form associated with this resource, then the subsequent pages display the required fields. Enter the process details for each resource you selected. Note that the itres field is a mandatory field, and you must specify a value for the IT resource. Without IT resource being populated, the following error message is displayed:
Either values for some required fields are missing or a value for a required field is invalid.
If you do not want to edit the form fields, then click Skip This Step. The Create Access Policy - Step 2: Select Revoke or Disable Flag page is displayed.
Note:
Oracle recommends that you do not specify policy defaults for passwords and encrypted attributes. -
For each resource listed in the page, select any one of the following options:
-
Revoke if no longer applies: Selecting this option revokes the account and the entitlements associated with the access policy when the access policy is no longer applicable.
-
Disable if no longer applies: Selecting this option disables the account and the entitlements associated with the access policy when the access policy is no longer applicable.
See "Revoking or Disabling the Policy" and "Evaluating Policies" for more information about revoking or disabling accounts and entitlements when access policies no longer apply.
-
-
Click Continue.
The Create Access Policy - Step 3: Selected Resources (to deny) page is displayed.
-
Use this page to select resources to be denied by this access policy.
To select resources to be denied:
-
Select the resources from the results table.
-
Click Add to place the resource in the Selected list.
You must select at least one resource to deny if you have not selected any resources to be provisioned. Selecting the same resources to be denied as to be provisioned will automatically unassign them from the resources to be provisioned selection.
Similarly, in Step a, assigning the same resources to be provisioned as you have already selected to be denied will automatically remove them from the resources to be denied selection. You can remove the resources that were selected to be denied. You do this by selecting those resources from the Selected list, and clicking Remove.
-
Click Continue.
The Create Access Policy - Step 5: Verify Access Policy Information page is displayed.
-
-
If you want to modify any of the selections you made in the preceding steps of this procedure, then click Change to go to the corresponding page of the wizard. After making the required modifications, click Continue to return to the Step 5: Verify Access Policy Information page.
Note:
The Policy Owner Type and Policy Owner fields are displayed only if values for these fields have been specified, as described in step 5. -
Click Create Access Policy to create the access policy.
Note:
When you create an access policy on a resource having a process form with Password field, the password policy is not evaluated. For information about password policies, see .5.4 Managing Access Policies
You can use Oracle Identity System Administration to modify information in existing access policies.
To manage access policies:
-
In the Identity System Administration, click Access Policies under Policies.
The Manage Access Policies page is displayed.
Use the menu in the search criteria field to select an access policy attribute. You can use the asterisk (*) wildcard character to search for all access policy instances that have any value for the attribute selected. Click Search Access Policies.
The Manage Access Policies page is displayed with your search results.
-
To view the details of the Access Policy you want, click the access policy name.
The access policy details page is displayed. To make modifications to this access policy, use the Change link at the end of each selection category. After you make the required modifications, click Update Access Policy to save the changes.
The Policy Owner Type and Policy Owner fields are displayed only if values for these fields have been specified when creating the access policy. You can modify the values of both the Policy Owner Type and Policy Owner fields. If you change the value of the Policy Owner Type field from USER or ROLE to Select Policy Owner Type, then the existing policy owner type and policy owner is retained.
Note:
-
You can change the Revoke if no longer applies and Disable if no longer applies options as a part of the access policy modification. See "Revoking or Disabling the Policy" and "Evaluating Policies" for information about the effects of changing these options in access policies.
-
The IT Resources field cannot be edited from the access policy details page.
-
-
After you complete making the required modifications for the selection categories, click Exit.
See Also:
"The Access Policies Tab" in Performing Self Service Tasks with Oracle Identity Manager for information about adding access policies to a role and removing access policies assigned to a role.5.5 Provisioning Multiple Instances of the Same Resource via Access Policy
Provisioning multiple instances of the same resource via access policy by using account discriminator involves the following:
-
Creating Separate Accounts for the Same User and Same Resource on a Single Target System
-
Provisioning Multiple Instances of a Resource to Multiple Target Systems
-
Limitation of Provisioning Multiple Instances of a Resource via Access Policy
5.5.1 Enabling Multiple Account Provisioning
By default, Oracle Identity Manager does not support multiple account provisioning. To enable multiple account provisioning:
Set the value of the XL.AllowAPBasedMultipleAccountProvisioning system property to TRUE. See "System Properties in Oracle Identity Manager" for information about this system property. See "Creating and Managing System Properties" for information about setting the value of a system property.
When multiple account provisioning is enabled, you must define the appropriate account discriminator attributes. To do so:
-
Log in to the Design Console.
-
Update the process form as follows:
-
Expand Development Tools, and then double-click Form Designer.
-
Search and open the process form.
-
On the Form Designer tab, click Create New Version.
-
In the Create a New Version dialog box, enter a label in the Label field, and then click Save.
-
From the Current Version list, select the version that you created.
-
On the Properties tab, select the field that you want to designate as the discriminator field, and then click Add Property.
-
In the Add Property dialog box, select Account Discriminator as the property name, enter
Truein the Property Value field, and then click Save. -
Click Make Version Active, and then click OK.
-
Click Save.
-
5.5.2 Creating Separate Accounts for the Same User and Same Resource on a Single Target System
Two distinct accounts can be created for the same user and same resource on a single target system via access policy. For example, it is required to create two accounts, a user account and service account on a single AD instance. The Active Directory target system is represented by the AD User resource in Oracle Identity Manager. This is implemented in the following way:
-
Create a AD User resource.
-
Create the user, such as JohnD.
-
In the process form, mark UD_ADUSER_ORGNAME as the discriminator field so that two distinct accounts have different login IDs.
-
Create two access policies as follows:
-
For regular account:
Access policy name: AP1
Associated to role: Role1
Resource to provision: AD User
Process form having Discriminator field: User ID (UD_ADUSER_ORGNAME)
Default value in access policy: Account1
-
For service account:
Access policy name: AP2
Associated to role: Role2
Resource to provision: AD User
Process form having Discriminator field: User ID (UD_ADUSER_ORGNAME)
Default value in access policy: Account2
Note:
You must create a prepopulate adapter associated with the process form to generate the values for User ID so that unique values are generated for this field. -
-
Assign Role1 and Role2 to JohnD. Note that you will not see the resource provisioned right after completion of role assignment. You must either wait for the Evaluate User Policies scheduled task to run automatically or you run this scheduled task manually.
When Role1 is assigned to JohnD, the Account1 account is created in the AD User target system via the AP1 access policy. When Role2 is assigned to JohnD, Account2 is created in AD User via AP2. Therefore, two distinct accounts can be created for the same user and same resource on a single target system via access policy.
5.5.3 Provisioning Multiple Instances of a Resource to Multiple Target Systems
The following are the broad-level steps to provision multiple instances of a resource object to multiple target systems via access policy:
-
Create an IT resource type by using the IT Resources Type Definition Form in the Oracle Identity Manager Design Console. For information about using this form, see "IT Resources Type Definition Form" in Developing and Customizing Applications for Oracle Identity Manager.
-
Create multiple IT resource instances of the IT resource type that you created in step 1. For information about creating IT resources, see "Creating IT Resources".
Here, IT resource instance is the account discriminator. See "Provisioning Multiple Instances of the Same Resource via Access Policy by Using Account Discriminator" for information about account discriminator.
Note:
Display the process form default for ITResource. It is mandatory to display it. By doing so, you can successfully provision an application instance via access policy. -
Create a process form with a field of type that you created in step 1.
-
Create a resource object.
-
Create a process definition, and associate the resource object and process form. For information about creating a process definition, see "Creating a Process Definition" in Developing and Customizing Applications for Oracle Identity Manager.
-
Create access policies associating a role and resource object. See "Creating Access Policies" for details.
When you have two instances of the same resource on different physical server, you can use access policy to provision both the instances of a resource to the same user, JohnD. This is described with the help of the following scenario:
You have tow AD instances, one hosted on server with IP as 10.151.14.82 and another hosted on server with IP 130.35.66.254. The user is to be provisioned to both the instances via access policy-based provisioning. To achieve this:
-
Create a AD User resource.
-
Create an IT resource with name ADServer1 that represents the server with IP address as 10.151.14.82.
-
Create an IT resource with name ADServer2 that represents the server with IP address as 130.35.66.254.
-
Mark the AD Server (UD_ADUSER_SERVER) process form field as the discriminator field.
-
Create two access policies as follows:
-
For the account to be created on ADServer1:
Access policy name: AP3
Associated to role: Role3
Resource to provision: AD User
Process form having Discriminator field: AD Server (UD_ADUSER_SERVER)
Default value for ITResourceLookup field: ADServer1
-
For the account to be created on ADServer2:
Access policy name: AP4
Associated to role: Role4
Resource to provision: AD User
Process form having Discriminator field: AD Server (UD_ADUSER_SERVER)
Default value for ITResourceLookup field: ADServer2
-
-
Assign Role3 and Role4 to the user JohnD.
When Role3 is assigned to JohnD, the account is created in the target system on ADServer1 via the AP3 access policy. When Role4 is assigned to JohnD, the account is created in the target system on ADServer2 via the AP4 access policy. Therefore, two distinct accounts are created for the same user and same resource on two different instances of the target system via access policy.
5.5.4 Limitation of Provisioning Multiple Instances of a Resource via Access Policy
Provisioning multiple instances of a resource via access policy has the following limitations:
-
A single access policy cannot provision multiple instances of a resource to a user. Multiple access policies must be created to provision multiple instances of resource. You must create the same number of access policies as that of instances of same resource that is to be provisioned.
-
If a resource object has a process form that has fields marked as account discriminator fields, then the value of these fields must be specified in any access policy that provisions that resource. Otherwise, issues might be encountered, such as multiple accounts might be provisioned when the policies are evaluated next time.
-
If a resource object has a process form that has fields marked as account discriminator fields and if you use the access policy engine to provision this resource to one or more users, then the values of the account discriminator fields must remain constant throughout the lifecycle of the account. In other words, the values of the account discriminator fields must not be changed. This is because the access policy engine uses the resource object key and the account discriminator values to decide whether or not to provision a new account to the user.
By modifying account discriminator values, you modify the basis on which the provisioning decision had been taken. and the behavior of the access policy engine cannot be determined. Therefore, it is recommended that you do not modify account discriminator values. And the process form values of the account discriminator fields must not be changed.
-
If access policies are configured with different account discriminator values, they provision different accounts to the user.
Note:
Account discriminator values that are different only in casing (for example, abc and aBc) are also treated as different values. With this data, two accounts are provisioned to the end user.
5.6 Troubleshooting Issues with Evaluate User Policy Scheduled Job
In some cases, the Evaluate User Policy scheduled task may not trigger, process users, or process only a few users. Any of the following could be the reasons:
-
The Evaluate User Policy scheduled task ran, but there are no users marked for policy evaluation.
-
Users were marked for policy evaluation, however the users are not active.
-
Policy evaluation was done, however provisioning operations failed.
In this case, the event handlers related to provisioning is in CANCELLED state. Therefore, no accounts or entitlements are provisioned to the users.
-
The Evaluate User Policy scheduled task is not triggered due to an issue with the scheduler.
In this case, the scheduler issue needs to be troubleshooted separately.
To identify if the issue is with access policy, provisioning, or scheduler, perform the steps mentioned in the MetaLink note 1563379.1.