13 Troubleshooting Oracle Mobile Security Suite
This chapter provides troubleshooting tips for Oracle Mobile Security Suite.
It includes the following sections:
-
Troubleshooting Common Oracle Mobile Security Suite Deployment Issues
-
Troubleshooting Missing LDAP Group in the List of Roles Applicable to the User
-
Troubleshooting the Microsoft Exchange Notification Integration Issues
13.1 Gathering Mobile Security Workspace Logs
You can mail client logs using the "Send logs" function, which packages all necessary client logs.
To gather detailed logs for troubleshooting:
-
Navigate to the Mobile Security Workspace application settings.
-
Turn on Log Mode.
-
Set Log Level to verbose.
13.2 Configuring Mobile Security Access Server Logs
Mobile Security Access Server (MSAS) components generate log files containing messages that record all types of events. For information on how to view and manage log files to assist in monitoring system activity and in diagnosing problems, see "Managing Log Files" in Oracle Fusion Middleware Administering Oracle Mobile Security Access Server.
13.3 Logging Mobile Security Manager Component Event Messages
Logging is the mechanism by which components write messages to a file. Administrators can use the logging mechanism to capture component events with information at various levels of granularity. Oracle Mobile Security Manager uses the same logging infrastructure and guidelines as any other component in Oracle Fusion Middleware 11g. This is accomplished by using the package java.util.logging, which is standard and available in all Java environments. The logging system writes output to flat files only.
Configuring logging and locating log files are the focus of this section. Diagnosing problems using the information in log files is outside the scope of this manual. This section contains the following topics:
-
Configuring the Loggers and Log Handlers Using Fusion Middleware Control
-
Configuring the Loggers and Log Handlers Using the logging.xml File
-
Configuring the Loggers and Log Handlers Using Fusion Middleware Control
-
Configuring the Loggers and Log Handlers Using the logging.xml File
13.3.1 About Oracle Diagnostic Log File Management
Oracle Diagnostic Logging (ODL) is the principal logging service used by Oracle Mobile Security Manager. For ODL logging to work, both loggers and log handlers need to be configured. Loggers send messages to handlers, and handlers accept messages and output them to log files.
Oracle Mobile Security Manager makes use of the files in the below table
Table 13-1 Logging Files Used for Oracle Mobile Security Manager
| File Type | Description |
|---|---|
|
Logging Configuration File |
Provides logging level and other configuration information for logging. This file is stored in the following path: $DOMAIN_HOME/config/fmwconfig/servers/SERVER-NAME/logging.xml |
|
Log File |
Logged information is stored in the following location: $DOMAIN_HOME/servers/SERVER-NAME/logs/SERVER-NAME-diagnostics.log |
Logging configuration is controlled by the logging.xml file described in Section 13.3.5, "Configuring the Loggers and Log Handlers Using the logging.xml File." This file can either be edited directly (Section 13.3.5, "Configuring the Loggers and Log Handlers Using the logging.xml File") or edited through the Oracle Fusion Middleware Control (Section 13.3.4, "Configuring the Loggers and Log Handlers Using Fusion Middleware Control").
See Also:
For information about component loggers for Oracle Mobile Security Manager, see Section 13.3.2, "About Component Loggers for Oracle Mobile Security Manager."For information about logging message types and levels, see Section 13.3.3, "About Logging Message Types and Levels."
13.3.2 About Component Loggers for Oracle Mobile Security Manager
Oracle Mobile Security Manager has its own loggers, separate from the loggers of other Oracle Identity Management components, that can be configured independently to send different amounts of information to one or more log handlers.
Table 13-2 describes the component loggers for Oracle Mobile Security Manager.
Table 13-2 Oracle Mobile Security Manager Component Loggers
| Logger Name | Description |
|---|---|
|
oracle.idm.msm.common |
Logs events related to settings, configuration and security which are used by other features internally. |
|
oracle.idm.msm.identity |
Logs events related to identity management. |
|
oracle.idm.msm.notification |
Logs events related to user and device notification. |
|
oracle.idm.msm.platform |
Logs events related to services provided by the platform (mainly used by other features). Includes services for persistence management, bean management, and so on. |
|
oracle.idm.msm.policy |
Logs events related to policy management. |
|
oracle.idm.msm.repository |
Logs events related to app catalog management, device operation queue and device configurations. |
|
oracle.idm.msm.runtime |
Logs events related to runtime services such as registration service, profile service, device management, SCEP service, and son. |
|
oracle.idm.msm.service |
Logs events related to all the services which are exposed to the external client. This also includes the ReST service implementations. |
13.3.3 About Logging Message Types and Levels
The amount of data output by a logger is controlled by its level; the higher the level, the more information is logged. You can specify logging message types and levels in ODL. ODL recognizes five message types: INCIDENT_ERROR, ERROR, WARNING, NOTIFICATION, and TRACE. Each message type can also take a numeric value between 1 (highest severity) and 32 (lowest severity) that you can use to further restrict message output. When you specify a message type, ODL returns all messages of that type, as well as the messages that have a higher severity. For example, if you set the message type to WARNING, ODL also returns messages of type INCIDENT_ERROR and ERROR.
Message types and levels are described in greater detail in "Setting the Level of Information Written to Log Files" in Oracle Fusion Middleware Administrator's Guide.
Table 13-3 ODL Message Types and Levels
| Message Type and Numeric Value | Description |
|---|---|
|
INCIDENT_ERROR:1 |
A serious problem that may be caused by a bug in the product and that should be reported to Oracle Support. Examples are errors from which you cannot recover. |
|
ERROR:1 |
A serious problem that requires immediate attention from the administrator and is not caused by a bug in the product. An example is if Oracle Fusion Middleware cannot process a log file, then you can correct the problem by fixing the permissions on the document. |
|
WARNING:1 |
A potential problem that should be reviewed by the administrator. Examples are invalid parameter values or a specified file does not exist. |
|
NOTIFICATION:1 |
A major lifecycle event such as the activation or deactivation of a primary sub-component or feature. This is the default level for |
|
NOTIFICATION:16 |
A finer level of granularity for reporting normal events. |
|
TRACE:1 |
Trace or debug information for events that are meaningful to administrators, such as public API entry or exit points. |
|
TRACE:16 |
Detailed trace or debug information that can help Oracle Support diagnose problems with a particular subsystem. |
|
TRACE:32 |
Very detailed trace or debug information that can help Oracle Support diagnose problems with a particular subsystem. |
13.3.4 Configuring the Loggers and Log Handlers Using Fusion Middleware Control
Oracle Fusion Middleware components generate log files containing messages that record all types of events. Administrators can set logging levels and create new log handlers for Oracle Mobile Security Manager using Fusion Middleware Control, as described in this section.
If you want to configure loggers and log handlers through editing the logging.xml file instead of using Fusion Middleware Control, see Section 13.3.5, "Configuring the Loggers and Log Handlers Using the logging.xml File."
Accessing Logging Configuration
To access the logging configuration using Oracle Fusion Middleware Control:
-
Log in to Oracle Fusion Middleware Control.
For information on logging in to Oracle Fusion Middleware Control, see "Displaying Fusion Middleware Control" in Oracle Fusion Middleware Administrator's Guide.
-
From the navigation pane, expand the farm, then WebLogic Domain, and then navigate to your domain.
-
Right-click your domain and select Logs, and then, Log Configuration.
The Log Configuration page is displayed. All the packages available for logging are displayed on the log configuration screen, as shown in Figure 13-1.
Figure 13-1 Oracle Mobile Security Manager Log Configuration in Oracle Fusion Middleware Control
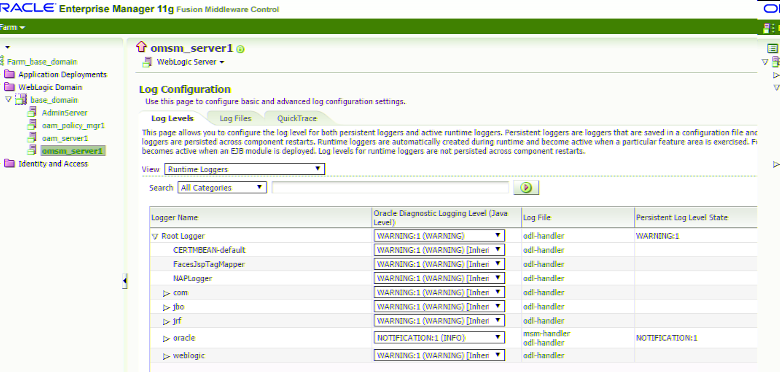
Description of ''Figure 13-1 Oracle Mobile Security Manager Log Configuration in Oracle Fusion Middleware Control''
The packages specific to Oracle Mobile Security Manager can be accessed under oracle.idm.msm.
The different log levels are available for selection under the Oracle Diagnostic Logging Level column.
To configure the Oracle Diagnostic Logging level:
-
Click the Log Levels tab.
-
In the Diagnostic Logging Level column, choose the logging level for the corresponding logger.
-
Click Apply to submit and apply log level configuration changes, which take affect immediately.
In addition, you can create and configure new log handlers using the Log Files tab.
-
Click the Log Files tab.
-
Click the Create button to display a fresh Create Log File form.
-
Enter a name and file system path for this log file.
-
Click the desired Log File Format. For example:
... Text. -
Set the logging attributes.
-
Associate a Logger.
-
Specify the Rotation Policy.
-
Click OK to submit the configuration.
If you want to create a log handler like an existing one, click the Create Like button.
13.3.5 Configuring the Loggers and Log Handlers Using the logging.xml File
You can configure loggers and create log handlers in Fusion Middleware Control. However, you can also edit the logging.xml file to configure loggers and log handlers, as described here.
The logging.xml file is located in the following directory:
DOMAIN_NAME/config/fmwconfig/servers/SERVER_NAME/logging.xml
DOMAIN_NAME and SERVER_NAME are the domain name and server name, respectively, specified during the installation of Oracle Mobile Security Manager.
13.3.5.1 Logger and Log Handler Configuration Example
The logging.xml file has a <log_handlers> configuration section, followed by a <loggers> configuration section. Each log handler is defined within the <log_handlers> section, and each logger is defined within the <loggers> section.
The file has the following basic structure:
<logging configuration>
<log_handlers>
     <log_handler name='console-handler' level="NOTIFICATION:16"></log_handler>
     <log_handler name='odl-handler'></log_handler>
     <!--Additional log_handler elements defined here....-->
</log_handlers>
<loggers>
     <logger name='' level='WARNING:1'>
          <handler name='odl-handler'/>
          <handler name='wls-domain'/>
          <handler name='console-handler'/>
     </logger>
     <logger name="example.logger.one" level="NOTIFICATION:16">
          <handler name="console-handler"/>
     </logger>
     <logger name="example.logger.two" />
     <logger name="example.logger.three" />
     <!--Additional logger elements defined here....-->
</loggers>
</logging_configuration>
When configuring a logger to write messages to either the console or a file, make configuration changes to both the logger and the handler. Setting the level attribute for the logger configures the amount of detail (and therefore, the volume of messages) that the logger sends to the handler. Similarly, setting the level attribute for the handler configures the amount of detail that the handler accepts from the logger.
13.3.5.2 Configuring Log Handler Level
You configure individual log handlers in the <log_handlers> section of the logging.xml file. Configure the level attribute for the handler to set the amount of detail that the handler will accept from loggers.
To configure the log handler-level attribute
-
Open the
DOMAIN_NAME/config/fmwconfig/servers/SERVER_NAME/logging.xmlfile. -
Change the level attribute as shown in the following examples.
In this example XML code, the level attribute for the
omsm-handleris set toWARNING:32:<log_handler name='omsm-handler' class='oracle.core.ojdl.logging.ODLHandlerFactory' filter='oracle.dfw.incident.IncidentDetectionLogFilter' level='WARNING:32' >
For the
omsm-handlerto be able to writeTRACElevel messages to the console, change the level attribute as shown:<log_handler name='omsm-handler' class='oracle.core.ojdl.logging.ODLHandlerFactory' filter='oracle.dfw.incident.IncidentDetectionLogFilter' level='TRACE:1' >
-
Save your changes and restart the application server.
13.3.5.3 Configuring Additional Settings for Log Handlers
You can configure additional properties for log handlers that write to a file. For example, this excerpt from logging.xml configures the omsm-handler:
<log_handler name='omsm-handler' class='oracle.core.ojdl.logging.ODLHandlerFactory'     filter='oracle.dfw.incident.IncidentDetectionLogFilter'>
    <property name='path'     value='${domain.home}/servers/${weblogic.Name}/logs/${weblogic.Name}-diagnostic.log'/>
    <property name='maxFileSize' value='10485760'/>
    <property name='maxLogSize' value='104857600'/>
    <property name='encoding' value='UTF-8'/>
    <property name='useThreadName' value='true'/>
    <property name='supplementalAttributes' value='J2EE_APP.name,J2EE_MODULE.name,     WEBSERVICE.name,WEBSERVICE_PORT.name,composite_instance_id,component_instance_id,     composite_name,component_name'/>
</log_handler>
See "Configuring Settings for Log Files" in the Oracle Fusion Middleware Administrator's Guide for information about both the Fusion Middleware Control tool and the WLST command-line tool
See "Logging Custom WLST Commands" in the Oracle Fusion Middleware WebLogic Scripting Tool Command Reference for information about the WLST command-line tool
13.3.5.4 Configuring Loggers
Individual loggers are configured in the <loggers> section of the logging.xml file. Oracle Mobile Security Manager has eight loggers that can be configured to send messages to log handlers. Setting the level attribute for the logger configures the amount of detail (and, hence, the volume of messages) that the logger sends to its handlers. Nesting one or more <handler> elements inside of <logger> elements assigns handlers to loggers. The following excerpt shows a logger called oracle.idm.msm.service. The level attribute is set to TRACE:32 and the logger sends messages to two handlers:
<logger name='oracle.idm.msm.service' level='TRACE:32' useParentHandlers='false'>
   <handler name='odl-handler'/>
   <handler name='omsm-handler'/>
  </logger>
A logger can inherit a parent logger's settings, including the parent's level setting and other attributes, as well as the parent logger's handlers. To disable inheritance, set the useParentHandlers attribute to false, as shown in the previous excerpt.
At the top of the logger inheritance tree is the root logger. The root logger is the logger with an empty name attribute, as shown in the following example.
 <loggers>
   <logger name="" level="WARNING:1">
      <handler name="odl-handler"/>
      <handler name="wls-domain"/>
      <handler name="console-handler"/>
    </logger>

    <!-- Additional loggers listed here -->
</loggers>
If a logger is configured with only its name attribute, the logger will inherit the rest of its attributes from the root logger, as shown in the following example:
<loggers>
    <logger name="oracle.idm.msm.service"/>
    <!-- Additional loggers listed here -->
</loggers>
To configure loggers:
-
Open the
DOMAIN_NAME/config/fmwconfig/servers/SERVER_NAME/logging.xmlfile. -
Locate the logger you want to configure. The lists of Oracle Mobile Security Manager loggers is at.
-
Define the level attribute for the
<logger>element. See the example at the beginning of this section. -
Add one or more
<handler>elements to the<logger>element. -
When you are finished editing both the
<loggers>and<log_handlers>sections oflogging.xml, save the file. -
Restart the application server for the changes to take effect.
13.3.5.5 Sample Oracle Mobile Security Manager Log Output
The following ODL log excerpt illustrates the kind of output you can expect in Oracle Mobile Security Manager.
[2015-03-10T14:29:38.713-07:00] [omsm_server1] [ERROR] [MSM-00906] [oracle.idm.msm.identity] Identity Service exception.

[2015-03-12T01:57:03.391-07:00] [omsm_server1] [TRACE] [] [oracle.idm.msm.policy] [SRC_CLASS: oracle.idm.msm.policy.impl.PolicyManagerImpl] [SRC_METHOD: getMobilePolicy] Error while Getting Policy:Default Policy_DeviceProvisioningPolicy

[2015-03-12T01:57:03.315-07:00] [omsm_server1] [TRACE:16] [] [oracle.idm.msm.policy] [SRC_CLASS: oracle.idm.msm.policy.impl.spi.oes.PolicyManagerSpiImpl] [SRC_METHOD: getPolicyNames] ENTRY ( ( "MOBILE_POLICY_NAME" eq "policy" ) or ( "POLICY_DESCRIPTION" eq "policy" ) or ( "POLICY_GROUP" eq "policy" ) )
13.4 Troubleshooting Common Oracle Mobile Security Suite Deployment Issues
This section lists common issues that may occur when deploying the Oracle Mobile Security Suite. They are as follows:
-
Ports are not opened (incoming and outgoing from Mobile Security Access Server).
-
Ports are blocked either by an external firewall, an application firewall, or
iptablesconfiguration -
Host names are not resolving or there are DNS problems
-
Users do not know how to obtain server certificates
-
Mobile Security Access Server certificates are not trusted on mobile device
-
Clock on the Mobile Security Access Server and the Windows domain controller are out of synchronization
-
Users entered
UIDused instead of the fullUPN -
Kerberos Service Principal Names (SPNs) are not properly defined for back-end applications
-
Workspace and containerized applications signed with different certificates
-
When building a workspace static library project for iOS, a simulator or connected devices were selected as a build target instead of a generic iOS device
-
Clock on the Mobile Security Access Server and the mobile device are out of synchronization
-
Trying to perform PKINIT with older Windows version, prior to Win2k8 R2
-
Incorrect user certificate templates were used
-
Incorrect web settings sent everything directly or blocked everything
-
Missing trust relationships were in multi-domain environments
-
Use of alternate UPN suffixes were used with KINIT (requires configuration change)
-
Some back-end servers were running old SSL stacks that cannot handle newer ciphers reported by the Mobile Security Access Server (requires configuration change)
-
Old or low-end Android devices
-
Invite button is disabled if user does not have an email address in the LDAP directory.
13.5 Troubleshooting Missing LDAP Group in the List of Roles Applicable to the User
When a user accesses the Oracle Access Management Access Manager console, the Domain Users LDAP group does not appear in the list of roles applicable to the user. The Domain Users role does appear in the role list, but does not have many users associated with it.
The Domain Users LDAP group does not appear because Domain Users is a special group which is part of the User's security attributes and not part of the memberOf attribute in AD which provides information on group memberships. The primaryGroupID attribute is a single-valued attribute that contains the primaryGroupToken of the group that is the primary group of the object. The primary group of the object is not included in the memberOf attribute. For example, by default, the primary group of a user object is the primaryGroupToken of the Domain Users group, but the Domain Users group is not part of the user object's memberOf attribute.
Refer to https://msdn.microsoft.com/en-us/library/ms677943.aspx for information on memberOf and primaryGroupId.
To work around this issue, create a separate LDAP group and make the users members of that group.
13.6 Troubleshooting the Mobile Security Access Server Issues
This section describes troubleshooting tips for Oracle Mobile Security Access Server. It contains the following topics:
-
Troubleshooting Mobile Security Access Server SSL-Related Issues
-
Troubleshooting Mobile Security Access Server Connection Errors
13.6.1 Troubleshooting Mobile Security Access Server SSL-Related Issues
If you are experiencing Mobile Security Access Server problems related to Secure Sockets Layer (SSL), the following tips may help you with the issues:
-
Ensure that the Mobile Security Access Server certificate and certificate chain are not revoked.
-
If the Mobile Security Access Server certificate contains a Subject Alternate Name, ensure that the server certificate subject name is also in the Subject Alternate Name (SAN) attribute of the certificate.
-
Ensure that all subject names/subject alternative names are resolved by DNS.
-
Ensure that the certificate chain file is built with the issuing CA, followed by zero or more intermediate CA(s) and then the Root CA.
13.6.2 Troubleshooting Mobile Security Access Server Connection Errors
If you are experiencing Mobile Security Access Server issues related to internet connection, the following tips may help you with the issues:
-
Ensure that the mobile device is online/connected to the internet.
-
Ensure that the Mobile Security Access Server is running.
-
Ensure that all necessary Mobile Security Access Server ports are open on the host firewall or other firewalls in the route from the mobile device to the Mobile Security Access Server.
-
Ensure that no other services are using the configured Mobile Security Access Server ports.
-
Ensure that the applications behind Mobile Security Access Server are accessible from the Mobile Security Access Server.
-
Ensure that the Mobile Security Access Server can resolve in DNS the host names of the applications behind Mobile Security Access Server.
-
If the connection error occurs for only a single application behind the Mobile Security Access Server, ensure that the application is running.
-
Ensure that there are no systems in the network blocking proxy traffic if a firewall or reverse proxy is configured.
13.7 Troubleshooting Kerberos-Enabled Applications Issues
This section lists tips for troubleshooting Kerberos-enabled applications. The troubleshooting tips are as follows:
Note:
Normal requests come in asscheme://hostname:port/path and the resulting Service Principal Name (SPN) is HTTP/hostname.
MSM requests come in as scheme://mfm_hostname:port/fileserver_hostname:port/share_path. The Service Principal Name (SPN) needs to be set to HTTP/fileserver_hostname.
There is also the form where the request comes in as scheme://mfm_hostname:port/mfm/fileserver_hostname:port/share_path. The Service Principal Name (SPN) still needs to be set to HTTP/fileserver_hostname.
-
You must configure Web applications that are accessed through the Mobile Security Access Server for Kerberos with a Service Principal Name (SPN) for each application server that is accessed by an alias instead of its host name.
For example, if the hostname is
sp1.oracle.internalbut it is accessed asHTTP/sharepoint.oracle.internal, the SPN must be set ashttp://sharepoint.Additional certificate requirements apply for the Mobile Security Access Server certificate.From a machine within the domain of the application server (Mobile Security Access Server can be used if it is joined to the same domain), perform the following steps:
-
Open a command window.
-
At the command-line prompt, type:
setspn -l customer_application_hostname
-
Verify an SPN exists for the URL that the device is trying to access.
-
If the SPN is missing, then type:
setspn -a customer_application_hostname
-
Verify the SPN by typing:
setspn -l customer_application_hostname
-
-
Configure Internet Information Services (IIS) applications such as Microsoft SharePoint for Negotiate authentication. It can be followed by NTLM authentication if desired.
-
Internet Information Services (IIS) applications use an application pool with an application-pool identity. This pool cannot be a local account on the web server. Typically, it can be set to a built-in account of
NETWORKthat has permission to access the Active Directory for authentication.When a service account is used for the pool identity, ensure that the account has permission to access and authenticate to Active Directory.
-
Ensure that the authentication provider is set to
Negotiate. -
Ensure that Windows authentication is set.
-
Ensure that Anonymous User is not set.
Note:
The following commands are useful to debug network issues with Wireshark:-
In display filter, type:
kerberos
-
In display filter, type:
ntlmssp
-
In display filter, type:
http
-
-
13.8 Troubleshooting Mobile Devices Access Issues
This section describes how to troubleshoot mobile device access issues. It contains the following topics:
-
Troubleshooting Mobile Security Access Server SSL-Related Issues
-
About the Normal Sequence of Request for Registration and Authentication
13.8.1 Troubleshooting General Mobile Device Access Issues
The following are some general tips for troubleshooting mobile device access issues:
-
Ensure that the Mobile Security Access Server host name can be resolved by the mobile device.
-
Ensure that the Proxy Auto Configuration (PAC) files are accessible from the URL location specified in the mobile configuration.
-
Ensure that the Mobile Security Access Server host name as specified in the PAC files can be resolved by DNS.
-
Ensure that the Mobile Security Access Server name matches the PROXY statement in the PAC file on the Oracle Mobile Security Access Server.
-
If the mobile device is configured for Wi-Fi, ensure that the proxy with the URL of the
bmax.pacfile is specified. -
If the mobile device is configured for VPN, ensure that the proxy with the URL of
bmax.pacfile is specified on the VPN and is not needed in the Wi-Fi configuration. -
Ensure that the Mobile Security Access Server configuration files,
bmconfig_*.json, are correctly configured in the Mobile Security Workspace application settings. -
If the Mobile Security Access Server is configured for PKINIT or KINIT authentication, ensure that the user account being used is not locked in Active Directory.
-
If the Mobile Security Access Server is configured for Oracle Access Manager authentication, ensure that the user account is not locked.
-
If the Mobile Security Access Server is configured for PKINIT authentication, ensure that client certificates have the correct attributes for mutual authentication and smart-card login.
-
If the Mobile Security Access Server is configured for PKINIT authentication, ensure that the CA certificate chain for the Mobile Security Access Server certificate is installed in the mobile device key chain (network profiles).
13.8.2 Troubleshooting Mobile Device Access SSL-Related Issues
See Section 13.6.1, "Troubleshooting Mobile Security Access Server SSL-Related Issues."
13.8.3 Turning on Client Debug Logs
Navigate to the Mobile Security Workspace application settings. Turn on Log Mode and set Log Level to Verbose or Debug.
13.8.4 About the Normal Sequence of Request for Registration and Authentication
During the normal registration process for a Mobile Security Workspace, the following sequence of requests are sent:
-
A sequence of requests to an authentication URL, with the expected response of
HTTP 407. The number of requests may be different depending on the authentication method being used. The UPN or user ID of the authenticating user should appear at the beginning of the line associated with the authentication request. These requests occur every authentication. -
A final request to an authentication URL, with the expected response of
HTTP 200orHTTP 302. A response ofHTTP 200means that the authentication was initiated directly within the Mobile Security Workspace, while a response ofHTTP 302means that the authentication was initiated by a redirect from an external application such as the Safari web browser or a containerized application. If anHTTP 403is returned in response to any authentication request, it means that the authentication failed. This request occurs every authentication. -
A request to
/action. This request sets up the workspace for offline authentication and PIN/Password reset. This request only occurs during registration and PIN/Password resets. -
A request to
/ecp/ecpservice/registercontainer.This request registers the workspace with the Mobile Security Manager server. The expected response isHTTP 200. This request only occurs during registration. -
A request to
/ecp/ecpservice/policy/get. This is a request to retrieve the policies associated with the workspace. The expected response isHTTP 200. This request occurs every authentication. -
A request to
/ecp/ecpservice/settings/get. This is a request to retrieve the company settings. The expected response isHTTP 200. This request occurs every authentication. -
A request to
/ecp/ecpservice/getcommands. This is a request to retrieve pending commands for the workspace. The expected response isHTTP 200. This request occurs periodically after registration.
Depending on the deployment configuration, there will also be a number of requests to the bmax.pac file and stunnel.pac. If there are no requests to the stunnel.pac or bmax.pac it likely means that the Mobile Security Access Server is not accessible from the mobile device.
13.9 Troubleshooting the Microsoft Exchange Notification Integration Issues
This section describes troubleshooting tips for the integration with Microsoft Exchange notifications.
If notifications are not being sent to clients, verify the following:
-
The Exchange configuration matches the version of Exchange.
-
The permission of the proxy account to act on behalf of users is configured in Exchange. This permission is different for Microsoft Exchange Server 2007 than for Exchange Server 2010.
Details for the two versions are described in the following topics:
13.9.1 Exchange Impersonation on Exchange 2007
Microsoft Exchange Server 2007 requires two rights for Exchange Impersonation to work:
-
*ms-Exch-EPI-Impersonation: This right is applied to the Client Access Server and grants the Service Account permission to function as an Exchange Impersonation account on that CAS. -
oms-Exch-EPI-May-Impersonate: This right is applied on either a user-by-user basis for each of the users that require impersonation to be enabled, or it can be applied on a mailbox database.
For example, Joe Client is a user with a device, and EWS Proxy is the account used to impersonate the user for notification.
To add these rights:
   Add-ADPermission
      -Identity (Get-ExchangeServer
      -IdentityYOUR_   CAS).DistinguishedName
      -User (Get-User -Identity "EWS Proxy").Identity
      -extendedRight ms-Exch-EPI-Impersonation

   Add-ADPermission
      -Identity (Get-User -Identity "Joe Client").DistinguishedName
      -User (Get-User -Identity "EWS Proxy").Identity
      -extendedRight ms-Exch-EPI-May-Impersonate
13.9.2 Exchange Impersonation on Exchange 2010
Exchange 2010 requires rights for Exchange Impersonation to work.
To configure Exchange Impersonation for specific groups of users:
-
Ensure that the
ADusers are placed in the group (for example,Notification Users) and the service account has a Management scope for theADgroup that Exchange is recognized. For example:New-ManagementScope -Name:"ExchImpersonationScope" -RecipientRestrictionFilter {memberofgroup -eq "CN=BNS Users,OU=QA,DC=bitzermobile,DC=com"} -
Define Assign Role:
New-ManagementRoleAssignment -Name:"ExchImpersonationRole" -Role:ApplicationImpersonation -User:"ewsproxy@example.com" -CustomRecipientWriteScope:"ExchImpersonationScope
If you receive the following message, you may have configured an incorrect Exchange version for the Exchange notification integration:
microsoft.exchange.webservices.data.ServiceVersionException: Method SubscribeToPushNotificationsOnAllFolders is only valid for Exchange Server version Exchange2010 or later
If there are no errors it may be caused by Apple Push Notification server, as it does not guarantee for delivery. Verify your Apple credentials provided are valid.
13.10 Troubleshooting Mobile File Manager Connection Issues
The Mobile File Manager will fail to connect if a Windows file share on any of the following Windows versions is being referenced by a DNS alias instead of the native system host name:
-
Windows Server 2012
-
Windows Server 2008
-
Windows 8
-
Windows 7
-
Windows Vista
To fix the issue, either access the file share using the native host name, or complete the following steps to modify the registry on the file share server:
-
Locate and click the following key in the registry of the server:
HKEY_LOCAL_MACHINE\System\CurrentControlSet\Services\LanmanServer\Parameters
-
On the Edit menu, click Add Value, and then add the following registry value:
Value name: DisableStrictNameChecking
Data type: REG_DWORD
Radix: Decimal
Value: 1
-
Restart the Windows Server service on the file share server.