12 Working with Resource Groups
This chapter describes how to create, manage, and delegate access privileges for Oracle Privileged Account Manager resource groups in the following sections:
Note:
-
You must be an administrator with the Security Administrator Admin Role to create or delete a resource group.
-
You can also use the Oracle Privileged Account Manager's command line tool or RESTful interface to work with resource groups. For more information, refer to Section A.8, "Working with Resource Group" to use the command line tool and the Appendix B, "Resource Groups Resource" to use the RESTful interface.
12.1 What is a Resource Group?
In Oracle Privileged Account Manager, all targets and accounts are considered resources. A resource group is a collection of resources that can include targets, accounts, and other resource groups. Resource groups facilitate easier and better administration of resources in your deployment.
Resource groups simplify management by organizing data into groups and delegating administration to users or user groups. In Oracle Privileged Account Manager, a user with a global administrative role such as Security Administrator role has administrative access to all resources, such as, all targets and accounts. Deployment needs will require administrative access to be provided for users to a subset of resources rather than providing a global access. For example a regional admin may need access to manage only the resources within his region. Resource groups provide the mechanism to create such sub sets of resources and delegate administration to users.
For example, you could create a resource group called "Austin Group", that contains the two following members:
-
Austin DB Group:
This group further contains two member groups called "appsdb01" and "DBADMIN."
-
Austin Unix group:
This group further contains two member groups called "appserver01" and "root."
Figure 12-1 illustrates the structure of the "Austin Group" resource group.
Figure 12-1 Tree Structure of the "Austin Group" Resource Group
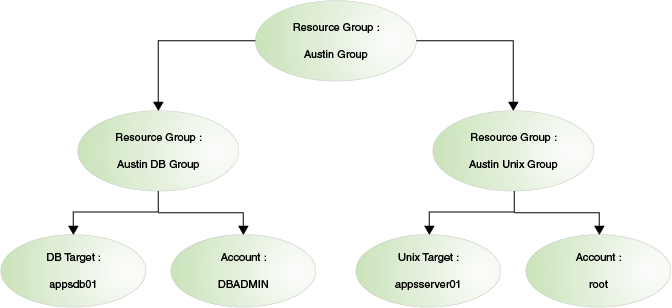
Description of ''Figure 12-1 Tree Structure of the "Austin Group" Resource Group''
After creating a resource group, you can then delegate administration privileges for that group to specific users, groups, or both. For more information about delegation, refer to Section 12.3, "Delegating Administrative Privileges."
12.2 Creating Resource Groups
To create a resource group,
-
Log in to Oracle Privileged Account Manager.
-
Select Resource Groups from the Administration accordion. The Resource Groups page will open.
-
Click Create to open the "Resource Group: Untitled" page, which contains the following tabs:
-
General: Select this tab to create the resource group and add members.
-
Delegate: Select this tab to delegate and modify administrative privileges for the resource group to specific users and groups.
-
Hierarchy View: Select this tab to view and work with a hierarchical view of the selected resource group.
-
Member-of: Select this tab to view the different resource groups that this resource group is a member of, as resource groups can be hierarchical.
Note:
The Delegate, Hierarchy View, and Member-of tabs do not become active until you create and save the resource group. -
-
On the General tab, enter a name for the group in the "Name" field and add an optional description. For example, describe the purpose of this resource group to other administrators in the "Description" field.
-
In the Members section, click Add.
The Add Members dialog box is displayed. Use this dialog box to search for and add members to the new resource group, as follows:
-
Use the Type menu to indicate the type of members you are adding to the group. You can choose the account, target, or resource group options.
-
Enter one or more letters of the name of an account, target, or resource group into the Name field, and click Search.
-
After the search results are displayed, select one or more rows in the table, and click Add to add those members to the group.
Tip:
Use Shift+Click to select multiple, consecutive rows or Ctrl+click to select multiple, non-consecutive rows.A success message is displayed below the Name field.
-
When you are finished, click Close.
The selected members are displayed in the Members search results table.
-
-
Click Save.
Oracle Privileged Account Manager assigns a unique GUID value to the new group and displays that value under the Name field.
The Delegate tab becomes active. To delegate administrator privileges for the new resource group, refer to Section 12.3, "Delegating Administrative Privileges."
12.3 Delegating Administrative Privileges
This section explains delegation and describes how to delegate and remove access privileges for an Oracle Privileged Account Manager resource group. The following sections discusses this topic:
12.3.1 Understanding Delegation
Delegation enables you to share administrative responsibilities for a particular resource group or individual resources with other users or groups.
If an administrator delegates the administrative privileges over a resource group to a user or a group, then the delegatee only has administrative privileges for the designated resource. After delegation, the delegated user has privileges on the resource group and all the resources within that resource group. The delegatee does not have privileges for all other resources outside of the delegated resource group.
Users who have delegated privileges can also delegate their delegated resources to other users or groups. However, only those privileges that were delegated to the user can be further delegated by the user. For example, a user with the "security administrator" privileges can only delegate "security administrator" privileges to others. Similarly, a user with the "user manager" privileges can only delegate the "user management" privileges to others.
For example, Jane is a user with the "Security Admin" privilege on the system and during her vacation, an LDAP server may need to be managed. In such a scenario, Jane can create a resource group and add the target to this group. She can delegate her "Security Admin" privilege for this resource group to Joe. Now, Joe will have the "Security Admin" privilege for Jane's resource group, and will be able to administer the group. However, he does not have the same privileges on any other resource.
Delegating privileges provides the following benefits:
-
Flexibility.
-
Makes it easier to separate roles and responsibilities in the system.
-
Makes auditing safer and easier.
The following privileges can be delegated:
-
Security Administrator
-
User Manager
Initially, you may have users with Security Administrator or User Manager role for the entire system, and they can create resource groups and assign resource group level delegated administrators. Delegated administrators can further delegate to their privileges to other users and can also create sub resource groups to split the resource management. The following table explains the tasks that can be performed by the global administrators and delegated administrators:
Table 12-1 Tasks that each Admin Role can perform
| Admin Role | Task Description |
|---|---|
|
Security Administrator |
|
|
User who is delegated the Security Administrator privilege for a resource group |
|
|
User Manager |
|
|
User or group to whom the User Manager privilege for a resource group is delegated |
|
Note:
When you delegate privileges on a resource group, you are implicitly granting the same administration privileges for all resources in that group, including resource groups that are part (child groups or children) of the delegated resource group.12.3.2 Delegating Privileges to Users and Groups
To delegate access privileges for a resource group to users or groups, select the Delegate tab and complete the following steps:
Note:
The steps for adding and delegating privileges to users and groups are essentially the same.-
To add users, perform these steps from the Users section.
-
To add groups, perform these steps from the Groups section.
-
Click the Add icon located above the Search Results table.
-
When the Add Users dialog box is displayed, search for available delegates by typing one or more letters of a name into the Name field. Click Search.
For example, if you enter a single character that is common to many names, a list of all names containing that character will display. To narrow the results, enter more characters.
-
Select one or more rows from the list of results and click Add.
Tip:
Use Shift+Click to select multiple, consecutive rows or Ctrl+click to select multiple, non-consecutive rows. -
After selecting the desired rows, Click Close.
The selected names and the assigned Privilege are now available in the appropriate table on the Delegate tab.
-
To change the default assigned privilege, choose a different option from the Privilege menu.
-
When you have finished adding delegates, click Apply to save your changes.
12.3.3 Opening Users and Groups
You can open a "delegate" to view more information about that user or group as described below:
For users you can view the following information:
-
First Name and Last Name
-
User Type
-
OPAM Role
-
The privileged accounts that the user can access
For groups you can view the following information:
-
Group description
-
List of users who belong to the group
-
List of groups that belong to this group
-
The privileged accounts that the group can access
Perform the following procedure to open a delegate:
-
Select the Name link in the Users or Groups table.
-
Select the appropriate table row and click Open.
Depending on your selection, the User: User_Name page or the Group: Group_Name page is displayed.
12.3.4 Removing Access Privileges
To remove a delegate and their access privilege, select the table row in the Users or Groups table and click Remove.
Note:
The user who was delegated a resource group can modify delegations on this resource group. The delegated user can even remove the delegated privilege. Do not remove the delegated privilege, as the only workaround for a removed delegated privilege is to have it re-delegated.12.4 Working with Hierarchical Views
This section describes how to view and work with the hierarchy of a resource group.
After you create and save a resource group, the Hierarchy View tab becomes active. Select this tab to view a diagram of the resource group's hierarchy, which includes the parent resource group and all of the resource members (accounts, targets, and other resource groups).
For example, Figure 12-2 shows a diagram of a resource group named IT Operations.
Figure 12-2 Example Hierarchical View of the IT Operations Resource Group
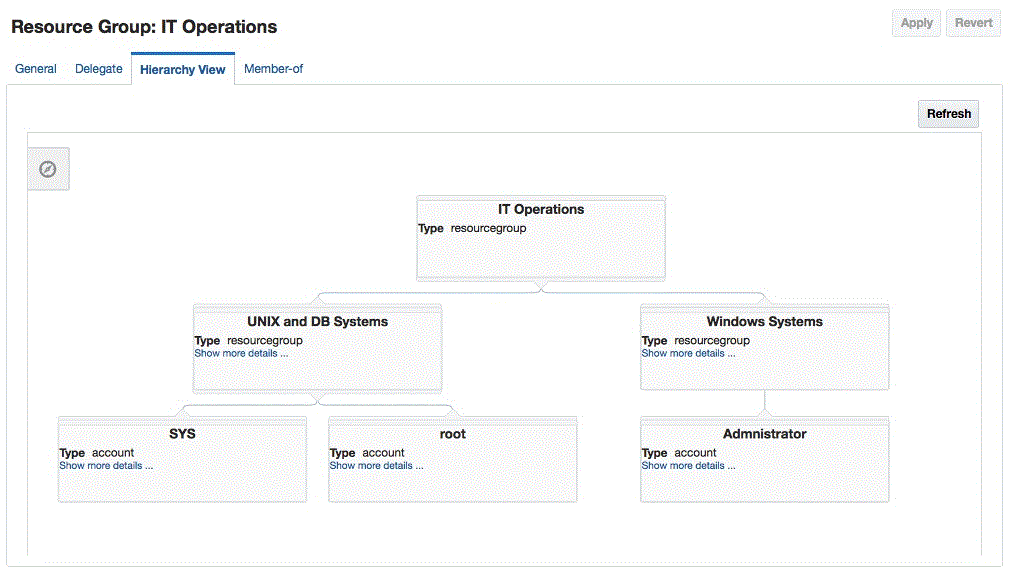
Description of ''Figure 12-2 Example Hierarchical View of the
IT Operations Resource Group''In addition to the diagram, this page also contains a control panel that enables you manipulate the hierarchical diagram in various ways. This control panel is hidden by default. To access the controls, click the Show/Hide Control Panel icon ![]() , located on the left side of the display area.
, located on the left side of the display area.
The control panel is displayed, as shown Figure 12-3:
Figure 12-3 Hierarchical Diagram Control Panel
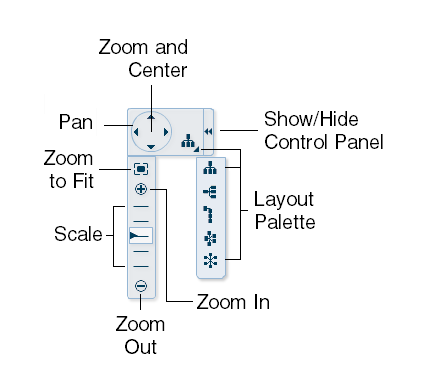
Description of ''Figure 12-3 Hierarchical Diagram Control Panel''
Table 12-2 describes the features that are available on this control panel.
Table 12-2 Hierarchy View Page Control Panel Features
| Feature | Description |
|---|---|
|
Zoom and Center |
Click the center of the wheel to center the diagram within the display area. |
|
Pan |
Click the arrow points along the outside of the wheel to move the diagram around the display area. |
|
Zoom to Fit |
Click this icon to scale the diagram so that it fits into the display area. |
|
Scale |
Slide the arrow up or down the bars to scale the diagram size. Slide up to enlarge the diagram or down the scale to shrink it. |
|
Zoom Out |
Click the icon to zoom out the diagram. |
|
Zoom In |
Click the icon to zoom in the diagram. |
|
Layout Palette |
Click the icon to display a palette of icons that you can use to change the type of diagram being displayed. The layout options include:
|
In addition to the control panel, the Hierarchy View page provides the following features:
-
Click and drag: Click anywhere on the diagram and use your mouse to drag the diagram around the display area.
-
Rollover pop-up: Hover your cursor over the following features to view more information:
-
Hover over icons in the Control Panel to view a pop-up containing the name and, if available, the alternative quick keys.
-
Hover over any box in the diagram to view a pop-up containing an enlarged view of the information in that box.
-
-
Show more details links: Click a link to view the configuration page for that particular member. For example, if you click the link in a target box, the Target:Target_Name page is displayed.
-
Hide, Show, Isolate, and Restore icons: Toggle the icon to collapse the diagram to view only the selected box and then restore the diagram to view all of the boxes.
-
Quick-Key commands: Type the following key combinations as an alternative to using the control panel icons:
-
Ctrl+Alt+0: Zoom and Center -
/(backslash): Toggle to hide or show the Hierarchical Diagram Control Panel -
0(zero): Zoom to Fit -
+(plus sign): Zoom In -
-(minus sign): Zoom Out -
Shift+Enter: Hide, Show, Isolate, and Restore
-
12.5 Searching for Resource Groups
If you have administrator privileges, you can search for a resource group by Name, Description, or by using both these parameters.
To search for a resource group,
-
Select Resource Groups in the Administration accordion.
-
When the Resource Groups tab is displayed, use the Search portlet parameters to configure your search. For example,
-
To search for the
rg1resource group, you could typer,rg, orrg1into the Name field. -
To search for all existing resource groups, do not specify any search parameters.
-
-
Click Search.
Review your search results in the Search Results table.
12.6 Opening Resource Groups
You can open a resource group to review and edit the group's configuration parameters.
To open a resource group:
-
Select Resource Groups in the Administration accordion.
-
When the Resource Groups tab is displayed, use the Search portlet to locate the resource group you want to open.
-
When the results are displayed in the Search Results table, perform the following:
-
Click the resource group's Name (an active link) in the Search Results table.
-
Select the resource group's Row number and then click the Open icon.
-
The Resource Group: ResourceGroupName page opens where you can access the group's configuration and delegation information.
12.7 Deleting Resource Groups
Note:
Only administrators with the Security Administrator Admin Role can delete resource groups.To delete a resource group,
-
Select Resource Groups in the Administration accordion.
-
When the Resource Groups tab is displayed, use the Search portlet to locate the group you want to delete.
-
Select the "row number" of the group from the Search Results table and then click the Remove icon.