13 Working with Plug-Ins
This chapter provides some background information about Java plug-ins for Oracle Privileged Account Manager and explains how to configure and deploy plug-ins by using the Oracle Privileged Account Manager Console.
This chapter includes the following sections:
Note:
You can also manage Oracle Privileged Account Manager plug-ins from the command line or by using Oracle Privileged Account Manager's RESTful interface.-
For information about using the Oracle Privileged Account Manager Command Line Tool (CLI), refer to Section A.9, "Working with Plug-Ins" in Appendix A, "Working with the Command Line Tool."
-
For information about using the Oracle Privileged Account Manager RESTful interface, refer to Section B.7, "Account Resource" in Appendix B, "Working with Oracle Privileged Account Manager's RESTful Interface."
13.1 What is a Plug-In?
A plug-in is a customized program that enables you to extend Oracle Privileged Account Manager's functionality to better meet your specific business and technical requirements. A plug-in enables you to provide custom logic as part of a transaction or by connecting to a custom data source.
An Oracle Privileged Account Manager plug-in can be a Java program that has a configuration entry in the Oracle Privileged Account Manager server. That configuration entry specifies the conditions for invoking the plug-in, which include:
-
An operation, such as
checkoutorupdate -
A resource, such as an account, a target, or a server
-
A timing, relative to the operation, such as
pre_checkoutorpost_update
Oracle Privileged Account Manager plug-ins can provide various types of added functionality, such as:
-
Validating data before the Oracle Privileged Account Manager server performs an operation on it and performing specified actions after the server performs an operation
-
Sending notifications based on Oracle Privileged Account Manager operations
-
Performing step-up authentication and authorization
-
Authenticating users through external identity stores
Upon start-up, the Oracle Privileged Account Manager server loads your plug-in configuration and library. When the server processes requests, it calls the plug-in functions whenever the specified event takes place.
13.2 Developing Plug-Ins for Oracle Privileged Account Manager
This section provides an overview of how you develop plug-ins for Oracle Privileged Account Manager. The topics include:
13.2.1 Overview
You can develop plug-ins by using the Oracle Privileged Account Manager plug-in framework, which is shipped in the following jar file:
ORACLE_HOME/opam/jlib/opam-plugin-framework.jar
Note:
Currently, Oracle Privileged Account Manager does not ship with any complete plug-ins. Refer to Chapter 18, "Developing Plug-Ins for Oracle Privileged Account Manager" for additional information about developing plug-ins for Oracle Privileged Account Manager.Figure 10-1 illustrates the Oracle Privileged Account Manager plug-in framework.
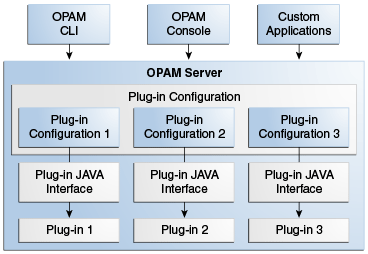
You can configure plug-ins for Oracle Privileged Account Manager operations. The plug-ins are invoked whenever the operations are performed and the plug-in filter rules are met. Any type of Oracle Privileged Account Manager client, such as the command line tool or the Oracle Privileged Account Manager Console, can perform these operations. The Oracle Privileged Account Manager server and the plug-in program communicate through the plug-in JAVA interface. When a plug-in is invoked, the Oracle Privileged Account Manager server sends information about the operation and the entities involved to the plug-in. The plug-in then operates on that information and, after completing execution, sends the result back to the Oracle Privileged Account Manager server.
Note:
For additional information, refer to Section 18.3.1, "Communication between the Server and Plug-In."After developing a plug-in, you register it with Oracle Privileged Account Manager. Registration enables Oracle Privileged Account Manager to discover and configure the plug-in to be invoked for Oracle Privileged Account Manager events such as check-ins, checkouts, and so forth.
Oracle Privileged Account Manager's Java-based plug-in framework enables you to create new plug-ins as well as customize existing ones.
13.2.2 Supported Languages
Currently, Oracle Privileged Account Manager only supports plug-ins written in Java.
13.2.3 Prerequisites
To develop Oracle Privileged Account Manager plug-ins, you should be familiar with the following topics:
-
Oracle Privileged Account Manager
-
Oracle Privileged Account Manager RESTful API
In addition, you should have some proficiency programming in Java.
13.2.4 Oracle Privileged Account Manager Plug-In Benefits
Some of the ways in which you can use plug-ins to extend Oracle Privileged Account Manager operations include:
-
Validating data before the server performs operations on that data
-
Performing actions that you define after the server successfully completes an operation
-
Defining extended operations
-
Authenticating users through external credential stores
-
Replacing an existing server module with a module of your own
Upon start-up, the Oracle Privileged Account Manager server loads your plug-in configuration and library. The server calls your plug-in functions while processing various Oracle Privileged Account Manager requests.
13.2.5 Design Guidelines
Oracle recommends using these guidelines when designing plug-ins:
-
Use plug-ins to guarantee that when Oracle Privileged Account Manager performs a specific operation, related actions are also performed.
-
Use plug-ins only for centralized, global operations that should be invoked for the program body statement, regardless of which user or application issues the statement.
-
Do not create recursive plug-ins.
For example, creating a
pre_checkoutplug-in that itself issues acheckoutstatement will cause the plug-in to execute recursively until it has run out of resources. -
Use plug-ins judiciously. Remember, they are executed every time the associated operation occurs.
13.2.6 Framework Description
The Oracle Privileged Account Manager plug-in framework is the environment in which you develop, configure, and apply plug-ins. Each individual plug-in instance is called a plug-in module.
The Oracle Privileged Account Manager plug-in framework includes the following:
-
Plug-in configuration tools
-
Plug-in module interface
-
Plug-in RESTful APIs, including Java package oracle.xxx.xxx
To use the Oracle Privileged Account Manager server plug-in framework,
-
Write a user-defined plug-in procedure in Java.
-
Compile the plug-in module.
-
Register the plug-in module through the configuration entry interface by using Oracle Privileged Account Manager's
-
Console, as described in Section 13.3, "Creating a Plug-In Configuration."
-
Command line tool, as described in Section A.9, "Working with Plug-Ins."
-
RESTful interface, as described in Section B.12, "Plug-In Resource."
-
13.2.7 Supported Operations and Timings
Oracle Privileged Account Manager supports plug-ins for operations on the following resources:
| Operations For Account Resources | Operations For Server Resources | Operations For Target Resources |
|---|---|---|
|
|
|
When developing plug-ins, Oracle Privileged Account Manager enables you to specify when those plug-ins are executed. Oracle Privileged Account Manager supports pre and post operation timings for plug-ins, which are described in the following sections:
13.2.7.1 Pre-Operation Plug-Ins
Oracle Privileged Account Manager adds pre-operation plug-ins to a queue and executes them in a specified order before performing the designated operation. As Oracle Privileged Account Manager executes each pre plug-in that is in the queue, the results are passed from the current plug-in to the next one in the queue. For example, if a target-add pre plug-in modifies the plug-in description, then the next plug-in sees the modified description.
Oracle Privileged Account Manager will not perform the operation until all pre plug-ins have successfully finished executing. If a pre plug-in fails or times out, then the operation also fails and Oracle Privileged Account Manager will not execute any of the other pre plug-ins queued for that operation.
Adding lots of pre plug-ins may increase the time taken for the operation because Oracle Privileged Account Manager must execute all pre plug-ins before performing the operation.
13.2.7.2 Post-Operation Plug-Ins
Oracle Privileged Account Manager adds post-operation plug-ins to a queue and executes them after performing the designated operation. Oracle Privileged Account Manager executes post plug-ins for both successful and failed operations. Post plug-ins assess the results, including the success or failure status of the operation, but they cannot modify the results because the operation has already been completed. Oracle Privileged Account Manager executes all queued post plug-ins and it does not matter if some of them fail. Results from one post plug-in cannot be passed to another. The execution order of post plug-ins is arbitrary and is not guaranteed and the 'order' attribute is not effective here.
Adding post plug-ins does not increase the time taken for the operation because they are not executed until after the operation is performed.
Oracle Privileged Account Manager post-operation plug-ins can be used to perform tasks like synchronizing password changes to external application wallets. There can be cases when the post plug-in may fail due to non-product issues such as network unavailability, remote host down, and so on. In such cases, the post plug-in can be retried to ensure that the extended functionality is completed when the condition for failure is fixed.
The Oracle Privileged Account Manager plug-in framework supports a retry mechanism and allows administrators to configure the retry parameters.
The Oracle Privileged Account Manager post plug-in configuration will queue the failed plug-in execution and retry them periodically when the retry parameters are defined. The configuration parameters control the duration of retry for the failed plug-in. It also controls when the retry is abandoned.
The following are the parameters of the retry configuration:
| Parameter | Description |
|---|---|
| Retry duration in seconds | This is the duration (specified in seconds) of the interval or the waiting period before next re-run of the plug-in. |
| Retry number of times | This is the total number of times the plug-in must re-run before abandoning the retry. |
13.2.8 Filtering Rules
The Oracle Privileged Account Manager server executes plug-ins on specifically configured operations for specific end users. You can configure filtering rules that determine for which users or groups a plug-in will or will not be executed, and for which results codes a post plug-in will be executed.
Note:
Only administrators with the Security Administrator Admin role can add, edit, or remove Filter Rules.-
To configure filtering rules from the Console, refer to Section 13.3, "Creating a Plug-In Configuration," step 6 for instructions.
-
To configure filtering rules from the command line, refer to Section A.9.1, "
addpluginCommand," for instructions.
Oracle Privileged Account Manager evaluates filtering rules in the following sequence to decide which rule takes precedence over another:
-
Enable Result Code (for post plug-ins)
-
Disable Result Code (for post plug-ins)
-
Disable user
-
Enable user
-
Disable group
-
Enable group
-
Enable Resource Group
-
Disable Resource Group
In general, rules that are defined at the user level override those that are defined at the group level, because the user level rules are more specific. User level rules target a specific user rather than a group of users.
In addition, the Disabled lists take precedence over Enabled lists.
Note:
Result codes override all other filtering rules.You can specify the users or groups for which a plug-in should be executed by adding them to an Enabled user or group list. Similarly, you can specify the users or groups for which a plug-in should not be executed by adding them to a Disabled user or group list.
For example, assume person1 is a user in the Administrators group. If you put person1 in the Disabled user list and Administrators into the Enabled group list, then the Oracle Privileged Account Manager will not invoke the plug-in for person1 because the server checks the Disabled user list before checking the Enabled group list, and because the user-level rule overrides the group-level rule.
However, if you put person1 in the Enabled user list and put Administrators in the Disabled group list, then person1 can invoke the plug-in because the Enabled user check is performed before the Disabled group check.If there are no values in these four fields, then all users and groups can invoke the plug-in. However, as long as there is one user or group in the Enabled user list or Enabled group list, then only that user or group can invoke the plug-in. No others can invoke that plug-in. If person1 is the only user in the Enabled user list, then all other users and groups are prevented from invoking the plug-in.
Note:
The Filtering Rules evaluation sequence stops when it finds a match. For example, if the filter finds an Enabled user that matches the user who is performing the action, then the filtering stage stops. It does not matter if the user is present in any Enable or Disable group filters.After performing an Oracle Privileged Account Manager operation, the server returns an HTTP response containing an HTTP status integer, such as 200 for success, 201 for creation, 401 for insufficient privileges, and so on.
You can configure filtering rules for post plug-ins that are based on one or more HTTP result code values. For example, if you specify a filtering rule for enabling result code 200, then the server will only execute the post plug-in when the result status is 200. And, if you specify a filtering rule for disabling result code 200, then the server will only execute the post plug-in when the result status is not 200.
Note:
Result codes override all other filtering rules.Accounts and Targets can be members of Resource Groups. You can configure filtering rules based on the resource groups to specify for which accounts and targets the plug-in will execute.
For example, assume that the structure of your deployment contains the "USAccounts" resource group holding accounts located in USA as members, and the "UKAccounts" resource group holding accounts located in UK as members. Here, some additional validations and notifications may be needed for accounts located only in the USA. In this case, the filtering rule can be established to enable the plug-in to perform this additional task for the "USAccounts" resource group. Once the filtering rule is established, whenever an account is checked out, Oracle Privileged Account Manager checks if the account is a member of the "USAccounts" resource group, and if yes, executes the plug-in.
13.3 Creating a Plug-In Configuration
Creating a plug-in configuration means to register details about the plug-in with the plug-in resource (an account, a server, or a target).
Note:
You must be an Oracle Privileged Account Manager administrator with the Application Configurator Admin Role to create plug-ins.When you create a new plug-in configuration, the status is disabled and the plug-in cannot be executed. Only an administrator with the Security Administrator Admin Role can enable plug-in configurations and determine under which conditions those plug-ins can be executed.
To create a plug-in configuration from the Console,
-
Select Plug-in Configuration in the Configuration accordion to open the Search Plug-in Configuration page.
-
Click Create, located in the Search Results table toolbar.
-
When the "Plug-In Configuration: Untitled" page is displayed, provide the following information in the Configuration Settings section of the General tab:
Parameter Name Description Name Enter a name for the new plug-in configuration. Description Enter a description for this plug-in configuration. Status Enable an option to configure the plug-in's execution status at runtime by selecting one of these options: -
Active: Allow the plug-in to execute.
-
Disabled (default): Do not allow the plug-in to execute.
Resource Type Choose the type of resource on which the plug-in will perform: -
account
-
server
-
target
Operation Choose the operation that the plug-in will perform. Note: Refer to Section 13.2.7, "Supported Operations and Timings" for a complete list of supported operations.
Timing Specify when you want Oracle Privileged Account Manager to execute the plug-in by choosing one of the following options: -
pre: Executes the plug-in before performing the Oracle Privileged Account Manager operation.
-
post: Executes the plug-in after performing the Oracle Privileged Account Manager operation.
Note: Refer to Section 13.2.7, "Supported Operations and Timings" for more information.
Order Enter a value to specify the order in which a plug-in is queued for execution in relation to other plug-ins. For example, plug-in 1 is executed before plug-in 2. The minimum value is 1.Timeout Specify a value to indicate the maximum duration (in seconds) for which the plug-in can be executed. When the plug-in execution exceeds this time out period, Oracle Privileged Account Manager aborts the plug-in execution. The default is 120 seconds, and the minimum value is10 seconds.Note: For additional information, refer to Section 13.2.7, "Supported Operations and Timings."
Plug-in Class Name Enter the name of the Java class that implements the plug-in's interface. Plug-in Version Enter the plug-in's Java version number. Note: Oracle Privileged Account Manager does not actually use the plug-in version. Instead, Oracle Privileged Account Manager uses the jar file listed in the plug-in's directory.
Retry Times Specify the number of times the plug-in must re-run before abandoning the retry. Note: This can parameter be configured only for a post plug-in.
Retry Interval Specify the duration (in seconds) of the interval or the waiting period before the plug-in is retried is it failed. Note: This can parameter be configured only for a post plug-in.
-
-
To configure a Java classpath where the plug-in jar file is located, use the Class Paths section as follows:
-
To add a classpath, click Add.
When a new row is displayed in the table, type the Java classpath into the blank field. For example,
/u01/plugins/emailplugin.jar
Note:
The Oracle Privileged Account Manager server process must be able to access the specified class path files. You can specify any type of location, such as local file system, network file system, etc. -
To delete a classpath, select that classpath row in the table, and then click Remove.
-
-
To configure custom attributes for the plug-in, expand and use the Custom Attributes section as follows:
-
To add an attribute, click Add.
When a new row is displayed in the table, type the Attribute Name and Value into the blank fields. For example, for an email notification plug-in, you might create a
notificationemailattribute with a value ofabc@abc.com. -
To delete a custom attribute, select that attribute's row in the table, and then click Remove.
-
To load custom attributes, if they are defined for a plug-in, click Load.
-
-
To configure filtering rules that determine when Oracle Privileged Account Manager executes the plug-in, select and use the Filter Rules tab as follows:
Note:
You must be an Oracle Privileged Account Manager administrator with the Security Administrator Admin Role to add, edit, or remove Filter Rules.For information about how Oracle Privileged Account Manager uses filtering rules, refer to Section 13.2.8, "Filtering Rules."
-
Expand the Users, Groups, Resource Groups, or Result Codes sections to specify for which users or groups the server can or cannot invoke the plug-in.
-
Select the Enabled tab or Disabled tab and click Add.
-
When the Add dialog box is displayed, enter one or more letters of a name into the User Name field for Users, or into the Name field for Groups and Resource groups and click Search.
-
When the search results display, select the row you want, and click Add.
A success message is displayed above the search results list.
-
Continue selecting and adding users or groups until you are finished, then click Close.
-
-
Expand the Result Codes section to configure filtering rules for a post plug-in that are based on one or more result codes.
Note:
You cannot configure result codes for pre plug-ins.-
Click Add.
-
When a new HTTP Result Code row is displayed, enter an enabled HTTP response code into the blank field. For example, type
200to execute a post plug-in when the response status is a successful request. -
When a new HTTP Result Code row is displayed, enter a disabled HTTP response code into the blank field to support cases such as to execute a post plug-in for failures only. For example, type
200to execute all post plug-ins whose response status is not200.
-
-
To delete a Filter Rule, select that rule row in the applicable table, and then click Remove.
-
-
After setting all of the necessary plug-in configuration parameters, click Test to verify that the configuration is valid.
This test checks whether Oracle Privileged Account Manager can load the configured plug-in and whether it implements the required plug-in interface. Testing catches common issues, such as plug-in jars that are configured with the wrong file paths, plug-ins that implement the wrong interface, pre plug-ins that implement a post plug-in interface or vice versa, etc.
This test does not execute the plug-in or validate any plug-in custom attributes, which are only used by the custom plug-in logic itself.
If the configuration is valid, a "
Test Succeeded" message is displayed. -
Click Save to create the new configuration.
Oracle Privileged Account Manager automatically assigns a Plug-In GUID, which is displayed in the Configuration Settings section.
13.3.1 Creating a Duplicate Plug-in Configuration Using the Create-Like functionality
Administrators creating a new plug-in configuration may want to configure similar or duplicate plug-ins for multiple operations, such as, creating an email notification plug-in for both account checkout and checkin. In such cases, the Create Like functionality can be used, where a new plug-in configuration is created as duplicate of an existing configuration. Then, the administrator can edit only the required values and save the configuration without the need to reconfigure all the values in the Plug-in Configuration page. To do so:
-
Select Plug-in Configuration in the Configuration accordion. In the Plug-in Configuration page, Click Search.
Note:
You can use the Search portlet parameters to configure your search. Refer to Section 13.4, "Searching for Plug-In Configurations" for detailed information. -
In the Search Results table, select the row of the plug-in you want to copy and then click Duplicate, located in the Search Results table toolbar.
A "Copy of PLUG-IN_NAME" page opens. Here, PLUG-IN_NAME is placeholder text, and the name of the plug-in you selected will appear instead.
-
In the "Copy of PLUG-IN_NAME" page, you must specify values for the Name, and Description fields. You can change the values for any of the other fields to customise the plug-in configuration for a new plug-in. For detailed information about plug-in configuration parameters, refer to Section 13.3, "Creating a Plug-In Configuration."
-
Click Save to create the new plug-in configuration.
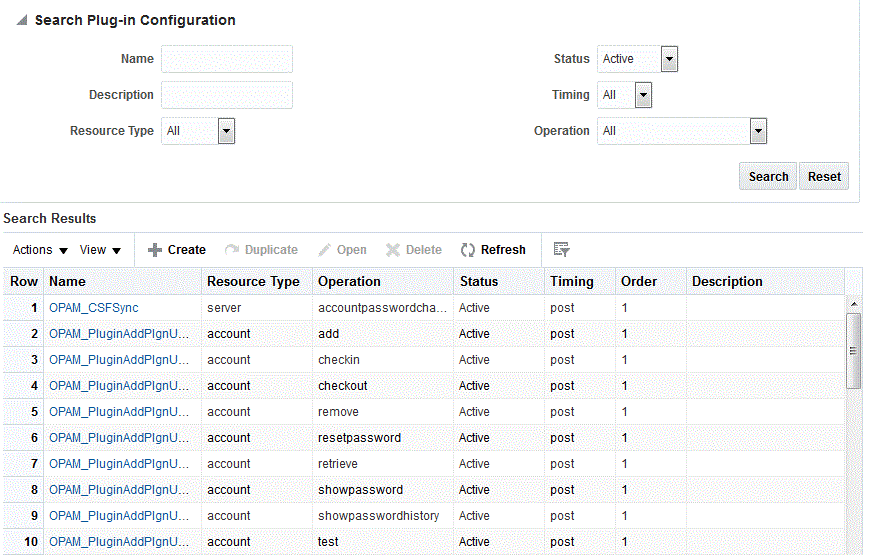
13.4 Searching for Plug-In Configurations
You can search for plug-in configurations by using one or more of the following parameters:
-
Name
-
Description
-
Resource Type (All, account, server, or target)
-
Status (All, Active, or Disabled)
-
Timing (All, pre, or post)
-
Operation (All, accountpasswordchange, add, autocheckin, checkin, checkout, passwordcycle, remove, resetpassword, retrieve, sessioncheckout, showpassword, showpasswordhistory, test, or update)
Note:
You must be an Oracle Privileged Account Manager administrator with the Security Administrator Admin Role or the Application Configurator Admin Role to search for and view plug-ins.To search for a plug-in,
-
Select Plug-in Configuration in the Configuration accordion.
-
When the Plug-in Configuration page is displayed, use the Search portlet parameters to configure your search.
-
For example, to search for a list of all active plug-ins, select Active from the Status menu.
-
To search for all available plug-ins, do not specify any search parameters.
-
-
Click Search.
Review your search results in the Search Results table, which contains a column for all of the search fields and a column for the Plug-In Order.
-
To perform another search, click Reset.
13.5 Opening a Plug-In
You can open a plug-in to view or edit the configuration parameters for that plug-in.
Note:
You must be an Oracle Privileged Account Manager administrator with the Security Administrator Admin Role or the Application Configurator Admin Role to view plug-ins.To open a plug-in, open the Plug-in Configuration page and perform one of the following actions:
-
Click the Plug-in Name (an active link) in the Search Results table.
-
Select the plug-in Row and then click Open.
The Plug-in Configuration: Plug-in Name page opens where you can access the plug-in's configuration settings, custom attributes, users or groups, and current status (active or disabled).
If you edited any of these settings, click Test to validate your changes. If the test is successful, a "Test Succeeded" message is displayed. Click Save.
13.6 Deleting a Plug-In
To delete a plug-in configuration,
-
Locate the plug-in to remove.
-
Select Plug-in Configuration in the Configuration accordion.
-
Click Search in the Search portlet to populate the Search Results table with a list of all available plug-ins.
To narrow the results or to locate a particular plug-in, enter search criteria in one or more the Search fields, and then click Search.
-
-
In the Search Results table, select the plug-in to be removed and then click Delete.
When you are prompted to confirm the deletion, click Delete to continue or Cancel.