18 Developing Plug-Ins for Oracle Privileged Account Manager
This chapter describes how to develop your own plug-ins for Oracle Privileged Account Manager.
Note:
For basic information about managing Oracle Privileged Account Manager plug-ins, including how to configure and deploy plug-ins, refer to Section 13, "Working with Plug-Ins."This chapter includes the following sections:
18.1 Overview
You can use Oracle Privileged Account Manager's Java-based plug-in framework to create plug-ins that extend Oracle Privileged Account Manager's functionality to accommodate your specific business and technical requirements. Plug-ins enable you to provide custom logic within a transaction or to connect to a custom data source.
The topics in this section include:
-
Section 18.1.1, "Oracle Privileged Account Manager Framework Packages"
-
Section 18.1.2, "Special Considerations for Using Oracle Privileged Account Manager Plug-Ins"
18.1.1 Oracle Privileged Account Manager Framework Packages
The Oracle Privileged Account Manager plug-in framework contains the plug-in interfaces and classes you need to develop a plug-in implementation. This framework is shipped in the following jar file:
ORACLE_HOME/opam/jlib/opam-plugin-framework.jar
You can use this jar file to develop, implement, and compile plug-ins.
Note:
Refer to Section 13.2, "Developing Plug-Ins for Oracle Privileged Account Manager" for additional information about developing plug-ins for Oracle Privileged Account Manager.18.1.2 Special Considerations for Using Oracle Privileged Account Manager Plug-Ins
Following are some special considerations and dependencies that you must consider when developing plug-ins:
-
Although an Oracle Privileged Account Manager server runtime is not required when developing plug-ins, the server runtime is required for deployment and testing purposes.
18.2 Setting Up a Plug-In
To set-up an Oracle Privileged Account Manager Java plug-in,
-
Create a standalone
Javaprogram using the predefined interface and implement the required methods.You can execute the plug-in using pre or post timing for an operation. You must implement the corresponding pre plug-in or post plug-in interface.
Note:
Refer to Section 13.2.7.1, "Pre-Operation Plug-Ins" and Section 13.2.7.2, "Post-Operation Plug-Ins" for a description of these timings. -
Before compiling, place the following
jarin your classpath:ORACLE_HOME/opam/jlib/opam-plugin-framework.jar -
Compile the plug-in Java files and create the
classorjarfile. Ensure the compilation completes without errors. -
Put the
classorjarfile in a file system location that is accessible to the Oracle Privileged Account Manager server. For high-availability cluster configurations, you may want to place theclassorjarfile in each individual node or in a shared location that is accessible to all nodes. -
Register the plug-in by adding the plug-in configuration entry.
Note:
-
For information about managing plug-in configurations from the Console, refer to Section 13.3, "Creating a Plug-In Configuration."
-
For information about managing plug-in configurations from the command line, refer to Section A.9, "Working with Plug-Ins."
You can choose any name and package for the class and jar files. However, you must be sure to use the same name and package when configuring the Plug-in Class Name and the Plug-in Class Path attributes when registering the plug-in.
For example, if you create a plug-in using a fully qualified name, such as my.sample.OpamPlugin, that is compiled to the /u01/myplugin.jar file and that has a dependency on some classes in /u01/myutils.jar, then your plug-in configuration must use the following:
| Plug-in Class Name | Plug-in Classpath |
|---|---|
| my.sample.OpamPlugin | /u01/myplugin.jar
|
After the plug-in configuration is registered and enabled, the server invokes the plug-in whenever the invocation criteria are met.
18.3 Understanding the Plug-In API
This section presents a high-level overview of the plug-in API and explains the role of the main classes and interfaces.
Note:
Do not useSystem.exit() in a plug-in implementation because it might cause failures in the server runtime.The topics in this section include:
18.3.1 Communication between the Server and Plug-In
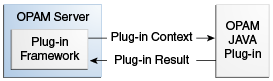
Oracle Privileged Account Manager plug-ins use the PrePlugin or PostPlugin interface to communicate with the Oracle Privileged Account Manager server. When invoking a plug-in, the server constructs the PluginContext object and passes details about the operation (such as target, account, and so forth) to the plug-in invoked by that operation. The server also passes the operation request body and the plug-in configuration that invokes the plug-in to the plug-in.
The plug-in constructs a PluginResult object. After completing its task, the plug-in passes the PluginResult object back to the server. The PluginResult object can contain a success or failure code, custom error messages, and log messages. In some cases, the plug-in can change or add details to the request body and pass those details back to the server.
The following figure illustrates how Oracle Privileged Account Manager plug-ins communicate with the server.
18.3.2 Plug-In Structure
The general structure for a Java plug-in is as follows:
public class OPAM_PLUGIN_CLASSNAME implements PrePlugin {
    public void runPrePlugin(PluginContext ctx, String reqBodyJSON, String pluginCfgJSON) {
       // Plugin Code
   }
}
public class OPAM_PLUGIN_CLASSNAME implements PostPlugin {
    public void runPostPlugin(PluginContext ctx, String reqBodyJSON, String pluginCfgJSON) {
       // Plugin Code
   }
}
18.3.3 Plug-In Interfaces and Classes
Note:
Refer to the Oracle Privileged Account Manager Plug-In Framework Java API Reference for more information.This section describes the plug-in interfaces and classes to use for Oracle Privileged Account Manager.
The topics in this section include:
18.3.3.1 PlugInContext
The Oracle Privileged Account Manager server creates the PluginContext object during plug-in invocation and sends it to the plug-in. This object contains the following information:
-
Account information in JSON format. Obtained by using the
getAccountJSON()method.-
Account information is present in operations involving accounts, such as
checkinandcheckout. -
Account information is not present in operations that do not involve accounts, such as adding or deleting a target. Also, account information is not present when you add a new account because the account is not yet created, and the details sent by the client can be obtained in the request body JSON.
Note:
Refer to Section B.7, "Account Resource" in Appendix B, "Working with Oracle Privileged Account Manager's RESTful Interface" for more information about the Account Resource and its JSON format. -
-
Target information in JSON format. Obtained by using the
getTargetJSON()method.Similar to Account information in JSON format (as described in the preceding point), target information is only present in operations involving targets.
Note:
Refer to Section B.6, "Target Resource" in Appendix B, "Working with Oracle Privileged Account Manager's RESTful Interface" for more information about the Target Resource and its JSON format. -
Operation information in JSON format. Obtained by using the
getOperationJSON()method.This method contains information about the resource that this operation is being performed on, such as target, account, and so on. It also contains information about which operation is being performed, such as
add,delete, and so on. For example:{ "resourceType":"account", "operationName":"add" } -
Authentication information in JSON format. Obtained using the
getAuthContextJSON()method.This method contains information about which user is performing the operation and in which groups that user is a member. For example
{
"requestor":"johndoe",
  "requestorGroups":["ITADMINS", "MANAGERS"]
}
This information is not present for operations of resource type
serverbecause the Oracle Privileged Account Manager server performs the operation rather than an end user. -
PluginResult Object. Must be created by the plug-in to pass information back to the server. Set this object by using the
setPluginResult()method and obtain the value that was set by usinggetPluginResult()method.Note:
Refer to Section 18.3.3.2, "PluginResult" for additional information about thePluginResultobject. -
HTTP Response Status (for post plug-ins only). Obtained using the
getHTTPResponseStatus()method.For post plug-ins, when the Oracle Privileged Account Manager server REST API-based operation has completed, the operation response code such as 200 OK, 401 Unauthorized, and so on, is sent to the plug-in.
-
HTTP Response Entity (for post plug-ins only). Obtained using the
getHTTPResponseEntity()method.Note:
This entity is helpful if you have to write a custom plug-in to update the custom credential store, as this method returns the account name and the password which has been changed by Oracle Privileged Account Manager.For post plug-ins, when the Oracle Privileged Account Manager Server REST API-based operation has completed, the operation results are sent to the plug-in. For example, operation results might include a list of accounts in JSON format from a search operation, an account token in JSON format from a
checkoutoperation, and so forth.The following is an example JSON for the HR_ADMIN account for the post timing on server for the "accountpasswordchange" event:
{ "accountToken": {"accountName":"HR_ADMIN", "accountUID":"ea75011d2ed48154a17d101cdb52c7b4", "accountPassword":"password" } } -
HTTP Response Location > Created GUID (for post plug-ins only). Obtained using the
gettHTTPResponseLocation() -> getGuid()method.For post plug-ins and
addoperations, when the Oracle Privileged Account Manager Server REST API-basedaddoperation has completed, the newly created entity's GUID is sent to the plug-in. This GUID is only present for creation operations. The GUID is not present for operations such as delete target, modify target, and so forth.
18.3.3.2 PluginResult
The plug-in creates PluginResult and uses it to send information back to the Oracle Privileged Account Manager server.
To create this object, the plug-in uses the PluginResult(java.lang.String resultJSON,int plgErrorCode,java.lang.String plgErrorMsg) method. After creation, PluginResult is passed back to the server by storing it in the PluginContext sent by the server. For example
PluginResult result = new PluginResult(resultJSON, plgErrorCode, plgErrorMsg);
ctx.setPluginResult(result);
The PluginResult object contains the following information:
-
Plugin modified request body JSON. Result information in JSON format.
-
In pre plug-in operations, the plug-in uses this information to change or add details to the request body JSON that is passed to it and then returns the updated content as result JSON. The server uses the result JSON to replace the request body JSON before performing the operation.
If multiple pre plug-ins are executed for the same operation, then each plug-in gets the updated request body based on their order of execution. After the last pre plug-in is executed, the final request body is used to execute the operation in the server.
If the plug-in does not want to modify the request body JSON, it can be passed as is into the plug-in result JSON. The plug-in can set this value when creating the
PluginResultobject and can access it by using thegetResultJSON()andsetResultJSON()methods. -
In post plug-in operations, the plug-in can read this value but modifying the value has no impact because the operation has already been completed.
-
-
Error code. Specifies success (
PluginResult.CODE_SUCCESS) or failure (PluginResult.CODE_FAILURE).The plug-in can set this value during the
PluginResultobject creation and can access it by using thegetErrorCode()andsetErrorCode()methods. -
Error message. Describes the error in case of failures.
The plug-in can set any string message and pass it back to the client. The plug-in can set the message during the
PluginResultobject creation and can access it by using thegetPlgErrorMsg()andsetErrorMs()methods.For example, assume you configured a pre plug-in for
checkoutoperations to validate checkout dates and prevent account usage on blacklisted dates, such as regional holidays, weekends, etc. The plug-in can set an error message on checkout such as, "Checkout is not allowed on holidays." In this case, thecheckoutoperation will fail and it will include the error message, "Plug-in execution failed with error message: Checkout is not allowed on holidays." -
Debug logging. Provides information about the plug-in execution.
The plug-in can pass log messages back to the server that will be logged in the server log file. You can use these logs for debugging the plug-in execution. access the log message by using the
getLog(),appendLog(String), andclearLog()methods.
18.3.3.3 PrePlugin
You must implement the PrePlugin interface to create a pre plug-in for Oracle Privileged Account Manager operations. Use following method to implement the PrePlugin interface:
void runPrePlugin(PluginContext ctx, java.lang.String reqBodyJSON, java.lang.String pluginCfgJSON)
The following information is passed from the server to the pre plug-in through runPrePlugin method:
-
PluginContext object. Contains details about the operation.
Refer to Section 18.3.3.1, "PlugInContext" for more information.
-
Request Body JSON. Provides the request sent by the client to Oracle Privileged Account Manager for the REST API operation.
The plug-in can modify this information for pre plug-ins and it can send the newly updated JSON back to the server in the
PluginResultobject. Refer to Section 18.3.3.2, "PluginResult" for more information. -
Plug-in configuration. Invokes this operation in JSON format.
You can use the same Java plug-in implementation for many operations. For example, you can use the same plug-in that performs email notification for both
checkoutandcheckinoperations.When the plug-in configuration is passed to the plug-in, it provides details to the plug-in on which the configuration is causing this invocation, which is also useful for passing custom attributes that are present in the configuration to the plug-in. For example, in the email notification case, you can store mail server details as custom attributes in the plug-in configuration and they will be passed to the plug-in.
18.3.3.4 PostPlugin
You must implement the PostPlugin interface to create a post plug-in for Oracle Privileged Account Manager operations. Use following method to implement the PostPlugin interface:
void runPostPlugin(PluginContext ctx, java.lang.String reqBodyJSON, java.lang.String pluginCfgJSON)
The information that is passed from the server to the post plug-in through the runPostPlugin method is the same as the information described in the previous section. Review the list in Section 18.3.3.3, "PrePlugin."
18.3.3.5 Property File
Plug-ins support custom attributes that are used to pass input parameters from the plug-in configuration to the plug-in implementation. As these attribute names are defined by the plug-in developer, they must be manually configured along with their values by the administrator. To simplify the process, the property file is used to define the attribute names and values.
The developer can create a .properties file named after the defined plug-in and package it in the .jar file. For example, if the plugin is named "my.sample.OpamPlugin", then the .properties file is named as "my.sample.OpamPlugin.properties". The properties file should be packaged in the root folder of the compiled plug-in .jar file.
Within the .properties file, a list of custom attributes and the following information can be defined for each plug-in:
-
The default value or values
-
If the configuration of a custom attribute is mandatory
-
If the value of a custom attribute should be masked
The administrator can load a .properties file while configuring a plug-in. If a .properties file exists for a plug-in, then:
-
The default value of custom attributes can be loaded to the plug-in configuration using the Load button in the Console. Refer to Step 5 of Section 13.3, "Creating a Plug-In Configuration" for detailed information.
-
The mandatory plug-in custom attributes will be checked as defined in the .properties file.
-
Custom attribute values will be masked as defined in the .properties file.
The following is the snippet of a sample .properties file named examplePlugin.properties within the examplePlugin.jar:
Note:
Thename, default, mask, and required properties that are defined in the following snippet are mandatory. If you want to supply a blank value for these properties, you must configure the value as =""
<customattribute>
    <name value="email"/>
    <default value="abc@efg.com"/>
    <mask value="false"/>
    <required value="true"/>
  </customattribute>
  <customattribute>
    <name value="day"/>
    <default value=["Saturday,Sunday"]/>
    <mask value="false"/>
    <required value="false"/>
  </customattribute>
18.4 Debugging and Logging for Plug-Ins
A plug-in can maintain its own log file and can log to that file in real time. In addition, a plug-in can log debug messages in the Oracle Privileged Account Manager server log file during execution by using PluginResult object debug logging methods, as described in Section 18.3.3.2, "PluginResult."
Messages logged using the PluginResult method will be present in the Oracle Privileged Account Manager Server log file. To view these messages, you must set the logging level to TRACE:32 (very detailed trace or debug information).
The following example shows the sample code used to implement a plug-in's logging functionality.
Example 18-1 Sample Code Used to Implement Plug-In Logging
public void runPostPlugin(PluginContext ctx, String reqBodyJSON,
String pluginCfgJSON) { // the parameters are the same for runPrePlugin()
…
  PluginResult result = ctx.getPluginResult(); // get the PluginResult object
    from PluginContext object
  result.appendLog("Here is the log");  // append log
…
  // System.out.println(result.getLog()); // getLog() will return current log
  // result.clearLog(); // clearLog() will remove the log that has been recorded
…
}
18.5 Example Plug-ins
This section discusses the following examples:
18.5.1 Pre Plug-In Example
Example 18-3 illustrates a pre plug-in that blocks an operation, based on the specified dates, before the operation is executed.
Your organization may have some blacklist dates, such as regional holidays and yearly closures, when access to privileged accounts should not be allowed. This pre plug-in performs the validation and extends Oracle Privileged Account Manager's Usage Policy functionality.
This section discusses the following topics:
18.5.1.1 Configuring a Pre Plug-In
You can define the attributes of a plug-in to configure it to perform specific actions. Use the attributes described in the following table to configure the plug-in:
| Attribute Name | Attribute Value |
|---|---|
| pluginName | BlackListDates |
| pluginStatus | active |
| pluginResource | account |
| pluginOperation | checkout |
| pluginTiming | pre |
| pluginOrder | 1 |
| pluginClassName | BlackListDates |
| pluginClassPath | /myhome/plugins/BlackListDates.jar |
| pluginCustomAttrs | Use the date custom attribute to specify one or more blacklist dates.For example:
|
| pluginTimeout | 60 |
This plug-in uses the following custom attributes to specify the blacklist dates.
| Attribute Name | Attribute Value |
|---|---|
| date | Month/Day, for example 10/01.
Note:
|
Optionally, perform the procedure in this section to configure custom attributes for a pre-plugin using a property file. If a property file is defined, then the load button can be used to load the properties while creating the plugin configuration. If the property file is not defined, then you can manually type the custom attributes while creating the plugin configuration.
To configure custom attributes using a property file:
-
Create a file named "BlackListDates.properties" in the same folder that contains the "BlackListDates.class" file.
-
Define a default value for the "date" attribute.
-
Save the .properties file.
Example 18-2, "Custom Attributes of the Blacklist Dates Pre Plug-In Property File" provides the sample content of this .properties file.
Example 18-2 Custom Attributes of the Blacklist Dates Pre Plug-In Property File
 <customattribute>
    <name value="date"/>
    <default value=["10/01,12/01"]/>
    <mask value="false"/>
    <required value="true"/>
  </customattribute>
  <customattribute>
    <name value="version"/>
    <default value=["1.0.0"]/>
    <mask value="false"/>
    <required value="false"/>
  </customattribute>
18.5.1.2 Compiling a Pre Plug-In
After you configure a pre plug-in, you must compile it. Perform the procedure described in this section to do so:
-
If necessary, download the following files:
Download From Files to Download ORACLE_HOME opam-plugin-framework.jar-
jettison-1.3.jar -
jersey-bundle-1.18.jar -
jsr311-api.jar
-
Use the following sample compile command:
javac -cp .:ORACLE_HOME/opam/jlib/opam-plugin-framework.jar:
ORACLE_HOME/opam/jlib/third-party/jettison-1.3.jar:
ORACLE_HOME/opam/jlib/third-party/jersey-bundle-1.18.jar:
ORACLE_HOME/opam/jlib/third-party/jsr311-api.jar
BlackListDates.java
-
Create a jar file:
jar -cf BlackListDates.jar BlackListDates.class BlackListDates.properties
After you configure this plug-in for Oracle Privileged Account Manager, the plug-in will block the user from executing the Oracle Privileged Account Manager operation based on the date attributes. For example, if today is 10/01, and one of the date attributes is 10/01, then the user will not be able to perform this operation.
Note:
In the following example, only the month and day are necessary. The year does not matter.Example 18-3 Blacklist Dates Pre Plug-In
import org.codehaus.jettison.json.JSONException;
import org.codehaus.jettison.json.JSONObject;
import org.codehaus.jettison.json.JSONStringer;
import org.codehaus.jettison.json.JSONArray;

import com.oracle.idm.opam.plugin.interfaces.PrePlugin;
import com.oracle.idm.opam.plugin.context.PluginContext;
import com.oracle.idm.opam.plugin.context.PluginResult;

import java.util.Date;
import java.text.DateFormat;
import java.text.SimpleDateFormat;
import java.util.Calendar;

public class BlackListDates implements PrePlugin {

public void runPrePlugin(PluginContext ctx, String reqBodyJSON, String pluginCfgJSON){
  System.out.println("===== In BlackListDates.runPrePlugin =====");
  try {
    JSONArray blackDates = null;
    JSONObject plugin = new JSONObject(pluginCfgJSON);
    JSONObject config = plugin.getJSONObject("plugin");
    JSONArray customAttrsArr = new JSONArray();
    if(config.has("pluginCustomAttrs"))
      customAttrsArr = config.getJSONArray("pluginCustomAttrs");
    for(int i=0; i<customAttrsArr.length(); i++) {
      JSONObject singleJSON = customAttrsArr.getJSONObject(i);
      JSONObject singleAttr = singleJSON.getJSONObject("pluginCustomAttr");
      String attrName = singleAttr.getString("attrname");
    if(attrName.equalsIgnoreCase("date"))
      blackDates = singleAttr.getJSONArray("attrvalue");
    }

    for(int i=0; i<blackDates.length(); i++) {
      String date = blackDates.getString(i);
      String[] count = date.split("/");
      if(count.length != 2)      // wrong format, ignore
        continue;
      else {
        if(isToday(date)) {
          setResult(ctx, reqBodyJSON, PluginResult.CODE_FAILURE,
 "You are not allowed to do the operation on this date : " + date);
         return;
        }
      }
     }
   }
  catch (Exception e) {
    System.out.println("Exception happened: ");
    e.printStackTrace();
    PluginResult ret = new PluginResult(reqBodyJSON, PluginResult.CODE_FAILURE, e.getMessage());
    ctx.setPluginResult(ret);
  }
  System.out.println("===== Finished BlackListDates.runPrePlugin =====");
}
private static boolean isToday(String blackDate) {
  DateFormat dateFormat = new SimpleDateFormat("MM/dd");
  Date date = new Date();
  if( blackDate.equalsIgnoreCase( dateFormat.format(date).toString() ) )
    return true;
  else
    return false;
 }
private static void setResult(PluginContext ctx, String reqBodyJSON, int resultCode, String msg) {
  PluginResult ret = new PluginResult(reqBodyJSON, resultCode, msg);
  ctx.setPluginResult(ret);
  return;
}

}
18.5.2 Post Plug-In Example
Example 18-4 illustrates a post plug-in that sends an email about the operation after the operation has completed.
This section discusses the following topics:
18.5.2.1 Configuring a Post Plug-In
You can define the attributes of a plug-in to configure it to perform specific actions. Use the attributes described in the following table to configure the plug-in:
| Attribute Name | Attribute Value |
|---|---|
| pluginName | EmailNotification |
| pluginDescription | This is an Email Notification Plug-in. |
| pluginResource | account |
| pluginOperation | checkout |
| pluginTiming | post |
| pluginOrder | 1 |
| pluginClassName | EmailNotificationPlugin
Note: Class Name should be consistent with the class name in your plug-in jar file |
| pluginClassPath | /myhome/plugins/EmailNotificationPlugin.jar
Note: The
pluginClassPath: ["/myhome/plugins/EmailNotificationPlugin.jar"]
|
| pluginCustomAttrs | Use the following custom attributes to send information, such as the SMTP server to use for sending the email, the address where the email is sent, and so forth:
|
You must also configure the following custom attributes to send information, such as the SMTP server to use for sending the email, the address where the email is sent, and so forth.
| Attribute Name | Attribute Value |
|---|---|
| smtp_server | SMTP host name |
| smtp_port | 25 |
| to_addr | <EMAIL ADDRESS>
Note: You can set up multiple values. Enter as many |
| from_addr | <EMAIL ADDRESS> |
| user | Optional. SMTP login user name |
| password | Optional. SMTP login user password |
This plug-in uses the JAVA Mail API to send emails. For more information about the JAVA Mail library and to download the library, refer to the following link:
http://www.oracle.com/technetwork/java/javamail/index.html
Optionally, perform the procedure in this section to configure custom attributes for a post-plugin using a property file. If a property file is defined, then the load button can be used to load the properties while creating the plugin configuration. If the property file is not defined, then you can manually type the custom attributes while creating the plugin configuration.
To configure custom attributes using a property file:
-
Create a file named "EmailNotificationPlugin.properties" in the same folder that contains the "EmailNotificationPlugin.class" file.
-
Define a default value for the "date" attribute.
-
Save the .properties file.
Example 18-4, "Email Notification Post Plug-In Property File" provides the sample content of this .properties file.
18.5.2.2 Compiling a Post Plug-In
After you configure a post plug-in, you must compile it. Perform the procedure described in this section to do so:
-
If necessary, download the following files:
Download From Files to Download ORACLE_HOME opam-plugin-framework.jar-
jettison-1.3.jar -
jersey-bundle-1.18.jar -
jsr311-api.jar
JAVA Mail API mail.jar -
Use the following sample compile command:
javac -cp .:ORACLE_HOME/opam/jlib/opam-plugin-framework.jar:
ORACLE_HOME/opam/jlib/third-party/jettison-1.3.jar:
ORACLE_HOME/opam/jlib/third-party/jersey-bundle-1.18.jar:
ORACLE_HOME/opam/jlib/third-party/jsr311-api.jar:.
/javax.mail.jar EmailNotificationPlugin.java
-
Create a jar file:
jar -cf EmailNotificationPlugin.jar EmailNotificationPlugin.class EmailNotificationPlugin.properties
After you configure this plug-in for Oracle Privileged Account Manager, the plug-in will send an email to the address that you set-up in custom attributes whenever the configured operation is performed. For example, if you configure this plug-in for the account resource type and checkout operation, then the plug-in will send an email notification whenever a checkout is completed.
Example 18-4 Email Notification Post Plug-In Property File
import org.codehaus.jettison.json.JSONException;
import org.codehaus.jettison.json.JSONObject;
import org.codehaus.jettison.json.JSONStringer;
import org.codehaus.jettison.json.JSONArray;

import com.oracle.idm.opam.plugin.interfaces.PostPlugin;
import com.oracle.idm.opam.plugin.context.PluginContext;
import com.oracle.idm.opam.plugin.context.PluginResult;
import java.lang.Thread;
import java.io.*;
import java.util.*;
import javax.mail.*;
import javax.mail.internet.*;
import javax.activation.*;

/* Sample post plugin that sends email notification */
public class EmailNotificationPlugin implements PostPlugin {

    public void runPostPlugin(PluginContext ctx, String reqBodyJSON,
                              String pluginCfgJSON) {

        PluginResult result =
            new PluginResult(reqBodyJSON, PluginResult.CODE_SUCCESS, null);

        try {

            result.appendLog("Starting EmailNotificationPlugin");

            /* Get the resource type and operation name from the context */
            JSONObject opJSON = new JSONObject(ctx.getOperationJSON());
            String resourceType = opJSON.getString("resourceType");
            String operationName = opJSON.getString("operationName");

            /* Get the target name */
            JSONObject json = null;
            String targetName = null;
            if (ctx.getTargetJSON() != null) {
                JSONObject targetJSON = new JSONObject(ctx.getTargetJSON());
                json = targetJSON.getJSONObject("target");
                targetName = json.getString("targetName");
            }

            /* Get the account name */
            String accountName = null;
            if (ctx.getAccountJSON() != null) {
                JSONObject accountJSON = new JSONObject(ctx.getAccountJSON());
                json = accountJSON.getJSONObject("account");
                accountName = json.getString("accountName");
            }

            /* Get which user performed the operation */
            JSONObject pluginAuthJSON =
                new JSONObject(ctx.getAuthContextJSON());
            String requestor = pluginAuthJSON.getString("requestor");

            /* Get custom attributes defined in plugin configuration such as email server,
               to address etc */
            JSONObject plugin = new JSONObject(pluginCfgJSON);
            JSONObject config = plugin.getJSONObject("plugin");

            JSONArray customAttrsArr = new JSONArray();
            if (config.has("pluginCustomAttrs"))
                customAttrsArr = config.getJSONArray("pluginCustomAttrs");

            String smtpServer = null;
            String smtpPort = null;
            String fromAddr = null;
            String user = null;
            String password = null;
            JSONArray emailList = null;

            for (int i = 0; i < customAttrsArr.length(); i++) {
                JSONObject singleJSON = customAttrsArr.getJSONObject(i);
                JSONObject singleAttr =
                    singleJSON.getJSONObject("pluginCustomAttr");

                String attrName = singleAttr.getString("attrname");

                if (attrName.equalsIgnoreCase("smtp_server"))
                    smtpServer =
                            singleAttr.getJSONArray("attrvalue").getString(0);
                if (attrName.equalsIgnoreCase("smtp_port"))
                    smtpPort =
                            singleAttr.getJSONArray("attrvalue").getString(0);
                if (attrName.equalsIgnoreCase("from_addr"))
                    fromAddr =
                            singleAttr.getJSONArray("attrvalue").getString(0);
                if (attrName.equalsIgnoreCase("to_addr"))
                    emailList = singleAttr.getJSONArray("attrvalue");
                if (attrName.equalsIgnoreCase("user"))
                    user = singleAttr.getJSONArray("attrvalue").getString(0);
                if (attrName.equalsIgnoreCase("password"))
                    password =
                            singleAttr.getJSONArray("attrvalue").getString(0);
            }

            for (int i = 0; i < emailList.length(); i++) {
                Properties properties = System.getProperties();
                properties.setProperty("mail.smtps.host", smtpServer);
                properties.setProperty("mail.smtp.port", smtpPort);
                if (user != null && password != null) {
                    properties.setProperty("mail.user", user);
                    properties.setProperty("mail.password", password);
                }
                Session session = Session.getDefaultInstance(properties);

                MimeMessage message = new MimeMessage(session);

                message.setFrom(new InternetAddress(fromAddr));
                message.addRecipient(Message.RecipientType.TO,
                                     new InternetAddress(emailList.getString(i)));

                /* Set the email subject and body */
                String subject =
                    "OPAM Notification : " + resourceType + " " + operationName;
                String emailBody =
                    "Target : " + targetName + "\nAccount : " + accountName +
                    "\nOperation : " + operationName + "\nRequestor : " +
                    requestor;
                message.setSubject(subject);
                message.setText(emailBody);

                /* Send the email */
                Transport.send(message);
                result.appendLog("Completed EmailNotificationPlugin successfully");
                ctx.setPluginResult(result);
            }
        } catch (Exception e) {
            result.appendLog("Exception happened: " + e);

            result.setErrorCode(PluginResult.CODE_FAILURE);
            result.setErrorMsg(e.getMessage());
            ctx.setPluginResult(result);
        }
    }
}
Example 18-5 Email Notification Post Plug-In Custom Attributes Property File (EmailNotification.properties)
 <customattribute>
    <name value="smtp_server"/>
    <default value=[""]/>
    <mask value="false"/>
    <required value="true"/>
  </customattribute>
 <customattribute>
    <name value="smtp_port"/>
    <default value=["25"]/>
    <mask value="false"/>
    <required value="true"/>
  </customattribute>
  <customattribute>
    <name value="to_addr"/>
    <default value=[""]/>
    <mask value="false"/>
    <required value="true"/>
  </customattribute>
  <customattribute>
    <name value="from_addr"/>
    <default value=[""]/>
    <mask value="false"/>
    <required value="true"/>
  </customattribute>
  <customattribute>
    <name value="user"/>
    <default value=[""]/>
    <mask value="false"/>
    <required value="false"/>
  </customattribute>
  <customattribute>
    <name value="password"/>
    <default value=[""]/>
    <mask value="true"/>
    <required value="false"/>
  </customattribute>
18.6 Managing Plug-Ins
For information about managing plug-ins,
-
Refer to Chapter 13, "Working with Plug-Ins" for information about managing plug-ins from the Console.
-
Refer to Section A.9, "Working with Plug-Ins" for information about managing plug-ins from the command line.