12 Understanding the Proxy, Distribution, and Virtualization Functionality
This chapter provides a conceptual overview of the Oracle Unified Directory functionality that enables you to use a proxy server for various types of deployments.
This functionality includes configurable workflow elements and an extensible plug-in API that you can use to work with data residing on remote and distributed data sources or servers.
This chapter includes the following sections:
-
Section 12.1, "Understanding How to Access Remote Data Sources"
-
Section 12.2, "Understanding Load Balancing Using the Proxy"
-
Section 12.3, "Understanding Data Distribution Using the Proxy"
-
Section 12.4, "Understanding Data Integration Using the Proxy"
Note:
Before reading this chapter, review Chapter 1, "Introduction to Oracle Unified Directory" and Chapter 3, "Example Deployments Using the Proxy Server" for a better understanding of the concepts described here.For more information about configuring the features and functionality described in this chapter, see the chapters in Part IV, "Configuring Proxy, Distribution, and Virtualization Functionality."
12.1 Understanding How to Access Remote Data Sources
This section describes how to access remote data in either a relational database management system (RDBMS) such as an Oracle Database or a remote LDAP directory server.
The topics in this section include:
-
Section 12.1.1, "Enabling LDAP Clients to Access Identity Data Stored in an RDBMS"
-
Section 12.1.2, "Enabling Communication with a Remote LDAP Server"
For configuration information, see Chapter 20, "Configuring Access to Remote Data Sources."
12.1.1 Enabling LDAP Clients to Access Identity Data Stored in an RDBMS
The RDBMS workflow element enables LDAP clients to access identity data stored in a relational database management system (RDBMS) using the LDAP protocol.
The topics in this section include:
For information about configuring an RDBMS workflow element and its supporting components, see Section 20.1, "Configuring Access to Identity Data Stored in an RDBMS."
12.1.1.1 Why Use an RDBMS Workflow Element?
The RDBMS workflow element allows you to create a bridge between Oracle Unified Directory LDAP clients and an RDBMS such as an Oracle Database. A deployment can use an RDBMS workflow element implementation to meet the following requirements:
-
The deployment stores some identity data in an LDAP directory server, but it also has additional data stored in an RDBMS. LDAP clients want to integrate data from both sources into aggregate virtual views.
-
LDAP clients want to use the LDAP protocol to read and write the identity data stored in both the LDAP directory server and the RDBMS. These clients do not want to use SQL queries and commands to access the RDBMS data.
12.1.1.2 RDBMS Workflow Element Features
An RDBMS workflow element implementation supports the following features:
-
You can configure a connection to most RDBMS databases that support JDBC. For a list of supported databases, check the Oracle Unified Directory 11g Release 2 (11.1.2.3) Certification Matrix.
-
You can map LDAP object classes and attributes to SQL tables and columns in the RDBMS to create virtual views of the RDBMS data. You are not required to make any modifications to the RDBMS.
-
You can use the following LDAP operations. These operations are translated to the equivalent SQL queries to access data stored in the RDBMS:
-
BIND -
ADD -
DELETE -
MODIFY -
MODIFYDN -
SEARCH
Note:
In the current release, the RDBMS workflow element does not support LDAP write operations (add, modify, or delete) when entries are built from multiple SQL tables. -
-
You can control access to the virtual views of the RDBMS data using an access control group and virtual ACIs based on LDAP client identities.
12.1.1.3 RDBMS Workflow Element Caching
The RDBMS workflow element maintains an in-memory cache containing data already accessed from the RDBMS. By default, this cache is enabled.
The default (and recommended) caching-scheme is soft-weak. This scheme holds soft references to the database entries and enables optimal caching of objects while still allowing the JVM to garbage collect them if memory is low. This scheme also maintains a most frequently used subcache containing soft references to the objects, which allows the objects to be garbage collected except for a fixed number of the most recently used objects.
To specify a different caching scheme for the RDBMS workflow element, use dsconfig. For example:
$ dsconfig set-workflow-element \
--element-name ORCL1 \
--set caching-scheme:full
When data entries targeted by the proxy are modified by external means (for example, by an application or a user directly accessing the database using an SQL statement), the changes might not be reflected in the RDBMS workflow element. If you require strong data consistency, change the caching scheme or disable caching altogether by setting the caching-scheme property in the RDBMS workflow element.
For example, to disable caching, set the caching-scheme property to none:
$ dsconfig set-workflow-element \
--element-name ORCL1 \
--set caching-scheme:none
For more information about the RDBMS workflow element caching properties, including the caching schemes you can configure, see the Oracle Fusion Middleware Configuration Reference for Oracle Unified Directory.
12.1.1.4 RDBMS Workflow Element Configuration
To implement an RDBMS workflow element, you configure the following components:
For information about configuring the components, see Section 20.1, "Configuring Access to Identity Data Stored in an RDBMS."
12.1.1.4.1 Oracle Unified Directory Proxy Server
The RDBMS workflow element requires an Oracle Unified Directory proxy server as the interface between the LDAP clients and the RDBMS. The proxy server uses the following elements to communicate with the RDBMS:
-
An RDBMS extension manages the connectivity with the remote server through JDBC by periodically checking the response from the remote peer and providing valid connections maintained by the connection pool.
-
An RDBMS workflow element retrieves the connections from the RDBMS extension element, performs mapping between LDAP entries and SQL tables, and executes operations received from the LDAP clients.
To create a proxy server, you run the oud-proxy-setup or oud-proxy-setup.bat script. These scripts require a supported Java installation (JRE 7 or JDK 7). Your JAVA_HOME environment variable should point to this installation.
12.1.1.4.2 JDBC Driver JAR File
An RDBMS workflow element implementation relies on the JDBC standard to communicate with the RDBMS, so you must install the JDBC driver JAR file that corresponds to the RDBMS you are using.
12.1.1.4.3 RDBMS Workflow Element and Supporting Components
Communication with the RDBMS requires the RDBMS workflow element and its components. To create and configure these components, you perform the following tasks:
-
Create an RDBMS extension, RDBMS workflow element, and a workflow associated with the RDBMS workflow element.
-
Assign the workflow associated with the RDBMS workflow element to a network group.
-
Configure LDAP-SQL mappings for the LDAP attributes and object classes that correspond to the SQL tables and columns you want to access in the RDBMS.
12.1.1.4.4 Access Control Group and Virtual ACIs
Note:
To use the virtual directory capabilities described here, you must have a validOracle Directory Service Plus license.Access control to the virtual data from the RDBMS is configured using an access control group with virtual ACIs based on the LDAP client identities. Virtual ACIs are created and stored on the Oracle Unified Directory proxy instance.
To configure access control to the virtual data, you perform the following tasks:
-
Create an access control group for the workflow associated with the RDBMS workflow element.
-
Create virtual ACIs based on the LDAP client identities and add these virtual ACIs to the access control group created in Step 1.
Note:
Your access control strategy for the virtual data from the RDBMS depends on your corporate policies, so you must create virtual ACIs to follow those policies.For more information, see Section 9.7, "Understanding Virtual ACIs" in Chapter 9, "Understanding the Oracle Unified Directory Access Control Model."
12.1.2 Enabling Communication with a Remote LDAP Server
You can use the following elements to enable communication between a proxy instance and a remote LDAP server:
-
LDAP Server Extension: This element manages connectivity with a remote server by periodically checking the response from the remote peer and providing valid connections maintained by the connection pool.
-
Proxy LDAP Workflow Element: This element retrieves connections from the LDAP server extension element and executes operations received from the user as defined in the configured mode.
Note:
-
For information about configuring an LDAP server extension, see Section 20.2.1, "Configuring LDAP Server Extensions."
-
For information about configuring a Proxy LDAP workflow element, see Section 20.2.2, "Configuring Proxy LDAP Workflow Elements."
12.2 Understanding Load Balancing Using the Proxy
You can use the proxy to load balance requests across multiple data sources or replicated LDAP servers.
Note:
For information about how to configure load balancing, see Chapter 21, "Configuring Load Balancing Using the Proxy."In a load balancing deployment, the requests are routed to one of the data sources based on the load balancing algorithm set. You can choose one of the following load balancing algorithms:
-
Failover. Several remote LDAP server handle requests, based on the priority configured on a server, for a given operation type. When there is a failure, requests are sent to the server with the next highest priority for that operation type.
For more information, see Section 12.2.1, "Failover Load Balancing."
-
Optimal. There is no priority between the different remote LDAP servers. The LDAP server with the lowest saturation level is the one that handles the requests. The saturation level of the remote LDAP servers is regularly reevaluated, to ensure that the best route is chosen.
For more information, see Section 12.2.2, "Optimal Load Balancing."
-
Proportional. All the remote LDAP servers handle requests, based on the proportions (weight) set.
For more information, see Section 12.2.3, "Proportional Load Balancing."
-
Saturation. There is one main LDAP server that handles all requests, until the saturation limit is reached.
For more information, see Section 12.2.4, "Saturation Load Balancing."
-
Search Filter. Several LDAP servers are deployed, and handle requests based on certain attributes in the request search filter.
For more information, see Section 12.2.5, "Search Filter Load Balancing."
12.2.1 Failover Load Balancing
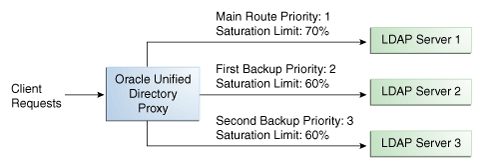
In a load balancing with failover algorithm, the proxy routes requests to the remote LDAP server or data center with the highest priority for a given operation type, for example for Add operations. The proxy continues to send requests to the priority route until the remote LDAP server goes down. This may be caused by a network cut, a hardware failure, a software failure or some other problem. At failover, the proxy routes incoming requests to the server with the second highest priority for that specific operation type.
Figure 12-1 illustrates a failover load balancing configuration. In this example, there are three routes, each with a unique priority per operation type. All Add operations are treated by Server 1, since it has the highest priority, that is priority=1, while Bind operations are handled by Server 2. If Server 1 goes down, the Add requests are sent to the server with the second highest priority, that is, Server 2.
Figure 12-1 Failover Load Balancing Example
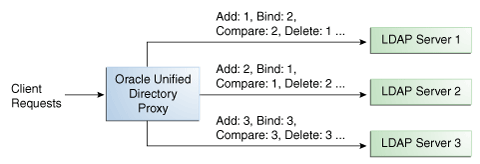
Description of ''Figure 12-1 Failover Load Balancing Example''
By default, the proxy does not immediately reroute requests to a server that has gone down, once it is running again. For example, if Server 1 goes down, the Add requests are sent to Server 2. Even when Server 1 is up again, Server 2 continues to handle incoming Add requests. However, if Server 2 goes down, and Server 1 is up again, Server 1 will now receive incoming requests. This default behavior can be changed with the switch-back flag. For information about configuring the switch-back flag, see Section 21.1.4.2, "Setting the switch-back Flag."
For failover to work effectively, the monitoring check interval must be set to be low enough so that the failover happens inside a time interval that suits your business needs. For details about setting the monitoring check interval, see Section 20.2.1.7, "Modifying the LDAP Data Source Monitoring Connection Properties."
12.2.2 Optimal Load Balancing
With the optimal load balancing algorithm, the proxy sends requests to the route with the lowest saturation level. The proxy continues to send requests to this route until the saturation level of the remote LDAP server on that route passes the saturation level of the other remote LDAP servers in the deployment. The saturation level is represented as a percentage.
When the saturation level of a route changes, the load balancing algorithm re-evaluates the best route and if required, selects another route as the active one. The route with the lowest saturation level is always chosen as the optimal route. In the configuration illustrated by Figure 12-5, Server 1 has the lowest saturation level and will handle all the requests until its saturation level rises above the saturation level of the other servers. If one of the servers goes down, its saturation level is considered as 100%.
Figure 12-2 Optimal Load Balancing Example
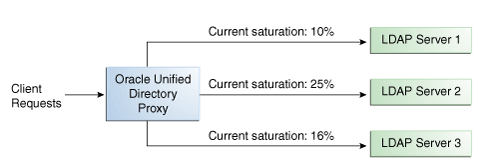
Description of ''Figure 12-2 Optimal Load Balancing Example''
You can configure the saturation precision, to set the difference of saturation between two servers before the route changes to the server with the lowest saturation level. By default, the saturation precision is set to 5. However, if you find that the algorithm is switching between servers too often, you can set the saturation precision to 10, for example. The saturation precision is set in the LDAP server extension, see Section 21.1.4.3, "Setting the Saturation Precision for the Optimal or Saturation Algorithm."
12.2.2.1 Determining Saturation Level
The saturation level is a ratio between the number of connections in use in the connection pool and its configured maximum size. The connection pool maximum size is an advanced parameter of the LDAP server extension object.
If the number of connections in use is lower than the maximum pool size divided by 2, then the saturation is 0. This implies that the pool is not saturated.
When more than half of the connections are in use, the saturation level is calculated as follows:
100 * (1 - available connections/(max pool size/2))
This implies that the saturation level is 100 when all the connections are in use.
12.2.3 Proportional Load Balancing
With the proportional load balancing algorithm, the proxy forwards requests across multiple routes to remote LDAP servers or data sources, based on the proportions set. The proportion of requests handled by a route is identified by the weight that you set for each route in your configuration. The weight is represented as an integer value.
When you configure load balancing, you must indicate the proportion of requests handled by each LDAP server. In the example in Figure 12-3, Server 1 handles twice as many connections as Server 2, since the weight is set with a proportion of 2:1. Server 2 and Server 3 handle the same amount of requests (1:1).
Figure 12-3 Proportional Load Balancing Example
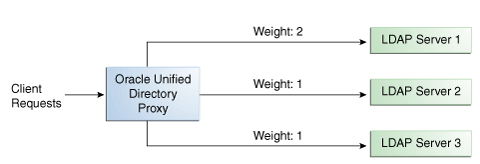
Description of ''Figure 12-3 Proportional Load Balancing Example''
You can configure a specific weight for each type of client operation, as illustrated in Figure 12-4. For example, in you want Server 1 to handle all the Bind operations, this is possible. To do so, set the weight of bind to 1 (or higher) for Server 1, and to 0 for Server 2 and Server 3.
In the example illustrated in Figure 12-4, Server 1 will handle three times as many Add requests as Server 2 and Server 3. However, Server 1 will handle only one half the Search requests handled by Server 2, and Server 3. Server 2 and Server 3 will handle the same amount of Add and Search requests, but will not handle Bind requests.
Figure 12-4 Proportional Load Balancing with Request Specific Management
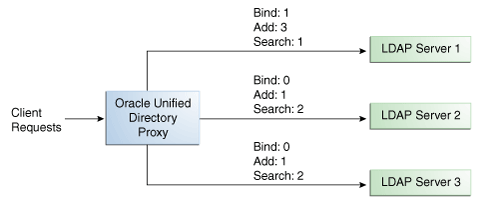
Description of ''Figure 12-4 Proportional Load Balancing with Request Specific Management''
If you do not modify the weights of operations other than Bind, Add, and Search, as illustrated in Figure 12-4, the servers will share the same load for all other operations (for example for Delete operations).
For more information on configuring the load balancing weights of routes when using proportional load balancing, see Section 21.1.4, "Modifying Load Balancing Properties."
12.2.4 Saturation Load Balancing
With the saturation load balancing algorithm, the proxy sends requests to a chosen priority route. The proxy continues to send requests to the priority route until the remote LDAP server on that route passes the saturation threshold set. The saturation threshold is represented as a percentage.
For example, if you want a remote LDAP server to manage all incoming requests, set it as priority 1. If you want that same remote LDAP server to stop handling requests when its saturation index reaches 70%, set the saturation threshold to 70%, as illustrated in Figure 12-5. In this way, the server handles all incoming requests until it becomes 70% saturated. The proxy then sends all new requests to the remote LDAP server to Server 2, since it has the next highest priority. Server 2 will continue to handle requests until it reaches its own saturation threshold, or until Server 1 is no longer saturated.
In other words, if Server 1 reaches 70% saturation, the proxy directs the requests to Server 2. If Server 1 is still at 70%, and Server 2 reaches 60%, the proxy directs the new requests to Server 3.
However, if while Server 2 is handling requests, the saturation level of Server 1 drops to 55%, the proxy will direct all new requests to Server 1, even if Server 2 has not reached its saturation threshold.
Figure 12-5 Saturation Load Balancing Example
Description of ''Figure 12-5 Saturation Load Balancing Example''
If all routes have reached their saturation threshold, the proxy chooses the route with the lowest saturation.
You can set a saturation threshold alert that warns you when a server reaches its saturation limit. For example, if you set a saturation threshold alert to 60%, you will receive a notification when the server reaches this limit, and you can act before the server becomes too degraded.
For more information about how to determine the saturation level, see Section 12.2.2.1, "Determining Saturation Level."
12.2.5 Search Filter Load Balancing
With the search filter load balancing algorithm, the proxy routes search requests to LDAP servers based on the presence of certain attributes defined in the request search filter.
The topology consists of several LDAP servers that are accessible through the proxy. All the LDAP servers contain similar data, but each server is optimized based on attributes defined in the search filter to provide better performance. You can configure each route with a list of allowed attributes and a list of prohibited attributes. A search request matches a route when the request search filter contains at least one allowed attribute, and none of the prohibited attributes.
The Figure 12-6 illustrates a search filter load balancing algorithm. In this example, there are three LDAP servers and therefore three distinct routes. LDAP server 1 indexes the uid attribute, LDAP server 2 indexes the cn attribute, and the third LDAP server is a pass-through route.
Figure 12-6 Search Filter Load Balancing
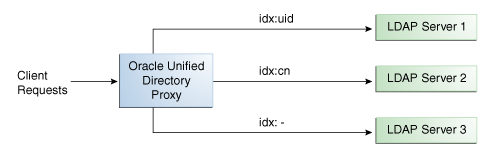
Description of ''Figure 12-6 Search Filter Load Balancing''
When the proxy receives a search request that contains the uid attribute in its search filter, the search request is routed to LDAP server 1 for better performance. Similarly, if the search filter contains a cn attribute, then the search request is routed to LDAP server 2. All other search requests are routed to the pass-through LDAP server 3.
All other requests, such as ADD, DELETE, MODIFY, and so on can be routed to any LDAP server based on the highest priority. Each search filter route is given a priority. This priority determines the order in which the route are evaluated. The highest priority route filter that matches the search filter is selected to process the request. If all the search filter routes have the same priority, then any route can process the request.
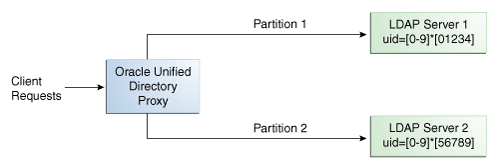
12.3 Understanding Data Distribution Using the Proxy
The Oracle Unified Directory distribution feature addresses the challenge of large deployments, such as horizontal scalability, where all the entries cannot be held on a single data source, or LDAP server. Using distribution can also help you scale the number of updates per second.
Note:
For information about configuring data distribution, see Chapter 22, "Configuring Distribution Using the Proxy."In a distribution deployment, you must first split your data into smaller chunks. To split the data, you can use the split-ldif command. These chunks of data are called partitions. Typically, each partition is stored on a separate server.
The split of the data is based on one of the following distribution algorithms:
-
Numeric. Entries are split into partitions and distributed based on the numeric value of the naming attribute (for example uid). See Section 12.3.1, "Numeric Distribution" for more information.
-
Lexico. Entries are split into partitions and distributed based on the alphabetical value of the naming attribute (for example cn). See Section 12.3.2, "Lexico Distribution" for more information.
-
Capacity. Entries are added to a partition based on the capacity of each partition. This algorithm is used for Add requests only. All other requests are distributed by the global index catalog or by a broadcast. See Section 12.3.3, "Capacity Distribution" for more information.
-
DN pattern. Entries are split into partitions and distributed based on the pattern (value) of the entry DN. See Section 12.3.4, "DN Pattern Distribution" for more information.
The type of data distribution you choose will depend on how the data in your directory service is organized. Numeric and lexico distribution have a very specific format for distribution. DN pattern can be adapted to match an existing data distribution model.
If a client request (except Add) cannot be linked to one of the distribution partitions, the proxy broadcasts the incoming request to all the partitions, unless a global index catalog has been configured.
However, if the request is clearly identified as outside the scope of the distribution, the request is returned with an error indicating that the entry does not exist. For example, if the distribution partitions includes data with uid's from 1-100 (partition1) and 100-200 (partition2) but you run a search where the base DN is uid=222,ou=people,dc=example,dc=com, the proxy will indicate that the entry does not exist.
Moreover, for the numeric and lexico algorithms, it is the first RDN after the distribution base DN that is used to treat a request. For example, the following search will return an error, as the uid is not the first RDN after the distribution base DN, for example ou=people,dc=example,dc=com.
$ ldapsearch -b "uid=1010,o=admin,ou=people,dc=example,dc=com" "objectclass=*"
Consider the number of partitions carefully. When defining the number of partitions for your deployment, be aware that you cannot split and redistribute the data into new partitions without downtime. You can, however, add a new partition with data that has entries outside the initial ones.
For example, if the initial partitions cover data with uids from 1-100 (partition1) and 100-200 (partition2), you can later add a partition3 which includes uids from 200-300. However, you cannot easily split partition1 and partition2 so that partition1 includes uids 1-150 and partition2 includes uids 150-300, for example. Splitting partitions is essentially like reconfiguring a new distribution deployment.
12.3.1 Numeric Distribution
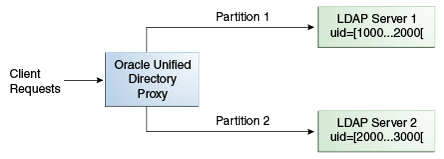
With a distribution using numeric algorithm, the proxy forwards requests to one of the partitions, based on the numeric value of the first RDN after the distribution base DN in the request. When you set up distribution with numeric algorithm, you split the data of your database into different partitions based on a numerical value of the attribute of your choice, if the attribute represents a numerical string. The proxy then forwards all client requests to the appropriate partition, using the same numeric algorithm.
For example, you could split your data into two partitions based on the uid of the entries, as illustrated in Figure 12-7.
Figure 12-7 Numeric Distribution Example
Description of ''Figure 12-7 Numeric Distribution Example''
In this example, a search for an entry with a uid of 1111 is sent to Partition 1, while a search for an entry with a uid of 2345 is sent to Partition 2. Any request for an entry with a uid outside the scope of the partitions defined will indicate that no such entry exists.
Note:
The upper boundary limit of a distribution algorithm is exclusive. This means that a search for uid3000 in the example above returns an error indicating that the entry does not exist.Example 12-1 Examples of Searches Using Numeric Distribution Algorithm
The following search will be successful:
$ ldapsearch -b "uid=1010,ou=people,cn=example,cn=com" "cn=Ben"
However, the following searches will indicate that the entry does not exist (with result code 32):
$ ldapsearch -b "uid=1010,o=admin,ou=people,cn=example,cn=com" "objectclass=*"

$ ldapsearch -b "uid=99,ou=people,cn=example,cn=com" "objectclass=*"
The following search will be broadcast, as the proxy cannot determine the partition to which the entry belongs, using the distribution algorithm defined above:
$ ldapsearch -b "ou=people,cn=example,cn=com" "uid=*"
12.3.2 Lexico Distribution
With a distribution using lexico algorithm, the proxy forwards requests to one of the partitions, based on the alphabetical value of the first RDN after the distribution base DN in the request. When you set up distribution with lexico algorithm, you split the data of your database into different partitions, based on an alphabetical value of the attribute of your choice. The proxy then forwards all client requests to the appropriate partition, using the same algorithm.
For example, you could split your data into two partitions based on the cn of the entries, as illustrated in Figure 12-8.

In this example, any requests for an entry with a cn starting with B such as Ben are sent to Partition 1, while requests for an entry with a cn from M-Y are sent to Partition 2.
Note:
The upper boundary limit of a distribution algorithm is exclusive. This means that a search for cn=Zachary in the example above will indicate that no such entry is found. If you want to include entries that start with Z in the search boundaries, then use the unlimited keyword. For example, use cn=[M..unlimited[to include all entries beyond M.Example 12-2 Examples of Searches Using Lexico Distribution Algorithm
The following search will be successful:
$ ldapsearch -b "cn=Ben,ou=people,cn=example,cn=com" "objectclass=*"
The following search will also be successful, as cn=Ben is the first RDN.
$ ldapsearch -b "uid=1010,cn=Ben,ou=people,cn=example,cn=com" "objectclass=*"
However, the following searches will indicate that the entry does not exist (with result code 32):
$ ldapsearch -b "cn=Ben,o=admin,ou=people,cn=example,cn=com" "objectclass=*"

$ ldapsearch -b "cn=Zach,ou=people,cn=example,cn=com" "objectclass=*"
The distribution cannot determine to which partition the following search belongs and will be broadcast:
$ ldapsearch -b "ou=people,cn=example,cn=com" "cn=*"
12.3.3 Capacity Distribution
With a capacity-based distribution, the proxy sends Add requests based on the capacity of each partition, which is determined by the maximum number of entries the partitions can hold. All other requests are distributed by the global index catalog or by broadcast.
Because the data is distributed to the partitions in a completely random manner, the easiest way to identify on which partition a particular data entry is by using a global index. Global index is mandatory when using capacity distribution. If no global index is set up, all requests other than Add will have to be broadcast. For more information about global indexes, see Section 12.6, "Understanding the Global Index Catalog" and Section 23.7, "Configuring Global Indexes Using the Command Line."
Figure 12-9 Capacity Distribution Example
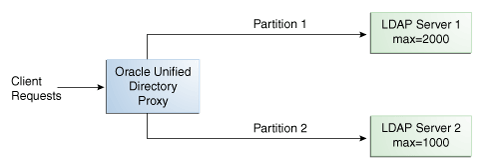
Description of ''Figure 12-9 Capacity Distribution Example''
In the example illustrated in Figure 12-9, Partition 1 has twice the capacity of Partition 2, therefore Partition 1 will receive twice the add requests sent to Partition 2. This way, both partitions should be full at the same time. When all the partitions are full, the distribution will send one request to each partition at each cycle.
12.3.4 DN Pattern Distribution
With a distribution using DN pattern algorithm, the proxy forwards requests to one of the partitions, based on the match between a request base DN and a string pattern. The match is only perform on the relative part of the request base DN, that is, the part after the distribution base DN. For example, you could split your data into two partitions based on a the DN pattern in the uid of the entries, as illustrated in Figure 12-10.
Distribution using DN pattern is more onerous than distribution with numeric or lexico algorithm. If possible, use another distribution algorithm.
Figure 12-10 DN Pattern Distribution Example
Description of ''Figure 12-10 DN Pattern Distribution Example''
In this example, all the data entries with a uid that ends with 0, 1, 2, 3, or 4 will be sent to Partition 1. Data entries with a uid that ends with 5, 6, 7, 8, or 9 will be sent to Partition 2.
This type of distribution, although using numerical values is quite different from numeric distribution. In numerical distribution, the data is partitioned based on a numerical range, while DN pattern distribution is based on a pattern in the data string.
Distribution using a DN pattern algorithm is typically used in cases where the distribution partitions do not correspond exactly to the distribution base DN. For example, if the data is distributed as illustrated in Figure 12-11, the data for Partition 1 and Partition 2 is in both base DN ou=people,ou=region1 and ou=people,ou=region2. The only way to distribute the data easily is to use the DN pattern.
Figure 12-11 Example of Directory Information Tree
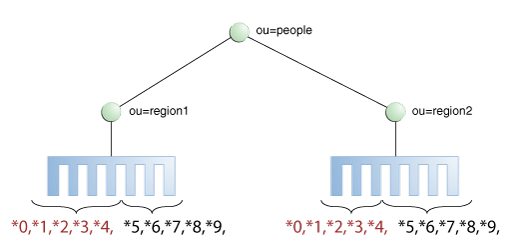
Description of ''Figure 12-11 Example of Directory Information Tree''
Example 12-3 Example of DN Pattern Algorithm Split by Region
If the deployment of the information is based in two geographical locations, it may be easier to use the DN pattern distribution to distribute the data. For example, if employee numbers were 4 digit codes, where the first digit indicated the region, then you could have the following:
| Region 1 | Region 2 |
|---|---|
| 1000 | 2000 |
| 1001 | 2001 |
| 1002 | 2002 |
| 1003 | 2003 |
| 1004 | 2004 |
| 1005 | 2005 |
| 1006 | 2006 |
| 1007 | 2007 |
| 1008 | 2008 |
| 1009 | 2009 |
| 1010 | 2010 |
| ... | ... |
To spread the data load, the entries in each location are split over two servers, where Server 1 contains all entries that end with 0, 1, 2, 3, and 4, while Server 2 contains all the entries that end with 5, 6, 7, 8, and 9, as illustrated in Figure 12-10.
Therefore, a search for DN pattern 1222 would be sent to partition 1, as would 2222.
12.4 Understanding Data Integration Using the Proxy
This section describes different methods you can use to retrieve and integrate data from a variety of sources, including databases and directories, to present a unified view of that data.
The topics in this section include:
-
Section 12.4.1, "Retrieving All Attribute Values from an Active Directory Server"
-
Section 12.4.2, "Integrating with Enterprise User Security Databases"
-
Section 12.4.3, "Enabling LDAP Clients to Update User Passwords Stored in Active Directory"
-
Section 12.4.5, "Understanding Oracle Unified Directory Plug-Ins"
Note:
For information about configuring data integration, see Chapter 23, "Configuring Integration Using the Proxy."12.4.1 Retrieving All Attribute Values from an Active Directory Server
Retrieving the contents of a multi-valued attribute sometimes result in a large number of returned values. Microsoft Active Directory server limits the maximum number of attribute values that can be retrieved in a single query.
Microsoft Active Directory provides a range retrieval mechanism that allows you to retrieve all the values of a multi-valued attribute. This mechanism permits a client-specified subset of the values to be retrieved in a search request. By performing multiple search requests, each retrieving a distinct subset, the complete set of values for the attribute can be retrieved.
Oracle Unified Directory handles Active Directory range retrieval by providing support for Microsoft Active Directory paging. The main purpose of Microsoft Active Directory paging is to detect if a range option is present among the options of the returned attributes and to retrieve the complete range of attribute values from the Microsoft Active Directory server. This complete set of attribute values is returned, so that the client application does not have to deal with the range option.
Microsoft Active Directory paging is implemented as a workflow element that is relevant only if the leaf of the workflow element chain is connected to an Active Directory server. You can configure the following properties of an Active Directory Paging workflow element:
-
The next workflow element in the chain as this workflow element is not a leaf workflow element
-
An optional list of attributes that can reduce the processing of scanning attributes to detect the range option
Note:
To use the virtual directory capabilities described here, you must have a validOracle Directory Service Plus license.Note:
For information about how to configure Microsoft Active Directory paging, see Section 23.1, "Retrieving All Attribute Values from an Active Directory Server."12.4.2 Integrating with Enterprise User Security Databases
You can integrate Oracle Unified Directory and Enterprise User Security to leverage user identities stored in an LDAP-compliant directory service without any additional synchronization.
When integrated with Enterprise User Security, Oracle Unified Directory supports the following:
-
Microsoft Active Directory
-
Novell eDirectory
-
Oracle Unified Directory
-
Oracle Directory Server Enterprise Edition
For more information about Oracle Enterprise User Security, see the Oracle Database Enterprise User Security Administrator's Guide. For detailed instructions on configuring Oracle Unified Directory and Enterprise User Security to work together, see Chapter 31, "Integrating Oracle Unified Directory with Oracle Enterprise User Security."
12.4.3 Enabling LDAP Clients to Update User Passwords Stored in Active Directory
The Ad Password workflow element enables Oracle Unified Directory LDAP client applications to update user passwords stored in Microsoft Active Directory and Active Directory Lightweight Directory Services (AD LDS) using the LDAP protocol.
This section includes the following topics:
-
Section 12.4.3.1, "Why Use the Ad Password Workflow Element?"
-
Section 12.4.3.2, "Ad Password Workflow Element Functionality"
-
Section 12.4.3.3, "Ad Password Workflow Element Check for an SSL Connection"
-
Section 12.4.3.4, "Considering Your Requirements for Using the Ad Password Workflow Element"
To configure an Ad Password workflow element, see Section 23.3, "Updating User Passwords Stored in Active Directory."
12.4.3.1 Why Use the Ad Password Workflow Element?
Microsoft Active Directory and AD LDS have characteristics and requirements that Oracle Unified Directory LDAP clients cannot always handle using standard LDAP operations.
For example, if a client updates a user password (userPassword attribute) using a standard LDAP modify operation, the update is successful on most LDAP servers. Active Directory will accept this modify operation, but it will not update the user password because of the following requirements:
-
Active Directory stores a user password in the
unicodePwdattribute on a user object rather than in theuserPasswordattribute.The syntax for the
unicodePwdattribute is an octet-string containing a UNICODE string enclosed in double quotes ("). -
The
unicodePwdattribute cannot be added during the creation of a user object. The user object must first be created without theunicodePwdattribute and then the attribute is added on the new object with a modify operation. -
Only an administrator can reset a user password without knowing the previous password.
-
Active Directory user passwords can be updated only over an SSL connection.
The Ad Password workflow element can handle these specific requirements. It allows existing client applications to update user passwords stored in Active Directory or AD LDS using standard LDAP operations, without requiring the client applications to be re-coded.
For the supported versions of Active Directory and AD LDS, check the Oracle Unified Directory 11g Release 2 (11.1.2.3) Certification Matrix.
12.4.3.2 Ad Password Workflow Element Functionality
The Ad Password workflow element performs specific functions, depending on the LDAP operation it is processing:
-
Section 12.4.3.2.1, "Ad Password Workflow Element Functions for ADD Operations"
-
Section 12.4.3.2.2, "Ad Password Workflow Element Functions for MODIFY Operations"
12.4.3.2.1 Ad Password Workflow Element Functions for ADD Operations
If a secure proxy LDAP workflow element is configured, the Ad Password workflow element handles an ADD operation that contains a userPassword attribute as follows:
-
Maps the
userPasswordattribute to theunicodePwdattribute (map-userpasswordproperty is set totrue). -
Handles the ADD operation that contains a
userPasswordattribute in the following order:-
Executes an ADD operation on the Active Directory user object without the
unicodePwd,useraccountcontrol, andmsds-useraccountdisabledattributes. This operation is handled by the workflow element defined by thenext-workflow-elementproperty in the Ad Password workflow element. -
Executes a MODIFY operation on the user object to create the
unicodePwdattribute. This operation is handled by workflow element defined by thesecure-proxy-workflow-elementproperty in the Ad Password workflow element. -
If the original ADD operation contained a
useraccountcontrolormsds-useraccountdisabledattribute, executes a MODIFY operation on the user object. This operation is handled by the workflow element defined by thenext-workflow-elementproperty in the Ad Password workflow element.The
useraccountcontrolandmsds-useraccountdisabledattributes cannot be set before theunicodePwdattribute is created in Step 2.
-
If Step 2 or Step 3 fails either during the bind or the MOD operation, the ADD operation is rolled back (that is, the entry is deleted).
If a secure proxy LDAP workflow element is not configured, the Ad Password workflow element handles an ADD operation that contains a userPassword attribute as follows:
-
Maps
userPasswordtounicodePwd, if needed (map-userpasswordproperty is set totrue). -
Handles the ADD operation by the workflow element defined by the
next-workflow-elementproperty in the Ad Password workflow element. If thenext-workflow-elementdoes not use SSL, then Active Directory might refuse the operation.
12.4.3.2.2 Ad Password Workflow Element Functions for MODIFY Operations
If a secure proxy LDAP workflow element is configured, the Ad Password workflow element handles a MODIFY operation that contains a userPassword attribute as follows:
-
Executes a MODIFY operation on the user object with the user password change. This operation is handled by the workflow element defined by the
secure-proxy-workflow-elementproperty in the Ad Password workflow element.If this step fails either during the bind or the MOD operation, Oracle Unified Directory returns the MOD result code to the client without trying Step 2.
-
Executes the MODIFY operation on the object. This operation is handled by the workflow element defined by the
next-workflow-elementproperty in the Ad Password workflow element.
If a secure proxy LDAP workflow element is not configured, the Ad Password workflow element handles a MODIFY operation that contains a user password as follows:
-
Maps
userPasswordtounicodePwd, if needed (map-userpasswordproperty is set totrue). -
Executes a MODIFY operation on the object. This operation is handled by the workflow element defined by the
next-workflow-elementproperty in the Ad Password workflow element.
12.4.3.3 Ad Password Workflow Element Check for an SSL Connection
When SSL is required, the Ad Password workflow element checks that an SSL connection is configured to the remote Active Directory or AD LDS server, as follows:
-
If you configure a
secure-proxy-workflow-element, Oracle Unified Directory will check that this workflow element is a proxy LDAP workflow element that is using an LDAP server extension configured to always use SSL (remote-ldap-server-ssl-policyproperty set toalways). -
If you do not configure a
secure-proxy-workflow-element, thenext-workflow-elementmust use an LDAP server extension configured to always use SSL.
If operations on a user password fail because of an incorrect configuration, the Ad Password workflow element returns the error codes it receives from the remote Active Directory or AD LDS server.
12.4.3.4 Considering Your Requirements for Using the Ad Password Workflow Element
Before you create and configure an Ad Password workflow element, consider your deployment's security and performance requirements using the following use cases:
See Also:
-
Section 12.4.3.2, "Ad Password Workflow Element Functionality" for information about how LDAP ADD and MODIFY operations are handled.
-
"Configuring Security Between the Proxy and the Data Source" for more information about the security between a proxy and a data source such as Active Directory or AD LDS server.
12.4.3.4.1 All LDAP Operations are Performed Over an SSL Connection
This use case performs all LDAP operations between clients and Active Directory or AD LDS server over an SSL connection.
The advantage of this use case is that all LDAP operations are always performed over a fully secure SSL connection, regardless of how the client connects to the proxy server. A disadvantage is that some LDAP operations performed over an SSL connection can cause performance degradation for your deployment.
This use case requires the following components:
-
An LDAP server extension configured with the
remote-ldap-server-ssl-policyproperty set toalways. -
A secure proxy LDAP workflow element that points to an LDAP server extension as described in the previous item (that is, configured with the
remote-ldap-server-ssl-policyoption set toalways). -
An Ad Password workflow element configured with the
next-workflow-elementproperty pointing to a secure proxy LDAP workflow element.
12.4.3.4.2 Only LDAP Operations for Password Modifications are Performed Over an SSL Connection
This use case performs operations that are related to password modifications over an SSL connection to Active Directory or AD LDS server. Other LDAP operations are performed over an SSL or non-SSL connection according to the remote-ldap-server-ssl-policy configuration property of the LDAP server extension used by next-workflow-element.
An advantage of this use case is that it forces password modifications to take place over an SSL connection, without requiring all communications to the remote server to use SSL. The other communications can either never use SSL or use SSL only if the client connection is using SSL.
This use case requires the following components:
-
Two LDAP server extensions to communicate with the remote Active Directory or AD LDS server:
-
An LDAP server extension for SSL connections. The
remote-ldap-server-ssl-policyproperty must be set toalways. -
Another LDAP server extension for operations not related to password modifications. The
remote-ldap-server-ssl-policyproperty is set to eitherneveroruser(or omitted).
-
-
Two proxy LDAP workflow elements to communicate with the remote Active Directory or AD LDS server:
-
A secure proxy LDAP workflow element for SSL connections.
-
Another proxy LDAP workflow element for operations not related to passwords.
-
-
Ad Password workflow element configured with both the
secure-proxy-workflow-elementandnext-workflow-elementproperties:-
LDAP operations that modify the user password are handled by the workflow element specified by the
secure-proxy-workflow-elementproperty and will take place over an SSL connection. -
Other LDAP operations not related to password modifications are handled by the workflow element specified by the
next-workflow-element.
-
12.4.3.4.3 Active Directory Configuration When Attribute Mapping is Not Required
With a specific configuration, Active Directory and AD LDS can handle modifications on the userPassword attribute without requiring the userPassword attribute to be mapped to the unicodePwd attribute.
This Active Directory or AD LDS configuration requires:
-
The domain controller (DC) must be running as Active Directory or AD LDS, and the domain functional level must be Windows 2003 or greater.
-
The
fUserPwdSupportcharacter must be set totruein thedSHeuristicsattribute.
For more information about this specific configuration, see the following Microsoft document:
http://msdn.microsoft.com/en-us/library/cc223249.aspx
For this configuration, user password attribute mapping is not required. To control this mapping, the Ad Password workflow element provides the map-userpassword property:
-
true(default) enables mapping. TheuserPasswordattribute is automatically mapped tounicodePwd. LDAP ADD and MODIFY operations are then performed onunicodePwdinstead ofuserPassword. -
falsedisables mapping. LDAP ADD and MODIFY operations are performed onuserPassword.
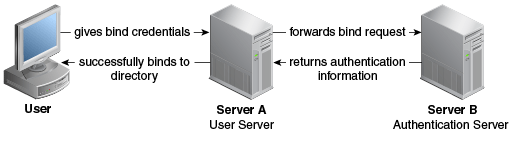
12.4.4 Understanding Pass-Through Authentication
Pass-through authentication (PTA) is a mechanism where one directory server consults another directory server to authenticate bind requests. A typical scenario for pass-through authentication involves passing authentication through to Active Directory for users coming from Oracle Unified Directory.
Note:
To use the virtual directory capabilities described here, you must have a validOracle Directory Service Plus license.This section describes the use and operation of pass-through authentication. The topics include:
-
Section 12.4.4.1, "Using the Pass-Through Authentication Mechanism"
-
Section 12.4.4.2, "Pass-Through Authentication Configuration Model"
-
Section 12.4.4.3, "Pass-Through Authentication Configuration Parameters"
-
Section 12.4.4.4, "Implementing Pass-Through Authentication for Different Servers"
-
Section 12.4.4.5, "Implementing Pass-Through Authentication for a Kerberos Server"
-
Section 12.4.4.4.3, "Handling LDAP Operations Using Pass-Through Authentication Workflow Element"
Note:
For information about configuring pass-through authentication, see Section 23.4, "Configuring Pass-Through Authentication."12.4.4.1 Using the Pass-Through Authentication Mechanism
You use the pass-through authentication mechanism when the client attempts to bind to the directory server and the user credentials for authenticating are not stored locally, but instead in another remote directory server known as the authentication (Auth) server. The directory server then redirects the bind operation to the authentication server to verify the credentials. The credential here refers to the userpassword attribute. The Auth server that stores the user credentials can be Oracle Unified Directory, Microsoft Active Directory, or an LDAP V3 compliant directory server.
Exactly how Oracle Unified Directory redirects the bind depends on how the user entry in user server maps to the corresponding user entry in the authentication server. Oracle Unified Directory supports one-to-one mapping between the user entry and the authentication entry.
To gain a better understanding of the pass-through authentication mechanism, consider the example depicted in Figure 12-12.
Figure 12-12 Pass-Through Authentication Mechanism
Description of ''Figure 12-12 Pass-Through Authentication Mechanism''
Let us consider two servers, say server A and server B and a user entry cn=myuser stored on server B. Now, if a user attempts to access server A to perform any operation it has to first bind to server A with its credentials for authentication. However, the credentials are not present on server A, therefore the bind to server A would normally fail. But, using the pass-through authentication mechanism, server A can verify the credential by directing the bind request to server B. After the credentials are validated using server B, and the bind is successful then server A returns success for the bind operation.
The Server A in this example acts as the user directory server or the pass-through authentication directory server. This is because it is the server that passes the bind request to another directory server. The authentication directory server B, acts as the authenticating directory, the server that contains the entry and verifies the bind credentials of the requesting client.
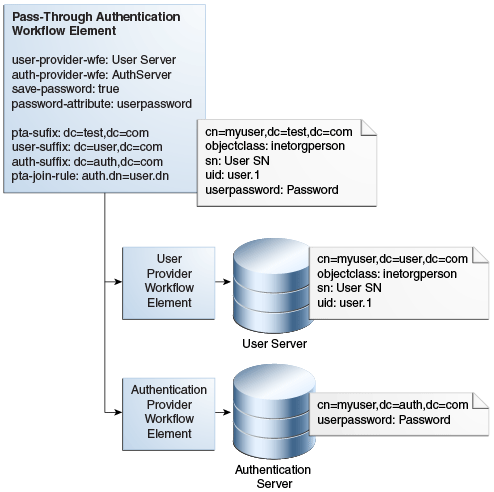
12.4.4.2 Pass-Through Authentication Configuration Model
Oracle Unified Directory implements pass-through authentication using pass-through authentication workflow element that allows you to administer your user and authentication directories on separate instances of directory server.
The user provider is a workflow element that contains the user entries, which is to say all attributes except the password of the user. On the other hand, the authentication provider is the workflow element that contains the user password.
Note:
Oracle Unified Directory provides support for local back end or proxy for both user provider workflow element and authentication provider workflow element. However, Kerberos is supported for authentication provider workflow element only.Figure 12-13 illustrates a pass-through authentication configuration model.
Figure 12-13 Pass-Through Authentication Configuration Model
Description of ''Figure 12-13 Pass-Through Authentication Configuration Model''
12.4.4.3 Pass-Through Authentication Configuration Parameters
Table 12-1 describes the configuration parameters used in the pass-through authentication configuration model described in Section 12.4.4.2, "Pass-Through Authentication Configuration Model."
For more information about configuring pass-through authentication using dsconfig command, see Section 23.4, "Configuring Pass-Through Authentication."
For more information about configuring pass-through authentication using ODSM, see Section 17.3.4.1, "Creating a Workflow Element."
Table 12-1 Configuration Parameters Used in Pass-Through Authentication Process
| Parameter | Description |
|---|---|
|
|
User Provider Workflow Element This parameter defines the workflow element that contains the user entries. This workflow element is used for all the operations except BIND. This is a mandatory parameter. |
|
|
Authentication Provider Workflow Element This parameter defines the workflow element that contains the authentication entry and verifies the bind credentials of the requesting client. This workflow element is used for This is a mandatory parameter. |
|
|
This parameter allows you to enable or disable the password-copy feature. If this parameter is set to This is an optional parameter. The default value is |
|
|
This parameter defines the attribute in which the password value is copied in the user entry when the password-copy feature is enabled. After the password is saved, it can be copied in the This is an optional parameter. The default value is |
|
|
This parameter defines the virtual DN that is exposed by the pass-through authentication workflow element. This is an optional parameter. By default, this parameter is not set and implies that there is no DN mapping. |
|
|
This parameter defines the actual suffix that contains the user entries on the user provider workflow element. This is an optional parameter. By default, this parameter is not set and implies that the DN is the same as the |
|
|
This parameter defines the actual suffix that contains the authentication entries on the authentication provider workflow element. This is an optional parameter. By default, this parameter is not set and implies that the DN is the same as the |
|
|
This parameter defines the mapping between an authentication entry and a user entry. This is an optional parameter. By default, this parameter is not set and implies that the rule is |
12.4.4.4 Implementing Pass-Through Authentication for Different Servers
If your user entries are stored on a Kerberos server, then you must configure a Kerberos workflow element. See Section 23.4.3.1, "Configuring Pass-Through Authentication for Different Servers" for more information.
12.4.4.4.1 Features of Pass-Through Authentication Workflow Element
The following is a list of some pass-through authentication workflow element capabilities:
-
Allows you to route requests to a specific workflow element depending on the request type. For instance, bind requests are routed to authentication workflow element. When you apply
MODIFYon any attribute exceptuserpasswordit is routed to the user workflow element. ApplyingMODIFYon theuserpasswordattribute is routed to the authentication workflow element (and also to the user workflow element if password-copy is enabled). All other requests, such asADD, DELETE, RENAME, COMPARE,andSEARCHare routed to the user workflow element. -
Support for Kerberos workflow element as an authentication workflow element. When the authentication workflow element is a Kerberos workflow element, Oracle Unified Directory forwards the authentication request to a Kerberos server, and the authentication is performed using Kerberos protocol instead of LDAP bind.
-
Simplifies migration from an external LDAP server containing user credentials to Oracle Unified Directory. During the migration phase, the pass-through authentication workflow element copies the user password from the external LDAP server to Oracle Unified Directory on successful bind. This feature is called as password-copy. For instance, when a user successfully authenticates, the bind is routed to the authentication workflow element, which is the external LDAP server. The pass-through authentication workflow element then stores the password used for this bind operation in the user workflow element. This migration phase populates the user password attribute of all the users that initiated contact during the migration phase.
-
Support cases where the entry on the authentication workflow element is linked to the entry on the user workflow element by a join rule and an authentication suffix. This join rule can be a
DN=DNmapping or a simple join rule with the following format:auth.<Attribute1>=user.<Attribute2>
For more information about join rules, see Section 12.5.1.3, "Understanding Join Rules."
The mapping between the user entry and the authentication entry must be a one-to-one mapping, which implies that each entry in the user provider corresponds with one entry in the authentication provider.
-
Support for DN mapping, for instance allows you to publish entries below
dc=pta,dc=comwhereas the user workflow element suffix isdc=user,dc=com. -
Support for password modification.
-
Support for all kinds of workflow element for the user workflow element, local or remote.
12.4.4.4.2 Pass-Through Workflow Element Considerations
When using the pass-through authentication workflow element, you must keep the following in mind:
-
The authentication workflow element handles only bind requests.
-
The user provider workflow element is used for all other operations, such as
ADD, DELETE, RENAME, COMPARE,andSEARCH. -
The
MODIFYoperation depends on thesave-password-on-successful-bindparameter. This parameter saves the password if needed in the user workflow element when pass-through authentication workflow element binds successfully with the authentication workflow element.If
save-password-on-successful-bindis enabled, thenuserpasswordparameter is modified on both participants.If
save-password-on-successful-bindis disabled, then the userpassword is modified on the authentication participant only. -
If you define the
user-suffixorauth-suffixparameter, then you must define thepta-suffix. Both parameters apply to DN renaming between the user or authentication participant and the pass-through authentication participant. -
If a join rule is defined, and the authentication and user entries do not necessarily have the same DN, then you must define the
auth-suffix. -
Note, if
user-suffixis not defined, then the workflow element assumes that theuser-suffix=pta-suffix. The same applies if theauth-suffixnot defined. Here, again the workflow element assumes that theauth-suffix=pta-suffix.
12.4.4.4.3 Handling LDAP Operations Using Pass-Through Authentication Workflow Element
Oracle Unified Directory supports the following LDAP operations using pass-through authentication workflow element:
| Operation | Description |
|---|---|
| ADD | All ADD operations processed through the pass-through authentication workflow element are sent to the user provider workflow element.
|
| BIND | The BIND operation is routed to the authentication-provider workflow element.
|
| COMPARE | The COMPARE operation is routed to the user-provider workflow element. The COMPARE operation that is applied to the userpassword attribute is routed to the user-provider workflow element, which may not contain the attribute unless the save-password-on-successful-bind parameter is enabled. |
| DELETE | The DELETE operation is routed to the user-provider workflow element only. The entry on the authentication server is not deleted. |
| MODIFY | For all attributes except userpassword, the modifications are performed on the user-provider workflow element. For the userpassword attribute:
|
| MODIFY_DN | The pass-through authentication workflow element processes MODIFY_DN on the user-provider workflow element only and does not modify the entry on the authentication-provider workflow element. |
| SEARCH | The SEARCH operations are routed to the user-provider workflow element only. This in turn implies, that a SEARCH operation that submits a request for the userpassword attribute might not return any value unless there is a copy in the user-provider workflow element. |
12.4.4.5 Implementing Pass-Through Authentication for a Kerberos Server
If your user entries are stored on a Kerberos server, then you must configure a Kerberos workflow element. See Section 23.4.3.2, "Configuring Pass-Through Authentication for a Kerberos Server" for more information.
12.4.5 Understanding Oracle Unified Directory Plug-Ins
Oracle Unified Directory provides a plug-in API that enables you to extend existing directory server functionality. A plug-in is similar to a workflow element and you can insert a plug-in into any Oracle Unified Directory workflow element tree.
You may want to develop your own plug-ins when you have a particular directory server requirement and Oracle Unified Directory does not provide the necessary functionality to accommodate that requirement.
For more information about Oracle Unified Directory plug-ins, see "Understanding Basic Oracle Unified Directory Plug-in Concepts" in the Oracle Fusion Middleware Developing Plug-Ins for Oracle Unified Directory.
12.5 Understanding Virtualization
This section describes how different Oracle Unified Directory features enable you to view and retrieve data from virtual directories and data sources.
Note:
To use the virtual directory capabilities described here, you must have a validOracle Directory Service Plus license.The topics in this section include:
-
Section 12.5.2, "Optimizing Search Results From Virtual Directories Using Workflow Elements"
-
Section 12.5.3, "Adding
memberofUser Attributes topersonEntries"
12.5.1 Using Entries from Multiple Directories
This section describes the Join workflow element, which presents a virtual directory view of your repositories and routes data to and from those repositories.
Note:
To use the virtual directory capabilities described here, you must have a validOracle Directory Service Plus license.The topics in this section include:
-
Section 12.5.1.11, "Configuring the Criticality of Join Participants"
-
Section 12.5.1.13, "Handling Cascading Write Operations to Secondary Participants"
12.5.1.1 Understanding the Join Workflow Element
For most enterprises, user identity information such as user profiles, access data, and authorization data for a single entry is scattered across heterogeneous data sources at multiple locations. For example, employee information is stored in HR databases or in Microsoft Active Directories, customer and partner data in CRM databases, and additional LDAP directories. Companies require aggregated user data from various data sources in real time. As a consequence, application-specific directories proliferate, copying and synchronizing identity data, which leads to high administration and maintenance costs, inconsistent identity data, and compliance issues.
Oracle Unified Directory provides a directory service solution that addresses these challenges. Oracle Unified Directory supports the Join workflow element that presents a virtual directory view of the repositories and then routes data to and from the repositories.
Oracle Unified Directory enables you to define workflow elements, such as the Proxy LDAP workflow element, to connect to its underlying data repositories. The Join workflow element enables you to combine data from different workflow elements, as needed, to present a customized directory tree.
The Join workflow element is dynamic and does not require synchronization between its data sources. It consolidates identity data without moving data from its native locations, and reuses identity data without copying. These capabilities lead to ease of deployment, diminished costs, simplified identity infrastructure, and a high return on investment by eliminating the need to constantly adapt the applications from changes in the identity stores.
Note:
Be aware that directory virtualization is not running a directory server in a virtualized environment.When data corresponding to a single entry is spread across multiple data sources, this workflow element combines those different data sources into one unified LDAP view, which is similar to a relational database's table join. Join workflow element does not connect to the underlying data repository. Instead, it builds on top of one or more proxy sources or local back ends to assemble its data as needed. Think of the Join workflow element as joining two or more data repositories by defining Join relationships, known as Joiners, between workflow elements. You can configure as many workflow elements as needed.
Note:
Do not confuse Join with Distribution.-
Use Distribution when some entries are on server A and others on server B. A given entry is stored inside a single server, either A or B, with all its attributes.
-
Use Join when a part of the entry (such as some attributes) is stored on server A and another part is stored on server B.
For more information about the Distribution workflow element, see Section 22.1, "Configuring Distribution Using the dsconfig Command."
12.5.1.1.1 Features of Join Workflow Element
Following are key features of the Join workflow element:
-
Allows you to define a relationship between any two participating elements. Supports one primary participant and any number of secondary participants. For more information, see Section 12.5.1.2, "Understanding Join Participants."
-
Supports a sophisticated relationship tree among Join participants using complex Join rules. For more information, see Section 12.5.1.3, "Understanding Join Rules."
-
Queries all associated secondary participants for each entry retrieved from the primary participant to form the combined entry. For more information, see Section 12.5.1.3, "Understanding Join Rules."
-
Adds a
joinedentrydnattribute value to each entry retrieved from one participating element, indicating which entries from secondary participants were used to form the consolidated entry. For more information, see Section 12.5.1.3, "Understanding Join Rules." -
Supports different Joiner types, such as one-to-one, many-to-one, and shadow for different kinds of Join scenarios. For more information, see Section 12.5.1.5, "Understanding Joiner Types."
-
Allows you to merge attributes and objectclasses from multiple participants to form a new virtual entry. For more information, see Section 12.5.1.7, "Creating Virtual Attributes."
-
Allows you to specify which attributes can be retrieved and which the attributes can be stored in a participating data source. For more information, see Section 12.5.1.8, "Understanding Attribute Flow Settings."
-
Supports bind-fall through feature. For more information, see Section 12.5.1.9, "Handling Bind Operations."
-
Supports translation of DN-syntaxed attribute values from each repository suffix to a common Join workflow element suffix. For information, see Section 12.5.1.10, "Handling Translation of DN Attributes."
-
Allows you to configure criticality of Join participants. For more information, see Section 12.5.1.11, "Configuring the Criticality of Join Participants."
-
Supports operations that are set as enabled. For more information, see Section 12.5.1.12, "Managing Enabled Operations."
-
Allows you to cascade write operations. For more information, see Section 12.5.1.13, "Handling Cascading Write Operations to Secondary Participants."
12.5.1.1.2 Understanding the Join Workflow Element Configuration Model
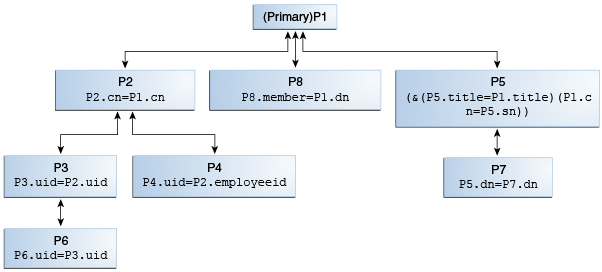
Figure 12-14 illustrates the configuration model for the Join workflow element and Join participants using Join rules.
A participant is a workflow element that contributes information to the Join workflow element to form a combined joined entry. Join rules determine how an entry from one participant relates to an entry from another participant.
Figure 12-14 Join Workflow Element Configuration Model
Description of ''Figure 12-14 Join Workflow Element Configuration Model''
Oracle Unified Directory treats all the participating elements equally; however, you must configure one participant as primary. You are not required to define a Join rule for a primary participant. In this figure, P1 is the primary participant and all other participants P2 though P8, are secondary participants.
Each secondary participant has a Join rule and has a Joiner type, which defines its relationship with another participant. For example, in case of P2, the Join rule P2.cn=P1.cn defines its relationship with P1 and if the Joiner type configured in P2 is many-to-one, then it implies that the relationship from P1 through P2 is one-to-many.
Participants P2, P8, and P5 are directly related to the primary participant P1, while the other secondary participants are indirectly related to the primary participant.
Note:
For more information about participants, Join rules, and Joiner types, see the following:12.5.1.2 Understanding Join Participants
A Join participant is a workflow element that contributes some information to the Join workflow element to form a combined joined entry.
A Join workflow element can have one or more participating data sources, with each exposed through a workflow element. Participating workflow elements include:
-
Distribution workflow element
-
Proxy LDAP workflow element
-
Local Backend workflow element
-
Load Balancing workflow element
-
Another Join workflow element
For example, for each directory, you must create a Proxy LDAP workflow element that is associated with a directory to retrieve information from that directory. Afterward, you formulate these workflow elements as participants of a Join workflow element.
Figure 12-15 depicts the relationship between a Join workflow element and the participating workflow elements.
Figure 12-15 Join Workflow Element and Join Participants
Description of ''Figure 12-15 Join Workflow Element and Join Participants''
A Join workflow element has only one primary participant, whose Directory Information Tree (DIT) structure is exposed by default, and can have one or more secondary participants. You determine which participant is primary.
You use the primary participant to create and search the directory tree entries. Entries must exist in the primary participant to be returned from a Join workflow element.
The Join workflow element takes each entry found in the primary participant and joins it with entries in other participants, based on the defined Join rule. You can also configure the Join workflow element to expose entries in the primary participant and entries that reside only in the secondary participants. For information about Join Rules, see Section 12.5.1.3, "Understanding Join Rules."
The Join workflow element and each participant must have an associated suffix (a DN).
-
A Join workflow element DN is the virtual DN that is exposed through the workflow associated with that Join workflow element. You can configure the Join workflow element to restrict the view to only the Directory Information Tree that is of interest to the client.
-
Ideally, a participant DN is the back-end naming context that is exposed through that participating workflow element or a descendant DN of that workflow element.
12.5.1.3 Understanding Join Rules
Join rules determine how an entry from one participant relates to an entry from another participant. Defining Join rules enables the Join workflow element to query secondary participants during LDAP operations.
Note:
-
A Join rule always specifies the relationship between two, and only two, participants.
-
You define Join rules only for secondary participants and not for a primary participant.
The Join workflow element forms a search filter to search each secondary participant based on the Join rule defined for that secondary participant.
When you configure a Join workflow element, you must configure a Join rule for each secondary participant that specifies a relationship between entries in one participant with entries in the other participant. Also, the Join rule specified in at least one of the secondary participants must involve the primary participant, so that the Join workflow element can traverse the entire relationship tree starting from the primary participant.
Join rules identify the attributes of an entry from one participant to search another participant for obtaining the matching entries. These matching entries are then joined with the original entry to form the joined entry. When a matching value is found in the destination view, a join between the two entries is created.
The Join workflow element adds an attribute value, joinedentrydn, for each entry retrieved from a participating element. This value indicates which entries from secondary participants were used to form the consolidated entry. You can decide whether to configure the Join workflow element to populate this attribute, which might be useful when troubleshooting Join issues.
Oracle Unified Directory supports the following Join rule types:
-
LDAP filter Join rules
-
DN Join rules
Join rules follow LDAP filter syntax, which enables you to create complex Join rules using AND and OR. For example:
(&(P1.userId = P2.uid)(|(P1.deptNumber = P2.department)(P1.empNum = P2.empId)))
Note:
In a Shadow Join relationship, the Join rule must use the same attribute in both the primary and the shadow participant. For example,p1.cn = p2.cn.
For more information, see Section 12.5.1.5.4, "Shadow Joiner Type."
Following are examples of valid Join rules:
-
p3.uid=p2.uid -
(&(P5.title=Primary.title)(Primary.cn=P5.sn)) -
P5.dn = P7.dn -
P8.member = Primary.dn -
Primary.dn = P2.uniquemember
Note:
the order in which you define the Join rule does not matter. For example,P1.cn=P2.commonname is the same as P2.commonname=P1.cn.The following sections briefly describe the two Join rules:
12.5.1.3.1 Attribute-Based Join Rules
Attribute-based Join rules define a Join relationship between two participants based on the common attribute values present in the matching entries from two participants.
For example, consider the Join rule p1.uid=p2.username, where p1 and p2 are two Join participants. This Join rule indicates that for an entry in p1, a corresponding matching entry from p2 is retrieved and joined with the entry from p1, if the uid attribute value of an entry from p1 matches the username attribute value of an entry from p2. If uid is a multi-valued attribute in p1, then the corresponding entry in p2 must match at least one of the values of p1. For instance, if the entry in p1 contains uid=user.12 and uid=user.34, then the entry from p2 must contain either uid=user.12 or uid=user.34.
12.5.1.3.2 DN Join Rules
In some situations, the participating data sources do not have any attribute values in common except the entry DN. In these cases, you can configure a Join rule involving Entry DN.
A DN Join rule uses DN syntax and can take one of the following forms:
-
The entry DN in one participant is constructed from an attribute in another participant. The DN must not contain the baseDN of the secondary participant, which makes it a relative DN. For example, you can configure the following DN join rule, which stipulates that the entry DNs in participant P2 must include the cn from participant P1, plus the ou=people suffix.
P2.dn = "cn={P1.cn},ou=people" -
The entry DN in one participant matches an attribute in another participant. For example, you can configure this rule using the following syntax
P8.member = P7.dn
The preceding DN Join rule stipulates that the member attribute value in P8 should be used for locating the matching entries from P7.
-
The entry DN in one participant is same as the entry DN in another participant. For example, you can configure this rule using the following syntax:
P2.dn = P3.dn
This Join rule stipulates that an entry DN in P2 must match an entry DN in P3 to form a joined entry. In this case, the Join rule looks for matching entries in portions of the DNs below the participant suffixes, although the full DNs may differ. For example, if participant P2 has a
dc=primarysuffix and participant P3 has adc=secondarysuffix, then the Join rule implies that the trees below the suffixes are identical and it associates the"uid=user.1,cn=users,dc=secondary"entry with"uid=user.1,cn=users,dc=primary."
12.5.1.4 Understanding Join Policies
Note:
Oracle Unified Directory 11.1.2.3 supports only the Standard Join functionality. Therefore, you cannot set the Left Outer Join and Full Outer Join policies described in Section 12.5.1.4, "Understanding Join Policies," because they are not available in this release.This section describes the different Join policies that govern joins between primary and secondary participants. Specifically, these policies determine which entries to return, including entries from only the primary participant, only from the secondary participant, or from both primary and secondary participants.
Oracle Unified Directory supports the following Join policy types:
-
Standard Join.
-
Left Outer Join.
-
Full Outer Join.
Note:
If you do not specify a particular Join type, then Oracle Unified Directory performs the Standard Join by default.12.5.1.4.1 Using the Standard Join Policy Type
If you specify the Standard Join policy type, then Oracle Unified Directory returns all entries in the primary participant that satisfy the search filter after joining the corresponding entries in the secondary participants.
12.5.1.4.2 Using the Left Outer Join Policy Type
If you specify the Left Outer Join policy type, then Oracle Unified Directory returns all entries in the primary participant after joining them with corresponding entries in secondary participants (by using a Standard Join), and then returns entries from the secondary participants that satisfy the join criteria and have a corresponding match in the primary participant. This process is equivalent to a Left Outer Join in database terminology.
If you are joining entries from a secondary participant to a primary participant, then the join relationship is reversed. For example, a one-to-many join from the primary participant to a secondary participant becomes a many-to-one join, which is the same as a one-to-one join, from a secondary participant to the primary participant. Similarly a many-to-one join from primary to secondary becomes a one-to-many join from secondary to primary.
12.5.1.4.3 Using the Full Outer Join Policy Type
If you specify the Full Outer Join policy type, then Oracle Unified Directory returns all the entries in the primary participant after joining them with corresponding entries in secondary participants (by using a Standard Join), and then returns entries from the secondary participants that satisfy the join criteria and have a corresponding match in the primary participant (by using a Left Outer Join), and then returns entries from the secondary participants that satisfy the search filter, but do not have a matching entry in the primary participant. This process is equivalent to a Left Outer Join + Right Outer Join in database terminology.
If you are joining entries from a secondary participant to a primary participant, then the join relationship is reversed. For example, a one-to-many join from the primary participant to a secondary participant becomes a many-to-one join, which is the same as a one-to-one join, from a secondary participant to the primary participant. Similarly a many-to-one join from primary to secondary becomes a one-to-many join from secondary to primary. For a Full Outer join, Oracle Unified Directory ignores the join condition for entries from secondary participants because it cannot compute the reverse of the join condition.
12.5.1.4.4 Join Policy Example
The following table illustrates how each of the Join Policies work. For this example, assume the following data resides in the primary participant and a secondary participant:
-
The primary participant namespace is
dc=internal, dc=com -
The secondary participant namespace is
dc=external, dc=com -
The Join workflow element suffix is
dc=example,dc=com
Table 12-2 How Join Policies Work
| Data in Primary Participant | Data in Secondary Participant |
|---|---|
dn: cn=Ronald, dc=internal,dc=com objectclass: inetorgperson cn: Ronald sn: Anne givenname: Anne Ronald telephonenumber: 54300 |
dn: cn=Ronald, dc=external,dc=com objectclass: inetorgperson cn: Ronald sn: Anne title: Manager |
dn: cn=Sam, dc=internal,dc=com objectclass: inetorgperson cn: Sam sn: Ketty manager: cn=Ronald, dc=internal,dc=com telephonenumber: 54301 |
dn: cn=Sam, dc=external,dc=com objectclass: inetorgperson cn: Sam sn: Ketty title: SMTS |
dn: cn=Richard,dc=internal,dc=com objectclass: inetorgperson cn: Richard sn: Rod title: Trainee manager: cn=Ronald, dc=external,dc=com telephonenumber: 54303 description: Trainee for dept 543 departmentNumber: 543 |
dn: cn=Richard,dc=external,dc=com objectclass: inetorgperson cn: Richard sn: Rod title: Trainee |
dn: cn=William,dc=internal,dc=com objectclass: inetorgperson cn: William sn: Tent description: User with no title |
dn: cn=Mike,dc=external,dc=com objectclass: inetorgperson cn: Mike sn: Ret title: MTS - dept_sec |
12.5.1.5 Understanding Joiner Types
A Joiner type defines the Join relationship between two participants. A Join relationship defines the way two Join participants are connected. In addition, a Join relationship between two participants is directed and defines the way a start participant is connected to the end participant. These Joiner types work for any kind of Join rule defined, complex or simple.
Note:
When a Join relationship from P1 to P2 with many-to-one Joiner type is configured, then internally Join workflow element implicitly creates a reverse relationship from P2 to P1 with one-to-many Joiner type and vice-versa. For a one-to-one Joiner and a shadow Joiner, the reverse relationship also contains the same Joiner type as that of the original relationship configured.The following is a description of the supported Joiner types, including:
12.5.1.5.1 One-to-One Joiner Type
The one-to-one Joiner, or simple join, defines a one-to-one relationship between the entries in two participants. In a one-to-one Joiner type, each entry in the start participant corresponds with one entry in the end participant of this relationship. If more than one matching entry exists in the end participant, then the Join workflow element uses the first returned entry from the end participant for the Join.
You can specify a more complex Join criterion involving a combination of AND and OR conditions using the LDAP filter syntax for the Join criteria. For example:
( & (P1.userId = P2.uid) ( | (P1.deptNumber = P2.department) (P1.empNum = P2.empId) ) )
In the preceding scenario, the search filter used for the secondary participant is coined based on the complex Join criteria configured. If the entry from primary participant does not have all the primary attributes specified in the Join rule, then the Join is not formed.
Figure 12-16 shows a a high-level example of a one-to-one Joiner used for authentication.
Figure 12-16 Sample One-to-One Joiner Type for Authentication
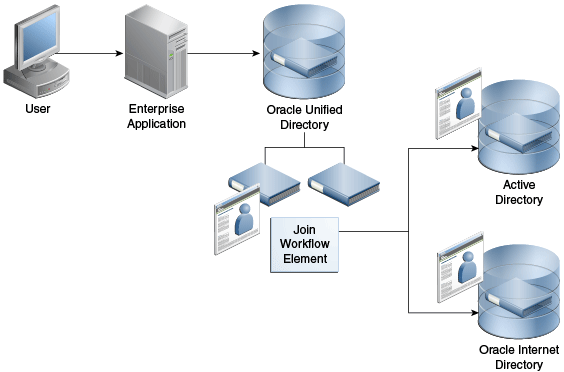
Description of ''Figure 12-16 Sample One-to-One Joiner Type for Authentication''
12.5.1.5.2 One-To-Many Joiner Type
The one-to-many Joiner type defines a one-to-many relationship between two participants. Similar to a one-to-one Join relationship, the one-to-many Joiner locates entries in the end participant by comparing attributes; however, if an entry in the start participant corresponds with more than one entry in the end participant, this Joiner type consolidates all of the matching entries into one virtual joined entry.
The one-to-many Join is useful if you must consolidate multiple role objects or identities into one virtual entry.
Figure 12-17 depicts a scenario where a policy server makes policy decisions about an individual. For integration purposes, the policy server prefers to see a single entry with the rights of the user exposed as a privilege attribute, which allows the policy server to test rights assertions with queries such as:
ldapsearch -b "uid=e027451,ou=People,o=LargeCo" -s base "(priv=XYZ Mgr)"
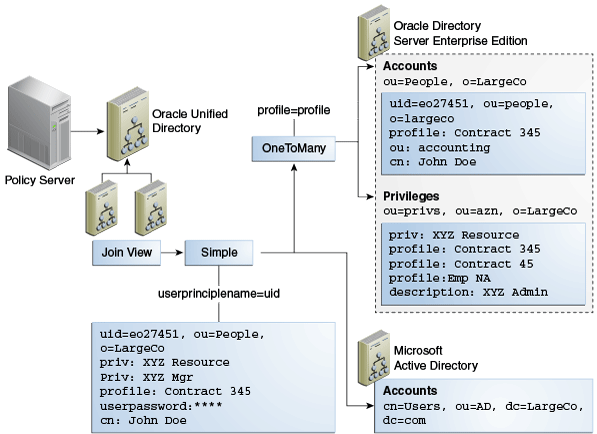
The one-to-many Joiner is used to match one or more privileges to a user, based on a profile attribute in their main ou=People entry. The one-to-many Joiner looks for all privileges with the same profile value as in the entry and merges them with the entry. A second stage Join uses the one-to-one so that the Oracle Directory Server Enterprise Edition (ODSEE) combined profile is used with the user's Active Directory credentials.
12.5.1.5.3 Many-To-One Joiner Type
The many-to-one Join relationship defines a many-to-one relationship between two participants, where multiple entries in the start participant have a corresponding single entry in the end participant. It is the inverse of one-to-many Joiner type.
For example, assume the primary participant contains a list of employee information and the secondary participant contains a list of department information. If multiple employees belong to one department, then a single department number in the secondary participant might apply to more than one employee in the primary participant.
However, if you delete an employee from the primary participant, you do not want to delete that employee's department number from the secondary participant. You can prevent this "cascading delete," by configuring a many-to-one relationship in the secondary participant. This relationship means that deleting an entry in the primary participant does not result in the deletion of the shared entry in the secondary participant.
12.5.1.5.4 Shadow Joiner Type
You sometimes need to store entries in a source, such as an LDAP store or a Database store, that requires a schema extension, but a schema extension is not possible either for business or technical reasons. The Shadow Joiner allows you to store the extended attributes in another store, such as Local Backend workflow element.
The Shadow Join relationship maintains the same structure of the entry in the primary participant, but stores additional attributes by creating shadow entries using a separate source. Using the Shadow Join relationship, applications can use the enterprise directory and also store application-specific attributes in the shadow directory such as Local Backend workflow element. The application believes it is communicating with a directory that stores all attributes, but Oracle Unified Directory silently stores application-specific data in an alternate shadow directory.
The Shadow Joiner encodes all primary participant DN's into a hash that is used to locate the matching entry in the shadow participant. If the Join workflow element fails to locate a corresponding record in the shadow participant, then it automatically creates a new one, storing the designated attributes in the shadow participant. The Shadow Joiner type operates transparently to the application, taking care of creating and renaming entries synchronized with that of the primary workflow element.
The Shadow Joiner supports all LDAP operations. When an LDAP modify operation occurs, the Shadow Join examines the parameters identified by the shadow participant's storable attributes to see if any of those attributes should be stored in the secondary participant. If any of these attributes exist, then the Shadow Join attempts to locate the local entry using the hash of the primary entry.
-
If the Shadow Join locates the local entry, then it performs the appropriate LDAP modify operation on that entry.
-
If Shadow Join does not find a local entry, it attempts a secondary search. The Shadow Join searches using a primary key, in case the primary DN changed.
If the local entry is still not found, the Shadow Join automatically creates a new entry.
Note:
For Shadow Joiner, the Join rule should involve the same attribute in both primary and shadow participant.For example,
p1.cn = p2.cn.You must ensure replication is configured for shadow back end to achieve high availability.
Figure 12-18 shows a firewall, for example CheckPoint, configured to connect to an Oracle Unified Directory. The Oracle Unified Directory uses Local Backend Database to maintain the firewall schema, allowing integration of the firewall into the corporate enterprise directory without requiring that the corporate enterprise directory schema be extended with application-specific data. Instead, by storing it in Oracle Unified Directory Local Backend database, the application-specific data can be managed by the team responsible for the firewall management.
Figure 12-18 Example Shadow Join Used for Storing Application-Specific Data Locally
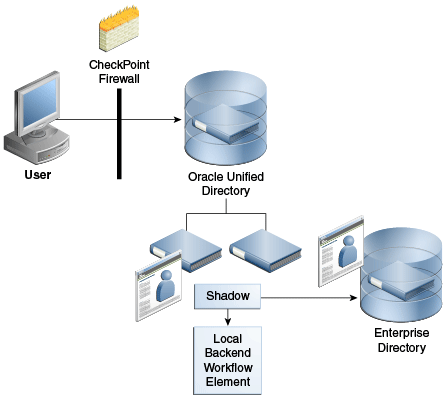
Description of ''Figure 12-18 Example Shadow Join Used for Storing Application-Specific Data Locally''
12.5.1.6 Understanding the Join Condition
Oracle Unified Directory enables you to define a filter condition for a Join rule, where only those entries that satisfy the specified condition are considered for the Join. All entries that do not satisfy the condition are returned, as is, without a Join.
You can configure a join filter condition with any of the Joiner types described in this chapter. See Section 12.5.1.5, "Understanding Joiner Types" for a description of the different Joiner types.
Oracle Unified Directory always evaluates the Join condition with respect to the participant in which it is defined. In most situations, it is useful to define this Join condition only in the primary participant and not in other participants.
You specify a Join condition in the LDAP filter syntax, and you can define a Join condition using any complex filter using OR and AND. For example:
(&(employeenumber=101)(sn=Smith))
Oracle Unified Directory always evaluates the Join condition based on the participant in which it is defined. In the following example, Oracle Unified Directory considers only the users in P2 whose sn is Smith and departmentNumber is 101 for a join with P3, based on the UserPrincipleName attribute. So, if you defined this configuration for P2, then it is associated with participant P2.
ds-cfg-join-criteria: P2.uid = P3.UserPrincipleName
ds-cfg-join-condition: (&(departmentNumber=101)(sn=Smith))
12.5.1.7 Creating Virtual Attributes
You can create virtual attributes based on the physical attributes stored in multiple participants of a Join workflow element. Because an attribute can be obtained from more than one participant, variables that define the attribute content must be fully qualified. That is, the source attribute value must include the name of the participant from which the attribute is taken.
For example, the following parameter creates a "mail" attribute from existing attributes in P1 and P2. This mail attribute is specified in the ds-cfg-create-virtual-attribute configuration parameter of the Join workflow element.
ds-cfg-create-virtual-attribute: mail =
 {P1.firstName}.{P2.lastName}@{P1.domainName}
In this case, the firstName and domainName attributes are taken from the P1 participant, and the lastName attribute is taken from P2.
The Join workflow element supports creation of virtual attributes based on individual attribute values from each participant. It also supports the simple concatenation or literal/attribute value assignment.
-
department = "ST" -
empid = P4.uid -
memberof = P8.dn -
mail = P3.CN + "." + P2.sn + "@oracle.com";
12.5.1.8 Understanding Attribute Flow Settings
Each participating data source has the privilege to specify which attributes can be retrieved from it and which attributes can be stored in it. You can configure this privilege by specifying the following attribute flow settings for each participating workflow element:
-
retrievable-attributeandnon-retrievable-attribute -
storable-attributeandnon-storable-attribute
Specifically, these settings control how attributes flow into and out of a Join participant. They also enhance security by preventing information from being requested by, or returned to, an unauthorized client. In addition, for Join workflow elements, the attribute flow settings control which attributes flow to which participant because multiple Join participants can contribute to the same virtual joined entry.
Note:
Unlike access controls, the attribute flow settings provide silent enforcement, which means they filter the request without returning an error to the client. In a high security environment, this silent enforcement prevents the client from knowing whether they are even allowed to see a particular attribute.The following sections provide more information about each of the attribute flow settings:
-
Section 12.5.1.8.1, "Working with Retrievable and Non-Retrievable Attribute Settings"
-
Section 12.5.1.8.2, "Working with Storable and Non-Storable Attribute Settings"
12.5.1.8.1 Working with Retrievable and Non-Retrievable Attribute Settings
This section describes how the retrievable-attribute and non-retrievable-attribute settings control which attributes a Join participant can retrieve from the target directory.
When configuring a Join participant, both the retrievable-attribute and non-retrievable-attribute lists are empty by default, which means all attributes are retrievable. However, you can specify a list of attributes that the Join participant can or cannot retrieve as follows:
-
Use the
retrievable-attributesetting to specify a list of attributes that the Join participant can retrieve from the target directory.This setting contributes to server performance and, in some cases, security because you can only retrieve the specified attributes from a proxied server during
SEARCHandCOMPAREoperations.In addition, you can use the retrievable-attribute setting to control attribute flow when using the Join workflow element. Because the Join workflow element Joins entries from multiple participants, you must configure the retrievable-attribute setting on each participant in the Join workflow element to restrict the flow of attributes from the participants in the Join view.
-
Use the
non-retrievable-attributesetting to specify a list of attributes that the Join participant cannot retrieve from the target directory.
Specifying a list of retrievable attributes indicates that only specific attributes may be requested from the proxied directory. An empty retrievable-attribute list indicates that all attributes are retrievable — unless you specify a list of non-retrievable attributes.
For example, you can retrieve attribute A1 in the following circumstances:
-
If both the retrievable-attribute and the non-retrievable-attribute lists are empty.
-
If the retrievable-attribute list is empty, and the non-retrievable-attribute list does not contain
A1. -
If the retrievable-attribute list contains
A1, and the non-retrievable-attribute list does not containA1.
12.5.1.8.2 Working with Storable and Non-Storable Attribute Settings
This section describes how the storable-attribute and non-storable-attribute settings control which attributes the Join participant can store on the target directory.
When configuring a Join participant, both the storable-attribute and non-storable-attribute lists are empty by default, which means all attributes are storable. However, you can specify a list of attributes that the Join participant can or cannot store as follows:
-
Use the
storable-attributesetting to specify a list of attributes that the Join participant can store on the target directory.This setting contributes to server performance and, in some cases, security because only the specified attributes and their values are sent to the proxied server for ADD and MODIFY operations.
In addition, you can use the storable-attribute setting to control attribute flow when using the Join workflow element. Because the Join workflow element Joins entries from multiple participants, you must configure the storable-attribute settings on each participant in the Join view to restrict the flow of attributes from participants in the Join view.
-
Use the
non-storable-attributesetting to specify a list of attributes that the Join participant cannot store on the target directory.
Specifying a list of attributes indicates that only specific attributes can go to the participating workflow element. An empty storable-attribute list indicates that all attributes are storable — unless you specify a list of non-storable-attributes.
For example, you can store an attribute in the following circumstances:
-
If both the
storable-attributeandnon-storable-attributelists are empty. -
If the
storable-attributelist is empty, but thenon-storable-attributelist does not contain that attribute. -
If the storable-attribute list contains the attribute, but the
non-storable-attributelist does not contain that attribute.
12.5.1.9 Handling Bind Operations
The Join workflow element supports user authentication for all participants. The Join workflow element provides a bind fall-through feature that allows you to try password validation against more than one data source. You must authenticate users against more than one data source because user identities might exist in multiple directories and passwords might be stored in any of the data sources.
To use the bind feature, you must configure the bind as an enabled operation in that participant. Use the --set participant-bind-priority configuration parameter to assign a bind priority to each participant in the Join workflow element, which determines the participant's priority in processing the bind.
Each participant is assigned a bind priority and the bind falls through all of the bind participants in the specified order until a successful bind is achieved. A bind failure is returned only when all bind participants have failed to authenticate the user.
The bind priority can be any positive integer that is greater than or equal to zero. The priority decreases from zero to higher integers. That is, the participant with least number has the highest bind priority, the participant with the next least number has the next higher bind priority, and so on. Zero has the highest priority.
12.5.1.10 Handling Translation of DN Attributes
DN attributes is a list of attributes to be treated as DNs for which namespace translation is required, such as member, uniquemember, and manager. For example, when reading a group entry from a proxied directory, Join workflow element converts the DN for the group entry and the uniquemember or member attributes if these attributes are in the DN attributes list.
Note:
Translate only those attributes that are needed by the client application. Entering all possible DN attributes may not be necessary for an application.12.5.1.11 Configuring the Criticality of Join Participants
The criticality configuration parameter determines how the Join workflow element behaves when a search being performed against a participant fails due to a host error. Criticality applies only to search requests.
-
WRITEoperations are always critical in all participants. -
BINDandCOMPAREoperations are always non-critical in all participants, so that they can fall-through all eligible participants until a success is found.
To configure criticality for a Join participant, use the dsconfig set-join-participant-prop subcommand and set one of the following criticality flag values:
-
true(default setting)This setting indicates that the participant is considered critical. If a participant fails to return a result because of an operation error, then the Join workflow element causes the overall search operation to fail and returns a
DSA Unavailableerror to the client, regardless of whether data was found in any other participant or not. -
falseThis setting indicates to the Join workflow element that the failure to perform an operation in the participant is not critical to the overall result. If a non-critical participant incurs an operations error, then that result is omitted from the overall LDAP search results. The Join workflow element returns partial results from any other participant and does not indicate any error.
-
partialThis setting indicates that the participant is partially critical, which implies that the application can notify its own users that partial results were obtained. If a partially-critical participant fails to return a result because of an operation error, then the Join workflow element returns not only partial results but also an
Admin Limit Exceedederror. While this is not the expected error, the intention of this setting is to cause client application logic to indicate that not all results are shown.
For example, the following command sets the criticality of a participant named joinparticipant-1 to true:
dsconfig -h localhost -p 4444 -D "cn=Directory Manager" -j pwd-file \ set-join-participant-prop --element-name we-join \
--participant-name joinparticipant-1 \
--set participant-criticality:true
12.5.1.12 Managing Enabled Operations
You can use the ds-cfg-enabled-operation parameter to configure which LDAP operations to perform on a Join participant. These operations include:
-
ADD -
BIND -
COMPARE -
DELETE -
MODIFY -
MODIFYDN -
SEARCH
The participant can participate only in the operations that you specify in this parameter.
-
The
COMPARE,DELETE,MODIFY, andSEARCHoperations are enabled by default. -
You must configure
BINDas an enabled operation to allow a participant to participate in bind operations. If you enable the BIND operation, then the configured bind priority determines the participant's priority when the bind is processing. -
The
ADDandMODIFYDNoperations are not enabled by default.-
If the Join is a shadow join, you can enable
ADDandMODIFYDNon primary and secondary participants. -
If the Join is not a shadow join, you can only enable
ADDandMODIFYDNon the primary participant.
-
12.5.1.13 Handling Cascading Write Operations to Secondary Participants
You can cascade write operations, such as DELETE and MODIFY, to secondary participants. That is, if you delete an entry a primary participant, then the related entries in all secondary participants are also deleted. However, this cascading operation is applicable only when you configure the DELETE operation as an enabled operation in the associated secondary participant and the relationship between the original participant and the to-be-cascaded-delete participant is not many-to-one.
MODIFY operations are also cascaded to all eligible secondary participants based on their enabled-operations configuration and storable attribute configuration. ADD and MODIFYDN are cascaded only to shadow secondary participants based on the storable attributes configured in those participants.
12.5.1.14 Implementing Pass-Through Authentication Using the Join Workflow Element
You can configure the Join workflow element to delegate bind requests to the Authentication (Auth) Provider workflow element and non-bind requests to the User Provider workflow element, as depicted in Figure 12-19. This configuration also takes care of delegating MODIFY PASSWORD requests to the Auth Provider workflow element and other MODIFY operations to the User Provider workflow element.
Figure 12-19 Pass-Through Authentication Using the Join Workflow Element
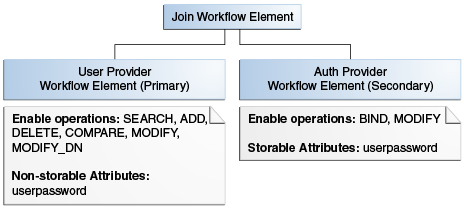
Description of ''Figure 12-19 Pass-Through Authentication Using the Join Workflow Element''
Note:
For a simple pass-through authentication scenario, use the pass-through authentication workflow element described in Section 12.4.4.1, "Using the Pass-Through Authentication Mechanism."Use the Join workflow element to configure pass-through authentication only if you have special requirements that cannot be met by using the pass-through authentication workflow element. For example, the pass-through authentication workflow element does not route bind requests to the User Provider workflow element, and the user password is stored only in the Authentication Provider workflow element. If you want a different deployment scenario, where you want to store the user password in both the Authentication Provider workflow element and the User Provider workflow element, then you can use the Join workflow element and configure both providers to handle bind requests.
12.5.1.15 Handling LDAP Operations in Join Workflow Elements
If an attribute exists in both the primary and secondary participants, then the Join workflow element merges the attribute values. For read operations, this implies that a multi-valued attribute is returned with the values from all participants. For write operations, the proxy queries all participants and determines where to write the value based on the storable attributes configured in each Join participant.
When configuring the Join workflow element, you must keep the following points in mind:
-
When you have multiple attributes with the same name from multiple data sources, such as two
uidattributes from two different Proxy LDAP workflow elements, the Join workflow element only displays a single value.However, you can configure the Join workflow element to retrieve attribute values from a specific participant. To do this, remove the attributes from the Retrievable Attributes field for any participants for whom you do not want to view the attribute.
-
You must configure virtual ACIs correctly to grant or deny entries and attributes from a Join workflow element.
-
When using a Proxy LDAP workflow element as a Join participant, the credentials you use to perform operations in each participant plays a significant role, as follows:
-
If you configure the
use-specific-identitybind mode in the Proxy LDAP workflow element, then only a specific identity is used for all non-bind operations. -
If you configure the
use-client identitybind mode in Proxy LDAP workflow element, then actual client credentials are used whenuserDNis a descendant of any of the DNs configured in theinclude-listof a Proxy LDAP workflow element. Otherwise, Oracle Unified Directory uses a specific identity to perform operations in the Proxy LDAP workflow element. -
All Proxy LDAP workflow elements must set the
include-listto the respective user container DNs so that the bind correctly happens either with the client DN or with a specific identity. This configuration also requires each participant's user container to be unique, or the bind fails. -
You must always configure the proxy and root credentials in the Proxy LDAP workflow element because some internal operations use those credentials. These credentials are also required when you configure a
include-listin a Proxy LDAP workflow element.
-
Table 12-3 describes how the Join Workflow element processes each LDAP operation.
Table 12-3 How the Join Workflow Element Processes LDAP Operations
| LDAP Operation | Processing Description |
|---|---|
|
|
|
|
|
Processed in each bind participant based on bind priority. |
|
|
|
|
|
|
|
|
|
|
|
|
|
|
Processed in primary participant first. Then, joins the entry with all eligible secondary participants for each entry returned from the primary that satisfies the Join condition. |
Note:
The Join workflow element displays a single value only, if there are multiple attributes with the same name from multiple data sources, for example twouid attributes from two different Proxy LDAP workflow elements. However, you can configure the Join workflow element to retrieve attribute values only from a specific participant. To view the attribute from a specific participant only, you must ensure that the attribute is not listed in the Retrievable Attributes field for the participant for which you do not want to show the attribute for.12.5.2 Optimizing Search Results From Virtual Directories Using Workflow Elements
Oracle Unified Directory provides two workflow elements that automatically narrow search results to help you more efficiently view or retrieve data from virtual data sources. You can insert these workflow elements into any workflow that returns search results.
- GetRidofDuplicate
-
The
GetRidofDuplicateworkflow element removes, from search results for the current search operation, all the entries whose DN has already been returned to the client application. This is useful when a workflow element is likely to return several entries, maybe hundreds, with the same DN. - HideByFilter
-
The
HideByFilterworkflow element enables you to control in fine detail which entries are returned by search operations. For example, if you use Oracle Unified Directory as an address book directory, you can display only the entries for customer service representatives. First, give customer service representatives anouvalue such asCSR. Then you can use theHideByFilterworkflow element with thehideByFilterset toou=CSR. When the directory is searched, only the customer service representatives entries are returned.
For detailed information about configuring the GetRidOfDuplicates and HideByFilter workflow elements, see Section 24.2, "Optimizing Search Results From a Virtual Directory."
12.5.3 Adding memberof User Attributes to person Entries
You can configure the VirtualMemberof workflow element to add the memberof user attribute to person entries, which is useful when you want applications see group membership, but do not want them to perform secondary searches for those groups.
The memberof attribute values are the DNs of any groups to which the person entry belongs.
Note:
The VirtualMemberOf workflow element only impacts theSEARCH operation
For information about creating and configuring a VirtualMemberof workflow element, see Section 24.3, "Adding the memberof User Attribute to person Entries."
12.5.3.1 Using the memberof Attribute in a Search Filter
You can use the memberof attribute in a search filter (for example, MemberOf=group1); however, memberof does not support the following combinations:
-
PRESENT,SUBSTRING,GREATER_OR_EQUAL,LESS_OR_EQUALformemberof -
ORfilter with an innermemberofcomponent -
NOTfilter with an innermemberofcomponent
Based on these restrictions, an inner memberof component is supported only in AND filters.
When you use the memberof attribute in the search filter, Oracle Unified Directory only returns entries with objectclass=person. The VirtualMemberof workflow element does not support using the memberof attribute on a non-person entry.
12.5.4 Renaming DNs Using the Proxy
Each entry in a directory is identified by a DN and a set of attributes and their values. Sometimes, the DN and the attributes defined on the client side do not map with the DN and the attributes defined on the server side. For instance, an organization, Example A contains dc=parentcompany, dc=com entries. It acquires another organization, Example B. Example B contains dc=newcompany, dc=com entries. Therefore, dc=newcompany, dc=com must be renamed to dc=parentcompany, dc=com for the existing client applications to work correctly.
You can define a DN renaming workflow element to rename DNs to values that match the server side. When a client makes a request, the DNs and attributes are renamed to match those in the server. When the result is returned to the client, the DN and attributes are changed back to match what the client has requested.
Note:
For information about configuring DN renaming, see Section 24.4, "Configuring DN Renaming."12.5.4.1 How the DN Renaming Workflow Element Works
Oracle Unified Directory provides a DN renaming workflow element that allows you to transform the content of a Directory Information Tree (DIT) into another DIT with a different base DN. When an operation (Add, Bind, Delete, Modify, and so on) goes through a DN renaming workflow element, its parameters are transformed according to the DN renaming configuration to transform the virtual entries into real entries.
Figure 12-20 illustrates how DN renaming is performed using the proxy.
The client expects ou=myorg, dc=server, dc=com entries. However, the LDAP server contains ou=people, dc=server, dc=com entries. The proxy renames the DNs by making use of the DN renaming workflow element.
In this example, the real entries ou=people, dc=server, dc=com are seen as ou=myorg, dc=server, dc=com entries from the client side.
The DN renaming transformation is applicable to the following objects:
-
DN of the entry
For example, the real entry on the LDAP server
dn:uid=user,ou=people,dc=server,dc=comis transformed into a virtual entrydn:uid=user,ou=myorg,dc=server,dc=comfrom the client perspective -
Attributes of the entry that contain either DNs or Name And Optional UIDs syntax
For example, the server-side value of the
managerattribute of an entry with an objectclassinetorgpersonhas a DN syntax:manager: uid=mgr,ou=people,dc=server,dc=comand is transformed into the valuemanager: uid=mgr,ou=myorg,dc=server,dc=comon the client side.In another example, the server-side value of the
uniquememberattribute has a Name And Optional UID syntax (as defined in RFC 4517) asuniquemember: uid=member,ou=people,dc=server,dc=com#'0111'Band is transformed into the valueuniquemember: uid=member,ou=myorg,dc=server,dc=com#'0111'Bon the client side.
Note:
You can apply the transformation to all the user attributes of the entries, define a restricted list of attributes to which the operation applies, or define a restricted list of attributes to which the operation does not apply.12.5.5 Changing RDN Values Using the Proxy
Oracle Unified Directory enables you to rename or replace RDN values from the source directory to Oracle Unified Directory using the RDNChanging configuration.
Note:
To use the virtual directory capabilities described here, you must have a validOracle Directory Service Plus license.Note:
For information about configuring RDN changing, see Section 24.5, "Configuring RDN Changing."Figure 12-21 illustrates how RDN changing is performed using the proxy.
Note:
The relative distinguished name (RDN) is the leftmost element in an entry DN. For example, the RDN foruid=Marcia Garza,ou=People,dc=example,dc=com is uid=Marcia Garza. You can only change the leftmost element in an entry DN.The RDNChanging configuration has the following parameters:
- objectclass
-
Identifies the objectclass type that RDN renaming is performed on. The default setting is
person. - replace-value
-
True or False: Indicates whether the value of original RDN value in the client view (identified by the
source-rdnparameter) should be replaced by the value of the new RDN value (identified by theclient-rdnparameter). The default setting istrue.Note:
When the value is set to true, and an entry has multiple values for the new RDN attribute, then Oracle Unified Directory uses the first value in RDN. - source-rdn
-
Identifies the original RDN attribute name from the source directory to be replaced or renamed in Oracle Unified Directory.
- client-rdn
-
Identifies the new RDN attribute name to be used in Oracle Unified Directory and replaces the attribute name identified by the source-rdn configuration parameter.
- dn-attributes
-
List of attributes with DNs to perform RDN renaming on. The default list of attributes are
member,manager, andowner.
12.6 Understanding the Global Index Catalog
A global index catalog can be used with a distribution deployment. If you are configuring a capacity based distribution, you must have a global index, with DN indexed. The global index catalog maps the entries to the distribution partition in which the data is held. When the proxy receives a request from the client, the distribution looks up the attribute entry in the global index catalog, and forwards the client request to the correct partition. This diminishes the need for broadcasts. Moreover, if a modify DN request is made, the global index catalog will ensure that the entry is always found.
A global index catalog maps the entries based on specific attributes, such as employee number or telephone number. The value of the attribute to be indexed must be unique across all the entries. You cannot use a global index to map entries based on country, for example, as that information is not unique.
If you index an attribute whose values are not unique, the proxy server might be unable to return all the requested entries. Say, for example, that you index the mail attribute, whose values are not necessarily unique. You now add the following two entries in sequence:
-
Entry 1, with
uid=user.1andmail=joe.smith@example.comis sent to partition 1. -
Entry 2, with
uid=user.2andmail=joe.smith@example.comis sent to partition 2.
In this situation, the global index mail keeps reference to the second entry only. A search with the filter (mail=joe.smith@example.com) will return only the second entry, uid=user.2.
A global index catalog can include several global indexes. Each global index maps a different attribute. For example, you can have one global index catalog called GI-catalog, which includes a global index mapping the entries based on the telephone number and one mapping the entries based on the employee number. This means that you can forward client requests to the right partition using either the telephone number or the employee number.
Global index catalogs and global indexes are created and configured using the gicadm command.
Note:
For more information see Section 23.7, "Configuring Global Indexes Using the Command Line" and Appendix A, "gicadm."The global indexes can be populated with data from LDIF files. The data from one LDIF file can be split into partitions using the split-ldif command. For more information, see Appendix A, "split-ldif."
A global index catalog should be replicated to avoid a single point of failure. For information on replicating the global index catalog, see Section 23.7.2, "Replicating Global Index Catalogs."
Example 12-4 Using a Global Index Catalog for Telephone Numbers
A typical example of a unique attribute which can be used to create a global index is a telephone number: the value of the attribute is unique, that is, only one person (employee, for example) can have that telephone number.
In the example below, the entries in the database have been split based on the telephone number. The global index includes the following information:
| Value | Partition ID |
|---|---|
| 4011233 | 1 |
| 4011234 | 1 |
| 7054477 | 2 |
The global index does not store the name of the employees, location, and other attribute values that may be associated to the telephone number. It only maps the attribute indexed to the partition. The data associated to the indexed value (here telephone number) is stored in the remote LDAP server.
If an employee has multiple phone numbers, these are regarded as multi-valued entries. In this case, if the global index is created based on the telephone number, there will be two global index entries that will result in finding one employee, say Ben Brown.
In the example above, employee Ben Brown could have both telephone number 4011233 and 7054477 assigned to him. In this case, a search on one of Ben Brown's telephone number would return the correct partition, and all the information associated to the telephone number, including the name Ben Brown, regardless that he has two phone numbers attributed to him.
12.7 Understanding the Transformation Framework
Oracle Unified Directory supports transformation of data through the definition of workflow elements. By creating an instance of workflow element you can display physical data in a different way.
Note:
To use the virtual directory capabilities described here, you must have a validOracle Directory Service Plus license.This chapter describes how transformation in Oracle Unified Directory occurs and contains the following topics:
Note:
For information about configuring transformation, see Section 24.6, "Configuring Transformations."12.7.1 Overview of Transformation
The data structure of an LDAP client application may differ from the data structure of the LDAP repository. They may differ on the schema (different types of attribute in the entries) or the values (same attribute name with different semantic of values). This is where you need transformation.
A transformation performs a specific action in a certain direction. You must specify the transformations that you need and define these on an existing workflow element.
The topics in this section include:
12.7.1.1 Transformation Models
The direction of transformation (that is whether the transformation is applied during the request, during the response, or both) determines the transformation model.
Transformations can be categorized into the following types:
-
Read transformations (outbound transformations): For more information, see Section 12.7.1.1.1, "Read Transformations."
-
Write transformations (inbound transformations): For more information, see Section 12.7.1.1.2, "Write Transformations."
-
Mapping transformations (bidirectional transformations): For more information, See Section 12.7.1.1.3, "Mapping Transformations."
12.7.1.1.1 Read Transformations
The read transformation is the most common transformation. A read transformation is applied only during the response to a request. No transformation is applied during the request and the physical data is not changed.
Figure 12-22 illustrates the concept of a read transformation.

Consider a scenario of an organization that has a legacy application whose function is to display person entries. The application does not support entries that do not contain an email attribute. The physical data source has been upgraded and the email attribute no longer exists for person entries.
You must apply a transformation here, which is to add the email attribute during the search response. This transformation changes the entry that is read from the data source and adds an email attribute whose value is firstname.surname@mycompany.com. No reverse transformation is required and the physical data is not changed.
12.7.1.1.2 Write Transformations
A write transformation is applied during the request, but not during the response. A write transformation modifies data provided by the client before storing it in the back end.
Figure 12-23 illustrates the concept of a write transformation.
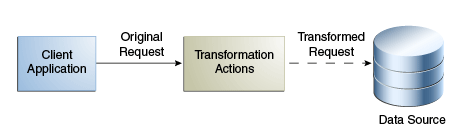
Consider a scenario of an organization that has a legacy application whose function is to add person entries to a data source. The application adds the entries without the email attribute. The physical data source has been upgraded and the email is now a mandatory attribute for person entries. You must apply a transformation here, which is to add the email attribute during the add request. This transformation changes the entry that is written to the database. No reverse transformation is required.
12.7.1.1.3 Mapping Transformations
The mapping transformation is the most common transformation. It is bidirectional in the sense that it is first applied during the request, and the reverse is applied during the response. These transformations are called mappings, because an attribute or entry in the physical data view maps to an attribute or entry in the virtual data view. Mapping transformations enable you to process existing values before assigning them to a DN component, an attribute type or value, or an object class.
Figure 12-24 illustrates the concept of a mapping transformation.
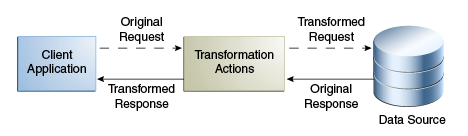
Consider a scenario of an organization, which has a physical data source that contains entries with the attributes surname and firstname. The organization has a client application that requires entries to have a cn (common name) attribute of the form firstname surname.
The client application sends a search request for an entry of the form cn=Joe Smith. A transformation is defined that extracts the firstname and surname during this request and transforms the request to one of the form surname=Smith, firstname=Joe. The corresponding entry is located in the data source. Before returning this entry to the client application, the inverse transformation is performed. The client application receives the entry as cn=Joe Smith, which it understands.
This request is transformed to be of the form surname=Smith, firstname=Joe.
12.7.1.2 Implementing Transformation in Oracle Unified Directory
Oracle Unified Directory is an LDAP server that supports transformations in a proxy server.
To implement transformations, you must:
-
Create an instance of a workflow element of type transformations.
-
Insert the transformation workflow element in the desired workflow elements list.
Note:
-
For more information about the architecture of Oracle Unified Directory, see Section 5.2, "Architecture of Oracle Unified Directory."
-
For more information about configuring transformations, see Section 24.6, "Configuring Transformations."
A transformation workflow element instance is essentially a data view on which certain transformation actions are defined.
12.7.2 Components of Transformation
This section describes the components for configuring the workflow elements for transformation.
The topics in this section include:
12.7.2.1 Transformation Types
You can configure the workflow element of type transformations with the following set of transformations:
Note:
Here:-
Client side: Refers to the side where the Oracle Unified Directory server interacts with the client application.
-
Source side: Refers to the side where the Oracle Unified Directory server interacts as a data server with its local data source, or as a proxy server with a remote server.
-
Inbound direction: Refers to the direction where transformations are applied from the client to the source.
-
Outbound direction: Refers to the direction where transformations are applied from the source to the client.
The topics in this section include:
-
Section 12.7.2.1.1, "
addOutboundAttributeTransformation Type" -
Section 12.7.2.1.2, "
filterOutboundAttributeTransformation Type" -
Section 12.7.2.1.3, "
addInboundAttributeTransformation Type" -
Section 12.7.2.1.4, "
filterInboundAttributeTransformation Type"
12.7.2.1.1 addOutboundAttribute Transformation Type
This transformation adds a virtual attribute or value(s) to entries returned to the client during a SEARCH operation, when the list of attributes in the request is either undefined (all) or when it contains this attribute.
When you cannot determine if an entry already contains a virtual attribute, the conflict-behavior parameter decides which of the following policy will apply:
-
The virtual value is not added
-
The virtual value is added and merged with the existing values
-
The virtual value replaces the existing one
If you are aware that the virtual attribute is searchable in the source repository, which implies some entries in the source repository contain the virtual attribute and searches are optimized on this attribute, and if the flag virtual-in-source is set then the transformation process forwards the virtual attribute to the source repository in the SEARCH REQUEST filter. Usually, the virtual attribute is not forwarded to the source repository. When it is set to FALSE, search requests are optimized for common cases, which implies virtual attributes not expected to be in the source repository.
Note:
You must keep in mind that the source schema check is applied when the virtual attribute is expected to appear in ADD or MODIFY requests. Therefore, it is recommended to configure the schema of the source to accept the virtual attribute. Otherwise, disable schema checking.Table 12-4 describes the parameters of addOutboundAttribute transformation type.
Table 12-4 Parameters of addOutboundAttribute Transformation Type
| Parameter | dsconfig CLI | Multi (M) / Single (S) Valued | Optional (O) / Mandatory (M) | Values |
|---|---|---|---|---|
|
Name of the client virtual attribute and the value definitions of the client virtual attribute |
|
S |
M |
string For more information, see Section 12.7.2.3, "Defining Attribute Values for Transformation." For example, |
|
Conflict behavior policy |
|
S |
O [default= |
|
|
Virtual in source policy |
|
S |
O |
|
|
Condition based on a filter that the entry must match |
|
S |
O |
LDAP filter |
|
Condition based on DN that must be an ascendant |
|
M |
O |
DN |
|
Condition to exclude operations in the operation processing |
|
M |
O |
enumerated (ADD, MODIFY...) |
12.7.2.1.2 filterOutboundAttribute Transformation Type
This transformation removes an attribute or value(s) from entries received from the source before sending to the client.
Table 12-5 describes the parameters of filterOutboundAttribute transformation type.
Table 12-5 Parameters of FilterOutboundAttribute Transformation Type
| Parameter | dsconfig CLI | Multi (M) / Single (S) Valued | Optional (O) / Mandatory (M) | Values |
|---|---|---|---|---|
|
Name of the source attribute and the value definitions of the source attribute |
|
S |
M |
string For more information, see Section 12.7.2.3, "Defining Attribute Values for Transformation." For example, |
|
Condition based on a filter that the entry must match |
|
S |
O [default = apply to all entries processed by the workflow element] |
LDAP filter |
|
Condition based on DN that must be an ascendant |
|
M |
O [default = apply to all requests processed by the workflow element] |
DN |
|
Condition to exclude operations in the operation processing |
|
M |
O [default = apply to all LDAP operations] |
enumerated (ADD, MODIFY...) |
12.7.2.1.3 addInboundAttribute Transformation Type
This transformation adds a virtual attribute or value(s) to entries received from the client while performing the ADD operation before forwarding the data to the source.
When you cannot determine if an entry already contains a virtual attribute, the conflict-behavior parameter decides which of the following policy will apply:
-
The virtual value is not added
-
The virtual value is added and merged with the existing values
-
The virtual value replaces the existing one
Table 12-6 describes the parameters of addInboundAttribute transformation type.
Table 12-6 Parameters of addInboundAttribute Transformation Type
| Parameter | dsconfig CLI | Multi (M) / Single (S) Valued | Optional (O) / Mandatory (M) | Values |
|---|---|---|---|---|
|
Name of the source virtual attribute and the value definitions of the source virtual attribute |
|
S |
M |
string For more information, see Section 12.7.2.3, "Defining Attribute Values for Transformation." For example, |
|
Conflict behavior policy |
|
S |
O [default= |
|
|
Condition based on a filter that the entry must match |
|
S |
O [default = apply to all entries processed by the worflow element] |
LDAP filter |
|
Condition based on DN that must be an ascendant |
|
M |
O [default = apply to all requests processed by the workflow element] |
DN |
|
Condition to exclude operations in the operation processing |
|
M |
O [default = apply to all LDAP operations] |
enumerated (ADD, MODIFY) |
12.7.2.1.4 filterInboundAttribute Transformation Type
This transformation removes an attribute or value(s) from entries (and modifications) received from the client on a ADD (and MODIFY) before forwarding to the source.
Table 12-7 describes the parameters of filterInboundAttribute transformation type.
Table 12-7 Parameters of FilterInboundAttribute Transformation Type
| Parameter | dsconfig CLI | Multi (M) / Single (S) Valued | Optional (O) / Mandatory (M) |
Values |
|---|---|---|---|---|
|
Name of the client virtual attribute and the value definitions of the client virtual attribute |
|
S |
M |
string For more information, see Section 12.7.2.3, "Defining Attribute Values for Transformation." For example, Similarly, |
|
Condition based on a filter that the entry must match |
|
S |
O [default = apply to all entries processed by the worflow element] |
LDAP filter |
|
Condition based on DN that must be an ascendant |
|
M |
O [default = apply to all requests processed by the workflow element] |
DN |
|
Condition to exclude operations in the operation processing |
|
M |
O [default = apply to all LDAP operations] |
enumerated (ADD, MODIFY...) |
12.7.2.1.5 mapAttribute Transformation Type
The transformation can rename or revalue a client attribute to one source attribute in both directions.
Table 12-8 describes the parameters of mapAttribute transformation type.
Table 12-8 Parameters of mapAttribute Transformation Type
| Parameter | dsconfig CLI | Multi (M) / Single (S) Valued | Optional (O) / Mandatory (M) | Values |
|---|---|---|---|---|
|
Name of the client attribute and the value definitions of the mapping from the client virtual attribute to the source virtual attribute |
|
S |
M |
string For more information, see Section 12.7.2.3, "Defining Attribute Values for Transformation." For example, |
|
Virtual in source policy |
|
S |
O [default = |
|
|
Conflict behavior policy |
|
S |
O [default= |
|
|
Condition based on a filter that the entry must match |
|
S |
O [default = apply to all entries processed by the worflow element] |
LDAP filter |
|
Condition based on DN that must be an ascendant |
|
M |
O [default = apply to all requests processed by the workflow element] |
DN |
|
Condition to exclude operations in the operation processing |
|
M |
O [default = apply to all LDAP operations] |
enumerated (ADD, MODIFY,...) |
12.7.2.2 Transformation Conditions
You can configure the Transformations workflow element with a set of conditions. Conditions are properties (attributes) that can be set either on a transformations-workflow-element or on an individual transformation.Transformation works only when LDAP request matches all conditions and all conditions set at the level of workflow element.
The following conditions are applicable for implementing transformation:
-
You can configure conditions to rules whether transformations apply or not.
-
You can set conditions on the transformations-workflow-element. In this situation, conditions apply for all transformations set on the workflow-element and they are evaluated prior to eventually processing each transformation.
-
You can set conditions on each individual transformation and they are evaluated prior to eventually processing this transformation.
In this sense, conditions can be broadly categorized as follows:
12.7.2.2.1 Parent Suffix
This condition is applicable for transformations applied only for LDAP operations that target an entry for which name is under one of the parent suffixes specified.
When no condition of this type is configured, then transformation applies to all entries processed.
12.7.2.2.2 Entry Match Filter
This condition is applicable for transformations applied on LDAP operations only for entries that match the provided filter.
When no condition of this type is configured, then transformation applies to all entries processed.
12.7.2.2.3 Excluded LDAP Operation
This condition specifies a list of multi-valued attributes, where each attribute is an LDAP operation that should not be impacted by the transformation. It allows you to disable the action of the transformation (when it has one) on each LDAP protocol message.
When no condition of this type is configured, then transformation applies to all LDAP operations normally impacted by this type of transformation.
12.7.2.3 Defining Attribute Values for Transformation
An attribute value allows you to define the value of a virtual attribute during transformation. This value can either be a default value, or rule that creates the value from other attribute values.
For addInboundAttribute, addOutboundAttribute, and mapAttribute, you must configure the values of the virtual attribute added. For filterInboundAttribute and filterOutboundAttribute, the values you intend to filter may be configured.
An attribute can derive its value from the following:
12.7.2.3.1 Constant
It is used to generate an attribute with a static default value or to filter a static value of an attribute.
For example, the property source-attribute:mycompany=Acme is used to provide a default company name.
dsconfig create-transformation \
--type add-inbound-attribute \
--set source-attribute:mycompany=Acme \
--transformation-name virtDeptName \
12.7.2.3.2 Value of Another Attribute
It is used to create a new attribute from an existing attribute in the entry that is being processed or to filter a value taken from another attribute using the %inputAttrName% syntax.
For example, the property source-attribute:displayName=%cn% specifies that the value of the new attribute must be taken from the value of the cn attribute.
dsconfig create-transformation \
--type add-inbound-attribute \
--set source-attribute:displayName=%cn% \
--transformation-name virtDeptName \
Note:
You must keep in mind that another virtual attribute generated in the sametransformations-workflow-element should not be referenced, because the evaluation order is not guaranteed.12.7.2.3.3 Regular Expressions
It is used to create an attribute value or to filter an attribute value by manipulating the value of an existing attribute using the {expression} syntax.
For example, the property client-attribute:mail={%cn%.%sn%@mycompany.com} is a regular expression that is used for deriving an attribute by combining the values of existing attributes.
dsconfig create-transformation \
--type add-outbound-attribute \
--set client-attribute:mail={%cn%.%sn%@mycompany.com} \
--transformation-name virtDeptName \
12.7.2.3.4 Values Mapping
It is used for defining virtual values as a mapping of values of another attribute using the virtAttrName=%refAttrName%(virtValue1,refValue1)(virtValue2,refValue2) syntax.
For the virtAttrName parameter, the transformation adds or filters values extracted from refAttrName. If refAttrName matches refValue1, then transformation processes either add or filter for virtValue1. In the values provided, characters '(', ')', ',' and '\'must be escaped using '\' character.
For example, consider an organization with several departments where department name is returned for the retrieved department ID, such as Department:1–Marketing, 2–Sales, 3–Finance and so on. But, when deptId is 1, the value returned for deptName is Marketing. When deptId is 2,the value for deptName is Sales. Similarly, when deptId is 3, the value returned for deptName is Finance.
dsconfig create-transformation \
--type add-outbound-attribute \
--set client-attribute:deptName=%deptId%(Marketing,1)(Sales,2)(Finance,3) \
--transformation-name virtDeptName
12.7.2.3.5 Multi-valued Virtual Attributes
It is used to specify a virtual multi-valued attribute using the virtAttrName=virtAttrValue1=virtAttrValue2= syntax.
dsconfig create-transformation \
--type add-outbound-attribute \
--set client-attribute:countriesResp=France=Germany=Italy \
--transformation-name virtCountriesRep
12.7.3 Transformation Use Case Examples
The following sections illustrate practical uses for transformation, and provide example configurations:
12.7.3.1 Mapping Activation or Deactivation for a Specific Back End Directory
This configuration is useful when an application has its own user activation attribute and values, which is different from the back end user activation attribute and values, and a mapping for read and write operations is required.
In the following example, the attribute myuseraccountcontrol with values activated and deactivated transforms to the back-end attribute nsAccountLock with values false and true for a DSEE (SunONE) back end.
$ ./dsconfig -X -n -Q -p 1444 -D cn=directory manager -j pwdfile
 create-transformation --transformation-name mapactivate --type map-attribute
--set client-attribute:myuseraccountcontrol="%nsAccountLock%(activated,false)
(deactivated,true)"
In the following example, the attribute myuseraccountcontrol with values activated and inactivated transforms to back-end attribute userAccountControl with values 544 and 546 for an Active Directory back end.
$ ./dsconfig -X -n -Q -p 1444 -D cn=directory\ manager -j pwdfile
 create-transformation --transformation-name mapactivate --type map-attribute
 --set client-attribute:myuseraccountcontrol="%userAccountControl%
(activated,544)(deactivated,546)"
12.7.3.2 Mapping Object Classes
This configuration is useful when an application has an objectclass with same meaning as an objectclass on the back-end server, but the two objectclasses have different names. A mapping on the objectclass name is required on read and write operations.
In the following example, a search comes in from the client with filter objectClass=User, and you want to transform that filter to objectClass=inetOrgUser. When an entry is returned to the client, if the entry is stored with the objectClass=inetOrgUser, then the entry is mapped to objectClass User.
$ ./dsconfig -X -n -Q -p 1444 -D cn=directory manager -j pwdfile
 create-transformation --transformation-name mapoc --type map-attribute
--set client-attribute:objectClass="%objectClass%(User,inetOrgUser)"

$ ./dsconfig -X -n -Q -p 1444 -D cn=directory manager -j pwdfile
 create-workflow-element --type transformations  --element-name trsfwfe
--set enabled:true --set next-workflow-element:userRoot --set transformation:mapoc
$ ./dsconfig -X -n -Q -p 1444 -D cn=directory manager -j pwdfile set-workflow-prop
 --workflow-name userRoot0 --set workflow-element:trsfwfe