24 Configuring Virtualization
This chapter describes how to configure virtualization.
This chapter includes the following sections:
-
Section 24.1, "Configuring a Virtual Directory View of Your Repositories"
-
Section 24.2, "Optimizing Search Results From a Virtual Directory"
-
Section 24.3, "Adding the
memberofUser Attribute topersonEntries"
Note:
To use the virtual directory capabilities described here, you must have a validOracle Directory Service Plus license.Note:
You can choose to configure some virtualization elements usingdsconfig or Oracle Directory Services Manager (ODSM).
-
For information about using the
dsconfigcommand, see Section 17.1, "Managing the Server Configuration Usingdsconfig." -
For information about using ODSM, see Chapter 16, "Accessing Oracle Unified Directory Using ODSM."
24.1 Configuring a Virtual Directory View of Your Repositories
This section describes how to create and configure a Join workflow element to create a virtual directory view of your repositories.
Note:
To use the virtual directory capabilities described here, you must have a validOracle Directory Service Plus license.This section includes the following topics:
-
Section 24.1.2, "Creating a Join Workflow Element Using the
dsconfigCommand" -
Section 24.1.3, "Creating a Join Workflow Element Using ODSM"
24.1.1 Before You Begin
Before creating the Join workflow element, you must configure the participating workflow elements so you can link to them from the Join workflow element configuration.
For example, consider a scenario with two separate Proxy LDAP workflow elements:
-
The first Proxy LDAP workflow element,
we-proxy1, will be linked to the primary participant of the Join workflow element configuration. -
The second Proxy LDAP workflow element,
we-proxy2, will be linked to the secondary participant of the Join workflow element configuration.
Note:
For more information about creating Proxy LDAP workflow elements, see Section 20.2.2, "Configuring Proxy LDAP Workflow Elements."Assume there is an entry in the we-proxy1 data source as follows:
dn:cn=john,cn=users,dc=com1
objectclass:inetorgperson
cn:john
sn:doe
uid:jdoe
title:PMTS
description: This entry is from we-proxy1
Next, assume there is an entry in the we-proxy2 data source as follows:
dn: sn=doe,cn=employees,dc=com2
empid: jdoe
cn:John
sn:doe
department: Sales
manager: userid=smith,cn=users,dc=com2
description: This entry is from we-proxy2
objectclass:inetorgperson
The joined-entry returned from Join Workflow element would be:
dn:cn=john,cn=users,dc=join
objectclass:inetorgperson
cn:john
sn:doe
uid:jdoe
empid: jdoe
title:PMTS
description: This entry is from we-proxy1
description: This entry is from we-proxy2
manager: userid=smith,cn=users,dc=join
department: Sales
24.1.2 Creating a Join Workflow Element Using the dsconfig Command
This section describes how to create and configure a Join workflow element topology, based on the scenario using the two Proxy LDAP workflow elements described in Section 24.1.1, "Before You Begin."
Note:
The following steps assume that you have already created the participating workflow elements.To configure a Join workflow element topology:
-
Create a Join workflow element, named
we-join.dsconfig -h localhost -p 4444 -D "cn=Directory Manager" -j pwd-file -X -n create-workflow-element --set enabled:true --set join-suffix:dc=join --type join --element-name we-join
>>>> Specify Oracle Unified Directory LDAP connection parameters Directory server hostname or IP address [ip]: Directory server administration port number [4444]: Administrator user bind DN [cn=Directory Manager]: Password for user 'cn=Directory Manager': >>>> Configure the properties of the Join Workflow Element Property Value(s) --------------------------------------------------------------- 1) dn-attribute manager, member, memberof, uniquemember 2) enabled true 3) join-suffix dc=join 4) populate-joinedentrydn false ?) help f) finish - create the new Join Workflow Element q) quit Enter choice [f]: f The Join Workflow Element was created successfully -
Create a primary participant, named
jp-p1, that is linked to the Proxy LDAP workflow element named,we-proxy1.dsconfig create-join-participant --element-name we-join \ --set participant-dn:dc=com1 \ --set participating-workflow-element:we-proxy1 \ --set primary-participant:true --type generic --participant-name jp-p1 \
Provide the following information to create a primary participant:
>>>> Specify Oracle Unified Directory LDAP connection parameters Directory server hostname or IP address [ip]: Directory server administration port number [4444]: Administrator user bind DN [cn=Directory Manager]: Password for user 'cn=Directory Manager': >>>> Configure the properties of the Join Participant Property Value(s) ---------------------------------------------------------------------- 1) enabled-operation compare, delete, modify, search 2) join-condition By default, no join condition is defined. That is all entries satisfying the original search filter are considered for join. 3) joiner-type one-to-one 4) non-retrievable-attribute By default, the non-retrievable list is empty, which means that all attributes are retrievable. 5) non-storable-attribute By default, the non-storable list is empty, which means that all attributes are storable. 6) participant-bind-priority 0 7) participant-criticality true 8) participant-dn dc=com1 9) participants-join-rule "" 10) participating-workflow-element we-proxy1 11) primary-participant true 12) retrievable-attribute By default, the retrievable list is empty, which means that all attributes are retrievable. 13) storable-attribute By default, the storable list is empty, which means that all attributes are storable. ?) help f) finish - create the new Join Participant q) quit Enter choice [f]: f The Join Participant was created successfully. -
Create a secondary participant, named
jp-p2, that is linked to the Proxy LDAP workflow element named,we-proxy2.dsconfig create-join-participant --element-name we-join \ --set participant-dn:dc=com2 \ --set participating-workflow-element:we-proxy2 \ --set primary-participant:false --type generic --participant-name jp-p2 \ --set participants-join-rule:jp-p1.uid=jp-p2.empid
Provide the following information to create a secondary participant:
>>>> Specify Oracle Unified Directory LDAP connection parameters Directory server hostname or IP address [ip]: Directory server administration port number [4444]: Administrator user bind DN [cn=Directory Manager]: Password for user 'cn=Directory Manager': >>>> Configure the properties of the Join Participant Property Value(s) ---------------------------------------------------------------------- 1) enabled-operation compare, delete, modify, search 2) join-condition By default, no join condition is defined. That is all entries satisfying the original search filter are considered for join. 3) joiner-type one-to-one 4) non-retrievable-attribute By default, the non-retrievable list is empty, which means that all attributes are retrievable. 5) non-storable-attribute By default, the non-storable list is empty, which means that all attributes are storable. 6) participant-bind-priority 0 7) participant-criticality true 8) participant-dn dc=com2 9) participants-join-rule jp-p1.uid=jp-p2.empid 10) participating-workflow-element we-proxy2 11) primary-participant false 12) retrievable-attribute By default, the retrievable list is empty, which means that all attributes are retrievable. 13) storable-attribute By default, the storable list is empty, which means that all attributes are storable. ?) help f) finish - create the new Join Participant q) quit Enter choice [f]: f The Join Participant was created successfully. -
To specify which Join policy type to use for a Join workflow element, configure the
ds-cfg-join-policyparameter. For example,--set join-policy:left-outer-join.
24.1.3 Creating a Join Workflow Element Using ODSM
If you prefer, you can create a Join workflow element using the ODSM graphical user interface.
Note:
For information, see Section 17.3.4.1, "Creating a Workflow Element."24.2 Optimizing Search Results From a Virtual Directory
To help you more efficiently view or retrieve data from virtual data sources, Oracle Unified Directory provides two workflow elements that automatically narrow search results. You can insert the GetRidOfDuplicate or HideByFilter workflow elements into any workflow chain that returns search results.
This section includes the following topics:
For more information about Oracle Unified Directory workflows, see "OUD Plug-Ins and Workflows" in Oracle Fusion Middleware Developer's Guide for Oracle Unified Directory.
24.2.1 Eliminating Duplicate Entries from Search Results Using the GetRidofDuplicate Workflow Element
The GetRidofDuplicate workflow element removes, from search results for the current search operation, all the entries whose DN has already been returned to the client application. This is useful when a workflow element is likely to return several entries with the same DN.
To eliminate duplicate entries from search operations:
Add the GetRidOfDuplcate workflow element before any workflow element, such as the Join workflow element, that returns duplicate entries.
24.2.1.1 Sample Configuration
The following example creates a get-rid-of-duplicate WFE (next WFE=NEXT_WFE).
dsconfig create-workflow-element \
          --set enabled:true \
          --set next-workflow-element:NEXT_WFE \
           --set cache-size:1000000 \
          --type get-rid-of-duplicate \
          --element-name example \
          --hostname locahost \
          --port 1444 \
          -X \
          --bindDN cn=Directory\ Manager \
          --bindPasswordFile ****** \
          --no-prompt
In this example, a search will return no more than 1000000 unique entries.
Note:
In this configuration example, the created workflow element is not part of any workflow chain. A full configuration must also define or create the workflow chain, and update the Network group.24.2.2 Filtering Search Results Using the HideByFilter Workflow Element
The HideByFilter workflow element enables you to control in fine detail which entries are returned by searches of a virtual directory. For example, if you are using Oracle Unified Directory as an address book directory, you can display only the entries for customer service representatives. First you give all customer service representatives an ou value of CSR. Then can use the HideByFilter workflow element with hideFilter set to ou=CSR. When the directory is searched, only the customer service representatives entries are returned.
To filter search results using the HideByFilter workflow element:
Create and link a HideByFilter workflow element. For example:
dsconfig create-workflow-element \
          --set enabled:true \
          --set next-workflow-element:NEXT_WFE \
          --set ldap-filter:ou=CSR \
          --type hide-entries-by-filter \
          --element-name example1 \
          --hostname dosapano \
          --port 1444 \
          -X \
          --bindDN cn=Directory\ Manager \
          --bindPasswordFile ****** \
          --no-prompt
24.2.2.1 Configuration Parameters
Table 12-3 summarizes the HideByFilter plug-in configuration parameters:
Table 24-1 HideByFilter Parameters
| Parameter | Description |
|---|---|
|
|
|
|
|
If an entry matches the ldapURL filter then it is returned to the client application only if it's a descendant of the LdapURL base DN. All the other fields of the LDAP filter are ignored. |
|
|
A list of adapters from which the user entry for the dynamic filter is searched. If list is empty, or if the user entry can be found in none of the adapters (including the current adapter) then the dynamic filter is ignored. |
|
|
When set to true, the filtering does apply to admin users. The parameter is optional and the default value is false. |
24.3 Adding the memberof User Attribute to person Entries
This section describes how to add the memberof user attribute to person entries.
Note:
For more information, see Section 12.5.3, "Addingmemberof User Attributes to person Entries."To define a VirtualMemberof workflow element, use the following configuration parameters:
-
searchBase: DN of the base to search for groups containing
personentries. -
explicitRequestOnly: Specify
TrueorFalse-
True (default): Adds the
memberofattribute to the entry only if it is explicitly requested as a returned attribute. -
False: Always adds the
memberofattribute to the entry.
-
-
member-attribute-name: The name of the
memberofattribute to add.Note:
Thememberofattribute has a default value for Oracle Virtual Directory convergence.In Oracle Virtual Directory, the
memberofattribute is auserattribute (not operational). The definition is:attributeTypes: ( 1.2.840.113556.1.2.102 NAME 'memberOf' DESC 'The distinguished name of the groups to which this object belongs' EQUALITY distinguishedNameMatch SYNTAX 1.3.6.1.4.1.1466.115.121.1.12 X-ORIGIN 'Microsoft Active Directory' )
24.4 Configuring DN Renaming
To configure DN renaming, you must first create a DN renaming workflow element and then you can modify the following DN renaming properties:
-
client base DN -
source base DN -
next workflow element -
black list attributes -
white list attributes
This section includes the following topics:
24.4.1 Creating a DN Renaming Workflow Element
To create a DN renaming workflow element, use the dsconfig create-workflow-element command, as follows:
$ dsconfig -h localhost -p 4444 -D "cn=Directory Manager" -j pwd-file -X -n \
 create-workflow-element \
 --type dn-renaming \
 --element-name RenameorgDN \
 --set client-base-dn:ou=myorg,dc=example,dc=com \
 --set next-workflow-element:load-bal-we1 \
 --set source-base-dn:ou=people,dc=example,dc=com \
 --set enabled:true
where:
-
--set client-base-dnindicates the client base DN, which is the workflow entry point -
--set source-base-dnindicates the base DN which the entries should have after transformation, which is the workflow exit point. -
--set next-workflow-elementindicates the workflow element that will follow the DN renaming workflow element in the proxy architecture. You can specify any type of workflow element here.
24.4.2 Modifying a DN Renaming Configuration
You can view and modify a DN renaming configuration by using the following dsconfig commands:
-
To view the current DN renaming properties, use the
dsconfig get-workflow-element-propcommand. -
To modify a DN renaming property, use the
dsconfig set-workflow-element-propcommand. For example,$ dsconfig -h localhost -p 4444 -D "cn=Directory Manager" -j pwd-file -X -n \ set-workflow-element-prop \ --element-name RenameorgDN \ --set source-base-dn:ou=admin,dc=example,dc=com
In the preceding example, only the
source-base-dnis modified. There is no need to specify the old source base DN. Only the new one is required. -
To create a black list of DN attributes that should not be renamed by using, use the
dsconfig set-workflow-element-propcommand. For example,$ dsconfig -h localhost -p 4444 -D "cn=Directory Manager" -j pwd-file -X -n \ set-workflow-element-prop --element-name RenameorgDN \ --set black-list-attributes:manager
The attribute must have a DN type.
24.5 Configuring RDN Changing
To change RDNs, you must first create an RDN Changing workflow element, and then you can modify the following properties:
-
client RDN -
source RDN -
next workflow element -
objectclass -
dn attributes -
replace-value
Note:
To use the virtual directory capabilities described here, you must have a validOracle Directory Service Plus license.This section includes the following topics:
24.5.1 Creating an RDN Changing Workflow Element
To create an RDN Changing workflow element, use the dsconfig create-workflow-element command as follows:
dsconfig create-workflow-element \
          --set client-rdn:cn \
          --set enabled:true \
          --set next-workflow-element:localproxy \
          --set source-rdn:uid \
          --type rdn-changing \
          --element-name myrdnchangingwfe \
          --hostname localhost \
          --port "4444" \
          --trustAll \
          --bindDN cn=directory\ manager \
          --bindPasswordFile pwd-file \
          --no-prompt
where:
-
--set client-rdnindicates the client base RDN, which is the workflow entry point. -
--set source-rdnindicates the base RDN which the entries should have after transformation, which is the workflow exit point. -
--set next-workflow-element:localproxyindicates the workflow element that will follow the RDN changing workflow element in the proxy architecture. This can be any type of workflow element.Note:
You must create the Proxy LDAP workflow element with the parameters-
remote-root-dn -
remote-root-password
The RDN Changing workflow element uses these credentials to perform internal searches on the remote server.
-
-
--element-name myrdnchangingwfeindicates the name of the RDN Changing workflow element you are creating.This configuration replaces
uid=user.1,ou=people,dc=example,dc=com with cn=User CN,ou=people,dc=example,dc=com.
24.5.2 Modifying RDN Values
After you have configured an RDN changing workflow element, you can view and modify RDN values by using the following dsconfig commands:
-
To view the current RDN properties, use the
dsconfig get-workflow-element-propcommand. -
To rename or replace an RDN property, use the
dsconfig set-workflow-element-propcommand.$ dsconfig -h localhost -p 4444 -D "cn=Directory Manager" -j pwd-file -X -n \ set-workflow-element-prop \ --element-name myrdnchangingwfe \ --set source-rdn:uid
In the preceding example, only the
source-rdnis modified. There is no need to specify the oldsource-rdn. Only the new one is required.
24.6 Configuring Transformations
This section explains the transformations configuration model and describes two methods for configuring transformations.
Note:
To use the virtual directory capabilities described here, you must have a validOracle Directory Service Plus license.This section includes the following topics:
Note:
For more information about transformations, see Section 12.7, "Understanding the Transformation Framework."24.6.1 Overview of the Configuration Model
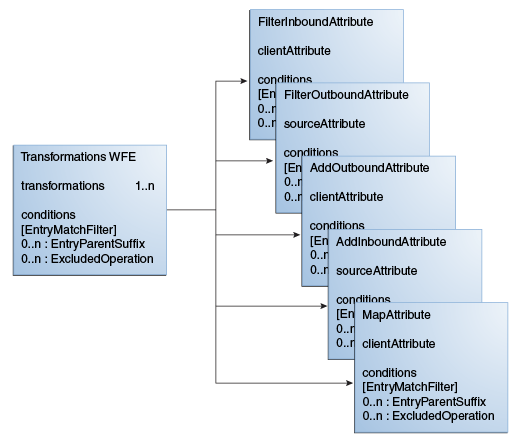
The transformation workflow element and transformations are the backbone entities for configuring transformation.
The transformation workflow element is a container that contains a list of references to transformations. One transformation can be reused by multiple transformation workflow elements. Conditions are properties (attributes) that you can set either on a transformation workflow element or on a transformation.
Note:
For detailed information about the various transformation types, conditions, and parameters that you can configure for a transformation workflow element, see Section 12.7.2, "Components of Transformation."You cannot configure the order in which the transformations should work. For example, you define a transformation workflow element that uses transformation A and transformation B. But, you cannot determine if an entry is first processed by transformation A and then by transformation B. It can be B before A.
If you must define the order in which transformations should occur, for example transformation A should happen before transformation B, then it is recommended that you first create a transformation workflow element that uses transformation A. Next, create another transformation workflow element that uses transformation B. Then, place the second transformation workflow element after the first transformation workflow element.
Figure 24-1 illustrates a high-level configuration model.
24.6.2 Configuring Transformation Using dsconfig
This section uses an example to illustrate how to create transformations, create a transformation workflow element, add transformations, and associate conditions using the dsconfig CLI.
Note:
-
To create a transformations workflow element using ODSM, see Section 24.6.3, "Configuring Transformations Using ODSM."
-
For more detailed information about transformations, transformation workflow elements, and conditions, see Section 12.7, "Understanding the Transformation Framework,"
To configure transformation:
-
Create a first transformation of type
filter-outbound-attribute.$ dsconfig create-transformation -X -n -Q -p -D cn="directory manager" -j pwd-file \ --set source-attribute:description \ --type filter-outbound-attribute\ --transformation-name fodescription
-
Create another transformation of type
add-outbound-attribute.$ dsconfig create-transformation -X -n -Q -p -D cn="directory manager" -j pwd-file \ --set client-attribute:legacyemail=%cn%.%sn%@mycompany.com \ --type add-outbound-attribute \ --transformation-name legacyemail
-
Create the
transformations-workflow-elementwith the first transformation, and add it to the processing flow.$ dsconfig create-workflow-element -X -n -Q -p -D cn="directory manager" -j pwd-file \ --set transformation:legacyemail \ --set set next-workflow-element:pxywfe \ --type transformations \ --element-name trsfwfe
$ sdsconfig set-workflow-prop -X -n -Q -p -D cn="directory manager" -j pwd-file \
--workflow-name pxywf \
--set workflow-element:trsfwfe
-
Add the second transformation to the workflow element.
$ dsconfig set-workflow-element-prop -X -n -Q -p -D cn="directory manager" -j pwd-file \
--element-name trsfwfe \
--add transformation:fodescription
-
Define the transformation criteria, which is that the transformation will occur only under
cn=users.$ dsconfig set-workflow-element-prop -X -n -Q -p -D cn="directory manager" -j pwd-file \ --element-name trsfwfe \ --set entry-parent-suffix:cn=users,dc=example
-
Set that transformations will happen only for users located in Paris.
$ dsconfig set-workflow-element-prop -X -n -Q -p -D cn="directory manager" -j pwd-file \
--element-name trsfwfe \
--set entry-match-filter:l=Paris
-
Create a new mapping transformation and add it to the workflow element.
$ dsconfig create-transformation -X -n -Q -p -D cn="directory manager" -j pwd-file  \
--set client-attribute:faxnum=%facsimileTelephoneNumber% \
--type map-attribute \
--transformation-name mapfax
$ dsconfig set-workflow-element-prop -X -n -Q -p -D cn="directory manager" -j pwd-file \
--element-name trsfwfe \
--add transformation:mapfax
-
Set that this transformation will happen only for persons.
$ dsconfig set-transformation-prop -X -n -Q -p -D cn="directory manager" -j pwd-file \
--transformation-name mapfax \
--set entry-match-filter:\(objectclass=person\)
24.6.3 Configuring Transformations Using ODSM
You can create, modify, and delete a transformation workflow element for Oracle Unified Directory proxy servers using ODSM.
Note:
To create a transformation workflow element usingdsconfig, see Section 24.6.2, "Configuring Transformation Using dsconfig."This section includes the following topics:
24.6.3.1 Creating Transformations
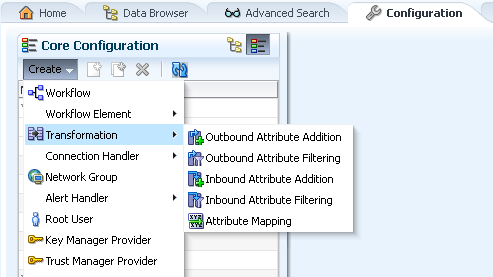
If you are connected to an Oracle Unified Directory Proxy Server, then ODSM allows you to create five different types of transformations. For more information about the types of transformations supported, see Section 12.7.2.1, "Transformation Types."
Note:
If you are connected to an Oracle Unified Directory server instance, then the option to create a new Transformation is not available because transformation functionality is supported by proxy servers only.To create a transformation using ODSM, follow these steps:
-
Connect to the directory server from ODSM, as described in Section 16.2, "Connecting to the Server Using ODSM."
-
Select the Configuration tab.
-
Select the Core Configuration view.
-
From the Create menu, select Transformation.
-
From the Transformation submenu, select the desired transformation type.
In this example, consider the following properties for an Outbound Attribute Addition transformation type.
Note:
The properties that appear while creating a transformation vary depending on the type of transformation you create. For more information about each transformation type and the associated properties, see Section 12.7.2.1, "Transformation Types." -
In the Name field, type the name for the transformation.
-
In the Conditions region, enter the following information:
Note:
Conditions are optional. However; at runtime, conditions specified here at the transformation level are used with those specified at the transformation workflow element level in the transformation workflow element where the transformation is used. For more information about transformation workflow element, see Section 17.3.4, "Configuring Workflow Elements Using ODSM."-
In the Entry Matching Filter field, type a valid LDAP filter.
-
In the Entry Parent Suffixes box, click Add to specify the DN that must be an ascendant.
To select an entry, click Select.
In the Entry Picker window, select Tree View to navigate the directory tree and locate the entry, or Search View to search for the entry.
-
From the Excluded Operations list, select the operations that you want to exclude.
-
-
In the Transformation Definition region, enter the following information:
-
In the Client Attribute field, type the name of the client virtual attribute.
To select a client attribute entry, click Select.
In the Attribute Picker window, select locate the desired entry, or Click Search to search for the entry.
-
In the Value Definitions box, click Add to specify the value definitions of the client virtual attribute.
Click Define to enter an appropriate value definition. For more information about specifying value definitions, see Section 24.6.3.4, "Selecting Values from Value Definition Screen."
-
-
From the Conflict Behavior list, select the desired conflict behavior policy.
-
Click Virtual in Source to Yes.
-
Click Create.
24.6.3.2 Modifying Transformations
This section describes how to modify the properties for a transformation. In this example, modify the properties for an Outbound Attribute Addition transformation type created in Section 24.6.3.1, "Creating Transformations."
To modify a transformation, perform the following steps:
-
Connect to the directory server from ODSM, as described in Section 16.2, "Connecting to the Server Using ODSM."
-
Select the Configuration tab.
-
Select the Core Configuration view.
-
Expand the Transformations element.
-
Click the desired transformation.
Transformation configuration details appear for modification in the right pane.
-
Modify the required information.
-
Click Apply.
24.6.3.3 Deleting Transformations
To delete a transformation, perform the following steps:
-
Connect to the directory server from ODSM, as described in Section 16.2, "Connecting to the Server Using ODSM."
-
Select the Configuration tab.
-
Select the Core Configuration view.
-
Expand the Transformations element.
-
Select the desired transformation to delete.
The Delete configuration window appears seeking confirmation before deleting.
-
Click OK.
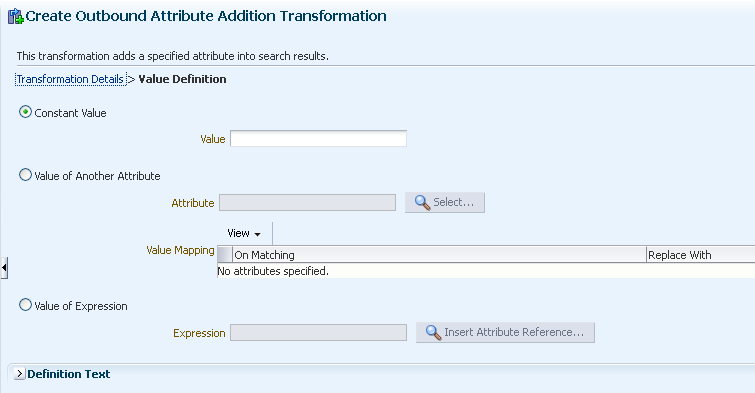
24.6.3.4 Selecting Values from Value Definition Screen
The Value Definition Builder subscreen allows you to define a value for an attribute that is being added, mapped, or deleted by a transformation.
You can specify the following values:
-
Constant value: It is used to enter a constant value.
-
Value of another attribute: It is used to create a new attribute from an existing attribute in the entry that is being processed or to filter a value taken from another attribute.
-
Value of expression: It is used to create an attribute value or to filter an attribute value by manipulating the value of one or more existing attributes.
Figure 24-3 shows the Value Definition screen.