
|
|
|
Profile Screen
Note: The Recently Used feature (available when the GENERAL > RECENT USED RECORDS MENU is set to Y) allows you to quickly access up to 10 of the last-used (created, opened, or changed) profiles, reservations, contracts and business blocks from the main OPERA menu bar. (When the OPS/OPC<version number> Sales and Catering license is also active, up to 10 recently used contacts, events, and accounts are additionally available.)
In multi-property environments, (when the OPP_MHOT Multi-Property PMS add-on license code is active), you may access business blocks and reservations at properties other than your log-in property if you have appropriate permissions at those properties. (In Sales and Catering environments, you may also access events for properties other than your log-in property.) Profiles (including contact and account profiles), are considered to be "global" across properties. If you have permission to view and edit profiles, you may access any profile, regardless of the property at which it was created.
OPERA uses profiles to store a host of details about the guests, companies, agents, business sources, contacts, and groups you do business with. A profile contains extensive demographic information (including name, mailing address, e- mail address, phone number, preferences, etc.) as well as reservation and stay histories and other statistical data. Having profile information on hand makes it easy to create reservations for guests, process commissions for agents, prepare billing statements, construct mailings, manage membership programs, collect accurate statistics, and perform many other OPERA tasks. In addition, you can specify relationships between profiles to identify their affiliations for marketing and business planning purposes. For example, a relationship might be identified between an individual and a company if that individual is an employee of the company.
The Profile screen is available from many points within OPERA. For example, you can access the Profile screen by making a selection from the Profile Search screen, or by selecting the Profile button on the Reservation screen. The Profile screen differs somewhat depending on the type of profile you are viewing. (The type of profile you are working with is shown in the upper left corner of the screen.) The profile types are:
Note: When the OPR<version number>ORS license code is active, after an update has been inserted in a profile in ORS, there is now a five minute delay before the message "BROADCAST PROFILE" is triggered and the profile is broadcast to all subscribed properties. This prevents the possibility of the broadcasted profile overwriting changes that are still being made to the profile from the originating property.
Note: When the OPR<version number>ORS license code is active and the GENERAL > ORS CM (hidden) application parameter is set to Y, profiles that get created for a particular chain brand can only be used for that specific chain brand that it was created for.
Note: Keep in mind that most fields on all of the profile screens are screen paintable (see Screen Painting for details) and may vary from the information that is listed below. To view a complete list of all the fields that are screen paintable for each profile screen, select one of the following topics:
Individual Profile Screen Painting Elements
Contact Profile Screen Painting Elements
Company Profile Screen Painting Elements
Travel Agent Profile Screen Painting Elements
Source Profile Screen Painting Elements
Group Profile Screen Painting Elements
Each of these profile types is described below. Once the Profile screen is displayed, move from field to field by pressing the Tab key or Enter key on the keyboard. Or use the mouse to click in the field.
Note: The Created and Updated times and dates shown at the bottom of the Profile screen are given in database server time (see Database Time Zone Regions) unless a local time zone has been specified in the Time Zone Region field on the Property Details screen General tab during property configuration.
Individual profiles are probably the most common type you will create and work with. Many properties require that a new individual profile be created for each guest. (If this is true, the RESERVATIONS > MANDATORY GUEST PROFILE application parameter is set to Y.) For repeat guests, the name, primary phone number, and other information provided in the individual profile can be automatically pulled into reservations when you create a new reservation. This makes the reservation process faster and more accurate.
Note: When the PROFILES > ADDRESS TYPE DEFAULT application setting is set to Default or does not have a value defined, then the PROFILES > INDIVIDUAL ADDRESS TYPE application setting will be used to specify the default address type to display. If an address type is not specified for the PROFILES > INDIVIDUAL ADDRESS TYPE application setting, then the address type specified as the Primary is displayed.
Use the Profile screen to enter demographic information about the individual. To create a profile you need, at a minimum, the individual's first and last name. Gather as much other information as possible or as directed by management. Note that you can enter multiple addresses, telephone numbers, and notes.
Property. Select the down arrow to choose the property to see this profile's property-specific information. Property-specific information includes details such as Last Room, Last Rate, and Last Visit. Rate Code and AR Number may or may not be property-specific, at each property's option. Your login property is displayed by default. (This feature is available if the OPP_MHOT multi-property add-on license or if OPR<version number>ORS license code is active.)
Last Name. The surname or last name of the individual. Ensure upper and lower case is used appropriately and the spelling is correct. Select the globe icon to enter an alternate name. (This feature is available when the OPP<version number>OPERA PMS license and/or the OPR<version number>ORS license code is active and when the GENERAL > ALTERNATE NAME application function is set to Y. The alternate name appears in search screens and during the Profile Merge process to help identify profiles. See Alternate Names for details.)
Note: When the PROFILES > RESTRICT PROFILE NAME CHANGE AFTER FOLIO CREATION application parameter is set to Y, the Profile name can't be modified after a folio or invoice has been generated with that profile as the Payee of that folio/invoice. The last name field on the profile screen will be grayed out.
When the PROFILES > INCOGNITO application function is set to Y, the Incognito functionality can be applied to a guest. This functionality enables a guest to create a "fictitious" name and "fictitious" profile to use while dealing with a property. This hides the guest's true identity from the hotel personnel, unless permission has been granted to view it. If the permission has been granted, an i button displays next to the Last Name field on both the Profile Search and Profile screens. Selecting the i button will display or allow a search based on the guests true last and first name. The true name has to be entered into the profile screen, by selecting the i button, before it can be searched on from the Profile Search screen. This functionality is used for celebrities, so that news does not get out by the hotel personnel that a celebrity is staying at the property.
First/Middle Name. The first or given name of the individual. Optionally, you may enter a middle name or middle initial in the field to the right. Ensure upper and lower case is used appropriately and the spelling is correct.
Note: When editing the last or first name of the profile and that guest has future reservations, then the Future Reservations screen is displayed to confirm that you want to modify the name associated to all of the future reservations.
Select the OK button to change the name of the guest associated to all of the listed reservations. Selecting the OK button will display a confirmation prompt. Select Yes to make the changes or no to cancel them.
Note: When the OPR<version number>ORS license is active, if certain settings are enabled, the system will accept duplicate profile name codes across chains. The Chain Ownership and Chain Ownership Profiles Types application settings must be defined, as below:
Global > Profile > Function > CHAIN OWNERSHIP is activated and set to Y. When this function is activated, you must define the profile type that you will allow to have duplicate name codes (see below). If this application function is set to N, duplicate name codes are not allowed. After activating this function you will need to run a utility to synchronize chain codes with the profiles in OPERA. Access Utilities > Profile > Synchronize Chains.
Global > Profile > Setting > CHAIN OWNERSHIP PROFILE TYPES must be defined for the type of profile you want to allow duplicate name codes, such as Company, Individual, Group, Primary Member, Source, or Travel Agent. If the setting is null, this indicates ALL profile types with duplicate name codes will be allowed.
Language. Select the down arrow and choose the guest's preferred correspondence language. A default correspondence language was established for your property during set up.
Title. Select the down arrow and choose a courtesy greeting (Mr., Mrs., Ms., Dr., Herr, Mm., etc.) from the Titles list of values. The greetings are sorted based on the language selected. When you select a title, the default salutation for that title appears in the Salutation field.
Note: When PROFILES > OVERRIDE ENVELOPE GREETING application parameter is set to Y, the Envelope Greeting field will update each time a user selects a new title for the profile and will update based on the envelope greeting that has been configured for the selected title.
When the PROFILES > OVERRIDE ENVELOPE GREETING application parameter is set to N and the PROFILES > ADVANCED TITLE application parameter is set to Y, the Envelope Greeting field will not update when a new title is selected. However, when the PROFILES > ADVANCED TITLE application parameter is set to N, the Envelope Greeting field will always update when a new title is selected, and the OVERRIDE ENVELOPE GREETING application parameter setting will be ignored. In addition, when the Title is deleted and either the Save or OK button is selected, the Envelope Greeting field will be cleared. Finally, the Envelope Greeting functionality is only applicable to the Individual profile type and not to other profile types.
Note: When the PROFILES > ADVANCED TITLE application parameter is set to Y but title suffixed have not been configured (see Titles for details), upon selecting the Title down arrow the "Title suffixes not configured" message appears. Title suffixes must be configured when the ADVANCED TITLE parameter is active.
Note: When the OPX_GHA or OPX_GHA2 add-on license is active, updates made by the GHA interface to a profile's title will only be accepted in PMS when the title is null. When the profile already has a title attached at the property level, the property will ignore updates to the title sent by GHA.
Address Information. Enter the guest's address (mailing address) city, postal code and extension, country, and state. Please note that if postal codes for the city, state, and country have been configured in Configuration > Profiles > Geographic Data > Cities and Postal Codes, if you enter an existing postal code the city and state will automatically populate. If you enter an existing postal code that exists for more than one city or state, the first city or state configured automatically populates; you can then change to the other configured city or state, if necessary. If you enter an existing postal code, but it doesn't match the current state, a message displays such as "Postal Code is not in the valid range." If you enter a postal code that has not been configured, you may enter any state and city without an error message. You may select the ellipsis button to open the Address list to create multiple addresses. If multiple addresses are available for this profile, the Addresses lamp appears (in red) in the lower part of the screen (See Indicator Lamps for details). (See Addresses for details.) If multiple addresses are created, select one as the primary address. The primary address displays on the Profile screen with the address type (shown in blue: for example, Home Address, Business Address) next to it. The default primary address type is set by the PROFILES > INDIVIDUAL ADDRESS TYPE application setting.
(Applicable when the General > Function > ALTERNATE NAME and General > Function > AUTO ALTERNATE NAME TRANSLATE application settings are set to Y.) When you edit or create a new profile in ORS/OCIS or in an OPMS/ORS/OCIS integrated environment, the profile's alternate language (defined in the General > Setting > ALTERNATE NAME LANGUAGE application setting) will be used for the new address. However, if either application setting is set to N, the profile's default language will be used to create the new address for the profile.
When the OPP_<version number> OPERA Property Management System and the OPR_<version number> OPERA Reservation System license are active, OPERA handles address information specially for each module. As these two modules communicate via OXI, address information is compared to see if the profile exists in the systems or if a new profile needs to be created. And if the profile does exist, do any of the details need to be updated that were updated in the other module. This comparison is completed in a different manner for each system. For inbound messages from PMS to ORS, the comparison is completed with the Address 1 field and the number of characters defined by the Compare Address Length for OXI_HUB. For inbound messages from ORS, the comparison is completed on the Address Type and the first 7 characters in the Address 1 field.
Note: When an address is deleted on a profile, the address will become inactive in OPERA, not deleted. The inactive record will be removed after 30 days by the purge process. Prior to this 30 days, the address record may be reactivated if added back to the profile.
Address. Enter the guest's street address.
City. Enter the city portion of the guest's address.
Postal Code. Postal code portion of the guest's address.
State/Province. Select the down arrow to choose the state or province portion of the address, if applicable.
Note: State codes configuration in ORS may be completed differently than the state code configuration in PMS. In ORS, a specific set of state codes may be configured that are dictated by the Corporate Office. Where the PMS property may have a set of state codes that differ from the corporate office or may have additional state codes for various countries that are not being used by ORS. And for these types of scenarios, the communication of state codes must be handled in a specific manner when address information is communicated between the ORS and PMS modules. If the Address and City match for an incoming address and receiving system (i.e., PMS to ORS), but the incoming address does not have a state defined, then the original state in the ORS system will remain and will not be removed. The following 2 examples display how this works.
Example 1
ORS Address
1234 Address 1
Naples
FL
34105
PMS Address
1234 Address 1
Naples
--
34105
Result: Address sent from PMS to ORS, State will remain as FL in ORS.
Example 2
ORS Address
1234 Address 1
Naples
FL
34105
PMS Address
1234 Address 1
Naples
OH
34105
Result: Address sent from PMS to ORS, State will be updated from FL to OH in ORS.
Country. Select the down arrow to choose the country portion of the guest's address. If an ISO country code is associated with the country code you select here, the appropriate national flag image will appear next to the Country field and list of values down arrow, if this option has been configured (see Countries for details).
Note: If the PROFILES > QUICK ADDRESS application function is set to Y, entering the Country and the Postal Code information will autofill the State and City fields for US, DE and selected other addresses.
Note: In multi-language environments, users can apply application settings that determine how foreign language address records will be handled when sending the profile from V6/V7 PMS to ORS/OCIS. In OXI-HUB, when the Update Primary parameter is set to Enabled (OXI-HUB > Interface OXI-V6 or OXI-V7 > Interface Parameters > OXI_PROFILES > Update Primary = Enabled) and the OXI-HUB Profile Second Address parameter (OXI-V6 /OXI-V7) is set (OXI-HUB > Interface OXI-V6 or OXI-V7 > Interface Parameters > OXI_PROFILES > Profile Second Address = Y or N), the following address options are available.
Profile Second Address parameter is set to N. - When the incoming profile has an address that contains no special characters, only standard English letters, only one address is created.
Profile Second Address parameter is set to N. - When the incoming profile has a foreign language address (language code other than 'E') that contains special characters, (i.e. Russian), two addresses are created; the original language and one translated to English.
Profile Second Address parameter is set to Y. - When the incoming profile has a foreign language address (language code other than 'E'), two addresses will be created whether or not special characters exist; one in the foreign language and one translated into the English language.
Replace Address. This check box is screen painted in PMS. When a user adds or modifies an address or communication type on an existing profile, selecting this check box indicates to the system that the user made intentional changes. This check box transfers to and from external systems such as PMS and ORS, via OXI-HUB, indicating on various screens that the user made address or communication changes to the profile. For example, if a profile had an address modified in PMS and the user selected the Replace Address check box, when uploaded to ORS the Profile Screen in ORS would also have this check box marked. (Once the address and/or communication type has been transferred, the check box no longer remains flagged at the originating Profile Screen.) This check box can also display on the first panel of the Suspended Profiles - Three Panel Merge Screen.
The resulting profile address/communication type changes depend upon the OXI-Profiles interface parameter of Update Primary - whether it is set for ENABLED, DISABLED, or REPLACE (see OXI_PROFILE Parameters in OXI_HUB). This parameter allows you to decide what address and communication type will be designated as Primary upon sending a profile to ORS.
Cleansed. This check box is available in PMS and ORS/OCIS if an external address cleansing interface is licensed (e.g., the OPP_ADDO Address Doctor Interface) and the PROFILE > ADDRESS CLEANSING application parameter is set to Y (otherwise the check box is disabled). Address verification is performed when the Cleansed check box on the Profile screen (or the Addresses screen) is un-selected. Enter your address information and select the OK or Save button to initiate address cleansing. Address validation may be applied to the profile address information when the profile is created or when the address is edited. This check box is automatically selected after the address has been validated. To re-validate an address change, edit the appropriate address elements and un-check the Cleansed check box. The address will be re-validated when you select the Save or OK button. See Address Doctor Setup and Address Cleansing Result for details.
Note: When the Cleansed option is selected and the profile is sent from PMS to ORS/OCIS, the profile in ORS/OCIS will be updated with this option selected.
Protected. This field is screen painted and is available when the OPR<version number>ORS license code is active. Select CENTRAL from the LOV if you want to protect this profile from changes made at the PMS property level (details are explained below). When this profile is saved after CENTRAL Protect has been selected, the profile is identified with a green label "Protected" on both the ORS and PMS Profile Screen.
Note: Centrally protected guest profiles can also be sent to V6 and V7 PMS properties. Interface rules must be set up for OXI-V6. See Interface Rules in OXI-HUB for more information.
Salutation. By default, the system combines the individual's last name with the selected title to create a salutation. You may directly edit the salutation.
Note: If the application parameters OVERRIDE ENVELOPE GREETING and OVERRIDE SALUTATION are set to Y, the Envelope Greeting and Salutation fields are updated when the Last, First or Title field is changed. The Envelope Greeting and Salutation fields can also be updated manually.
When the application parameters are set to N, these fields are not updated when the Last, First or Title field is changed. However, they can still be updated manually.
VIP. (This field is available if the PROFILES > VIP application function is set to Y.) Select the down arrow to open the VIP list of values and select a VIP status level, if any.
Profession. (This feature is available if the OPR <version number> ORS license code is active.) Enter a profession for the individual.
Company. (This feature is available if the OPR <version number> ORS license code is active.) Enter the name of the individual's company or employer.
Bus. Seg. (Business Segment). (This feature is available if the OPP<version number>OPERA PMS license is active.) Select the down arrow to choose a market segment to be associated with this guest.
Note: Codes that have been inactivated cannot be selected, although they will continue to display in the LOV shaded with a gray background and be available for selection in filters and queries.
Business Title. (This feature is available if the OPR <version number> ORS license code is active.) Enter a business title or position for this profile.
Nationality. Select the down arrow to choose the guest's nationality.
Ref. Curr. Currency that will be used to produce the guest's billings and statements. The property's local currency is the default currency. If the guest prefers billing and invoicing in another currency, select the down arrow and choose that currency from the list of values. (This feature is available when the GENERAL > MULTI CURRENCY application function is set to Y)
Mail Action. Select the down arrow to choose one or more mailing lists for this individual. This profile can be included in all mailings generated using the selected lists if the Mailing List field is set to Y. Mailing action codes are set up in System Configuration > Profiles > Mailing Action Codes. (This feature is available if the OPP<version number>OPERA PMS license is active.)
Note: Codes that have been inactivated cannot be selected, although they will continue to display in the LOV shaded with a gray background. See Mail Action for details.
Mailing List. Select this check box to place the guest on mailing lists for the selected mail action(s). For example, if your property has a New Years mail action to which the guest is assigned, you may generate a mailing list for all guests whose Mailing List option is selected and who have the New Years Mail Action assigned. (This feature is available if the OPP<version number>OPERA PMS license is active. Mailing lists may be generated by using Miscellaneous > Data Extract > Data Extract Query.)
Note: When Profile Privacy is active (Privacy check box is selected), this option will automatically be unselected for the profile.
Keyword. Select the ellipsis button to choose the type of keyword you wish to enter and the keyword value. You may enter one keyword for each available keyword type. Keywords can be used to search for the profile and as a filter for reporting. See Keywords for details. (This feature is available if the PROFILES > KEYWORD application function is set to Y.) When keywords are added or changed on the Profile screen, the activity is logged in the User Activity Log.
Date of Birth. Enter the guest's date of birth or select the date using the calendar tool. Entering a date of birth allows you to generate lists of guests for mailing birthday greetings.
Note: If your property is included in a database schema that has one or more properties in Korea (KR) country mode and you have initiated and completed the associated encryption process, Date of Birth information is masked with X's by default. In this situation, if you have PROFILES > VIEW SENSITIVE INFORMATION ON PROFILE permission, you may double-click on the field to see this information in clear text.
Note: If both the property and the central database are located in Korea, OXI and OXI-HUB will handle the encryption process when transferring data between the two databases so that the data cannot be viewed when transferred. If one database is located in Korea and the other is located outside, OXI will only pass non-encrypted data to the database outside Korea.
Passport. Enter the guest's passport number.
Note: This field will also be populated or updated if the Passport field on Dashboard 2 has a number entered or is updated.
Note: By default, Passport Number and ID Number information is masked with X's except for the last two characters. If you have PROFILES > VIEW SENSITIVE INFORMATION ON PROFILE permission, you may double-click on the field to see this information in clear text. When updating ID and Passport numbers with masked values, the user is expected to replace the entire string rather than parts and pieces of the masked value. This is because these fields accommodate alphanumeric characters and therefore, if the string is not replaced in its entirety, the masked values will be saved as X's.
Note: If both the property and the central database are located in Korea, OXI and OXI-HUB will handle the encryption process when transferring data between the two databases so that the data cannot be viewed when transferred. If one database is located in Korea and the other is located outside, OXI will only pass non-encrypted data to the database outside Korea.
Client ID. Unique number assigned by the property or chain to identify this profile. You may use the Client ID field on the Profile Search screen to locate this profile. (When the OPI_<version_number> OCIS license is active, a client ID is automatically generated if the PROFILES > AUTO GENERATE CLIENT ID application parameter is set to Y. The dependent PROFILES > GENERATE ID FOR PROFILE TYPES application setting is used to specify the profile types for which auto generate is used.)
If you enter a client ID that is the same as the client ID already assigned to another profile, a prompt appears: "Duplicate Client ID exists with name <last_name, first_name>. Do you wish to merge the two profiles?" If you reply Yes, the Profile Merge screen appears allowing the two profiles to be merged.
Central AR No. Accounts receivable number assigned to this profile at the CRO level. (This feature is available if the OPR <version number> ORS license code is active.)
Notes. Select the ellipsis button to add notes to the profile. Notes can be of any of several kinds (e.g., General, Reservation, Background, Employee, etc.). The newest General-type note to be added is displayed on the Profile screen. See Profile Notes for details. (Profile note types are configured in Configuration > Setup > Note Types.) Should notes/comments be added to an existing reservation through Reservation > Update Reservation > Profile > Options > Notes, the notes/comments added for the existing reservation will not be seen when returning to the Reservation screen.
Use these fields to enter telephone numbers, email addresses and/or web addresses for the profile. Select the down arrow to choose the type of communication (e.g., Home Phone, Business Phone, Cell Phone, Fax, Email, Web, etc.). Then type the address in the field to the right. To add multiple communication addresses of a type (e.g., two business phone numbers or two email addresses), select the ellipsis button. If multiple communication addresses of a single type are configured for the profile, the Communication lamp (in red) appears in the lower part of the screen (See Indicator Lamps for details).
Note: Email addresses on any type of profile must be correctly formatted in order to save them to the profile. If the email address is not properly formatted, and you attempt to tab out of the field, a message "Please enter a valid E-mail address" displays.
Only one communication address belonging to each communication role (i.e., phone, fax, email and web page) may be designated as a primary communication address. For example, even though there are three business and home voice phone numbers for an individual, only one can be the primary phone number if all are assigned to the phone role. (See Communication Information for details on roles and primary communication addresses.)
Phone Number. Enter the phone number for the profile. When the OPR<version number>ORS license code and OPI<version number>OCIS license code is active, you have the option to define the minimum amount of digits that will be allowed for the phone number in PMS before it will be uploaded to ORS/OCIS. If the minimum amount of digits is not met when adding/modifying a phone number in PMS, the phone number will not be transferred to ORS/OCIS. If the minimum amount of digits is met, the phone number will be transferred from PMS to ORS/OCIS. The minimum phone length is set up in OXI-HUB (Interface Configuration > Interface Parameters > OXI_PROFILES > MIN PHONE LENGTH). The default value is 6 digits. If the value is set for less than 5, more matches will result during the ORS Match & Merge process. See OXI_PROFILE Parameters in OXI-HUB for more information.
Note: When the OPR<version number>ORS license code is active, you may add an email address used only for requests (EMAIL_REQ). This email address appears in the Profile Requests New or Edit screen by default (when Options > Requests > New or Edit is selected) even though other email addresses may exist. If the EMAIL_REQ address is not entered, the Profile Request screen displays the primary email address. This Email Request address does not download to PMS at the property level; nor can it be deleted or replaced by changes made at the property level. Other email addresses can be changed within PMS however, at the property level, and will upload to ORS.
Note: When a phone number is deleted on a profile, the phone number will become inactive, not deleted in the system. The inactive record will be removed after 30 days by the purge process. Prior to this 30 days, the phone record may be reactivated if added back to the profile.
History. Select this check box to save this profile from being purged according to the criteria used by the OPERA Data Purge Routine to remove inactive profiles from the database. By default, this check box is not selected when creating a new profile.
Notes:
When a new profile is created via the Profile screen, this check box is unchecked by default.
When a new profile is created during the creation of a reservation or a Business Block, this check box is checked by default.
To change the default behavior of this check box for all scenarios, select Configuration > Setup > Screen Design > Field Defaults to open the Field Defaults Maintenance screen. In the Screen Name field, select Individual/Group, and then select the New button to access the Field Maintenance Details screen. Select Keep History in the Field Name field and select Y in the Field Value field to make the default checked (or select N to make the default unchecked), and then select the OK button.
Profiles created from the Group Rooming List screen inherit the History check box attribute from the group profile attached to the business block.
When a profile is updated by a non OPERA interface (e.g., GHA) and sent to ORS, the History check box option will not be updated in ORS and will remain as it is on the profile.
Contact. Select this check box if this individual is to be designated as a contact. When this box is selected, the Contact tab becomes active. See Contact Profile for details. (This feature is available if the PROFILES > CONTACTS application function is set to Y.)
Active. (PROFILES > ACTIVE CHECKBOX ACCESS permission must be granted to have access to this check box.) Select this check box if the profile is active (this is the default). To make the profile inactive, un-select the check box. A profile may be made inactive, for example, if the guest has not made a reservation in a long time. It is usually preferable to make a profile inactive rather than deleting it (which is done by selecting the Delete button from the Profile Options menu). A profile must be made active to make reservations. A message informs you that the profile is inactive when you attempt to make a reservation for a guest whose profile is inactive. If you select Yes to proceed, the profile is automatically activated.
Note: When the PROFILES > ACCESS ACTIVE CHECKBOX BY PRIMARY MEMBERSHIP permission is granted, a non-supervisor user can select/unselect this check box when a profile with an active primary membership is edited. The ACTIVE CHECKBOX ACCESS permission must first be granted before the ACCESS ACTIVE CHECKBOX BY PRIMARY MEMBERSHIP permission can be granted.
Private. This option is available on the property level and is only visible in PMS when the Multi-Property Cross Reservations OPP_MHT2 add-on license is active. The Private check box is also available in ASP Mode. Select this check box if you want to make this profile Private. For security purposes, it may be necessary to protect individual profiles from being displayed at other properties within a CRO, chain, or multi-property configuration. The Private check box is screen painted on the Profile Screen and is by default, unselected. This means that the profile can be viewed/shared globally. A user, with permissions, can mark a profile as Private when creating it. This profile will only display at the property where it was created (Property A); other properties cannot view it. Users with permission at Property A during editing can also mark that profile Private or Not Private. Users cannot mark profiles as Private or Not Private if the profile was created at another property.
This feature will override another existing check box (Share Profiles) that is available during chain configuration (Setup > CRO Configuration) when the OPR<version number>ORS license code is active. See Multi Property and CRO Setup.
Message prompts appear to indicate if a profile can be shared or not when the Private check box has been selected or unselected: "Profile cannot be designated as Private." and "Profile cannot be designated as Shared."
See Individual Profile Screen Painting Elements for details.
A/R No. Accounts receivable number.
Addr. Language. Select the language for the address information.
Address Type. Select the type of address being used for the profile.
Allow Email. Select the check box so that the profile will allow emails.
Allow Phone. Select the check box so that the profile will allow phone calls.
Allow SMS. Select the check box so that the profile will allow text messages.
Note: For the checkbox Allow SMS to be checked by default for new profiles, field and button defaults must be configured from Setup > Screen Design > Field and Button Defaults > Screen Name > Individual/Group Profile.
Alt. Name. Enter an alternate name to use for the profile.
Note: When the OPR_<version number> OPERA Reservation System license is active, the GENERAL > ALTERNATE NAME application function is set to Y, and the GENERAL > AUTO ALTERNATE NAME TRANSLATE application parameter is set to Y, when creating a new profile the cursor is automatically defaulted to the Alt. Name field. When editing a profile, alternate names will automatically be translated into English and auto-populated into the Alt. First and Alt. Name fields. For translating from double byte characters to English, this feature requires all the expected characters to have an accurate translation in configuration (Setup > System Configuration > Profile > External IFC > Character Conversion). If the character conversion is not properly configured or does not exist or the alternate name lacks special characters, English will be copied to English.
Note: If the application parameters OVERRIDE ENVELOPE GREETING and OVERRIDE SALUTATION are set to N, the Envelope Greeting defaults to the Extended Title Tags (i.e., Ms. <XFIRSTNAME> <XLASTNAME>) instead of the Alternate Last Name and Alternate First Name tags. The Envelope Greeting and Salutation fields should not be updated when the Alternate Last Name, Alternate First Name or Alternate Title fields are changed.
Communications. Label for the Communication section of the screen.
Credit Rating. (ORS Only) Select the Credit Rating to attach to the profile. When a credit rating is selected for a profile, a credit rating deposit and cancellation rule will now apply anytime that this guest makes a reservation. See Credit Ratings for details.
Direct Bill Batch Type. Available when the CASHIERING > DIRECT BILL BATCH FOLIOS function is set to Y, select the batch type to be associated with a profile to allow batch printing of folios for direct bill guests based on the type assigned to the profile and on when the direct bill batch folios were last printed.
Envelope Greeting. Enter the envelope greeting to use for the guest profile. In S&C, the Envelope Greeting field can be manually changed on a Contact profile to allow sales managers to greet customers by their first name rather than by their formal name.
Note: If the application parameters OVERRIDE ENVELOPE GREETING and OVERRIDE SALUTATION are set to Y, the Envelope Greeting and Salutation fields are updated when the Last, First or Title field is changed. The Envelope Greeting and Salutation fields can also be updated manually.
When the application parameters are set to N, these fields are not updated when the Last, First or Title field is changed. However, they can still be updated manually.
Gender. Select the gender of the guest for the profile.
Guest Type. Select the code to specify the type of guest such as hotel guest, members, staff, and outside guests.
ID Issued. Select the country where the guests identification was issued.
ID Issued Date. Enter the date the identification was issued.
ID Number. Enter the identification number.
Note: This number can automatically be populated or updated when a number is added or updated on Dashboard 2 in the Passport field and the ID Type is blank or set to an ID Code that is configured as a Passport ID Type.
Note: By default, Passport Number and ID Number information is masked with Xs except for the last two characters. If you have PROFILES > VIEW SENSITIVE INFORMATION ON PROFILE permission, you may double-click on the field to see this information in clear text. When updating ID and Passport numbers with masked values, the user is expected to replace the entire string rather than parts and pieces of the masked value. This is because these fields accommodate alphanumeric characters and therefore, if the string is not replaced in its entirety, the masked values will be saved as Xs.
Note: If both the property and the central database are located in Korea, OXI and OXI-HUB will handle the encryption process when transferring data between the two databases so that the data cannot be viewed when transferred. If one database is located in Korea and the other is located outside, OXI will only pass non-encrypted data to the database outside Korea.
ID Issued Place. Enter the place where the identification was issued.
ID Type. Enter the type of identification. This field is required to be defined in the event that the property chooses to use the OPP_IDS ID Document Scanning PMS add on license and functionality. Also the ID Type Edit ellipsis button can be screen painted in which multiple types of identification can be attached to the profile along with scanned images. See Multiple IDs and Attachments Per Profile for details.
Internal Information. Label for the Internal Information section of the screen.
Legal Company. Enter the legal company to attach to the profile.
Name Keywords. Enter any keywords to associate to the name on the profile.
Participate In Market Research. Select the check box if the guest would like to participate in any market research.
Preferred Room. Enter the preferred room number for the profile.
Privacy. Select this check box to indicate that the guest wishes to maintain privacy. This field can also be screen painted on the Reservation screen. Changes made in one location will update the setting in other locations. This field may be used to indicate whether or not the guest wants to participate in mailings, surveys, email promotions, etc.
Receive Information From Third Parties. Select the check box if the guest would like to receive information from third parties.
Suffix. Enter the suffix for the guest's name.
Tax Category. Select an acceptable tax category for the individual.
Tax Office. Select the tax office location for the profile.
Tax Perc1 - Tax Perc5. Enter the tax percentage in the appropriate field.
Tax Type. Select the appropriate tax type to attach to the profile.
URL Button 1 - URL Button 2. When selecting this button, the user is taken to the URL address that has been configured for the button.
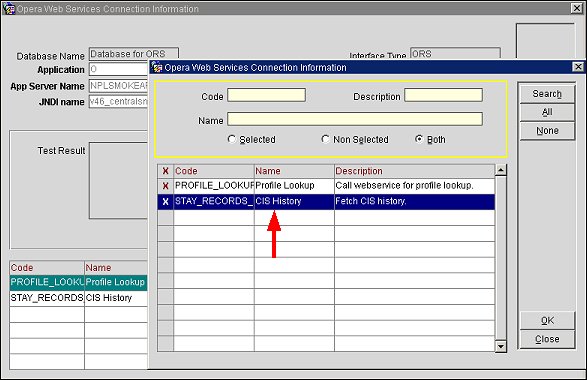
CIS History. In PMS, the profile must have a subscription with the OCIS system in order for information to be retrieved when this check box is selected. Select to display a grid detailing the stay history of the profile. This will display the property, confirmation number, arrival date, departure date, and record type for each stay. In an interfaced PMS/OCIS environment (PMS and OCIS are not in the same database), the number of stay records to fetch for the CIS stay history can be set in PMS using the Profiles > Settings > CIS HISTORY DOWNLOAD (COUNT) application setting.
Note: In the scenario of separate PMS and OCIS database implementation, a CIS History web service will be called to fetch a profile's stay history information when the CIS History check box is selected. The web service lookup will be available only if the web service has been setup for the database/interface type, and the profile has a subscription with the OCIS system. See External Database Setup topic for more information on setting up web services for a database/interface type.
Stay Statistics. Select to display information that only includes actual stays.
Rate Code. Displays a negotiated rate code, if any. This information comes directly from the negotiated rate codes entered using the Neg. Rates option from the Profile screen Options menu and a maximum of 150 active negotiated rates can be assigned to a profile per property.
Membership No. Displays a membership type and number, if any. Membership information comes directly from the Memberships entered using the Memberships option from the Profile screen Options menu.
AR Number. When the CASHIERING > ACCOUNT RECEIVABLES application function is set to Y, displayed is the accounts receivable number, if one has been assigned to this individual. (Select AR > Account Maintenance to add an AR account to a profile, or use the Stats & Info tab.
Last Room. The room in which the individual stayed during the last visit. (If the OPP_MHOT multi-property add-on license is active, this information is specific to the property selected in the Property field.)
Last Rate. The room rate for the individual's last stay. (If the OPP_MHOT multi-property add-on license is active, this information is specific to the property selected in the Property field.)
Note: If the RATES > MULTI CURRENCY application parameter is set to Y and rate codes are configured in various currencies, the rate amount displayed is based on the currency of the rate code.
Last Visit. The arrival date of the individual's last stay. (If the OPP_MHOT multi-property add-on license is active, this information is specific to the property selected in the Property field.)
When the PROFILES > SEARCH PANEL WITHIN PROFILE SEARCH application parameter is set to Y, the search grid shows profiles. To search for another profile, enter the last name or the first part of the last name in the Search Name field and select the Tab key.
Now when the RESERVATIONS > RESTRICT GUEST PROFILE LINK UPDATE application parameter is set to Y, the RESERVATIONS > GUEST PROFILE LINK UPDATE user permission can be granted. When this permission is granted to a user, they can link a new Individual Guest Profile to an In-House reservation at anytime during the reservations tenure at the property. But if the permission is not granted to the user, then they will not be able to link a new Individual Guest Profile to an In-House Reservation after the first End of Day procedure has been processed for the day the reservation Checked In as the grid is grayed-out (inactivated).
But when the PROFILES > SEARCH PANEL WITHIN PROFILE SEARCH application parameter is set to N, then this area becomes a Select Another Profile button. Selecting this button displays the Profile Search screen. Assuming the profile being viewed is an individual profile, then the select another profile will display the profile search screen for individuals. Should the profile being viewed be a group profile, selecting this button opens the group profile search screen.
Scan. With the activation of the OPP_IDS ID Document Scanning add-on license, a scanning vendor specified in the PROFILES > ID DOCUMENT SCANNING VENDOR application setting, and an installed ID Document scanner or swipe that matches the specified scanning vendor to the user’s workstation, an ID Document can be scanned/swiped via the Scan button. From the scan/swipe, this information will be automatically populated into the guest’s profile and depending on the value defined for the Profiles > ID Document Stored Image Type and the type of scanner being used, an image can be attached to the guests profile. See ID Document Scanning for details.
Options. Open the Profile Options menu.
Note: When the GENERAL > ENHANCED OPTIONS MANAGEMENT application parameter is set to Y, you have another way of quickly accessing options without selecting the Options button to open the Options menu itself. You can press Ctrl+T to display the blue Option field.
To view all the available options in alphabetical order, scroll through the options list by selecting the Up and Down arrow keys. Press Enter to select the displayed option and open the corresponding option screen. Or, instead of scrolling through the options list, type the first three letters of the desired option. The corresponding options screen appears. (For example, type c-a-n for Cancel.)
You may also enter the first letter of the desired option and all options beginning with that letter will appear in alphabetical order as you scroll. To scroll, use the arrow keys or repeatedly press the beginning letter key. For example, if you typed a-a-a-a you might scroll through the options of Accompanying, Add on, Agent/Company, Alerts. Press Enter to open the desired option.
New. Create a new profile. The default profile type is the current profile type.
Save/OK. Select the Save button to save your changes without leaving the Profile screen. Select OK to save your changes and go to one of the following:
Search. Display the Profile Search screen to search for another profile of the same profile type as the profile displayed.
Group profiles are created to handle group events (for example, conventions, meetings, parties, or weddings). A group profile is distinguished from a company profile in that groups usually book for a specific time period and do not have an ongoing (year to year) relationship with the property or chain.
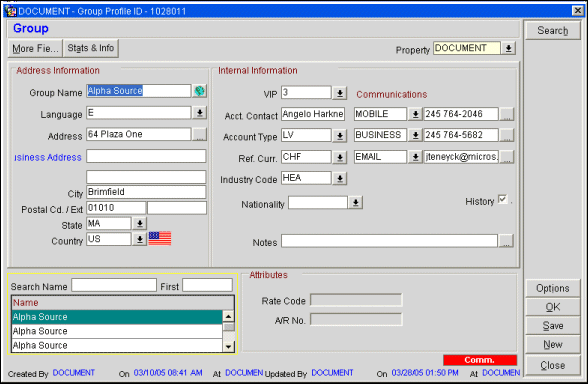
Use the Profile screen to enter demographic information about the group. To create a profile you need, at a minimum, the group name. Gather as much other information as possible or as directed by management. Note that you can enter multiple addresses, telephone numbers, and notes.
Note: When creating a new Group Profile, the system automatically generates Group Profile Client IDs if these application settings are activated: Global > Profiles > Parameters > AUTO GENERATE CLIENT ID = Y and Global > Profiles > Settings > GENERATE ID FOR PROFILE TYPES: G – Group. After a new Group Profile is created, you may scroll to the right on the Profile Search Screen to view the new Client ID.
Property. Select the down arrow to choose the property to see this profile's property-specific information. Property-specific information may include Owner, Rate Code and AR Number. Your login property is displayed by default. (This feature is available if the OPP MHOT Multi-property add-on license or if OPR<version number>ORS license code is active.)
Group Name. Enter the name of the group. It can be any name. A shortened version of the full name is popular.
Language. Select the down arrow and choose the group's preferred correspondence language. A default correspondence language was established for your property during set up.
Address Information. Enter the group's address (mailing address, city, postal code and extension, country, and state). You may select the ellipsis button to open the Address list to create multiple addresses. (See Addresses for details.) If multiple addresses are created, select one as the primary address. The primary address displays on the Profile screen with the address type (shown in blue: for example, Home Address, Business Address) next to it. The default primary address type is set by the PROFILES > COMPANY ADDRESS TYPE application setting.
Address. Enter the street address.
City. Enter the city portion of the address.
Postal Code. Postal code portion of the address.
State/Province. Select the down arrow to choose the state or province portion of the address, if applicable.
Country. Select the down arrow to choose the country portion of the address. If an ISO country code is associated with the country code you select here, the appropriate national flag image will appear next to the Country field and list of values down arrow, if this option has been configured (see Countries for details).
Note: If the PROFILES > QUICK ADDRESS application function is set to Y, entering the Country and the Postal Code information will auto-fill the State and City fields for US and selected other addresses.
Replace Address. This check box is screen painted in PMS. When a user adds or modifies an address or communication type on an existing profile, selecting this check box indicates to the system that the user made intentional changes. This check box transfers to and from external systems such as PMS and ORS, via OXI-HUB, indicating on various screens that the user made address or communication changes to the profile. For example, if a profile had an address modified in PMS and the user selected the Replace Address check box, when uploaded to ORS the Profile Screen in ORS would also have this check box marked. (Once the address and/or communication type has been transferred, the check box no longer remains flagged at the originating Profile Screen.) This check box can also display on the first panel of the Suspended Profiles - Three Panel Merge Screen.
The resulting profile address/communication type changes depend upon the OXI-Profiles Interface parameter of Update Primary - whether it is set for ENABLED, DISABLED, or REPLACE (see OXI_PROFILE Parameters in OXI_HUB). This parameter allows you to decide what address and communication type will be designated as Primary upon sending a profile to ORS.
Cleansed. Available if an external address cleansing interface is licensed (e.g., the OPP_ADDO Address Doctor Interface) and the PROFILE > ADDRESS CLEANSING application parameter is set to Y. Address validation may be applied to the profile address information when the profile is created or when the address is edited. This check box is automatically selected once the address has been validated. To re-validate an address change, edit the appropriate address elements and un-check the Cleansed check box. The address will be validated when you select the Save or OK button. See Address Doctor Setup and Address Cleansing Result for details.
Protected. This field is screen painted and is available when the OPR<version number>ORS license code is active. Select CENTRAL from the LOV if you want to protect this profile from changes made at the PMS property level (details are explained below). When this profile is saved after CENTRAL Protect has been selected, the profile is identified with a green label "Protected." This green Protected label also appears on the PMS Profile screen.
VIP. Select the down arrow to open the VIP list of values and select a VIP status level, if any. (This feature is available if the PROFILES > VIP application function is set to Y.)
Account Contact. The person designated as a contact for this group. (This feature is available if the PROFILES > CONTACTS application function is set to Y.)
Account Type. Account types may be used to classify statistical information such as revenue and room nights by the type of business (for example, local or international). Select the down arrow to choose an account type. Account type codes are defined by each property or property chain. See Account Types for details.
Ref. Curr. Currency that will be used to produce the group's billings and statements. The property's local currency is the default currency. If the group prefers billing and invoicing in another currency, select the down arrow and choose that currency from the list of values. (This feature is available when the GENERAL > MULTICURRENCY application function is set to Y.)
Industry Code. Select the down arrow to choose the industry classification to which this group belongs. Industry codes are defined by each property or property chain. See Industry Codes for details. (This feature is available when the OPS <version number> Sales & Catering license code is active.)
Owner. Sales manager responsible for this account. Open the sales manager drop down list and select a sales manager code. Sales manager codes are defined by each property or property chain. The description of the code appears to the right of the field. See Ownership for details. (This feature is available when the GENERAL > OWNER application parameter is set to Y.)
Notes. Select the ellipsis button to add notes to the profile. Notes can be of any of several kinds (e.g., General, Reservation, Background, Employee, etc.). The newest General- type note to be added is displayed on the Profile screen. See Profile Notes for details. (Profile note types are configured in System Configuration > Setup > Note Types.) Should notes/comments be added to an existing reservation through Reservation > Update Reservation > Profile > Options > Notes, the notes/comments added for the existing reservation will not be seen when returning to the Reservation screen.
Use these fields to enter telephone numbers, email addresses and/or web addresses for the profile. Select the down arrow to choose the type of communication (e.g., Home Phone, Business Phone, Cell Phone, Fax, Email, Web, etc.). Then type the address in the field to the right. To add multiple communication addresses of a type (e.g., two business phone numbers or two email addresses), select the ellipsis button. Only one communication address belonging to each communication role (i.e., phone, fax, email and web page) may be designated as a primary communication address. For example, even though there are three business and home voice phone numbers for an individual, only one can be the primary phone number if all are assigned to the phone role. (See Communication Information for details on roles and primary communication addresses.)
Phone Number. Enter the phone number for the profile. When the OPR<version number>ORS license code and OPI<version number>OCIS license code is active, you have the option to define the minimum amount of digits that will be allowed for the phone number in PMS before it will be uploaded to ORS/OCIS. If the minimum amount of digits is not met when adding/modifying a phone number in PMS, the phone number will not be transferred to ORS/OCIS. If the minimum amount of digits is met, the phone number will be transferred from PMS to ORS/OCIS. The minimum phone length is set up in OXI-HUB (Interface Configuration > Interface Parameters > OXI_PROFILES > MIN PHONE LENGTH). The default value is 6 digits. If the value is set for less than 5, more matches will result during the ORS Match & Merge process. See OXI_PROFILE Parameters in OXI-HUB for more information.
History. Select this check box to save this profile from being purged according to the criteria used by the purge routine to remove inactive profiles from the database. By default, this checkbox is not selected when creating a new profile.
Note: To make this check box selected by default, select Configuration > Setup > Screen Design > Field Defaults to access the Field Defaults Maintenance screen. In the Screen Name field, select Individual/Group, and then select the New button to access the Field Maintenance Details screen. Select "Keep History" in the Field Name field, select "Y" in the Field Value field, and select the OK.
See Group Profile Screen Painting Elements for details.
Addr. Language. Select the language for the address information.
Address Type. Select the type of address being used for the profile.
Alt. Language. Select an alternate language to use with the profile.
Alt. Name. Enter an alternate name to use for the group profile.
Note: When the OPR_<version number> OPERA Reservation System license is active, the GENERAL > ALTERNATE NAME application function is set to Y, and the GENERAL > AUTO ALTERNATE NAME TRANSLATE application parameter is set to Y, when creating a new profile the cursor is automatically defaulted to the Alt. Name field. When editing a profile, alternate names will automatically be translated into English and auto-populated into the First and Name fields. For translating from double byte characters to English, this feature requires all the expected characters to have an accurate translation in configuration (Setup > System Configuration > Profile > External IFC > Character Conversion). If the character conversion is not properly configured or does not exist or the alternate name lacks special characters, English will be copied to English.
Birth Country. Select the country of birth for the profile.
Birth Place. Enter the place of birth for the profile.
Central A/R No. Accounts receivable number assigned to this profile at the CRO level. (This feature is available if the OPR <version number> ORS license code is active.)
Country. Select the country for the profile.
Credit Rating. (ORS Only) Select the Credit Rating to attach to the profile. When a credit rating is selected for a profile, a credit rating deposit and cancellation rule will now apply anytime that this guest makes a reservation. See Credit Ratings for details.
CRS ID. Identification number for the central reservation system.
Direct Bill Batch Type. Available when the Cashiering > Direct Bill Batch Folios function is set to Y, select the batch type to be associated with a profile to allow batch printing of folios for direct bill guests based on the type assigned to the profile and on when the direct bill batch folios were last printed.
IATA Corp. ID. When the PROFILES > IATA YN application parameter is set to Y, this field displays the IATA corporate ID number for the group.
Internal Information. Label for the Internal Information section of the screen.
Legal Company. Enter the legal company for the group profile.
Nationality. Select the nationality code for the group.
Passport. Enter any passport information.
Note: By default, Passport Number and ID Number information is masked with X's except for the last two characters. If you have Profiles > View Sensitive Information on Profile permission, you may double-click on the field to see this information in clear text. When updating ID and Passport numbers with masked values, the user is expected to replace the entire string rather than parts and pieces of the masked value. This is because these fields accommodate alphanumeric characters and therefore, if the string is not replaced in its entirety, the masked values will be saved as X's.
PMT. Due Days. Enter the number of days before the payment is due.
Profession. Enter the profession to associate to the group profile.
Tax Category. Select an acceptable tax category for the individual.
Tax Office. Select the tax office location for the profile.
Tax Perc1 - Tax Perc5. Enter the tax percentage in the appropriate field.
Tax Type. Select the appropriate tax type to attach to the profile.
URL Button 1 - URL Button 2. When selecting this button, the user is taken to the URL address that has been configured for the button.
Rate Code. Negotiated rate code, if any applies to this group. This information comes directly from the negotiated rate codes entered using the Neg. Rates option from the Profile screen Options menu and a maximum of 150 active negotiated rates can be assigned to a profile per property.
AR Number. When the CASHIERING > ACCOUNT RECEIVABLES application function is set to Y, displayed is the accounts receivable number, if one has been assigned to this individual. (Select AR > Account Maintenance to add an AR account to a profile, or use the Stats & Info tab.
Central AR No. Accounts receivable number assigned to this profile at the CRO level. (This feature is available if the OPR <version number> ORS license code is active.)
The search grid only shows profiles of the profile type currently displayed. To search for another profile of the same profile type, enter the last name or the first part of the last name in the Search Name field and select the tab key.
Options. Open the Profile Options menu.
Note: When the GENERAL > ENHANCED OPTIONS MANAGEMENT application parameter is set to Y, you have another way of quickly accessing options without selecting the Options button to open the Options menu itself. You can press Ctrl+T to display the blue Option field.
New. Create a new profile. The default profile type is the current profile type.
Save/OK. Select the Save button to save your changes without leaving the Profile screen. Select OK to save your changes and go to one of the following:
Search. Display the Profile Search screen to search for another profile of the same profile type as the profile displayed.
This profile is used for businesses with which the property has commercial dealings. This category might include businesses who sponsor guests, businesses for which your property handles events, or companies who directly provide products or services to your property or chain. Sources (of business) and travel agents are special kinds of businesses that have their own profile types, although in all essential respects source and travel agent profiles are identical to the company profile type. For this reason, you will see the title "Account" on the profile screen of a profile belonging to a company, an agent, or a source.
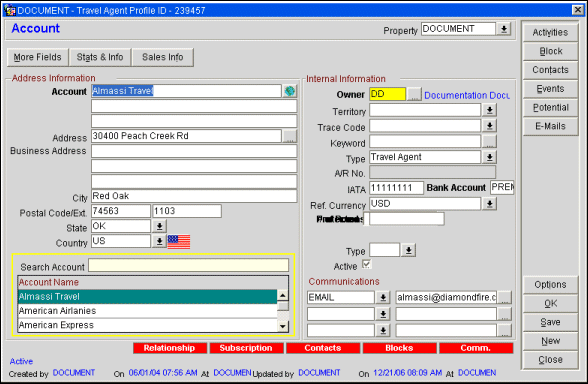
Use the Profile screen to enter demographic information about the account. To create a profile you need, at a minimum, the account name. Gather as much other information as possible or as directed by management. Note that you can enter multiple addresses, telephone numbers, and notes.
Protected. This field is screen painted and is available when the OPR<version number>ORS license code is active. Select CENTRAL from the LOV if you want to protect this profile from changes made at the PMS property level (details are explained below). When this profile is saved after CENTRAL Protect has been selected, the profile is identified with a green label "Protected." This green Protected label also appears on the PMS Profile screen.
Tip: When the PROFILES > UPDATE PROFILE PROTECTION permission is granted, the Protected field can be unlocked for editing by holding Ctrl+Shift while double clicking in the field. When the Protected field is unlocked, an "Unlocked" label will be displayed in blue at the top of the screen next to the "Protected" label. Users can then either modify or enter new information in the field. The Protected field will only become locked again when new information is typed into the field and the Profile screen is saved and closed. When reopening the Profile, the Protected field must be unlocked again before it can be edited.
Note: When the profile is protected by OPERA or CENTRAL, it is changeable as normal without any permissions.
Property. Select the down arrow to choose the property to see this profile's property-specific information. Property-specific information may include details such as Owner and AR Number and negotiated rates, as well as the information displayed on the Stats & Info tab. Your login property is displayed by default. (This feature is available if the OPP_MHOT multi-property add-on license or if OPR<version number>ORS license code is active.)
Account. Enter the account name. Three lines are available to add additional name information such as the name of the division. Only the information entered on the first line may be used when searching for this account by name. Select the globe button next to this field to enter an alternative name for the profile. See Alternative Name for more information.
Address Information. Enter the account's address (mailing address, city, postal code and extension, country, and state). You may select the ellipsis button to open the Address list to create multiple addresses. (See Addresses for details.) If multiple addresses are created, select one as the primary address. The primary address displays on the Profile screen with the address type (shown in blue: for example, Home Address, Business Address) next to it. The default primary address type is set by the PROFILES > COMPANY ADDRESS TYPE application setting.
Address. Enter the street address.
City. Enter the city portion of the address.
Postal Code. Postal code portion of the address.
State/Province. Select the down arrow to choose the state or province portion of the address, if applicable.
Country. Select the down arrow to choose the country portion of the address. If an ISO country code is associated with the country code you select here, the appropriate national flag image will appear next to the Country field and list of values down arrow, if this option has been configured (see Countries for details).
Note: If the PROFILES > QUICK ADDRESS application function is set to Y, entering the Country and the Postal Code information will auto-fill the State and City fields for US and selected other addresses.
Replace Address. This check box is screen painted in PMS. When a user adds or modifies an address or communication type on an existing profile, selecting this check box indicates to the system that the user made intentional changes. This check box transfers to and from external systems such as PMS and ORS, via OXI-HUB, indicating on various screens that the user made address or communication changes to the profile. For example, if a profile had an address modified in PMS and the user selected the Replace Address check box, when uploaded to ORS the Profile Screen in ORS would also have this check box marked. (Once the address and/or communication type has been transferred, the check box no longer remains flagged at the originating Profile Screen.) This check box can also display on the first panel of the Suspended Profiles - Three Panel Merge Screen.
The resulting profile address/communication type changes depend upon the OXI-Profiles interface parameter of Update Primary - whether it is set for ENABLED, DISABLED, or REPLACE (see OXI_PROFILE Parameters in OXI_HUB). This parameter allows you to decide what address and communication type will be designated as Primary upon sending a profile to ORS.
Cleansed. Available if an external address cleansing interface is licensed (e.g., the OPP_ADDO Address Doctor Interface) and the PROFILE > ADDRESS CLEANSING application parameter is set to Y. Address validation may be applied to the profile address information when the profile is created or when the address is edited. This check box is automatically selected once the address has been validated. To re-validate an address change, edit the appropriate address elements and un-check the Cleansed check box. The address will be validated when you select the Save or OK button. See Address Doctor Setup and Address Cleansing Result for details.
Owner. Sales manager responsible for this account. Open the sales manager drop down list and select a sales manager code. Sales manager codes are defined by each property or property chain. The description of the code appears to the right of the field. See Ownership for details. (This feature is available when the GENERAL > OWNER application parameter is set to Y.)
Territory. Select the down arrow to choose the sales territory to which this account belongs. Territory codes are defined by each property or property chain. See Territory Codes for details. (This feature is available when the OPS <version number> Sales & Catering license code is active.)
Trace Code. Select the down arrow to choose a trace code for this account. Traces may be used to automatically generate activities based on defined conditions, such as a change to a specific profile data field. See Traces Definition for details. (This feature is available when the OPS <version number> Sales & Catering license code is active.)
Keyword. Select the ellipsis button to choose the type of keyword you wish to enter and the keyword value. You may enter one keyword for each available keyword type. Keywords can be used to search for the profile and as a filter for reporting. A shortened version of the account name, or a version of the name that is likely to be used for searching, is a popular use of the keyword. See Keywords for details. (This feature is available if the PROFILES > KEYWORD application function is set to Y.)
Type. Select a profile type for this account. Options include: Company, Travel Agent, Source, and Vendor. An account's Type may not be changed if any of the following conditions is true:
AR Number. When the CASHIERING > ACCOUNT RECEIVABLES application function is set to Y, displayed is the accounts receivable number, if one has been assigned to this individual. (Select AR > Account Maintenance to add an AR account to a profile, or use the Stats & Info tab.
Note: When the CASHIERING > ALLOW DUPLICATE AR NUMBERS application parameter is set to Y, the same AR number can be entered on multiple AR accounts. This parameter is only displayed when the AR > AUTOMATICALLY ASSIGN AR NUMBER application parameter is set to N.
Central AR No. Accounts receivable number assigned to this profile at the CRO level. (This feature is available if the OPR <version number> ORS license code is active.)
Corporate ID. An identification number assigned by the property or chain to uniquely identify this company. If the OPR <version number> ORS license code is active, a parameter can be set that allows duplicate Corporate, Travel Agent, and Source IDs to be entered. The parameter can be accessed through Application Settings > Global > Profiles > Parameters > ALLOW DUPLICATE ID'S.
IATA. If the profile type is Travel Agent, the agent IATA (International Association of Travel Agents) number. If the OPR <version number> ORS license code is active, a parameter can be set that allows duplicate Corporate, Travel Agent, and Source IDs to be entered. The parameter can be accessed through Application Settings > Global > Profiles > Parameters > ALLOW DUPLICATE ID'S. Additionally, in ORS, another parameter called IATA OVERRIDE allows invalid IATA numbers to be entered. To provide flexibility, invalid IATA numbers can be entered on the Travel Agent Profile/Account screen. When the appropriate application setting parameters are set, properties can create local Travel Agents that do not have valid IATA numbers and these numbers will be accepted by OPERA. Access the parameters by selecting Application Settings > Profiles > Parameters > IATA YN and IATA OVERRIDE.
If IATA YN is set to Y, an IATA number must be attached to the Travel Agent or Source profile in order to pay the commission. Selecting N will allow commission payments to Travel Agent or Source profiles without an IATA number.
IATA Override (appears when IATA YN is set to Y).
When this parameter is enabled (Y), the user is able to override IATA validation and enter an invalid IATA number after the system gives a visible warning.
IATA Number Scenarios
There are three possible scenarios when entering an IATA Number:
Type. Select the down arrow to choose the IATA or company type. See Company Type for details. (This feature is available to the right of the Corporate ID field or the IATA field if the Profiles > IATA COMPANY TYPE application function is set to Y.)
Notes. Select the ellipsis button to add notes to the profile. Notes can be of any of several kinds (e.g., General, Reservation, Background, Employee, etc.). The newest General-type note to be added is displayed on the Profile screen. See Profile Notes for details. (Profile note types are configured in System Configuration > Setup > Note Types.) Should notes/comments be added to an existing reservation through Reservation > Update Reservation > Profile > Options > Notes, the notes/comments added for the existing reservation will not be seen when returning to the Reservation screen.
Ref. Curr. (This feature is available when the GENERAL > MULTICURRENCY application function is set to Y) Currency that will be used to produce the account's billings and statements. The property's local currency is the default currency. If the account prefers billing and invoicing in another currency, select the down arrow and choose that currency from the list of values.
Active. Select this check box if the account is active (this is the default). To make the account inactive, un-select the check box. It is usually preferable to make an account inactive rather than deleting it (by selecting the Delete button from the Profile Options menu). You may not delete an account that has "child records" (for example, active contacts or business blocks). See Deleting an Account for details.
From the Address Information and Internal Information sections of the Profile screen, the following fields are used for specific vendor functionality (such as PBX, Video System, Web Access) and can be sent to the vendor through an interface at the time a reservation is checked in or when changes are made to the fields during a reservation stay.
Use these fields to enter telephone numbers, email addresses and/or web addresses for the profile. Select the down arrow to choose the type of communication (e.g., Home Phone, Business Phone, Cell Phone, Fax, Email, Web, etc.). Then type the address in the field to the right. To add multiple communication addresses of a type (e.g., two business phone numbers or two email addresses), select the ellipsis button. Only one communication address belonging to each communication role (i.e., phone, fax, email and web page) may be designated as a primary communication address. For example, even though there are three business and home voice phone numbers for an individual, only one can be the primary phone number if all are assigned to the phone role. (See Communication Information for details on roles and primary communication addresses.)
Phone Number. Enter the phone number for the profile. When the OPR<version number>ORS license code and OPI<version number>OCIS license code is active, you have the option to define the minimum amount of digits that will be allowed for the phone number in PMS before it will be uploaded to ORS/OCIS. If the minimum amount of digits is not met when adding/modifying a phone number in PMS, the phone number will not be transferred to ORS/OCIS. If the minimum amount of digits is met, the phone number will be transferred from PMS to ORS/OCIS. The minimum phone length is set up in OXI-HUB (Interface Configuration > Interface Parameters > OXI_PROFILES > MIN PHONE LENGTH). The default value is 6 digits. If the value is set for less than 5, more matches will result during the ORS Match & Merge process. See OXI_PROFILE Parameters in OXI-HUB for more information.
See Company Profile Screen Painting Elements, Source Profile Screen Painting Elements, Travel Agent Profile Screen Painting Elements for details.
Address Information. Title field to be used as the address information section of the screen.
Account Phone 1-3. Enter the phone number for the type of phone.
Account Phone Type 1-3. Select the type of phone to use for the account and up to 3 different types of phones can be selected.
Address Type. This field allows for manual entry of the type of address.
Address Type Description. This field allows for the manual entry of the description for the type of address.
Allow Phone. Check box that if selected the profile will accept phone calls.
Allow SMS. Check box that if selected the profile will accept text messages.
Alt. Language. Alternate language to use for the account.
Alt. Name. Alternate name to use for the account.
Note: When the OPR_<version number> OPERA Reservation System license is active, the GENERAL > ALTERNATE NAME application function is set to Y, and the GENERAL > AUTO ALTERNATE NAME TRANSLATE application parameter is set to Y, when creating a new profile the cursor is automatically defaulted to the Alt. Name field. When editing a profile, alternate names will automatically be translated into English and auto-populated into the Account Name field. For translating from double byte characters to English, this feature requires all the expected characters to have an accurate translation in configuration (Setup > System Configuration > Profile > External IFC > Character Conversion). If the character conversion is not properly configured or does not exist or the alternate name lacks special characters, English will be copied to English.
Communications. Title field to be used for the Communications section of the screen.
Internal. Title field to be used for the Internal information section of the screen.
Language. Select the language to be used with the account.
Payment. Method of payment used for the profile.
Pmt. Due Days. Number of days that the payment is due.
Tax Category. Displays a list of acceptable tax categories for the account.
Tax ID - Tax ID2. Tax identification numbers to use for the account.
Tax Office. Displays a list of acceptable tax office locations.
Tax Type. Available when the CASHIERING > TAX TYPES application function is set to Y, select to calculate taxes based on prices. Properties that want the ability to calculate taxes on transaction codes based on either the guest's profile tax type status.
Tax Perc1 - Perc5. Tax percentage fields used for the account.
URL Button 1 & 2. Selecting the button will display the URL address that has been configured for the button.
VIP. When the PROFILES > VIP application function is set to Y, select the down arrow to open the VIP list of values and choose a VIP status level, if applicable.
Options. Open the Profile Options menu.
Note: When the GENERAL > ENHANCED OPTIONS MANAGEMENT application parameter is set to Y, you have another way of quickly accessing options without selecting the Options button to open the Options menu itself. You can press Ctrl+T to display the blue Option field.
New. Create a new profile. The default profile type is the current profile type.
Save/OK. Select the Save button to save your changes without leaving the Profile screen. Select OK to save your changes and go to one of the following:
Activities. Display the Activity Search screen showing all activities for this account. You may open the activities or create new activities for this account.
Block. Display the Business Block Search screen showing all blocks for this account. You may open the blocks or create new blocks for this account.
Contacts. Display the Contact Search screen showing all contacts associated with this account. You may open the contact profiles or create new contacts for this account.
Events. Display the Event Search screen showing all events that are associated with this account. You may open the Events screen for any of the listed events. If no business blocks are associated with the account, the Business Block Search screen appears and you may create a business block and events if you wish. (This feature is available if the OPS <version number> Sales & Catering license code is active.)
Potential. Display the Potential Search screen showing all potentials associated with this account. You may open the Potential screen for any of the listed potentials or create new potentials for this account. (This feature is available if the OPS <version number> OPERA Sales & Catering license code is active or the GENERAL > POTENTIAL application function is set to Y.)
An individual profile may be associated with another type of profile — the contact profile. (The Contacts feature is available if the PROFILES > CONTACTS application function is set to Y.) As a contact, the individual profile can take on another role in which it is linked with one or more accounts in a "relationship." (You may set up relationships for a profile by selecting the Profile screen Options menu Relationship button.) For example, a relationship may be set up between an individual and his or her company such that the company is the employer of the individual and the individual becomes a contact for the company.
Note: When the PROFILES > ADDRESS TYPE DEFAULT application setting is set to Default or does not have a value defined, then the PROFILES > CONTACT ADDRESS TYPE application setting will be used to specify the default address type to display. If an address type is not specified for the PROFILES > CONTACT ADDRESS TYPE application setting, then the address type specified as the Primary is displayed.
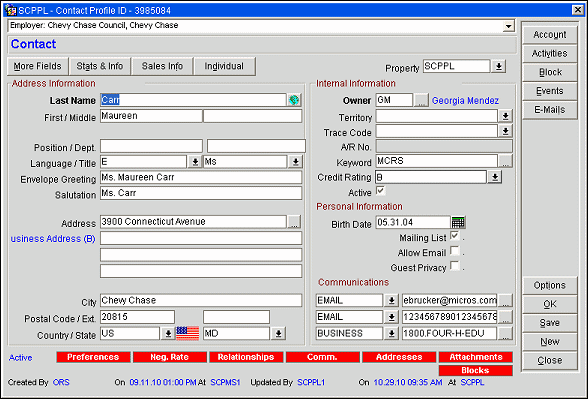
When the Contact check box on the individual profile is selected, the profile is designated as a contact. The Contact tab becomes active and you may supply specific details about the individual in his or her role as a contact.
Note: You may also create a contact profile directly, without working from the individual profile. For example, from the Profile Search screen you can select the New button, then choose Contact when presented with the profile type choices.) In this case, an individual profile is automatically created to "back up" the contact profile you create, and an Individual tab automatically appears on the contact Profile screen.
The field at the top of the screen shows the primary account with which the contact is associated, if one has been designated. The primary account is selected from the Contact Relations screen (select the Relationship button on the Contact Options menu). If there are multiple accounts, select the drop down arrow to see a list. Contact information is autofilled from the individual profile screen.
See Contact Tab for details on the contact profile.
See Sales Info for details on the contact profile Sales Info tab. Sales Info screen is Screen Paintable (See Screen Painting for details).
Replace Address. This check box is screen painted in PMS. When a user adds or modifies an address or communication type on an existing profile, selecting this check box indicates to the system that the user made intentional changes. This check box transfers to and from external systems such as PMS and ORS, via OXI-HUB, indicating on various screens that the user made address or communication changes to the profile. For example, if a profile had an address modified in PMS and the user selected the Replace Address check box, when uploaded to ORS the Profile Screen in ORS would also have this check box marked. (Once the address and/or communication type has been transferred, the check box no longer remains flagged at the originating Profile Screen.) This check box can also display on the first panel of the Suspended Profiles - Three Panel Merge Screen.
The resulting profile address/communication type changes depend upon the OXI-Profiles interface parameter of Update Primary - whether it is set for ENABLED, DISABLED, or REPLACE (see OXI_PROFILE Parameters in OXI_HUB). This parameter allows you to decide what address and communication type will be designated as Primary upon sending a profile to ORS.
Protected. This field is screen painted and is available when the OPR<version number>ORS license code is active. Select CENTRAL from the LOV if you want to protect this profile from changes made at the PMS property level (details are explained below). When this profile is saved after CENTRAL Protect has been selected, the profile is identified with a green label "Protected." This green Protected label also appears on the PMS Profile screen.
Details: When the profile is Central Protected, only certain changes can be made at the PMS property level, such as negotiated rates, comments, or preferences. These changes are uploaded to ORS (and MyFidelio, if configured) and sent back to PMS where this information is overwritten. ORS and PMS profiles contain the same information. When the PROFILES > FULL PROTECTION application parameter is set to N, changes cannot be made at the PMS property level to protected fields, such as the Last Name, First Name, Company, Address, Country, State, Communication Types, Name Code, VIP, or Profile Type. In PMS, an application setting is available that restricts any changes made to a Central Protected profile. The PMS application setting is PROFILES > PARAMETER > FULL PROTECTION = Y. When this parameter is activated, no changes at all can be made to the protected profile.
When the RESERVATION > RESERVATION CONTACT application function is set to Y, a Contact field displays on the Reservation screen. The list of values for this field displays all profiles (individual profile type, marked as a contact) that have been attached as relationships to any of the other company, travel agent or source profiles which are also attached to the reservation.
Example 1: Assume that Micros-Fidelio UK has two relationships attached: John Smith (an individual profile type marked as Contact) who is configured as an employee relationship, and Micros-Fidelio GmbH (a company profile type) which is configured as a company relationship. If the Micros-Fidelio UK profile is attached to a reservation the list of values on the Reservation Contact field displays John Smith because he is designated as a contact. The list of values displays the profile name (first and last), and allows you to select the role of the contact (e.g., Reservation Contact, Billing Contact) for the reservation.
The list of values displays all contacts (individual profiles which have the Contact check box selected) associated with the Company, Agent, Group, or Source named on the reservation. You can select one Reservation Contact and one Billing Contact (select the same contact to be both Reservation and Billing Contact if necessary) from among all the contacts listed. Contacts can be used for registration cards, confirmation letters, and guest folios.
Example 2: Assume Dee Wells is a guest staying at the property as an employee of ABC Company. In the Reservation screen ABC is attached in the Company field. Bill Brown is a contact for ABC and is attached to the reservation as Billing Contact. When the Confirmation screen appears, both Dee Wells and Bill Brown are listed as eligible to receive confirmation letters. In addition, routing instructions are set up so that the guest, Dee Wells, is responsible for all incidental charges (e.g., telephone, minibar and beverages) on Folio 1, and ABC is responsible for room charges on Folio 2. Folio 1 displays the guest's name (Dee Wells) and the guest's address. Folio 2 displays the company's name and address, and the Billing Contact, Bill Brown, associated with the company.
The Contact field on the Reservation screen is highlighted in yellow to alert the users when there are different contacts for billing and reservation. If multiple contacts are associated with the reservation the sequence displayed in the Contact list of values is Guest, Company, Travel Agent, Source, Group.
See Reservation/Billing Contacts for further details on setting up contacts.
Address Information. Enter the account's address (mailing address, city, postal code and extension, country, and state). You may select the ellipsis button to open the Address list to create multiple addresses. (See Addresses for details.) If multiple addresses are created, select one as the primary address. The primary address displays on the Profile screen with the address type (shown in blue: for example, Home Address, Business Address) next to it. The default primary address type is set by the PROFILES > COMPANY ADDRESS TYPE application setting.
Address. Enter the street address.
City. Enter the city portion of the address.
Postal Code. Postal code portion of the address.
State/Province. Select the down arrow to choose the state or province portion of the address, if applicable.
Country. Select the down arrow to choose the country portion of the address. If an ISO country code is associated with the country code you select here, the appropriate national flag image will appear next to the Country field and list of values down arrow, if this option has been configured (see Countries for details).
Note: If the PROFILES > QUICK ADDRESS application function is set to Y, entering the Country and the Postal Code information will auto-fill the State and City fields for US and selected other addresses.
Replace Address. This check box is screen painted in PMS. When a user adds or modifies an address or communication type on an existing profile, selecting this check box indicates to the system that the user made intentional changes. This check box transfers to and from external systems such as PMS and ORS, via OXI-HUB, indicating on various screens that the user made address or communication changes to the profile. For example, if a profile had an address modified in PMS and the user selected the Replace Address check box, when uploaded to ORS the Profile Screen in ORS would also have this check box marked. (Once the address and/or communication type has been transferred, the check box no longer remains flagged at the originating Profile Screen.) This check box can also display on the first panel of the Suspended Profiles - Three Panel Merge Screen.
The resulting profile address/communication type changes depend upon the OXI-Profiles interface parameter of Update Primary - whether it is set for ENABLED, DISABLED, or REPLACE (see OXI_PROFILE Parameters in OXI_HUB). This parameter allows you to decide what address and communication type will be designated as Primary upon sending a profile to ORS.
Cleansed. Available if an external address cleansing interface is licensed (e.g., the OPP_ADDO Address Doctor Interface) and the PROFILE > ADDRESS CLEANSING application parameter is set to Y. Address validation may be applied to the profile address information when the profile is created or when the address is edited. This check box is automatically selected once the address has been validated. To re-validate an address change, edit the appropriate address elements and un-check the Cleansed check box. The address will be validated when you select the Save or OK button. See Address Doctor Setup and Address Cleansing Result for details.
Owner. Sales manager responsible for this account. Open the sales manager drop down list and select a sales manager code. Sales manager codes are defined by each property or property chain. The description of the code appears to the right of the field. See Ownership for details. (This feature is available when the GENERAL > OWNER application parameter is set to Y.)
Territory. Select the down arrow to choose the sales territory to which this account belongs. Territory codes are defined by each property or property chain. See Territory Codes for details. (This feature is available when the OPS <version number> Sales & Catering license code is active.)
Trace Code. Select the down arrow to choose a trace code for this account. Traces may be used to automatically generate activities based on defined conditions, such as a change to a specific profile data field. See Traces Definition for details. (This feature is available when the OPS <version number> Sales & Catering license code is active.)
Keyword. Select the ellipsis button to choose the type of keyword you wish to enter and the keyword value. You may enter one keyword for each available keyword type. Keywords can be used to search for the profile and as a filter for reporting. A shortened version of the account name, or a version of the name that is likely to be used for searching, is a popular use of the keyword. See Keywords for details. (This feature is available if the PROFILES > KEYWORD application function is set to Y.)
AR Number. When the CASHIERING > ACCOUNT RECEIVABLES application function is set to Y, displayed is the accounts receivable number, if one has been assigned to this individual. (Select AR > Account Maintenance to add an AR account to a profile, or use the Stats & Info tab.
Note: When the CASHIERING > ALLOW DUPLICATE AR NUMBERS application parameter is set to Y, the same AR number can be entered on multiple AR accounts. This parameter is only displayed when the AR > AUTOMATICALLY ASSIGN AR NUMBER application parameter is set to N.
Central AR No. Accounts receivable number assigned to this profile at the CRO level. (This feature is available if the OPR <version number> ORS license code is active.)
Notes. Select the ellipsis button to add notes to the profile. Notes can be of any of several kinds (e.g., General, Reservation, Background, Employee, etc.). The newest General-type note to be added is displayed on the Profile screen. See Profile Notes for details. (Profile note types are configured in System Configuration > Setup > Note Types.) Should notes/comments be added to an existing reservation through Reservation > Update Reservation > Profile > Options > Notes, the notes/comments added for the existing reservation will not be seen when returning to the Reservation screen.
Active. Select this check box if the account is active (this is the default). To make the account inactive, un-select the check box. It is usually preferable to make an account inactive rather than deleting it (by selecting the Delete button from the Profile Options menu). You may not delete an account that has "child records" (for example, active contacts or business blocks). See Deleting an Account for details.
Use these fields to enter telephone numbers, email addresses and/or web addresses for the profile. Select the down arrow to choose the type of communication (e.g., Home Phone, Business Phone, Cell Phone, Fax, Email, Web, etc.). Then type the address in the field to the right. To add multiple communication addresses of a type (e.g., two business phone numbers or two email addresses), select the ellipsis button. Only one communication address belonging to each communication role (i.e., phone, fax, email and web page) may be designated as a primary communication address. For example, even though there are three business and home voice phone numbers for an individual, only one can be the primary phone number if all are assigned to the phone role. (See Communication Information for details on roles and primary communication addresses.)
Phone Number. Enter the phone number for the profile. When the OPR<version number>ORS license code and OPI<version number>OCIS license code is active, you have the option to define the minimum amount of digits that will be allowed for the phone number in PMS before it will be uploaded to ORS/OCIS. If the minimum amount of digits is not met when adding/modifying a phone number in PMS, the phone number will not be transferred to ORS/OCIS. If the minimum amount of digits is met, the phone number will be transferred from PMS to ORS/OCIS. The minimum phone length is set up in OXI-HUB (Interface Configuration > Interface Parameters > OXI_PROFILES > MIN PHONE LENGTH). The default value is 6 digits. If the value is set for less than 5, more matches will result during the ORS Match & Merge process. See OXI_PROFILE Parameters in OXI-HUB for more information.
See Contact Profile Screen Painting Elements for details.
Address Information. Title field to be used as the address information section of the screen.
Account Phone 1-3. Enter the phone number for the type of phone.
Account Phone Type 1-3. Select the type of phone to use for the account and up to 3 different types of phones can be selected.
Address Type. This field allows for manual entry of the type of address.
Address Type Description. This field allows for the manual entry of the description for the type of address.
Allow Phone. Check box that if selected the profile will accept phone calls.
Allow SMS. Check box that if selected the profile will accept text messages.
Alt. Language. Alternate language to use for the account.
Alt. Name. Alternate name to use for the account.
Note: When the GENERAL > ALTERNATE NAME and GENERAL > AUTO ALTERNATE NAME TRANSLATE application functions are set to Y and the OPI<Version Number>OCIS license is active, all alternate names will automatically be translated into English and auto-populated into the First Name and Name fields. This occurs when a new profile is created or updated or when the Name fields are empty. For translating from double byte characters to English, this feature requires all the expected characters to have an accurate translation in configuration (Setup > System Configuration > Profile > External IFC > Character Conversion). If the character conversion is not properly configured or does not exist or the alternate name lacks special characters, English will be copied to English.
Birth Date. Enter the birth date of the contact.
Note: If your property is included in a database schema that has one or more properties in Korea (KR) country mode and you have initiated and completed the associated encryption process, Date of Birth information is masked with X's by default. In this situation, if you have PROFILES > VIEW SENSITIVE INFORMATION ON PROFILE permission, you may double-click on the field to see this information in clear text.
Note: If both the property and the central database are located in Korea, OXI and OXI-HUB will handle the encryption process when transferring data between the two databases so that the data cannot be viewed when transferred. If one database is located in Korea and the other is located outside, OXI will only pass non-encrypted data to the database outside Korea.
Communications. Title field to be used for the Communications section of the screen.
Folio Instructions. Instructions to display on the folio.
Internal. Title field to be used for the Internal information section of the screen.
Language. Select the language to be used with the account.
Payment. Method of payment used for the profile.
Pmt. Due Days. Number of days that the payment is due.
Tax Category. Displays a list of acceptable tax categories for the account.
Tax Office. Displays a list of acceptable tax office locations.
Tax Type. Available when the CASHIERING > TAX TYPES application function is set to Y, select to calculate taxes based on prices. Properties that want the ability to calculate taxes on transaction codes based on either the guest's profile tax type status.
URL Button 1 & 2. Selecting the button will display the URL address that has been configured for the button.
Options. Open the Profile Options menu.
Note: When the GENERAL > ENHANCED OPTIONS MANAGEMENT application parameter is set to Y, you have another way of quickly accessing options without selecting the Options button to open the Options menu itself. You can press Ctrl+T to display the blue Option field.
New. Create a new profile. The default profile type is the current profile type.
Save/OK. Select the Save button to save your changes without leaving the Profile screen. Select OK to save your changes and go to one of the following:
Account. Display the Profile screen for the primary account for which this profile is a contact.
Activities. Display the Activity Search screen showing all activities with which this contact is associated. You may open the activities or create new activities for this contact.
Block. Display the Business Block Search screen showing all blocks with which this contact is associated. You may open the blocks or create new blocks for this contact.
Events. Display the Event Search screen showing all events that are associated with this contact. You may open the Events screen for any of the listed events. If no business blocks are associated with the contact, the Business Block Search screen appears and you may create a business block and events if you wish. (This feature is available if the OPS <version number> Sales & Catering license code is active.)
By selecting the tabs displayed on the profile screen you may access additional information fields. Which other tabs actually appear on a Profile screen is determined by the type of profile. In addition:
Individual/Contact |
Company |
Travel Agent |
Source |
Group |
Sales Info (Screen Paintable) |
Sales Info (Screen Paintable) |
Sales Info (Screen Paintable) |
|
|
Sales Info (Screen Paintable) |
|
|
|
|
Owner Stats (When the OPV_<version number> OPERA Vacation Ownership System license is active and a contract is linked to the profile. |
|
|
|
|
Note: Properties may use the OPERA Screen Painter feature to add and modify fields on the main Profile screen and on the More Fields tab. This means that your Profile screen may include additional fields, restrictions on field use, different order of fields, and different layouts from those described here. See your manager if you have questions regarding specific changes made at your property.
Show Me
![]() Update Individual Profile After First Night Audit
Update Individual Profile After First Night Audit
See Also
|