
|
|
|
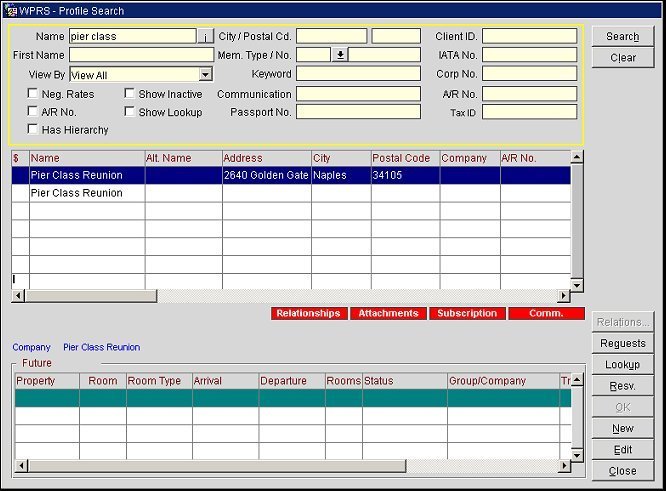
Profile Search Screen
OPERA uses profiles to store a host of details about the guests, companies, agents, business sources, contacts, and groups you do business with. A profile contains extensive demographic information (including name, mailing address, e-mail address, phone number, preferences, etc.) as well as reservation and stay histories and other statistical data. Having profile information on hand makes it easy to create reservations for guests, process commissions for agents, prepare billing statements, construct mailings, manage membership programs, collect accurate statistics, and perform many other OPERA tasks. In addition, you can specify relationships between profiles to identify their affiliations for marketing and business planning purposes. For example, a relationship might be identified between an individual and a company if that individual is an employee of the company. Further, from the Profile Search screen, you can search for profiles and determine which one will be used as the primary profile when merging profiles. See Merge Profile for more information.
External systems (databases) can be searched using a lookup web service. If the external system and property are configured to use the lookup web service, profile search can use the web service to simultaneously search multiple external sources for the profile. OPERA external systems can use the pre-defined lookup web services; however, other third-party external systems will have to write their web services based on the OPERA messaging specifications in order to call the lookup web service from their system.
See External Database Setup for more information on how to configure web services for external systems.
Note: The external system and its web services must be configured under PMS. The lookup web service using multiple external systems can be triggered by entering only the Membership Number as a search parameter.
To search for an existing profile or to create a new one, access the Profile Search screen:
The Profile Search screen also displays automatically at various points in the program where you must select an existing profile or create a new one as part of the activity you are performing. See the Profile Search screen below.
The Profile Search screen is divided into a search criteria section and a search results grid. Function buttons on the right let you manage your profile search, create and edit profiles, and perform other activities based on your profile selection.
Note: A Future Grid, showing a guest's future reservations, appears below the search results grid opens and displays future reservations for all profile types (Individual, Company, Travel Agent, Group, Source and Contact) as well as the default View By value of View All when the PROFILES > SHOW FUTURE RESERVATIONS Application Parameter is set to Y.
Note: If the RATES > MULTI CURRENCY application parameter is set to Y and rate codes are configured in various currencies, the rate amount displayed is based on the currency of the rate code.
Note: When performing Profile Merge, an identical screen appears from the Profile Search screen named Profile Search (Merge). The Profile Search (Merge) screen appears when a profile is highlighted and these buttons are selected: Edit > Options > Merge. See Profile Merge for more information.
Note: Please be aware that the maximum number of search results returned for any search is 1000 records.
Enter as many search criteria as you think necessary to narrow your search. Press the Enter key or select the Search button to initiate the search. Select the Clear button to remove all search criteria and enter new search options.
Note: When the application parameter under RESERVATIONS > ENHANCED PROFILE SEARCH is activated, the Profile Search screen will not appear when Save is selected. A third required profile field must be entered. For example, if the user enters the Last and First Names of the guest, the user will also need to enter either the City, Postal Code, or Phone Number. If three fields are not populated, the user will be prompted with the message, "Additional profile information required to search for existing profile."
Select the Advanced button to display additional profile search criteria. (Available when the OPR <version number> ORS license code is active.)
Name. Enter the individual's last name, or the first part of the last name. If you are searching for a company or agent type profile, enter the business name. To search for a partial name, use the % symbol along with the name to search for all profile containing that specific text in the profile name. The following displays how the % symbol can be used:
When the PROFILES > INCOGNITO application function is set to Y, the Incognito functionality can be applied to a guest. This functionality enables a guest to create a "fictitious" name and "fictitious" profile to use while dealing with a property. This hides the guest's true identity from the hotel personnel, unless permission has been granted to view it. If the permission has been granted, an i button displays next to the Last Name field on both the Profile Search and Profile screens. Selecting the i button will display or allow a search based on the guests true last and first name. The true name has to be entered into the profile screen, by selecting the i button, before it can be searched on from the Profile Search screen. This functionality is used for celebrities, so that news does not get out by the hotel personnel that a celebrity is staying at the property.
When the Profile Search Screen is accessed by creating a new AR Account from the AR > Account Maintenance > New, the AR Account that is selected in the AR Account Search Screen is automatically populated in this field. The new profile can then be attached to the AR Account or select the Clear button to clear out the Name field and create or search for another profile.
First Name. Enter the individual's first name.
View By. Select the down arrow and select a profile type. The default is View All profile types. For the correct profile to display in the search results, based on other search criteria entered, it may be necessary to select the specific profile type rather than View All.
City/Postal Code. Enter the profile's residential city location or postal code. The postal code may be searched in any of the following ways:
Mem. Type/No. In the Mem. Type field, enter the membership program type or select the down arrow to choose from a list of membership types. You may search for profiles using a name and a membership type, a membership number, or a combination of a membership type and membership number; you may not search for profiles based on the membership type alone.
When searching on a membership number enter the complete membership number in the No. field. When the Allow Card No. Override and Save Card Number History check boxes are selected on the Membership Types screen for the primary membership and a central profile is merged with a PMS profile (profiles have different primary membership numbers), users will be able to search for the merged profile using the discarded membership number.
If the guest has a membership card, position your cursor in the No. field and swipe the card. OPERA will populate this field with the membership number. In this case, a membership type is required in the Mem.Type field because the membership type is used as a filter and to determine the card's mag strip layout. If no Mem.Type has been entered, the default membership type (set using the PROFILES > DEFAULT MEMBERSHIP TYPE application setting), if available, is assumed.
Note: The lookup web service (profile lookup using multiple external systems) can be triggered using only the Membership Number as a search parameter.
Keyword. Enter all or the first part of any keyword that is associated with the profile you are seeking. For example, if your property uses Social Security Numbers as keywords, you could enter the Social Security Number (or the first few digits of the Social Security Number) of the individual you are looking for. See Keyword Types for details on setting up keywords. (This feature is available if the PROFILES > KEYWORD application function is set to Y.)
Communication. Use this field to search by any communication type (e.g., Phone, Fax, Email) associated with the guest's profile.
Passport No. Enter a full passport number to filter search results by passport number.
Client ID. Enter all or the first part of the unique identification number assigned to this profile by a chain or property. (When searching for a Group profile type, in addition to entering the Client ID, users must select the Group profile type from the View By LOV. If the Client ID and Group profile type are not both selected, the system will look for that Client ID among all other profile types and may return the wrong profile based only on the Client ID, i.e. Individual profile).
IATA No. Enter all or the first part of the unique International Association of Travel Agents number if the profile you are seeking is a travel agent. (Keep in mind, if the OPR <version number> ORS license code is active, a parameter can be set that allows duplicate Corporate, Travel Agent, and Source IDs. The parameter can be accessed through Application Settings > Global > Profiles > Parameters > ALLOW DUPLICATE ID'S.) Also, if the application setting Profiles > Pad IATA Digits has been defined (available when the PROFILES > IATA COMPANY TYPE function is active), the number you enter may be "padded." Padding is a feature that adds zeros in the beginning (to the left) of a number to make the total amount of required digits. For example, if the IATA number has been set up to have 10 digits and you enter six numbers (345678), the system adds four more zeros in the beginning of the number to equal 10 (0000345678).
Corp. No. Enter all or the first part of the unique corporate ID number or code assigned to the profile if you are seeking a company profile. (Keep in mind, if the OPR <version number> ORS license code is active, a parameter can be set that allows duplicate Corporate, Travel Agent, and Source IDs. The parameter can be accessed through Application Settings > Global > Profiles > Parameters > ALLOW DUPLICATE ID'S.) Also, if the application setting Profiles > Settings > Pad Corpno Digits has been defined (available when the PROFILES > IATA COMPANY TYPE function is active), the number you enter may be "padded." Padding is a feature that adds zeros in the beginning (to the left) of a number to make the total amount of required digits. For example, if the Corporate ID number has been set up to have six digits and you enter three numbers (123), the system adds three more zeros in the beginning of the number to equal six (000123).
Neg Rates. Select this check box to search only for guests having negotiated rates. Available when the RATES > NEGOTIATED RATES application function is set to Y.
A/R No. Enter an A/R number to filter search results to display only profiles that match the particular A/R number.
Tip: When entering an AR number that is only one or two characters long, an exact search will be conducted. When the exact 2 characters for the AR number are entered, the matching profile will be displayed in the search results grid. If more than 2 characters are entered, a broad "like" search will be conducted. For example, entering "101" will return all AR numbers with a "101" in the number sequence.
Note: An asterisk (*) in front of A/R No indicates that the profile has a Central AR number and not a regular AR number.
Tax ID. Available when the Tax ID field is set to display from the Menu and Screen Design menu option, enter a partial or full Tax ID number to search for a single profile or multiple profiles. When entering only a partial Tax ID number, all profiles, excluding Contact Profiles, that have the matching Tax ID string attached will be returned for the Profile Search. The search will consider the ‘Tax ID’ and ‘Tax ID 2’ fields and return results that match either one of those fields.
Has Hierarchy. Select this check box to display only the master profile for profiles that have relationships linked to them via a default, primary, or hierarchical relationship. When unselected all profiles are displayed, regardless of any hierarchical position. Default is unselected. Available when the PROFILES > ADVANCED RELATIONSHIPS and PROFILES > RELATIONSHIP HIERARCHY application parameters are set to Y.
Show Inactive. Select to include inactive profiles by selecting the Show Inactive check box. Inactive profiles are differentiated by appearing with a gray background. The profile can be made active/inactive using the Active check box on the Profile screen. A message informs you that the profile is inactive when you attempt to make a reservation for a guest whose profile is inactive. If you select Yes to proceed, the profile is automatically activated.
Note: When you make a profile inactive or active (including making an inactive profile active by selecting the profile for a new reservation), the action is recorded in the User Activity Log.
Incomplete Address/Comm. (ORS only) This check box is used when searching by Name, First Name, and Communication. Users have the ability to filter profiles by an incomplete address or communications: filtering out profiles having minimal information that may not be useful. If the search is done on a Membership Type/No., Keyword, Client ID, Corp No., and IATA No. the Incomplete Address/Comm. check box does not apply. All matching profiles for the criteria will display, whether or not they are complete.
The results of your search are displayed in the search results grid. If you cannot find the profile you are seeking, try alternate search criteria, ask for your manager's help, or create a new profile.
Note: To customize the search results display, right click in the header and select Modify Grid. See Customizing Grids for details.
Note: When the PROFILES > ADDRESS TYPE DEFAULT application setting is set to Default or does not have a value defined and View By in the Search Criteria = Individual or View All, then the PROFILES > INDIVIDUAL ADDRESS TYPE application setting will be used to specify the default address type to display. If an address type is not specified for the PROFILES > INDIVIDUAL ADDRESS TYPE application setting, then the address type specified as the Primary is displayed.
Note: When the PROFILES > ADDRESS TYPE DEFAULT application setting is set to Default or does not have a value defined and View By in the Search Criteria = Contact, then the PROFILES > CONTACT ADDRESS TYPE application setting will be used to specify the default address type to display. If an address type is not specified for the PROFILES > CONTACT ADDRESS TYPE application setting, then the address type specified as the Primary is displayed.
Rate Indicator. One dollar sign ($) indicates one negotiated rate for this profile. Two dollar signs ($$) indicate two or more negotiated rates are attached to this profile. Negotiated rates are set up for the profile by selecting the Neg. Rates button from the Profile screen Options menu. See Negotiated Rates for details.) Negotiated rates are also associated with a profile if the individual profile has a relationship with a Company profile having negotiated rates. A (#) or (##) appears in this column for those account profiles that have a top level entity in their relationship hierarchy from which they inherit one or more negotiated rates. For example, if ABC-Retail is a subsidiary of ABC Systems, then ABC-Retail inherits profile rates from ABC Systems. Whether or not the relationship entails rate inheritance is determined by the Inherit Rates From setting in the applicable Relationship Type setup (Configuration > Profile > Relationship Type).
Note: The dollar sign(s) appear only if the negotiated rate(s) attached to the profile are active, that is, if the current date is between the Start Sell Date and End Sell Date that have been established for the negotiated rate.
Name. The person's last name, first name; or the name of the group, company, agent, source.
Note: When the application parameter PROFILES > EXTENDED ACCOUNT NAME SEARCH is set to Y searching by Name for a Company, Travel Agent or Source profile on the Profile Search screen will also search the Name 2 and Name 3 fields. The Name 2 and Name 3 fields will be added as columns and are available in the Profile Search screen Grid Definition.
Alt. Name. If the GENERAL > ALTERNATE NAME application function is set to Y, the guest name can also be recorded in the national character set (Chinese characters, for example). If the profile includes an alternate name, it appears in this field.
Address. The street mailing address.
City. The city location.
Postal Code. The zip code or postal code.
Company. The company affiliation for this profile. If the profile has a company relationship, the company appears here. If the profile has multiple company relationships, the primary company relationship appears here.
Note: A profile can have a Legal Company associated with it. The legal company might be associated with the OPERA profile if the legal company is brought over to OPERA during data migration from Fidelio V6. A legal company can also be added directly to an OPERA profile by screen painting the Legal Company field onto the Profile screen More Fields tab. If a legal company is associated with a profile, the legal company will display in the Profile search screen Company field unless a company is associated with the profile via a company relationship.
AR No. The Accounts Receivable account number, if one has been set up for the profile at the property. If the AR > ACCOUNT NUMBER MANDATORY application parameter is set to N, and the profile has an AR account, AR appears in this field.
VIP. Available when the PROFILES > VIP application function is set to Y, this is the VIP code for this profile.
Rate Code. A negotiated rate code if one has been attached to the profile.
Next Stay. The date of the guest's next stay.
Last Stay. Date the last time the guest stayed at the property.
Last Room. The previous room number and category requested by this guest.
Last Group. The previous group affiliation.
Last Source. The previous source of business.
Title. The guest's title (e.g., Mr, Mrs, Ms, Mme, Herr).
Country. The country associated with the profile address.
Type. The profile type.
Client ID/IATA/Corp No. Displays the unique identification number, the unique International Association of Travel Agents number, or the unique corporate ID number associated with the profile.
Email. E-mail address associated to the profile.
Phone No. Phone number that is associated to the profile.
Fax No. Fax number associated to the profile.
Passport. Passport number associated to the profile.
Note: When the Passport/ID Number View permission is not granted to the user, then the Passport/ID Number will be masked with X's except for the last two numbers.
Membership No. Membership number associated with the profile
Membership Type. Type of membership.
Membership Level. Level of the membership.
R. Displays a P when the account is the parent in a hierarchical relationship.
S. Displays an S when the account is the subsidiary in a hierarchical relationship.
Note: The R and S columns will only display when the application parameter PROFILES > RELATIONSHIP HIERARCHY is set to Y. Additionally, these fields may not be immediately available upon activating this parameter if the grid has been previously modified. To view these columns, you must first add the columns to the grid display (right-click on Grid label row > Modify Grid).
Webpage. Web page address associated with the profile that also serves as a link to the web site. Click on the web address to go to the web site.
Note: Employee profiles are not returned by a profile search. Employee profiles can be accessed by selecting Setup > User Configuration > Users.
A right-click on the column headers in the search results grid allows you to change the sort order of the search results and make other modifications to the grid. Options include:
Add this Item to Order By. Use this option to add the selected column to the sort order. For example, if the default order by is start date and user wants to order by start date and then status, right click on status and select this option.
Add this item in order by, descending. Use this option to add the selected column to the sort order, in descending order. The same as above except that the sort on status will be in reverse sequence order.
Order by this item in descending order. Use this option to start the sort order using the selected column.
Remove this item from Order By. Use this option to remove the selected column from the sort order.
Don't Order By Any Column. Use this option to display results without a sort order.
Show Existing Order By. Select this option for a text display of the current sort order.
Column. To increase or decrease the width of a selected column in the Search result grid, select the Column option and select Increase Width or Decrease Width. You can also select and drag the right border of the column header to the desired width. The changes only remain in place in the Search grid when the Search screen is open. If you want permanent changes to the column adjustment:
- Select Save Grid in the right-click Order by menu.
- Or, select Modify Grid. The Grid Definition screen appears where you can set the desired width in the Preview Grid and select Save.
Save Grid. Select this option to enable the Modify Grid option to change the display of the columns in this grid.
Modify Grid. Opens the Grid Definition screen which allows you to add or remove columns from the grid, edit column headers, change the column width or the column order and color code the grid. If the Modify Grid option is grayed out, you must first select Save Grid.
Lamps in the lower part of the screen alert you when the profile has preferences, relationships, attachments, different communication types, unresolved notifications, or other features associated with it (see Indicator Lamps for details).
Note: On the Profile Search Screen, the indicator lamps that get displayed for the highlighted profile are view-only and cannot be opened when in the process of creating Profile Relationships or Merging Profiles. Clicking on them will result in no action.
Note: This feature is available when viewing by the individual profile type if the PROFILES > SHOW FUTURE RESERVATIONS application parameter is set to Y.
For individual profiles, the Future grid provides the following future reservation information:
Property. Property for which the future reservation was made. This field is available when the OPP_MHOT Multi-Property Base add-on license is active.
Room. Room number assigned to the reservation.
Room Type. Room type assigned to the reservation.
Arrival. Arrival date for the reservation.
Departure. Departure date for the reservation.
Rooms. Number of rooms. This column will not be displayed when the RESERVATIONS > ROOM LIMIT PER RESERVATION application setting is set to 1 and the RESERVATION > SHARES application function is set to N.
Status. Reservation status.
Group/Company. Group and/or company associated with the reservation.
Travel/Source. Travel agent and/or source associated with the reservation. Source is available when the PROFILES > SOURCE application function is set to Y.
Rate Code. Rate code attached to the reservation.
Rate Amount. Room rate amount for the reservation.
Double-click on an entry in the Future grid to display the associated Reservation screen.
The Lookup grid can be displayed when one or more external databases (Gaming, Loyalty, ORS/OCIS) are available in OPERA and the Show Lookup check box is selected in the Profile Search Criteria section and the MEMBERSHIP > LOOKUP application function is set to Y.
R. An "X" under this column indicates the master profile has a global relationship with the profile listed in the grid. Select the X to open a second Lookup screen and download the relationship from the central system by selecting the Download button from this screen. See the "Download" button description for more information about the download process.
Interface ID. Identifies the interface ID of where the Profile resides.
Client ID. Corporate ID for a Company profile, IATA number for an agent profile, client ID for an individual profile.
Name. Individual profile last name, first name or company name.
Alt. Name. Available when GENERAL > ALTERNATE NAME application function is set to Y. Extended byte name (e.g., name in Chinese characters.)
Address1. Street address.
City. Profile address city.
Email. E-mail address.
Phone. Primary phone number.
Membership Type. Loyalty or frequent flyer membership type.
Membership Number. Loyalty or frequent flyer membership number,
Company. Name of company with which profile has a relationship.
ID Type. Type of ID attached to the profile.
ID Number. Number for the ID attached to the profile.
State. State attached to the profile.
Country. Country attached to the profile.
Postal Code. Postal Code attached to the profile.
Address2. Address Line 2.
FF Type. Type of Frequent Flyer membership.
FF Number. Number attached to the Frequent Flyer membership.
Passport. Passport number.
Hierarchy. This button is available when the highlighted profile has a hierarchy associated with it and is involved in a relationship. When selected, this button displays the current profile’s hierarchical position in a “tree view” style diagram on the Relationship Hierarchy screen. For example, the individual profile may have a relationship with a family or employer. For more information, refer to Relationship Hierarchy.
Requests. Display the Profile Request screen. This screen shows existing requests for information such as rate cards, brochures, special offers, etc., and allows you to enter new requests, track completed requests, and resend requested information. (Available when the PROFILES > PROFILE REQUEST application function is set to Y.)
Enrollment. Display the Profile Enrollment screen for enrolling the guest in a membership program. (Available when the OPP <version number> PMS license code is active and the GENERAL > ENROLLMENT application parameter is set to Y.) See Enrollment for details.
Lookup. Display the Lookup screen to access guest profile information in an external database, for example, a guest loyalty program, a player tracking system, or the OPERA Customer Information System (OCIS). If found, this information can be used to create a new profile. (Available when the OPP <version number> PMS license code is active and the GENERAL > LOOKUP application parameter is set to Y.) If INACTIVE profiles are found in ORS/OCIS database, they will be displayed in the LOOKUP screen's results grid and highlighted in gray. See Profile Lookup for more details.
Note: When an INACTIVE profile is looked up in ORS/OCIS system and downloaded into OPMS, the profile will be created in OPMS as an ACTIVE profile. However, the profile will remain INACTIVE in ORS/OCIS.
Note: When the OPR_<version number> OPERA Reservation System license is active, the GENERAL > ORS_CM (hidden) application parameter is set to Y, the MEMBERSHIP > LOOKUP application function is set to Y, and the MEMBERSHIP > LOOKUP TYPE application setting is set to GAMING, then selecting the Lookup button displays the Gaming Lookup screen. See Gaming Lookup for details.
Resv. Create a new reservation for the highlighted profile. The profile last name and first name populate the Name field in the Reservation screen. When the RESERVATIONS > PROFILE SEARCH PRIOR TO NEW RESERVATION application setting is set to Y, then the user will be forced to select a profile from the Profile Search screen before a new reservation can be made.
Note: When a new reservation is made for a guest having a profile negotiated rate, you will be asked whether you wish to use the negotiated rate. If the guest has multiple profile negotiated rates, you are prompted to select the negotiated rate that should apply to the reservation.
OK. Accept the results of the profile search, select the highlighted profile, and return to the previous screen. The profile first name and last name populate the Name field in the previous screen, as appropriate.
New. Create a new profile. You will be prompted to first select the type of profile you wish to create.
Note: When the PROFILES > PROFILE NAME STRING application parameter is set to Y and a new profile is being created, a match and validation takes place against a configured profile type and name to see if the new profile name string matches with the profile type (see Profile Name String for details). If a validation is done and the name string does not match the profile type, a warning prompt is displayed stating the following, "Profile Type for this profile should be <Profile Type>. Do you want to continue?" Selecting Yes will create the new profile and selecting No will not create the profile.
When the PROFILES > FORCE AUTO CENTRAL LOOKUP application parameter is set to Y and the New button is selected, a message prompt is displayed asking "Do you wish to do a central profile lookup?" Selecting Yes opens the Lookup screen and selecting No returns the user to the Profile Search screen.
Edit. Display the profile for the highlighted entry. You may also double click on a profile entry to display the profile.
When the New button is selected on the Negotiated Tab in Rate Setup, a modified version of the Profile Search screen will open. From this Profile Search screen, you can search for profiles and select one or more profiles to attach the Negotiated rate to by choosing either the Select button or the Select All button, respectively.
The profiles selected in the upper grid will be loaded into the lower grid. You can choose the Unselect button to remove a highlighted profile from the lower gird. After the negotiated rate is attached to the profiles, select the OK button to distribute the negotiated rate to select properties. When OK is selected, the Negotiated Rate screen will open. When OK is selected on the Negotiated Rate screen, a Select Property LOV will open from which you can choose the properties to distribute the negotiated rate to.
When setup is complete, an automatic background job will run in OPERA to handle the distribution task.
Note: The Select All button will select all profiles displayed in the upper grid with a limit of up to 500 profiles.
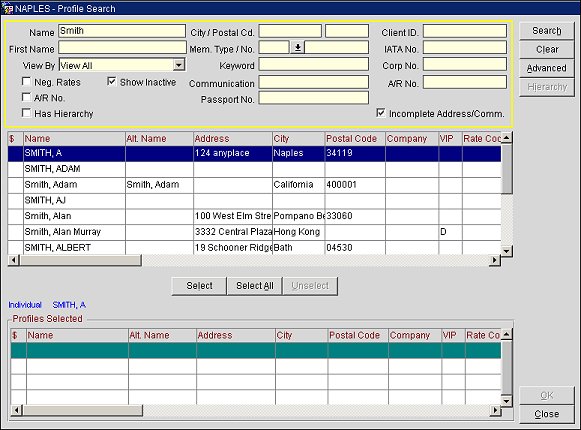
Profile Search Screen when opened from the Negotiated Tab in Rate Setup
Show Me
See Also