
|
|
|
Membership Claims
Requirements/prerequisites
Please note the following required permissions:
For OPMS users, the following conditions must be met to have access to the Membership Claims feature:
The ORS Memberships module contains many features to administer and resolve issues with membership claims. For example, you can use the claims features when a member feels that award points have not been properly credited to their account, or when a member has questions about how points rules were applied. You can also access and view membership transactions exceptions that the system may have flagged if the Membership Exceptions parameter is enabled (Global>Membership>Parameter> Membership Exceptions).
Multiple paths can be taken to access the Membership Claims functionality, such as:
Membership>Claims
Profiles>Profile Search>Claims Lamp
Profiles>Profile Search>Options>Claims
Profiles>Profile Search>Member Lamp>Claims button
Profiles>Profile Search>Options>Memberships>Claims button

This screen allows you to search for claims, and then subsequently review the details for existing open or resolved claims, and enter new claims into the system.
The following search criteria are available. Enter your search options and select the Search button.
Name. The member's name (the name on the membership card). Select the ellipsis button to display the Profile search screen to search for the member. The caller's name may be different from the membership name.
Membership Type. Select the down arrow to display the Membership Types list of values. Choose the membership program associated with the claim.
Membership Number. Select the down arrow to choose from a list of the membership numbers for the member identified in the Name field, or for all members if the Name field is blank.
Claim Type. Select the type of claim to be searched. These types are user-definable and configured in Configuration>Profiles>Memberships>Claim Types.
Claim Source. Select the down arrow and choose the source or origin of the claim. The available options are OCIS, OPMS or WEB.
Owner. The OPERA user ID of the person entering the claim, or the person responsible for handling the claim. Select the down arrow to choose from the list of values. Users may use this option to filter for all the claims for which they have responsibility. The names on the list are users who have the CLAIMS SUBMIT permission granted for administering claims.
Claim Number. The unique ID number assigned to the claim. Each claim is automatically given a claim number when the claim is entered into the system.
Property. The property where the stay took place. Select the down arrow to choose from the Property list of values.
Reservation Number. PMS reservation number or ORS booking number.
Clear. Select this button to clear the current search criteria.
Advance. Select this button to display advanced search options.
New. Select this button to create a new claim for the profile listed in Name field (last name, first name). The Membership Claim screen appears. Or, if no name is listed, selecting New opens the Search Profile screen where you can search for a profile for whom to make a new claim. When you select the profile and the OK button, the Membership Claim screen appears.
Edit. (Available for users with the Memberships>MEMBERSHIP CLAIMS EDIT permission granted.) Selecting this button opens the Membership Claim screen where you can view an existing claim, make changes to or resolve the claim, and create a new claim.
Select the Advanced button to use these additional search criteria:
Submitter. Select the down arrow to choose the user ID of the user who entered this claim.
Status. Select the down arrow to choose the status of the claim (e.g., Waiting for Callback, Pending Manager, etc.).
Close Date. Enter the date when the claim was resolved, or closed; or use the calendar tool to select the date.
Claim Date Range. To search a range of claim origination dates, specify the start date in the >= field and the end date in the <= field. Or, enter only the start date or end date. You may also use the calendar tool to enter dates.
Reply By Date Range. To search a range of reply by dates, specify the start date in the >= field and the end date in the <= field. Or enter only the start date or end date. You may also use the calendar tool to enter dates.
Arrival Date Range. To search a range of arrival dates, specify the start date in the >= field and the end date in the <= field. Or enter only the start date or end date. You may also use the calendar tool to enter dates.
Departure Date Range. To search a range of departure dates, specify the start date in the >= field and the end date in the <= field. Or enter only the start date or end date. You may also use the calendar tool to enter dates.
Approve/Reject. To filter search by approved or rejected claims. Select the down arrow and choose either All (searches for both), Approve, or Reject.
Select the Main button to return to the main Membership Claims screen search options.
The search results grid shows the list of current claims that met the filter criteria:
Claim Number. Unique ID number assigned to the claim by the system.
Claim Date. Date the claim was made.
Caller's Name. Name of the person placing the claim. This name may be different from the name on the membership card.
Reply By. The date, if any, by which a response to the caller was promised.
Type. The membership type.
Membership Card Number. The ID number on the membership card.
Status. Status of the claim. For example, OPEN, CLOSED, PENDING, REVIEW, or WAIT-CALLER (waiting for call back). When a claim has a status other than Closed, a Claims indicator lamp displays on the member's Profile Screen. Users who have one of the Membership Claims permissions (CLAIMS SUBMIT, MEMBERSHIP CLAIMS EDIT, MEMBERSHIP CLAIMS VIEW, NON PRIMARY CLAIMS SUBMIT or PRIMARY CLAIMS SUBMIT) will be able to see the Claim Lamp and the view-only Membership Claim screen. Only users with MEMBERSHIP CLAIMS EDIT permission will be able to make adjustments to the claim by accessing Membership>Claims.
Claim Type. Type of claim, such as NEWCARD (lost/replaced card), STAY (missing stay credit), and XXXX (lost card).
Close Date. If the status is closed, the date the claim was closed.
Record Type. Record associated with the claim: STAY, OTHER, or LIMITED ADJUSTMENT.
Close Date. If the claim is closed, the date it closed.
Resort. Property where the stay took place.
PMS Reservation Number. PMS reservation number for the reservation associated with this claim.
CRS Booking Number. Central (ORS) booking number for the reservation associated with this claim.
Arrival Date. Arrival date for the stay associated with this claim.
Departure Date. Departure date for the stay associated with this claim.
Owner. User who is assigned to handle this claim.
Submitter. User who entered this claim.
Source. The source of the membership claim. This will be either OCIS, OPMS or WEB.
Origin. Displays the origin of the membership claim, i.e. Email, Fax, Phone Call, etc.
Approve/Reject. Indicates whether or not the claim has been approved or rejected.
The Membership Claim screen appears when an individual name and the New button is selected from the Membership Claims screen. Here you can create a new claim for the individual. Or, this screen appears when you want to edit or resolve (close) an existing claim, by highlighting your choice on the Membership Claims screen and selecting the Edit button.
Note: The Membership Claims screen can also be opened from the Profile screen by selecting the Claims lamp or from the Profile Options screen by selecting the Claims button.

Provide or view the following information.
Claim Number. (view-only) For existing claims, the unique claim number assigned to the claim by the system. A number will be assigned to the new claim when the claim is saved.
Claim Date. (view-only) For existing claims, the date the claim was made. The date will be entered on a new claim when the claim is saved.
Close Date. (view-only) For existing claims, the date when the claim was closed or resolved.
Source. (view-only) The source or origin of the claim.
Caller Name. Name of the person making the claim. The caller's name may be different from the name of member on the membership card.
Claim Status. Select from the LOV the status of the claim - such as OPEN, CLOSED, PENDING, REVIEW, or WAIT- CALLER (waiting for call back). The status codes in the list are hard coded and cannot be changed. When a claim has a status other than Closed, a Claims indicator lamp displays on the member's Profile Screen. Users who have one of the Membership Claims permissions (CLAIMS SUBMIT, MEMBERSHIP CLAIMS EDIT, MEMBERSHIP CLAIMS VIEW, NON PRIMARY CLAIMS SUBMIT or PRIMARY CLAIMS SUBMIT) will be able to see the Claim Lamp and the view-only Membership Claim screen. Only users with MEMBERSHIP CLAIMS EDIT permission will be able to make adjustments to the claim by accessing Membership>Claims.
Note: When a new Claim is opened by OPMS user, the claim status will be "OPEN" and cannot be changed.
Claim Origin. Select from the list of values, the origin (i.e., fax, email, phone call, etc.) for the membership claim.
Owner. Your OPERA user ID as submitter of the claim, or the person responsible for handling the claim. Select the down arrow to choose from the list of values. You must have user permission to administer claims.
Claim Type. Category of the claim. Claim types are set up in membership claim types configuration. They may be used for reporting purposes.
Name. The member's name (the name on the membership card). For new claims, you are prompted to select the name from the Profile search screen . For existing claims, select the ellipsis button to display the Profile screen for the member. The caller's name associated with the claim may be different from the membership name.
Membership Type. The membership program with which this claim is associated.
Membership Number. Select the down arrow to choose from a list of the membership numbers for the member identified in the Name field. The list of values shows all membership numbers and the associated membership types for this member.
Approve/Reject. Select the down arrow and choose either Approve, Reject or None for the claim action. When entering a new claim in OPMS, this field will default to "None" and cannot be edited by OPMS users.
Card Level. (view-only) The membership level at the time the claim is made.
Joined Date. (view-only) Date when the member enrolled in the membership program.
Expiration Date. (view-only) Membership expiration date.
Property. Property where the stay took place.
Record Type. Category of claim: STAY, OTHER, or LIMITED ADJUSTMENT. When LIMITED ADJUSTMENT is selected, additional fields will become available in the lower part of the screen. See "Limited Adjustments" heading below for more information.
PMS Reservation Number. PMS reservation number for the reservation associated with this claim.
ORS Booking Number. Central booking number for the reservation associated with this claim.
Arrival Date. Arrival date for the stay associated with this claim. Enter the date or use the calendar tool to select the date.
Departure Date. Departure date for the stay associated with this claim. Enter the date or use the calendar tool to select the date.
Caller Information. In the text area you may enter details related to this call that may help to resolve the claim.
Reply By Date. If a reply has been promised to the caller by a certain date, enter the date here or select the date using the calendar tool.
Comments. Add any comments about this claim or steps taken to resolve the claim.
Notes. The notes area at the bottom of the screen stores a chronology of events related to resolving the claim. The first entry is, by default, the opening of the claim. Thereafter, each time some measure is taken to resolve the claim, a note may be added by selecting the New button. A standard activity type may also be associated with the note (e.g., Reply, or Call Property for Verification) for identifying areas where action is needed. Each new note and activity is added to the list with a sequence number. The name column identifies the person who entered the note or activity. To see an entire comment and related activity details, highlight your choice and select the View button.
The below fields display when LIMITED ADJUSTMENT is selected for the Record Type. Select an adjustment code and enter values for award points and tier points adjustments. The values you enter must fall between the upper and lower thresholds. If a value is higher or lower than the threshold, an error message will display and the claim cannot be submitted until the value is corrected.
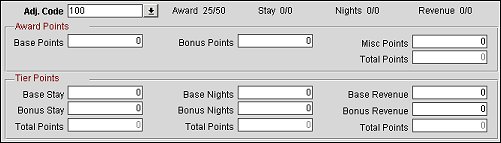
Adj. Code. The adjustment code. Select the down arrow and select an adjustment code from the list of values. The selected adjustment code's Award, Stay, Nights, and Revenue thresholds will display.
Base Points. Enter a value for the base award points adjustment.
Bonus Points. Enter a value for the bonus award points adjustment.
Misc Points. Enter a value for the miscellaneous award points adjustment.
Total Points. Enter a value for the total award points adjustment.
Base Stay. Enter a value for the tier base stay points adjustment.
Bonus Stay. Enter a value for the tier bonus stay points adjustment.
Total Points. Enter a value for the total tier stay points adjustment.
Base Nights. Enter a value for the tier base nights points adjustment.
Bonus Nights. Enter a value for the tier bonus nights points adjustment.
Total Points. Enter a value for the total tier nights points adjustment.
Base Revenue. Enter a value for the tier base revenue points adjustment.
Bonus Revenue. Enter a value for the tier bonus revenue points adjustment.
Total Points. Enter a value for the total tier revenue points adjustment.
All Trx. Select this button to view the current member's transactions. You can also view the transactions flagged as exceptions if the Membership Exceptions parameter is enabled. See below - Viewing Transactions and Making Adjustments.
Search. To narrow down transactions, click the Search button.
Save. Select this button to save your changes to the claim.
New. (Available for users with the Memberships>MEMBERSHIP CLAIMS ACTIVITY NEW permission granted.) Select this button to add comments to the claim. The Claim Activity screen opens. These comments appear in the grid at the bottom of the membership claim screen. Select one of the following comment types from the drop down box: Reply, Call Property for Verification, Caller Called Back, and Remarks. The comment type that you choose here appears in the Activity column.

View. Select this button to view the selected comment.
OK. Select this button to save your changes and close the membership claims new/edit screen.
Close. Select this button to discard changes that have not been saved and close the membership claims new/edit screen.
While working in the membership claims screen to resolve a claim, select the All Trx button to view a complete list of award points transactions and adjustments for the current member. If the Membership Exceptions parameter is enabled (Setup>Application Settings>Membership>Parameter>Membership Exception=Y) you can also view various membership transaction exceptions that may have occurred for this member. You may view details and choose to grant awards and/create adjustments to the award points transactions.
Access the Transactions screen by selecting Membership>Claims>Edit>All Trx.
![]()
The Transaction screen shows each membership transaction and all related information. The Green rows indicate that points have not been calculated, either because an exception was found and has not yet been resolved, or because of the batch processing date not having yet been met. To view the actual membership transaction, select the View button. The Membership Transaction screen (view-only) appears.
The following specific information is shown on the Transactions screen.
Name. (view-only) Member's name.
Member Card No. (view-only) The ID number on the membership card.
Property. Select a property or the entire ORS database for the member's transactions for which you want to search.
Exception Filter. If the Membership Exceptions parameter is enabled, this filter displays on the Membership Claim/Transaction screen when searching for All Transactions. It displays various exceptions filters you can select. Select from the LOV the type of exceptions for which you want to search, such as:
Arrival Date. Enter the arrival date of the member's stay for which you want to search.
Property. Property where the stay took place.
PMS Reservation Number. PMS reservation number associated with the stay.
Record Type. Transaction record type, for example, Stay or Adjustment to Stay. (See Membership Points Transactions for details.)
Arrival Date. Arrival date for the stay.
Departure Date. Departure date for the stay.
ORS Booking Number. ORS booking for the stay.
Card Number. Membership card ID number.
Type. Membership type.
Level. Membership level at the time of the transaction.
Transaction Date. The date when the points were calculated. This may differ from the guest's check out date. The Membership Type screen sets the Delay in Days from the time the guest stay ends (when the guest checks out) to the time the points are actually calculated. The minimum delay is 3 days; this allows the stay record to be adjusted at the PMS level before points are calculated.
Points Calculated. A Yes in this column means that the points have been calculated. Once points have been calculated, only adjustments can be made.
Points Credited Date. for adjustment transactions, the date the points were credited to the account.
Total Points. The total number of award points (Base Points, Bonus Points and Miscellaneous Points).
Base Points. The current number of base award points credited to the member's account.
Bonus Points. The current number of bonus award points credited to the member's account.
Miscellaneous Points. The current number of miscellaneous award points credited to the member's account.
Base Revenue. The current number of base tier points for revenue credited to the member's account.
Bonus Revenue. The current number of bonus tier points for revenue generated by the member.
Bonus Nights. The current number of bonus tier points for nights credited to the member's account.
Base Nights. The current number of base tier points for nights credited to the member's account.
Base Stay. The current number of base tier points for stays credited to the member's account.
Bonus Stay. The current number of bonus tier points for stays credited to the member's account.
Options. (Only available if in CHECKED OUT status; see screen below.) Select this button to replace the originally entered membership card or add a new membership card to the transaction. This option is useful if the wrong membership card was used in the original transaction and you do not want to do an adjustment to reassign points to a different card.

Est. Points. (Displayed after a membership card is attached to an existing stay record.) When selected, a screen will display the number of potential points to be credited to the member due to the claim. To calculate potential points, the membership stay will be evaluated against existing and valid membership rules (as of day of running) and not against membership rules that were valid when the member stayed.
View. Select this button to see the membership transaction screen which will appear if the selection is a membership transaction (record types: Expired, Stay/Adj, Enrollment). The stay record appears if the record type is: NO SHOW, CHECKED OUT, or CANCELLED.
New. Create a membership points transaction adjustment using the membership transaction screen.
See Also