
|
|
|
ORSMERGE - Suspended Profiles in ORS
Access the Suspended Profiles screen in ORS by selecting Profiles>Suspended Profiles. This screen provides users with the process of using specific criteria to search for suspended profiles, view staged suspended profiles, and reprocess or rematch the profiles.
This topic outlines the four different main screens of the ORSMERGE process:
Note: When the parameter Global>Profiles>Parameters>MERGE CONTACT WITH DIRECT GUEST is set to Y, the system will merge contacts with the direct guest profiles. When set to N, contacts and guest profiles cannot be merged.
The Summary Screen is used to query suspended profiles. You can filter the results on Property and other criteria. You also have the option to suppress certain success messages, such as “Profile Successfully Merged” when merging profiles in the Match and Merge process and “Successfully Created New” message when processing invalid profiles. Choosing not to have the messages appear may save time, as the extra click to continue and ridding the message during processing adds up - especially when working with hundreds of profiles every day.
Note: Only suspended profiles for properties the user has permission for (Setup>User Configuration>Users) will be displayed.
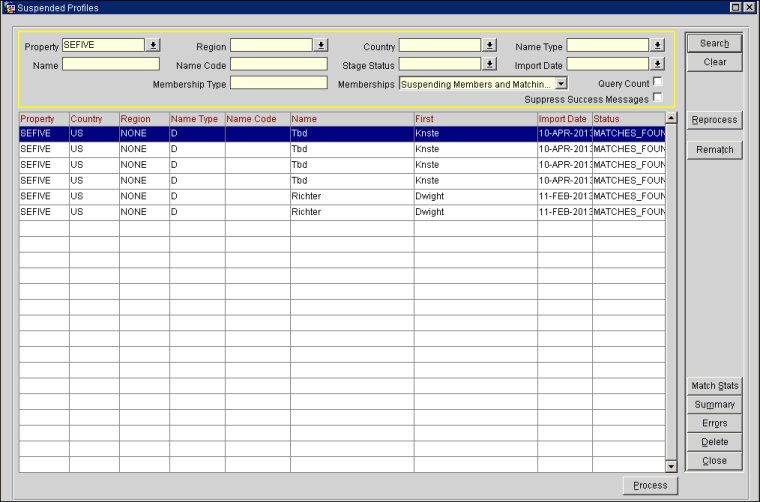
Property. Select a property for which the suspended profiles shall be displayed. Only properties the user has permission to access (Setup>User Configuration>Users) will be displayed in the LOV.
Region. Select a profile region for which the suspended profiles shall be displayed.
Country. Select the country of residence where the properties are located that have received the suspended profiles.
Name Type. If you want to filter for Matches found, select the ORS profile type. If you want to filter for Invalids, select the external system profile type.
Name. Enter a profile name to filter search results by a specific name.
Name Code. Enter a profile ID number to filter search results by a specific ID.
Note: When the OPR<version number>ORS license code is active, there are conditions where Chains can enter duplicate names. During the match and merge process, if certain settings are enabled, the system will accept duplicate profile name codes across chains. The Chain Ownership and Chain Ownership Profiles Types application settings must be defined, as below:
Global>Profile>Function>CHAIN OWNERSHIP is activated and set to Y. When this function is activated, you must define the profile type that you will allow to have duplicate name codes (see below). If this application function is set to N, duplicate name codes are not allowed. After activating this function you will need to run a utility to synchronize chain codes with the profiles in OPERA. Access Utilities>Profile>Synchronize Chains.
Global>Profile>Setting>CHAIN OWNERSHIP PROFILE TYPES must be defined for the type of profile you want to allow duplicate name codes, such as Company, Individual, Group, Primary Member, Source, or Travel Agent. If the setting is null, this indicates ALL profile types with duplicate name codes will be allowed.
Stage Status. This allows a search on a particular status. Options are:
Memberships. Select either "Suspending Members Only" (only staged profiles will display), "Matching with Members Only" (only matching profiles that have active memberships will display), or "Suspending Members and Matching with Members" (both types of profiles will display). When the Search button is selected, the grid will display profiles based on the selection. When a selection is not made, all profiles will display including those without memberships.
Import Date. Enter the date on which the suspended profiles have been received.
Membership Type. Enter a membership type to filter search results by a specific membership type. Multiple memberships can be entered if separated by a comma.
Query Count. Select to display the number of results that are displayed, based on the query, in the lower left-hand portion of the screen.
Suppress Success Messages. Select to suppress any success messages when processing the profiles.
Search. Based on the selection in the yellow search area this button will invoke the search for suspended profiles with matching criteria.
Reprocess. Tool to efficiently process a large number of profile records of the same error message that have originally failed. With the Reprocess button you have the choice of reprocessing one record, All records for that Property, or All records on the screen. For example, if a property has added a guest preference that has not been properly added in the OXI_HUB conversion codes, many profiles using this preference will be staged as conversion is not possible. You can then correct the problem by inserting the new value into the respective OXI_HUB conversion table, apply the reprocess button, and the system will automatically go through all staged profiles and re- validate them. When you select the Reprocess button, the following screen appears.
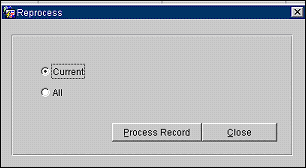
Current. Select this option to reprocess a single, highlighted profile record on the suspended profile list.
All. Select this option to reprocess all suspended profile records on the list.
Process Record. Select this button to activate the process.
Rematch. Sets the profile to match a status of Valid, and then rechecks to verify if the profile is a potential match and recalculates points. The Reprocess screen appears, as described above.
Match Stats. Select this button to evaluate various performance statistics of the Match 'n’ Merge process and to determine if changes to the Match Criteria and/or Merge Rules are needed for more efficient profile processing. The Match Stats button opens the Match Stats screen.
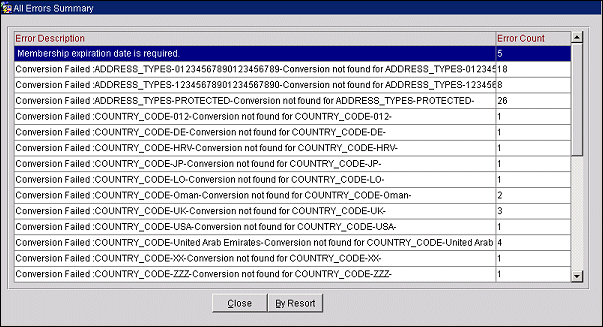
Summary. This button summarizes all of the errors in profiles with an Invalid Status, sorted by error and by resort. This information displays in the All Errors Summary screen. You can double-click on the specific row and further filter the invalid profile records.
Note: This screen displays all errors for all properties, whether or not you have permission to these properties. If you double-click on an error for a property to which you do not have permission, you will not be able to further process the profile.
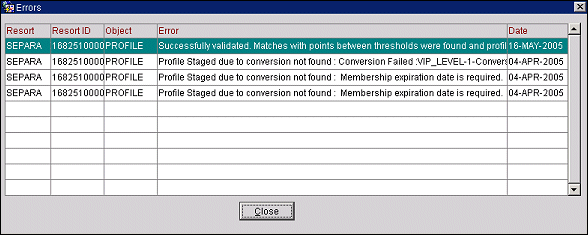
Errors. Selecting this button displays an Errors pop up screen with all errors that occurred to the highlighted profile, placing it in suspension.
Delete. Selecting this button deletes the highlighted, suspended profile. Permission must be granted to the user for this button to be enabled and active.
Process. This takes you to the Invalid Profile or the Suspended Profile Matches screen based upon the selected entry in the Summary screen.
This screen is utilized to correct invalid data only. If there are invalid data in the address, membership, credit cards, phone, preference, UDF’s, and/or rates of the selected profile, the corresponding button on the right side of the screen will be enabled.
Example: Screen of staged profile that shows the Invalid data in Red and Error Description.
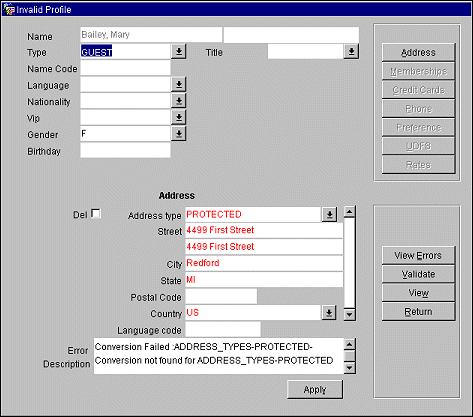
View Errors. This summarizes the conversion errors on the profile.
Validate. Saves any changes made to the profile and validates the profile against all conversions.
View. This enables all the profile child table buttons for you to view the complete profile, however only invalid data can be edited.
Return. Returns you to the summary screen.
Apply. Save the changes made to the profile.
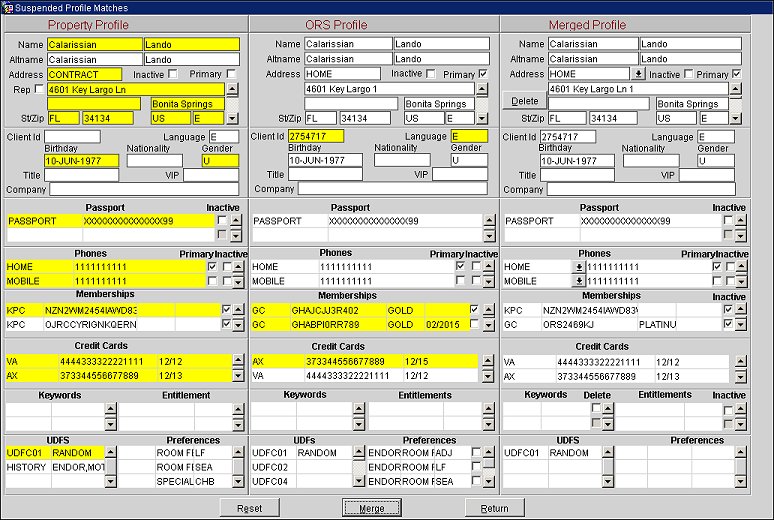
The Suspended Profile Matches screen allows you to view as much profile data as possible to be able to make a good decision if the profiles are potential duplicates or not. The information in red on the central profile part quickly identifies the data that is different in ORS from the incoming profile.
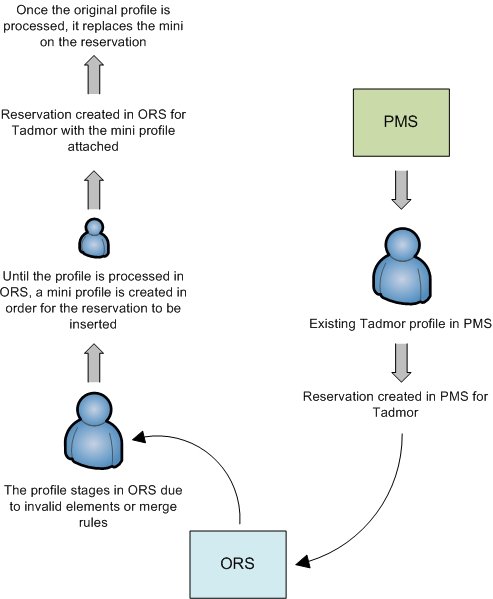
A Mini Profile is a temporary profile that is created while waiting for the system to process a staging profile. When merging profiles, the Mini Profile is deleted rather than made inactive. The original UDF field has been replaced with the Mini Y/N Check box in the Match and Merge screen.
When a profile is staged, it is due to invalid information or when profile matches are found. In order for the reservation to be created without being stopped by the interface, a Mini Profile is created until the data can be merged. The Mini profile is created when the Profile has not existed in the database before and has invalid data to be resolved. In short, Mini Profiles can be created in one of two ways:
Or
Identification of the Mini profile will have the Last and First name information. It will also show in the ORS Profile Merge screen with the Mini Y/N flagged active. In the Profile Merge screen, you will see the new check box selected under the Inactive check box. You will need to merge this profile into a valid profile or find an existing match. You will not be able to make the Mini profile a primary profile. Instead, you will need to match it to existing profiles in the database and merge it.
When profiles in a rooming list block are processed, the profiles are usually staged (Suspended Profiles) in ORS, caused by the profiles not having an Address or Phone Number. To identify the new profile created through the Block Rooming List, the profile is automatically flagged with a Y in the PSEUDO_PROFILE_YN column in the Name Table. These profiles are called Pseudo Profiles. The Pseudo Profile check box is selected by default when the profile is viewed on the Suspended Profiles screen in ORS. Users in ORS have the option to unselect the Pseudo Profile check box and add additional profile information centrally.
New. To create a new profile from the external system data in the ORS database.
Previous/Next. If more than two potential matches are found, the Next and Previous button will be enabled to view all potential matching profiles. When applying the Process Record button from the summary screen, you are prompted with the number of matches if they are more than two.
Match. Displays the Three- Panel Merge Screen.
Rematch. Allows the validation on match criteria and merge rules to be re-calculated on the particular suspended profile. When applying the PROCESS Record button from the summary screen, you are prompted with the number of matches if they are more than two.
Unmask. (Available to users granted the PROFILE > VIEW SENSITIVE INFORMATION ON PROFILE permission.) Select to unmask encrypted profile ID and birth date fields. After selection, the fields remain unmasked when moving to the Three-Panel Merge screen or when viewing other profiles.
Merge. This button allows you to merge two profiles centrally. The system will re-validate against possible matches until all possible match criteria have been validated.
Example:
If the below two central profiles were MERGED, the system would check for any potential matches based upon the match criteria hierarchy, thus having the ability to completely keep the database clean of all potential duplicates.
Return. Go back to the previous screen.
This screen is accessed by selecting Match from the Suspended Profiles Match screen. It allows you to determine the exact profile data that will be inserted into the ORS database. By double-clicking on any data in the merged profile, the data will be removed; by selecting any data in the property or ORS profile, the data will be inserted into the merged profile. This three-panel screen is only available if the OXI_HUB parameter THREE_PANEL_MERGE_SCREEN is enabled.
Note: When a primary membership is attached to the profile, users cannot make changes to the membership information.
The data highlighted in yellow is the data defaulted to the merged profile.
If you have changed any data in the MERGED PROFILE panel by applying Reset, the data will be reset to its original values.
Please note that if postal codes for the city, state, and country have been configured in Configuration>Profiles>Geographic Data>Cities and Postal Codes, if you enter an existing postal code the city and state will automatically populate. If you enter an existing postal code that exists for more than one city or state, the first city or state configured automatically populates; you can then change to the other configured city or state, if necessary. If you enter an existing postal code, but it doesn't match the current state, a message displays such as "Postal Code is not in the valid range." If you enter a postal code that has not been configured, you may enter any state and city without an error message.
This panel displays the profile contents that were sent by the external property.
Note: NAME2 and NAME3 fields are only displayed for Company, Travel Agent and Source profile types when the LOOKUP EXTENDED ACCOUNT NAME SEARCH application parameter is set to Y. You can decide if the Name2 and NAME3 fields will be included in the merged profile.
Rep. The Replace Address check box is screen painted in PMS on the Profile Screen. When a user adds or modifies an address or communication type on an existing profile, selecting this check box on the Profile Screen indicates to the system that the user made intentional changes. If the OXI-Profiles interface parameter of Update Primary is set to DISABLED, however, in the Property Profile panel when the Replace Address check box is marked, the system does not add the change but displays it for processing. (For more information on the OXI-Profiles interface parameter of Update Primary, see OXI_PROFILE Parameters in OXI_HUB).
Passport. This field lists all passports attached to the profile. Double clicking on a passport in the Merged Profile panel will remove it from the final merged profile. When a profile has multiple passports attached, you can scroll down to view each passport. Passport numbers will be encrypted, i.e., masked.
Tip: You can make a passport number inactive by selecting the Inactive check box next to it.
Note: When the Profiles>VIEW SENSITIVE INFORMATION ON PROFILE permission is granted, a user can double click on a passport number to unmask it and view the number. Users without the permission will see the passport numbers masked.
This panel displays the profile contents of the current ORS profile.
This panel displays the profile contents of the profile merged between property and ORS. Through the manipulation of data on the first two panels you can view and modify the final merged profile data.
Reset. Aborts changes that may have been made in the merge panel, and resets the data in the ‘Merged Profile’ panel back to its original values.
Merge. This button inserts the profile into the ORS database based upon the data in the 3rd panel.
Return. Go back to the previous screen.
When an address or phone number is deleted on a profile, the record will become inactive in OPERA, not deleted. The inactive record will be removed after 30 days by the purge process. Prior to this 30 days, the record may be reactivated if added back to the profile.
When an address or phone number is deleted in PMS, OXI will send the record as "inactive" to external systems. When a perfect match is found on the address or phone number, the address or phone record will become inactive in the external systems when the profiles merge. However, this behavior will depend on the UPDATE PRIMARY parameter setting in OXI-HUB as well as the configured IFC rules (ALWAYS, NEVER, WHEN BLANK). See Interface Rules in OXI_HUB for more information on IFC rules.
When the OXI_Profiles > Replace Membership Card Number application parameter is set to Y, the card number for an existing membership can be overwritten by an external system if it is of the same membership type and has been configured properly. In order for an external system to complete this action, the membership type has to be configured to Allow Card Number Override and to Save the Card Number History if both the memberships are the same membership type. (For more information on the OXI-Profiles interface parameter of Replace Membership Card Number, see OXI_PROFILE Parameters in OXI_HUB. For more information on Membership Type Configuration, see Membership Types Setup and Maintenance.) Also, see the "Show Me" video below.
Note: When two profiles have the same membership type and a membership level is required for the membership type, their membership levels will carry over into the merged profile.
The following are scenarios of when the membership number cannot and can be overridden. See the "Show Me" video below for an example.
Setup: If Property Profile and ORS Profile have the same membership type and membership number populated.

Result: Membership number cannot be overridden as only 1 membership type and membership number exists.
Setup: An add-on profile is created in an external system with a new inactive membership type and number and it is displayed in the Property Profile Panel and the existing membership type, with original membership number, is displayed in the ORS Property Panel.

Result: As the membership in the Third Panel is populated by default with the ORS Property membership, double-clicking on the membership in the Property Panel will not override the membership in the Third Panel as the membership in the Property Panel is inactive.
Setup: A membership is inactivated in ORS. In the external system, an identical profile is created with the same membership type and a new membership number. The membership in ORS is suspended. In the Property Profile Panel the new membership is populated and the ORS Profile Panel has the suspended profile populated. The Third Panel has the ORS Profile Panel membership populated.

Result: Double-clicking on the membership in the Property Profile Panel will populated as the active membership in the Third Panel and the ORS Membership that was already populated in the Third Panel remains inactive.

Setup: In ORS, a membership type for a profile is inactivated and new membership is created for the same profile. In an external system, an identical profile is created with the same membership type and a new membership number. The profile is suspended.

Result: So the membership that was created in the external system is populated in the Property Profile Panel, both of the memberships that exists in ORS (inactivated one and newly created one) are populated in the ORS Profile Panel, and the Third Panel is populated with the ORS Profile Panel memberships by default. Double-clicking on the membership in the Property Profile Panel overrides the existing active membership in the Third Panel.

Show Me
![]() Overwriting Membership Card Number
Overwriting Membership Card Number
See Also
Viewing Masked Fields in OPERA