
|
|
|
Membership Types Setup and Maintenance
Membership types are used to identify the kinds of membership programs that are accepted by PMS and ORS/OCIS. The membership type information entered here includes the membership type code, membership program levels, or tiers (for example, gold, silver, bronze, elite, executive, and so on); the program rules (methods of points calculation, card validation algorithms, etc.); and the specific awards (special rates, upgrades, products, etc.) associated with each membership card type. The membership types configured here are available to attach to a guest profile on the Profile Memberships Screen.
Note: Before setting up membership types, you must already have configured the membership classes, or categories, to which they will be assigned. (Configuration> Profile> Memberships>Classes).
Select Configuration>Profile>Memberships>Types to display the membership types that have been configured and to configure new membership types. The Membership Types screen (MEMBERSHIP_LIST) appears, as shown below. (See Membership Types List for more details on this screen.)
To create a new membership type, select the New button. To edit an existing type, highlight your choice on the Membership Types screen and select the Edit button. The Membership Types - New or the Membership Types - Edit screen (MEMBERSHIP_SETUP) appears. (Available fields may differ depending on whether you access this screen from OPERA PMS or OPERA ORS/OCIS, as noted.)
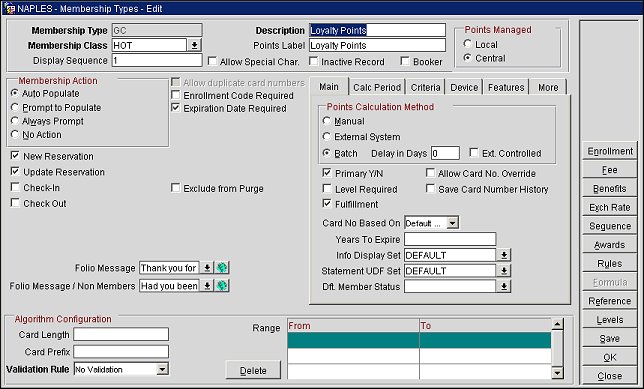
Membership Types screen for ORS/OCIS and PMS when Membership Points are Centrally Managed

Membership Types screen for PMS
Membership Type. The membership type represented by a code (for example, AA for American Airlines, BOOKER for Bookers). Most frequent flyer and loyalty programs use a two-digit code. OPERA has implemented check-digit (validation) algorithms for this list of airlines and loyalty programs referenced below. Although these membership types are pre-defined, they are not activated unless they are attached to a membership class by using this screen. Once the membership type is configured, this field may not be changed.
Note: In ORS, the ORS primary membership type of GC can be converted to GPR in V6 PMS, and also include the attached Stay records (ALLHOTNTS) value with the new or updated profile. Activate the OXI-V6 Interface. In OXI-HUB, set a conversion from GC membership type to GPR membership type in V6 PMS (Interface Configuration>Conversion Codes). Send the profile with the GC membership type and stay records attached to V6 PMS. The profile is downloaded both with the Membership type GPR and ALLHOTNTS (mfSTAY tag in the XML) field populated with the room nights from the ORS stay record.
The following fields have been added to the V6 table GAESTEST:
- ALLHOTNTS N 4
- FREENIGHT N 3
- MEMSHIPNTS N 4
- TOTFREENTS N 4
Description. The descriptive name for the membership type. For frequent flyer cards, we recommend using the official card name (American Airlines, Qantas, etc.). This description displays when searching for codes in the Membership list and in reports.
Membership Class. Select the down arrow to display the Membership Class LOV. Choose the membership class with which this membership type is associated.
Points Label. Enter the term used to describe the awards for this membership type. For example, you could enter Points for a loyalty club membership type, and Miles for a frequent flyer membership type. This label is used in messages and reports where the guests awards are specified. (For an example of how this label is used, see the explanation of Folio Message, below.)
Display Sequence. The number entered here determines the position of this membership type on the Membership Types screen.
Inactive Record. If this box is checked, the membership type will be inactive and will not be utilized. You may want to select this check box if you are setting up a new membership type that you do not wish to activate until some future date. Inactivating the membership type will inactivate it for all properties in the multi-property cluster (when the OPP_MHOT PMS Multi-property add-on license is active); the membership type will remain attached to the profiles to which it is assigned, but will be inactive for those profiles. Reactivating the membership type (by un-selecting the check box) will reactivate the membership type for all properties in the multi-property cluster (when the OPP_MHOT PMS Multi-property add-on license is active), except for those profiles where the membership was explicitly inactivated from the profile's Membership screen (see Profile memberships Options) prior to inactivating the membership type.
Exclude from Purge. Select to exclude profiles with an active membership of this type from the automatic purge utility. Selection of this option will not exclude profiles from being manually purged by users.
(ORS/OCIS only area)
When a guest has this membership type associated with his profile, OPERA allows you to select how you want the membership number to be attached to guest's reservations (that is, whether you want the membership to be automatically attached to the guest's reservations, or whether you want to be prompted to attach the membership to the guest's reservations). In addition, you can determine at what point(s) in OPERA you want this action to be taken (e.g., when the reservation is created, whenever the reservation is updated, at check in, and/or at check out). First select how you want to attach membership information to the reservation. Select the appropriate radio button for the reservation action you wish to use. Only one radio button choice is allowed:
Next, select one or more junctures in the lifecycle of the reservation when you want the membership action to be taken:
When the Membership>Preferred Card application parameter is set to Y, and the Front Desk>Preferred Membership Selection application parameter is set to Y, one loyalty membership type can be flagged as preferred for points accrual. If two or more memberships exist on the guest profile, you can configure the Membership Action features so that the user is prompted to choose the preferred membership for points accrual at the designated junctures in OPERA (e.g., at check in and check out). Once selected, this membership is the one that will be accounted for points calculation for the stay record when the guest checks out.
The Memberships screen will appear at the designated point(s) in OPERA allowing you to select the membership type that the guest wishes to choose for points accrual for the reservation. You may also mark a membership type as the preferred membership type for future reservations. See Reservation Memberships for details.
Allow Duplicate Card Numbers. Select this check box is multiple membership cards may be issued with the same membership number.
Enrollment Code Required. When this check box is selected, this membership type requires an enrollment code where the guest is automatically enrolled in either a loyalty program or a gaming program. See Enrollment.
Expiration Date Required. Select this check box if the membership expiration date is required for validation of the profile membership information. If no membership expiration date is provided when profile membership information is saved, then a message prompt is displayed notifying the user that an expiration date has to be entered.
(PMS and ORS/OCIS with Points Managed Local.) Provide information to enable automatic card validation.
Card Length. Enter the number of digits (maximum of 99) used in the membership number.
Card Prefix. Enter the prefix portion of the membership card number. This is the leading part of the number which remains the same on all membership cards of the membership type. For example, Delta numbers are prefixed by 2 followed by the unique membership number. If you are unsure of the prefix number, check with the program provider.
Validation Rule. Select the validation method you wish to use.
Note: AF, AZ, and EK membership types will be padded with zeroes, to meet their specified character length requirement, before the validation process begins.
Note: The Validation Rule field becomes inactive when the Chip & PIN check box is selected.
Mod 7. Valid membership numbers follow the Mod 7 validation rule.
Mod 10. Valid membership numbers follow the Mod 10 validation rule.
User Defined. When this option is selected, the Formula button becomes available where you select it to enter the validation algorithm for this membership type.
Internal. The membership number validation algorithm is supplied by the membership program provider. See Membership Types with Predefined Validation Rules below for a list of the programs that provide an internal validation rule.
No Validation. No validation is performed on the membership number.
Range From/To. In these fields enter valid numeric ranges for this membership type. To remove a range, highlight the entry and select the Delete button.
This area is only displayed in OCIS or PMS when the membership type points are centrally managed. To configure a membership type as centrally managed, select the Central radio button in the Points Managed area of the Membership Types-New screen or from the Membership Types-Edit screen if dependent membership records do not exist for the membership type.
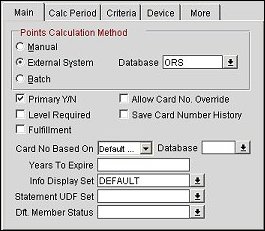
(ORS/OCIS and Points Managed Central only.) Select the appropriate radio button for the points calculation method you wish to use.
Manual. Points will not be calculated for the chosen membership type. The user will need to manually calculate them and modify them on the member account.
External System. Points information are calculated externally (e.g., third-party software) and received as a text file to be loaded into ORS/OCIS.
Database. (Displays when External System and Primary Y/N are both selected.) Select the down arrow and choose the database for the external system.
Batch. This must be selected if you want to use an automatic batch process to calculate points. To set up the calculation and expired points batch process to run automatically, select Miscellaneous>Scheduler. See OPERA Scheduler. (The Batch option must selected for the Membership Transaction Exceptions functionality.)
Delay in Days. When the Batch option is selected (above), the Delay in Days field appears. Award points will be recognized in this number of days following the guest's check out date. This delay provides a period of time during which adjustments can be made at the PMS level before awards are uploaded to ORS/OCIS. A value from 0 to 60 can be entered into this field (A minimum of three days is recommended.)
Note: When hovering over this field with your mouse, you will get the following tip: "Minimum of three days is recommended."
Primary Y/N. (ORS/OCIS and Points Managed Central only. Must be selected for the Features tab to display.) If this check box is selected, this membership type is designated as Primary. When a guest is enrolled in more than one membership program, one of the programs must be designated as Primary. When the application parameter Membership>Preferred Card is set it to Y, the first new membership program attached to the profile defaults to a Primary membership. The user will not be able to add other Membership Types to the profile unless a Primary membership type in ORS is set for the profile. For example, a Frequent Flier (FF) membership type can only be supported for a profile when that profile has a Primary Membership Type assigned to it, and the Primary Membership Type is a hotel loyalty program (i.e. Guest Awards - GA).
When a new Centrally Managed Primary membership program for a profile is created, the membership program defaults to the lowest sequence number (1) and thus appears at the top of the list in the Profile Memberships List. When each additional membership is added to the profile, the next available sequence number will be assigned.
When a membership type is designated as Primary, changes to the profile membership information will not be accepted from the external PMSs. Only new profile membership information will be accepted from the external PMSs.
Note: If a membership type designated as Primary is attached to a guest profile, the Attributes area of the guest Profile screen shows the guest's level, status, and membership type card number.
Fulfillment. (ORS/OCIS and Points Managed Central only.) Select this check box to be able to select this membership type when creating an export file for fulfillment (Miscellaneous> File Export> Membership Export). When re-issuing a lost or stolen card with the same number through fulfillment, this check box must be selected for the membership type here and also on the Membership Levels Details screen. Otherwise, the Re-Issue New Card check box will not appear as an option on the Memberships screen.
Allow Card No. Override. (ORS/OCIS and Points Managed Central only.) Select the check box to allow the user to select the active membership to be the merged membership in the ORSMERGE - Suspended Profile Matches form. With this check box selected and the user is determining the exact profile data that will be inserted into the ORS database on the Three-Panel Merge screen, if the first panel has an active primary membership then the user can double-click on that membership and it will automatically be moved to the third panel for the merge and overwrite the existing membership number.
Note: When the Allow Card No. Override and Save Card Number History check boxes are selected for the primary membership type and a central profile is merged with a PMS profile (profiles have different primary membership numbers), users will be able to search for the merged profile using the discarded membership number.
Save Card Number History. (ORS/OCIS and Points Managed Central only.) Select this check box to retain the membership number of the membership that will be discarded when a primary membership is overridden during a profile merge. This allows for the profile to still be found by searching on the discarded membership number.
Level Required. (ORS/OCIS and Points Managed Central only.) Select this check box if the membership level is required for validation when profile membership information is sent from the external system to ORS/OCIS. If no membership level is provided when profile membership information is uploaded by the PMSs, the profile will be suspended. Level information may be added by editing the suspended profile (Profiles> Suspended Profiles).
Card No. Based On. (Both PMS and ORS/OCIS) Select from the LOV the source method to generate new membership card numbers, either based on the enrollment code or on the next available number in the card sequence.
Database. (Displays when External System and Primary Y/N are both selected.) Select the down arrow and choose the external database if the card number is to be generated in a remote system.
Years to Expire. (ORS/OCIS and Points Managed Central only.) A guest's membership card will expire if there is no activity on the card for this number of years. If cards belonging to this membership type do not expire regardless of the inactive period, leave this field blank.
Info Display Set. Select the down arrow and choose a display set for the points information.
Statement UDF Set. Select the down arrow and choose a UDF display set from the Membership Statement UDF list. This will attach the selected UDF display set template to the membership. See Member Statement UDF for more details.
Dft. Member Status. (Displayed when the Primary Y/N check box is selected.) Select from the LOV the default membership status that will appear when this membership type is assigned to the guest profile. This status can be changed on the Memberships screen at any time. The member status codes are created in Setup>Profiles>Memberships>Status Codes.
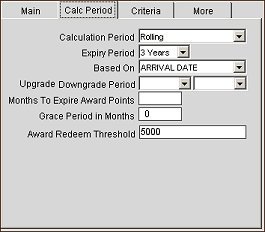
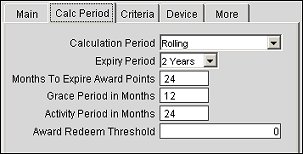
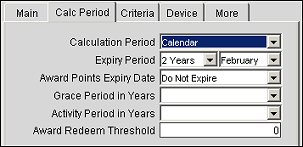
Calculation Period. (ORS/OCIS and Points Managed Central only.) This option is used to determine member upgrades, downgrades, and expirations based on tier points accumulation during a given time period. Calculation can be based on a 12-month calendar year (from January to December of a year) or a rolling 12-month period (based on a time period from the month the points are calculated). Your choice of Rolling or Calendar determines the options that are available in the Expiry, Upgrade, Downgrade Period drop down lists, as described below.
Consider this example showing how the Rolling calculation method differs from the Calendar calculation method and how the differences affect your clients: A guest receives 500 tier points in November 2002, which is not enough at that time to be upgraded to the next higher level. However, assume the guest accumulates another 300 tier points in January 2003. When the upgrade process is run in March 2003, because calculation is set to Rolling, the period covered would be from March 2002 to March 2003. The guest would have sufficient points to be upgraded. On the other hand, if the calculation period was set to Calendar, when the upgrade process was run in March 2003, the guest would not be upgraded. He would only have 300 tier points because with Calendar, the calculation considers points received from January to December.
Note: Once a Calculation Period is decided upon and configured, it is advised not to change it during the Membership Type Plan life span. This keeps the awards calculation consistent from time period to time period.
Expiry Period. (ORS/OCIS only.) Specify the time limit (from 1 to 5 years) for membership card expiration. When the Tier Management batch process is run and the calculation period is set to Rolling, the new expiration year will be based upon this value. For example, if the value is set to 2 Years, and the member is upgraded from Bronze to Silver in 10/04 with the current expiration set to 12/04, then the upgrade batch process would update to the new expiration date of 10/06 (2 Years from 10/04). If the same member was upgraded in 11/04 from Silver to Gold, then the expiration date would be again updated with the new expiration of 11/06 (2 Years from 11/04).
Based On. (ORS/OCIS only. Not displayed when RFM is selected under Tier Management.) Configure tier upgrade/downgrade processes based on either Arrival Date, Departure Date, Posting Date, or Transaction Date.
Months to Expire Award Points/Award Points Expiry Date. (ORS/OCIS only.) The label changes depending upon the Calculation Period selected (Rolling = Months to Expire Award Points. Calendar = Award Points Expiry Date).
"Rolling" selected for Calculation Period
When Rolling is selected for the Calculation Period, the time period calculated is from the month the calculation is made (e.g., March 2004) to the same month (e.g., March) for the time period selected. When Rolling is selected, the following options are available:
Upgrade Period/Downgrade Period. (ORS/OCIS only. Not displayed when RFM is selected under Tier Management.) Select the time period from 1 to 5 years to calculate the upgrade/downgrade points. The first LOV is for the Upgrade Period and the second LOV is for the Downgrade Period.
Months to Expire Award Points. Enter the number of months (0 to 60) for which award points are eligible for redemption. Zero means that award points are eligible for redemption only for the month in which they were calculated. If 12 months is selected, points are eligible for redemption for 1 year from the points calculation date. And so on. Leave this field blank if award points will never expire over the life of the membership.
Grace Period in Months. (Displayed when Rolling is selected for the Calculation Period.) Enter the number of months for the grace period. This is the number of months/years that the member's award points will be extended beyond the actual expiration date for the award points. The Auto Extend Membership Points job will run in OPERA Scheduler to auto extend the membership points.
Activity Period in Months. (Displayed when Rolling is selected for the Calculation Period.) Enter the number of months for the member's activity period. Only membership award points that fall within this activity period will be extended. For example, if 24 is the value entered for the activity period in months, the member's activity must fall within the past two years for his or her award points to be extended. The Auto Extend Membership Points job will run in OPERA Scheduler to auto extend the membership points.
"Calendar" selected for Calculation Period
When Calendar is selected, the calculation considers points received from January to December of a time period, no matter when the calculation is run. For tier management purposes, tier points accumulation is calculated annually for the 12-month period prior to the date of the upgrade/downgrade batch run. If the batch process is run on September 12, 2004, for example, then tier points from September 11, 2003, to September 12, 2004, will be considered in the upgrade/downgrade/expire calculations.
Calendar Month. (ORS/OCIS only.) Points accumulation is calculated annually for the 12-month calendar year (January 1 - December 31) for tier management purposes. It is recommended that if you are using Calendar as your tier management calculation method, that the Card Expiration Month be set to December; if set to any other month, a full year of tier points would not be calculated when running the upgrade/downgrade/expire process.
Upgrade Period/Downgrade Period. (ORS/OCIS only. Not displayed when RFM is selected under Tier Management.) Select the time period from This Year, Last Year, or from 2 to 5 years to calculate the upgrade/downgrade points. The first LOV is for the Upgrade Period and the second LOV is for the Downgrade Period.
Award Points Expiry Date. (ORS/OCIS only. Displays when Calendar is selected for the Calculation Period.) Select the down arrow to choose the length of time award points remain eligible for redemption: Do Not Expire, Same Year, 1 to 5 years.
Grace Period in Years. (Displayed when Calendar is selected for the Calculation Period.) Select the down-arrow and choose the number of years for the grace period.
Award Redemption Threshold. Enter a number for the award redemption threshold. This number represents the minimum amount of points required before points can be redeemed for awards by this member. The member will not be able to redeem membership points until this threshold amount is met. This feature is available for both primary and non-primary membership types.
CTR. (ORS/OCIS only and must be used independently from RFM and TMR. This option will automatically be unselected when either RFM or TMR is selected.) Select the Custom Tier Rules option to activate the Tier Rules button and configure custom tier rules for the membership.
RFM. Select to use RFM for membership tier management. This will base the membership upgrades and downgrades on the member's computed RFM score. When this option is selected, the RFM Code field will display next to it. See RFM Configuration for more information.
TMR. (When selected, the TMR button will display on the Membership Levels screen.) Select to activate the tier management reset functionality for the membership level. If a member is upgraded, downgraded or renewed, the membership tier points will be reset.
Dwn/Renw in Auto Job. (ORS/OCIS and Points Managed Central only. The membership type must be primary and the Utilities > OPERA Scheduler permission must be granted to the user.) Select this option to schedule the "Auto Process Membership Tier Management" job to run in the OPERA Scheduler. Based on the membership settings, this job will automatically upgrade, downgrade or renew all members with the primary membership type. See OPERA Scheduler Batch Processing for a full description of this job.
Requalify On Upgrade. (Not displayed when RFM or TMR is selected and membership is externally controlled.) Select this option to check if members have enough points to requalify on upgrade. If members have enough points, they will receive an upgrade and a new expiration date will be assigned. When members lack enough points for an upgrade, this option will check the following conditions: (a) if they have sufficient points to requalify for their current membership levels and (b) if their membership expiration dates are in the current year. If these conditions are met, members will stay at their current levels and be assigned new expiration dates.
Example
In 2013, a member has an active membership card expiring 02/14. If the member stays during 2013, his or her expiration date will be extended to 2015 (based on the membership level assigned). If the member has insufficient points, he or she will not receive an upgrade.
Upg/Dwn/Cycle. (Not Displayed when RFM or TMR is selected. "Calendar" must be selected for the Calculation Period.) Use these fields to define an upgrade and downgrade evaluation cycle for the membership type. Choose the upgrade years, downgrade years and a month from the respective LOV for each field. Your selections will define the number of years for the upgrade and downgrade cycles and the month in which the member will be considered for an upgrade or downgrade.
RFM. Select to use RFM for membership tier management. This will base the membership upgrades and downgrades on the member's computed RFM score. When this option is selected, the RFM Code field will display next to it. See RFM Configuration for more information.
RFM Code. (Displays when RFM is selected.) Select the down arrow and choose the RFM code to be used for calculating the member's RFM score. The RFM score will be used to determine the membership upgrades and downgrades. The RFM codes are configured from the RFM Configuration screen.
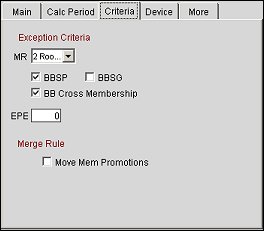
(ORS/OCIS and Points Managed Central only.) Select the appropriate criteria you want to use to detect exceptions. These exceptions appear on the Membership Transaction Exception screen. You may select MR and ONE of the following: BBSP, BBSG, or EPE.
For Example
For a guest that stayed from May 1 - May 3, 2011 earning Primary Membership Points and stayed May 3 - May 4, 2011 earning Frequent Flyer Miles, this would be considered as a Back to Back exception.
Move Mem Promotions. Select to move the membership promotions to the active membership after profile merge. For example, if 2 profiles are merged that have a promotion attached to their memberships (both must be of this membership type), the remaining active membership will have both promotions attached.
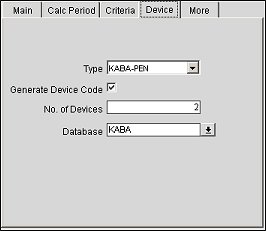
(ORS/OCIS and primary membership types only.) Use the fields on this tab to configure devices for the primary membership type. Devices are used by members for consuming hotel services and amenities. See Membership Devices and Configuring Membership Devices topics for more information.
Type. Select the down arrow and choose the type of device from the list of values.
Generate Device Code. Select for OPERA to auto-generate a code for the device. If clear, OPERA will receive the code from the device vendor.
No. of Devices. Enter a value for the number of devices OPERA will encode for the membership.
Database. Select the down arrow and choose the external database for the web service to the device vendor.
Note: This functionality is for the primary membership type only. For the Features tab to display, the Primary Y/N check box must be selected under the Main tab.
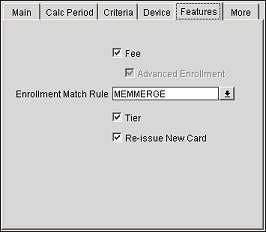
Fee. (ORS/OCIS only. When selected, the Fee button displays.) Select to configure a membership fee code for the membership type. See Membership Fees for more information.
Advanced Enrollment. (ORS/OCIS only) Automatically selected and grayed out when the Fee option is selected. This indicates that the membership fee functionality is active for the membership type.
Enrollment Match Rule. Select the down arrow and choose an enrollment match rule to be used for membership matching in the profile match and merge process. The enrollment rules are configured from the Profile Auto Merge configuration screen (Setup > System Configuration > Profile > Profile Auto Merge Setup > Rules).
Tier. (ORS/OCIS only) Select if the membership fee will be required for the member to upgrade to the next membership tier level. When this option is selected, the Tier button will display on the Loyalty Menu. See Membership Loyalty for more information.
Re-Issue New Card. (ORS\OCIS only and available when Fulfillment is selected under the Main tab.) Select if a new membership card will be issued to the member upon payment of the membership fee. When this option is selected, the Re-Issue New Card button will display on the Loyalty Menu. See Membership Loyalty for more information.
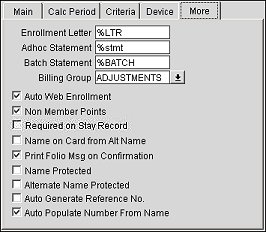
Auto Web Enrollment. Select to enable auto web enrollment functionality. When the auto web enrollment is enabled, a Web User Account Details screen will automatically open to allow a web user account to be created for the new member. See Web User Account for more information.
Enrollment Letter. Enter the name of the membership enrollment letter. When enrolling new members, this is the default letter to be sent. Once the enrollment letter is defined, when a new member enrolls (or one is edited), the Process Membership Letter screen will open allowing the user to choose how the membership welcome letter will be sent.
Tip: You can enter a "%" before the extension of the enrollment letter. For example, entering %LTR will search for all letters ending with an "ltr" extension.
Note: The language of the Enrollment Letter must match the profile language.
Adhoc Statement. Enter the name of the ad hoc statement. This is the membership type's default membership statement to be sent ad hoc. For more information, see the Sending Membership Statement Reports heading under Membership Points Transactions.
Tip: You can enter a "%" before the extension of the ad hoc statement. For example, entering %STMT will search for all statements ending with an "stmt" extension.
Batch Statement. Enter the name of the batch membership statement.
Tip: You can enter a "%" before the extension of the batch statement. For example, entering %BATCH will search for all statements ending with a "batch" extension.
Non Member Points. Select to display on the guest's folio the potential membership points that could be earned for the stay. The points will display for guests who are not members of a loyalty program and who are checked in the hotel.
Required on Stay Record. Select to calculate stay points for a loyalty program guest even if the loyalty membership card is not attached to the reservation.
Name on Card from Alt Name. (ORS/OCIS only) Select to generate a membership card name using the alternate name on the profile. When enrolling a guest into the membership program, the Profile Membership screen's Name on Card field will auto populate with the alternate name on the guest profile.
Name Protected. (ORS/OCIS and primary, central managed membership type only) Select to prevent the profile's name from being changed by PMS users in an integrated OCIS/PMS environment. This configuration will only apply to an individual or contact profile in PMS with a primary membership type.
Alternate Name Protected. (ORS/OCIS and primary, central managed membership type only. The GENERAL>Function>ALTERNATE NAME application setting must be set to Y.) Select to prevent the profile's alternate name from being changed by PMS users in an integrated OCIS/PMS environment. This configuration will only apply to an individual or contact profile in PMS with a primary membership type.
Auto Generate Reference Number. (ORS/OCIS and primary, central managed membership type only.) Select to automatically generate the reference number for the primary membership type. When transferring points between the primary membership and other membership types, the Reference No. field will be unavailable on the Membership Transaction - Adjustment screen.
Auto Populate Number from Name. (ORS/OCIS only) Select to auto populate a membership number from the profile name for profile's with this membership type. When this check box is selected for the membership type and you enter a name into the Name field on the ORS Sales - Define Search screen and tab or click out of the field, the Profile Search screen will open with a list of profiles that can be selected. After selecting a profile, the Member No. field on the ORS Sales - Define Search screen will auto populate with the selected profile's membership number.
Booker. (ORS/OCIS only) Select the Booker check box if the membership type is for a Booker. These are people who are the source of the booking, having profile types of Company, Travel Agent, Source, or Group. When enrolled in the Booker Membership program, these people are granted award points when they book a reservation for a guest and a membership transaction gets generated. The booker profile gets attached to the guest's reservation by the reservation agent, during the reservation process. When the guest's stay record is inserted into OCIS, the system checks configuration of the booker program profile type and automatically generates a membership transaction for the pertinent booker name Id.
This check box appears when the application setting, Membership>Parameter>OCIS BOOKER PROGRAM is activated and set to Y.
When Booker check box is selected, the following Profile Types group of check boxes will become available:
Select the appropriate check box for the profile type to which you want to add the booker membership. Multiple check boxes can be selected.

Other features of the booker program are:
(ORS/OCIS only) Select the radio button that corresponds to how the award points for this membership type will be managed.
Warning. Once points have been awarded to clients, this choice may not be changed.
Local. Points are calculated and managed at the PMS level. The OPERA PMS license code must be active. A membership is defined as local only by setting up conversion at the property level for the membership type. If there are local membership types that should download/upload to and from certain properties (when associated with a profile), special set up procedures are necessary, as follows. See below for Local Membership Types Set Up.
Central. Points are calculated and managed centrally at the ORS/OCIS level. The ORS/OCIS license code must be active.
Note: Depending on your choice, certain fields may be unavailable on this screen, as noted.
Send Check Out to Interface. (PMS Only) Available when the MEMBERSHIP>COURTESY CARD HANDLING application parameter is set to Y. If a membership card of this membership type is attached to the reservation that is checked out, when this check box is selected the reservation that is eligible for points would have its data processed by the End of Day procedures and transferred to the interface.
Note: Points are not calculated for a total revenue that is negative except for courtesy card membership types (available when the MEMBERSHIPS >COURTESY CARD HANDLING application parameter is set to Y).
Chip & PIN. (PMS Only) Available when the IFC>CHIP AND PIN application parameter is set to Y, the membership card incorporates a microchip that stores information which can be used to verify the validity of the membership and authenticate the customer based on a PIN.
When this checkbox is selected, a Read Card button displays when that Membership Type is chosen for a Profile that allows the card to be read by a device that provides the Membership data to OPERA.
Validation by Interface. (PMS Only) When the Membership>Courtesy Card Handling application parameter is set to Y, the membership card is validated through the interface.
Note: When the Membership>Courtesy Card Handling application parameter is active, the membership card is validated through the interface if the Validation by Interface check box is selected. In order to use interface validation for the courtesy card, the membership type may be no longer than 10 characters in length.
Note: The Validation by Interface check box becomes inactive when the Chip & PIN check box is selected.
Multiplier. (PMS only) If checked, a multiplier field appears on the Membership screen when this Membership Type is selected on a guest reservation. This allows the user to input a value by which the base number of points is multiplied. For example, if the Membership Type is currently set up for 10 points for every $1 spent, but you wish to give customers who select this Membership Type and pay by American Express to receive 20 points for every $1 spent, you would enter a 2 in the multiplier field. If the license code called OPP_MEM is active, and you have attached one or more membership programs to a reservation, then it is possible to add a multiplier to the membership calculation points from within the reservation screen.
Allow Shares. (PMS Only) Select to award points to each membership holder attached to the shared reservation. If this is not selected, then the priority owner attached to the reservation will be awarded.
Folio Message. (PMS only) If you want text to print on the folio at check out advising the guest of the number of points earned during the stay, enter that information here. The field name that displays the number of points is MEMBERSHIP_TOTAL_POINTS. It must be surrounded by two sets of square brackets. For example, "Your American Airlines account has been credited with [[MEMBERSHIP_TOTAL_POINTS]] for this visit." Remember, if you don't want to use the word points you can change the text in the Points Label field. In addition to the merge code shown in the Folio Message section of the screen, the following merge codes are also available to use.
Note: If the guest is linked to more than one membership program for the stay, the Folio Message only prints for the primary membership type of each membership class. The primary membership type for a class is the membership type that has an X in the X column of the Memberships screen (accessed by selecting the down arrow on the Member Type field on the Reservation screen).
Select the globe icon to the right of this field to provide translations of this message in specific languages. See Multilanguage Descriptions for details. (This feature is available when the General>Profile Language application parameter is set to Y.)
Folio Message/Non Members. (PMS only) This field displays if the license code OPP_MEM is active and the Membership>Calculate Pseudo Membership Points (calculate pseudo points based on the rules set up for the membership type selected in the Profile>Default Membership Type application setting) application function is set to Y. If you want text to print on the folio at check out advising the guest with no membership of the number of points that could have been earned during the stay, enter that information here. The text along with the required merge codes can be configured within this display window to be shown on the guest folio. For example, "As a Starwood Preferred [[MEMBERHSIP_LEVEL]] Guest you could have earned [[MEMBERSHIP_BASE_POINTS]]StarPoints for this visit. Please provide your membership number or enroll today." The merge code must be surrounded by two sets of square brackets.
Note: Pseudo points calculated are not stored as actual membership award points but are cleared and not shown in the stay history.
Select the globe icon to the right of this field to provide translations of this message in specific languages. See Multilanguage Descriptions for details. (This feature is available when the General>Profile Language application parameter is set to Y.)
Currency. (PMS only) Select the currency in which you would like to calculate the points. In ORS, this only applies when Revenue has been selected as the Calculation Rule on the Point Calculation Rule screen. This information is used if the membership type is set up in a currency different than the local currency of the hotel. If exchange rates are configured for the currencies involved, the membership points calculation based on revenue figures would be converted into the currency selected in this membership type.
For example, 6C membership type might be set up for points calculation in US dollars. The hotel might be located in Mexico and the corporate office might be based in the United States. Most corporate hotels will set up one membership point calculation rule for all properties and regardless of their currencies will expect the guest revenues exchanged into points based on the currency of the corporate hotel.
Exchange Type. (PMS only) Exchange type to be used in the currency conversion.
Point Cost. (PMS only) The cost per point. This information is for reference only.
The buttons in the lower part of the screen enable configuration of the following membership type features:
Tier Rules. (ORS/OCIS only) Displays when the CTR option is selected under the Tier Management section.) Select to open the Membership Custom Tier Rules screen.
Fees. (ORS/OCIS only) Select to open the Membership Fee Codes screen and configure a fee code to be used for membership fee configuration.
Enrollment. (ORS/OCIS only) Select to open the Enrollment Design screen and select the fields that will be mandatory when upgrading, downgrading or issuing a membership card for a member in a loyalty program.
Benefits. (ORS/OCIS only or ORS/PMS integrated environment) Select to open the Membership Benefit Program screen and configure benefit codes for assigning to members with a primary membership type.
Exch Rate. (ORS/OCIS only) Visible when the Primary check box is selected. Configure the exchange rate of award points that can be exchanged between a Primary guest loyalty program and a frequent flyer program.
Reader. (PMS only) Configure membership card reader.
Sequence. (ORS/OCIS only) Configuration to auto-generate primary membership card numbers. Available when the MEMBERSHIP > AUTO GENERATE MEMBERSHIP NO application parameter is set to Y.
Awards. Configure the awards available for redemption of points with this membership type. In PMS, the Awards button will open a read-only Membership Awards screen.
Rules. Membership points calculation rules.
Formula. (Available when User Defined is selected as a Validation Rule in Algorithm.) Select this button to display the User Defined Membership Validation screen where you may enter the validation algorithm for this membership type. To test the algorithm, enter a sample membership number in the Number field and select the Test button. Check the result of the validation in the Result field. The default algorithm provided on the User Defined Membership Validation screen is shown below. This algorithm can be modified by the user. Select the Reset button to revert any changes back to the default. Select OK to save your changes.
Default Validation Algorithm
DECLARE
in_card_no VARCHAR2(50);
out_return_val NUMBER := 1; --Should be either 1 or 0
/*declare your variables here*/
BEGIN
in_card_no := :card_no;
BEGIN
/*write user defined validation here
using in_card_no, out_return_val and your variables.
Assign "1" to out_return_val variable if in_card_no passes the validation.
Assign "0" to out_return_val variable if in_card_no fails the validation.*/
null;
END;
:return_val :=out_return_val;
END;
Reference. (ORS/OCIS only) Configure external references for this membership type. External membership clubs (airlines, chains, hotels, etc.) may use other codes in their system to identify membership types. By identifying these external system codes and matching them to OPERA membership type codes, a conversion can be made when OPERA membership information is exported to these external systems.
Levels. Configure the membership levels, or tiers, and the rules that control their application.
Once a membership type has been configured, you may duplicate the type for use as a "template" for creating new membership types. On the Membership Types screen, highlight the membership type you wish to copy and select the Repeat button. The Copy Membership Types screen appears. See Copy Membership Types for more information.
This table lists airlines membership types and indicates those having an internal check digit routine for validation. These validation routines can only be changed by Oracle when new specifications are provided by the third party membership clubs.
Note: Internal validation routines are run when the Validation Rule option on the Membership Types screen is set to Internal.
See List of OPERA Membership Types
See Also
|